BB1200 - Vacuum Cleaner Oreck - Free user manual and instructions
Find the device manual for free BB1200 Oreck in PDF.


User questions about BB1200 Oreck
0 question about this device. Answer the ones you know or ask your own.
Ask a new question about this device
Download the instructions for your Vacuum Cleaner in PDF format for free! Find your manual BB1200 - Oreck and take your electronic device back in hand. On this page are published all the documents necessary for the use of your device. BB1200 by Oreck.
USER MANUAL BB1200 Oreck
natural_image
Line drawing of a vacuum cleaner with various pipe fittings and accessories (no text or symbols)F R A N Ç A I S
GUIDE D'UTILISATION PAGE 5
E S PA Ñ O L
GUIA DEL USUARIO PAGE 9
USER'S GUIDE
COMPACT
CANISTER
VACUUMS
BB1200
Series
•IMPORTANT•
SAVE THIS BOOKLET!
Includes:
- Safety Warnings
- Parts List
- Operating Instructions
- Maintenance
- Warranty
- Trouble Diagnosis
- Accessories List
BEFORE OPERATING CLEANER, READ ALL INSTRUCTIONS IN THIS MANUAL CAREFULLY.
Table of Contents
Safeguards,
Important Safety Instructions ...... page 2
Warranty, Parts List, Accessories ...... page 3
Assembly, Polarized Plug Notice, To Operate,
Maintenance page 4
Maintenance & Customer Service,
Troubleshooting Guide ...... page 5
WARNING: Unplug cord from electrical outlet before servicing.
- IMPORTANT: Make sure filter bag is in place. Do not operate cleaner without filter bag. Damage to motor may occur.
- Be sure bag gasket is in place. If the white bag gasket is damaged or lost, replace at once.
- For best results, change disposable filter bag regularly even if it is not completely full. An extremely dirty bag or a bag close to full will affect the suction of the cleaner and can create excessive motor heat that could damage the motor. A good practice is to change filter bag every 30 days even if it is not full.
- Do not pick up moist material or liquids.
- Clean your vacuum cleaner with a damp (not wet) cloth in the disposable bag cavity and the outside of canister unit.
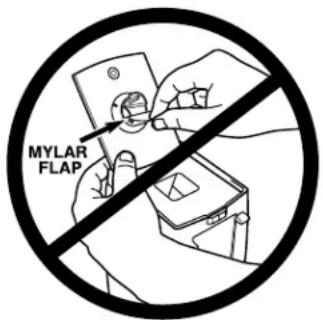
- IMPORTANT: DO NOT REMOVE the dirt retaining flap attached on the back of the front plate. It must be left in place for the unit to operate properly and to ensure cleaning effectiveness.
- MOTOR PROTECTION SYSTEM: If fine materials such as soot, cement, plaster dust, copy machine powder, etc. are picked up, the bag surface may seal and cause the motor to shut off to avoid overheating. If this happens, turn the switch off and unplug the cleaner. Replace filter bag. Check and clear any clogs in hose or accessories. After approximately 30 minutes the motor will have cooled and the cleaner will be ready to use.
Note: The cleaner must remain unplugged for 30 minutes for motor to cool and system to reset.
IMPORTANT SAFETY INSTRUCTIONS
When using an electrical appliance, basic precautions should always be followed, including the following:
READ ALL INSTRUCTIONS BEFORE USING THIS VACUUM CLEANER

WARNING
To reduce the risk of fire, electric shock, or injury:
- Do not leave appliance unattended when plugged in. Unplug from outlet when not in use and before servicing.
- Do not use outdoors or on wet surfaces.
- Do not allow to be used as a toy. Close attention is necessary when used by or near children.
- Use only as described in this manual.
- Do not use with damaged cord or plug. If appliance is not working as it should, has been dropped, damaged, left outdoors, or dropped into water, return it to a service center or call customer service at:
US: 1-800-989-3535
Canada: 1-888-676-7325
- Do not pull or carry by cord, use cord as a handle, close door on cord, or pull cord around sharp edges or corners. Do not run appliance over cord. Keep cord away from heated surfaces.
- Do not unplug by pulling on cord. To unplug, grasp the plug, not the cord.
- Do not handle plug or appliance with wet hands.
- Do not put any object into openings. Do not use with any opening blocked; keep free of dust, lint, hair and anything else that may reduce air flow.
- Keep hair, loose clothing, fingers and all parts of body away from openings and moving parts.
- Do not use to pick up anything that is burning or smoking, such as cigarettes, matches, or hot ashes.
- Do not use without filter bag assembly in place.
- Turn off all controls before unplugging.
- Use extra care when cleaning on stairs.
- Do not use to pick up flammable or combustible liquids, such as gasoline, or use in areas where they may be present.
SAVE THESE INSTRUCTIONS
Household Use Only
Warranty
TTI Floor Care North America (ORECK) gives you, the original purchaser of this product, the following limited warranty only if this product was purchased from Oreck or an Oreck Authorized Retail Dealer, used only for residential purposes, and not held for resale.
Oreck will repair or replace, free of charge, any part of this product that is found to be defective in material or workmanship within three (3) years following the date of purchase; ten (10) years on housing for all residential models. NOTE: warranty is void if used in a commercial setting. This limited warranty does not cover the replacement of expendable or consumable parts such as filters, cartridges, and other parts subject to normal wear unless they are defective in material or workmanship.
This limited warranty does not apply to any part subjected to accident, abuse, commercial use, alteration, misuse, damage caused by an act of god, or the use of voltages other than on the data plate of this product. Damage to this product caused by service performed by someone other than Oreck or an Oreck Authorized Retail Dealer is not covered by and is excluded from this warranty. Oreck does not authorize any person or representative to assume or grant any other warranty obligation with the sale of this project.
The Oreck limited warranty is valid only if you retain proof of purchase from Oreck or an Oreck Authorized Retail Dealer for this product. If you purchase this product from any other source, your purchase is "AS IS," which means that Oreck grants you no warranty, and that you, not Oreck, assume the entire risk of the quality and performance of the product, including the entire cost of any necessary servicing or repairs of any defects.
The Oreck liability for damages to you for any costs whatsoever arising from this limited warranty shall be limited to the amount paid for this product at the time of original purchase, and Oreck shall not be liable for any direct, indirect, consequential or incidental damages arising out of the use or inability to use this product. Some states do not allow the exclusion or limitation of incidental or consequential damages, so the above limitations or exclusions may not apply to you.
ALL EXPRESS AND IMPLIED WARRANTIES OTHER THAN THE LIMITED WARRANTY SET FORTH ABOVE, FOR THE PRODUCT, INCLUDING IMPLIED WARRANTIES OF MERCHANTABILITY AND FITNESS FOR A PARTICULAR PURPOSE ARE EXPRESSLY DISCLAIMED TO THE FULLEST EXTENT ALLOWED BY APPLICABLE LAW.
Notwithstanding the foregoing, no warranty provided herein or arising under any applicable law shall exceed 3 years in duration. However, some states do not allow limitations on how long an implied warranty lasts, so the above limitation may not apply to you.
This warranty shall be governed and construed under the laws of the state of Ohio. This warranty gives you specific legal rights, and you may also have other rights, which vary from state to state.
Parts List
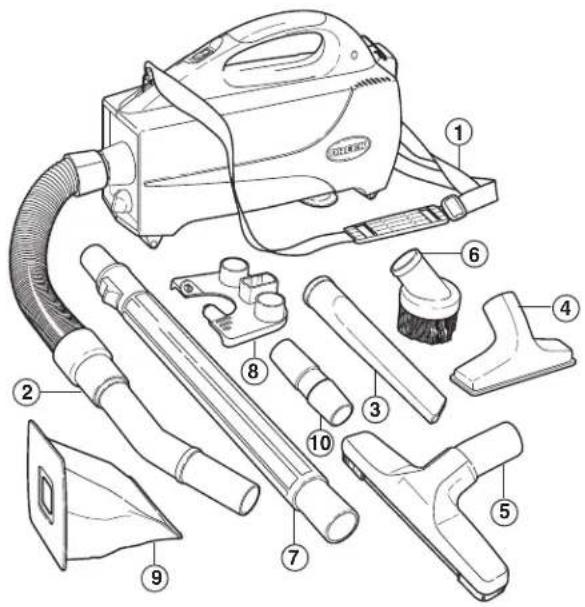
text_image
Labeled diagram of a vacuum cleaner with numbered parts for identification- Adjustable shoulder strap
- Flexible hose
- Crevice tool
- Upholstery tool
- Horsehair bare floor and wall tool
- Horsehair dusting brush
- Adjustable extension wand
- On-board tool caddy
- Paper filter bag
- Tool adapter tube for fitting tools directly to vacuum when not using hose.
• HEPA filter (not shown)
- Scent cartridge (not shown)
Accessories (Sold Separately)
Replacement Hypo-Allergenic Filter
Bags (12 pk. with 1 Micro Filter) Part No. PKBB12DW
Replacement Micro Filter Part No. 72005-01
Replacement HEPA Filter Part No. HF1000
Replacement White Bag
Gasket Part No. 72017-02
Oreck Fresh Air® Scent Cartridges
Notes of Vanilla®8pk. Part No. FA1PK
Blooming Jasmine® 8pk. Part No. FA3PK
To order new parts or accessories call:
US: 1-800-989-3535
Canada: 1-888-676-7325
Assembly
IMPORTANT: DO NOT REMOVE the dirt retaining flap attached on the back of the front plate. It must be left in place for the unit to operate properly and to ensure cleaning effectiveness.
text_image
MYLAR FLAPAttach Caddy and Insert Tools
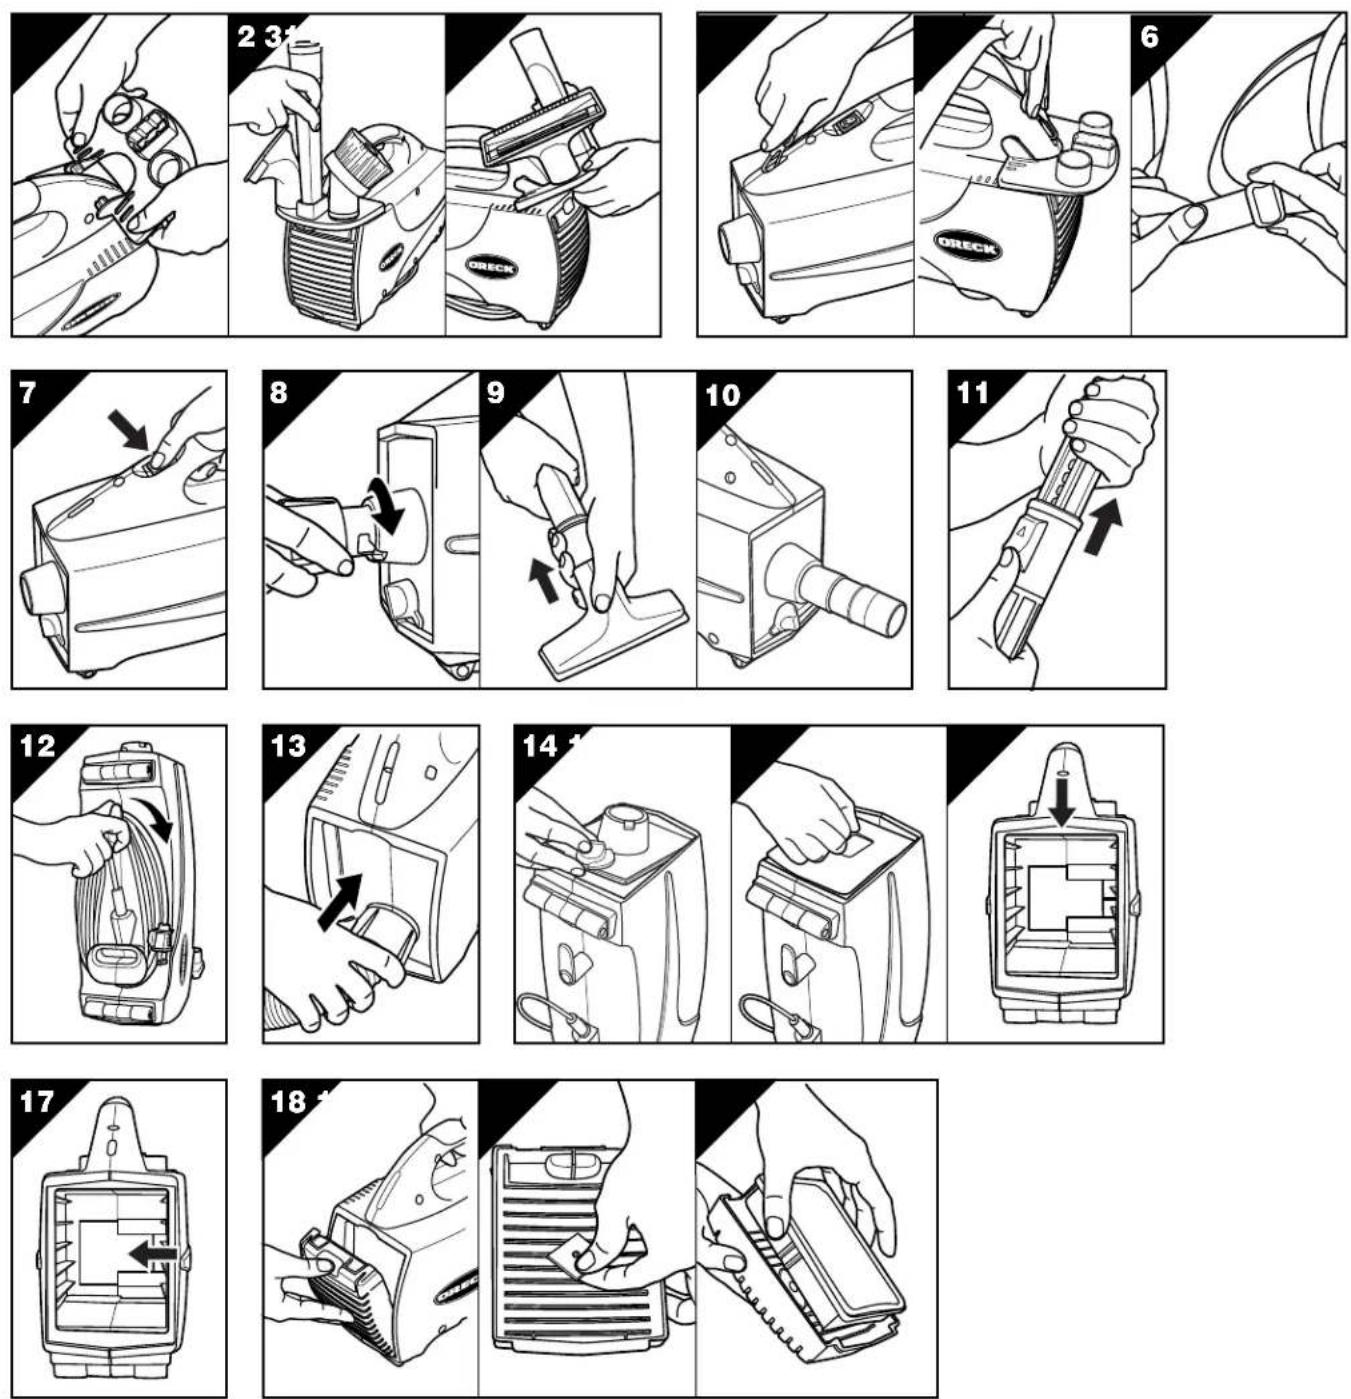
fig. 1 Locate caddy clip slots at top rear corners of canister handle. Place appliance on firm, non-slip surface or hold in your lap. Grasp handle firmly. Place one of caddy clip tabs inside slot on one side of handle and stretch the other tab around handle until the opposite tab inserts in slot.
fig. 2 Insert crevice tool, dusting brush and upholstery tool into caddy in spaces provided.
fig. 3 Caddy will lift up 90° to allow access to the HEPA filter cover.
Attach Shoulder Strap
fig. 4 Clamp one end of shoulder strap in front slot located at front of handle.
fig. 5 Clamp opposite end of shoulder strap in slot at back of handle.
fig. 6 Adjust length by pulling strap through clip.
IMPORTANT: Before using shoulder strap, pull both ends to be sure it is secure.
Polarized Plug Notice
This product is equipped with a polarized alternating current line plug (a plug having one blade wider than the other). This plug will fit into the power outlet only one way. This is a safety feature. If you are unable to insert the plug fully into the outlet, try reversing the plug. If the plug should still fail to fit, contact an electrician to replace the obsolete outlet. Do not defeat the purpose of the polarized plug.
To Operate
Plug cord into electrical outlet.
Power Switch
fig. 7 Push power switch to "ON" (I) position.
Hose and Tool Installation
fig. 8 The flexible hose uses a Shurlock ^ locking system that prevents hose removal unless intended. To install hose, align "J" slot in hose coupling with tab inside the suction port. Insert hose in port. Twist collar clockwise to lock hose coupling in port. Twist counterclockwise and pull to remove hose.
fig. 9 The adjustable extension wand and cleaning tools supplied with your Oreck XL Compact Vacuum lock together with friction. Twist and push to be sure they lock tightly when installing. Twist and pull to remove.
fig. 10 When installing tools directly to blower or suction port without using hose, tool adapter tube must be used.
Adjustable Extension Wand
fig. 11 To adjust extension wand, press release button and pull inner tube to desired length. Tube will lock when button is released. To shorten length, press release button and push inner tube.
For Easy Cord Storage
fig. 12 Wrap cord around the cord wrap and cord dump located on bottom of the canister. To release cord, twist the cord dump.
Blower Port
fig. 13 Remove HEPA Filter cover and filter at back of machine. Firmly insert flexible hose into exhaust port.
Maintenance

WARNING: Unplug cord from electrical outlet before servicing.
Changing the Filter Bag
fig. 14 Use only genuine ORECK XL filter bags. Stand unit on its back. Twist knob counterclockwise to release and lift out front plate.
fig. 15 Remove used bag and insert fresh bag. The cardboard rim fits smoothly into the recessed top. Align tabs on front plate with slots in housing and replace the front plate. Close unit by turning knob clockwise.
fig. 16 IMPORTANT: The white bag gasket glued in the housing must be in place or unit will not operate properly. Replace if needed.
NOTE: The disposable inner filter bag must be replaced once a month even if it is not full. Change it more often if it is used in extremely dirty areas. Increase the cleaning power of your vacuum by changing the bag often.
Replacing the Micro Filter
Remove filter bag by following the Changing the Filter Bag instructions.
fig. 17 Remove old micro filter from bottom inside unit. Replace with new filter.
NOTE: A replacement filter is supplied in each package of 12 ORECK XL filter bags or you may order filters separately.
Using a HEPA-Filter and Scent Cartridge
fig. 18 Remove HEPA Filter cover at back of machine by pressing down in top slot and folding back the cover. Lift cover to remove.
fig. 19 Insert an Oreck Fresh Air ^® Scent Cartridge on tab located in center of the filter cover.
fig. 20 Place the HEPA Filter in the filter cover.
fig. 18 Replace the HEPA Filter assembly on the canister by placing the bottom lip of the cover in the inside slot of the canister and closing the cover until the top latch is locked.
NOTE: It is recommended to replace the scent cartridge when the inner filter bag is replaced.
Replace the HEPA filter every 6 months. Replace more often if vacuum is used to pick up fine particles or in extremely dirty areas.
Maintenance and Customer Service
Your ORECK COMPACT CANISTER VACUUM is a product of precise engineering. The motor bearings are permanently lubricated and should not be oiled. If you require additional information or have problems with your ORECK appliance, you may call ORECK customer service at:
US: 1-800-989-3535
Canada: 1-888-676-7325
Please specify the model number and serial/code number which can be found on the data plate on the bottom of the vacuum.
Save your sales or purchase slip. Should your ORECK appliance require warranty service in the U.S.A., present this slip to the Authorized Service Center as your proof of purchase date, or, in Canada, call customer service.
Troubleshooting Guide
| PROBLEM | POSSIBLE SOURCE | AREAS TO CHECK |
| Cleaner Will Not Run | 1.Not plugged in properly2.No electricity in wall outlet.3.Motor protector tripped.4.Needs service. | 1.Be sure cleaner is firmly plugged into wall outlet.2.Check electrical source-fuse or circuit breaker.3.See Motor Protection System page 2.4.Take to service center or call for nearest service center. |
| Vacuum Will Not Pick Up Or Has Low Suction | 1.Filter bag is full.2.Hose/wand tool is clogged.3.Air leak due to missing or damaged gasket. | 1.Replace filter bag. See “Changing the Filter Bag,” page 4.2.Remove obstructions.3.Replace gasket See page 4. |
| Tools/Wands Will Not Stay Together | 1.Proper friction fit not being obtained. | 1.Push and turn. |
ALL OTHER SERVICING SHOULD BE DONE BY AN ORECK AUTHORIZED SERVICE CENTER.
CALL CUSTOMER SERVICE HOT LINE US: 1-800-989-3535 Canada: 1-888-676-7325
Whenever calling, please be sure to have your model and serial number from data plate.
ORECK XL
SIMPLY AMAZING®
GUIDE D'UTILISATION
FRANÇAIS
natural_image
Line drawing of a vacuum cleaner with various pipe fittings and accessories (no text or labels)NOIR AVEC DES ROUES
•IMPORTANTE•
CONSERVEZ CE FASCICULE
Comprend:
text_image
Labeled diagram of a vacuum cleaner with numbered parts for identificationNotes of Vanilla®8pk. Part No. FA1PK
Blooming Jasmine® 8pk. Part No. FA3PK
natural_image
Line drawing of a vacuum cleaner with various pipe fittings and accessories (no text or labels)ASPIRADORAS COMPACTAS
•IMPORTANT•
text_image
Labeled diagram of a vacuum cleaner with numbered parts for identificationNotes of Vanilla® 8pk. # FA1PK
Blooming Jasmine® 8pk. # FA3PK