
A620 - Thermometer Eurochron - Free user manual and instructions
Find the device manual for free A620 Eurochron in PDF.

| Product type | Temperature data logger (Thermo Logger) with external sensor |
| Brand | Eurochron |
| Model | A620 |
| Order numbers | 1486096 (encapsulated sensor, -50 °C to +70 °C), 1486097 (immersion probe, -40 °C to +300 °C) |
| Dimensions (L×D×H) | 74 x 74 x 20 mm |
| Weight (without batteries) | Approx. 70 g |
| Power supply | 2 AA alkaline batteries (1.5 V) |
| Measuring ranges | -50 °C to +70 °C (ref. 1486096), -40 °C to +300 °C (ref. 1486097) |
| Resolution | 0.1 °C |
| Accuracy (depending on range) | ±1 °C between 0 °C and 50 °C (ref. 1486096) or -18 °C to 100 °C (ref. 1486097) |
| External sensor | Waterproof encapsulated sensor (1486096) or immersion probe (1486097), cable length approx. 800 mm |
| Communication | Bluetooth® 4.0 |
| Bluetooth range | Up to 30 m in open field |
| Number of measurement points | Up to 14,400 |
| Display | LCD screen with temperature display and Bluetooth symbol |
| Mobile app | BTLogger (free) for iOS and Android |
| Main functions | Temperature measurement, high/low alarm, recording with configurable interval, standby mode |
| Maintenance and cleaning | Clean with a soft, damp cloth (water + mild detergent), do not immerse, do not use harsh chemicals |
| Operating conditions | Temperature: 0 °C to +40 °C, humidity: 10% to 90% (non-condensing) |
| Storage conditions | -20 °C to +60 °C, humidity: 10% to 95% (non-condensing) |
| Safety | Do not use in an oven or microwave, do not measure inside electrical appliances, keep out of reach of children |
| Package contents | Thermo Logger, external sensor, suction cup, instruction manual |
| Repairability | Replaceable batteries (AA), no other spare parts |
| Compliance | Directive 2014/53/EU |
Frequently Asked Questions - A620 Eurochron
User questions about A620 Eurochron
0 question about this device. Answer the ones you know or ask your own.
Ask a new question about this device
Download the instructions for your Thermometer in PDF format for free! Find your manual A620 - Eurochron and take your electronic device back in hand. On this page are published all the documents necessary for the use of your device. A620 by Eurochron.
USER MANUAL A620 Eurochron
GB Operating Instructions
Thermo logger A620/A621 Page
Item No. 1486096/1486097 30 - 54
F Mode d'emploi
www.business.conrad.at
text_image
QR code image containing encoded data, no visible human-readable texttext_image
Two triangular warning symbols: a lightning bolt and an exclamation mark, commonly used in safety or hazard prevention contexts.text_image
Two triangular warning symbols: a lightning bolt and an exclamation mark, commonly used in safety or hazard prevention.text_image
Cancel Device to Pair Press and hold the Pairing Button on the Device for 5 seconds. Select the Device from the lid below to initiate the pairing process BTL_94AA
text_image
Nearby Devices Paired Devices BTL_94A6 22.7°C Pair New DeviooBild 4
text_image
Back BTL_94A4 Temperature 25.5 °C Set your parameters before start Previous Set Experiment_5 Press Start action to start Start BTL_94A4 Done Temperature Alert > Sampling Interval TEMP Sampling Interval Section 3 > Section Sampling Interval -18°C - 21°C 00:01 21°C - 21°C 00:01 21°C - 21°C 00:01 Working Period 00:10:00 Recorded list 3 > App SleepBild 5
b) Temperatur-Alarm
text_image
BTI SMA4 Done Temperature Alert Sampling Interval TDVP Sampling Interval Section 3 > Section Sampling Interval -18° 21° 21° The battery level maybe not enough for this working period 0:01 0:01 0:01 OK Working Period Recorded list 3 > App SleepBild 7
- Introduction......31
- Explanation of Symbols......32
- Intended Use 32
- Scope of Delivery 33
- Safety Notes....34
- Battery and Rechargeable Battery Notes......35
- Operating Elements ......37
- Inserting and Replacing Batteries 38
- Operation....38
a) Switching On/Off 38
b) Item no. 1486096: Performing measurement via the temperature sensor....38
c) Item no. 1486097: Performing measurement via the temperature sensor....39
d) Handling the Device....40
- Measurement by App and Mobile End Device 40
a) Installing the App....41
b) Display Measurement with Bluetooth ^® 42
c) Basic Settings 44
- Further Setting Options of the App 44
a) Specifying Values for Measurements....44
b) Temperature alarm.... 46
c) Test range 46
d) Testing the interval settings.... 46
e) Section / test range 47
Page
f) Recorded list....50
g) Sleep mode....51
-
Maintenance and Cleaning....51
-
Disposal....52
a) General 52
b) Batteries and Rechargeable Batteries ....52
-
Declaration of Conformity (DOC)....53
-
Technical Data....53
1. Introduction
Dear Customer,
Thank you for purchasing this product.
This product complies with the statutory national and European requirements.
To maintain this status and to ensure safe operation, you as the user must observe these operating instructions!

These operating instructions are part of this product. They contain important notes on commissioning and handling. Also consider this if you pass on the product to any third party. Therefore, retain these operating instructions for reference!
If there are any technical questions, please contact:
International: www.conrad.com/contact
United Kingdom: www.conrad-electronic.co.uk/contact
2. Explanation of Symbols

The exclamation mark in a triangle indicates important notes in these operating instructions that must be observed strictly.
The arrow symbol indicates that special advice and notes on operation are provided.
3. Intended Use

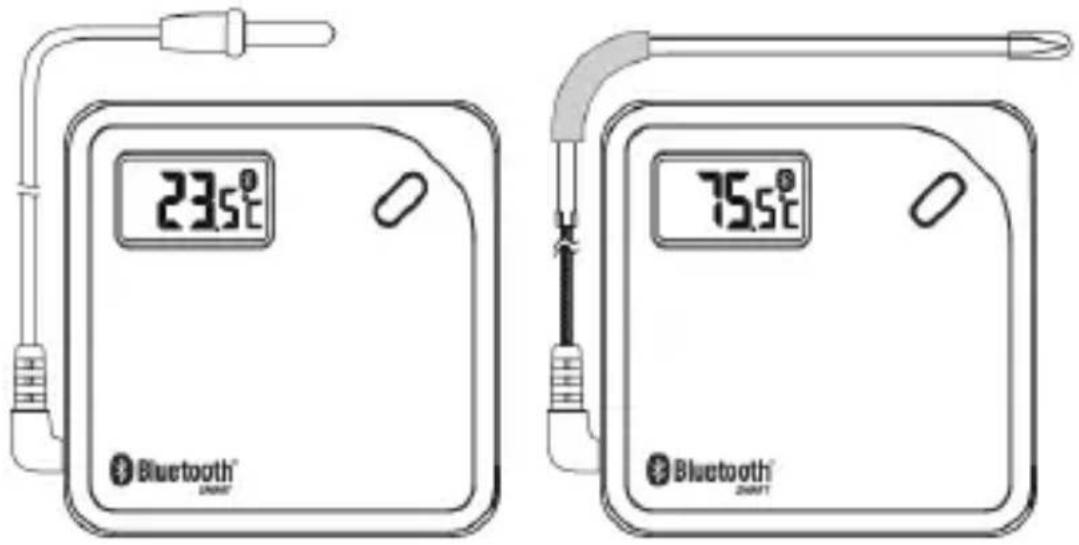
These operating instructions apply to the products with item no. 1486096 (with encapsulated outer sensor) and 1486097 (with insertion sensor). Both devices are operated identically. The products differ only by the external sensor (see figure) and the technical data. Deviations are explained explicitly in these operating instructions.
text_image
23.5°C Bluetooth® 75.5°C Bluetooth®Item no. 1486096 Item no. 1486097
The thermo logger is used to measure temperatures, e.g., of the air or in liquids, depending on the temperature sensor used. For this, a suitable temperature sensor is available depending on item no. that can be used for the measuring task. The measuring result can be read on the LC display at once. Additionally, the measuring result can be transferred to a tablet or Smartphone by Bluetooth® connection as well or processed there with the corresponding App. Operation takes place with two batteries type AA/mignon.
The safety notes and all other information in these operating instructions always have to be observed.
This product complies with the statutory national and European requirements. All company names and product names are trademarks of their respective owners. All rights reserved.
4. Scope of Delivery
- Thermo logger
- External sensor
- Suction cup
- Operating instructions
Up-to-date operating instructions
Download the latest operating instructions via the link www.conrad.com/downloads or scan the QRcode.Followtheinstructionsonthewebsite.

text_image
QR code image containing encoded data, no visible human-readable text
text_image
Two triangular warning symbols: a lightning bolt and an exclamation mark, commonly used in safety or hazard prevention.Please read the operating instructions completely before commissioning. They contain important information for correct operation.
The guarantee/warranty will expire if damage is incurred resulting from non-compliance with the operating instructions! We do not assume any liability for consequential damage!
We do not assume any liability for property damage or personal injury caused by improper use or non-compliance with the safety instructions! In such cases the warranty/guarantee is voided.
- The unauthorized conversion and/or modification of the product is inadmissible because of safety and approval reasons. Never disassemble it, except for the procedures described in these operating instructions for insertion or replacing the batteries.
- The product is not a toy and must be kept out of reach of children.
- The product must not be exposed to extreme temperatures, strong vibration or strong mechanical strain.
- The manufacturer assumes no responsibility for wrong or inaccurate displays or for the effects that may arise from such displays.
- Operation of the entire product, e.g. in the oven or in a microwave, is not permitted. There is a danger of fire and explosion, as well as danger to life from the toxic fumes.
- Handle the product with care; impacts, shock or fall even from low heights will damage it.
text_image
Two triangular warning symbols: a lightning bolt and an exclamation mark, commonly used in safety or hazard prevention contexts.If you determine any damage, the product must no longer be operated; take the product to a specialist workshop or dispose of it environmentally compatibly.
- Never measure inside any electrical devices and/or push the insertion sensor into any such devices or socket. There is danger to life from electric shock!
- In schools, training centres, hobby and self-help workshops, the use of the product must be supervised by responsible trained personnel.
- Do not leave packaging material lying around carelessly. It may become a dangerous toy for children!
- If you are not sure of the correct operation or if there are any questions that are not covered by the operating instructions, do not hesitate to contact our technical support or another specialist.
6. Battery and Rechargeable Battery Notes
- Keep batteries/rechargeable batteries out of the reach of children.
- Ensure that the polarity is correct when inserting the batteries/rechargeable batteries (observe plus/+ and minus/-).
- Do not leave any batteries/rechargeable batteries lying around openly. There is a risk of batteries being swallowed by children or pets. If swallowed, consult a doctor immediately.
- Leaking or damaged batteries/rechargeable batteries can cause chemical burns to skin on contact; therefore, use suitable protective gloves.
- Liquids leaking from batteries/rechargeable batteries are chemically highly aggressive. Objects or surfaces that come into contact with them may take severe damage. Therefore, keep batteries/rechargeable batteries in a suitable location.
- Make sure that batteries/rechargeable batteries are not short-circuited, disassembled or thrown into fire. There is a danger of explosion!
- Never recharge normal (non-rechargeable) batteries. There is a danger of explosion! Only charge rechargeable batteries which are intended for this purpose; use a suitable battery charger.
- If not used for a longer period (e.g. in case of storage), remove the inserted batteries/rechargeable batteries. There is a danger of old batteries/rechargeable batteries leaking, which causes damage to the product, loss of warranty/guarantee!
- Always replace the entire set of batteries/rechargeable batteries, only use batteries/rechargeable batteries of the same type and by the same manufacturer with the same charge status (do not mix charged with partially charged or empty batteries/rechargeable batteries).
- Never mix batteries and rechargeable batteries. Use either batteries or rechargeable batteries.
- For proper disposal of batteries and rechargeable batteries, please read the chapter "Disposal".
- It is possible to operate the thermo logger with rechargeable batteries. However, the lower voltage (battery = 1.5 V, rechargeable battery = 1.2 V) causes the operating duration and display contrast to reduce strongly.
• We therefore recommend not operating the product with rechargeable batteries, but only with high-quality alkaline batteries to warrant long and secure function.
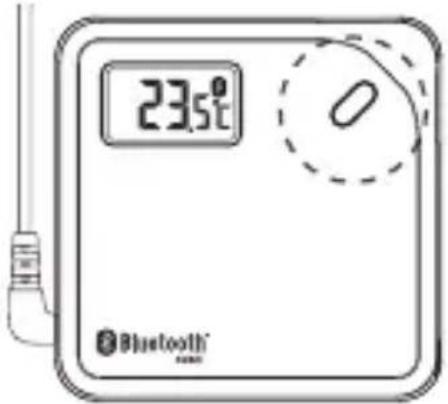
7. Operating Elements
text_image
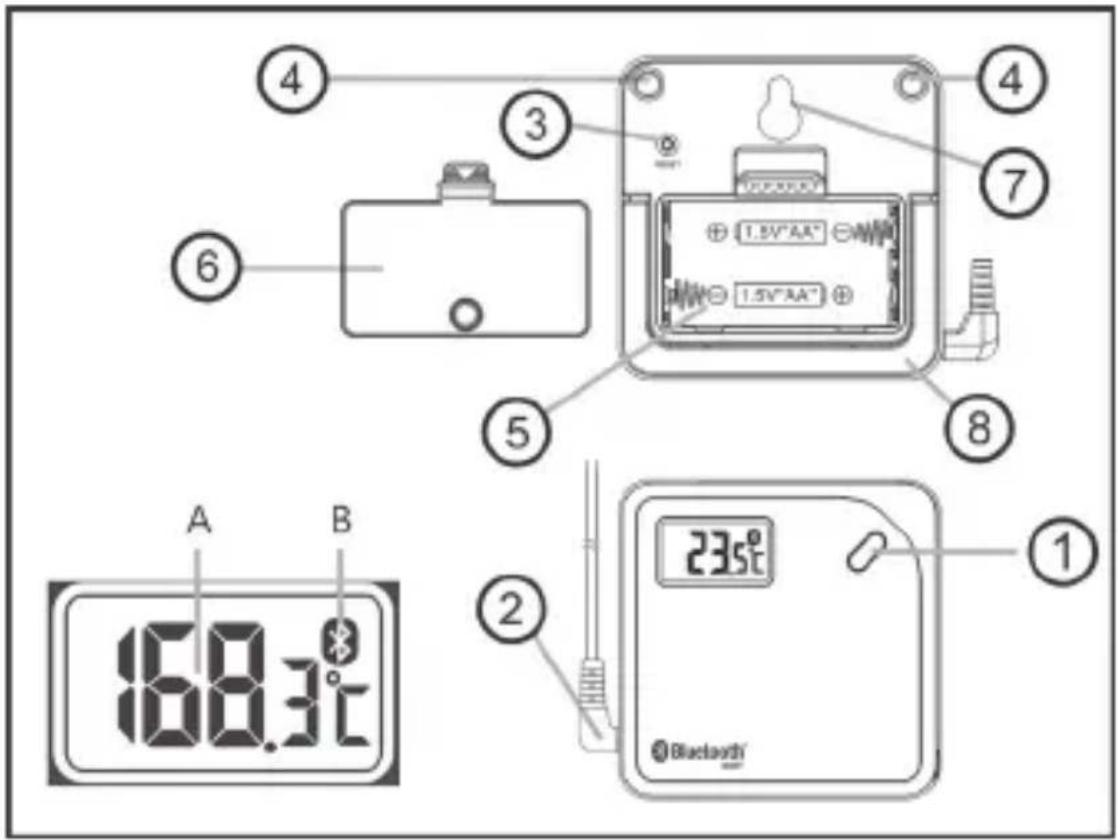
① 235°C 168.3°C ② A B ③ ④ ⑤ ⑥ ⑦ ⑧ 1.5V"AA" 1.5V"AA" Bluetooth1 Button "Bluetooth ^ " Figure 1
2 Connection for temperature sensor
3 Reset button
4 Magnets
5 Battery compartment
6 Battery compartment lid (with magnet)
7 Holder for suction cup (or screw)
8 Stand
A Temperature display
B Symbol for Bluetooth ^® connection
8. Inserting and Replacing Batteries
- Open the battery compartment (figure 1, item 5) on the rear by carefully pushing the closure mechanism of the battery compartment lid in the direction of the arrow and taking off the battery compartment lid (figure 1, item 6).
- Insert two type AA/mignon batteries with correct polarity into the battery compartment (observe plus/+ and minus/-), see notes in the battery compartment.
- Put the battery back on the compartment lid and let the closure mechanism latch. The thermo logger is now ready for operation.
- The batteries require changing when the display contrast is very weak or the device can no longer be switched on
9. Operation
a) Switching On/Off
The product has no on/off switch of its own. The device is switched on ready for operation when you insert the batteries into the product. If you want to cease operation of the device for a longer period of time, remove the batteries from the battery compartment.
b) Item no. 1486096: Performing measurement via the temperature sensor
The water-tight temperature sensor of the thermo logger with item no. 1486096 is very well suitable for temperature measurements of the air or in acid-free liquids (e.g. water). The sensor can be attached in any measuring location within the temperature range of the measuring sensor (-50 °C to 70 °C) by suction cup.
The temperature sensor must be plugged into the left side of the thermo logger for the measurement (figure 1, item 2). A temperature measurement requires a few seconds time to measure until the measured value has stabilised and the temperature display has stopped changing or changing essentially.
Measuring at high temperatures also poses a high risk of burns. Therefore, use suitable protection equipment (e.g. temperature-resilient gloves.
When measuring outside of the specifications of the devices, the display and/or app may no longer show any value at all (depending on how far the range is exceeded).
c) Item no. 1486097: Performing measurement via the temperature sensor
The insertion temperature sensor of the thermo logger with item no. 1486097 is very well suitable for temperature measurements in material to be measured, such as water or foods. The sensor must be held by the rubberised part of the insertion sensors during the measurement to avoid influences on the measuring results. The insertion temperature sensor must be submersed or inserted into the materials to be measured for this. The material to be measured must be within the temperature range of the measuring sensor (-40 °C to 300 °C).
The temperature sensor must be plugged into the left side of the thermo logger for the measurement (figure 1, item 2). A temperature measurement requires a few seconds time to measure until the measured value has stabilised and the temperature display has stopped changing or changing essentially.

Measuring at high temperatures also poses a high risk of burns. Therefore, use suitable protection equipment (e.g. temperature-resilient gloves.

When measuring outside of the specifications of the devices, the display and/or app may no longer show any value at all (depending on how far the range is exceeded).
d) Handling the Device
The delivery includes a suction cup. It can be installed on the rear of the product in the corresponding cut-out of the housing (figure 1, item 7). Alternatively, a screw hooked in there with a matching screw head (not enclosed) may also serve as a holder, e.g. to attach the device to a wall.
The rear of the device has magnets in the upper area and additionally on the battery compartment lid. You may attach the device to, e.g., a metal object this way.
If you simply want to put the device onto a table, fold out the stand (see figure 1, item 8).
10. Measurement by App and Mobile End Device

The following illustrations for the individual functions of the app are shown in English. Depending on the chosen language of the app (e.g. German), these notes are also displayed in the chosen language (i.e. also in German). The respective meaning of the notes/texts may, however, deviate slightly in use of language due to the translation.
The respective handling is, however, described in detail in the individual chapters.
The app can display the display content in several languages. In exceptions, it is possible that the display can not or not fully display some words due to limited numbers of characters in some locations.
Sometimes, the words are also displayed limited or completed only due to the display type of the mobile end device (display in portrait or landscape format).
There also are slight deviations in individual illustrations (design) between the "iOS-app" and the "Android-app". The figures shown in these operating instructions have been generated for the Android operating system.
Generally, software is changing continually and can change visually due to updates. The respective handling is not affected, however.
a) Installing the App
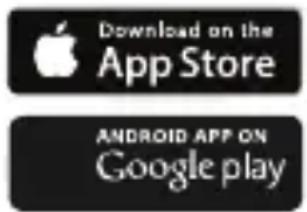
A special app can be used to display the measured results on your tablet or smartphone. There are suitable apps available for this for devices with the operating system "iOS" (Apple products, as of version 7.1) and the operating system "Android" (as of version 4.3). The app can be installed in different languages.
Connect your mobile end device (tablet or smartphone) to the internet and find the app "BTLogger" (see figure 3) in the "App Shops" matching your operating system (see figure 2). Install the app on your device. The app is free of charge. At most, the costs that would usually arise for downloading an app will arise.
text_image
Download on the App Store ANDROID APP ON Google playFigure 2
Figure 3
line
| Time Point | Value | | :--- | :--- | | 0 | 10 | | 1 | 15 | | 2 | 20 | | 3 | 25 | | 4 | 10 | | 5 | 15 | | 6 | 20 | | 7 | 25 | | 8 | 30 | | 9 | 25 | | 10 | 20 | | 11 | 15 | | 12 | 10 | | 13 | 15 | | 14 | 20 | | 15 | 25 | | 16 | 30 | | 17 | 25 | | 18 | 20 | | 19 | 15 | | 20 | 10 | | 21 | 15 | | 22 | 20 | | 23 | 25 | | 24 | 30 | | 25 | 25 | | 26 | 20 | | 27 | 15 | | 28 | 10 | | 29 | 15 | | 30 | 20 | | 31 | 25 | | 32 | 30 | | 33 | 25 | | 34 | 20 | | 35 | 15 | | 36 | 10 | | 37 | 15 | | 38 | 20 | | 39 | 25 | | 40 | 30 | | 41 | 25 | | 42 | 20 | | 43 | 15 | | 44 | 10 | | 45 | 15 | | 46 | 20 | | 47 | 25 | | 48 | 30 | | 49 | 25 | | 50 | 20 | | 51 | 15 | | 52 | 10 | | 53 | 15 | | 54 | 20 | | 55 | 25 | | 56 | 30 | | 57 | 25 | | 58 | 20 | | 59 | 15 | | 60 | 10 | | 61 | 15 | | 62 | 20 | | 63 | 25 | | 64 | 30 | | 65 | 25 | | 66 | 20 | | 67 | 15 | | 68 | 10 | | 69 | 15 | | 70 | 20 | | 71 | 25 | | 72 | 30 | | 73 | 25 | | 74 | 20 | | 75 | 15 | | 76 | 10 | | 77 | 15 | | 78 | 20 | | 79 | 25 | | 80 | 30 | | 81 | 25 | | 82 | 20 | | 83 | 15 | | 84 | 10 | | 85 | 15 | | 86 | 20 | | 87 | 25 | | 88 | 30 | | 89 | 25 | | 90 | 20 | | 91 | 15 | | 92 | 10 | | 93 | 15 | | 94 | 20 | | 95 | 25 | | 96 | 30 | | 97 | 25 | | 98 | 20 | | 99 | 15 | |100 |10 |b) Display Measurement with Bluetooth®
The app "BTLogger" permits simple display of the measured temperature on a mobile end device, long-term measurement including various monitoring functions and data recording of the measured values. In order to connect the thermo logger to a mobile end device, proceed as follows:
- Switch on your mobile end device (tablet or smartphone) and activate the function "Bluetooth®" on that device (see "Settings" in your mobile end device).
- Tap the app "BTLogger" on your mobile end device to activate it.
- Switch on the thermo logger.
- In the display of the mobile end device, select "Couple new device".
- Now push the Bluetooth ^ button on your thermo logger for about five seconds, as demanded by the app (see text in the display) (figure 1, item 1). Once the Bluetooth ^ connection has been established, this will be displayed by a brief double sound signal at the thermo logger as well as the display of the connected device in the app (device type and temperature display). If you now select the newly coupled device on the display, the app will switch to a new screen (also see figure 5). Regarding this, observe the following notes in this chapter.

If the connection by Bluetooth ^® is not established, this may be due to devices that are located in direct proximity of your devices and also broadcasting using Bluetooth ^® or other devices (such as a router) may act as an interfering signal. In this case, go elsewhere and start coupling of the two devices again. It may also be helpful to remove the battery from the thermo logger for approx. 30 seconds here (reset) or to push the "Reset button" on the rear of the housing (figure 1, item 3).

The Bluetooth® connection is retained until the devices are either out of range (range max. 30 metres in the free field; much less inside buildings), the Bluetooth® function and/or the app in your mobile end device is switched off or the thermo logger is deleted from the directory of the app.
When the Bluetooth ^® connection is interrupted, the app will no longer show any measured values. The symbol for Bluetooth ^® in the thermo logger display is no longer lit either. If the devices come back into range or the app is started again (the devices must be in range of each other for this), the Bluetooth ^® connection will be automatically re-established.
text_image
23.5°C Bluetooth®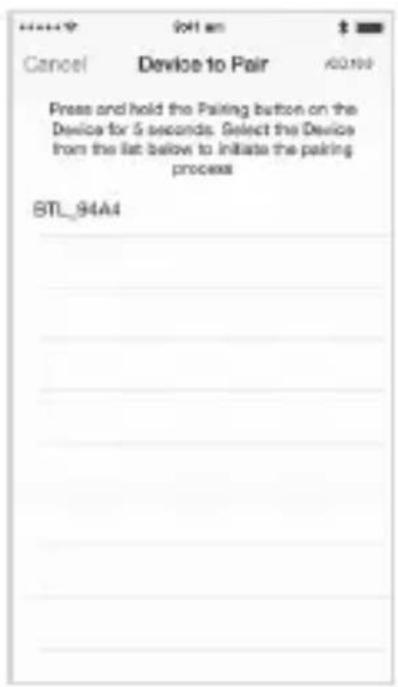
text_image
Cancel Device to Pair Press and hold the Pairing button on the Device for 5 seconds. Select the Device from the list below to initiate the pairing process STL_94A4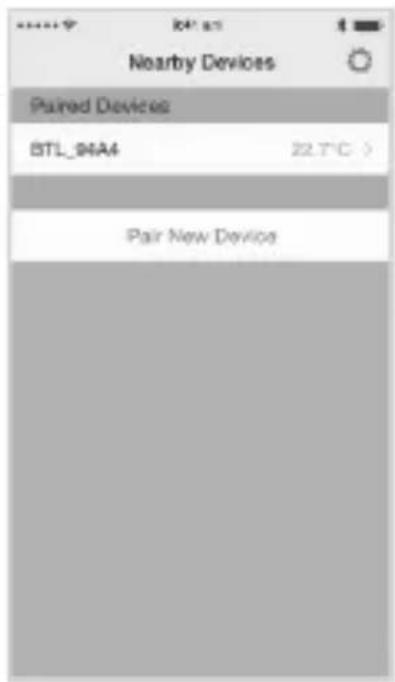
text_image
Nearby Devices Paired Devices BTL_94A4 22.7°C > Pair New DeviceFigure 4
c) Basic Settings
The device that has just been newly coupled with the app (thermo logger) is now indicated in the app under "connected device". The display for the device is a type designation that can be changed individually as follows:
- Select the gear at the upper right of the display. New display content is displayed.
- Briefly tap the type designation of the coupled device. The keyboard is displayed. Now you can assign a new name (e.g. Logger 1) to the coupled device. Save your input with "done".
- To delete a coupled device, tap the gear at the upper right of the display of the app again and select "edit". Now "delete" is displayed in the Android app. In the iOS-app, a minus symbol (-) is shown in front of the device. It must be used to delete it.

If a device is removed from the app (deleted), all previous recordings of the device are deleted as well. In order to avoid deletion of these data, they should be secured on the mobile device or any other storage medium.
11. Further Setting Options of the App
a) Specifying Values for Measurements
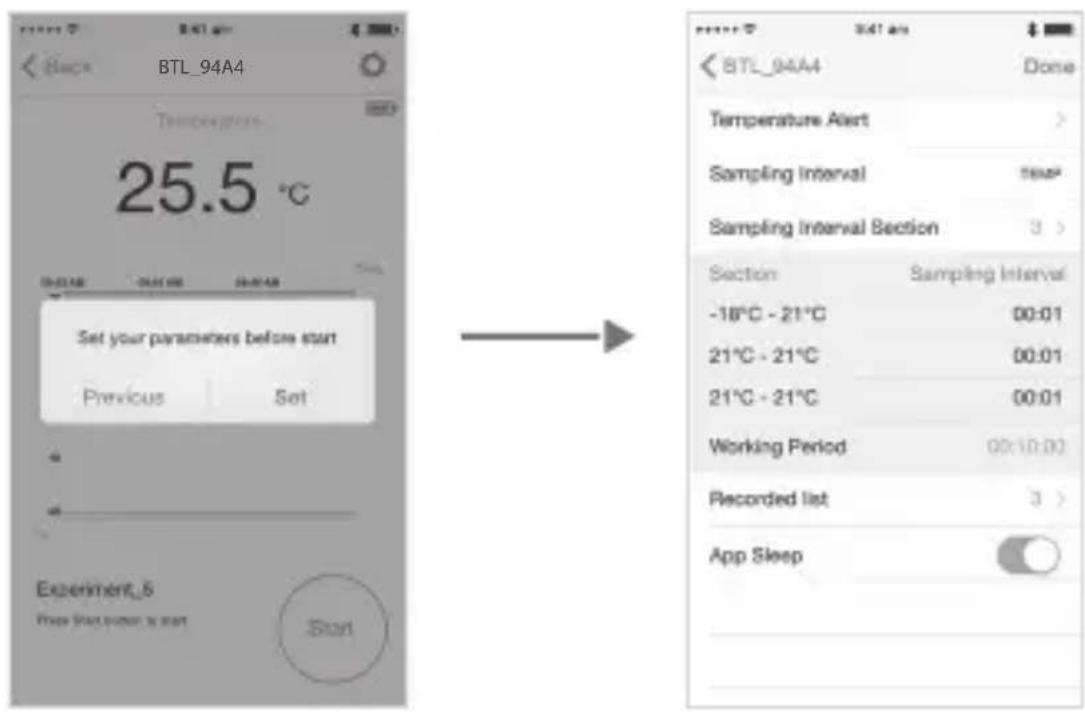
Once you select the newly coupled device on the display of the mobile end device, the app switches to new screen content. You will be informed by display that you need to specify parameters. When you select "Setting", the app will switch to the setting screen (figure 5).

When first setting up measuring parameters, you will be sent directly to the setup page. If any settings have been made there already, you can choose between "back" or settings. If you have already entered anything, "back" will be displayed as well. If you select "back", you will be right in the display menu, where you can start a measurement.
In this display, you can see the name of the device at the upper left (e.g. Logger 1). In the upper right, there is the button "done", which can be used to confirm the settings and complete them.
The button "Start" is in the lower right. Tapping this symbol will start measurement with recording. The parameters for this are specified first as described in the following chapters. Some alarm messages are output as well. Warning signals will sound during this at the thermo logger as well as the mobile end device. The mobile end device will also display a warning message that indicates the result. If you tap "OK" in this display, the alarm will be interrupted. Alternatively, you can stop the alarm by keeping the Bluetooth® button pushed for a few seconds.
text_image
BTL_94A4 Temperature 25.5 °C Set your parameters before start Previous Set Experiment_5 Free (without) start Start BTL_94A4 Done Temperature Alert > Sampling Interval TEMP Sampling Interval Section 3 > Section Sampling Interval -18°C - 21°C 00:01 21°C - 21°C 00:01 21°C - 21°C 00:01 Working Period 00:10:00 Recorded list 3 > App SleepFigure 5
b) Temperature alarm
In "Temperature alarm", you can set the limits ("Maximum" and "Minimum") that will trip an alarm later during the measurement. The range can be set according to the measurement range of the respective device. When making the setting, observe that the higher value under "Maximum" is complied with. You can also select the measuring unit "degrees Celsius" (°C) or degrees Fahrenheit (°F). Confirm your settings with "done". The display will back to the setting screen (figure 5).
switch
During the later measurement, the value "Maximum" will be displayed with a red line in the graphical display. The value "Minimum" is displayed with a blue line. When a set limit is exceeded or undercut, the thermo logger as well as the mobile end device will issue a warning signal. The mobile end device will additionally show a display for the event. The individual measuring results are displayed as a line in a selected time line.
The current temperature is displayed in the upper area of the display on the mobile end device. While a measurement is started, this display can show the average temperature when scrolling to the left, and the lowest and highest temperatures when scrolling to the right.
c) Test range
This function cannot be selected in the present devices and shows only the measuring size ("Temp" = Temperature) for a long-term measurement.
d) Testing the interval settings
In this function, you can activate up to three measurement ranges that can be viewed in the function displayed below "Section / test range" and also set individually. If you select "1", you can set a temperature range with a scan rate. If you select "2" or "3", you can activate one to three measurement ranges with different values.
Confirm your input with "done". Also observe the information in the following chapters on this.
e) Section / test range
In "Section", specify the measuring settings that you desire for recording of the measurement.
Now tap the temperature values displayed at the left of the display under "Section". A new window is opened. Set the upper value (maximum; e.g. 22 for the temperature) and the lower value (minimum; e.g. 20 for the temperature). Confirm the set values with "done" – just like all following settings. The graphical illustration then shows the limits (22 and 20) as lines to make the actual measured values and the reading dropping below or rising above them better visible.
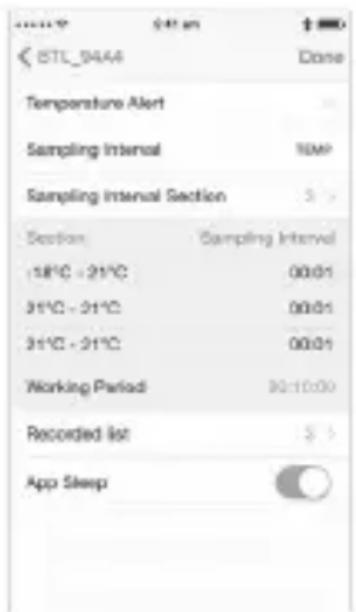
text_image
BTL_9444 Done Temperature Alert Sampling Interval 10MP Sampling Interval Section 3 > Section Sampling Interval 18°C - 21°C 00:01 31°C - 31°C 00:01 31°C - 31°C 00:01 Working Period 30:10:00 Recorded list 3 > App SleepFigure 6
Additionally select a scan rate in "Test range" that controls the frequency of the measured value recording (e.g. 1 minute = one measured value is saved every minute). The values named as examples here will save your recording at a scan rate (repetition of saving of a measured value) of one minute (= 60 measured values per hour).
You can select the number (max. three) of the adjustable "Sections" under "Testing the interval settings". Here, you can set different scan rates for the measured values for up to three different temperature ranges. The lower the interval under "Test range" is set, the more often will the measured temperature be updated and saved.
Example:
If you set a temperature of 20^ to 22^ and a scan rate of one minute in the first "Section", the measured temperature value is saved in a table every minute with the value measured at that time, independently of the set temperature range of 20^ to 22^ . This is done at this rhythm until the measured value recording is stopped. The set temperature values (here: 20^ to 22^ ) have purely statistical value in this case.

If only one "Section" is set up as "Temp", the set scan rate will not change when the temperature section (here: 20 ° to 22 °) is exceeded or undercut, and, e.g. (here: one minute) remain at one minute.
Now additionally generate a second section, e.g. with the temperature range of 22^ to 30^ with a scan rate of ten hours. If the measured temperature rises to above 22^ now (and thus into the temperature range of 22.1^ to 30.0^ ) as set in the second section, a measured value will be saved every ten seconds. Thus, you will have six measured values per minute. A temperature increase from, e.g. 22^ to 23^ could then, e.g., be reflected in the evaluation of the measured value recording as follows: 10 seconds after the limit has been exceeded (here: more than 22^ ) = 22.2^ ; 20 seconds after = 22.3^ ; 30 seconds after = 22.5^ ; 40 seconds after = 22.7^ ; 50 seconds after = 22.9^ ; after one minute (60 seconds) = 23.0^ . You thus have six measured values for a temperature increase of one degree within one minute.
If you have set up a setup, you can determine the period of measurement under "Working area". You can either specify a time span or select (lower right) "Continually". Confirm this input with "done" as well.

The function with several "Sections" may be helpful in order to set a switching point of a heating as precisely as possible. Here, the additional interval setting is made with a shorter scan rate in order to have the temperature increase displayed in as much detail as possible at the planned deactivation point.
If two or three "Sections" are set up, and the measured temperature undercuts or exceeds the lowest or highest value of a section, the scan rate for these temperature ranges is automatically set to the shortest scan rate.
A short interval in "Test range" means a high number of recorded data. If you select a long recording time for the measurement as well, the remaining energy in the batteries may become too low. In that case, the app will display a corresponding note (see figure 7).
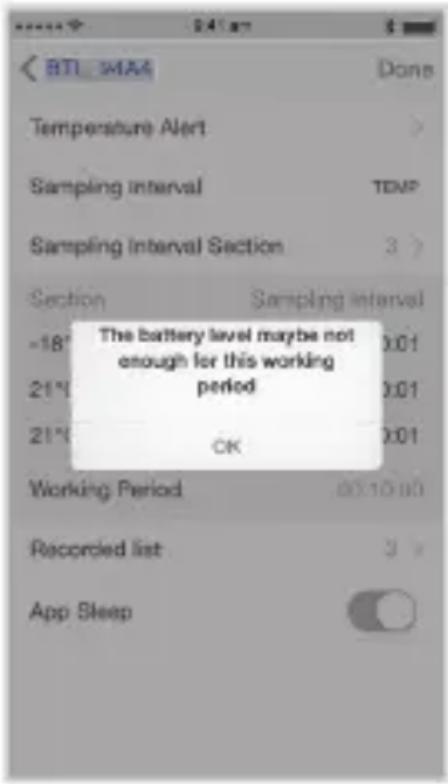
text_image
BTI -MA4 Done Temperature Alert Sampling interval TEMP Sampling Interval Section 3 > Section Sampling interval =18° 0:01 21° 0:01 21° OK Working Period 00:10:00 Recorded list 3 > App SleepFigure 7
Once you have set all parameters as desired, you can start the measurement. Confirm this with "done". The display will now switch to a new display. You can start the measurement in the lower right (tap "Start") or interrupt a current measurement (tap "Stop"). To the left of the "Start/Stop Button", you can see the name of the current measurement, (e.g. Recording 5), the date and starting time.
You can also see the current values in a graphical display with a time line and the current measured value. The display for this measured value can be scrolled to the left or right in order to view the min/max values or the average temperature. If the function "Average value" is
chosen, the graphical display will show a green line with the average value. The set upper threshold is displayed with a red line, the lower threshold with a blue line.
The upper right also shows a battery icon that will display the charge condition of the batteries inserted in the thermo logger to you. There also is a gear at the right at the very top. If you tap this when the measurement has stopped, the display will switch back to the already-familiar setting screen.
f) Recorded list
"Recorded list" shows all measured values recorded in the app. Tap the function. A list of all recordings opens. These recordings are displayed in chronological order and can be edited subsequently.
If you tap "Photo", you will be shown a small submenu. Select one of the options shown. Tap "Recording" to open the keyboard. You can then rename this measured value recording. Tap "Edit". You can now delete this measured value recording irrevocably.
If you want to view the recordings, tap the arrow on the right. A new display with the recorded measured values opens. At the very top, you can see the starting time and the starting date of the recording. Below it, there is a text field in which you can file notes.
The individual measured values are evident below. At the lower edge, you can choose between "CSV" (table view) and "Evaluation" (graphical view).
The graphical view permits scrolling and elongating or compressing the measured result as desired, just as is common on mobile end devices. If you select "Divide" at the upper right, a small submenu will be opened. You can send the results of the measurements, e.g. by email, here. Use the display and the possibility of your mobile end device for orientation.
g) Sleep mode
The function "Sleep mode" controls deactivation of the display in your mobile end device. If sleep mode is off, the display will switch off according to the settings in your mobile end device. If sleep mode is on, the display of the mobile end device is not switched off.
12. Maintenance and Cleaning
Apart from occasionally changing the batteries, the product is maintenance free for you; do not dismantle it.
Clean the product with care, e.g. with a soft, clean cloth. Do not push on the display too much; this will not only cause scratches but may also damage the display.
You can use a rag moistened with water and a little mild detergent for cleaning the temperature sensors.
Never put the thermo logger entirely in or under water. Also never clean the thermo logger in a dishwasher.
The product will be destroyed. Loss of warranty/guarantee!
Do not use any aggressive cleaning agents for cleaning, or even chemicals; this may cause not only discolouration but also damage to the product.
a) General
Electronic devices are recyclable and should not be disposed of in household waste.
end of its service life, dispose of the product accord ing to the relevant statutory regulations.
Remove any inserted batteries/rechargeable batteries and dispose of them separately from the product.
b) Batteries and Rechargeable Batteries
You as the end user are required by law (Battery Ordinance) to return all used batteries and rechargeable batteries. Disposing of them in the household waste is prohibited.
Batteries and rechargeable batteries containing hazardous substances are marked with the adjacent symbol to indicate that disposal in the household waste is prohibited.
You may return used batteries/rechargeable batteries free of charge at the official collection points in your community, in our stores, or wherever batteries/rechargeable batteries are sold!
You thus fulfil your statutory obligations and contribute to the protection of the environment.
14. Declaration of Conformity (DOC)
Conrad Electronic SE, Klaus-Conrad-Straße 1, D-92240 Hirschau, hereby declares that this product complies with directive 2014/53/EU.
The complete text of the EU declaration of conformity is available under the following web address:
www.conrad.com/downloads
Choose a language by clicking a flag symbol and enter the item number of the product into the search field; then you may download the EU declaration of conformity in the PDF format.
15. Technical Data
| Item no. 1486096 | 1486097 | |
| Power-supply | 2 AA/mignon batteries | |
| Measurement range | -50 °C to +70 °C -40 °C to +300 °C | |
| Resolution 0.1 °C | ||
| Accuracy -50 °C to -20 °C:+/- 3 °C | -40 °C to -30 °C:+/- 3 °C | |
| -20 °C to 0 °C:+/- 2 °C | -30 °C to -18 °C:+/- 2 °C | |
| 0 °C to 50 °C:+/- 1 °C | -18 °C to 100 °C:+/- 1 °C | |
| 50 °C to 70 °C:+/- 2 °C | 100 °C to 200 °C:+/- 2 °C | |
| Accuracy 200 °C to 250 °C: | +/- 3 °C | |
| Length of the sensor cable | approx. 800 mm | |
| Software pre-requisites iOS | at least 7.1 | |
| Software prerequisites Android | at least 4.3 | |
| Number of measured data | 14400 | |
| Radio transmission | Bluetooth ®4.0 | |
| Radio range max. | 30 m in the free field (much lower in buildings) | |
| Ambience conditions | 0 °C to +40 °C, humidity 10% to 90%, non-condensing | |
| Storage conditions | -20 °C to +60 °C, humidity 10% to 95%, non-condensing | |
| Dimensions meter | 74 x 74 x 20 mm (L x W x H) | |
| Weight with sensor | approx. 70 g (without batteries) | |
Page
Cher client, chère cliente,
France (email): technique@conrad-france.fr
Suisse:
www.conrad.ch
www.biz-conrad.ch
2. Explication des symboles

text_image
QR code image containing encoded data, no visible human-readable text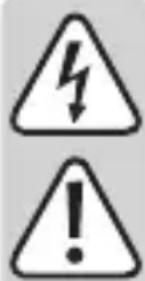
text_image
Two triangular warning symbols: a lightning bolt and an exclamation mark, commonly used in safety or hazard prevention contexts.text_image
Two triangular warning symbols: a lightning bolt and an exclamation mark, commonly used in safety or hazard prevention contexts.text_image
Cancel Device to Pair A0198 Press and hold the Pairing button on the Device for 5 seconds. Select the Device from the list below to initiate the pairing process BTL_94A4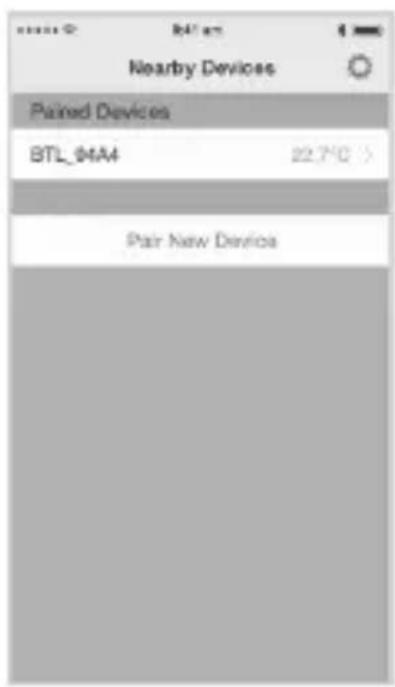
text_image
Nearby Devices Paired Devices BTL_04A4 22.750 Pair New DeviceFigure 4
c) Réglages de base
text_image
Back BTL_94A4 Recovery 25.5 °C Set your parameters before start Previous Set Experiment_3 Free Start: System port Start BTL_94A4 Done Temperature Alert > Sampling Interval TEMP Sampling Interval Section 3 > Section Sampling Interval -18°C - 21°C 00:01 21°C - 21°C 00:01 21°C - 21°C 00:01 Working Period 00:10:00 Recorded list 3 > App SleepFigure 5
text_image
BTL_94A4 Done Temperature Alert Sampling Interval SPAP Sampling Interval Section 3 > Section Sampling Interval -18°C - 21°C 00:01 21°C - 21°C 00:01 21°C - 21°C 00:01 Working Period 90.10.00 Recorded Int 3 > App SleepFigure 6
text_image
011 91AA Done Temperature Alert Sampling Interval TEMP Sampling Interval Section 3 Section Sampling Interval -18° The battery level maybe not 21° enough for this working 21° period 201 OK Working Period 00:10:00 Recorded list 3 App SleepFigure 7
www.conrad.com/downloads
text_image
QR code image containing encoded data, no visible human-readable text
text_image
Two triangular warning symbols: a lightning bolt and an exclamation mark, commonly used in safety or hazard prevention contexts.text_image
Two triangular warning symbols: a lightning bolt and an exclamation mark, commonly used in safety or hazard prevention contexts.text_image
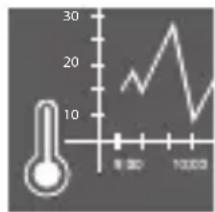
Thermometer and line chart showing temperature reading over time with a rising graph trendtext_image
Cancel Device to Pair Press and hold the Pairing button on the Device for 5 seconds. Select the Device from the list below to initiate the pairing process BTL_94A4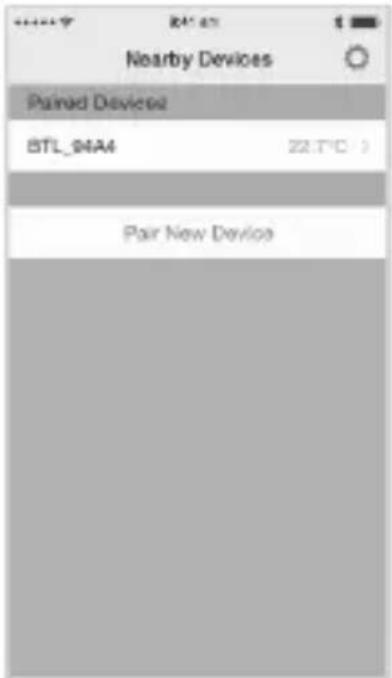
text_image
Nearby Devices Paired Devices BTL_04A4 22.7°C Pair New DeviceAfbeelding 4
c) Basisinstellingen
text_image
BTL_94A4 25.5 °C Previous Set Set your parameters before start Previous Set Experiment_L6 Down STARS (down) to start Start BTL_94A4 Done Temperature Alert Sampling Interval TEMP Sampling Interval Section Section Sampling Interval -18°C - 21°C 00:01 21°C - 21°C 00:01 21°C - 21°C 00:01 Working Period 90:10:03 Recorded list S > App SleepAfbeelding 5
text_image
BTL_9444 Temperature Alert Sampling Interval Sampling Interval Section Section Sampling Interval -18°C - 21°C 31°C - 21°C 31°C - 21°C Working Period Recorded list App SleepAfbeelding 6
text_image
BTL_34A4 Done Temperature Alert Sampling Interval TEMP Sampling Interval Section 1 > Section Sampling Interval -18° X:01 21° X:01 21° OK Working Period 00:10:00 Recorded list 3 > App SleepAfbeelding 7
www.conrad.com/downloads
Copyright 2016 by Conrad Electronic SE.

This is a publication by Conrad Electronic SE, Klaus-Conrad-Str. 1, D-92240 Hirschau (www.conrad.com).
All rights including translation reserved. Reproduction by any method, e.g. photocopy, microfilming, or the capture in electronic data processing systems require the prior written approval by the editor. Reprinting, also in part, is prohibited. This publication represents the technical status at the time of printing.
Copyright 2016 by Conrad Electronic SE.

Copyright 2016 by Conrad Electronic SE.

Copyright 2016 by Conrad Electronic SE.