
RT175 - Welding machine RIDGID - Free user manual and instructions
Find the device manual for free RT175 RIDGID in PDF.

| Product Type | Electric Soldering Tool |
| Brand | RIDGID |
| Model | RT175 |
| Supply Voltage | 115 V / 15 A |
| Useful Power (no-load voltage) | High: 7 V, Low: 6.2 V |
| Current Draw | 13.5 A (low position) / 15.0 A (high position) |
| Duty Cycle | Continuous |
| Maximum Pipe Capacity | 3 inches |
| Tool Cable Length | 136 inches |
| Power Cord Length | 98 inches |
| Weight | 32 pounds |
| Case Dimensions (H x W x D) | 6 x 17 x 11 inches |
| Soldering Temperature | >750 °F |
| Recommended Use | Soldering copper pipes |
| Compatible Solder Types | 50/50 to 95/5 (lead and lead-free) |
| Maintenance | Replacement of carbon tips and threaded studs |
| Included Accessories | Carbon tips (ref. 39966), threaded studs (ref. 39976) |
| Warranty | Lifetime warranty (perpetual) |
| After-Sales Service | RIDGID authorized service center - contact (800) 519-3456 |
Frequently Asked Questions - RT175 RIDGID
User questions about RT175 RIDGID
0 question about this device. Answer the ones you know or ask your own.
Ask a new question about this device
Download the instructions for your Welding machine in PDF format for free! Find your manual RT175 - RIDGID and take your electronic device back in hand. On this page are published all the documents necessary for the use of your device. RT175 by RIDGID.
USER MANUAL RT175 RIDGID
Electric Soldering Gun
OPERATOR'S MANUAL
- Français - 9
Castellano - pag. 19

WARNING!
Read this Operator's Manual carefully before using this tool. Failure to understand and follow the contents of this manual may result in electrical shock, fire and/or serious personal injury.
Table of Contents
Recording Form for Machine Serial Number 1
General Safety Information
Work Area Safety 2
Electrical Safety 2
Personal Safety 2
Tool Use and Care 2
Service 3
Specific Safety Information
Tool Safety 3
Description and Specifications
Description 3
Specifications 3
Tool Inspection 5
Tool and Work Area Set-Up 5
Operating Instructions 5
Maintenance Instructions
Carbon Tip Replacement 7
Accessories 7
Tool Storage 7
Service and Repair 8
Wiring Diagram 8
Lifetime Warranty . Back Cover
Model RT-175 Electric Soldering Gun

| RT-175 Electric Soldering Gun | |
| Record Serial Number below and retain product serial number which is located on nameplate. | |
| Serial No. | |
General Safety Information
WARNING! Read and understand all instructions. Failure to follow all instructions listed below may result in electric shock, fire, and/or serious personal injury.
SAVE THESE INSTRUCTIONS!
Work Area Safety
- Keep your work area clean and well lit. Cluttered benches and dark areas invite accidents.
- Do not operate tools in explosive atmospheres, such as in the presence of flammable liquids, gases, or dust. Electrical switches may create sparks which may ignite the dust or fumes.
- Keep by-standers, children, and visitors away while operating an electric soldering gun. Distractions can cause you to lose control.
Electrical Safety
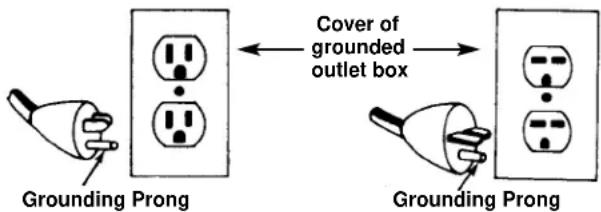
- Grounded tools must be plugged into an outlet, properly installed and grounded in accordance with all codes and ordinances. Never remove the grounding prong or modify the plug in any way. Do not use any adapter plugs. Check with a qualified electrician if you are in doubt as to whether the outlet is properly grounded. If the tool should electrically malfunction or break down, grounding provides a low resistance path to carry electricity away from the user.
- Avoid body contact with grounded surfaces such as pipes, radiators, ranges and refrigerators. There is an increased risk of electrical shock if your body is grounded.
- Do not expose power tools to rain or wet conditions. Water entering a tool will increase the risk of electrical shock.
-
Do not abuse cord. Never use the cord to carry the tools or pull the plug from an outlet. Keep cord away from heat, oil, sharp edges or moving parts. Replace damaged cords immediately. Damaged cords increase the risk of electrical shock.
-
When operating an electrical tool outside, use an outdoor extension cord marked "W-A" or "W". These cords are rated for outdoor use and reduce the risk of electrical shock.
- Use only three-wire extension cords which have three-prong grounding plugs and three-pole receptacles which accept the tool's plug. Use of other extension cords will not ground the tool and increase the risk of electrical shock.
- Use proper extension cords. (See Chart) Insufficient conductor size will cause excessive voltage drop, loss of power and overheating.
| Minimum Wire Gauge for Extension Cord | |
| Nameplate Amps | Total Length (in feet) |
| 0 - 25 26 - 50 51 - 100 | |
| 0 - 6 18 | AWG 16 AWG 16 AWG |
| 6 - 10 18 | AWG 16 AWG 14 AWG |
| 10 - 12 16 | AWG 16 AWG 14 AWG |
| 12 - 16 14 | AWG 12 AWG |
- Keep all electric connections dry and off the ground. Do not touch plugs or tool with wet hands. Reduces the risk of electrical shock.
Personal Safety
- Stay alert, watch what you are doing and use common sense when operating a power tool. Do not use tool while tired or under the influence of drugs, alcohol, or medications. A moment of inattention while operating tools may result in serious personal injury.
- Dress properly. Do not wear loose clothing or jewelry. Contain long hair. Keep your hair, clothing, and gloves away from moving parts. Loose clothes, jewelry, or long hair can be caught in moving parts.
- Avoid accidental starting. Be sure switch is OFF before plugging in. Carrying tools with your finger on the switch or plugging tools in that have the switch ON invites accidents.
- Do not overreach. Keep proper footing and balance at all times. Proper footing and balance enables better control of the tool in unexpected situations.
- Use safety equipment. Always wear eye protection. Dust mask, non-skid safety shoes, hard hat, or hearing protection must be used for appropriate conditions.
Tool Use and Care
- Do not use tool if switch does not turn it ON or
OFF. Any tool that cannot be controlled with the switch is dangerous and must be repaired.
- Store idle tools out of the reach of children and other untrained persons. Tools are dangerous in the hands of untrained users.
- Maintain tools with care. Properly maintained tools are less likely to cause injury.
- Check for breakage of parts and any other condition that may affect the tool's operation. If damaged, have the tool serviced before using. Many accidents are caused by poorly maintained tools.
- Use only accessories that are recommended by the manufacturer for your model. Accessories that may be suitable for one tool may become hazardous when used on another tool.
- Inspect tool and extension cords periodically and replace if damaged. Damaged cords increase the risk of electrical shock.
- Keep handles dry and clean; free from oil and grease. Allows for better control of the tool.
- Check electrodes for wear and replace before the threaded studs show. Prevents electrical arcing and excessive current draw.
Service
- Tool service must be performed only by qualified repair personnel. Service or maintenance performed by unqualified repair personnel could result in injury.
- When servicing a tool, use only identical replacement parts. Follow instructions in the Maintenance Section of this manual. Use of unauthorized parts or failure to follow Maintenance Instructions may create a risk of electrical shock or injury.
- Disconnect all power from the unit before servicing. Eliminates the risk of electrical shock and accidental starting.
Specific Safety Information
WARNING
Read this operator's manual carefully before using the Electric Soldering Gun. Failure to understand and follow the contents of this manual may result in electrical shock, fire and/or serious personal injury.
Call the Ridge Tool Company, Technical Service Department at (800) 519-3456 if you have any questions.
Tool Safety
- Tool is made to solder copper pipe. Follow instructions on proper use. Other uses may increase the risk of injury.
- Do not leave the unit unattended. Such preventive measures reduce the risk of injury or fire.
- Do not touch solder gun sleeves or carbon tips. They remain hot after use.
- Do not operate unit with the electrical box cover removed. Exposure to internal parts increases the risk of electrical shock.
- Use soldering sleeves and carbon tips provided with unit. Incorrect carbon tips or sleeves may result in overheating of the wires.
- Keep soldering sleeves away from combustible materials or articles that can be damaged by heat. Soldering sleeves and carbon tips remain hot after use.
- Do not solder near combustible materials. Copper pipe and soldering sleeves reach temperatures that can result in fire.
- Do not store the handle in the case until the carbon tips have cooled. They may burn the cord or solder gun cable.
- Do not clamp or touch threaded studs or stainless steel sleeves against pipe or fittings. Prevents electrical arcing and excessive current draw that may kick out circuit breaker.
Description, Specifications and Standard Equipment
Description
The RT-175 Electric Soldering Gun is capable of soldering joints in copper tube up to 3^ diameter while using a standard 110V, 15A circuit. The soldering gun will heat copper to temperatures in excess of 750^ which allows it to successfully melt solders used in plumbing applications - from the 50/50 solders to the 95/5 lead-free types.
Specifications
Power Input 115 V, 15 A
Power Output (open circuit voltage)
$$ \mathrm {H i} = 7. 0 \mathrm {V}, \mathrm {L o w} = 6. 2 \mathrm {V} $$
Current Draw. 13.5A @ Low Setting
15.0A @ High Setting
Duty Cycle.Continuous
Tube Capacity Up To 3"
Solder Gun
Cable Length. 136
Power Cord Length. 98
Weight 32 Lbs.
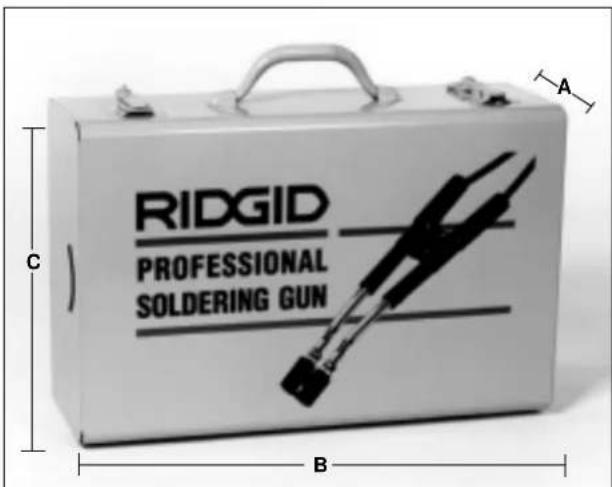
Figure 1 - Soldering Gun Case Dimensions
Height
(A-See Figure 1)6
Length
(B-See Figure 1)......17"
Width
(C-See Figure 1)....11"
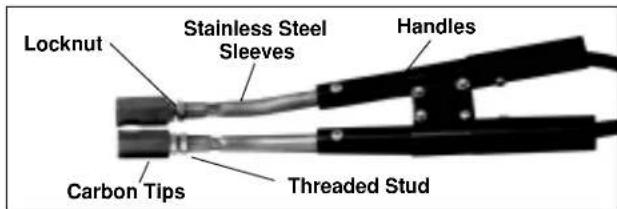
Figure 2b - RT-175 Handles and Carbon Tips
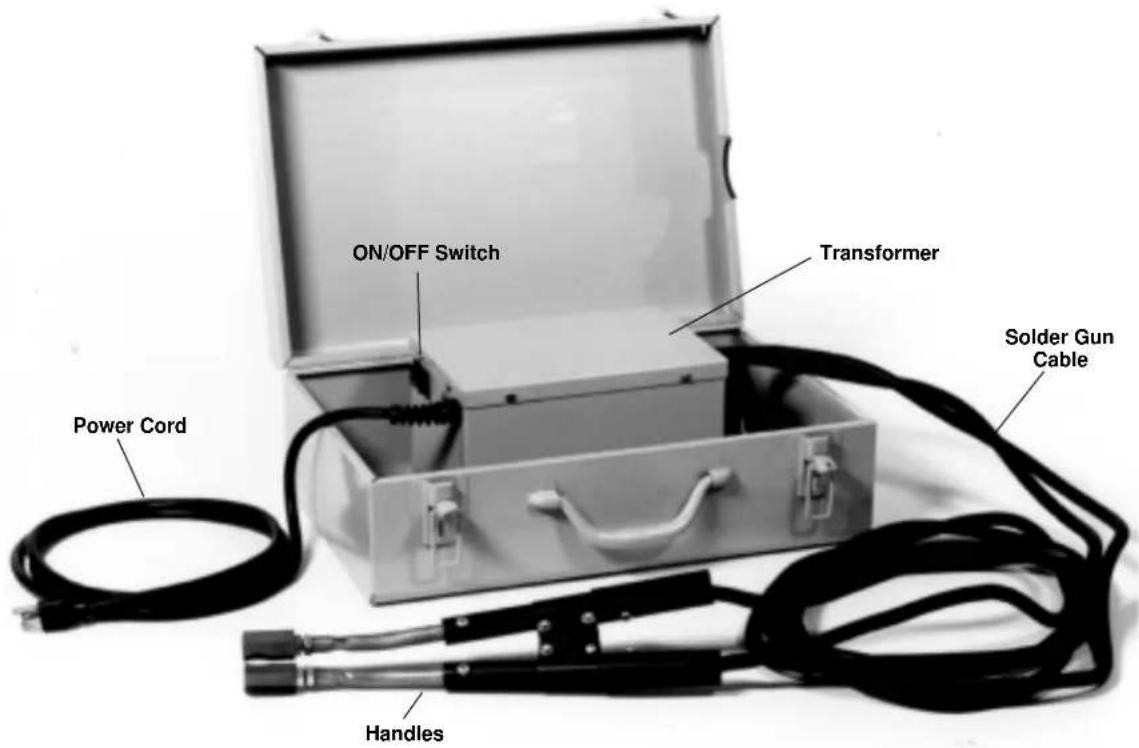
Figure 2a - RT-175 Soldering Gun
Tool Inspection
WARNING
To prevent serious injury, inspect your electric soldering gun. The following procedures should be followed.
- Make sure soldering gun is unplugged and the control switches are in the OFF position (Figure 2).
- Inspect the power cord and plug for damage. If the plug has been modified, is missing the grounding prong or if the cord is damaged, do not use the tool until the cord has been replaced.
- Inspect the cables and carbon tips for damage (Figure 2). If cable or tips are damaged, do not use the soldering gun until they are replaced. Only use soldering sleeves and carbon tips provided with the unit. Incorrect sleeves or tips may result in overheating of the wires.
- Clean any oil, grease or dirt from handles, controls and clamps.
- Inspect the soldering gun for any broken or missing parts as well as damage to the metal enclosure. If any of these conditions are present, do not use the tool until any problem has been repaired.
WARNING Do not operate unit with electrical box cover removed.
Tool and Work Area Set-Up
WARNING

To prevent serious injury, proper set-up of the tool and work area is required. The following procedures should be followed to set-up the Soldering Gun.
-
Check work area for:
-
Adequate lighting
-
15 Amp grounded electrical outlet.
- Clear path to the electrical outlet that does not contain any sources of heat or oil, sharp edges or moving parts that may damage electrical cord.
- Dry place for tool and operator. Do not use the tool while standing in water.
-
Flammable liquids, vapors, dust or any combustible materials that may ignite.
-
Position RT-175 Soldering Gun near the copper tubing that is to be soldered.
- Make sure ON/OFF switch is OFF and uncoil cable completely from carrying case.
- When plugging the Soldering Gun into the electrical outlet, making sure to position the power cord along the clear path selected earlier. If the power cord does not reach the outlet, use an extension cord in good condition.
WARNING To avoid electric shock and electrical fires, never use an extension cord that is damaged or does not meet the following requirements:
- The cord has a three-prong plug similar to shown in Electrical Safety section.
- The cord is rated as "W" or "W-A" if being used outdoors.
- The cord has sufficient wire thickness (14 AWG below 25^ / 12 AWG 25 - 50^ ). If the wire thickness is too small, the cord may overheat, melting the cord's insulation or causing nearby objects to ignite.
AWARNING To reduce risk of electrical shock, keep all electrical connections dry and off the ground. Do not touch plug with wet hands.
Operating Instructions
WARNING
To reduce risk of electrical shock, keep all electrical connections dry and off the ground. Do not touch plug with wet hands.
Carbon tips and sleeves become hot during use. Avoid contact with skin as burns can result.
Keep carbon tips and sleeves away from combustible materials or articles that can be damaged by heat.
Do not leave the unit unattended while in use.
- Make sure unit is turned OFF. Plug unit into a grounded 15 amp outlet making sure to position the power cord along the clear path selected earlier.
- Thoroughly clean the copper tube and fitting and apply the flux (Figure 3).
NOTE! When using the RT-175, proper soldering techniques should be followed.
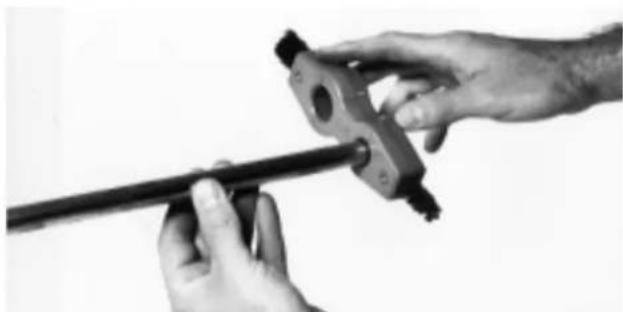
Figure 3 - Cleaning Copper Tube and Fittings
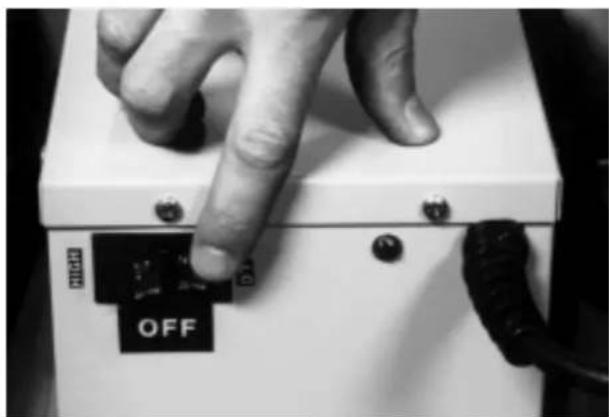
Figure 4 - Control Switch
- Turn the unit ON (Figure 4). Use the following guidelines for choosing between the HIGH and LOW settings:
LOW 3/8" - 1/2" 50/50 Soldering 3/8" - 1/2" 95/5 Soldering
HIGH 1/2" - 3" 50/50 Soldering
1/2" - 3" 95/5 Soldering
50' Maximum Extension Cord
NOTE! On HIGH setting, the maximum length of extension cord should be 50^
- Squeeze handles together to open the carbon tips to fit of the joint. Be sure to place the carbon tips over the joint to allow capillary effect to draw the solder into the solder cup of the fitting (Figure 5).
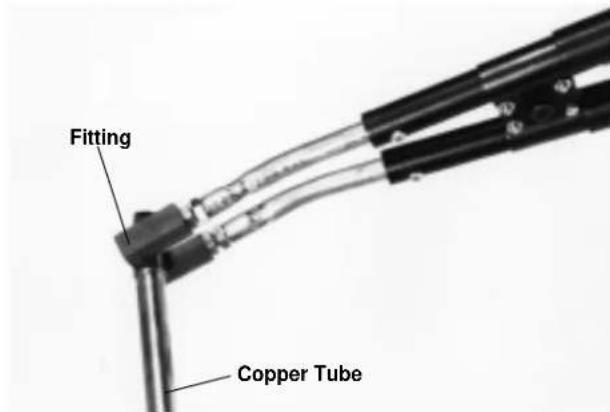
Figure 5 - Positioning Carbon Tips
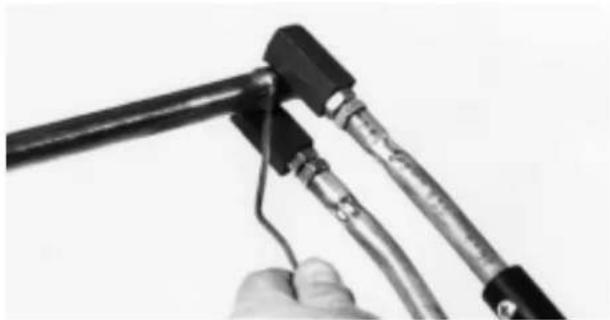
Figure 6 - Soldering Joint
- Hand solder wire at fitting lip until the solder begins to flow freely (Figure 6). When this occurs, squeeze handles and remove solder gun.
WARNING Do not overheat fitting.
WARNING Solder gun stainless steel sleeves and carbon tips remain hot. Do not touch. Do not lay on surfaces that may be damaged until sleeves and tips have cooled. - If the joint to be soldered is in a difficult to reach location, it is not necessary to clamp the carbon tips around the tube. The carbon tips only have to be in contact with the fitting (Figure 7).
WARNING Do not clamp or touch stainless steel sleeves, threaded studs or lock nuts against the tube or fittings. If this happens, electrical arcing or excessive current draw may occur, kicking out the circuit breaker. - Switch the unit OFF when not in use.
WARNING Do not store the handle in the case until it has cooled. They can damage the power cord or solder gun cables if they are too hot.

Figure 7 - Soldering with Carbon Tips Contacting Fitting
Maintenance
WARNING Make sure unit is unplugged from power source before performing maintenance or repairs.
CAUTION The carbon tips are brittle. Care should be taken when handling them. Do not over-torque and use wrenches only when needed - otherwise, make everything "finger tight".
Carbon Tip Replacement
The carbon tips will wear down as the RT-175 is used. They should be inspected before each use and replaced before the threaded studs begin to show through.
- Unplug the RT-175.
- Hold the lock nut and back-off the carbon tip by turning it counter-clockwise (Figure 8).
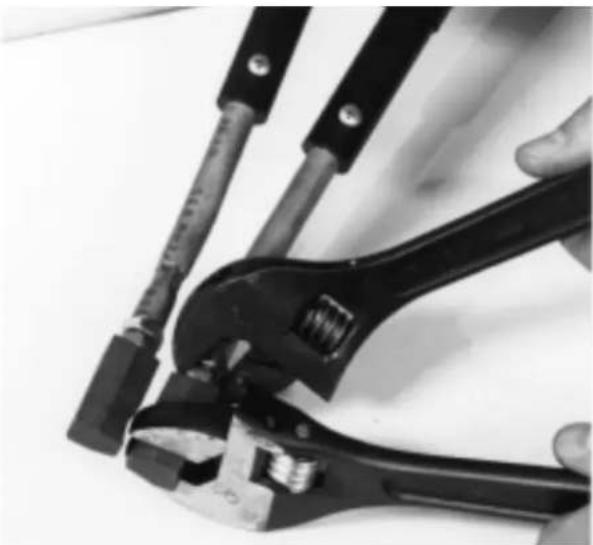
Figure 8 - Removing Carbon Tips
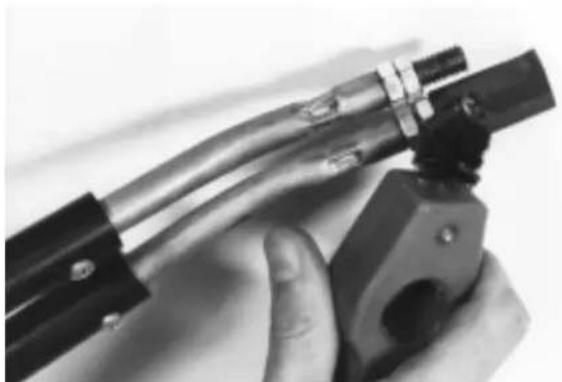
Figure 9 - Cleaning Threaded Stud
- Clean threads of the threaded stud with a wire brush to ensure good contact with the new carbon tips (Figure 9).Burned threaded studs will not produce good contact and will not heat properly. Replacement threaded studs are also available if they are damaged.
- Never apply torque to the insulated handles because you can crack the plastic material.
Accessories
Only the following RIDGID products have been designed to function with the RT-175 Electric Soldering Gun. Other accessories suitable for use with other tools may become hazardous when used on the RT-175. To prevent serious injury, use only the accessories listed below.
Catalog No.
Carbon Tips 39966
Threaded Studs 39976
Tool Storage
WARNING Electrical equipment must be kept indoors or well covered in rainy weather. Store the tool in a locked area that is out of reach of children and people unfamiliar with an Electric Soldering Gun. This tool can cause serious injury in the hands of untrained users.
Service and Repair
WARNING
Service and repair work on this tool must be performed by qualified repair personnel. Soldering unit should be taken to a RIDGID Independent Authorized Service Center or returned to the factory. All repairs made by Ridge service facilities are warranted against defects in material and workmanship.
WARNING When servicing this tool, only identical replacement parts should be used. Failure to follow these steps may create a risk of electrical shock or other serious injury.
If you have any questions regarding the service or repair of this machine, call or write to:
Ridge Tool Company
Technical Service Department
400 Clark Street
Elyria, Ohio 44035-6001
Tel: (800) 519-3456
E-mail: TechServices@ridgid.com
For name and address of your nearest Independent Authorized Service Center, contact the Ridge Tool Company at (800) 519-3456 or http://www.ridgid.com
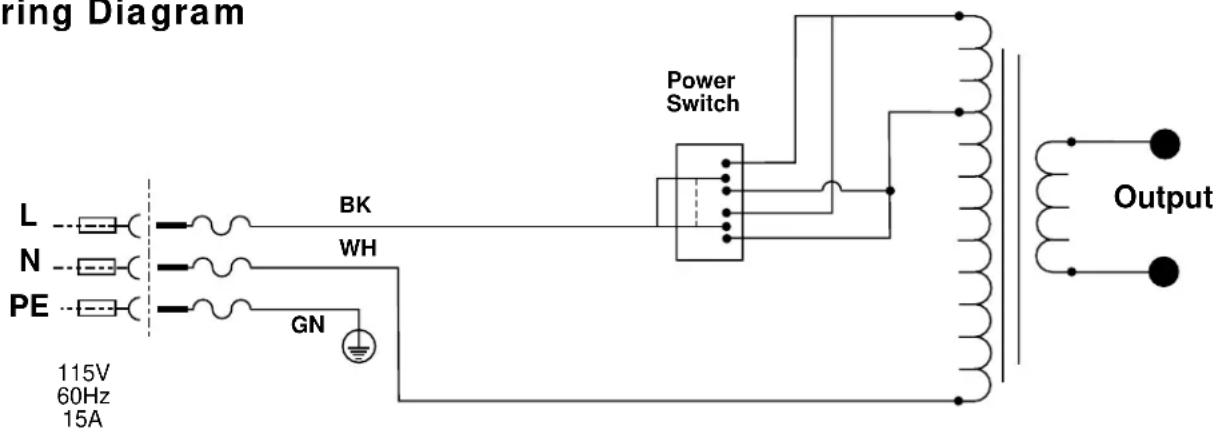
Wiring Diagram
CONSERVEZ CES INSTRUCTIONS!
Technical Service Department
400 Clark Street
Elyria, Ohio 44035-6001
Tel: (800) 519-3456
E-mail: TechServices@ridgid.com
Elyria, Ohio 44035-6001
RIDGID tools are warranted to be free of defects in workmanship and material.
How long coverage lasts
This warranty lasts for the lifetime of the RIDGID tool. Warranty coverage ends when the product becomes unusable for reasons other than defects in workmanship or material.
How you can get service
To obtain the benefit of this warranty, deliver via prepaid transportation the complete product to RIDGE TOOL COMPANY, Elyria, Ohio, or any authorized RIDGID ^ INDEPENDENT SERVICE CENTER. Pipe wrenches and other hand tools should be returned to the place of purchase.
What we will do to correct problems
Warranted products will be repaired or replaced, at RIDGE TOOL'S option, and returned at no charge; or, if after three attempts to repair or replace during the warranty period the product is still defective, you can elect to receive a full refund of your purchase price.
What is not covered
Failures due to misuse, abuse or normal wear and tear are not covered by this warranty. RIDGE TOOL shall not be responsible for any incidental or consequential damages.
How local law relates to the warranty
Some states do not allow the exclusion or limitation of incidental or consequential damages, so the above limitation or exclusion may not apply to you. This warranty gives you specific rights, and you may also have other rights, which vary, from state to state, province to province, or country to country.
No other express warranty applies
This FULL LIFETIME WARRANTY is the sole and exclusive warranty for RIDGID® products. No employee, agent, dealer, or other person is authorized to alter this warranty or make any other warranty on behalf of the RIDGE TOOL COMPANY.

Ce qui est couvert
Elyria, Ohio 44035-6001

Que cubre


- Electric Soldering Gun
- OPERATOR'S MANUAL
- WARNING!
- Table of Contents
- General Safety Information
- Specific Safety Information
- Description and Specifications
- Maintenance Instructions
- Model RT-175 Electric Soldering Gun
- SAVE THESE INSTRUCTIONS!
- Work Area Safety
- Electrical Safety
- Personal Safety
- Tool Use and Care
- Service
- WARNING
- Tool Safety
- Description, Specifications and Standard Equipment
- Description
- Specifications
- Tool Inspection
- Tool and Work Area Set-Up
- Operating Instructions
- Do not leave the unit unattended while in use.
- Maintenance
- Carbon Tip Replacement
- Accessories
- Tool Storage
- Service and Repair
- Wiring Diagram
- CONSERVEZ CES INSTRUCTIONS!
- How long coverage lasts
- How you can get service
- What we will do to correct problems
- What is not covered
- How local law relates to the warranty
- No other express warranty applies
- Ce qui est couvert
- Que cubre
Brand : RIDGID
Model : RT175
Category : Welding machine