iNDUS - Toilet THETFORD - Free user manual and instructions
Find the device manual for free iNDUS THETFORD in PDF.

| Product Type | Maceration toilet for leisure vehicles |
| Brand and model | Thetford iNDUS (i105-S) |
| Dimensions (H x W x D) - toilet module | 500 x 350 x 415 mm |
| Seat height | 485 mm |
| Weight - toilet module | 7.5 kg |
| Weight - discharge module | 1.7 kg |
| Weight - dosing module (without additives / with) | 1.1 kg / 4.7 kg |
| Power supply - toilet | 10-15 V DC, 10 A minimum |
| Power supply - tank module | 10.4-16.0 V DC, 20 A minimum |
| Max. switching current fresh water pump | 6 A |
| Black water tank capacity | 45 to 55 L depending on model |
| Grey water tank capacity | 10 to 120 L depending on model |
| Fresh water tank capacity (optional) | 150 L (model 210806-210807) or not available |
| Main functions | Flush with fresh water or recycled grey water, integrated macerator, automatic dosing of 3 additives, automatic discharge, control via Bluetooth app |
| Additives used | iNDUS GREY (grey water), iNDUS FLUSH (flush water), iNDUS BLACK (black water) |
| Connectivity | Bluetooth, iNDUS Thetford app (iOS and Android) |
| Regular maintenance | Weekly cleaning with Thetford products, full maintenance 2 times/year with iNDUS Cleaning & Storage |
| Winterization | Remove cartridges, empty tanks and use winterization mode |
| Safety | Disconnect before maintenance, wear gloves/goggles for additives, do not use wipes |
| Service and repairability | Thetford approved center, www.thetford.com, provide model and serial number |
| Warranty | See www.thetford.com for conditions |
| Disposal | Recyclable at collection center, do not dispose with household waste |
Frequently Asked Questions - iNDUS THETFORD
User questions about iNDUS THETFORD
0 question about this device. Answer the ones you know or ask your own.
Ask a new question about this device
Download the instructions for your Toilet in PDF format for free! Find your manual iNDUS - THETFORD and take your electronic device back in hand. On this page are published all the documents necessary for the use of your device. iNDUS by THETFORD.
USER MANUAL iNDUS THETFORD
1 Introduction....2
2 Safety....3
3 Overview....6
4 Before use....6
5 Use....8
6 Maintenance and cleaning....13
7 Disposal.... 17
8 Technical specifications....17
9 Service & questions....18
1. Introduction
General
This is the user manual for the Thetford iNDUS smart sanitation system.
Read the safety instructions and information on use and maintenance of the system carefully before continuing. This will enable you to use the system safely and efficiently. Retain this manual for future reference.
This document is version 210407/1223-V04 of the user manual. Please visit www.thetford.com for the most recent version.
Symbols
The following symbols may be used in this manual:

Warning. Risk of serious injury and/or damage.

Caution Risk of moderate injury and/or damage.

Attention. Important information.

Note. Additional information.

Video. Additional instruction video available.
2. Safety
General
The iNDUS system is an integrated domestic wastewater management system for leisure vehicles. It must not be used for any other purpose than the collection, storage, treatment, reuse and discharging of domestic wastewater produced by human habitation activities in the leisure vehicle.
Please read the safety instructions carefully before using the product.

Do not modify this product and its components, unless the modification is authorised by the manufacturer.
Children and vulnerable people

Risk of serious injury through cutting, clamping, skinburns, and eye irritation or damage to the product.
This product can be used by children aged 8 years or older and persons with reduced physical, sensory or mental capabilities and/or lack of experience and knowledge only if they are supervised or have been given instructions on the safe use of this product and understand the potential hazards.
- Do not allow children under 8 years of age to use the product without appropriate supervision.
■ Do not allow children to clean or maintain the product without supervision.
Use of the product

Risk of health issues or damage to the product.
■ Use this product only what it is intended for and not for anything else. Follow the instructions in this manual. The manufacturer cannot be held liable for damage resulting from improper use or incorrect setting of the controls. If the instructions have not been followed, warranty claims will not be accepted.
■ Never use wet wipes, moist toilet tissues or anything similar, even if it says it is safe to flush. Any wet wipe will block the product.
- Do not dispose any other than toilet paper into the toilet! Any other item (for example, ladies tampon, hair or cotton swab) will block the product.
- Do not empty if specific black water discharge rules or regulations indicate that it is not allowed. In that case, always use the discharge point for black water.
Use of the cartridges

Risk of health issues, injury, skin burns and eye irritation or damage to the product.
■ Refer to the hazard information and safety instructions on the cartridge label when handling the cartridges.
- Avoid contact with skin and eyes when replacing additive cartridges. It is recommended to wear protective gloves and eye protection.
■ Do not let any spills of additives come into the environment.
- Failure to use or improper use of the correct additive cartridges with iNDUS additives will void any warranty.
Maintenance and cleaning

Risk of serious injury through skin burns and eye irritations or damage to the product.
■ Always disconnect the product and its components from the power supply before performing any maintenance or cleaning work.
■ Human fecal wastewater contains substances that can be hazardous to your health, such as bacteria, viruses and fungi. Always treat fecal wastewater from human activities as hazardous liquid, and use appropriate personal protection equipment when performing work in areas contaminated by wastewater. Leakages of wastewater outside of the product should be cleaned up and disinfected promptly.
- Failure to use or improper use of the correct prescribed maintenance and cleaning products will void any warranty.
■ Always consult and follow the safety instructions on the label of the cleaning products.
■ Never use household cleaners. These may end up in the wastewater tanks and cause permanent damage to the seals and other components.
Servicing

Risk of serious injury through cutting and clamping or damage to the product.
■ All servicing must be carried out by an approved competent person.
■ Always disconnect the product and its components from the power supply before performing any service work.
Troubleshooting

Risk of serious injury through cutting and clamping or damage to the product.
■ Always disconnect the product and its components from the power supply before troubleshooting mechanical parts.
There is a serious injury risk when touching the sharp macerator knives located below the toilet bowl valve. The macerator is disabled when the bowl valve is open. Use extreme caution when removing obstructions out of the macerator house.
Storage

Risk of serious damage to the product due to frost.
■ Failure to drain or drain water tanks incorrectly can damage the product.
■ Do not forget to drain any non iNDUS water tanks.
3. Overview
The iNDUS system consists of the following components:
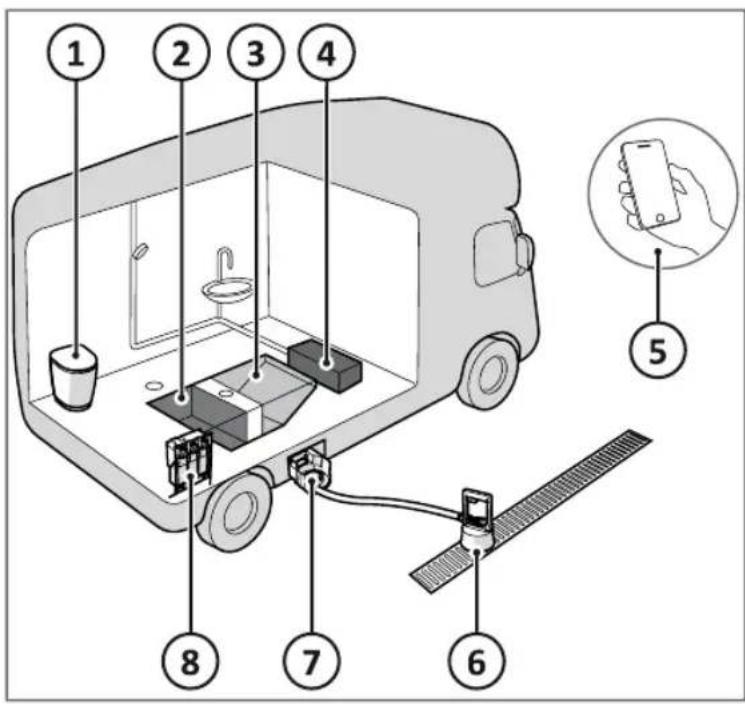
- Toilet
- Black water tank
- Grey water tank
- Fresh water tank (optional)
- Communication via Thetford app or vehicle board control
- Discharge device
- Discharge storage bin
- Dosing device with additive cartridges
System flow
Depending on the settings, the toilet is flushed with fresh or grey water. Toilet waste water goes to the black water tank. Additive from the corresponding three cartridges are added in the process. When the black or grey water tank is full, a notification will be visible in the communication app. The tanks can be emptied at a designated place with the aid of the discharge device.
4. Before use

Read the applicable instructions in the Safety chapter first.
Before using the product:
■ Prepare the dosing module.
■ Connect to the Thetford iNDUS app.
Prepare the dosing module
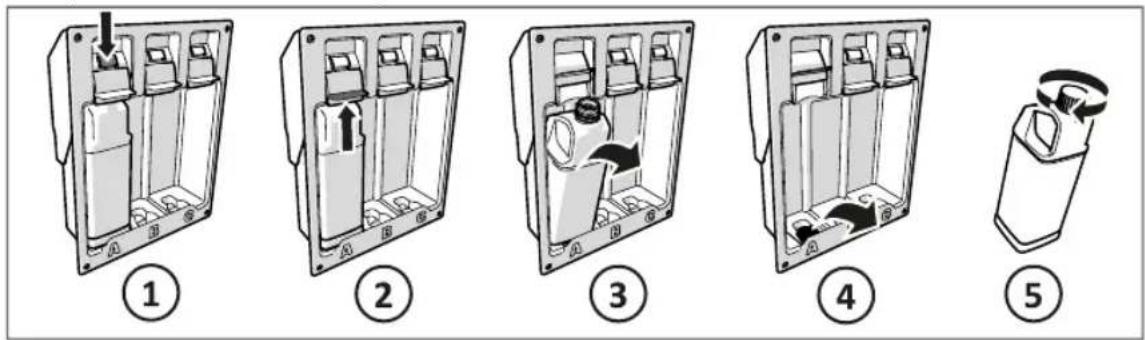
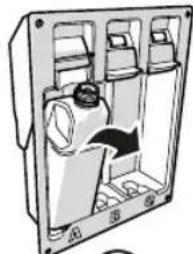
The dosing module contains three separate cartridges with additives:
A - iNDUS GREY; grey water additive.
B - iNDUS FLUSH; flush water additive.
C - iNDUS BLACK; black water additive.
The additives are automatically added based on the actual demand of the system. They each have their specific function and work synergistically with each other.

The additives work optimally at ambient temperatures between 0^ C and 45^ C.

Store the additive cartridges in a cool and dry place, out of direct sunlight, and at temperatures above 0^ C.

The additive cartridges are not interchangeable and cannot be refilled.
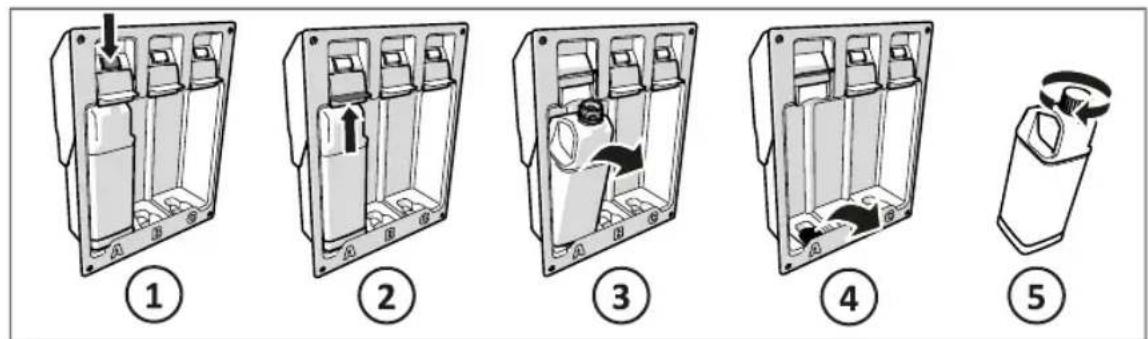
Place the additive cartridges in the correct sequence: A, B and C; refer to the corresponding symbols on the label.
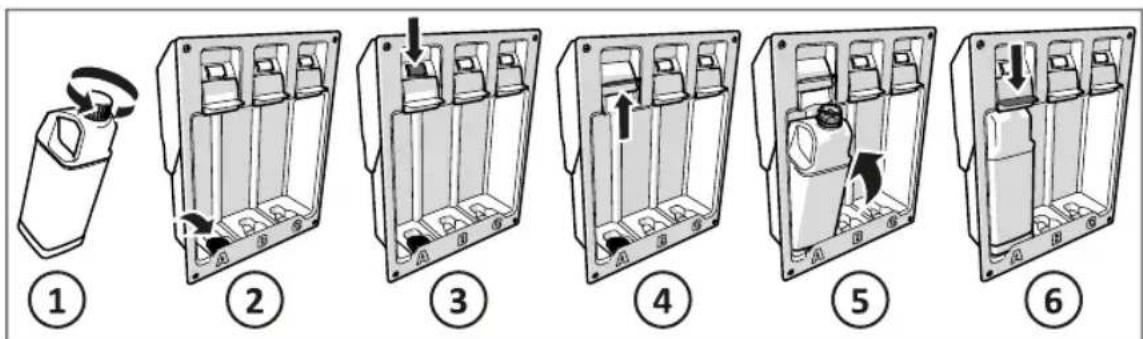
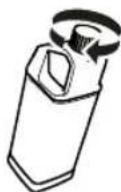
■ Push and turn the cap to open the additive cartridge (1).
■ Place the cap in the storage compartment in the additive cartridge holder (2).
■ Push the slide release button (3).
■ Lift the slide upwards to open (4).
■ Place the additive cartridge (5).
■ Push the slide down to close until you hear the click (6).

A blue light above the additive cartridge is OK, a red light is not OK.

Click here for more information on how to place the cartridges.
Connect to the Thetford iNDUS app
In order to get information on the additives- and tank levels the product needs to be connected to the Thetford iNDUS app on your smartphone.

■ Visit the Apple App Store (1) or Google Play Store (2) on your smartphone.
■ Search for Thetford iNDUS app (3).
■ Download and install the app.
■ Do not open the app yet.
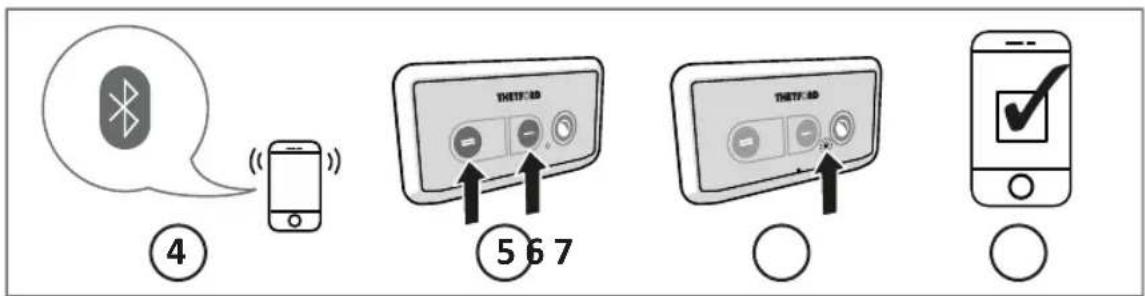
■ Turn on the Bluetooth connection on your smartphone (4).
■ Open the Thetford app and follow the steps up to the Setup connection screen.
■ Press and hold both flush buttons (5) simultaneously on the control panel of your toilet at least 5 seconds until the blue light (6) flashes.
■ Press Connect in the app to start pairing.
- When the pairing is complete, the app shows a message and the light on your toilet control panel turns blue for 10 seconds.
■ Finish the remaining setup steps in the app.
■ The Thetford app is now ready to use (7).

If pairing takes too long, try again.

It is only possible to pair one smartphone at the time.

Click here for more information on how to connect the app.
5. Use

Read the applicable instructions in the Safety chapter first.
Flush the toilet
The iNDUS toilet is a macerating toilet that is operated by means of a control panel. The control panel has three buttons:
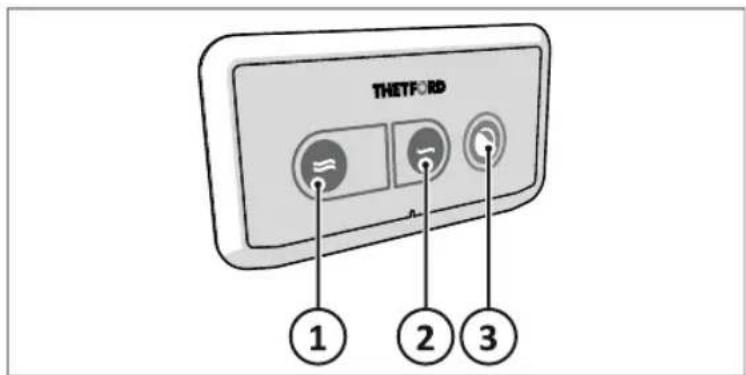
- Big flush
- Small flush
- Bowl valve open/close
EN

Use the Thetford app to adjust the settings regarding water consumption, flushing and night modus.
For daily use:
■ Flush the toilet using the button for big flush (1) or small flush (2).
■ When flushing, the bowl valve will open and close automatically.
■ After the bowl valve closes the macerator will be activated.

Preferably use the small flush to reduce water consumption.

To further reduce water consumption the system reuses the treated grey water for flushing the toilet. If the grey water level is insufficient, fresh water is used.
For quiet night time use:
■ Push the Bowl valve open/close button (3) to open the bowl valve.
■ Use the toilet.
■ Push the Bowl valve open/close button (3) again to close the bowl valve.
■ The macerator will not be activated, as long as the flush buttons are not used.

Use Thetford toilet paper to secure optimal system performance. Only if Thetford toilet paper is not available, temporarily use thin (single-ply) toilet paper.

Grey water contains small particles that are visible in the flushing water. This is normal.

Click here for more information on how to use the toilet.
Replace an additive cartridge
If an additive cartridges is empty, it must be replaced. Use the Thetford app for information on the additives level per cartridge, or look at the level through the additive cartridge in the cartridge holder.

If additive cartridge A & B are empty, the system only uses fresh water instead of grey water to flush.

Thetford advices to always have an extra set of additive cartridges with you when you go on holiday.
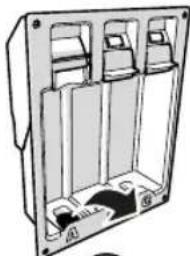
To replace an additive cartridge:
■ Push the slide release button (1).
■ Lift the slide (2).
■ Remove the additive cartridge (3).
■ Remove the cap from the storage compartment (4).
■ Place the cap on the additive cartridge (5.)
■ Place the new additive cartridge (refer to chapter Prepare the dosing module).

Dispose of empty additive cartridges in accordance with national regulations for plastic packaging.
In case of spilled additives:
■ Absorb large amounts of spilled additives with paper towels.
■ Clean up any remaining residue with warm water and a mild detergent.
■ Wash your hands with soap and water.

Do not eat or drink during cleaning up.
Discharge the tanks
The discharge devices automatically empties the black and grey water tank. First, the water from the toilet water tank is being pumped out by an automatic flush sequence. Then the black and grey water tank are emptied at once.
You can always discharge wastewater at discharge points for black water. In many cases it is also possible to discharge at a grey water discharge location, provided it is connected to the general sewerage infrastructure.

You can check the nearest discharge location via the Thetford app.
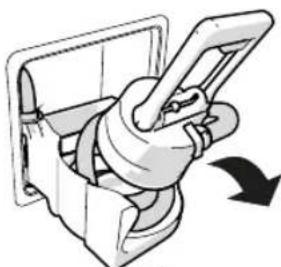
Preparation
EN
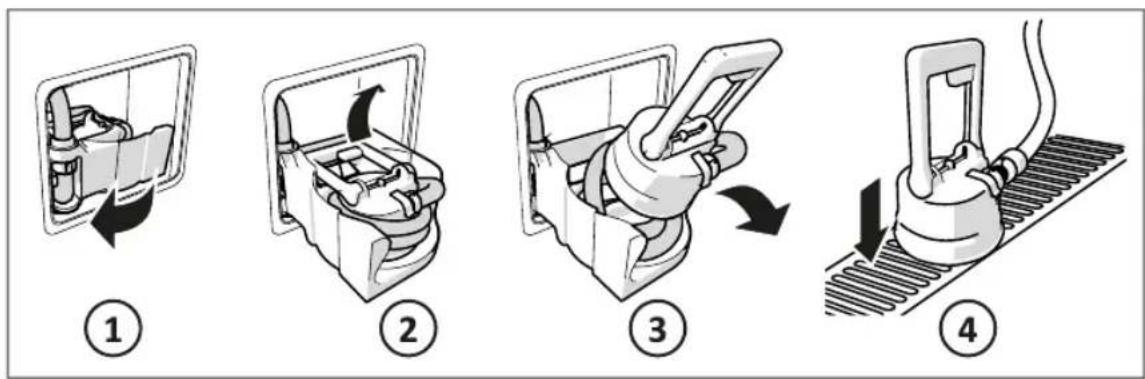
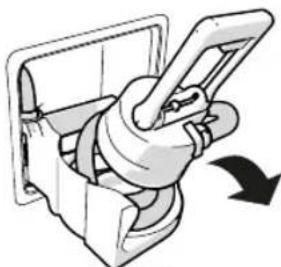
■ Open the service door and rotate the discharge module out of the storage location (1).
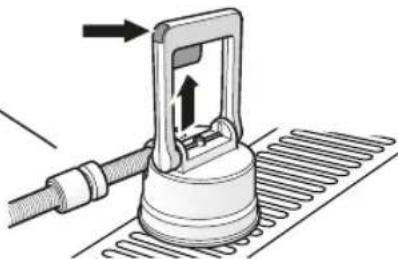
■ Pull the handle of the discharge device upwards (2).
■ Take the discharge device out of the discharge storage bin and unwind the hose (3).
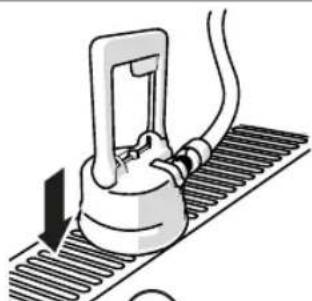
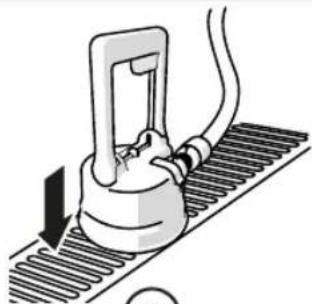
■ Place the discharge device directly above the grid of the discharge location (4).

If wastewater is spilled around the grid, rinse with fresh water and leave the discharge location tidy.
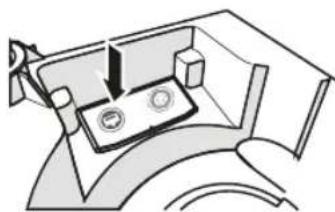
Discharge
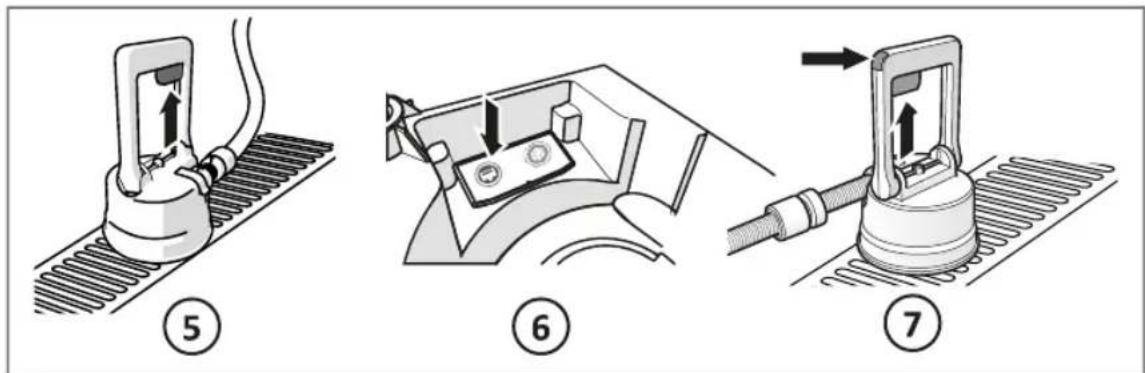
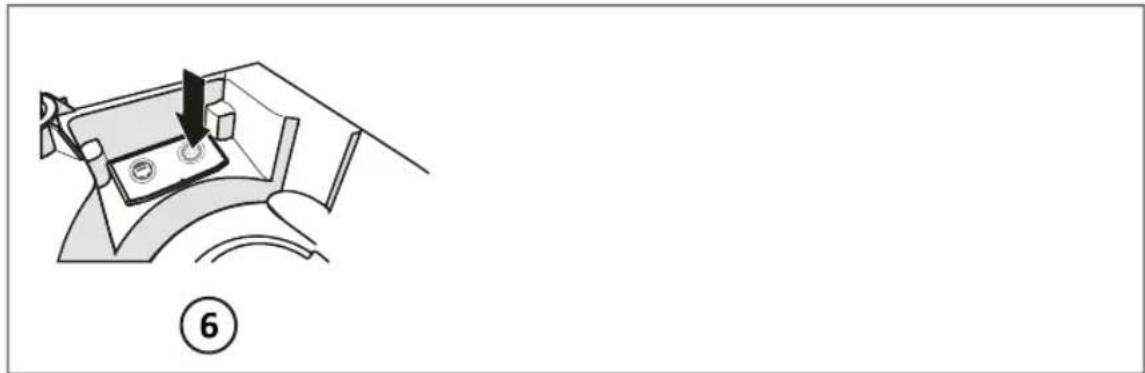
■ Press and release the knob in the handle (5).
■ The valve of the discharge device is open.
■ Push the discharge button on the control panel to start the discharge cycle (6). The light on the discharge control panel lights up blue.

To cancel the process, press the discharge button again.
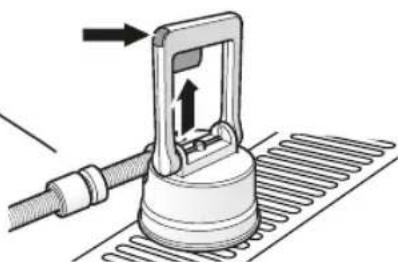
■ Wait for all the wastewater to be pumped out. The discharge cycle is complete when the blue light on the discharge control panel turns off.
■ To close the valve of the discharge device (7) depending on the version of the discharge device:
- Or press and release the knob in the handle.
- Or push the locking tab on top of the handle.
Completion
natural_image
Mechanical component diagram showing a lever mechanism with no visible text or symbols⑧
natural_image
Mechanical assembly diagram showing a motor or gear mechanism with no visible text or symbols⑨
natural_image
Diagram of a mechanical component with an arrow indicating rotation or force direction (no text or symbols)10
⑪
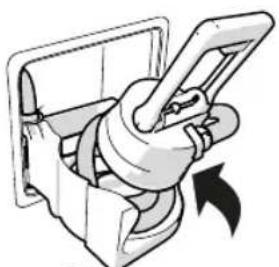
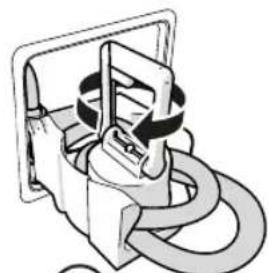
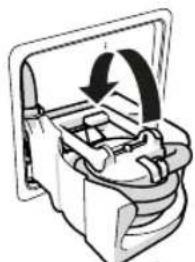
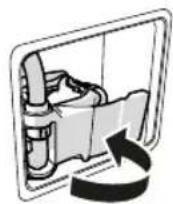
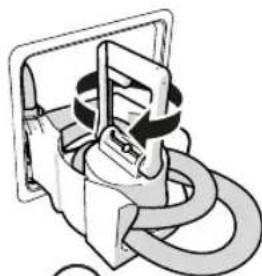
■ Place the discharge device back into the discharge storage bin (8).
■ Rotate the discharge device so that the hose wraps around it (9).
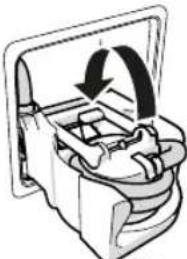
■ Fold the handle into the discharge storage bin (10).

The discharge handle can only be folded to one side. This should not require any force. If the handle cannot be folded at all, release the valve knob on the handle (7).
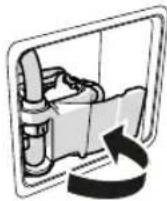
■ Rotate the discharge module inside the storage location and close the service door (11).

Click here for more information on how to discharge the system.
Optional: discharging to an iNDUS mobile holding tank
To be able to discharge, but not moving the vehicle to a discharge location, the iNDUS mobile holding tank is available. This tank has a volume of 19L.

The volume of the iNDUS mobile holding tank is much smaller than the volume of the grey and black wastewater tanks of the system. To empty the complete system, multiple discharge cycles must be done.
■ Prepare the discharge device (refer to steps 1, 2 and 3 of Discharge the tanks).
■ Place the holding tank on a flat surface.
EN
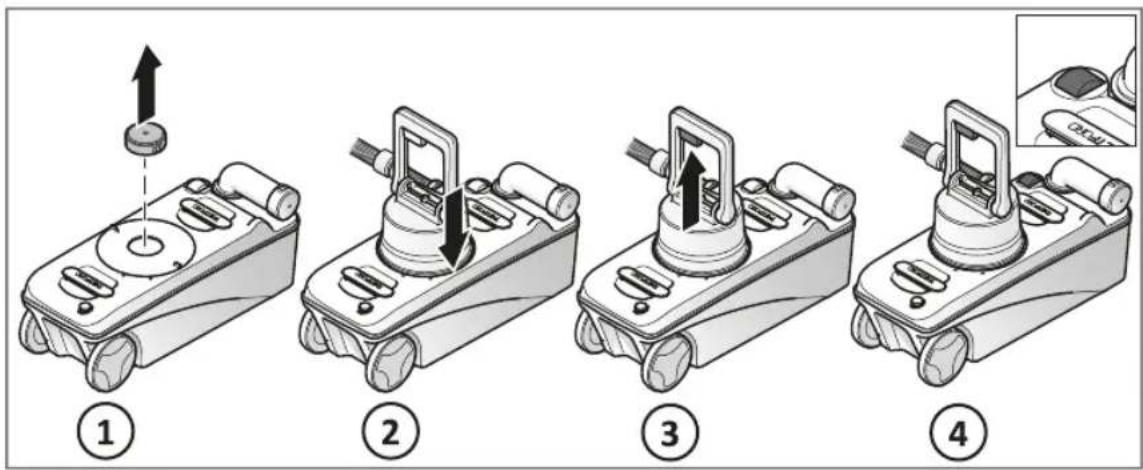
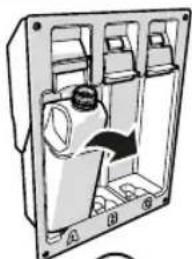
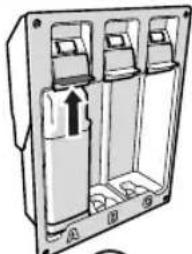
■ Remove the cap from the holding tank (1).
■ Place the discharge device directly on the opening of the holding tank (2).
■ Perform a normal discharge cycle. (refer to step 6 of Discharge the tanks) but, while holding the discharge device on the opening of the holding tank, press the discharge button using your other hand.
■ When the indicator on the holding tank turns red (4), press the discharge button again on the discharge control panel to stop the discharge process.

If you don't manually press the discharge button to stop, the discharge process will continue discharging, even when the mobile holding tank is full.

If wastewater is spilled around the tank, rinse with fresh water and leave the place tidy.
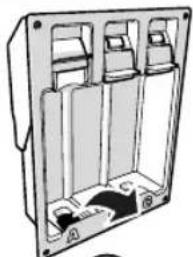
■ Remove the discharge device from the holding tank.
■ Place the cap on the holding tank.
■ Empty the holding tank at a designated location.
■ If necessary, repeat the discharge procedure until the tanks are completely discharged.
■ Store the discharge device back in the discharge storage bin (refer to steps 8, 9, 10 and 11 of Discharge the tanks).
■ Clean the holding tank by rinsing it with clean water.
■ Dry the outside with a cloth.
■ Leave the cap slightly open while storing to prevent mold.
6. Maintenance and cleaning

Read the applicable instructions in the Safety chapter first.
It is necessary to clean and maintain your product regularly to prevent limescale, ensure optimal hygiene and prolong the lifespan of the complete system.
Maintenance
Maintain the complete product at least two times a year, and before storage.
For maintenance of the system, use "iNDUS Cleaning & Storage". Refer to the bottle how to use this maintenance product.

Intervals are based on average use of 2 holidays of 3 weeks per year.
Cleaning
Clean the toilet and discharge device at least once a week.
Clean the toilet
■ Clean the inside of the bowl with "Thetford Toilet Bowl Cleaner" and a soft brush.
■ Clean the outside of the toilet with "Thetford Bathroom Cleaner".
Clean the discharge device
■ Remove the inset from the discharge device.
■ Clean the discharge device and the inset with water.
■ Dry with a soft cloth.
■ Place the inset back into the discharge device.
Storage
To protect the system from damage due to frost, remove the additive cartridges, discharge the water tanks, and drain all parts.
Remove the additive cartridges
For all three additive cartridges:
■ Push the slide release button (1).
■ Lift the slide (2).
■ Remove the additive cartridge (3).
■ Remove the cap from the storage compartment (4).
■ Place the cap on the additive cartridge (5).
■ Store in a frost free environment.

If you do not remove all the additive cartridges, the system cannot be winterized. A red light is displayed on the discharge control panel.
Discharge the black and grey water tanks
natural_image
Diagram of a mechanical device with a rotating component and directional arrow, labeled with number 6 (no text or symbols on the diagram itself)EN
■ Prepare the discharge device (refer to steps 1, 2, 3 and 4 of Discharge the tanks).
■ Perform a normal discharge cycle (refer to steps 5, 6 and 7 of Discharge the tanks) but now push the winter storage button (6) instead of the discharge button.
■ Store the discharge device back in the discharge storage bin (refer to steps 8, 9, 10 and 11 of Discharge the tanks).
Drain the water tanks
Any residual water in the tanks must be drained manually.
■ Open the access hatch in the floor.
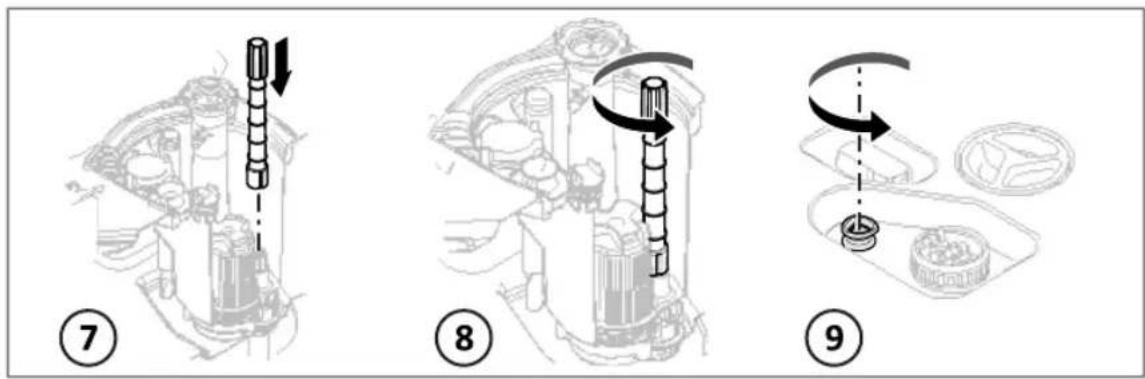
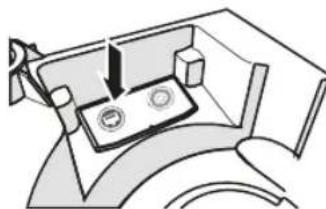
■ Place the drain stick onto the drain valve of the black water tank (7).
■ Open the drain valve by turning the stick counter-clockwise (8).
■ Repeat for the grey water tank.
If an iNDUS fresh water tank is installed: open the drain valve by turning the knob counter-clockwise (9).
■ Drain all the residual water from the tanks.
■ Leave the drain valves open.
■ Close the access hatch.
The system is now fully winterized.

Click here for more information on how to drain the tanks.
After storage
When using the system after storage:
■ Open the access hatch in the floor.
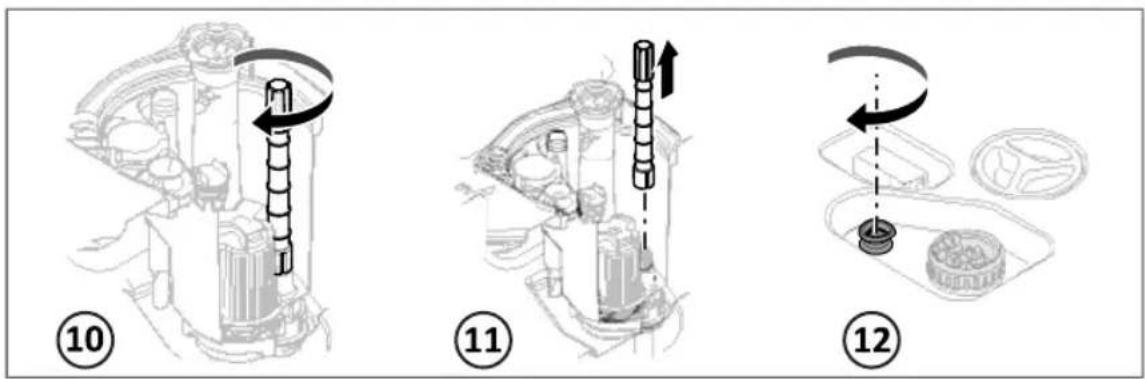
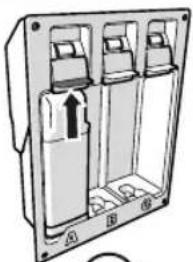
■ Close the drain valves of the black and grey water tank by turning the drain stick clockwise (10).
■ Remove the drain stick and store it (11).
■ If an iNDUS fresh water tank is installed: close the drain valve by turning the knob clockwise (12).
■ Close the access hatch.
■ Fill the fresh water tank.
■ Prepare the toilet again (refer to Prepare the dosing module).
■ Flush the toilet.

The first flush will have a delay of approximately 10 seconds.
The system is now ready to use again.
7. Disposal
When the system has reached the end of its life, it must be disposed of according to local regulations.
Environmental Protection
Discarded electric appliances are recyclable and should not be discarded in the domestic waste. Please actively support us in conserving resources and protecting the environment by returning this appliance to the collection centres (if available).
8. Technical specifications
Toilet module
| Model i105-S |
| Main dimensions (HxWxD) 500 x 350 x 415 mm |
| Seat height 485 mm |
| Weight 7.5 kg |
| Toilet placement Freestanding |
| Control panel dimensions (HxWxD) 68 x 125 x 35 mm |
| Operating voltage 10–15 V DC |
| Minimum power connection at rated voltage 10 A |
| Fresh water pump maximum switching current 6 A |
Discharge module
| Main dimensions (HxWxD) 200 x 240 x 340 mm |
| Main dimensions discharge device (HxDia) 275 x ø168 mm |
| Weight 1.7 kg |
Dosing module
| Main dimensions (HxWxD) 360 x 280 x 110 mm | |
| Weight without additives 1.1 kg | |
| Weight with additives 4.7 kg |
Tank module double floor models
| Model 210806 210807 210809 | |||
| Overflow volume black water tank 55 | 55 | 55 | | |||
| Overflow volume grey water tank 120 | 120 | 120 | | |||
| Overflow volume fresh water tank 150 | 150 | n.a. | |||
| Operating voltage 10,4 - | 16,0 V DC | 10,4 - 16,0 V DC | 10,4 - 16,0 V DC |
| Minimum power connection at rated voltage 20 A 20 | A 20 A |
Tank module single floor models
| Model 210808 | |
| Overflow volume black water tank | 45 l |
| Overflow volume grey water tank | 10 l |
| Overflow volume fresh water tank n.a. | |
| Operating voltage | 10,4 - 16,0 V DC |
| Minimum power connection at rated voltage | 20 A |
9. Service & questions

Read the applicable instructions in the Safety chapter first.
Service
Before starting any service work, disconnect the appliance from the electrical supply.
Troubleshooting
| Problem Possible cause Solution | ||
| An orange or red light is blinking on the toilet control panel. | Pairing did not succeed. Refer to the notifications in the Thetford app. | |
| There is an obstruction in the toilet bowl. | Open the toilet bowl valve by pressing the Bowl valve open/close button. Switch off the power of the central control board. Then try to remove the blockage | |
| An orange light is visible above the additive cartridge. | The additive cartridge is almost empty. | Be sure you have a replacement for this additive cartridge already available. |
| A red light is visible above the additive cartridge. | The additive cartridge is empty. | Replace this additive cartridge immediately. |
| The discharge control panel shows an orange light. | Warning, e.g. the tank temperature is below 0°C. | Refer to the notifications in the Thetford app. |
| The discharge control panel shows a red light. | Error in the system. Check if the discharge valve is open. Start the discharge cycle again. | |
| error message ‘can’t connect to iNDUS’. | Bluetooth is off. Turn bluetooth on.The Thetford app shows | |
| Pairing did not succeed. Connection is lost. | Try to pair, refer to Connect to the Thetford iNDUS app. | |
EN
| Problem Possible cause Solution | ||
| The flush water looks dirty. | Flushing with grey water. This is normal. Flushing with grey water gives particles in the flush water. | |
| Dirty dishes flushed down the sink. | Avoid flushing large and dirty parts through the sink or shower tray. | |
| The toilet does not flush. | The power is switched off. Switch on the power of the central control board of the vehicle. | |
| There is an obstruction in the toilet bowl. | Open the toilet bowl valve by pressing the Bowl valve open/close button. Switch off the power of the central control board. Then try to remove the blockage. | |
| The grey water tank is full and the function ‘flush with grey water’ is turned off. | Turn on ‘flush with grey water’ and try to flush again. | |
| Water is not flowing from the grey watertank. | The filter is clogged. Contact an authorised local Service Centre. | |
For more troubleshooting check the website www.thetford.com
Questions
If you have questions about your product, parts, accessories or authorised services visit www.thetford.com or use the service part in the Thetford app.
If you contact an authorised local Service Centre in your country, provide the details of the model and serial number plus the date of purchase.

Warranty
For our warranty clause, please refer to the conditions mentioned on www.thetford.com.
Declaration of Conformity
Thetford hereby declares that this product is in compliance with the essential requirements and other relevant provisions of the applicable Directives and Standards. A copy of the Declaration of Conformity can be found at www.thetford.com
natural_image
Mechanical assembly diagram showing a piston and housing component (no text or labels)②
natural_image
Mechanical component diagram showing a lever mechanism with a rotating arrow (no text or symbols)③
natural_image
Illustration of a mechanical device with a curved handle and threaded base, showing motion or assembly (no text or symbols)4
natural_image
Diagram of a mechanical device with a curved component and threaded base (no text or symbols)5
natural_image
Pure mechanical diagram showing a lever and base assembly without any text, numbers, or symbols⑥
natural_image
Diagram of a mechanical device with directional arrows indicating motion or force (no text or symbols present)⑦
natural_image
Mechanical device diagram showing a lever mechanism with an arrow indicating motion (no text or symbols)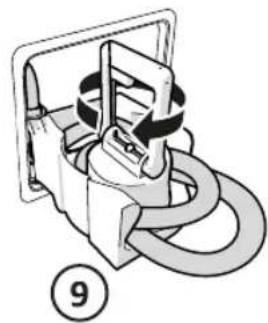
natural_image
Mechanical component diagram showing a curved pipe or spring assembly (no text or symbols)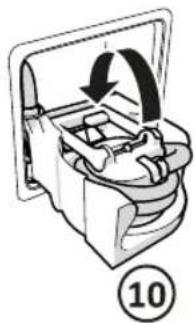
natural_image
Mechanical component diagram showing a rotating assembly with a numbered label (10) and directional arrow, no readable text or symbols.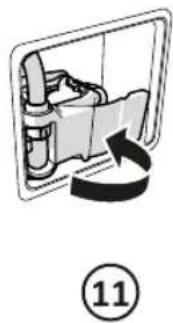
natural_image
Diagram of a car interior with a directional arrow indicating rotation, labeled with circled number 11 (no text or symbols on diagram itself)DE
natural_image
Diagram of a mechanical device with a lever and circular components, labeled with number 6 (no text or symbols on the diagram itself)FR
natural_image
Technical diagram of a three-segment electrical enclosure with mounting bracket (no text or symbols)①
natural_image
Diagram of a device casing with internal compartments and an upward arrow indicating motion (no text or symbols)②
natural_image
Diagram of a person seated inside a vehicle cabin with seats and equipment (no text or symbols visible)③
natural_image
Technical line drawing of a mechanical enclosure or enclosure with internal compartments and mounting holes (no text or symbols)④

⑤
natural_image
Mechanical assembly diagram showing a rotating component with an arrow indicating rotation (no text or labels)②
natural_image
Mechanical component diagram showing a rotating arm mechanism with directional arrow (no text or symbols)③
natural_image
Diagram of a mechanical device with a lever and base, showing motion or force direction (no text or symbols)④
natural_image
Diagram of a mechanical device with a curved component and threaded base (no text or symbols)⑤
natural_image
Pure mechanical diagram showing a component with two circular features, no text or symbols present⑥
natural_image
Diagram of a mechanical device with directional arrows indicating motion or force (no text or symbols present)⑦
natural_image
Mechanical assembly diagram showing a clamping mechanism with no visible text or symbols8
natural_image
Mechanical assembly diagram showing a clamping mechanism with no visible text or symbols⑨
natural_image
Mechanical component diagram showing a rotating mechanism with no visible text or symbols10
11
FR
natural_image
Technical line drawing of a three-pin electrical enclosure with mounting feet (no text or symbols)①
natural_image
Diagram of a three-pin electrical enclosure with labeled terminals A, B, and C (no text or symbols beyond labels)②
natural_image
Diagram of a vehicle interior showing seats and seatbelt (no text or labels)③
natural_image
Technical line drawing of a mechanical component with internal compartments and mounting holes (no text or symbols)④
5
natural_image
Diagram of a mechanical device with a downward arrow indicating force or movement (no text or symbols present)⑥
Thetford Italy c/o Tecma s.r.l.
Via Flaminia
Thetford Australia Pty. Ltd.
130-132 Freight Drive
Somerton VIC 3062
Australia
CHINA
Thetford China
Rm. 1207, Coastal Building
(East Block)
Haide 3rd Road, Nanshan District
Shenzen, 518054
China
T+46 31 336 35 80
F not available
E infos@thetford.eu
T+61393580700
F not available
E infoaus@thetford.com.au
www.thetford.com.au
T+86 755 8627 1393
F+8675586271673
E info@thetford.cn
www.thetford.cn
www.thetford.com
Copyright 2017-2023 Thetford B.V. All rights reserved.
692278/1223-V04
THETFORD

natural_image
Product display of a water purifier with three labeled bottles (A, B, C) and a gas stove, shown against a blue background (no text or symbols on main objects)USER MANUAL
WASTE WATER SYSTEMS
iNDUS SERIES
AT, AU, BE, DE, ES, FR, IT, LU, SE, SL, UK