
Heavy Duty HD0450S - Sewing machine SINGER - Free user manual and instructions
Find the device manual for free Heavy Duty HD0450S SINGER in PDF.

User questions about Heavy Duty HD0450S SINGER
0 question about this device. Answer the ones you know or ask your own.
Ask a new question about this device
Download the instructions for your Sewing machine in PDF format for free! Find your manual Heavy Duty HD0450S - SINGER and take your electronic device back in hand. On this page are published all the documents necessary for the use of your device. Heavy Duty HD0450S by SINGER.
USER MANUAL Heavy Duty HD0450S SINGER
natural_image
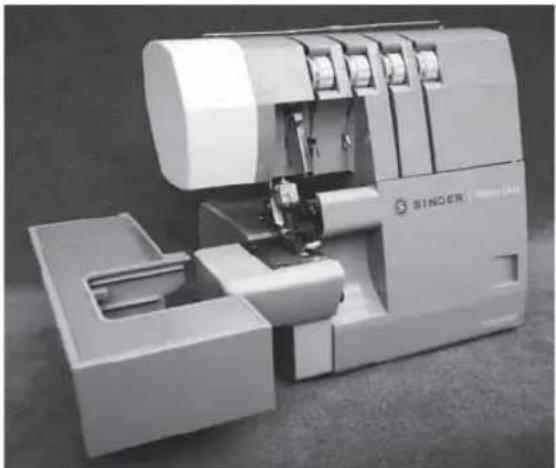
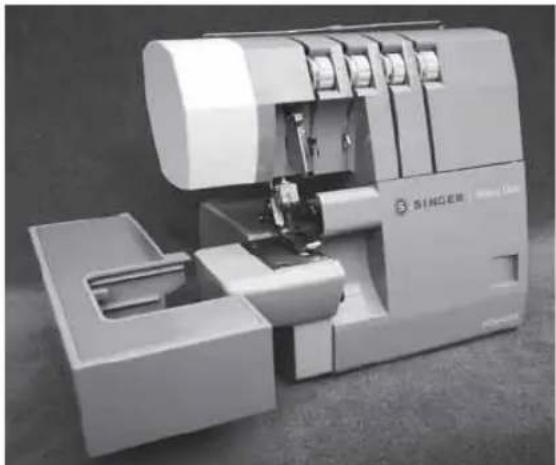
Black-and-white photo of a SINGER Heavy Duty sewing machine with visible branding and no text on the device itself.SINGER®
Instruction Manual
HD0400S
PREFACE
Thank you for your purchase of this overlock machine. This machine intended for household use, will provide you with excellent performance in sewing from light to heavy fabric (lawn to denim). Please refer to this booklet for proper use and optimum service. To get the most out of your overlock machine, read the entire operator's guide before attempting to operate the machine. Then familiarize yourself with the machine by following the operator's guide page by page.
To ensure that you are always provided with the most modern overlock capabilities, the manufacturer reserves the right to change the appearance, design or accessories of this overlock machine when considered necessary without notification or obligation.
For European Territories:
This SINGER Overlock Machine was tested according to European norms and meets the requirements regarding electrical safety radio interference and electromagnetic immunity.
The conformity is documented with the CC mark.

IMPORTANT SAFETY INSTRUCTIONS

* If the supply cord is damaged, it must be replaced by the manufacturer or its service agent or a similarly qualified person in order to avoid a hazard.
* Switch off or unplug the machine when leaving it unattended.
* Before servicing the appliance, unplug the machine.
* If the light is damaged, it must be replace by authorized dealer.
Correct Disposal of this product
This marking indicates that this product should not be disposed with other household wastes throughout the European Union. To prevent possible harm to the environment or human health from uncontrolled waste disposal, recycle it responsibly to promote the sustainable reuse of material resources. To return your used device, please use the return and collection systems or contact the retailer where the product was purchased. They can take this product for environmental safe recycling.
CE - Authorised Representative
VSM Group AB, SVP Worldwide
IMPORTANT SAFETY INSTRUCTIONS
When using this machine, basic safety precautions should always be followed including the following.
Read all instructions before using the machine.

DANGER
- To reduce the risk of electric shock:
- The machine should never be left unattended when plugged in. Always unplug the machine from the electric outlet immediately after using and before cleaning.

WARNING
- To reduce the risk of burns, fire, electric shock or injury to persons:
- Be sure that the electrical voltage of the electric outlet (wall receptacle) is the same as the rated voltage of the motor.
- Use this machine only for its intended use as described in this Instruction Manual. Use only attachments recommended by the manufacturer as contained in the Instruction Manual.
- To disconnect, turn all controls to the off ("0") position, then remove plug from outlet.
- Disconnect the power line plug from the socket outlet or switch the machine off when making any adjustments in the needle area, such as threading needle and loopers, changing needle, changing throat plate or changing presser foot, etc.
- Always unplug the machine from the electrical outlet when removing covers, lubricating, or when making any other user servicing adjustments mentioned in the Instruction Manual.
- Do not attempt to adjust the motor belt. Contact your nearest Service Center should any adjustment be required.
- Do not unplug by pulling on cord. To unplug, grasp the plug, not the cord.
- Handle the foot controller with care and avoid dropping it on the floor. Be sure not to place anything on top of it.
- Always use the proper throat plate. The wrong plate can cause the needle to break.
- Do not use bent needles.
- When sewing, keep fingers away from all moving parts. Special care is required around the sewing machine needle.
- Do not pull or push fabric while stitching. It may deflect the needle causing it to break.
- Use only the handle to lift and move the machine.
- Never operate the machine if it has a damaged cord or plug, if it is not working properly, if it has been dropped or damaged, or dropped into the water. Return the machine to the nearest authorized dealer or Service Center for examination, repair, electrical, or mechanical adjustment.
- Never operate the machine with any air openings blocked. Keep ventilation openings of the machine and foot controller free from the accumulation of lint, dust and loose cloth.
- Never drop or insert any object into any opening.
- Do not use outdoors.
- Do not operate where aerosol (spray) products are being used or where oxygen is being administered.
- Do not allow to be used as a toy. Close attention is necessary when the machine is used by or near children.
- Do not expose the machine or machine plastic case to sunlight directly. Also, do not keep it in a very warm or damp place.
- Do not touch the machine, foot controller and power line cord with wet hand, wet cloth or with anything wet.
- Do not connect power line cord to one of the many cords connected to one power outlet with adapters.
- Use machine on flat and stable table.
- Be sure to close the cylinder cover and looper cover before operating the machine.
- Keep presser foot and needles away from children's reach.
· Do not dismantle or modify the machine yourself. - Be sure to turn off the power switch and disconnect the power line plug before caring for your machine as instructed in the operator's guide.
This appliance can be used by children aged from 8 years and above and persons with reduced physical, sensory or mental capabilities or lack of experience and knowledge if they have been given supervision or instruction concerning use of the appliance in a safe way and understand the hazards involved. Children shall not play with the appliance. Cleaning and user maintenance shall not be made by children without supervision.
The machine must only be used with foot control of type GTC/HKT 72C (for 220-240V), GTE/HKT 7 (for 100-120V) manufactured by DANYANG GUOTI MOTOR & APPLIANCE CO., LTD/ZHEJIANG HUAXING ELECTRIC MOTOR CO.,LTD.
SAVE THESE INSTRUCTIONS
Servicing should be performed by an authorized service representative.
This product is not intended for industrial use.
FOR EUROPEAN AND SIMILAR TERRITORIES:
Machines for Great Britain and some other countries having similar wiring standards are shipped from the factory without a plug for connection to the mains. The wires in this mains lead are colored in accordance with the following code.
Blue: neutral (N) Brown: live (L)
As the colors of the wires in the mains lead of this appliance may not correspond with the colored markings identifying the terminals in your plug, proceed as follows:
The wire which is colored blue must be connected to the terminal which is marked with the letter N or colored black. The wire which is colored brown must be connected to the terminal which is marked with letter L or colored red. If a 13 Amp. (BS 1363) plug is used, a 3 Amp. fuse must be fitted, or if any other type of plug is used, a 5 Amp. fuse must be fitted either in the plug or adaptor or at the distribution board.
Neither cord is to be connected to the earth terminal of a three-pin plug.
CONTENTS
Page Page
-
Selection of Stitches.... 5
-
Handy Reference Chart 6
-
Accessories 7
-
Needle Information 7
-
Principal Parts 8
-
How to Open Looper Cover 9
-
Principal Parts Behind Looper Cover 9
-
Preparation Prior to Sewing 9
-
Preparation for Threading....10
- Setting up the thread guide holder 10
- How to Remove and Insert Needles .... 11
• To remove needle(s) 11
• To insert needle(s) 11
- Threading the Machine.... 12
- Threading diagram 12
• Understanding the color code 12
• To thread the machine correctly....12
1) Threading the upper looper (Orange) ..... 12
2) Threading the lower looper (Yellow) 14
3) Threading the right needle (Green) 16
4) Threading the left needle (Blue).... 18
- Important threading information.... 19
-
How to Change Threads / Tie on Method...... 20
-
How to Adjust the Stitch Length.... 21
-
How to Adjust the Seam Width 21
- Width adjustment by changing needle position ... 21
- Width adjustment with adjustment knob 21
-
How to Adjust the Presser Foot Pressure...... 22
-
Differential Feed 23
• Gathered overedge.... 23
- Stretch overedge.... 24
-
How to Disengage Movable Upper Knife 25
-
Converting the upper looper into spreader ..... 26
-
Free Arm Sewing (Tubular Work) 27
-
Standard Overedge and Rolled Hem Stitching ... 28
• To sew standard overedge 28
• To sew rolled hem 28
-
Chaining Off and Test Sewing 29
-
Starting and Ending Seams 30
• To Srart a Seam 30
• To End a Seam 30
- Suggested Tension Setting....31
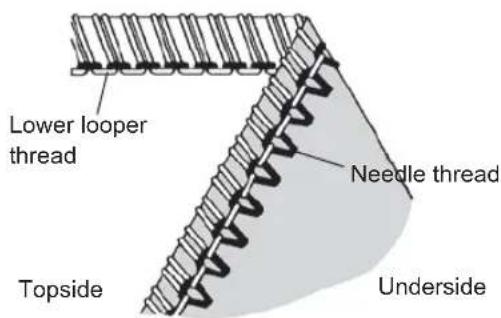
1) 2-thread wrapped edge overlock ....31
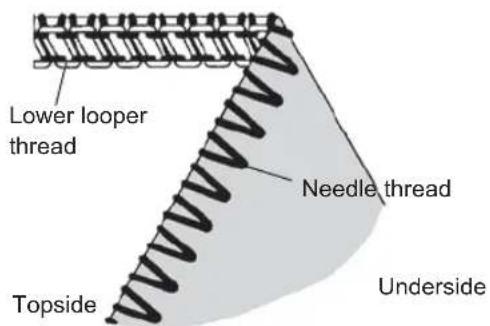
2) 2-thread standard rolled hem stitching ..... 32
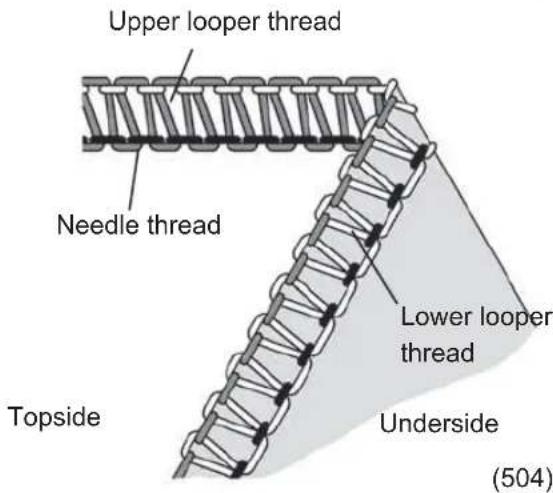
3) 3-Thread Overlock....33
4) 3-Thread Flatlock 34
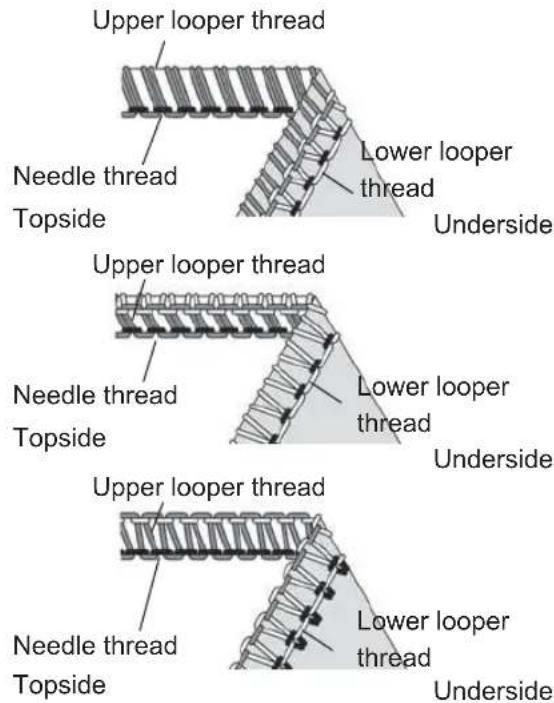
5) 3-Thread Wrapped Edge Overlock....35
6) 4-Thread Ultra Stretch Mock Safety Stitch ... 36
- How to Sew a Rolled Hem 37
1) a.2-thread wrapped edge overlock 38
b.2-thread standard rolled hem stitching .....38
2) a.3-thread standard rolled hem stitching ..... 39
• b.3-thread upper looper thread wrapped
- rolled hem stitching 39
25.*Stitch Variations and Sewing Techniques .....41
• How to sew a flatlock decorative seam ..... 41
• How to sew an overlock blind hem 43
• How to sew pin tucks ....43
- Turning square corners 44
• Pin placement 45
Securing the thread chain 45
• How to reinforce a seam 46
- Braiding by chaining off 46
- Machine Maintenance.... 47
Cleaning the machine....47
Oiling the machine 47
How to replace the stationary knife 48
-
Troubleshooting Chart.... 49
-
Relationship between Cloth, Thread and Needle...50
-
Specification 51
1. SELECTION OF STITCHES
This machine is capable of producing various types of stitches according to the combination of needle positions, threading methods, tension adjustment.
| Stitch Type | Reference Pages | ||
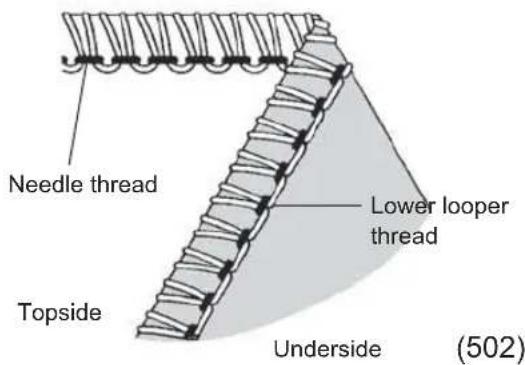
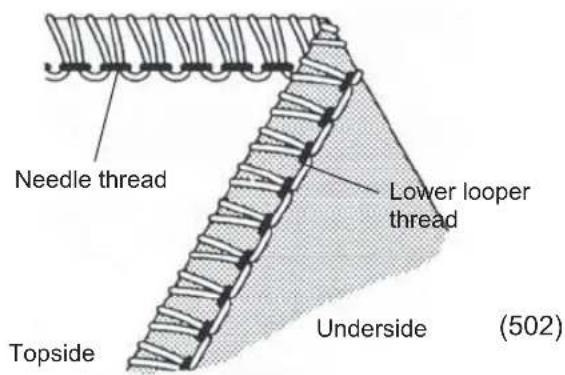
| 1. Two-thread wrapped edge overlock | 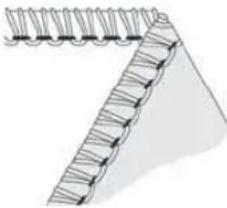 (502) (502) | 1-needle 2-thread stitch is used for light weight or knits fabrics. Also,a 3.5mm and 5.7mm wrapped overlock seam width can be obtained by changing the needle position.* | 31 |
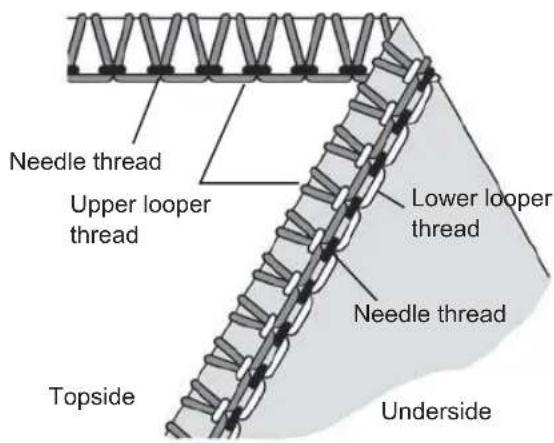
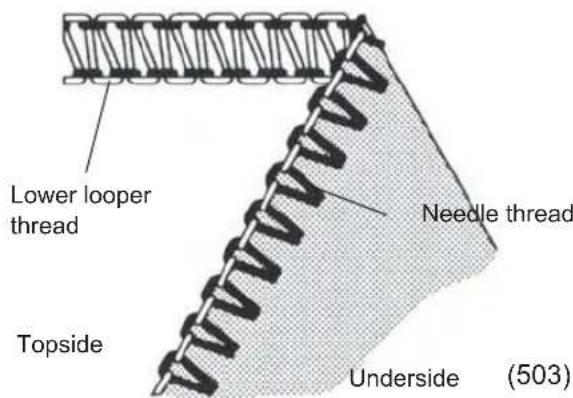
| 2. Two-thread standard rolled hem stitching | 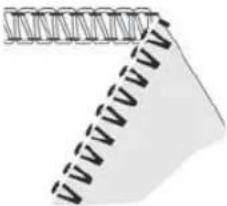 (503) (503) | 1-needle 2-thread stitch is used for overedge seaming,blindstich hemming on edge finishing operations. Also,a 3.5mm and 5.7mm standard rolled hem seam width can be obtained by changing the needle position.* | 32 |
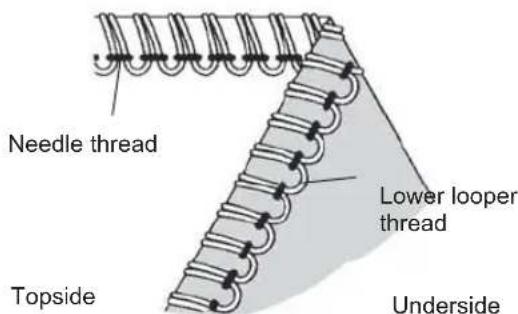
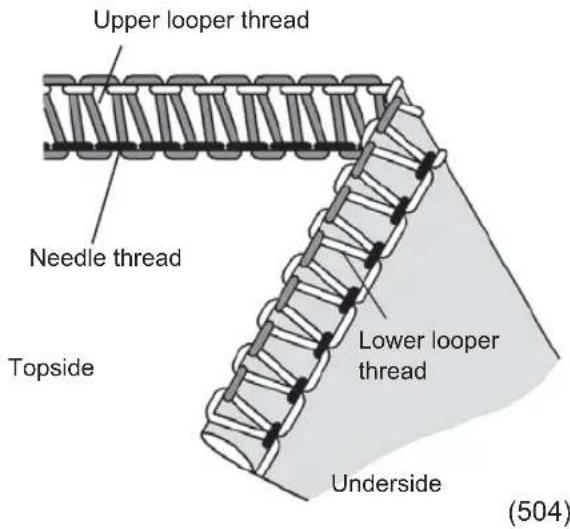
| 3. Three-thread Overlock |  (i04) (i04) | 1-needle 3-thread stitch is used for overedging and seaming on common fabrics. Also, a 3.5mm and 5.7mm overlock seam width can be obtained by changing the needle position.* | 33 |
| 4. Three-thread Flatlock | 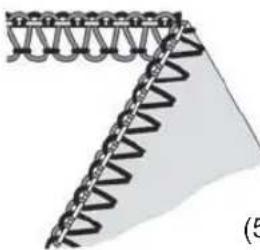 (i05) (i05) | 1-needle 3-thread stitch is used for butted or lapped seams and ornamental stitching with decorative thread. Also, a 3.5mm and 5.7mm flatlock width can be obtained by changing the needle position.* | 34 |
| 5. Three-thread Wrapped Edge Overlock | 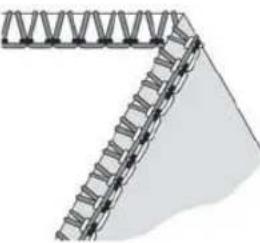 | 1-needle 3-thread stitch is used for sewing narrow rolled hems or ornamental edges. Also, a 3.5mm and 5.7mm wrapped overlock seam width can be obtained by changing the needle position.* | 35 |
| 6. Four-thread Stretch Mock Safety Stitch | 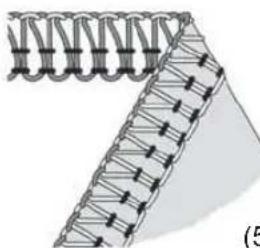 (i14) (i14) | 2-needle 4-thread stitch which is ideal for medium to heavy weight stretchy fabrics such as double knits and swim wear. | 36 |
* Depending on the needle positions used, this machine can sew 3-thread standard width 3.5mm overedge and a 5.7mm wide overedge seams.
Also, for overedging heavyweight fabrics, the seam width can be increased still more by turning the overedge seam width adjustment knob. (See page 21)
| Overedge width | 3.5mm | 5.7mm |
| Needle used | Overedge right needle | Overedge left needle |
| Needle thread tension dial | Green | Blue |
 |  |
2. HANDY REFERENCE CHART
| Stitch Type | Needle Positions | Tension Dial: Numbers shown are average settings on medium weight fabric with standard #80 polyester spun thread | Page | |||||
| Blue G | Green Orange | Yellow | Upper looper or spreader | |||||
| 1 | Two-Thread Wrapped Edge Overlock(502) | 3.5mm | 4.0 2.0 | Spreader | 31 | |||
| 5.7mm | 3.5 | 1.0 | Spreader | |||||
| 2 | Two-Thread Standard Rolled Hem Stitching(503) | 3.5mm | 0.5 | 6.0 | Spreader | 32 | ||
| 5.7mm | 0.5 | 5.0 | Spreader | |||||
| 3 | Three-Thread Overlock(504) | 3.5mm | 3.03.03 | Upper looper | 33 | |||
| 5.7mm | 3.03.03 | Upper looper | ||||||
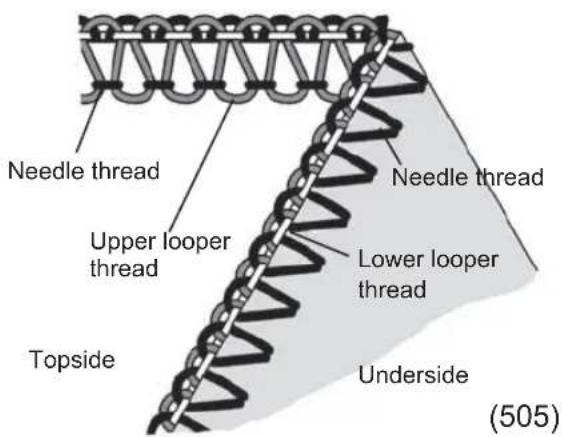
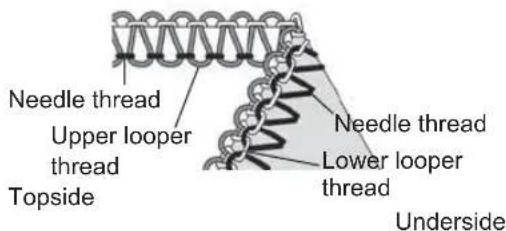
| 4 | Three-Thread Flatlock(505) | 3.5mm | 0.5 | 5.0 | 7.0 | Upper looper | 34 | |
| 5.7mm | 0.5 | 7.05.0 | Upper looper | |||||
| 5 | Three-Thread Wrapped Edge Overlock | 3.5mm | 3.0 | 7.01.0 | Upper looper | 35 | ||
| 5.7mm | 8.55.0 | Upper looper | ||||||
| 6 | Four-Thread Ultra-Stretch Mock Safety Stitch(514) | 3.0 | 3.03.03 | Upper looper | 36 | |||
The thread tension becomes tighter as the dials are turned to higher numbers. The tension settings shown on this page as well as throughout the instruction manual are suggested guides. Adjust thread tensions to suit the fabric and size of thread used. For best results make tension adjustments in small increments of no greater than half a number at a time.
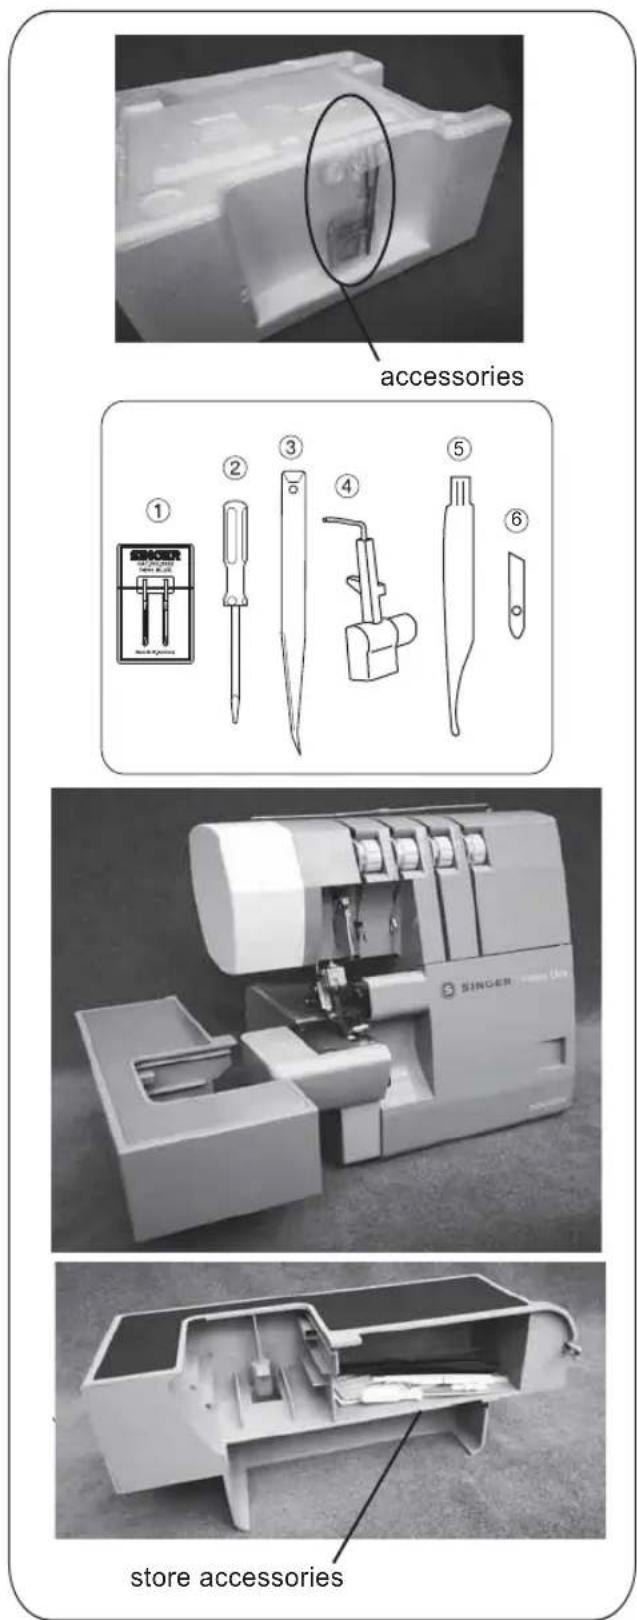
3. ACCESSORIES
Accessories are contained in the carton on Styrofoam.
| HD0400S | |
| 1 Needle set | 1 |
| 2 Screw driver (small size) | 1 |
| 3 Tweezers | 1 |
| 4 Spreader | 1 |
| 5 Lint brush with hole for mounting needle | 1 |
| 6 spare lower knife | 1 |
| 7 Scrap bag(in the carton) | 1 |
You can store these accessories in the accessory tray in the cloth plate after you open the carton.
4. NEEDLE INFORMATION
- SINGER needles #2022 size 100/16 (mounted on the machine) and size 90/14 (in the accessory case) are furnished with the machine.
- SINGER needles #2022 size 100/16 are intended to be used with heavy weight fabrics. It is recommended to change the needles size to work on lighter weight fabrics. Please go on page 50 to find more information on the relationship between cloth, thread and needle.
- In an emergency, standard Singer needle #2020 may be used.
However, unless the suggested tension setting is readjusted, skipping of the stitches may occur.
| Singer needle #2022 | |
| Sizes available | 80/1190/14100/16 |
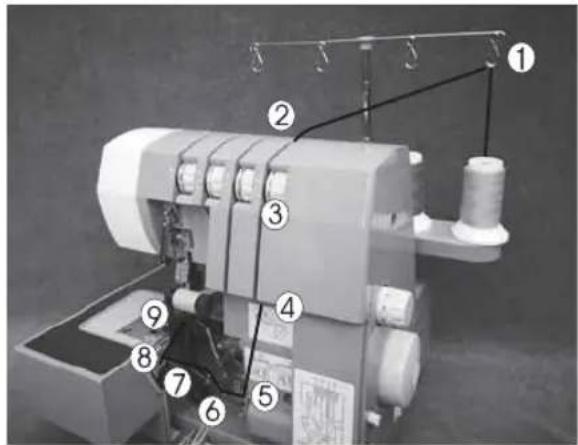
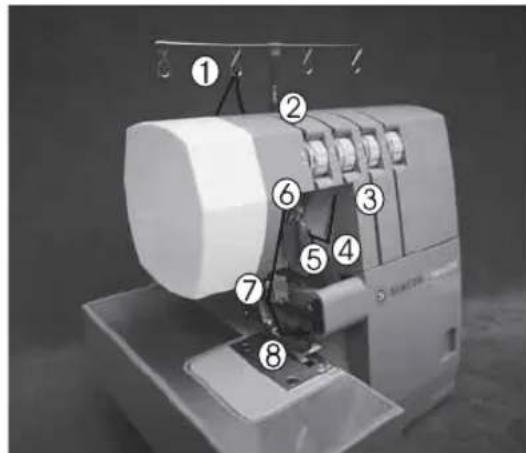
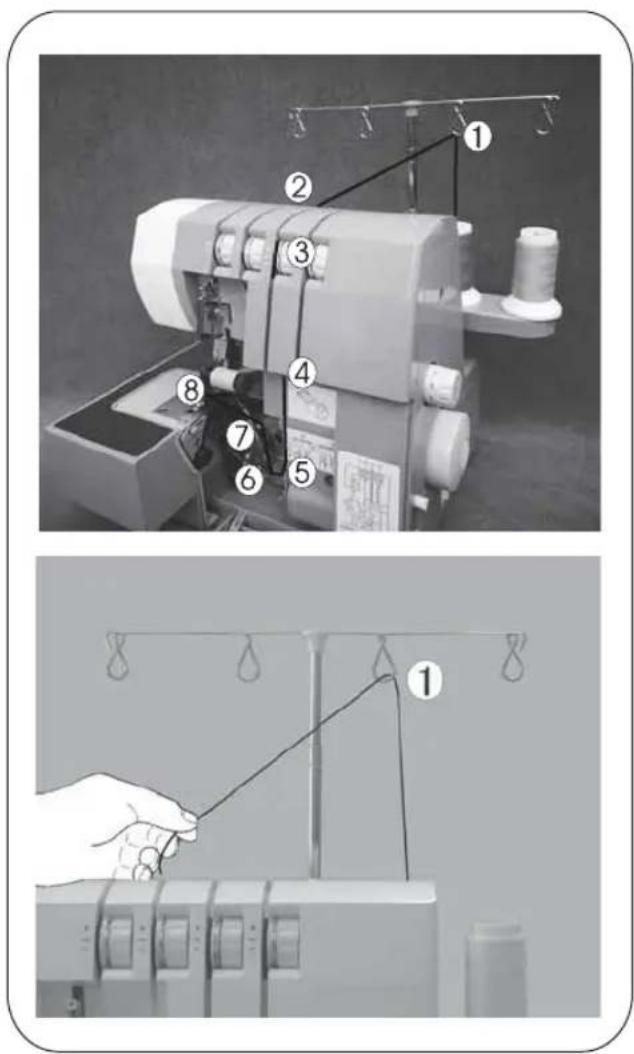
5. PRINCIPAL PARTS
1 Thread guides and holder
2 Handle
3 Left needle thread tension dial (blue)
4 Right needle thread tension dial (green)
5 Upper looper thread tension dial (orange)
6 Lower looper thread tension dial (yellow)
7 Throat plate
8 Cloth plate
9 Looper cover
10 Power & light switch
11 Stitch length dial
12 Hand wheel
13 Spool stand
14 Spool holder
15 Spool pin
16 Presser bar lifter
17 Differential feed adjusting lever knob
18 Seam width finger support plate
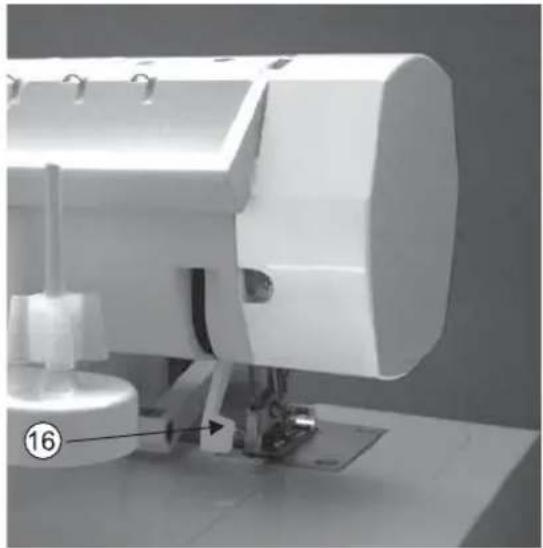
natural_image
Close-up of a white sewing machine with visible mechanical components and a numbered label (16) on the base (no readable text or symbols beyond the number)
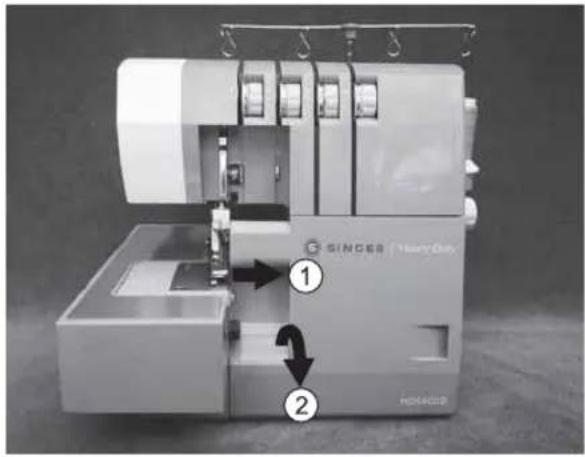
6. HOW TO OPEN LOOPER COVER

Caution:
Be sure to turn off power switch.
- Push the cover to the right as far as it will go 1.
• Pull cover down toward you 2.

Caution:
Be sure looper cover is closed when sewing.
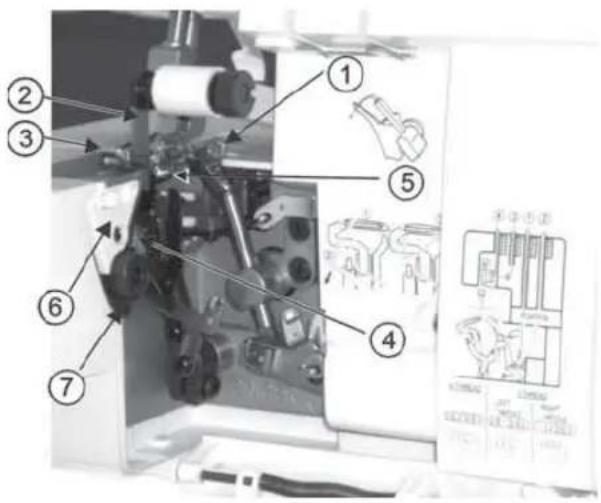
7. PRINCIPAL PARTS BEHIND LOOPER COVER
1 Upper looper
2 movable upper knife
3 Presser foot
4 Stationary lower knife
5 Lower looper
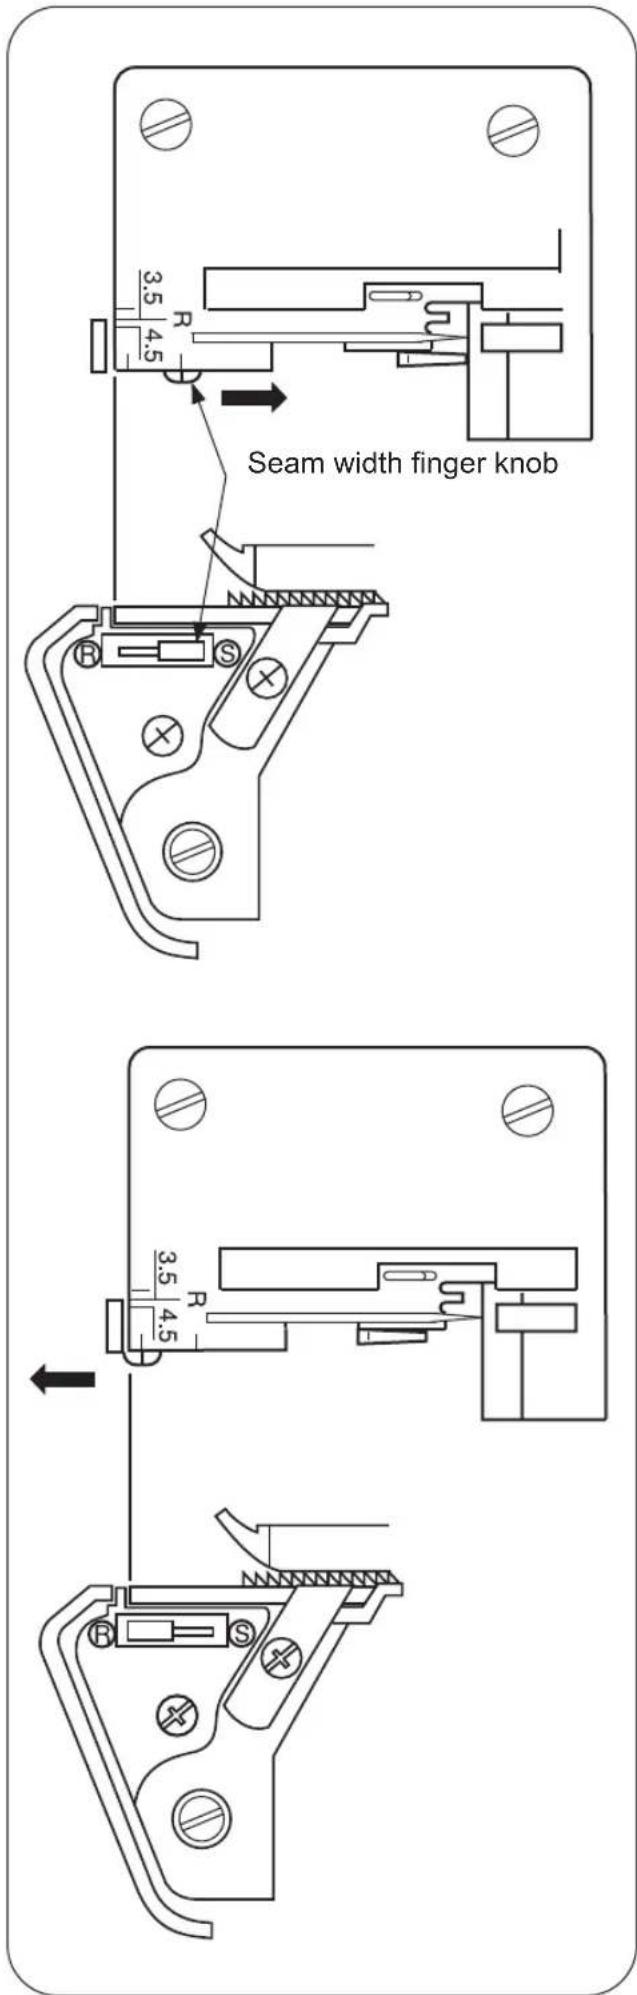
6 Seam width finger knob
7 Seam width adjustment knob
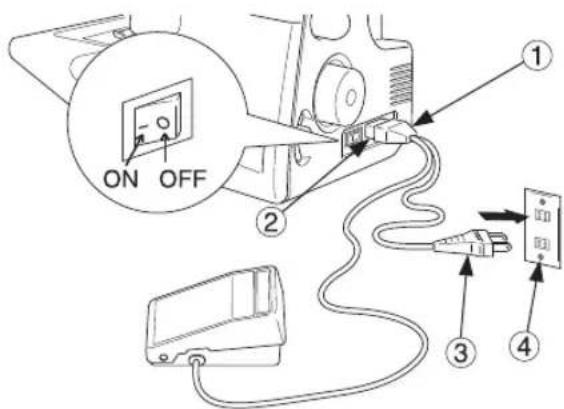
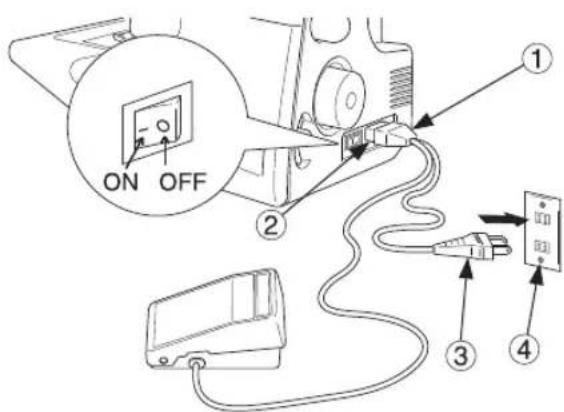
8. PREPARATION PRIOR TO SEWING
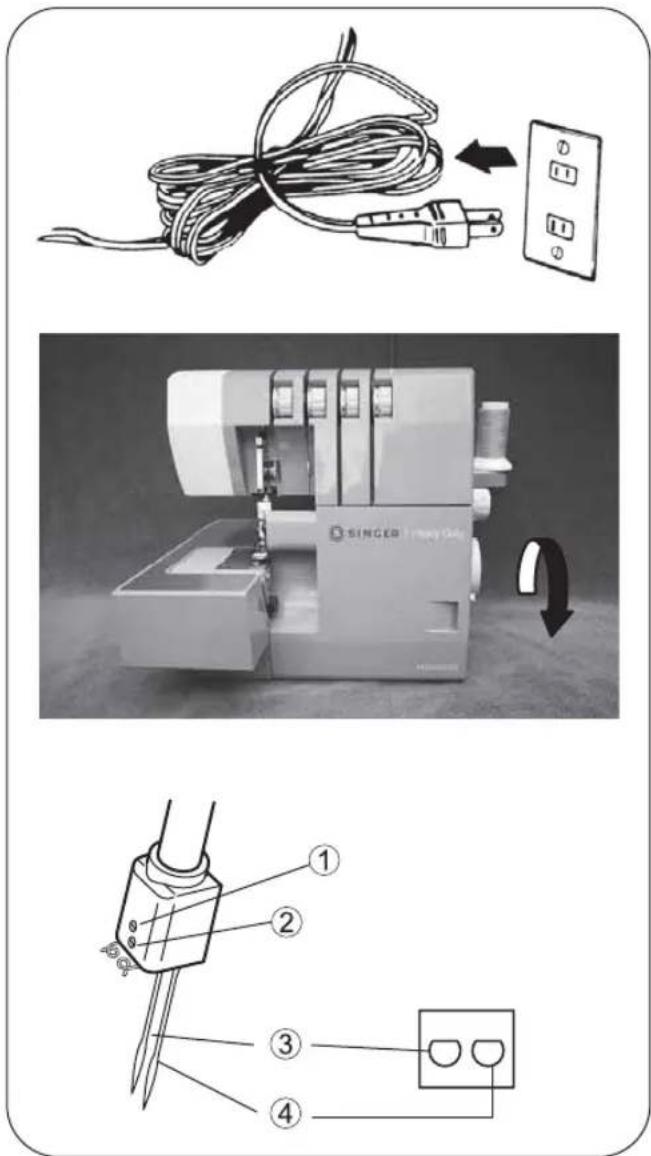
- Connect the controller / electric plug 1 to the machine receptacle 2.
- Plug power line 3 into electric outlet 4.
- Power Switch: Push “-” mark side to turn “ON”. Push “O” mark side to turn “OFF”.
- To run the machine and control the speed, press the controller.
- The harder you press, the faster the machine will sew.
- To stop the machine from sewing, remove your foot from the controller.
WARNING:
Use only foot controller provided with this machine.(YC-482 for U.S.A. & CANADA only) Be sure to make reference to "Warning" on following page.
POLARIZED PLUG INFORMATION (FOR U.S.A. & CANADA ONLY)
This appliance has a polarized plug (one blade wider than the other). To reduce the risk of electric shock, this plug is intended to fit in a polarized outlet only one way. If the plug does not fit fully in the outlet, reverse the plug. If it still does not fit, contact a qualified electrician to install the proper outlet. Do not modify the plug in any way.

Warning:
* Be sure that the electrical voltage of the electric outlet (wall receptacle) is the same as the rated voltage of the motor.
* Handle the foot controller with care and avoid dropping it on the floor. Be sure not to place anything on top of it when not in use.
* Disconnect the power line plug from the electric outlet when changing needles, presser feet or throat plates, or when leaving the machine unattended. This eliminates the possibility of starting the machine by accidentally pressing the controller.
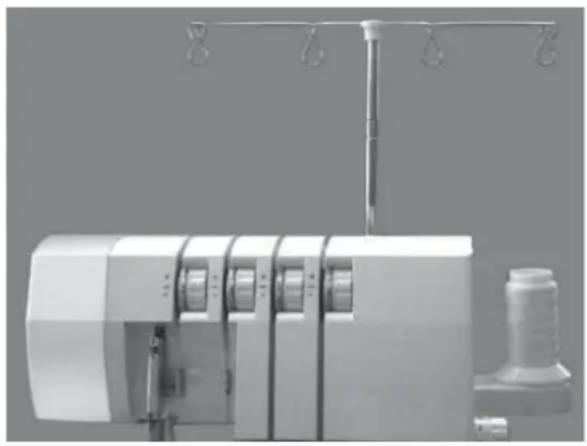
9. PREPARATION FOR THREADING
Setting Up the Thread Guide Holder
- This machine is shipped with the thread guide holder in the lowered position.
• Fully extend the thread guide holder. - The two joints on the telescope will click into place when they are correctly positioned.
- Center the thread guides above the spool pins.
- Place thread over the cone adapters on the spool pins.
Note: If the machine is threaded, straighten the threads to prevent tangling.
natural_image
Industrial sewing machine with hanging hook and spool, no visible text or symbols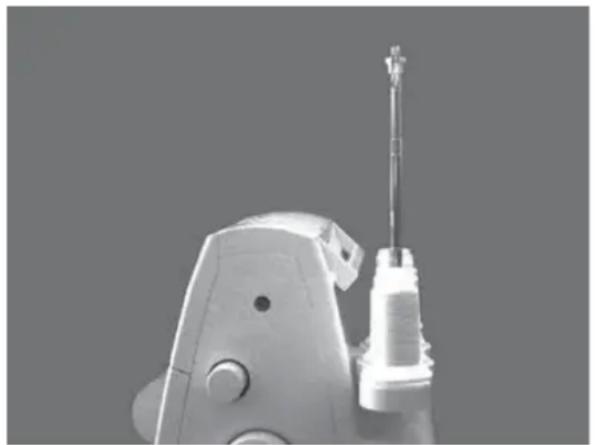
natural_image
Close-up of a mechanical tool with a spool and handle, no visible text or symbols10. HOW TO REMOVE AND INSERT NEEDLES
To Remove Needle(S)

Caution:
Be sure to disconnect the machine from the electric outlet before removing needle(s).
- Turn the hand wheel toward you until the needle is at its highest position.
- Loosen, but do not remove the needle set screw with the small screwdriver.
1 Left needle set screw
2 Right needle set screw
3 Left needle
4 Right needle
- Remove the needle(s).
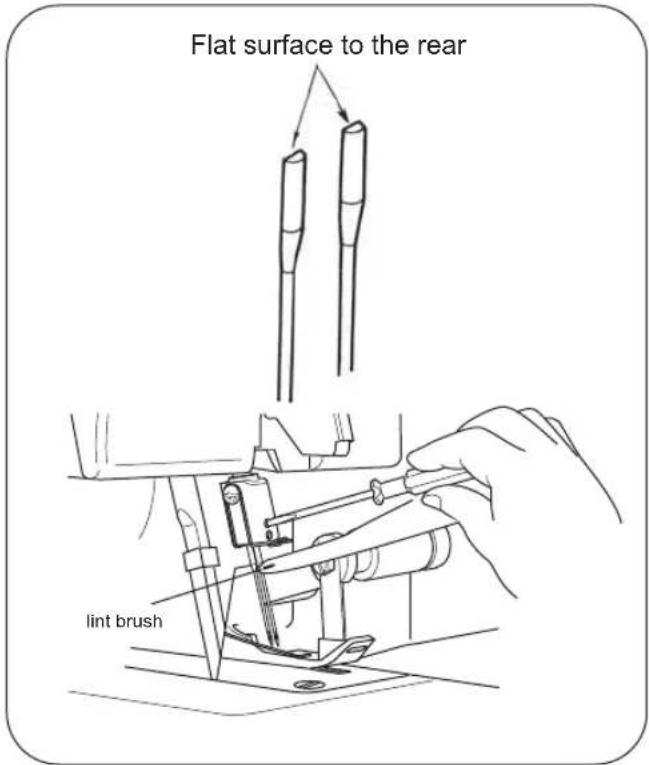
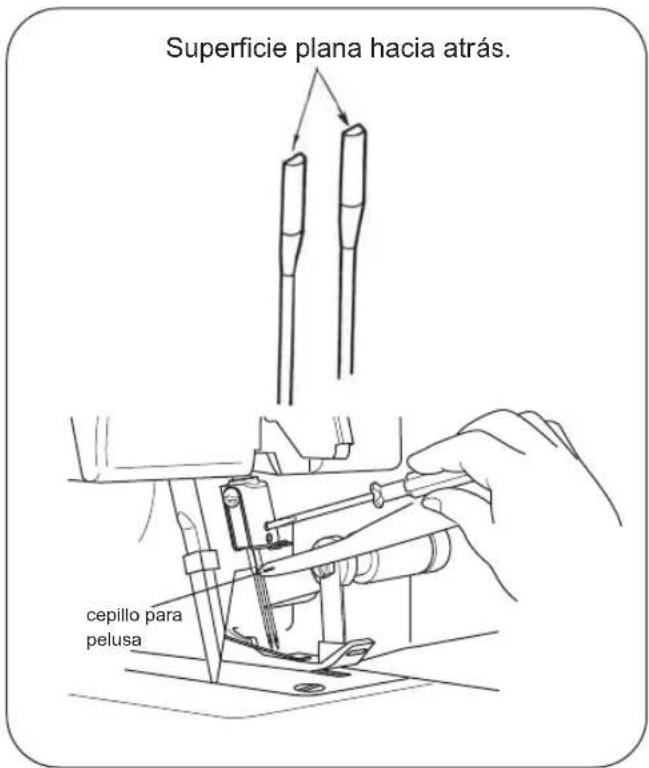
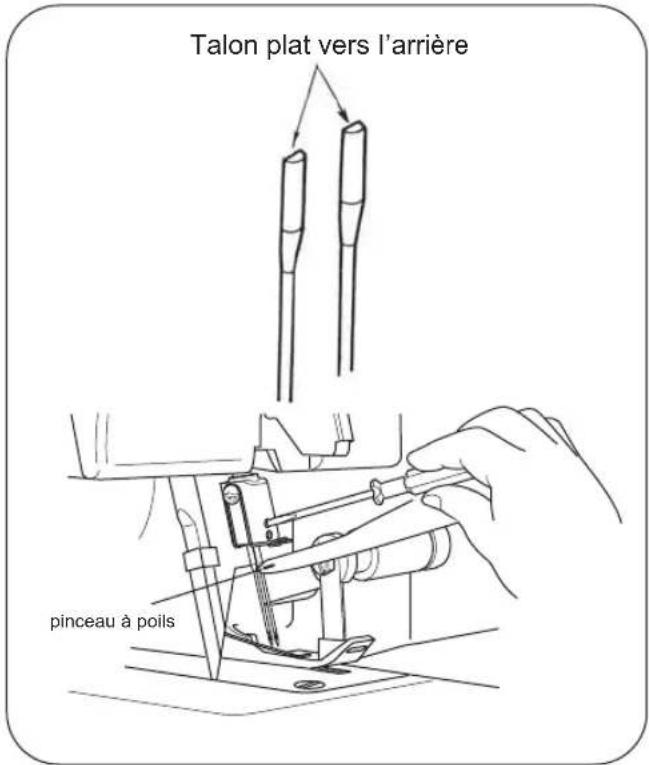
To Insert Needle(s)

Caution:
Be sure to disconnect the machine from the electric outlet before replacing needle(s).
- Hold the needle with the flat surface to the back.
- Insert the needle into the needle clamp as far as it will go with help of lint brush.
- Securely tighten the needle set screw.
Note: * This machine uses #2022 needles. Refer to page 7 for additional needle information.
* Remove the cloth plate if you find it difficult to remove and replace the needle.
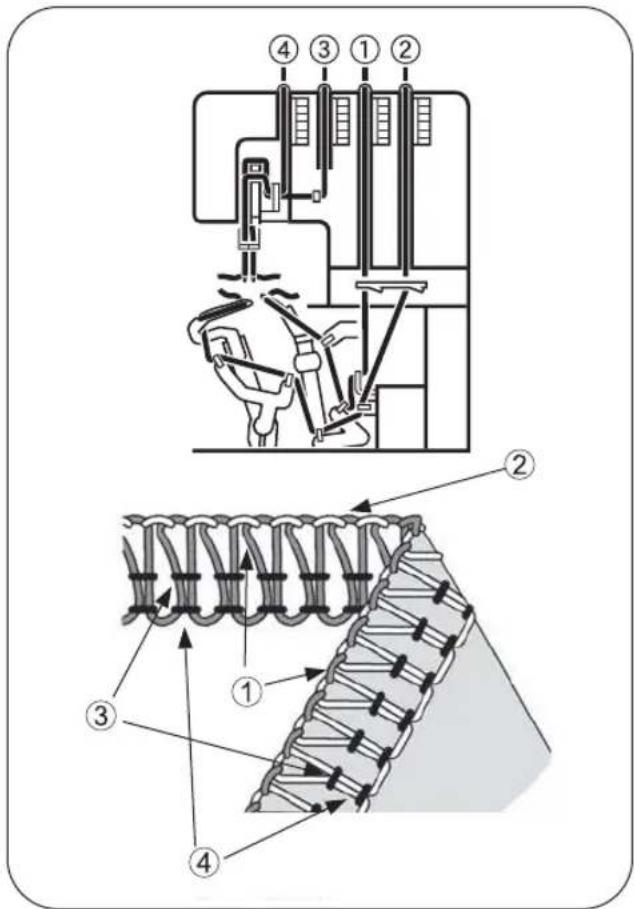
11. THREADING THE MACHINE
Threading Diagram
- A color coded threading diagram is located inside the looper cover for quick reference.
- Thread the machine in the order 1 to 4 as shown.
Understanding the Color Code
- Upper looper thread..... Orange
- Lower looper thread..... Yellow
- Right needle thread...... Green
- Left needle thread...... Blue
To Thread the Machine Correctly

Caution:
Be sure to turn off power switch.
Presser Foot needs to be up before theading.
You MUST rethread all 4 threads, if one breaks.
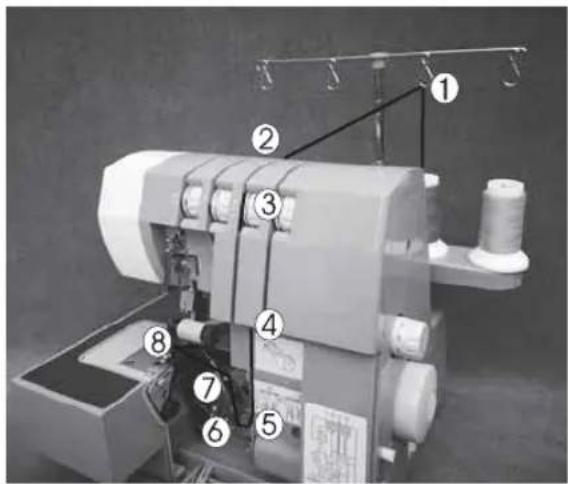
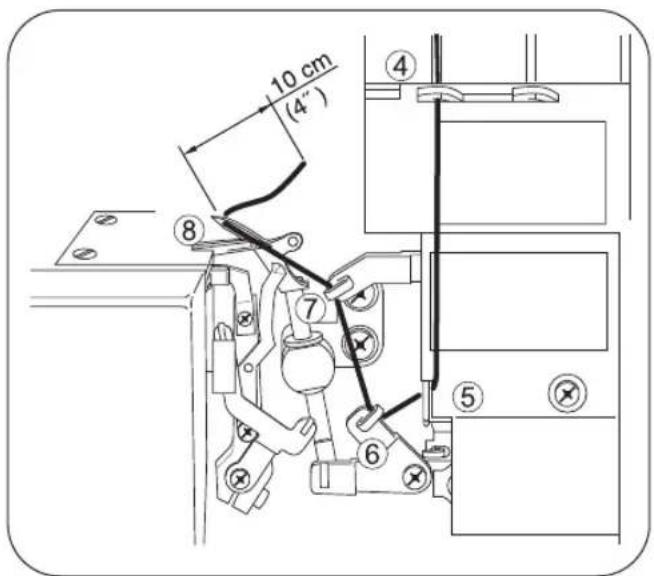
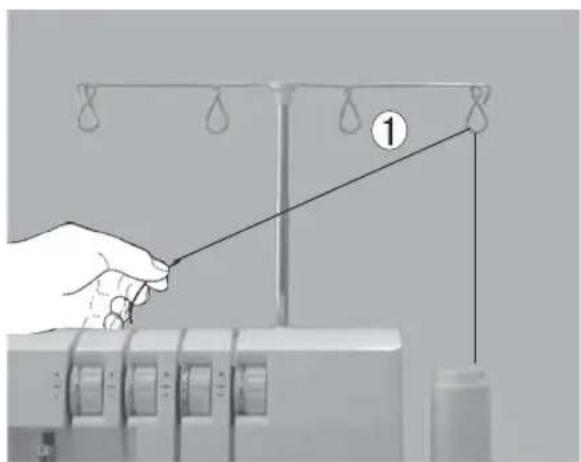
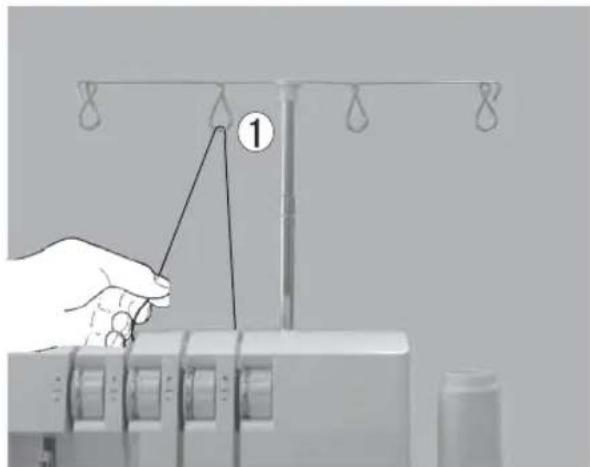
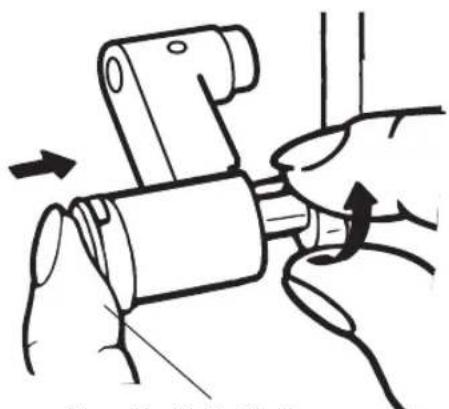
1) Threading the Upper Looper (Orange)
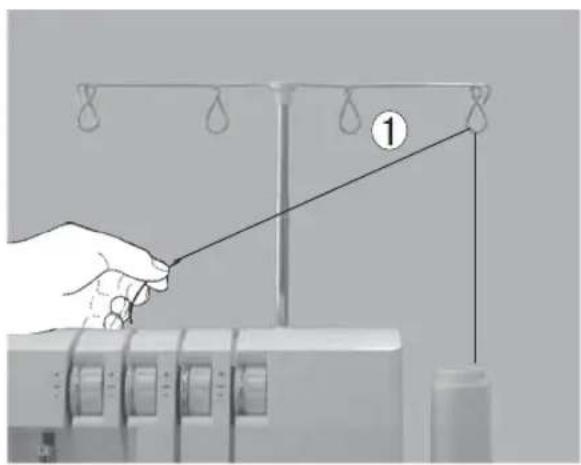
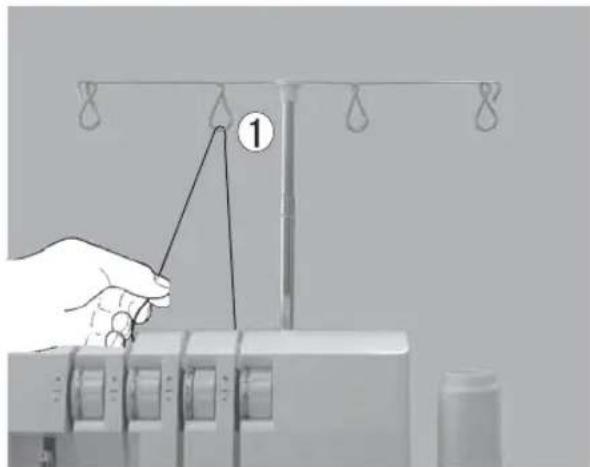
- Thread the upper looper as indicated 1 \~ 8.
• Pass thread from back to the front through the thread guide 1.
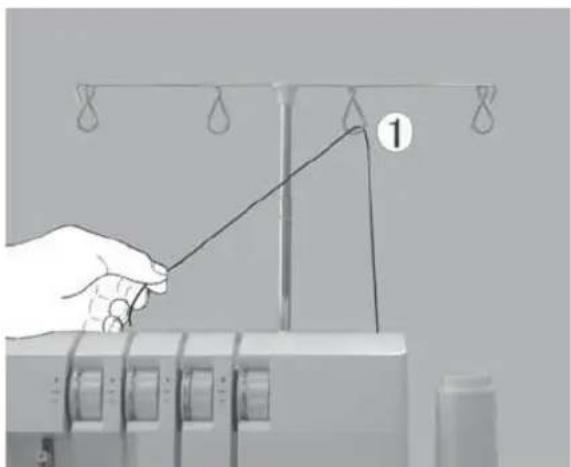
natural_image
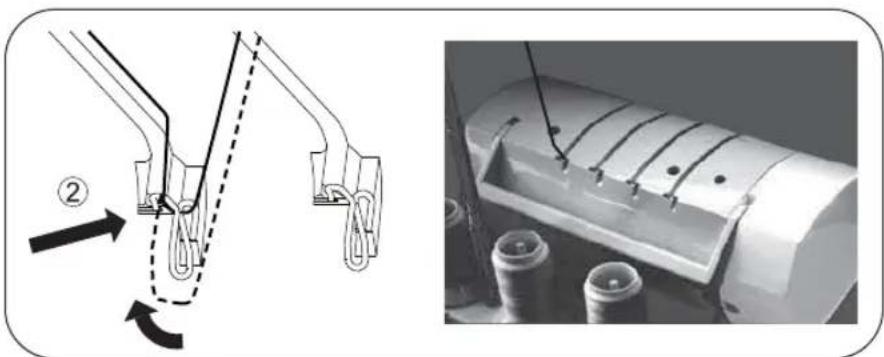
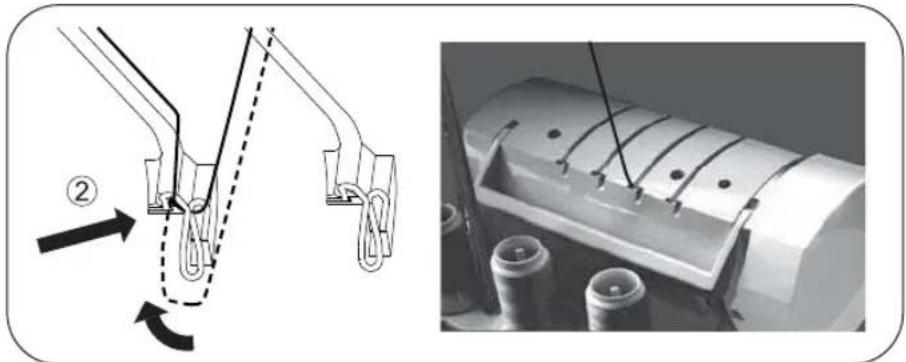
Illustration of a hand pulling a rope from a sewing machine to a hook, with hanging hooks above (no text or symbols)- Thread the top cover thread guide by pulling the thread downward until it slips under thread guide 2.
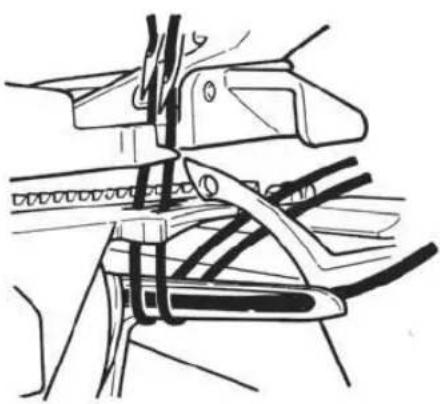
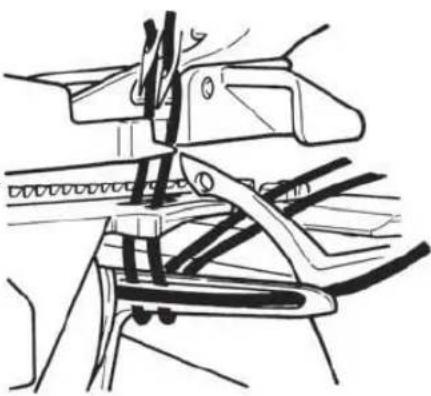
natural_image
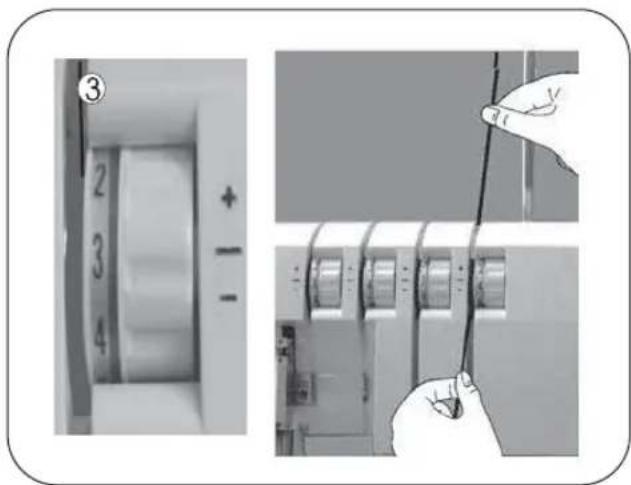
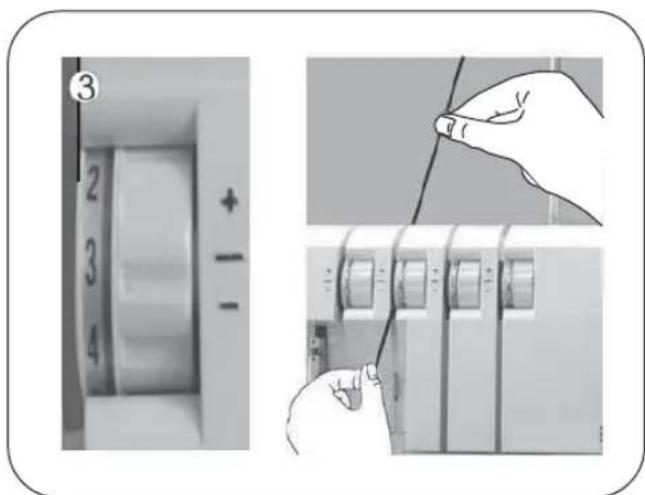
Mechanical assembly diagram showing a piston-cranked tool interacting with a cylindrical component, with no visible text or symbols.- While holding thread with finger, pass it between the tension discs and pull thread down to make certain it is properly located in between the tension discs 3.
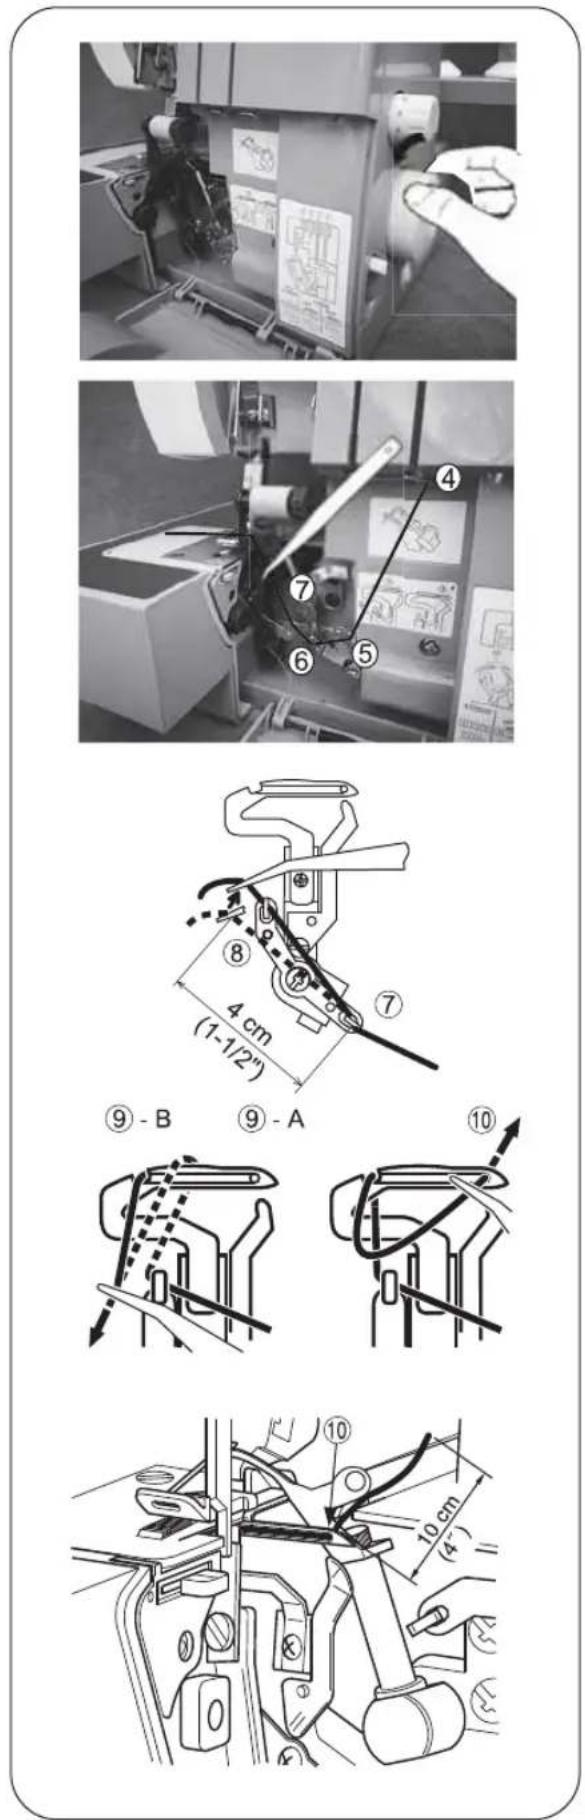
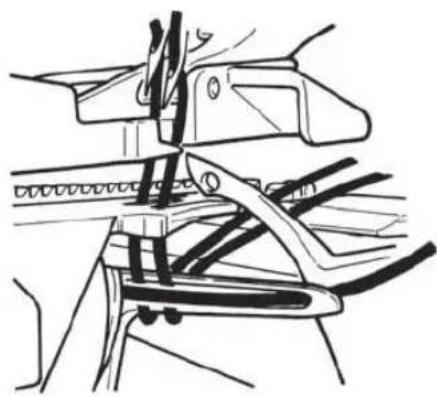
- Thread the looper area of the machine following the orange color coded thread guides (4 \~ 7).
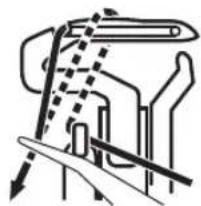
- Thread the hole in the upper looper from front to back 8.
Note: Use of tweezers provided in the accessory set to aid in threading the looper.
- Pull about 10cm (4 inches) of thread through the looper and place to the back of the throat plate.
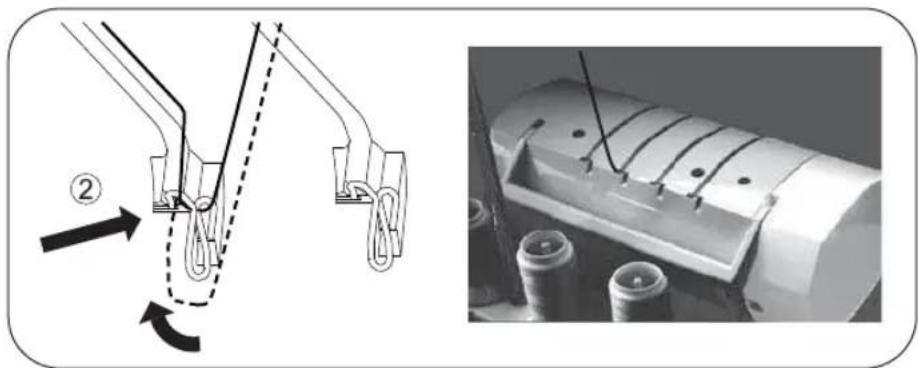
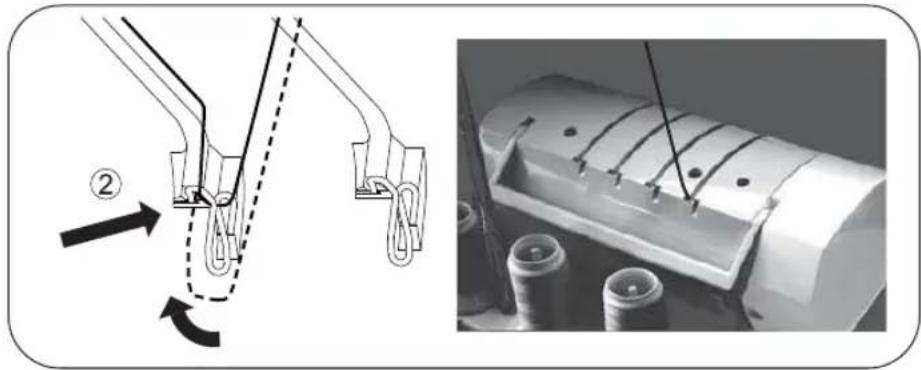
2) Threading the Lower Looper (Yellow)
- Thread the lower looper as indicated 1 \~ 9 .
• Pass thread from back to the front through the thread guide 1.
- Thread the top cover thread guide by pulling the thread downward until it slips under thread guide 2.
- While holding thread with finger, pass it between the tension discs and pull thread down to make certain it is properly located in between the tension discs 3.
- Turn the hand wheel toward you until the lower looper is at the far right.
- Thread the looper area of the machine following the yellow color coded thread guides 4 \~ 7.
Note: Use the tweezers provided in the accessory set to aid in threading the looper.
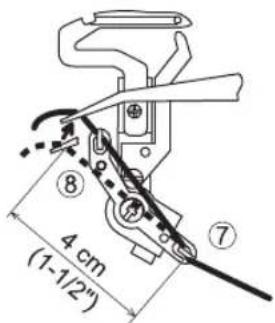
- Grasp the thread with the tweezers 4 cm (1-1/2 inches) from thread guide 7.
- Place the thread with the point of the tweezers slightly under and to the left of threading guide 8.
- Pull the thread up and into thread guide 8.
• Pass the thread behind and over the top end of left looper 9-A.
- Then pull it downward gently so that it will slip into the slot in the looper 9-B.
- Pick up the thread and pass it through the hole in the end of the looper 10.
Note : Use the tweezers provided in the accessory set to aid in threading the looper.
- The thread should be positioned in the groove of the lower looper.
- Pull about 10cm (4 inches) of thread through the looper and place it over the top of the upper looper and to the back of the throat plate.
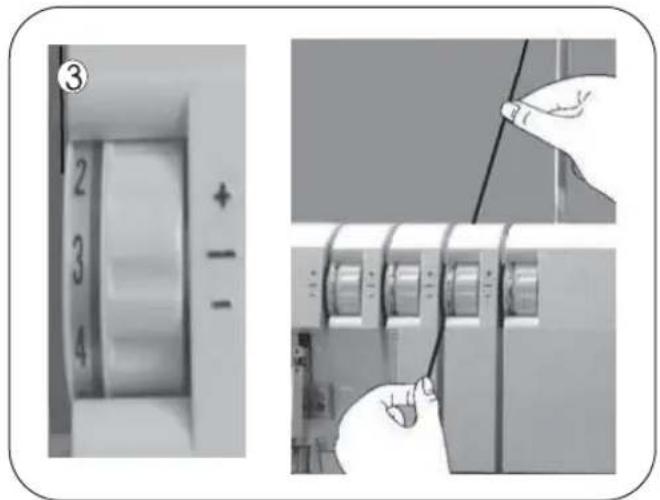
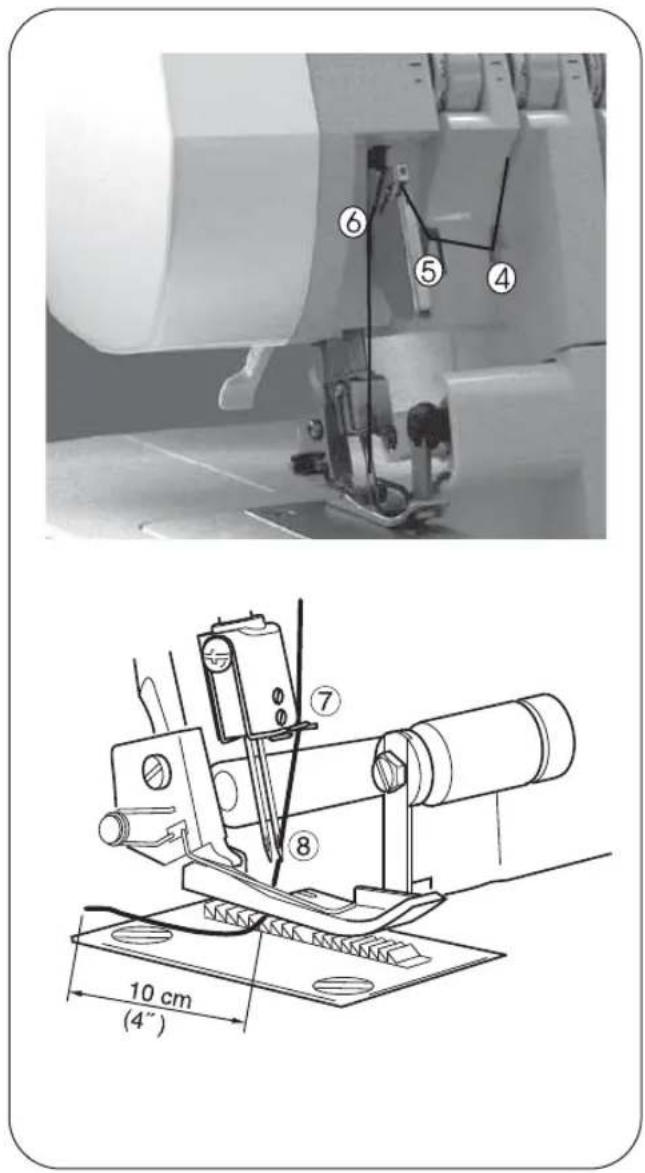
3) Threading the Right Needle (Green)
- Thread the right needle as indicated 1 \~ 8.
• Pass thread from back to the front through the thread guide 1.
natural_image
Hand operating a sewing machine with a hook pointer and hanging hook, no text or symbols visible- Thread the top cover thread guide by pulling the thread downward until it slips under thread guide 2.
natural_image
Mechanical assembly diagram showing a lever mechanism and a cylindrical component with internal structure (no text or symbols)- While holding thread with finger, pass it between the tension discs and pull thread down to make certain it is properly located in between the tension discs 3.
- Continue to thread points 4 \~ 7.
Note: Be sure to pass the thread through upper thread path of the thread guide 6.
- Thread the eye of the right needle 8.
Note: Use of tweezers in the accessory set will make needle eye threading easy.
- Draw about 10cm (4 inches) of thread through needle eye to hang free.
- Place the thread to the back, under the presser foot.
4) Threading the Left Needle (Blue)
- Thread the left needle as indicated 1 \~ 7.
• Pass thread from back to the front through the thread guide 1.


natural_image
Illustration of a hand operating a sewing machine with hanging droplets (no text or symbols)- Thread the top cover thread guide by pulling the thread downward until it slips under thread guide 2.
- While holding thread with finger, pass it between the tension discs and pull thread down to make certain it is properly located in between the tension discs 3.
- Continue to thread points 4 \~ 6 .
Note: Be sure to pass the thread through lower thread path of the thread guide 5.
- Thread the eye of the left needle 7.
Note: Use of tweezers in the accessory set will make needle eye threading easy.
- Draw about 10cm (4 inches) of thread through needle eye to hang free.
- Place the thread to the back, under the presser foot.
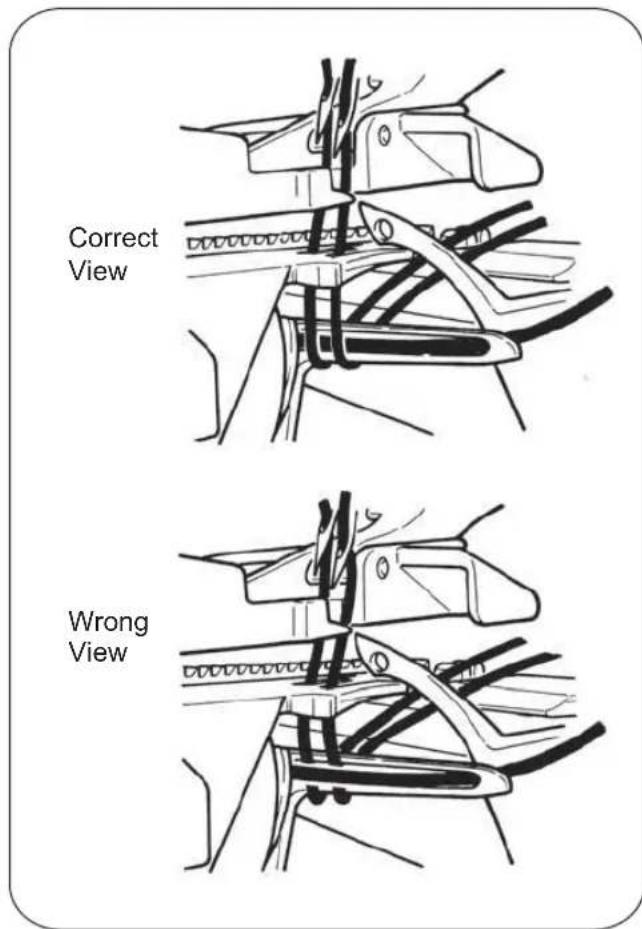
Important Threading Information
• Always thread the needle(s) last to prevent misthreading the lower looper.
- If the lower looper should come unthreaded;
1) Unthread the needle(s)
2) Thread the lower looper
3) Thread the needle(s)

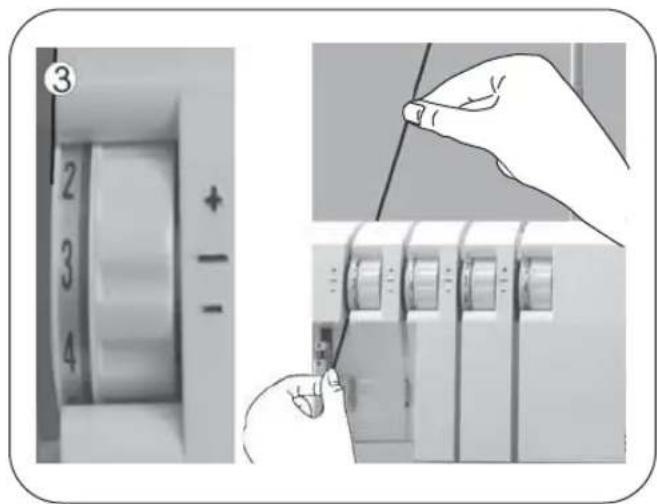
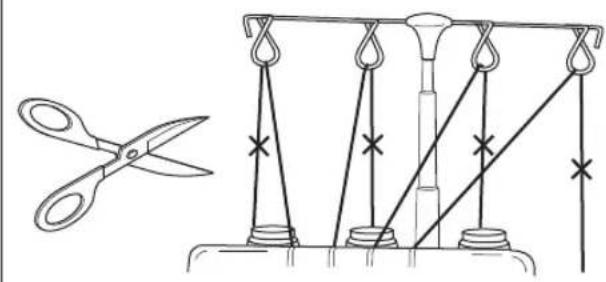
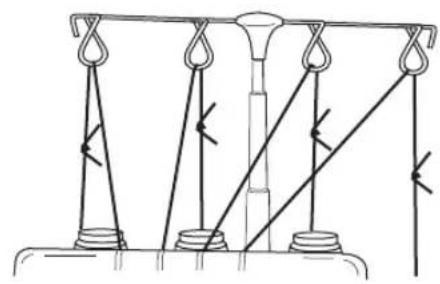
12. HOW TO CHANGE THREADS / TIE ON METHOD
- To change thread type or color, clip thread near the spool.
- Place new thread on stand.
- Tie new thread and old thread ends together.
- Clip thread tails to 2 \~ 3cm (1 inch) length. If clipped too short, threads may come untied.
- Firmly pull both thread to test knot security.
• Note tension dial settings. - Turn the tension dials down until the dial stops.
- Pull the threads through the machine one at a time.
- If threads do not pull easily, check for tangles on thread guides or looping under thread stand.
- When pulling thread through the needle, STOP when the knot is in front of the needle.
- Cut the thread, and insert it through the needle.
- Return tension dials to previous settings.
natural_image
Diagram of a mechanical lifting scale with three vertical supports and diagonal beams (no text or labels)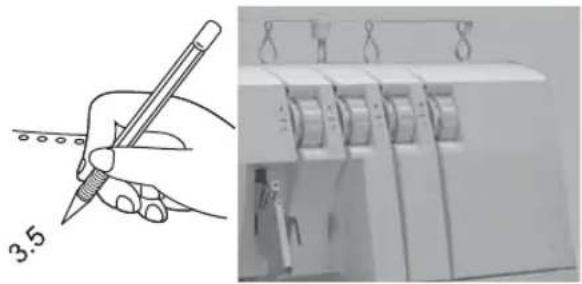
natural_image
Illustration showing a hand holding a pencil and a close-up of a mechanical device with hanging weights (no text or symbols)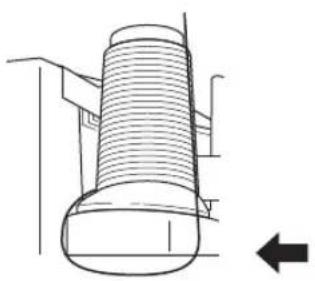
natural_image
Technical line drawing of a mechanical component with no visible text or symbols
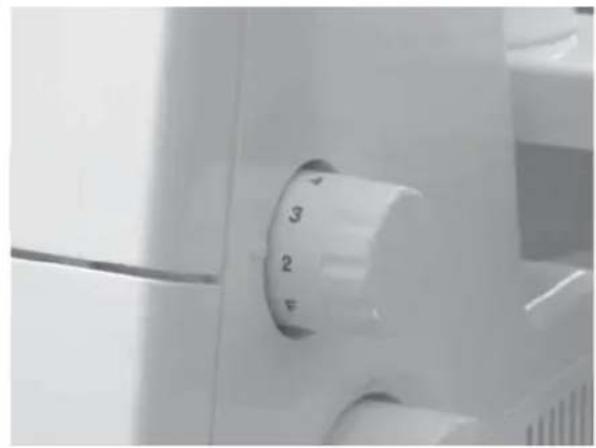
13. HOW TO ADJUST THE STITCH LENGTH
- The stitch length dial should be set on the 3 mm (1/8 inch) setting for most sewing conditions.
- Adjust the stitch length to 4mm (5/32 inch) when sewing heavy weight fabrics.
- Adjust the stitch length to 2mm (5/64 inch) when sewing light weight fabrics to obtain excellent seams without puckering.
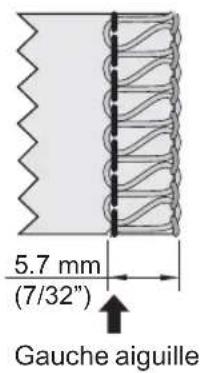
14. HOW TO ADJUST THE SEAM WIDTH
• Overedge seam width can be achieved by repositioning the needle position and also with the width adjustment knob.
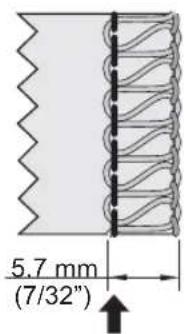
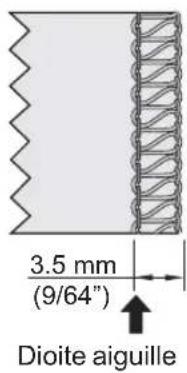
Width Adjustment by Changing Needle Position
• Overedge seam width can be adjusted by changing the needle position.
a) When only left needle is used 5.7 mm
(7/32 inch)
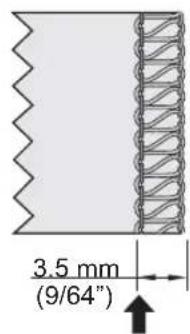
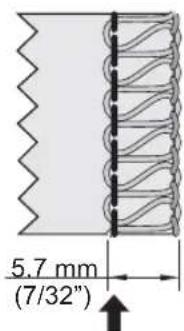
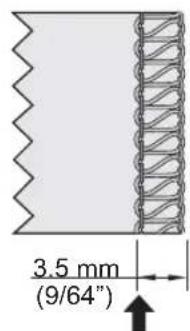
b) When only right needle is used.... 3.5 mm
(9/64 inch)
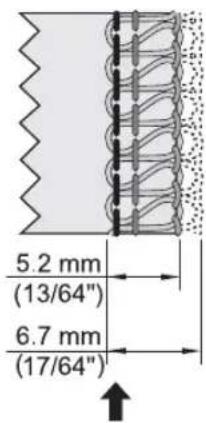
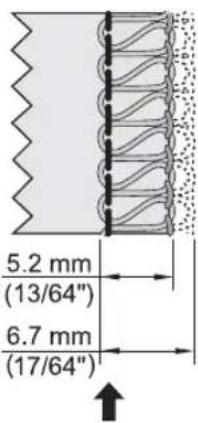
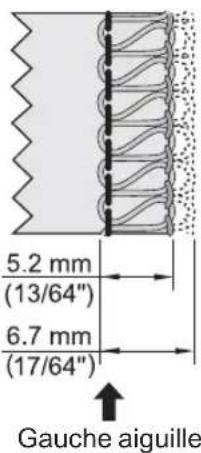
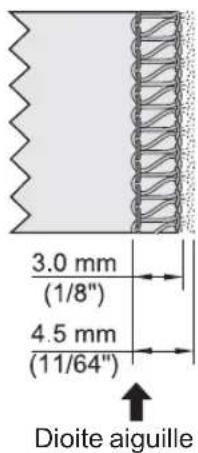
Width Adjustment with Adjustment Knob
- Use of width adjustment knob will permit further adjustment within the width range shown below.
a) when only left needle is used.....5.2 \~ 6.7 mm
(13/64 \~ 17/64 inch)
b) When only right needle is used... 3.0 \~ 4.5 mm
(1/8 \~ 11/64 inch)
natural_image
Close-up of a kitchen appliance's handle with numbered dial (no visible text or symbols)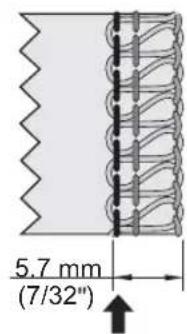
Left/Right needle
Right needleLeft need
Left/Right needle
Right needleLeft need

Caution:
Before making adjustments, be sure to turn off power switch
- Opening the looper cover will make adjustment easier.
- Push the upper knife to the right and while maintain the knife in this position, turn the knob away to adjust the desired seam width, using te graduations on the throat plate as a guideline.

Caution:
Always close looper cover before operating machine.
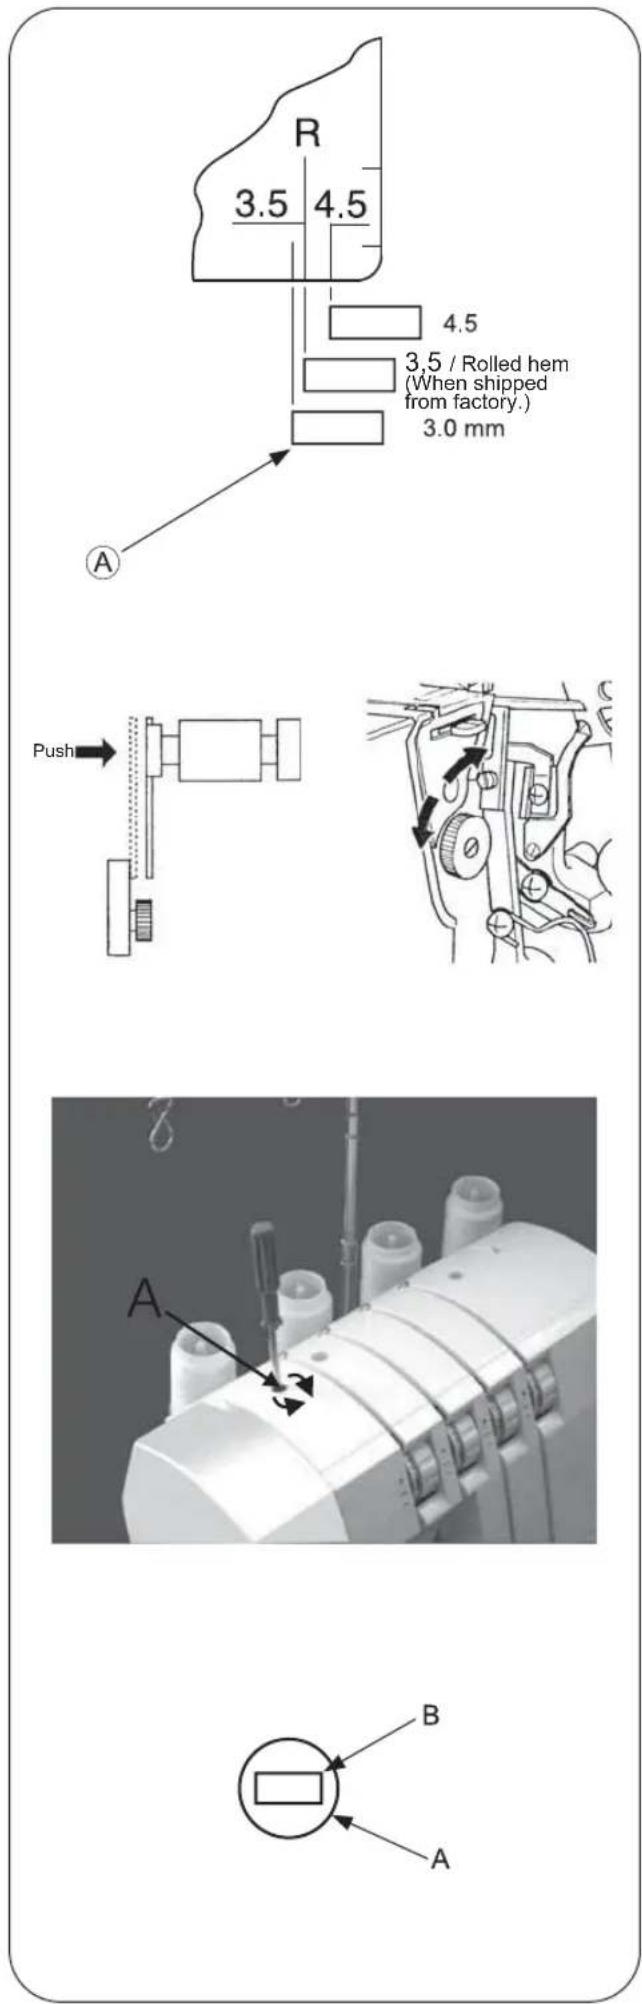
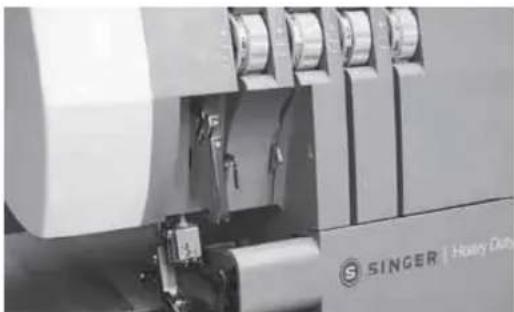
15. HOW TO ADJUST THE PRESSER FOOT PRESSURE
- The presser foot pressure of this machine is preadjusted at the factory to suit the sewing of medium weight fabrics.
- Most of the materials do not require adjustment of presser foot pressure however, there are some instances where adjustment is necessary when sewing lightweight and heavyweight fabrics.
- In such case, insert screwdriver through access hole (A) in top cover and into slot (B) in pressure regulating screw and turn regulating screw as required.
Note: Turn regulating screw counterclockwise until it stops against the top cover. Then turn screw clockwise 6 turns which will be the standard presser bar pressure.
• For lightweight fabric ... Decrease the pressure
• For heavyweight fabric ... Increase the pressure
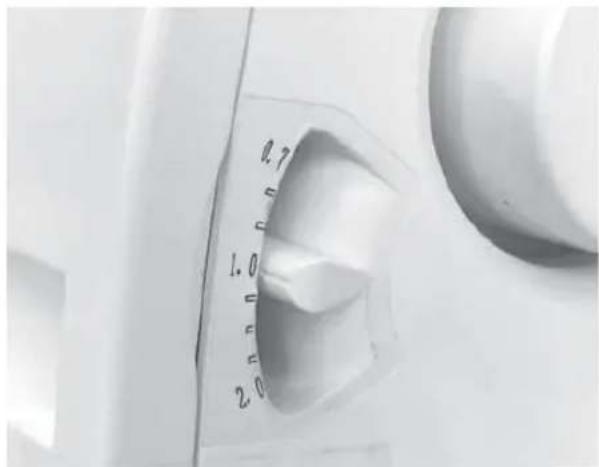
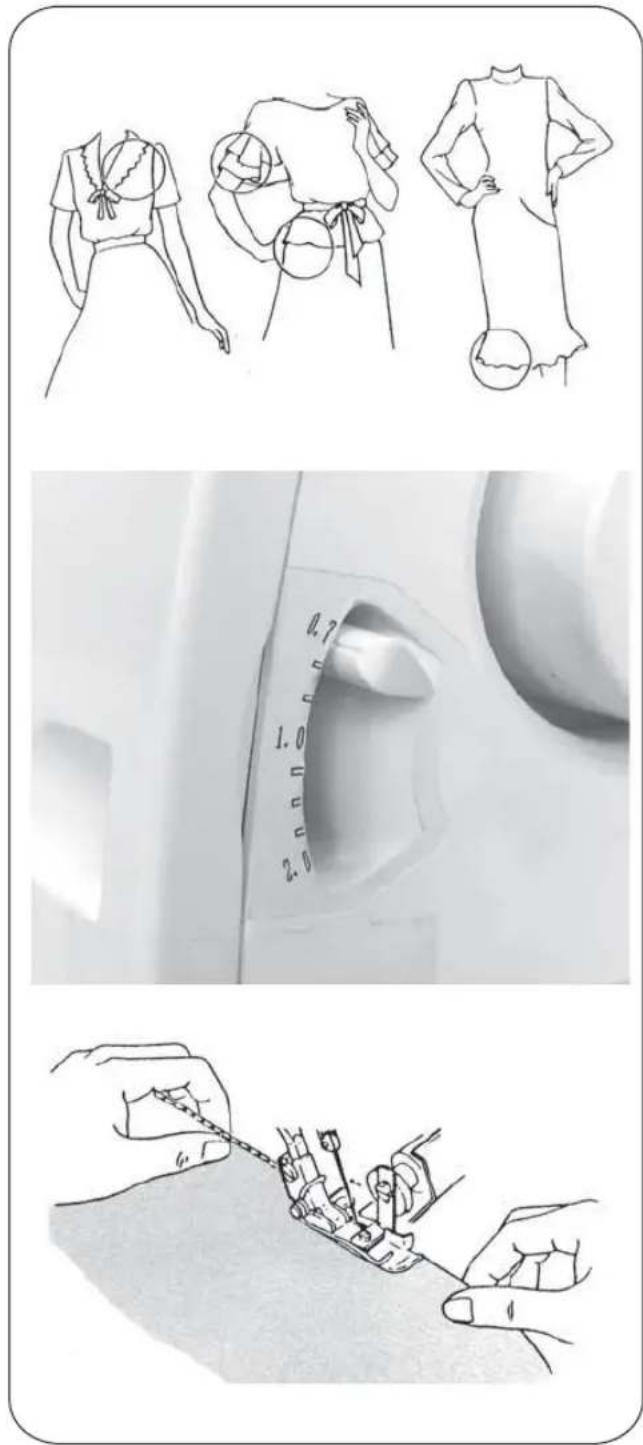
16. DIFFERENTIAL FEED
- Differential feed is a system which "stretches" or "gathers" the fabric, when amount of feed of front feed dog in relation to the rear feed dog is changed.
- The differential feed ratio ranges from 1:0.7 \~ 1:2.0. Adjustment is made by means of the differential feed adjusting lever pictured below.
- Use of differential feed is very effective in overedging stretch fabrics and fabrics cut on the bias.
- Graduation "1.0" is differential feed adjusting lever setting for ratio 1:1.
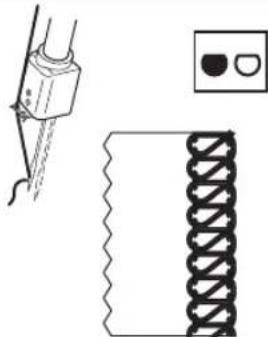
Gathered Overedge
- Gathered overedge is most suited for shirring sleeves, yokes, front and back bodices, skirt hems, etc. in stretch fabrics such as knits and jersey before assembling into garment.
To set the differential feed adjusting lever
- Set differential feed adjusting lever knob below graduation "1.0". Setting of adjusting lever knob depends on material being sewn as well as the amount of gather therefore set knob to suit the fabric and test sew before sewing your garment.
- When feed regulating dial is set at "3" or over, the amount of feed of the main feed dog will change to "3" automatically when adjusting lever knob is set to 2.0.
Note: For normal overedge stitching, set differential feed adjusting lever knob to graduation "1.0".
natural_image
Close-up of a white kitchen scale dial with numerical markings (0.7, 1.0, 2.0) on a surface, no readable text or symbols beyond measurement indicators.
natural_image
Line drawing of a women's dress showing front, back, and side views (no text or symbols)
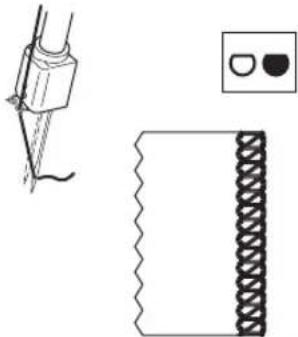
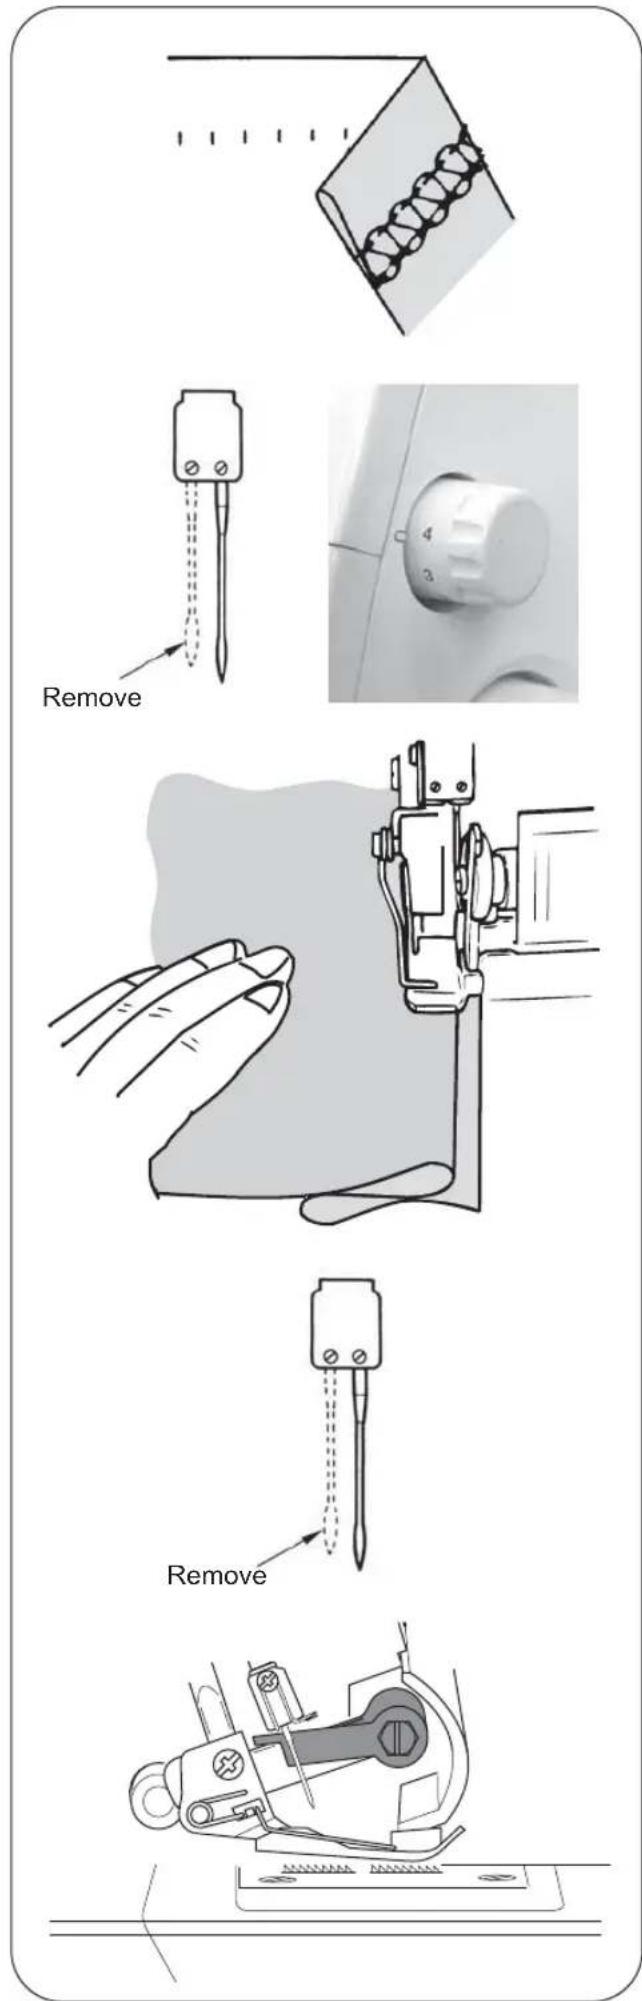
Stretch Overedge
- Stretch overedge is ideal for sewing decorative collars, sleeves, skirt hems, etc. on loosely knit and woven fabrics.
To set the differential feed adjusting lever
- Set differential feed adjusting lever knob above graduation "1.0".
- To sew a seam, apply gentle tension to the fabric by holding the seam lightly in front and back of the presser foot.
Note: * If amount of "stretch" is not correctly set in relation to the fabric being sewn, the fabric is apt to shift away from the needle resulting in improperly sewn overedge seam. In such case, reset differential feed adjusting lever closer to the center mark. * Be sure to reset the differential feed adjusting lever to graduation "1.0" for normal overedge stitching.
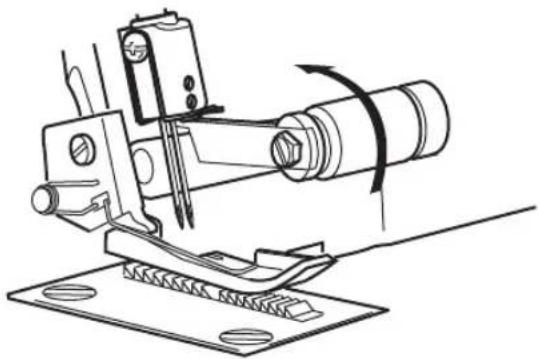
17. HOW TO DISENGGE MOVABLE UPPER KNIFE

Caution:
Be sure to turn off power switch.
To place movable knife in nonworking position
• Turn handwheel over toward you and raise upper knife to its highest position.
• Open looper cover (page 9)
- Push the movable knife holder to the right as far as it will go.
• Turn the knob away from you until the knife clicks into a horizontal position.
Note: If the knife stops in the up position;
* Turn the hand wheel toward you until the knife clears the top of the machine.
* Continue to rotate the knife to the hoeizontal position.
To place movable knife in working position
- Open looper cover and push the movable knife holder to the right as it will go.
- Turn the knob up and toward you until the knife clicks into the working position.

Caution:
Always close looper cover before operating machine
natural_image
Illustration of hands operating a mechanical device with a tool, showing a curved arrow indicating rotation (no text or symbols present)Movable Knife Holder
natural_image
Technical line drawing of a sewing machine tool with no visible text or symbols
natural_image
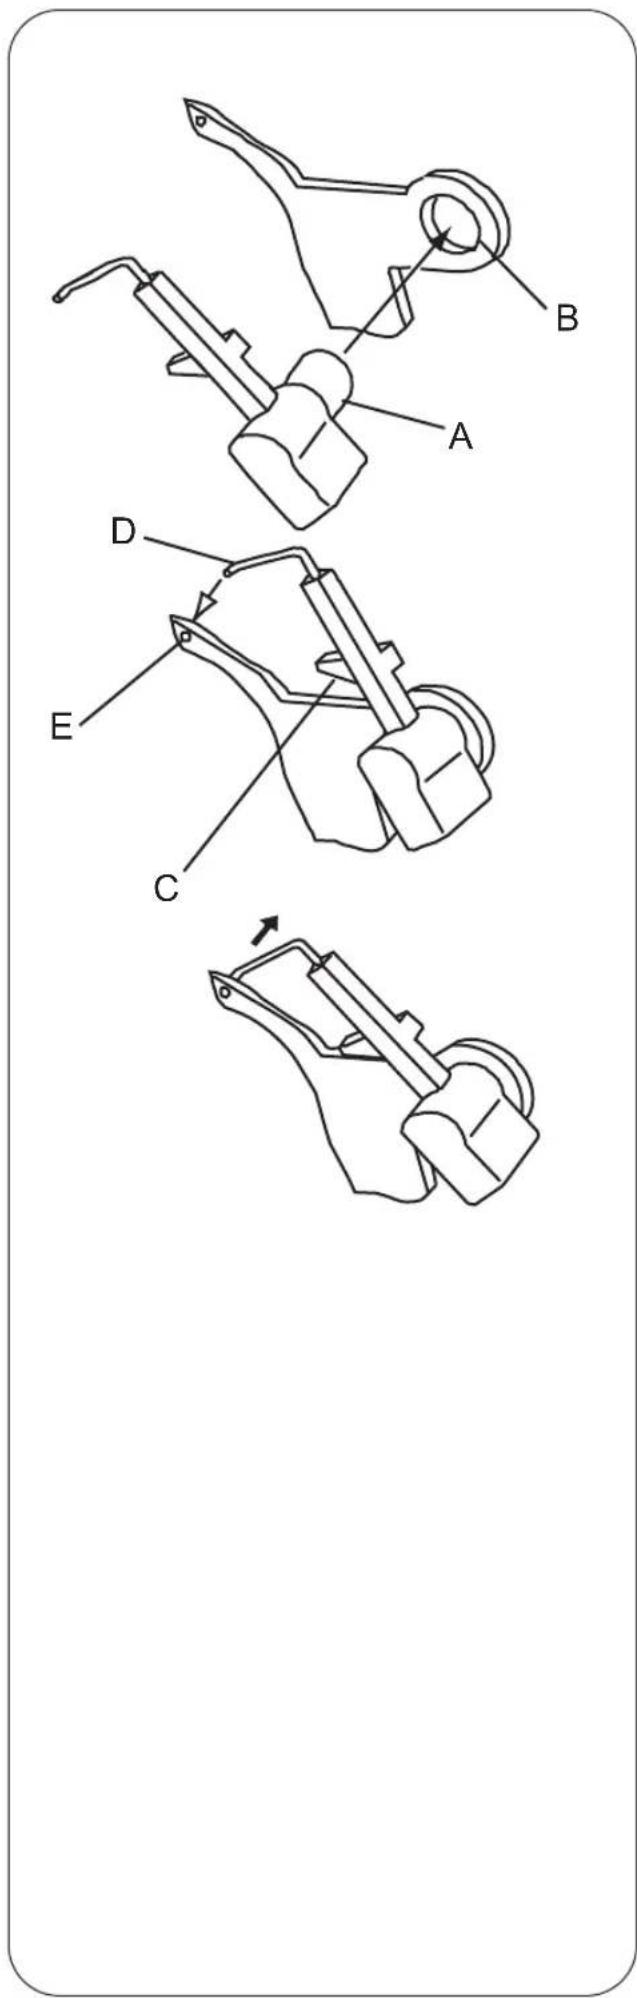
Technical line drawing of a sewing machine with a rotating shaft and base plate (no text or symbols)18. CONVERTING THE UPPER LOOPER INTO SPREADER

Warning:
Switch off the machine before installing or removing the spreader.
Installing the spreader.
- Insert the pin (A) of the spreader in the hole (B) of the upper looper.
- Put the positioning rib (C) in contact with the upper surface of the looper.
- Insert the point (D) in the hole (E) of the upper looper.
Removing the spreader
- Remove the point (D) of the hole (E) of the upper looper and take the spreader off the looper.
Note: Put the spreader back to the accessory storage.
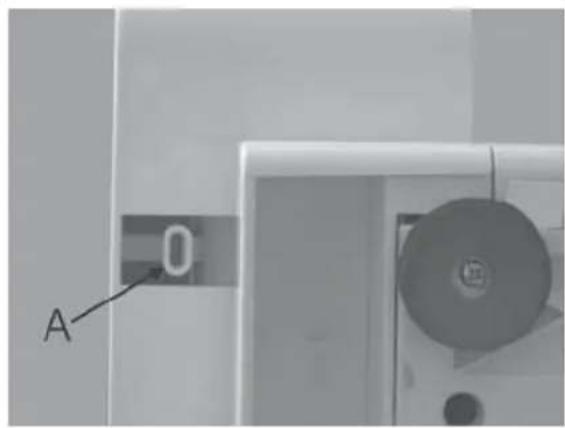
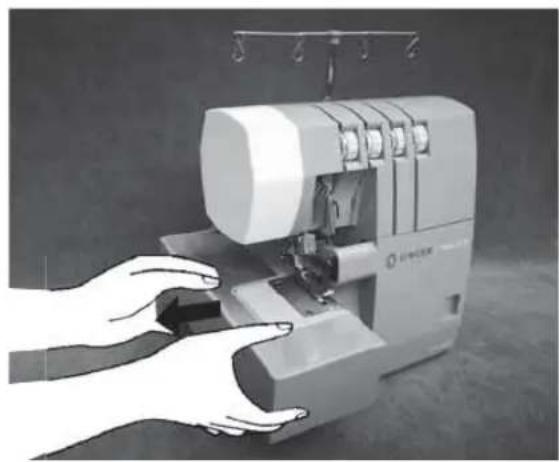
19. FREE ARM SEWING (TUBULAR WORK)
This machine become a free arm machine simply by removing the cloth plate.
To remove the cloth plate
- Slide cloth plate to the left and remove from machine while pressing button (A) located on the underside.
- This is especially suited for sewing hard to reach garment areas such as armholes and overcasting trouser cuffs.
• Place garment over the free arm and sew.
To replace the cloth plate
- Align projection on cloth plate with groove in cylinder cover and slide to the right until tab on cloth plate (front) snaps into slot in cylinder cover.
natural_image
Illustration of a sewing machine being handled with hands, no visible text or symbols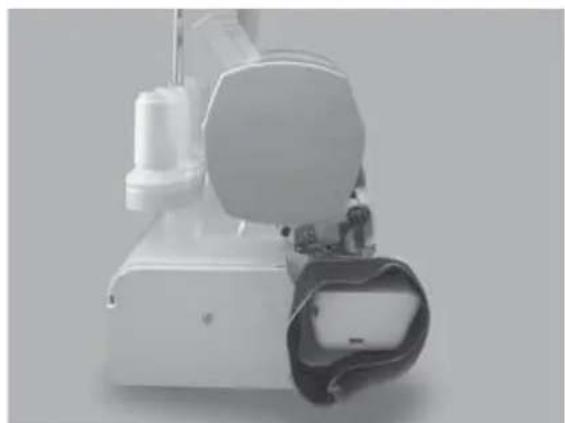
natural_image
Close-up of a white portable electronic device with a black cover and handle, no visible text or symbols
natural_image
Illustration of hands operating a sewing machine with a handle, no visible text or symbols20. STANDARD OVEREDGE AND ROLLED HEM STITCHING
To Sew Standard Overedge
- Set seam width finger knob to S to move seam width finger to projected position.
Note: Be sure to push seam width finger knob as far as it will go in the direction of setting S.
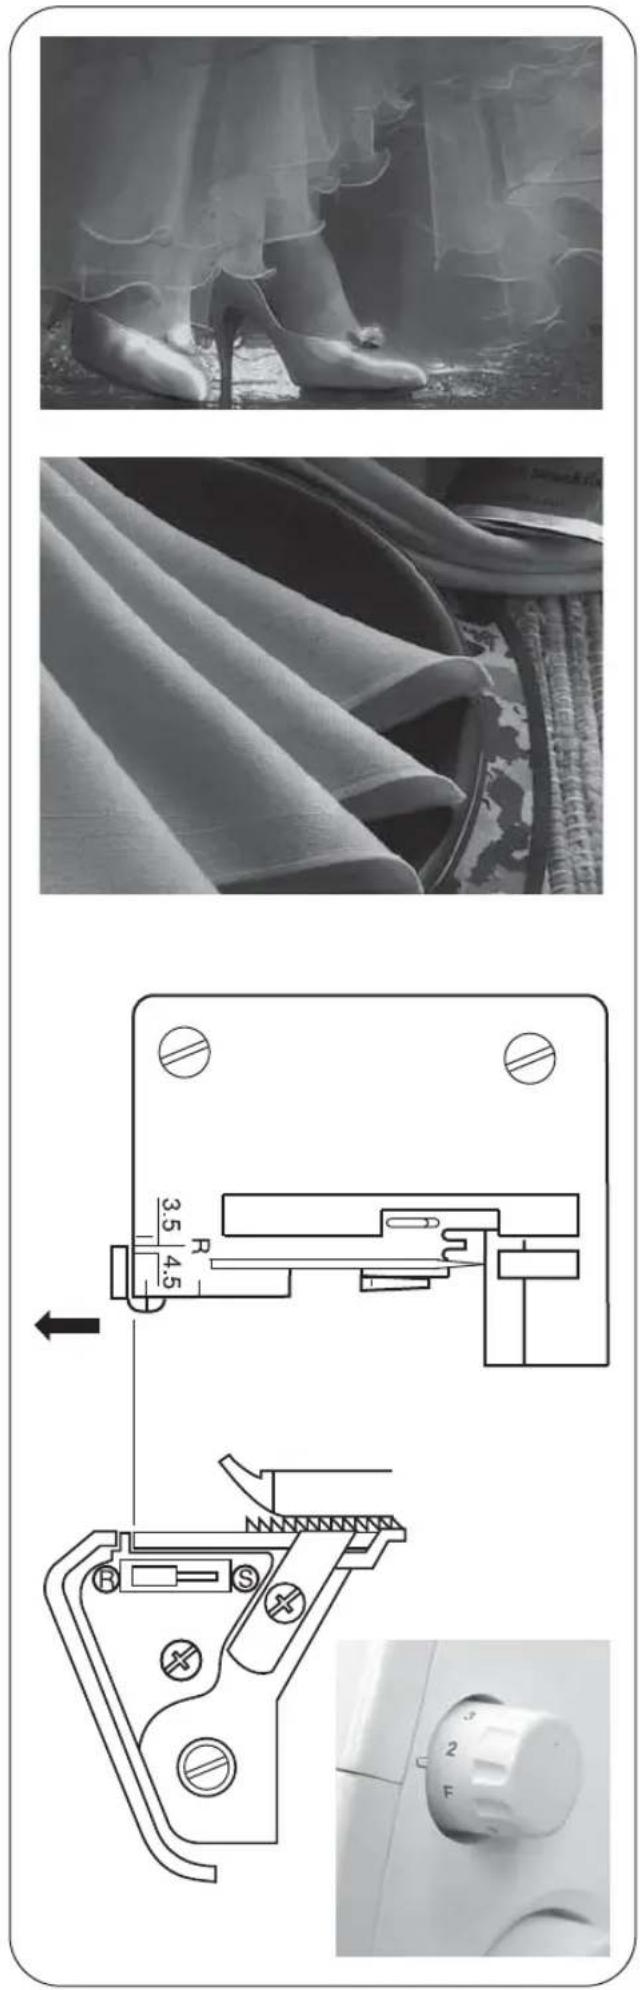
To Sew Rolled Hem
- Set seam width finger knob to R to retract the seam width finger.
Note: Be sure to push seam width finger knob as far as it will go in the direction of setting R.
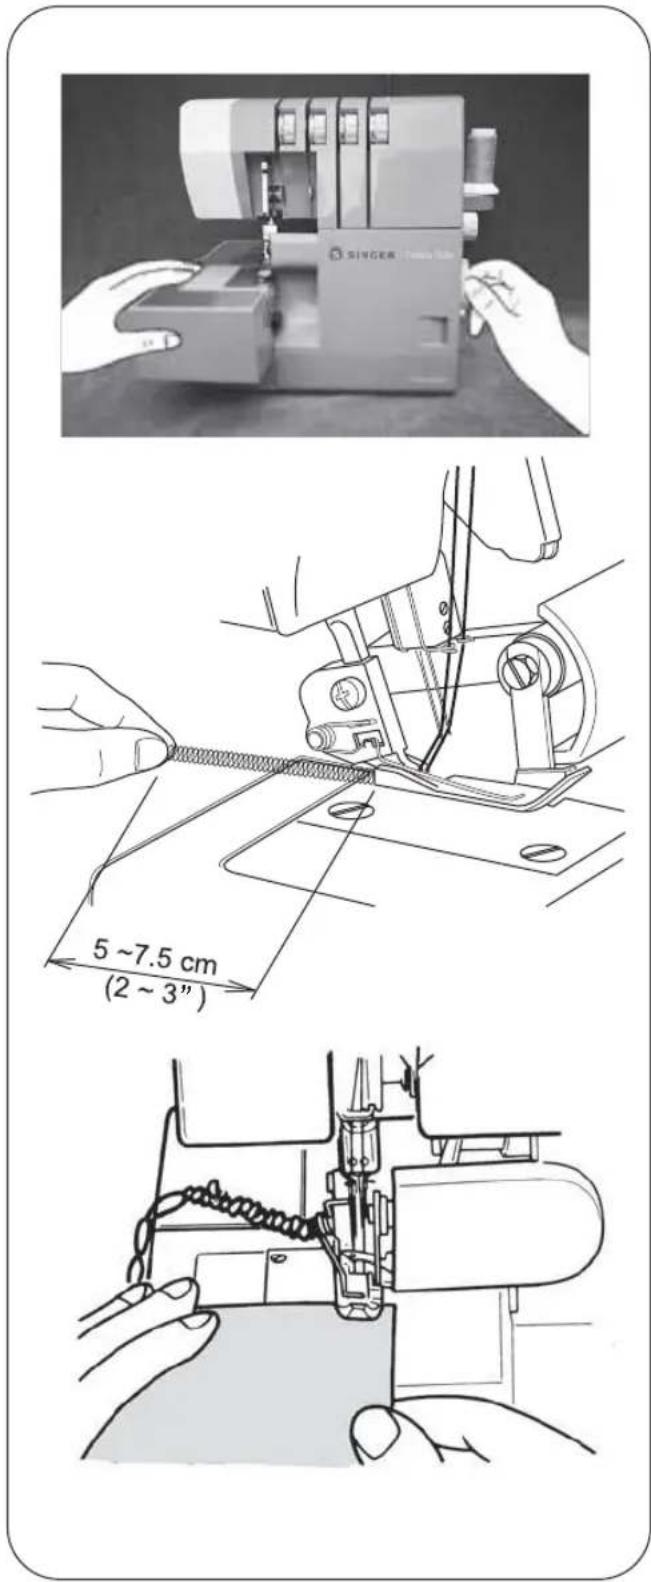
21. CHAINING OFF AND TEST SEWING
- When the machine is completely threaded, bring all of the threads over the throat plate and slightly to the left under the presser foot.
- Hold the threads and apply a slight tension.
- Turn the hand wheel toward you 2 or 3 complete turns to start the thread chain.
- Lower presser foot.
- Continue holding the chain and press on the foot controller until the chain is 5 \~ 7.5cm (2 \~ 3 inches) in length.
- Place fabric under the front of the presser foot and sew a test sample.
Note: Do not pull on the fabric while sewing as this may deflect the needle, causing it to break.
22. Starting and Ending Seams
To Start a Seam
- To start a seam on most fabrics, first bring the thread tail under the presser foot and then to the left of the machine.
- Hold the thread tail and step on the foot controller to begin sewing.
Sew until you have created a 3" (7.5 cm) chain.
- Place the fabric on the feed dogs in front of the foot. Start sewing.
Note: * For heavy or thick fabrics, it is recommended to use SINGER needles #2022 size 100/16.
* Heavy or thick fabrics may be more difficult to feed than others. In these cases, start by cutting a notch at the beginning of the seam about 1" (2.5 cm) down from the top of the fabric, and along the seam line.
* Lift the presser foot and raise the needles. Place the notch so that the top edge of the fabric is in front of the needles, with the cut edge lined up next to the blade.
* Lower the presser foot and sew.
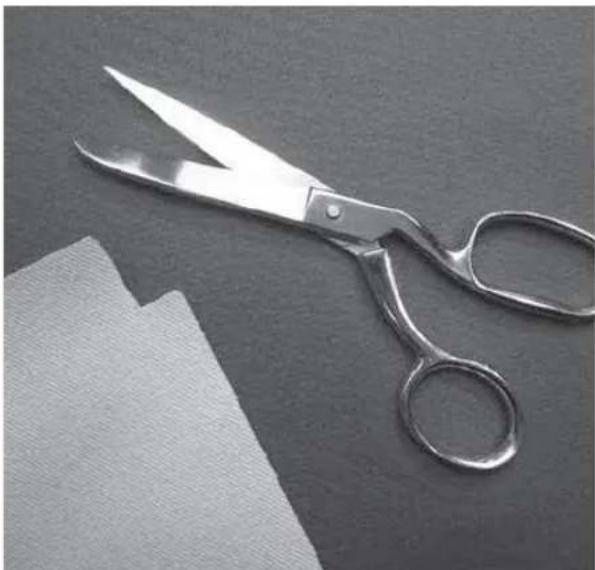
To End a Seam
- To end a seam, continue sewing past the end of the fabric until the thread chain forms.
- Cut the thread, leaving at least 3" (7.5 cm) at the end of the fabric.
natural_image
Close-up of metal scissors cutting a piece of paper on a dark surface (no text or symbols visible)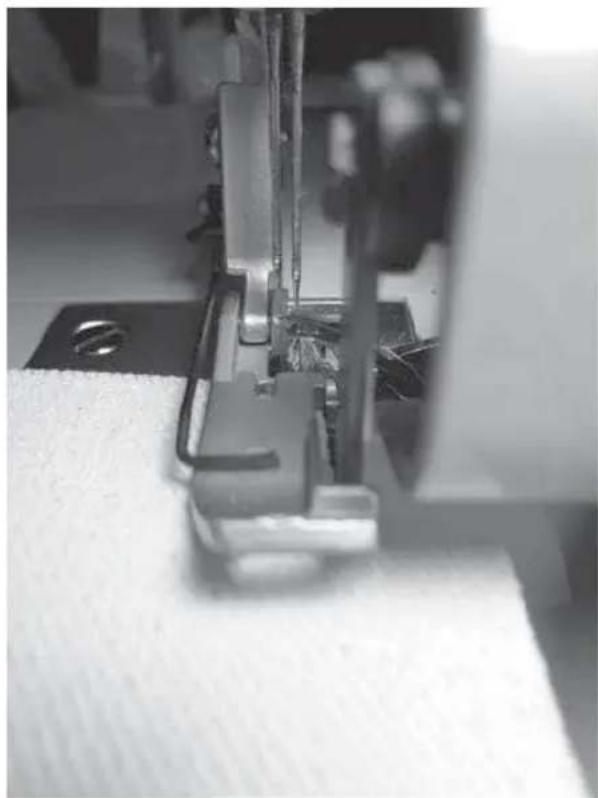
natural_image
Close-up of a sewing machine needle stitching fabric, showing metal clamps and mounting holes (no text or symbols visible)
natural_image
Close-up of a sewing machine stitching fabric with visible stitching details (no text or symbols)23. SUGGESTED TENSION SETTING
1) 2-Thread wrapped edge overlock.
Note: * These are suggested tension settings only.
* Tension settings are effected by;
1) Type and thickness of fabric
2) Needle size
3) Size, type and fiber content of thread
* See page 26 to converting the upper looper into spreader.
Correct Balance
- Set each tension dial to settings shown at right and test sew on a sample of your fabric
How to Balance
- When the lower looper thread tension is too tight or the needle thread tension is too loose:
-Turn the lower looper thread tension dial (yellow) toward a lower number.
-Or, turn the needle thread tension dial (blue or green) toward a higher number.
- When the lower looper thread tension is too loose; -Turn the looper thread tension dial (yellow) toward a higher number.
| NEEDLE POSITION | ||
| SEAM WIDTH FINGER KNOB | S | |
| STITCH LENGTH | 2 - 4 | |
| SPREADER | USE | |
| Fabric | Tension Dial | |||
| Blue | Green | Orange | Yellow | |
| Light weigt | 2.5 | Spreader | 1.0 | |
| Medium weight | 3.5 | Spreader | 1.0 | |
| Heavy weight | 4.0 | Spreader | 1.0 | |
| Fabric | Tension Dial | |||
| Blue | Green | Orange | Yellow | |
| Light weigt | 2.5 | Spreader | 2.0 | |
| Medium weight | 4.0 | Spreader | 2.0 | |
| Heavy weight | 5.0 | Spreader | 2.0 | |
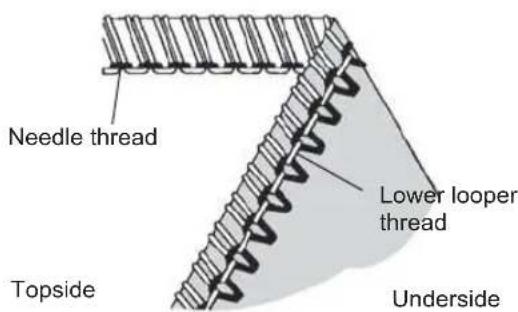
2) 2-Thread standard rolled hem stitching
Note: * These are suggested tension settings only.
* Tension settings are effected by;
1) Type and thickness of fabric
2) Needle size
3) Size, type and fiber content of thread
* See page 26 to converting the upper looper into spreader.
Correct Balance
- Set each tension dial to settings shown at right and test sew on a sample of your fabric
How to Balance
- When the lower looper thread is bottom side of the fabric.
-Tum the lower looper thread tension dial (yellow) toward a higher number.
-Or, turn the needle thread tension dial (blue or green) toward a lower number.
- When the needle thread tension is too loose;
-Tum the needle thread tension dial (blue on green) toward a lower number.
-Or, turn the lower looper thread tension dial (yellow) toward a lower number.
| NEEDLE POSITION | ||
| SEAM WIDTH FINGER KNOB | S | |
| STITCH LENGTH | 2 - 4 | |
| SPREADER | USE | |
| Fabric | Tension Dial | |||
| Blue | Green | Orange | Yellow | |
| Light weigt | 0 | Spreader | 5.0 | |
| Medium weight | 0.5 | Spreader | 5.0 | |
| Heavy weight | 1.0 | Spreader | 5.0 | |
| Fabric | Tension Dial | |||
| Blue | Green | Orange | Yellow | |
| Light weigt | 0 | Spreader | 5.0 | |
| Medium weight | 0.5 | Spreader | 6.0 | |
| Heavy weight | 1.0 | Spreader | 6.5 | |
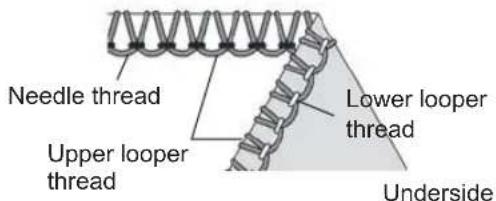
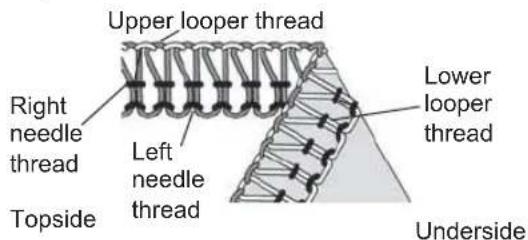
3) 3-thread Overlock
Note: * These are suggested tension settings only.
* Tension settings are effected by;
1) Type and thickness of fabric
2) Needle size
3) Size, type and fiber content of thread
Correct Balance
- Set each tension dial to settings shown at right and test sew on a sample of your fabric
How to Balance
- When the upper looper thread lies on the underside of the fabric;
- Turn the upper looper thread tension dial (orange) to a higher number.
- Or, turn the lower looper thread tension dial (yellow) to a lower number.
- When the lower looper thread appears on the top of fabric;
- Turn the lower looper thread tension dial (yellow) toward a higher number.
- Or, turn the upper looper thread tension dial (orange) to a lower number.
- When the needle thread is too loose, turn the needle tension dial (blue or green) to a higher number.
| NEEDLE POSITION |  |  |
| SEAM WIDTH FINGER KNOB | S | |
| STITCH LENGTH | 2 - 4 | |
| Fabric | Tension Dial | |||
| Blue | Green | Orange | Yellow | |
| Light weight | 2.5 | 3.0 | 3.0 | |
| Medium weight | 3.0 | 3.0 | 3.0 | |
| Heavy weight | 3.5 | 3.0 | 3.0 | |
| Fabric | Tension Dial | |||
| Blue | Green | Orange | Yellow | |
| Light weight | 2.5 | 3.0 | 3.0 | |
| Medium weight | 3.0 | 3.0 | 3.0 | |
| Heavy weight | 3.5 | 3.0 | 3.0 | |
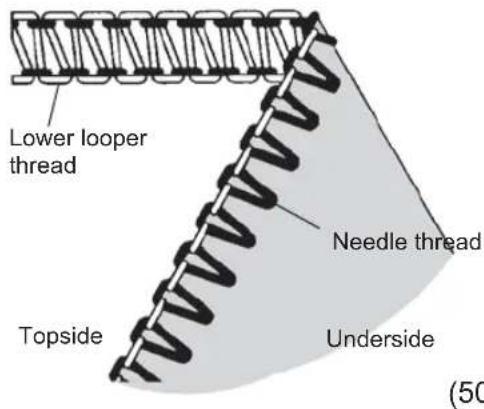
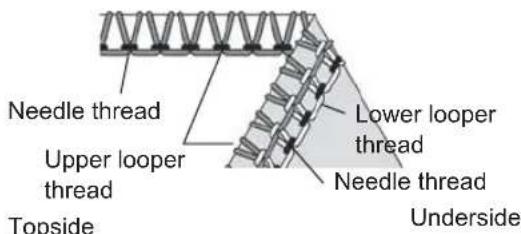
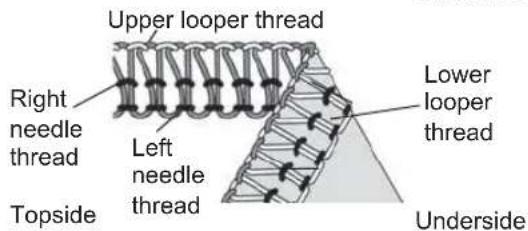
4) 3-thread Flatlock
Note: * These are suggested tension settings only.
* Tension settings are effected by;
1) Type and thickness of fabric
2) Needle size
3) Size, type and fiber content of thread
Correct Balance
- Set each tension dial to settings shown at right and test sew on a sample of your fabric
How to Balance
- When the lower looper thread tension is too loose;
- Turn the lower looper thread tension dial (yellow) toward a higher number.
- Or, turn the needle thread tension dial (blue or green) toward a lower number.
- When the upper looper thread tension is too loose;
- Turn the upper looper thread tension dial (orange) toward a higher number.
- Or, turn the needle thread tension dial (blue or green) toward a lower number.
- When the needle thread tension is too loose;
- Turn the needle thread tension dial (blue or green) toward a higher number.
- Or, turn the upper looper thread tension dial (orange) toward a lower number.
| NEEDLE POSITION | ||
| SEAM WIDTH FINGER KNOB | S | |
| STITCH LENGTH | 2 - 4 | |
| Fabric | Tension Dial | |||
| Blau | Green | Orange | Yellow | |
| Light weight | 0.5 | 5.0 | 7.0 | |
| Medium weight | 0.5 | 5.0 | 7.0 | |
| Heavy weight | 0.5 | 5.0 | 7.0 | |
| Fabric | Tension Dial | |||
| Blau | Green | Orange | Yellow | |
| Light weight | 0.5 | 5.0 | 7.0 | |
| Medium weight | 0.5 | 5.0 | 7.0 | |
| Heavy weight | 0.5 | 5.0 | 7.0 | |

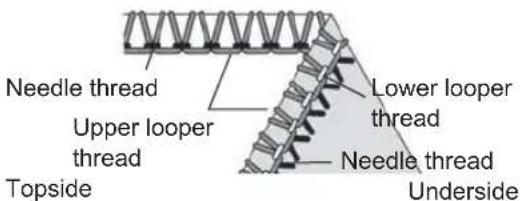
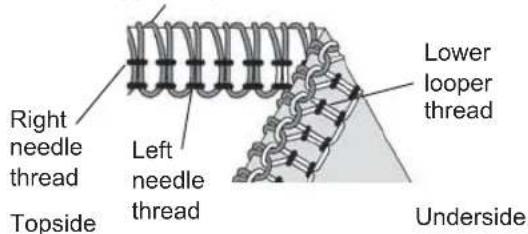
5) 3-thread Wrapped Edge Overlock
Note: * These are suggested tension settings only.
* Tension settings are effected by;
1) Type and thickness of fabric
2) Needle size
3) Size, type and fiber content of thread
Correct Balance
- Set each tension dial to settings shown at right and test sew on a sample of your fabric
How to Balance
- When the upper looper thread tension is too loose;
- Turn the upper looper thread tension dial (orange) toward a higher number.
- When the lower looper thread tension is too loose;
- Turn the lower looper thread tension dial (yellow) toward a higher number.
- Or, turn the upper looper thread tension dial (orange) toward a lowre number.
- When the needle thread tension is too loose;
- Turn the needle thread tension dial (blue or green) toward a higher number.
- Or, turn the upper looper thread tension dial (orange) toward a lower number.
| NEEDLE POSITION | ||
| SEAM WIDTH FINGER KNOB | S | |
| STITCH LENGTH | 2 - 4 | |
| Fabric | Tension Dial | |||
| Blue | Green | Orange | Yellow | |
| Light weight | 4.0 | 0 | 8.0 | |
| Medium weight | 5.0 | 0 | 8.5 | |
| Heavy weight | 5.0 | 0 | 8.5 | |
| Fabric | Tension Dial | |||
| Blue | Green | Orange | Yellow | |
| Light weight | 2.5 | 1.0 | 7.0 | |
| Medium weight | 3.0 | 1.0 | 7.0 | |
| Heavy weight | 3.5 | 1.0 | 7.0 | |
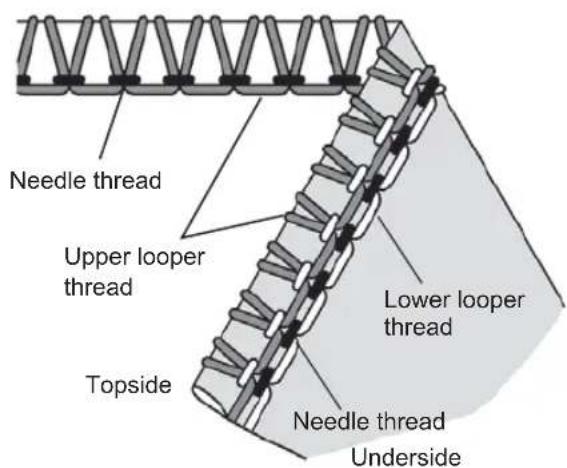
Topside
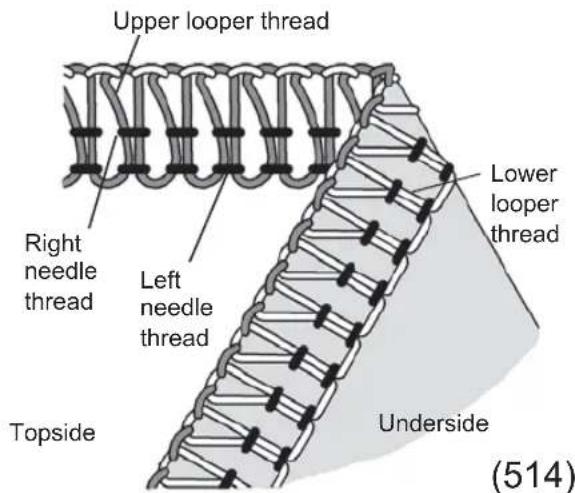
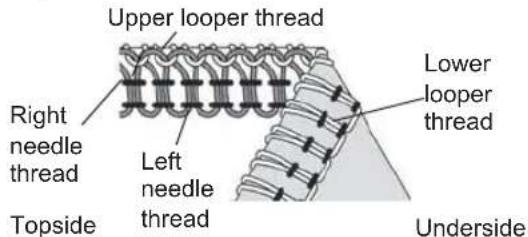
6) 4-thread Ultra Stretch Mock Safety Stitch
Note: * These are suggested tension settings only.
* Tension settings are effected by;
1) Type and thickness of fabric
2) Needle size
3) Size, type and fiber content of thread
Correct Balance
- Set each tension dial to settings shown at right and test sew on a sample of your fabric
How to Balance
- When the upper looper thread lies on the underside of the fabric;
- Turn the upper looper thread tension dial (orange) to a higher number.
- Or, turn lower looper thread tension dial (yellow) to a lower number
- When the lower looper thread appears on the top of the fabric;
- Turn lower looper thread tension dial (yellow) toward a higher number
- Or, turn the upper looper thread tension dial (orange) toward a lower number.
- When the left needle thread tension is too loose;
- Turn the left needle thread tension dial (blue) toward a higher number.
- When the right needle thread tension is too loose;
- Turn the right needle thread tension dial (green) toward a higher number.
| NEEDLE POSITION |  |
| SEAM WIDTH FINGER KNOB | S |
| STITCH LENGTH | 2 - 4 |
| Fabric | Tension Dial | |||
| Blue | Green | Orange | Yellow | |
| Light weight | 2.5 | 2.5 | 3.0 | 3.0 |
| Medium weight | 3.0 | 3.0 | 3.0 | 3.0 |
| Heavy weight | 3.5 | 3.5 | 3.0 | 3.0 |
24. HOW TO SEW A ROLLED HEM
• This machine can sew four types of rolled hems.
- Rolled hemming is done by rolling and overedging the fabric edge.
- Light weight fabrics such as lawn, voil, organdy, crepe, etc, perform the best.
- Rolled hemming is not suited for heavy or stiff fabrics.
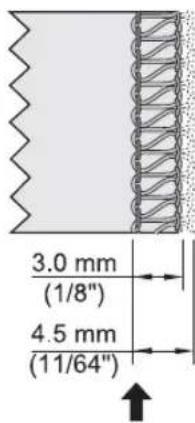
Machine Set Up
- Remove the left needle.
- Move seam width finger knob to setting R. (See page 28)
- Align left face of seam width finger support plate with R mark on throat plate by turning seam width finger knob, as required.
- Set stitch length dial to "F\~2" and a fine seam will be sewn.
- Needle: Singer Needle #2022 size 80/11 or 90/14
- Thread: A variety of thread combinations can be used for rolled hemming.
Note: For a beautiful two-thread rolled hem thread the upper looper with wooly nylon and the needle with lightweight regular thread.
1) a.2-Thread wrapped edge overlock
Correct Balance
- Set each tension dial to settings shown at right and test sew on a sample of your fabric
b.2-Thread standard rolled hem stitching
Correct Balance
- Set each tension dial to settings shown at right and test sew a sample of your fabric.
| NEEDLE POSITION |  |
| SEAM WIDTH FINGER KNOB | S |
| STITCH LENGTH | F - 2 |
| SPREADER | USE |
| Upper looper thread | Tension Dial | |||
| Blue G | Green | Orange | Yellow | |
| Polyester | 3.0 | 2.0 | ||
| Wooly nylon | 3.0 | 2.0 | ||
| Upper looper thread | Tension Dial | |||
| Blue | Orange | Yellow | ||
| Wooly nylon 2.0 4.0 | ||||
Note: For a beautiful rolled hem thread the upper looper with wooly nylon and the needle and lower looper with lightweight regular thread.
2) a.3-thread Standard Rolled Hem Stitching
Correct Balance
- Set Each Tension Dial to Settings Shown at Right and Test Sew on a Sample of Your Fabric
b.3-thread Upper Looper Thread Wrapped Rolled Hem Stitching
Correct Balance
- Set each tension dial to settings shown at right and test sew on a sample of your fabric
| NEEDLE POSITION |  |
| SEAM WIDTH FINGER KNOB | R |
| STITCH LENGTH | F - 2 |
| Upper looper thread | Tension Dial | |||
| Blue G | Green Orange | Yellow | ||
| Polyester | 3.0 | 5.0 | 3.0 | |
| Wooly nylon | 3.0 | 3.5 | 3.5 | |
| Upper looper thread | Tension Dial | |||
| Blue | Orange | Yellow | ||
| Polyester | 2.0 | 5.0 | 7.0 | |
| Wooly nylon | 2.0 | 2.0 | 5.0 | |
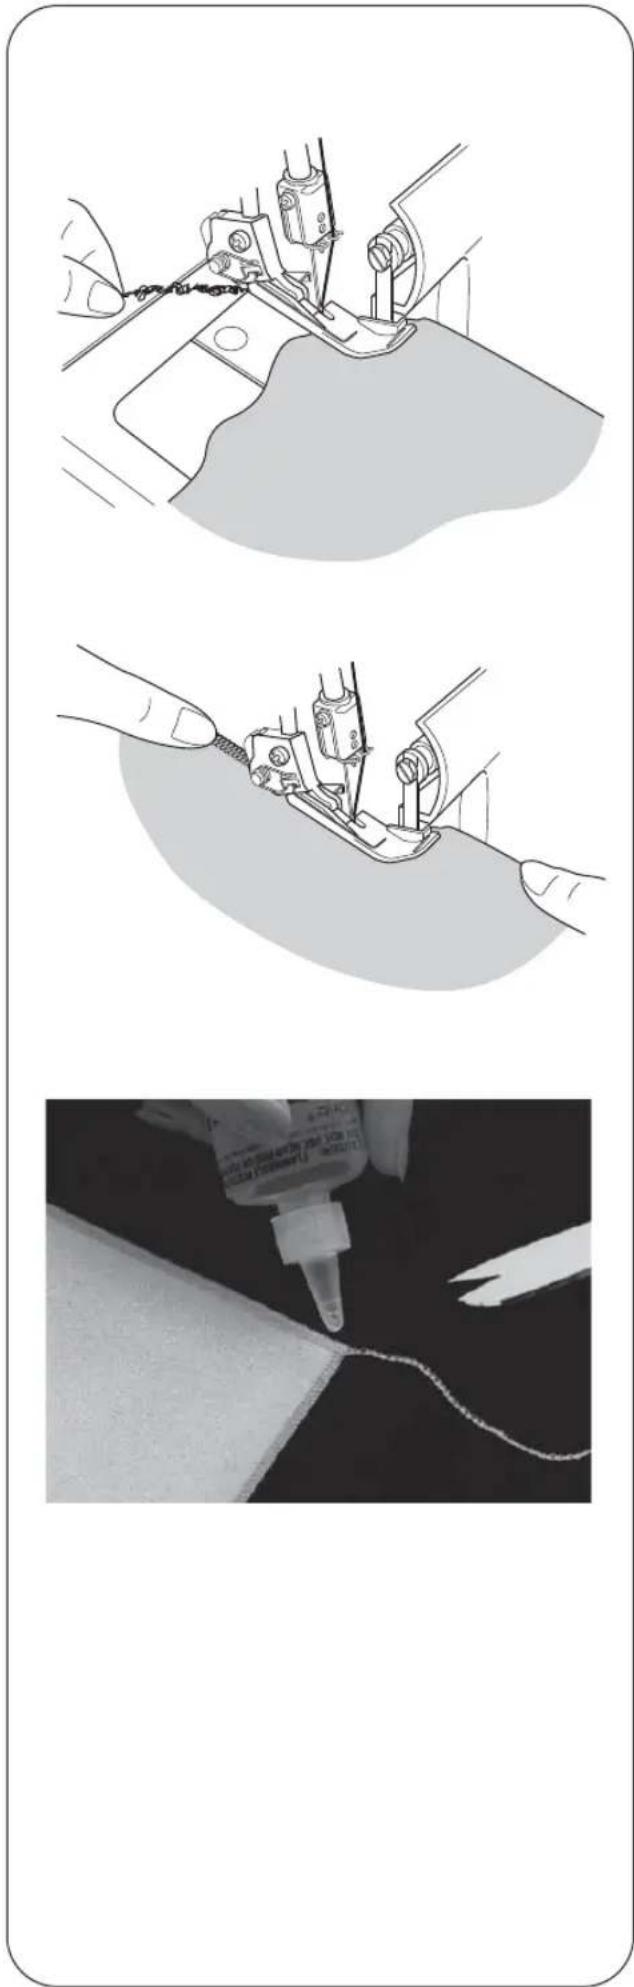
Additional Information About Rolled Hemming
- Hold the thread chain when you begin sewing to keep it from curling into the seam.
- Place a slight tension on the material in the sewing direction and a finer seam finish can be obtained.
- The minimum overedge stitch width that can be obtained for rolled hemming is approximately 1.5mm (1/16 inch) since the cutting width cannot be set below 3.5mm (9/64 inch).
To Secure the Rolled Hem Thread Chain
- Apply a small drop of liquid seam sealant to the end of the seam. Allow to dry, then cut the chain close to the stitches.
Note: Test the liquid seam sealant for color fastness before use.
natural_image
Three-panel illustration showing sewing process: fabric cutting, needle stitching, and needle application (no text or symbols)25. STITCH VARIATIONS AND SEWING TECHNIQUES
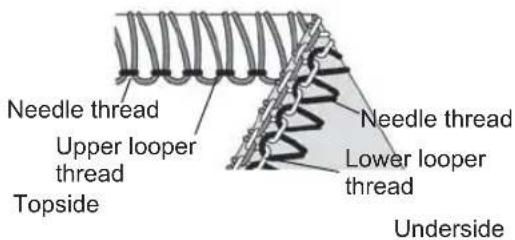
How to Sew a Flatlock Decorative Seam
- A flatlock stitch is achieved by adjusting the tension of the 3-thread overlock stitch, sewing the seam and pulling the fabric apart to flatten the seam.
- The flatlock stitch can be used as a construction and decorative stitch or for ornamentation only.
(1) Machine Set Up
- Remove the left or right needle.
- Begin with the machine threaded and tension balanced for the 3-thread overlock stitch (page 29).
- Loosen the needle thread tension (green or bule) generously.
- Loosen the upper looper thread tension (orange) slightly.
- Tighten the lower looper thread tension (yellow) generously.
(2) Flatlocking a Seam
- Place the fabric wrong sides together to sew a decorative stitch on the right side of the garment.
- Sew the seam, trimming the excess fabric.
- The needle thread (green or blue) will form a V on the underside of the fabric.
- The lower looper thread will pull into a straight line at the fabric edge.
- Pull on opposite sides of the seam to pull the stitches flat.
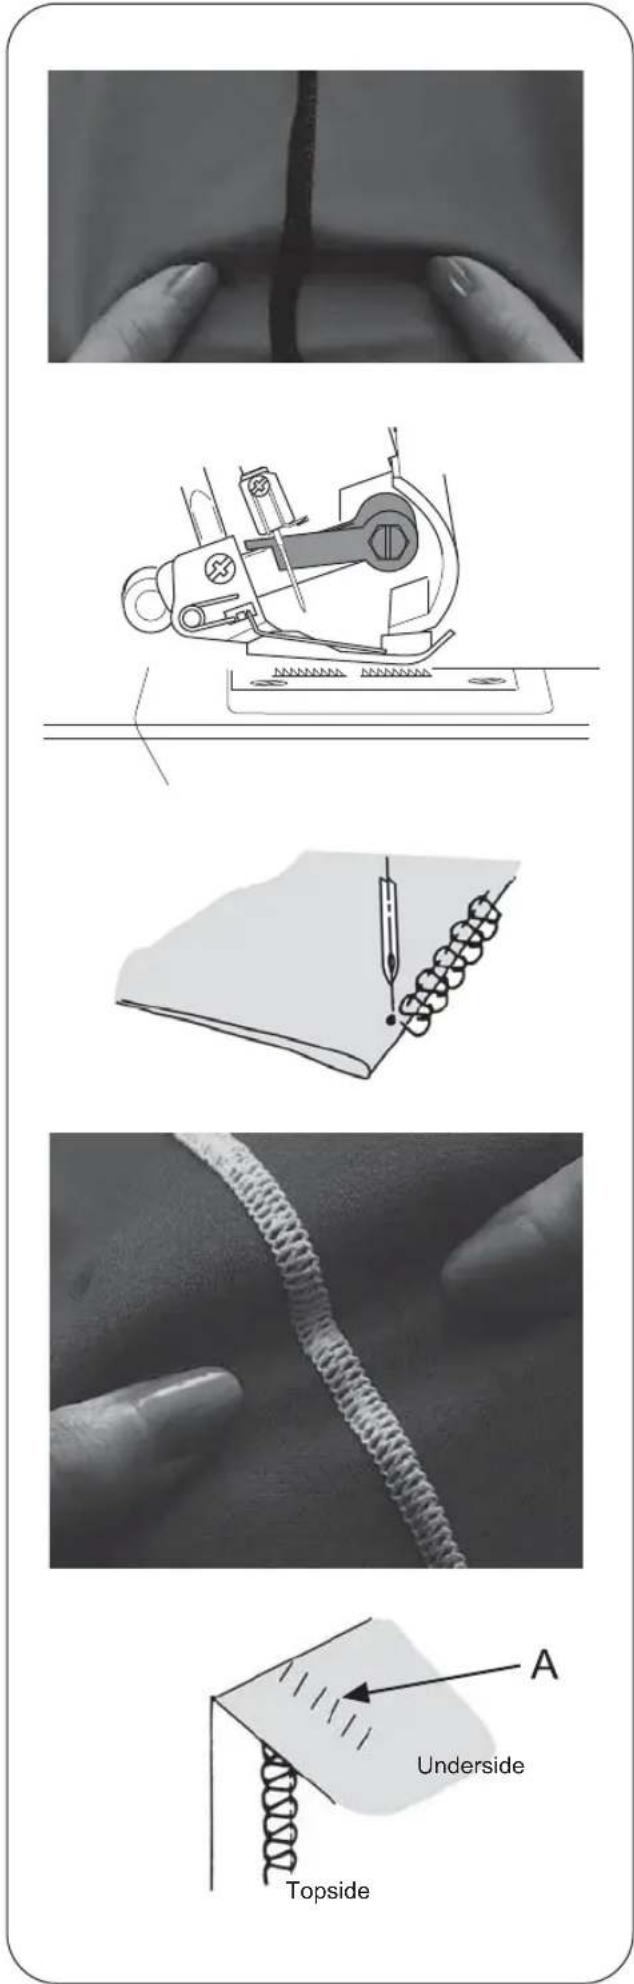
(3) Decorative Flatlocking
- Place the movable upper knife in the nonworking position (page 25). The fabric is not trimmed or this stitch.
- Fold fabric wrong sides together.
- Position the fabric so the seam is sewn with par of the stitch extending off the fabric.
- Pull on opposite sides of the stitch to flatten.
(4) Additional Information About Flatlocking
- The tensions must be correctly adjusted for the fabric to pull flat.
- The upper looper thread is the prominent thread in the flatlock stitch. Place a decorative thread in the upper looper and inconspicuous threads in the lower looper and needle.
- For a ladder stitch, sew seam with right sides together. The needle thread will be the prominent thread that creates the ladder (A).
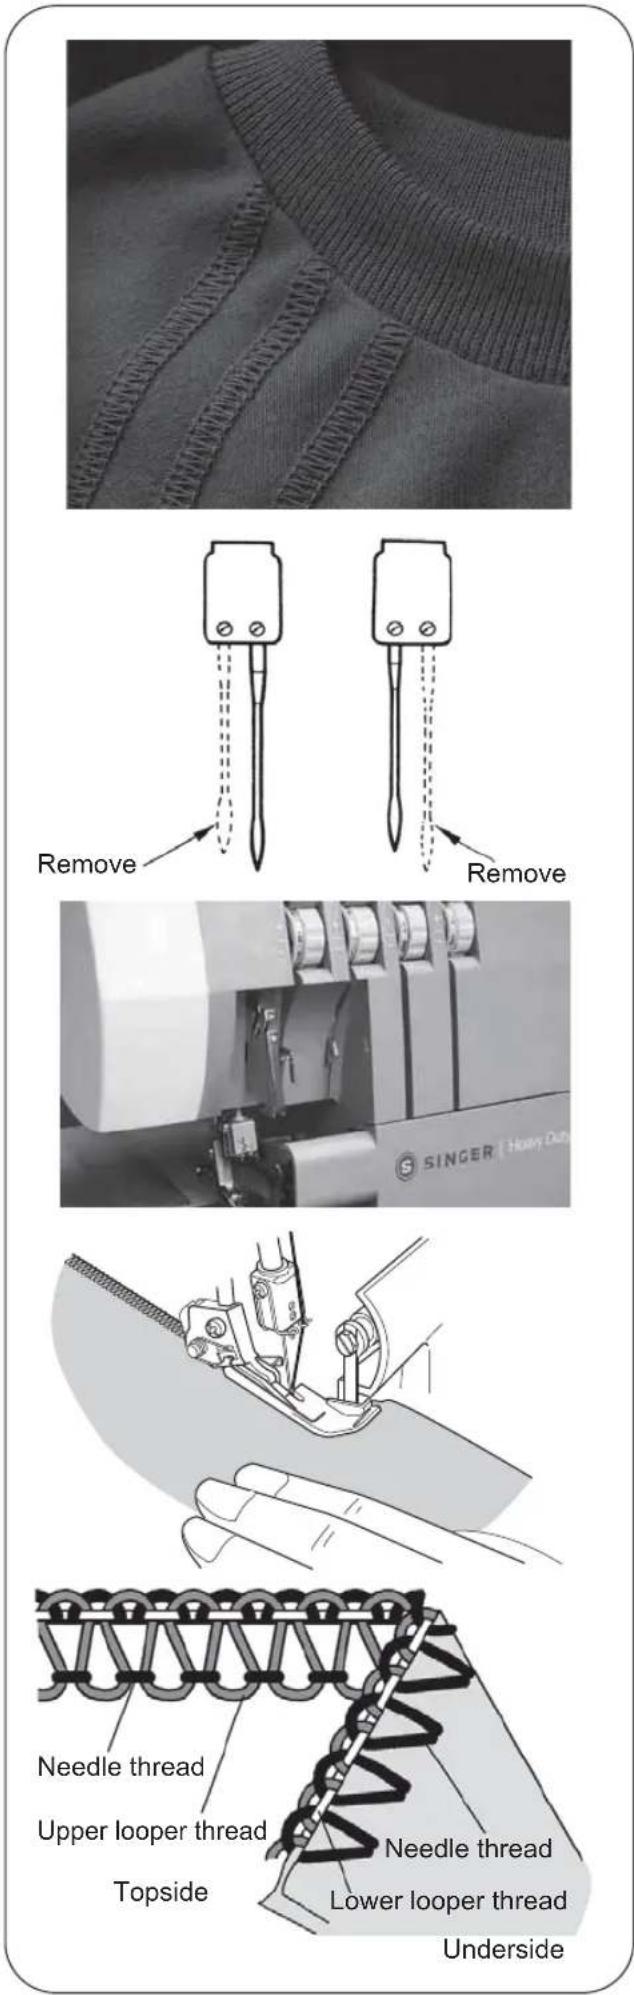
How to Sew an Overlock Blind Hem
- The excess fabric is trimmed and the hem is sewn and the raw edges are overlocked in one operation.
- The overlock blind hem is best suited for sewing knit wear. It provides a durable finish that is almost invisible.
- Remove the left needle and adjust machine for a narrow 3-thread overlock stitch.
Note: The three-thread flatlock stitch can also be used. - Set the stitch length dial at 4.
- Fold the hem to the wrong side of the fabric, then back to the right side with 6mm (1/4") beyond the fold.
- Stitch on the extended hem edge, allowing the machine needle to barely catch the edge of the fold.
How to Sew Pin Tucks
- Sew decorative pin tucks on the fabric before cutting out the garment.
- Remove the left needle and adjust machine for a narrow 3-thread overlock stitch.
Note: The rolled hem stitch can also be used for this technique.
- Place the movable upper knife in the nonworking position (page 25).
- mark the fabric with the desired number of pin tucks using a water soluble fabric marker.
Fold the fabric with the wrong sides together and sew.
Press the pin tucks in the same direction.
Cutting line
Turning Square Corners
(1) Outside Corner
Cut out approximately 2 cm (51/64 inch) from the corner, in line with the overedge seam edge.
Sew one stitch beyond point (A) and stop.
Raise needle and presser foot.
Pull the fabric to the rear of the machine just enough to release the thread caught on the finger of the throat plate.
Note: Presser foot has been removed to show detail.
Turn the fabric and lower the presser foot so that the knife is positioned in line with the cut edge.
Pull slack threads up, then start to sew.
Cutting line
(2) Inside Corner
Cut fabric at seam edge.
Cut Slit
- Place the movable upper knife in nonworking position (page 25).
- Stitch on cut edge of fabric.
- Stop sewing before you reach the corner and fold the fabric to the left to straighten the corner.
- Continue to sew slowly holding the fabric edge in a straight line moving the fold as you sew.
Pin Placement
- Insert pins to the left of the presser foot. The pins will be easy to remove and are away from the cutting action of the knives.

Caution:
Sewing over pins will damage and/or destroy the cutting edge of the knives.
Securing the Thread Chain
- Thread a large eye, hand sewing needle (such as a tapestry needle) with the thread chain.
- Insert the needle into the end of the seam to secure thread.
Note: To secure a rolled hem thread chain, see page 39.

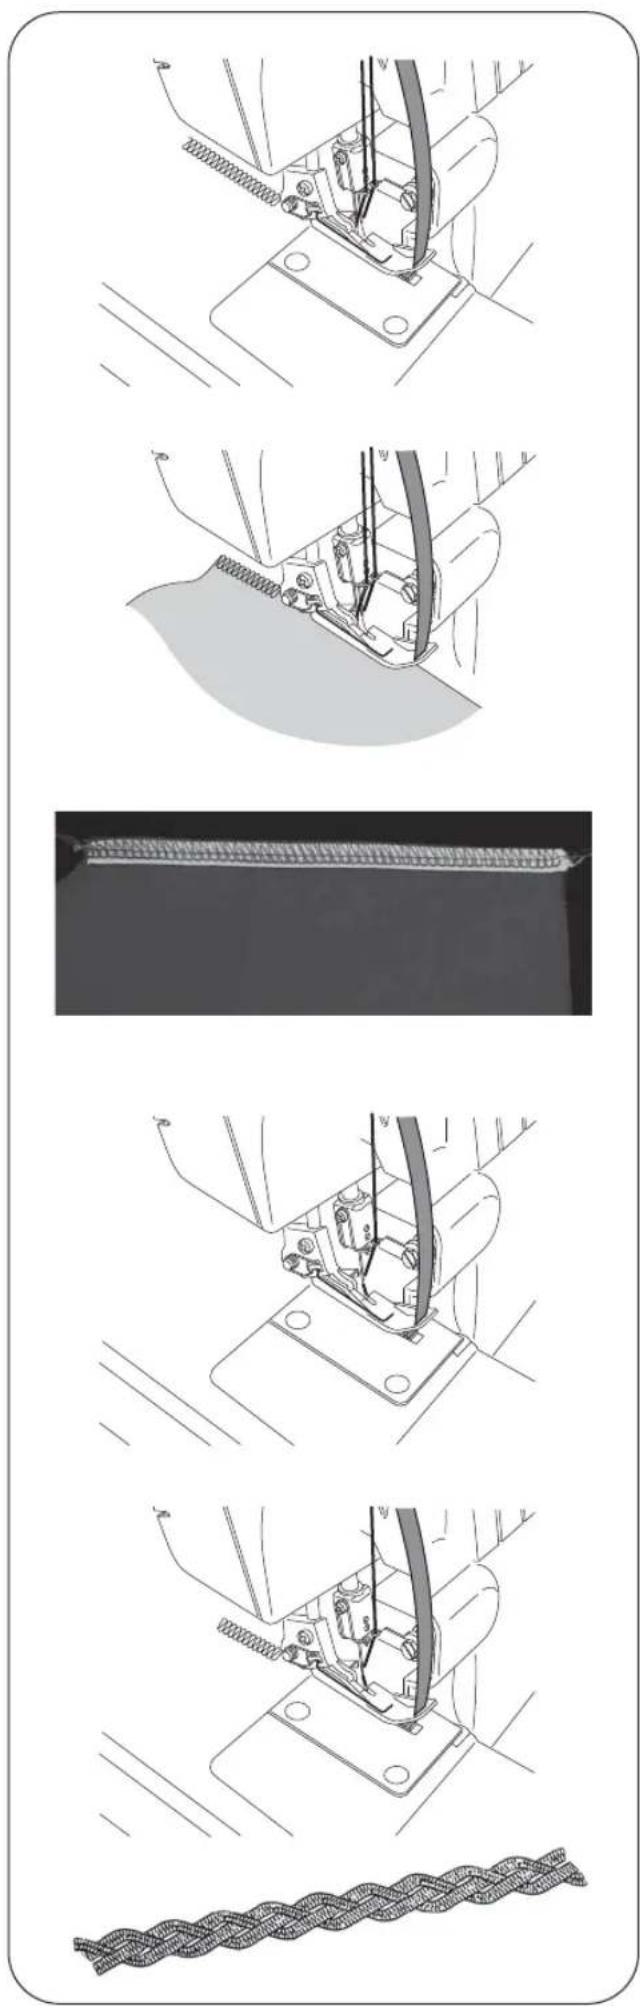
How to Reinforce a Seam
- Inserting twill tape while overedge sewing will stabilize the seam.
- Insert the tape through the hole in the front of the foot.
- Position the tape under the foot to the back of the machine and sew the garment seam.
• The tape is attached as the seam is sewn.
Braiding by Chaining Off
- Place the movable upper knife in nonworking position.
- Insert filler cord such as yarn or twill tape through the hole in the front of the foot.
- Position the filler cord under the foot and chain off the desired length.
- Chained off braids can be used individually or woven into 3 or 4 ply braids.
natural_image
Technical line drawings of sewing machine components including fabric, thread, and clasp (no text or symbols)26. MACHINE MAINTENANCE
An overlock requires more maintenance than a conventional machine mainly due to two reasons.
1) A lot of lint is produced due to the cutting action of the knives.
2) An overlock runs at a very high speed and needs to be oiled frequently to lubricate the internal working parts.
Cleaning the Machine

Danger:
Before cleaning your machine, disconnect power line plug from the wall receptacle.
- Clean the lint from the looper and knife area often with a dry lint brush.
Note: Lint brush is an optional part.
Oiling the Machine

Danger:
Before lubricating your machine, disconnect power line plug from the wall receptacle.
- The oiling points shown in the diagram, should be oiled periodically.
Note: Use sewing machine oil. Do not use any other oil or damage could result.
natural_image
Industrial machine with paper roll and control panel, no visible text or symbols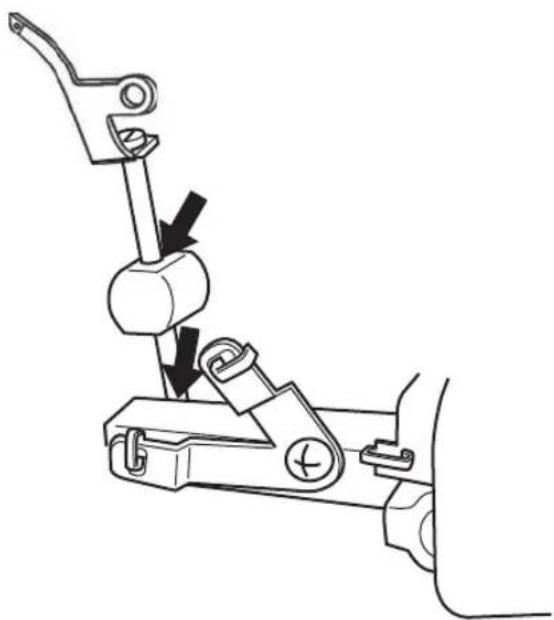
natural_image
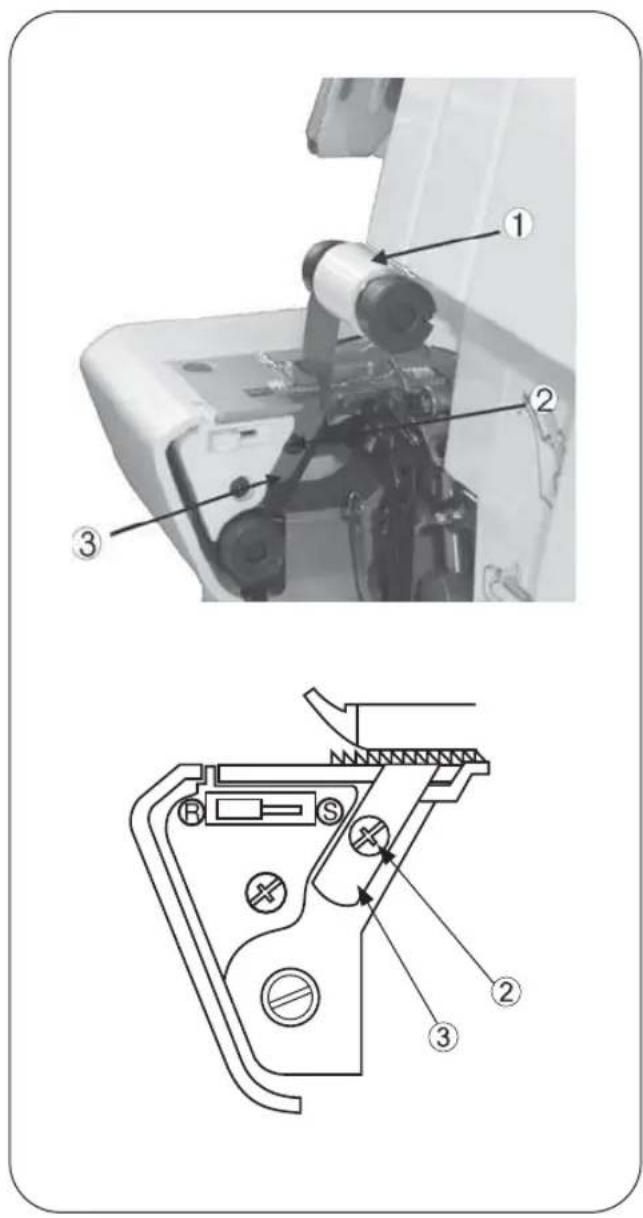
Mechanical assembly diagram showing a lever mechanism with no text or symbolsHow to Replace the Stationary Knife

Danger:
Before replacing the stationary knife, disconnect power line plug from the wall receptacle.
- The stationary knife should be changed when it becomes dull.
- The stationary knife can be replaced according to the directions provided, however if there are any difficulties experienced, consult your Singer representative to make the adjustments.
- Be sure that the power line plug is disconnected from the electric source.
- Open the looper cover and set the movable upper knife 1 in the nonworking position (page 25).
- Loosen the stationary knife set screw 2 and remove the stationary knife 3.
- Place a new stationary knife in the groove of the stationary knife holder.
- Tighten stationary knife set screw 2.
- Return the movable upper knife 1 to its working position.
- TROUBLE SHOOTING CHART
| Problem | Solution Page | |
| Fabric does not feed well | - Lengthen stitch length.- Increase presser foot pressure for heavy weight fabric.- Decrease presser foot pressure for light weight fabric. | 212222 |
| Needle breaks | - Insert needle correctly.- Do not pull fabric while sewing.- Tighten needle set screw.- Use a larger needle on heavy fabrics. | 1129117 |
| Thread breaks | - Check threading- Check for tangled or caught thread- Insert needle correctly- Insert new needle, current needle may be bent or have a blunt point.- Use a high quality thread.- Loosen thread tension. | 12~19201175031~39 |
| Stitches skip | - Insert new needle, current needle may be bent or have a blunt point.- Tighten needle set screw.- Insert needle correctly.- Change type or size of needle.- Check threading.- Increase presser foot pressure.- Use a high quality thread. | 7111712~192250 |
| Irregular stitches | - Balance thread tension.- Check for tangled or caught thread.- Check threading. | 31~392012~19 |
| Fabric puckers | - Loosen thread tension.- Check for tangled or caught thread- Use high quality light weight thread.- Shorten stitch length.- Decrease presser foot pressure for light weight fabrics. | 31~3920502122 |
| Irregular trimming | - Check alignment of knives.- Replace one or both knives. | 4848 |
| Fabric jams | - Close looper cover before sewing.- Check for tangled or caught thread- Compress thick layers of fabric with conventional machine before sewing with overlock. | 920 |
| Machine does not operate | - Connect machine to power source. | 9 |
- RELATIONSHIP BETWEEN CLOTH, THREAD AND NEEDLE
| Type of Fabric | Type of Thread | NeedleSinger Cat. No. 2022 |
| Light WeightLawn, Organdy,Voil, Crepe, etc. | Cotton: #100Silk: #100Spun: #80 - #90Tetron: #80 - #100 | #11 |
| Medium WeightMuslin, Sheersucker,Satin, Gabardine,Broadcloth, etc. | Cotton: #60 - #80Silk: #50Spun: #60 - #80Tetron: #60 - #80 | #11, #14 |
| Heavy WeightOxford, Denim,Tweed, Corduroy,Serge | Cotton: #40 - #60Silk: #40 - #60Spun: #60 - #80Tetron: #50 - #80 | #16 |
| KnitTricot | Spun: #80 - #90Tetron: #60 - #80 | #11 |
| Jersey | Spun: #60 - #80Tetron: #60 - #80Cotton: #60 - #80 | #11, #14 |
| Wool (woven, knit) | Spun: #60 - #80Tetron: #50 - #60Woolly nylonWoolly tetron | #11, #14 |
SINGER needle, Cat. No. 2022 is furnished with the machine. However, it is recommended that you select your needle in accordance with the material you are sewing.
29. SPECIFICATION
| Item Specification | |
| Sewing speed | 1,200±150 spm |
| Stitch length (feed amount) | 1~4mm (standard: rolled hemming F - 2, ordinary overedge 3.0) |
| Differential feed ratio | 1:0.7 ~ 1:2 (with differential feed machine) |
| Overedge stitch width | Rolled hemming 1.5mm, ordinary overedge 3.0 ~ 6.7mm(standard 3.5mm) |
| Needle bar stroke | 27mm |
| Presser foot rise | 4.5 ~ 5.0mm |
| Needle | SINGER Cat. No. 2022 #14SINGER Cat. No. 2022 #16 |
| Model | HD0400S |
| Number of threads | 2,3,4 |
| Machine dimensions (mm) | |
| Width | 338 |
| Depth | 280 |
| Height | 265 |
| Weight (Kg) | 6.2 |
NOTES
natural_image
Illustration of a spool and a coiled rope with measurement markings (no text or symbols)CE - Authorised Representative
VSM Group AB, SVP Worldwide
natural_image
Exterior view of a SINGER industrial machine (no visible text or symbols on the device body)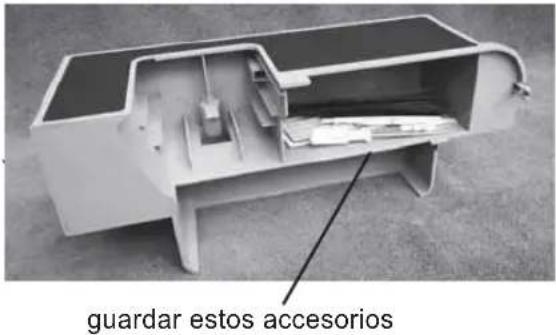
natural_image
Close-up of a white industrial sewing machine with visible components and a numbered label (16) pointing to a base mount.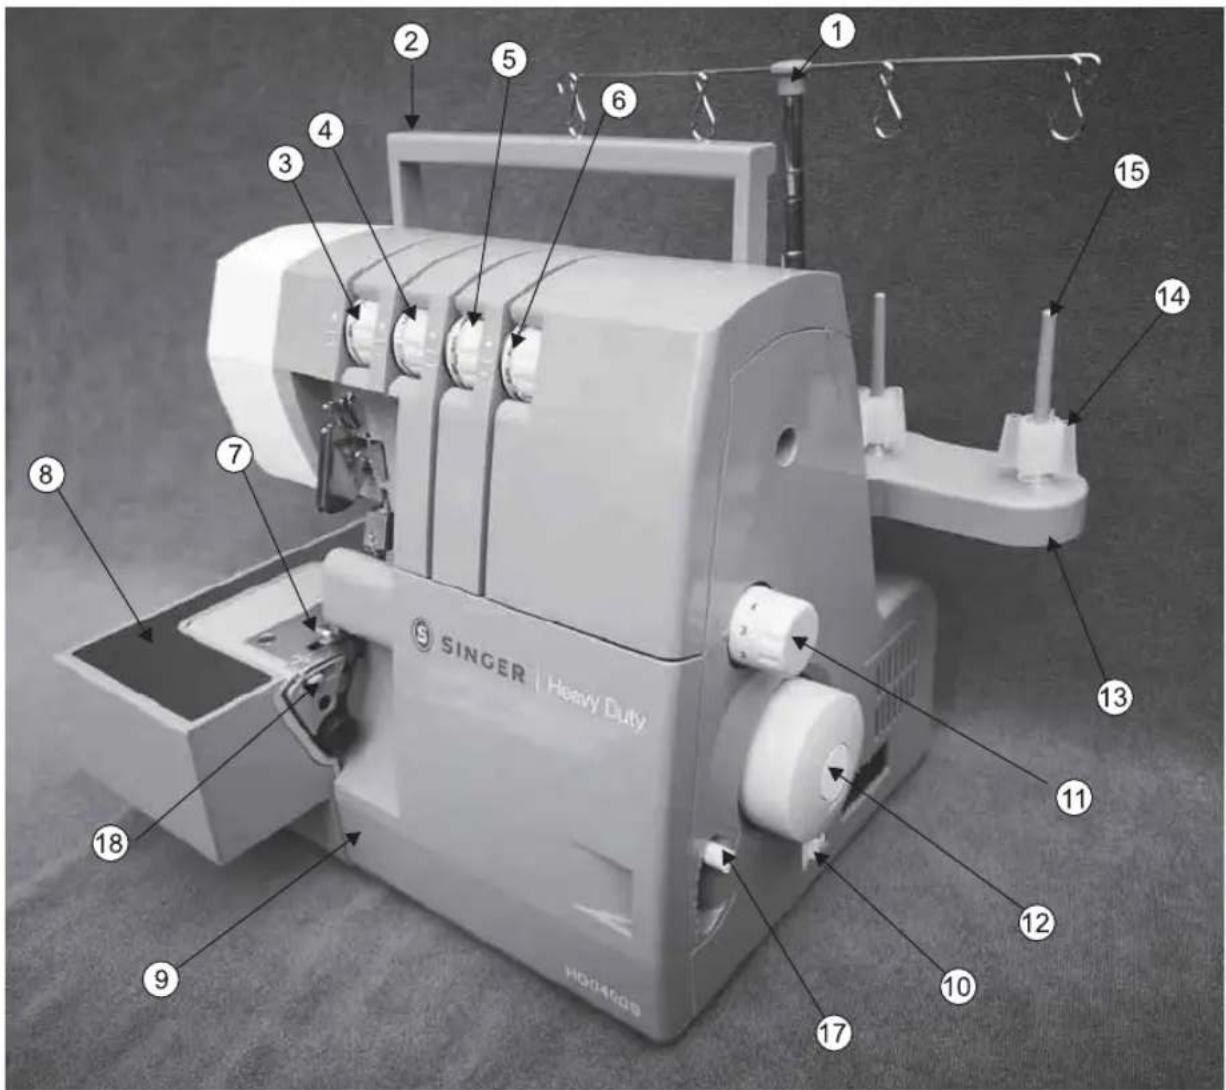
6. COMO ABRIR LA TAPA DEL OJO-GUÍA

Precaución:
ADVERTENCIA:
natural_image
Industrial sewing machine with hanging hook and spool, no visible text or symbols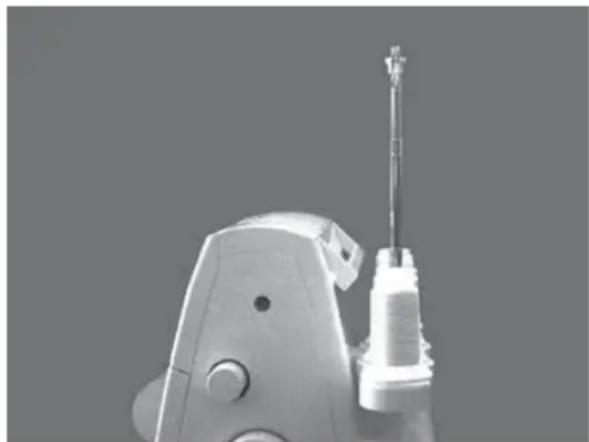
natural_image
Close-up of a small mechanical tool with a metallic tip and threaded shaft (no visible text or symbols)10. CÓMO RETIRAR E INSERTAR AGUJAS
natural_image
Mechanical assembly diagram showing a piston-cranked tool interacting with a cylindrical component, with no visible text or symbols.
natural_image
Mechanical assembly diagram showing a lever mechanism and a cylindrical component with internal components (no text or symbols)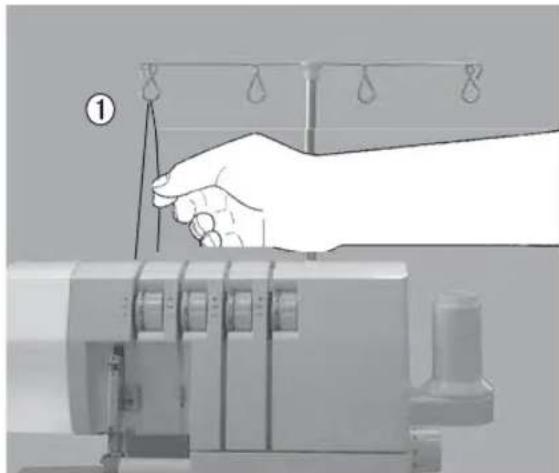
natural_image
Illustration of a hand operating a sewing machine with hanging droplets (no text or symbols)natural_image
Close-up of a sewing machine with numbered callouts (④ and ⑤) indicating specific components, no visible text or symbols beyond labels.
Vista correcta
natural_image
Technical line drawing of a mechanical assembly with no visible text or symbolsVista
incorrecta
natural_image
Technical line drawing of a mechanical assembly with no visible text or symbols12. COMO CAMBIAB LOS HIL OS/PROCEDIMIENTO DE ATADURA

natural_image
Diagram of a mechanical lifting scale with three vertical supports and diagonal rods (no text or labels)
natural_image
Illustration showing a hand holding a pencil and a close-up of a mechanical device with hanging weights (no text or symbols)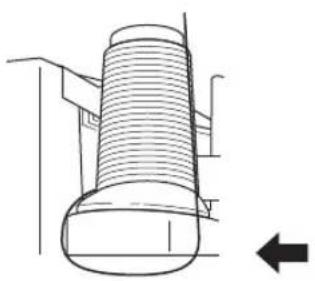
natural_image
Technical line drawing of a mechanical component with no visible text or symbols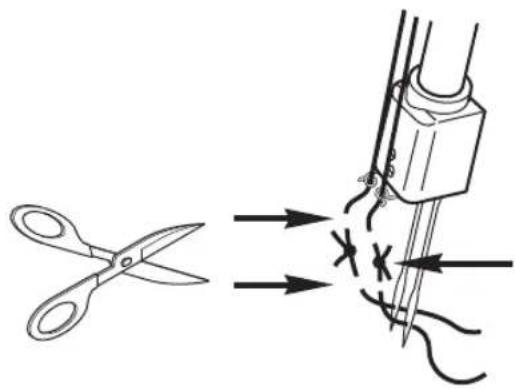
13. CÓMO AJUSTAR LA LONGITUD DE LA PUNTADA
natural_image
Close-up of a kitchen appliance's handle with a circular dial and lever (no visible text or symbols)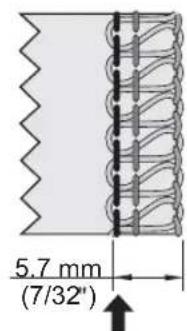
natural_image
Close-up of a white kitchen sink dial with a knob, showing the number 2.0 and scale markings (no text or symbols beyond the dial)
natural_image
Line drawing of a women's dress showing front, back, and side views (no text or symbols)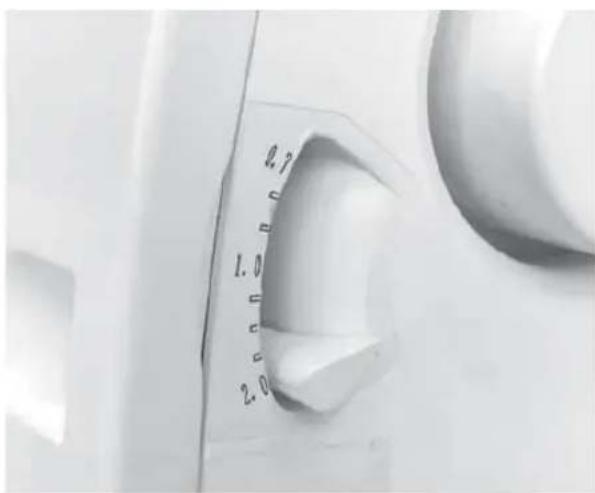
Sobreorillado extensible
17. COMO DESACOPLAR LA CUCHILLA SUPERIOR MÓVIL

Precaución:
natural_image
Illustration of a sewing machine with hands operating it, no visible text or symbols
natural_image
Medical device with open lid and internal components, no visible text or symbols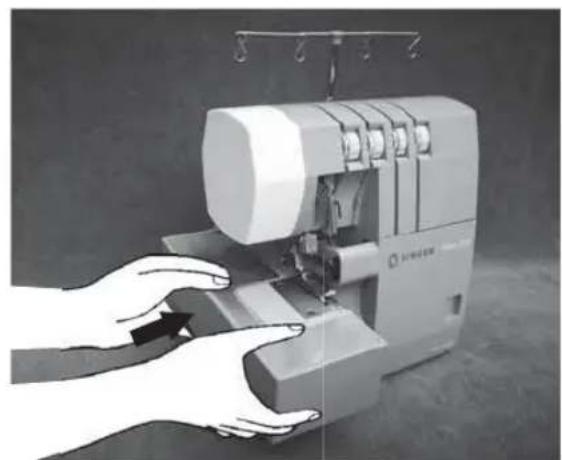
natural_image
Illustration of hands operating a sewing machine with a hook, no text or symbols visible20. SOBREHILADO ESTANDAR Y PUNTADA DE DOBLADILLO ENROLLADO
natural_image
Close-up of metal scissors cutting a textured fabric surface (no text or symbols visible)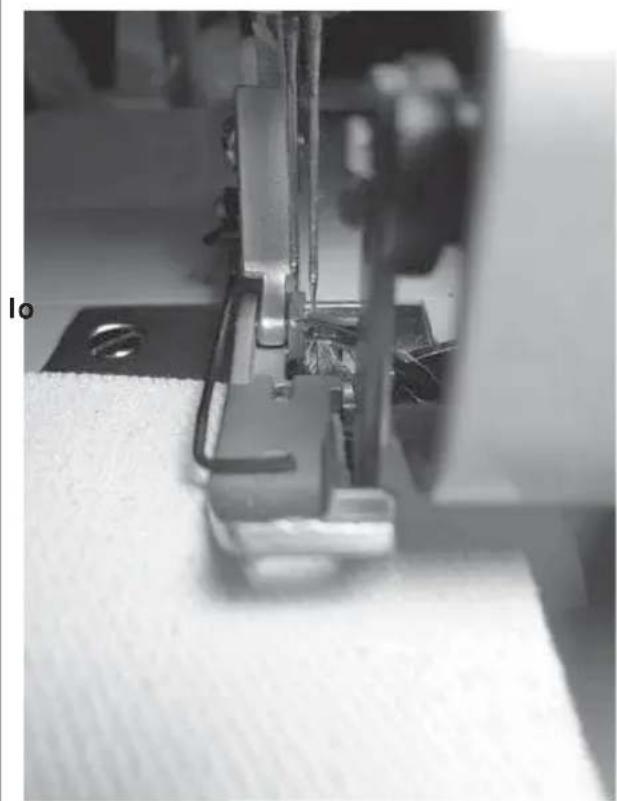
natural_image
Close-up of a sewing machine needle stitching fabric, showing metal components and mounting holes (no text or symbols visible)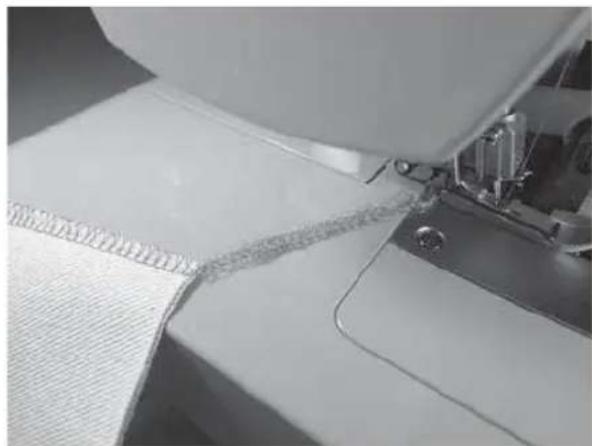
natural_image
Close-up of a sewing machine stitching fabric with visible stitching details (no text or symbols)23. MÉTODO SUGERIDO DE MONTAJE DE TENSIÓN.
natural_image
Three-panel diagram showing sewing process: fabric cutting, needle stitching, and fabric feeding (no text or symbols)25. VARIACIONES DE PUNTADAS YTECNICAS PARA COSER
natural_image
Close-up of a textured fabric with visible stitching and stitching details (no text or symbols)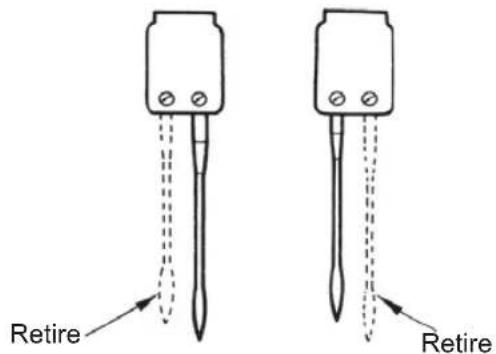
natural_image
Close-up of a SINGER Heavy Duty sewing machine (no visible text or symbols on the device itself)
natural_image
Line drawing of a sewing machine needle stitching fabric, with hands operating the process (no text or symbols)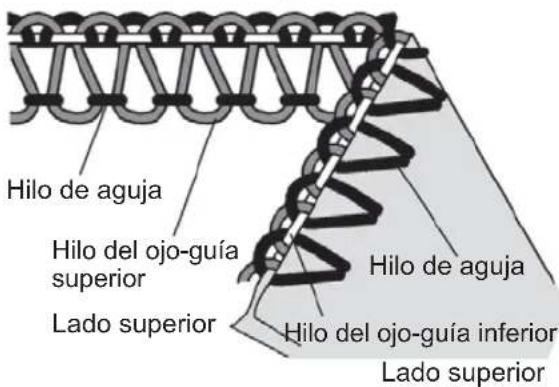
natural_image
Close-up of hands holding a thin dark object against a dark background (no text or symbols visible)
natural_image
Technical line drawing of a sewing machine with no visible text or symbols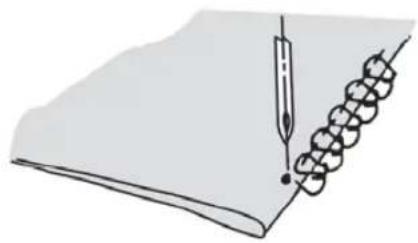
natural_image
Illustration of a notepad with a pen and a coiled spring (no text or symbols)
natural_image
Close-up of a textured, coiled, fiber-like structure with no visible text or symbols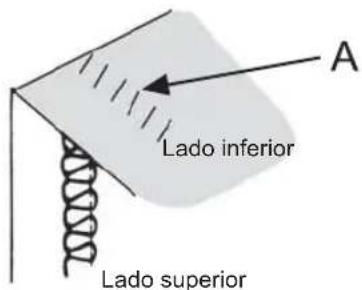
natural_image
Technical line drawing of a sewing machine needle stitching fabric (no text or symbols)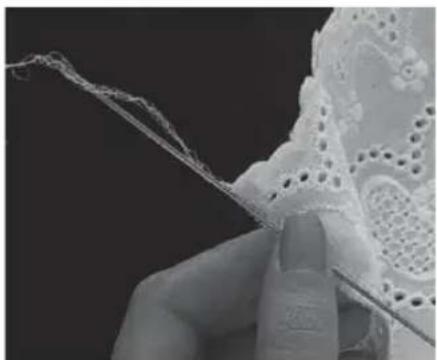
natural_image
Close-up of a hand holding a white lace or mesh structure with fine threads, no visible text or symbolsnatural_image
Technical line drawings of sewing machine components including clasp, zipper, and braided thread (no text or symbols)26. MANTENIMIENTO DE LA MAQUINA
natural_image
Industrial machine with paper roll and control panel (no visible text or symbols)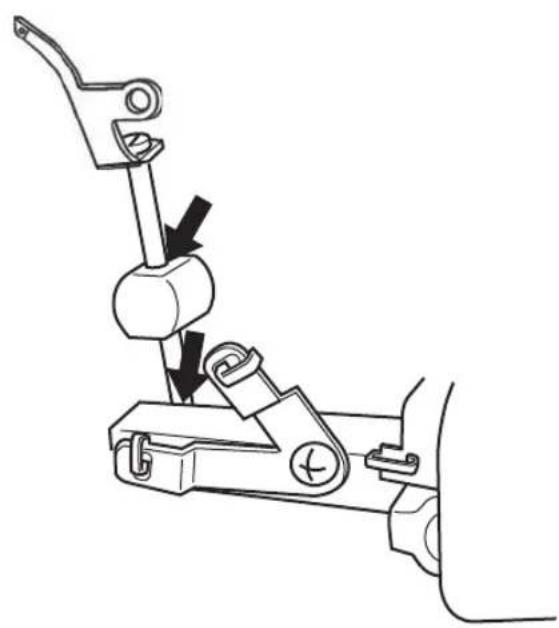
natural_image
Mechanical lever mechanism diagram showing pivot point and adjustment mechanism (no text or labels)natural_image
Illustration of a spiral measuring tape with a spool, no text or symbols presentHD0400S
(SURJETEUSE 2.3.4 FILS HEAVY DUTY)
Brochure D'instructions
PREFACE
CE - Authorised Representative
VSM Group AB, SVP Worldwide
natural_image
Exterior view of a modern industrial sewing machine (no visible text or symbols)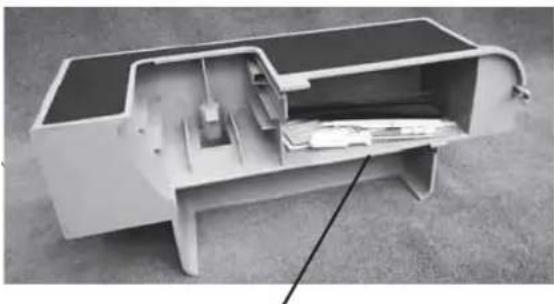
natural_image
Interior view of a minimalist furniture or storage unit with cutouts and internal compartments (no visible text or symbols)ranger ces accessoires
| Aiguille Singer No 2022 | |
| Taillesdisponibles | 80/1190/14100/16 |
5. PARTIES PRINCIPALES
natural_image
Close-up of a white sewing machine with visible mechanical components and a numbered label (16) on the base (no readable text or symbols beyond the number)
6. COMMENT OUVRIR LE CACHE-BOUCLEURS

Attention!

natural_image
Industrial machine with hanging weights and a small bottle, no visible text or symbols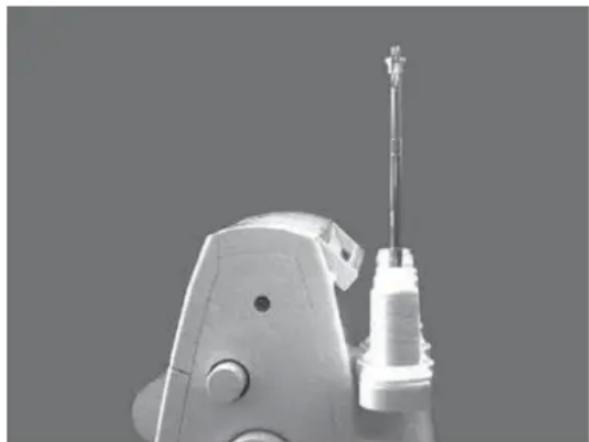
natural_image
Close-up of a white industrial sewing machine with a needle inserted (no visible text or symbols)10. COMMENT RETIRER ET INSERER LES AIGUILLES
Enfilage correct de la machine

Attention!
natural_image
Mechanical assembly diagram showing a piston-cranked tool interacting with a cylindrical component, with no visible text or symbols.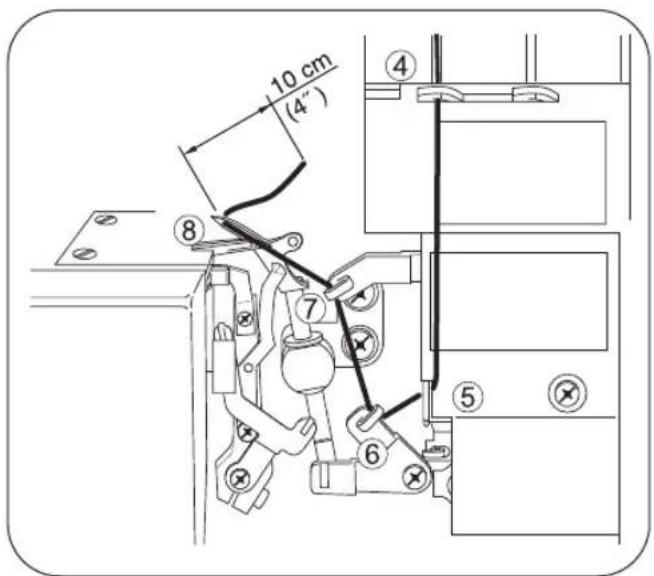
natural_image
Illustration of a hand pulling a rope from a medical device to a vertical pole, with hanging droplets above (no text or symbols)natural_image
Technical illustration showing a mechanical assembly with two parts and a close-up of a cylindrical component (no text or symbols)natural_image
Close-up of a hand operating a mechanical device with visible components and labels (no readable text or symbols)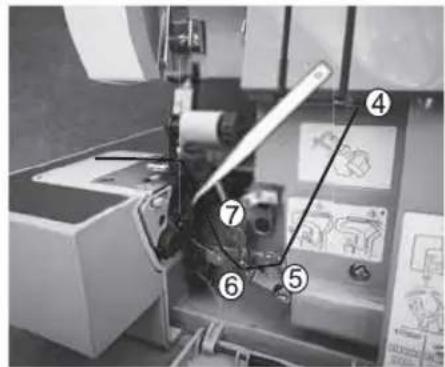
⑨ - B
⑨ - A
10
natural_image
Pure mechanical diagram showing gear and shaft assembly without any text or symbols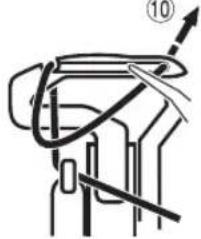
natural_image
Pure mechanical diagram showing a lever mechanism without any text, numbers, or symbols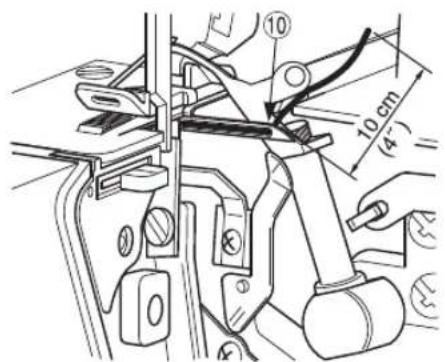
natural_image
Hand operating a sewing machine with a hook pointer and hanging hook, no text or symbols visiblenatural_image
Mechanical assembly diagram showing a lever mechanism and a cylindrical component with internal components (no text or symbols)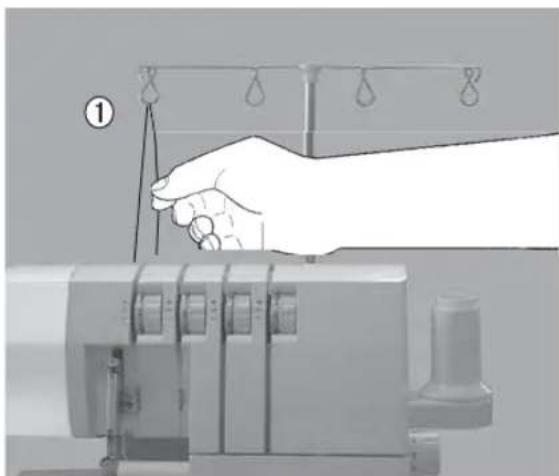
natural_image
Illustration of a hand operating a sewing machine with hanging weights (no text or symbols)natural_image
Close-up of a sewing machine with numbered callouts (4 and 5) indicating specific components, no visible text or symbols beyond labels.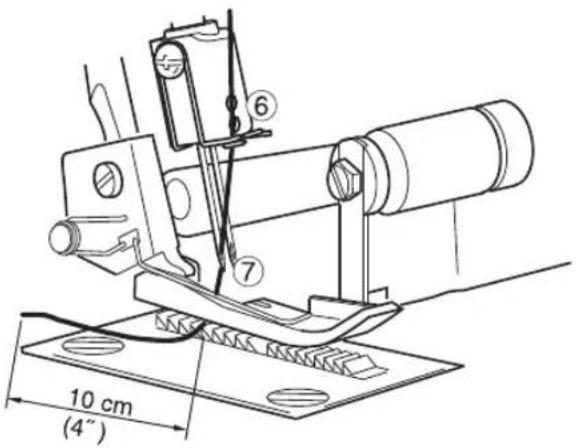
Enfilage correct

natural_image
Technical line drawing of a mechanical assembly with no visible text or symbolsMauvais
enfilage
natural_image
Technical line drawing of a mechanical assembly with no visible text or symbols12. COMMENT CHANGER DE FILS EN LES NOUANT
13. COMMENT REGLER LA LONGUEUR DE ROINT
natural_image
Close-up of a kitchen appliance's handle with numbered dial (no visible text or symbols)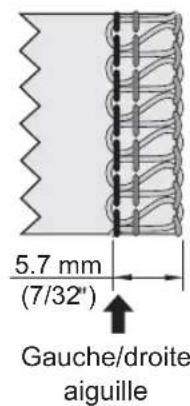


Attention:
natural_image
Close-up of a white kitchen scale dial with numerical markings (0.7, 1.0, 2.0) on the knob, no readable text or symbols beyond measurement indicators.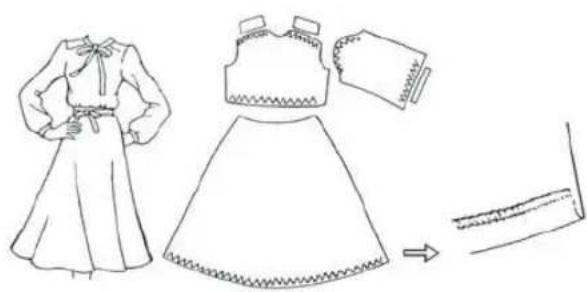
natural_image
Line drawing of a women's dress showing front, back, and side views (no text or symbols)
Surjet étiré
17. COMMENT UTILISER LE COUTEAU MOBILE

Attention!
natural_image
Illustration of a sewing machine being handled with hands, no visible text or symbols
natural_image
Close-up of a white medical or laboratory device with a dark opening and metallic handle (no visible text or symbols)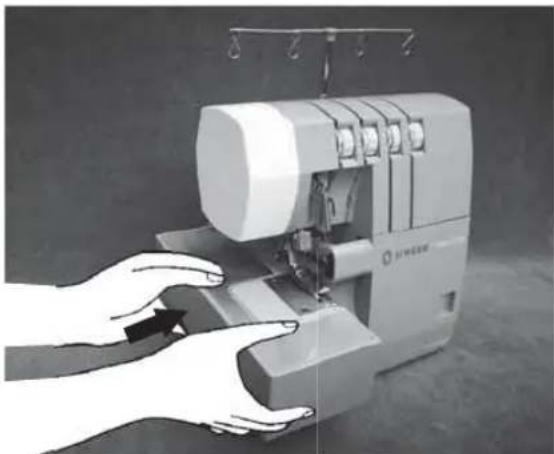
natural_image
Illustration of a sewing machine with hands operating it, no visible text or symbols20. SURJET STANDARD ET OURLET ROULOTTE
Surjet standard
natural_image
Close-up of metal scissors cutting a piece of paper on a dark surface (no text or symbols visible)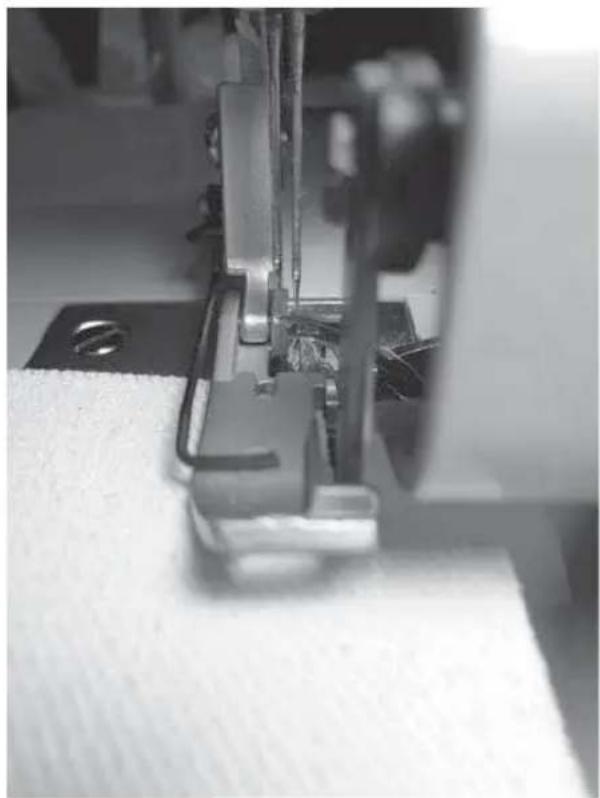
natural_image
Close-up of a sewing machine needle stitching fabric, showing metal clamps and mounting holes (no text or symbols visible)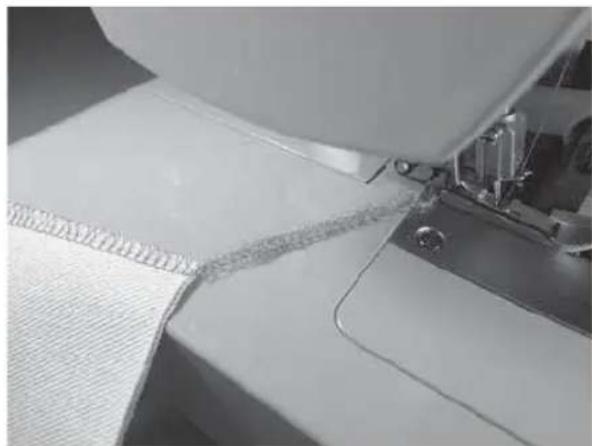
natural_image
Close-up of a sewing machine stitching white fabric with visible stitching details (no text or symbols)23. RÉGLAGE DE LA TENSION
natural_image
Three-panel diagram showing sewing process: fabric cutting, needle stitching, and needle application (no text or symbols)25. AUTRES POINTS ET CONSEILS COUTURE
natural_image
Close-up of a textured fabric with visible stitching and stitching details (no text or symbols)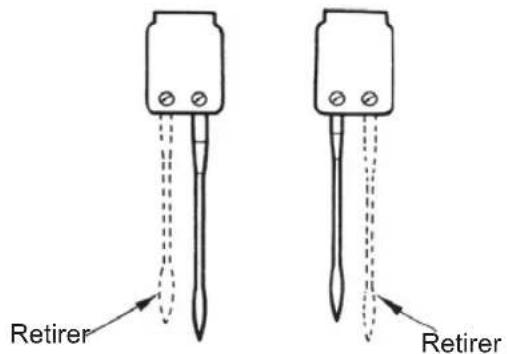
natural_image
Close-up of a SINGER brand sewing machine with visible branding and mechanical components (no readable text or symbols)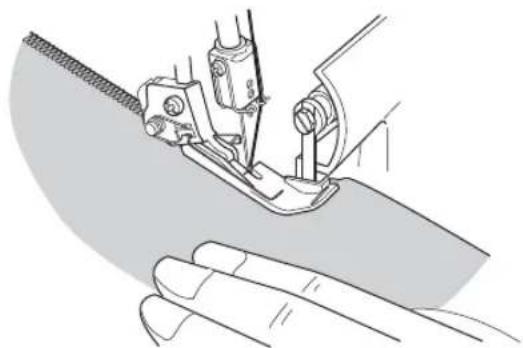
natural_image
Line drawing of a sewing machine needle stitching fabric, with no text or symbols present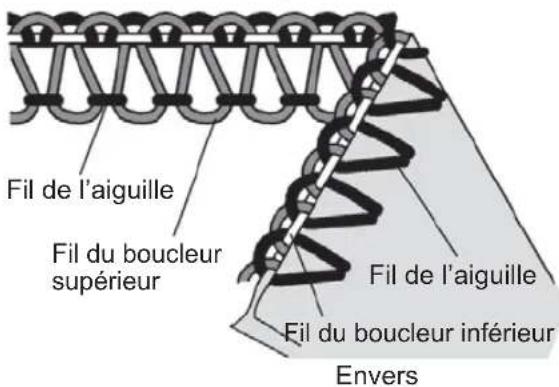
natural_image
Close-up of hands holding a thin dark object against a dark background (no text or symbols visible)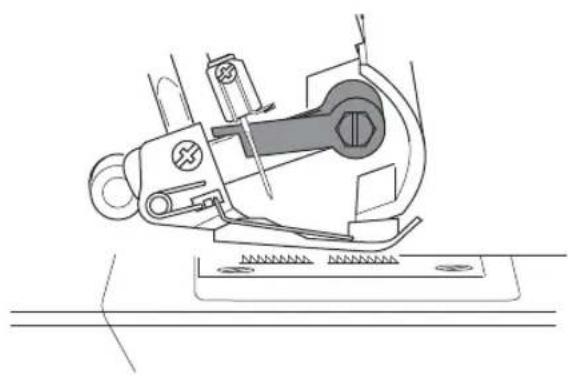
natural_image
Technical line drawing of a sewing machine with no visible text or symbols
natural_image
Illustration of a notepad with a pen and a coiled spring (no text or symbols)
natural_image
Close-up of a textured, coiled, fiber-like structure with no visible text or symbols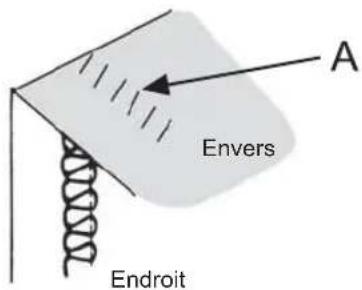
natural_image
Technical line drawings of sewing machine components including clasp, zipper, and knitted fabric (no text or symbols)26. ENTRETIEN DE LA MACHINE
natural_image
Industrial machine with paper roll and control panel (no visible text or symbols)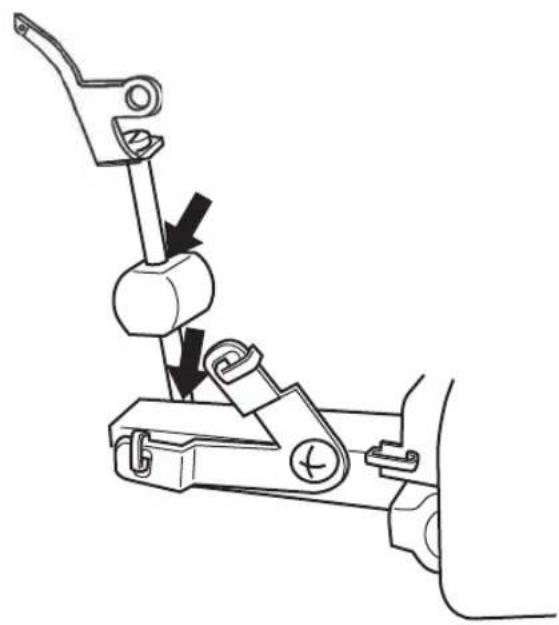
natural_image
Mechanical assembly diagram showing a lever mechanism with no text or symbols- QUE FAIRE SI
natural_image
Illustration of a spool and a coiled rope with measurement markings (no text or symbols)(Eng./Spa./Fren.)
Part No.600487-001
Rev.1
Printed in China
www.singer.com
SINGER (SHANGHAI) SEWING MACHINE CO.,LTD
No.1078,Dayao Road,MinHang,Shanghai 200245,China.