
TR I2WL950 - Food Warmer BARTSCHER - Free user manual and instructions
Find the device manual for free TR I2WL950 BARTSCHER in PDF.
| Product Type | Food warmer with infrared lamps |
| Brand | Bartscher |
| Model | TR I2WL950 |
| Power Supply | 230 V ~ 50 Hz, single-phase |
| Rated Power | 500 W |
| Dimensions (W x D x H) | 460 x 510 x 780 mm |
| Net Weight | 10 kg |
| Material | Stainless steel AISI 304 18/10, galvanized steel base |
| Installation Type | Countertop |
| Thermostat Temperature Range | 0 °C to 90 °C |
| Heating Indicator | Indicator light (heating in progress) |
| Infrared Lighting | Infrared lamps above the tray |
| Number of Feet | 4 anti-slip rubber feet |
| Control Type | Disconnect switch with voltage indicator and rotary thermostat |
| Protection Degree | IPX4 |
| Electrical Protection Class | Class I (mandatory grounding) |
| Maintenance and Cleaning | Unplug before cleaning; use a damp sponge and neutral detergent; do not use water jets or abrasive products |
| Spare Parts and Repairability | Contact the authorized dealer for spare parts and repairs; do not disassemble yourself |
| Environmental Conditions | Operating temperature 0 to 35 °C; max relative humidity 80% at 20 °C |
| Safety | Do not expose to weather; do not overload; keep out of reach of children |
Frequently Asked Questions - TR I2WL950 BARTSCHER
User questions about TR I2WL950 BARTSCHER
0 question about this device. Answer the ones you know or ask your own.
Ask a new question about this device
Download the instructions for your Food Warmer in PDF format for free! Find your manual TR I2WL950 - BARTSCHER and take your electronic device back in hand. On this page are published all the documents necessary for the use of your device. TR I2WL950 by BARTSCHER.
USER MANUAL TR I2WL950 BARTSCHER
PCI/4711 - PCI/4712 - PCI/4713
A114.242 / A114.245 / A114.250
natural_image
Exterior view of a modern stainless steel industrial enclosure with three hanging flasks and control panel (no visible text or symbols)HEIZPLATTEN MIT INFRAROTLAMPEN WARMING SURFACES WITH INFRARED LAMPS PLATEAUX CHAUFFÉS AVEC LAMPES À INFRAROUGES TRANCHEERPLATEN MET WARMTELAMPEN PŁYTY GRZEWCZE Z PROMIENNIKAMI PODCZERWIENI
CE
Betriebs-und Wartungsanleitung Operation and maintenance manual Manuel d'emploi et d'entretien Gebruiksaanwijzing en onderhoudshandleiding Instrukcja obsługi i konserwacji
PCI/4711 - PCI/4712 - PCI/4713
D

natural_image
Exterior view of a stainless steel industrial drying shelf with three hanging flasks (no text or symbols visible)HEIZPLATTEN MIT INFRAROTLAMPEN
INHALT
1 ALLGEMEINE INFORMATIONEN
natural_image
Line drawing of a hand holding a rectangular box (no text or symbols)natural_image
Exterior view of a stainless steel laboratory enclosure with three hanging flasks (no text or symbols visible)WARMING SURFACES WITH INFRARED LAMPS
CONTENTS
1 GENERAL INFORMATION
Purpose of the manual.... 4
Manufacturer and machine identification..... 4
Warming surfaces with infrared lamps description.... 5
Technical specifications.... 5
Overall dimensions.... 5
Safety information.... 6
2 INSTALLATION INFORMATION
Packaging and unpacking.... 7
Installation area.... 7
Electrical connections 7
3 USE AND CLEANING INFORMATION
Control descriptions.... 8
Recommendations for use 8
Warming surfaces with infrared lamps use..... 8
End of the day cleaning 8
Extended periods of disuse 8
4 TROUBLE SHOOTING, RECYCLING
Introduction.... 9
Problems, causes, solutions.... 9
Disposal and recycling.... 9
ATTACHMENTS
Spare parts catalogue
Wiring diagram
Purpose of the manual
This manual was written by the Manufacturer and is an integral part of machine equipment. During design and construction the Manufacturer has carefully considered possible hazards and personal risks that may result from interaction with the machine. In addition to observing the specific laws in force, the manufacturer has adopted all “exemplary construction technique principles”. The purpose of this information is to advise the users to use extreme caution to avoid risks. However, discretion is invaluable. Safety is also in the hands of all the operators who interact with the machine. Keep this manual in a suitable place, always within reach for consultation. The following symbols are included to better stress some passages:

DANGER – WARNING: indicates hazards that may cause serious damages; attention is required.

INFORMATION: indicates particularly important technical information.
The following is enclosed with this manual:
- Warranty certificate describing the Manufacturer's warranty conditions.
- Documents that prove conformity with effective health and safety laws.
Contact the Authorised dealer for any service request, information or spare parts order.
Manufacturer and machine identification

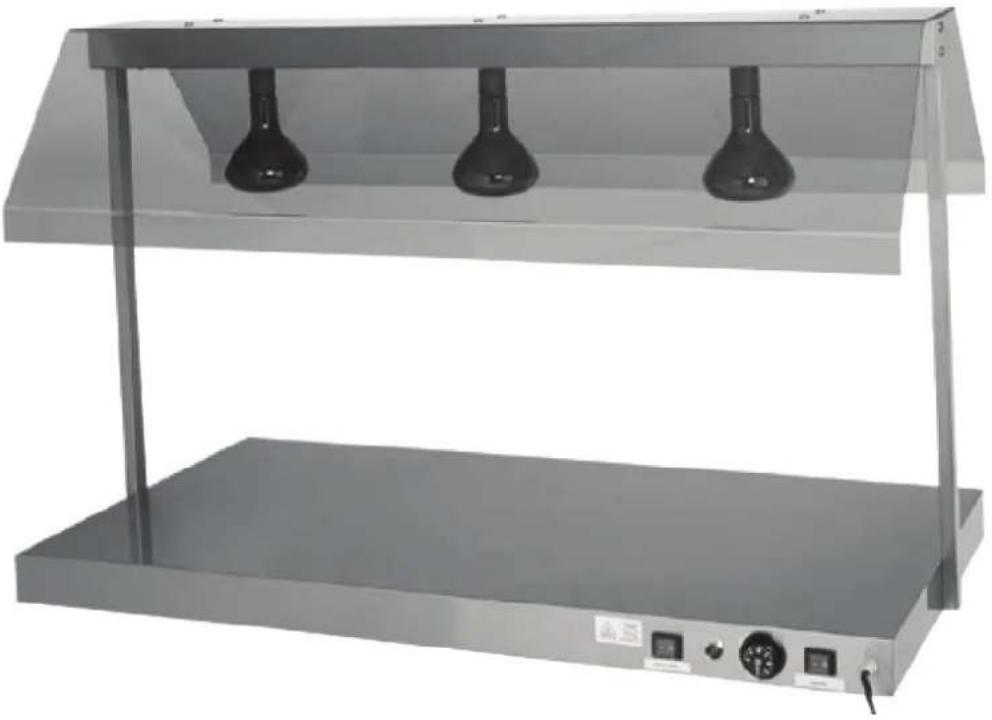
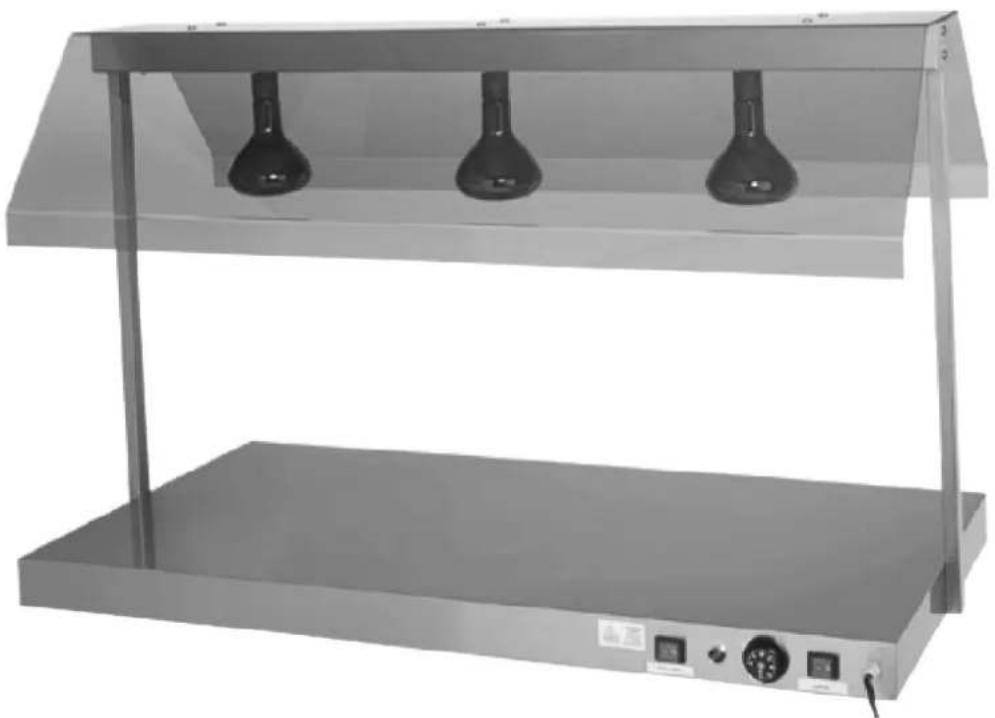
Warming surfaces with infrared lamp description
This product is specifically designed to keep the temperature of food placed over the heating surfaces constant. It is characterised by a highly simplified construction in order to reduce the possibility of malfunctions to a minimum and facilitate maintenance.
The heating surface is fully constructed with stainless steel AISI 304 18/10 with galvanized steel sheet metal bottom cover.
The resistance is attached under the heating surface.
The heating surface is distinguished by infrared lamps placed above the surface to increase its already high heating capacity.
4 rubber feet can be applied to the bottom of the heating surface for support and insulation.
Controls to turn on the machine and set temperature are found on the long side of the surface.
Technical specifications
| Descriptions Unit of measure | PCI 4711 PCI 4712 PCI 4713 | ||
| Power supply | V Hz Ph | 230V 50Hz 1Ph | |
| Nominal power W 500 1000 | 1500 | ||
| Net weight Kg 10 17 25 | |||
| Packaged weight Kg 14 22 | 30 | ||
| Installation Counter | |||
| Protection level IPX4 | |||
| Electrical shock protection | Class I | ||
| Conformity with directives and norms | 73/23/EEC - 93/68/EEC – 93/44/EEC - 89/336/EEC89/109/EEC | ||
Overall dimensions
| mm | A | B | C |  |
| PCI4711 | 60 | 50 | 85 | |
| PCI4712 | 65 | 85 | 85 | |
| PCI4713 | 70 | 125 | 85 | |
| mm | A | B | C | 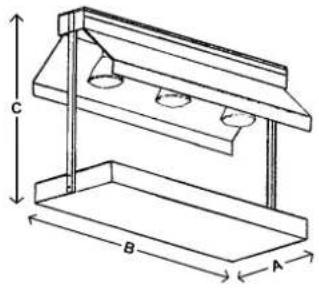 |
| PCI4711 | 460 | 510 | 780 | |
| PCI4712 | 620 | 860 | 780 | |
| PCI4713 | 620 | 1270 | 780 |
Safety information
- Careful consultation of this manual before installation and use is essential. Continual observance of the indications found in the manual guarantee personal and machine safety.
- Never tamper with safety devices for any reason.
- Strict observance of the work safety regulations issued by the responsible organisations in each country is strongly recommended.
- The manufacturer is not liable for damages to persons or things due to the neglect of safety regulations.
• Correct machine placement, illumination and cleanliness are important conditions for personal safety. - Do not expose the machine to the elements.
- Machine connections and start-up must only be performed by qualified technicians.
- Make sure that the system specifications of the room where the machine is installed correspond to the information printed on the plate.
- Make sure the machine is connected to a grounding system.
- The work area around the machine must always be kept clean and dry.
- Use the garments foreseen by work safety regulations.
- This machine must only be used for its specific purpose; any other use is considered improper and therefore hazardous.
- Do not overload the machine.
- Introducing objects, tools, hands or other within hazardous parts is forbidden.
- Keep the machine away from children.
- Disconnect the power cord from the electrical socket when the machine is not in use.
- In the event of malfunctions and/or problems, do not attempt to repair the machine. Contact the authorised dealer.
- Use original spare parts.
- Before cleaning the machine, disconnect the power supply by unplugging the machine.
- Do not clean with running water.
INSTALLATION INFORMATION 2
Packaging and unpacking
The machine is packaged in cardboard with polystyrene inserts to guarantee full integrity during transport.
- Handle the packaging according to the instructions.
- Open the packaging and check the integrity of all components. Keep packaging for future moves.
- Lift the machine as indicated and place it in the installation area.

natural_image
Line drawing of a hand holding a rectangular box (no text or symbols)Installation area
The arranged area must be suitably illuminated and an electrical socket must be available. The resting surface must be sufficiently ample, even and dry. The machine must be installed in rooms with non-explosive environments. In any case, installation must also be performed in consideration of the work safety laws in force.
Room conditions table
| Descriptions Values | |
| Working temperature 0÷35 °C (32÷95 °F) | |
| Storage temperature -15 to +65 °C (from -6.8 to +149 °F) | |
| Relative humidity | Maximum 80% with 20 °C room temperatureMaximum 50% with room temperature between 20÷60 °C |
| Dustiness Less than 0.03 g/m3 | |
Electrical connections

DANGER – WARNING: Electrical connections to the supply mains must be performed by qualified personnel.
Verify the efficiency of the grounding system in the building. Make sure that line voltage (V) and frequency (Hz) correspond to those of the machine (See the identification plate and wiring diagram). The machine is equipped with a power cord that connects to a multi-polar plug. The plug is to be connected to a wall switch equipped with a circuit breaker.

USE AND CLEANING INFORMATION
3
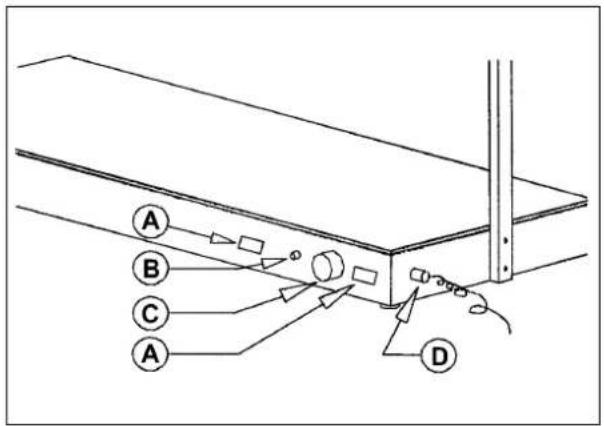
Control descriptions
- Indicator light (B)
- Adjustable thermostat 0°-90°C (C)
- Loaded circuit breaker (A) with tension led
- Power cord inlet (D) + cord
Recommendations for use
Before using the machine remove, if found, the special protective film.
Unpleasant odours produced during the first minutes of operation are due to the presence of processing grease residues.
On first use, heat the machine to the maximum temperature.
Warming surfaces with infrared lamps use
Connect the power cord to the main switch and turn the thermostat graduated knob to set the desired temperature. The led will stay on until the surface reaches the previously set temperature.
End of the day cleaning
- Remove the plug from the electrical socket at the end of the day.
- Accurately clean using neutral products.
- Clean external machine parts with a damp sponge when the machine is fully cooled.
- Do not use metallic pads and abrasive detergents.
- To avoid hazards caused by contact with high temperature parts, only access heating parts after maintenance operations have been completed.
Extended periods of disuse
For extended periods of disuse, turn off the main wall switch, clean the machine and cover it with a cloth to protect if from dust.
Introduction
In the event of breakdown or malfunctioning, disconnect the plug from the socket and contact your Dealer's service centre. Avoid dismantling internal machine parts.
The manufacturer is not liable for any machine tampering!
Problems, causes, solutions
| Problem Cause Solution | ||
| The machine does not heat | Main switch off Turn on main switch | |
| No voltage on the power supply Contact your dealer's service centre | ||
| Resistance broken Contact your dealer's service centre |
Disposal and recycling
The machine was designed and constructed to work for an average of 10.000 hours. When finished using the machine, follow national laws for disposal and recycling.
Please contact the environmental authorities or authorised organisations.
PCI/4711 - PCI/4712 - PCI/4713

natural_image
Exterior view of a stainless steel industrial drying rack with three hanging flasks (no text or symbols visible)PLATEAUX CHAUFFES AVEC LAMPES A INFRAROUGES
INDEX
1 INFORMATIONS GENERALES
But du manuel.... 4
natural_image
Line drawing of a hand holding a rectangular box (no text or symbols)Zone d'installation
Inconvénients, causes, remèdes
natural_image
Exterior view of a stainless steel industrial drying shelf with three hanging lights (no text or symbols visible)TRANCHEERPLATEN MET WARMTELAMPEN
INHOUDSOPGAVE
1 ALGEMENE INFORMATIE
OMSCHRIJVING TRANCHEERPLATEN MET WARMTELAMPEN
natural_image
Line drawing of a hand holding a rectangular box (no text or symbols)Installatieplaats
natural_image
Technical line drawing of a mechanical support structure connected to an electrical outlet (no text or symbols)natural_image
Exterior view of a stainless steel industrial drying rack with three hanging flasks (no text or symbols visible)PŁYTY GRZEWCZE Z PROMIENNIKAMI PODCZERWIENI
SPIS TREŚCI
1 INFORMACJE OGÓLNE
natural_image
Line drawing of a hand holding a rectangular box (no text or symbols)Obszar instalacji


- PCI/4711 - PCI/4712 - PCI/4713
- HEIZPLATTEN MIT INFRAROTLAMPEN
- INHALT
- ALLGEMEINE INFORMATIONEN
- WARMING SURFACES WITH INFRARED LAMPS
- CONTENTS
- GENERAL INFORMATION
- INSTALLATION INFORMATION
- USE AND CLEANING INFORMATION
- TROUBLE SHOOTING, RECYCLING
- ATTACHMENTS
- Purpose of the manual
- Warming surfaces with infrared lamp description
- Safety information
- INSTALLATION INFORMATION 2
- Packaging and unpacking
- Installation area
- Electrical connections
- DANGER – WARNING: Electrical connections to the supply mains must be performed by qualified personnel.
- USE AND CLEANING INFORMATION
- 3
- Control descriptions
- Recommendations for use
- Warming surfaces with infrared lamps use
- End of the day cleaning
- Extended periods of disuse
- Introduction
- Disposal and recycling
- PLATEAUX CHAUFFES AVEC LAMPES A INFRAROUGES
- INDEX
- INFORMATIONS GENERALES
- Zone d'installation
- TRANCHEERPLATEN MET WARMTELAMPEN
- INHOUDSOPGAVE
- ALGEMENE INFORMATIE
- OMSCHRIJVING TRANCHEERPLATEN MET WARMTELAMPEN
- Installatieplaats
- SPIS TREŚCI
- INFORMACJE OGÓLNE
- Obszar instalacji
Brand : BARTSCHER
Model : TR I2WL950
Category : Food Warmer