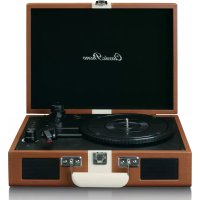
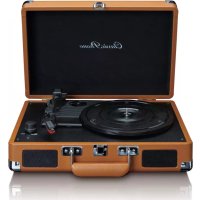
TT41OK - Turntable Classic Phono - Free user manual and instructions
Find the device manual for free TT41OK Classic Phono in PDF.
| Brand | Classic Phono |
| Model | TT41OK |
| Product type | Vinyl turntable with built-in speakers, Bluetooth, FM radio |
| Playback speeds | 33, 45, and 78 RPM |
| Bluetooth | Version 5.0, standard range, pairing name "TT-41" |
| FM radio | Frequency range 87.5 – 108 MHz, wire antenna |
| Auxiliary input | 3.5 mm jack socket |
| Audio output | RCA socket (for external speakers or hi-fi system) |
| Built-in speakers | 2 stereo speakers |
| Power supply | AC adapter 12V 1A, input 100-240 V ~ 50/60 Hz |
| Power consumption | 12 W |
| Dimensions (approx.) | 420 x 350 x 130 mm (lid closed) |
| Weight (approx.) | 4.5 kg |
| Included accessories | AC adapter, user manual, 45 RPM adapter |
| Auto stop | Yes, switchable (disablable for 45 RPM) |
| Tone arm lift lever | Yes, built-in |
| Dust cover | Yes, removable |
| Operating temperature | 0 to 40 °C |
| Storage temperature | -20 to 70 °C |
| Care and cleaning | Soft dry cloth; clean the stylus with a soft brush (back-and-forth motions) |
| Safety | Do not open the device, avoid moisture, keep out of reach of children, unplug during storms |
| Spare parts and repairability | Replaceable stylus (every 250 hours approximately); repair by qualified personnel only |
| Warranty | Conforms to European legislation, contact the dealer |
| General information | Manufacturer: Commaxx B.V., Wiebachstraat 37, 6466 NG Kerkrade, Netherlands; non-professional domestic use |
Frequently Asked Questions - TT41OK Classic Phono
User questions about TT41OK Classic Phono
0 question about this device. Answer the ones you know or ask your own.
Ask a new question about this device
Download the instructions for your Turntable in PDF format for free! Find your manual TT41OK - Classic Phono and take your electronic device back in hand. On this page are published all the documents necessary for the use of your device. TT41OK by Classic Phono.
USER MANUAL TT41OK Classic Phono
natural_image
Vintage portable radio with open lid and analog dial, no visible text or symbols on main bodyUSER MANUAL- Turntable with radio, Bluetooth and speakers GEBRUIKSHANDLEIDING- Platenspeler met radio, Bluetooth en luidsprekers BEDIENUNGSANLEITUNG – Plattenspieler mit Radio, Bluetooth und Lautsprechern MANUEL DE L'UTILISATEUR - Tourne-disque avec radio, Bluetooth et haut-parleurs MANUAL DE USUARIO- Tocadiscos con radio, Bluetooth y altavoces MANUALE UTENTE - Giradischi con radio, Bluetooth e altoparlanti РУКОВОДСТВО ПОЛЬЗОВАТЕЛЯ – Виниловый проигрыватель со встроенными динамиками, радио и Bluetooth
Index:
English....3
Nederlands 13
Deutsch....24
Français....36
Español 47
Italiano....58
Русский....69
Version: 3.0
English
CAUTION:
Usage of controls or adjustments or performance of procedures other than those specified herein may result in hazardous radiation exposure.
KEEP THESE INSTRUCTIONS IN MIND:
- Do not cover or block any ventilation openings. When placing the device on a shelf, leave 5 cm (2") free space around the whole device.
- Install in accordance with the supplied user manual.
- Keep the device away from heat sources such as radiators, heaters, stoves, candles and other heat-generating products or naked flame. The device can only be used in moderate climates. Extremely cold or warm environments should be avoided. Working temperature between 0^ and 35^ C.
- Avoid using the device near strong magnetic fields.
- Electrostatic discharge can disturb normal usage of this device. If so, simply reset and restart the device following the instruction manual. During file transmission, please handle with care and operate in a static-free environment.
- Warning! Never insert an object into the product through the vents or openings. High voltage flows through the product and inserting an object can cause electric shock and/or short circuit internal parts. For the same reason, do not spill water or liquid on the product.
- Do not use in wet or moist areas such as bathrooms, steamy kitchens or near swimming pools.
- The device shall not be exposed to dripping or splashing and make sure that no objects filled with liquids, such as vases, are placed on or near the apparatus.
- Do not use this device when condensation may occur. When the unit is used in a warm wet room with damp, water droplets or condensation may occur inside the unit and the unit may not function properly; let the unit stand in power OFF for 1 or 2 hours before turning on the power: the unit should be dry before getting any power.
- Although this device is manufactured with the utmost care and checked several times before leaving the factory, it is still possible that problems may occur, as with all electrical appliances. If you notice smoke, an excessive build-up of heat or any other unexpected phenomena, you should disconnect the plug from the main power socket immediately.
- This device must operate on a power source as specified on the specification label. If you are not sure of the type of power supply used in your home, consult your dealer or local power company.
- Keep away from animals. Some animals enjoy biting on power cords.
- To clean the device, use a soft dry cloth. Do not use solvents or petrol based fluids. To remove severe stains, you may use a damp cloth with dilute detergent.
- The supplier is not responsible for damage or lost data caused by malfunction, misuse, modification of the device or battery replacement.
- Do not interrupt the connection when the device is formatting or transferring files. Otherwise, data may be corrupted or lost.
- If the unit has USB playback function, the USB memory stick should be plugged into the unit directly. Don't use an USB extension cable because it can cause interference resulting in failing of data.
- The rating label has been marked on the bottom or back panel of the device.
- This device is not intended for use by people (including children) with physical, sensory or mental disabilities, or a lack of experience and knowledge, unless they're under supervision or have received instructions about the correct use of the device by the person who is responsible for their safety.
-
This product is intended for non professional use only and not for commercial or industrial use.
-
Make sure the unit is adjusted to a stable position. Damage caused by using this product in an unstable position vibrations or shocks or by failure to follow any other warning or precaution contained within this user manual will not be covered by warranty.
- Never remove the casing of this device.
- Never place this device on other electrical equipment.
- Do not allow children access to plastic bags.
- Only use attachments/accessories specified by the manufacturer.
- Refer all servicing to qualified service personnel. Servicing is required when the device has been damaged in any way, such as the power supply cord or the plug, when liquid has been spilled or objects have fallen into the device, when the device has been exposed to rain or moisture, does not operate normally, or has been dropped.
- Long exposure to loud sounds from personal music players may lead to temporary or permanent hearing loss.
-
If the product is delivered with power cable or AC power adaptor:
-
If any trouble occur, disconnect the AC power cord and refer servicing to qualified personnel.
- Don't step on or pinch the power adaptor. Be very careful, particularly near the plugs and the cable's exit point. Do not place heavy items on the power adaptor, which may damage it. Keep the entire device out of children's reach! When playing with the power cable, they can seriously injure themselves.
● Unplug this device during lightning storms or when unused for a long period. - The socket outlet must be installed near the equipment and must be easily accessible.
- Do not overload ac outlets or extension cords. Overloading can cause fire or electric shock.
● Devices with class 1 construction should be connected to a main socket outlet with a protective earthed connection.
● Devices with class 2 construction do not require a earthed connection.
● Always hold the plug when pulling it out of the main supply socket. Do not pull the power cord. This can cause a short circuit. -
Do not use a damaged power cord or plug or a loose outlet. Doing so may result in fire or electric shock.
-
If the product contains or is delivered with a remote control containing coin/cell batteries:
Warning:
- “Do not ingest battery, Chemical Burn Hazard” or equivalent working.
● [The remote control supplied with] This product contains a coin/button cell battery. If the battery is swallowed, it can cause severe internal burns in just 2 hours and can lead to death. - Keep new and used batteries away from children.
- If the battery compartment does not close securely, stop using the product and keep it away from children.
-
If you think batteries might have been swallowed or placed inside any part of the body, seek immediate medical attention.
-
Caution about the use of Batteries:
● Danger of explosion if battery is incorrectly replaced. Replace only with the same or equivalent type.
● Battery cannot be subjected to high or low extreme temperatures, low air pressure at high altitude during use, storage or transportation.
● Replacement of a battery with an incorrect type that can result in an explosion or the leakage of flammable liquid or gas.
- Disposal of a battery into fire or a hot oven, or mechanically crushing or cutting of a battery, that can result in an explosion.
● Leaving a battery in an extremely high temperature surrounding environment that can result in an explosion or that leakage of flammable liquid or gas.
● A battery subjected to extremely low air pressure that may result in an explosion or the leakage of flammable liquid or gas.
● Attention should be drawn to the environmental aspects of battery disposal.
INSTALLATION
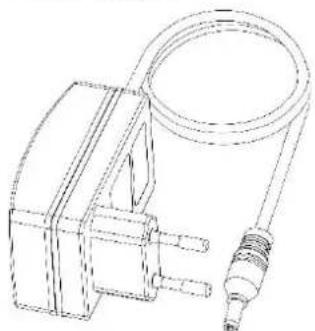
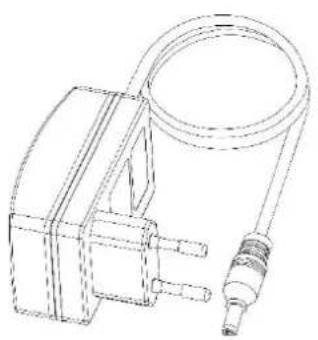
- Unpack all parts and remove protective material.
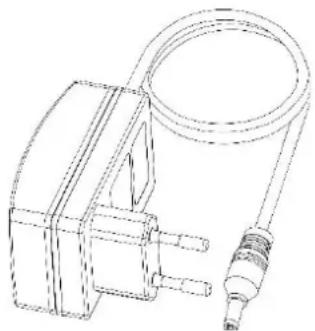
Accessories included:
User manual

natural_image
Simple line drawing of an open book with no text or symbols visiblePower adaptor
natural_image
Line drawing of a mechanical device with a coiled cable and two ports (no text or symbols)Location of Controls
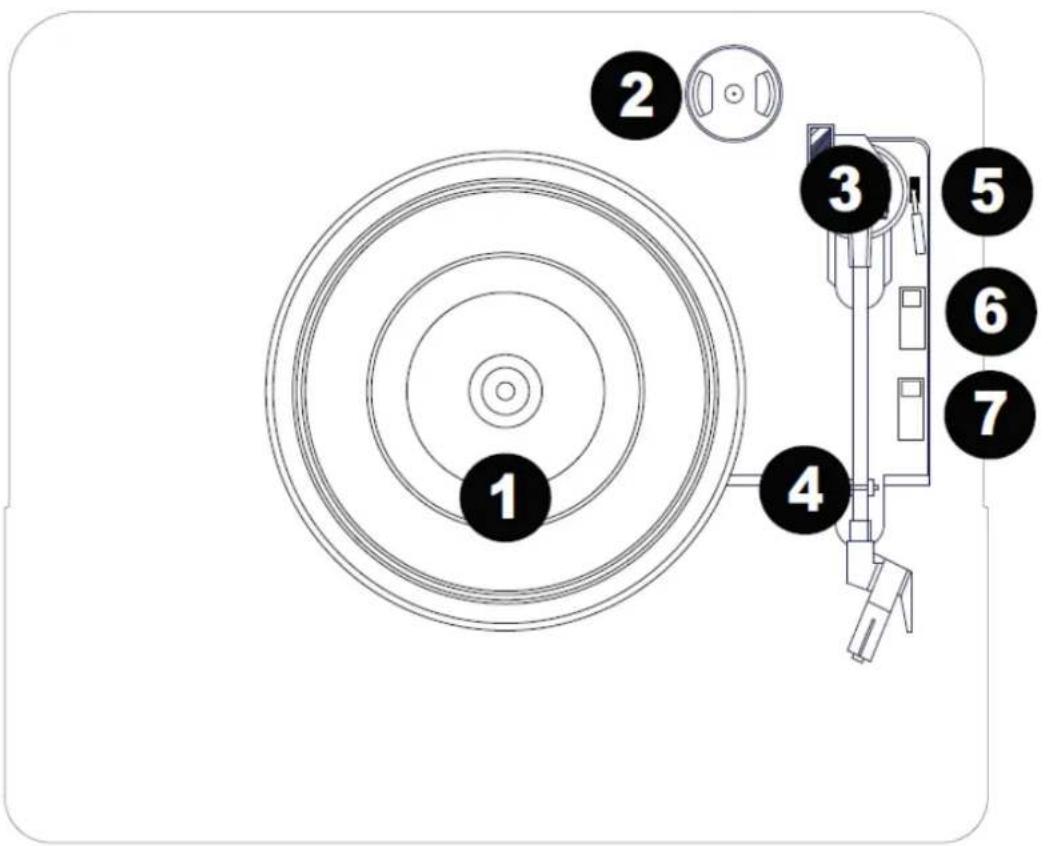
text_image
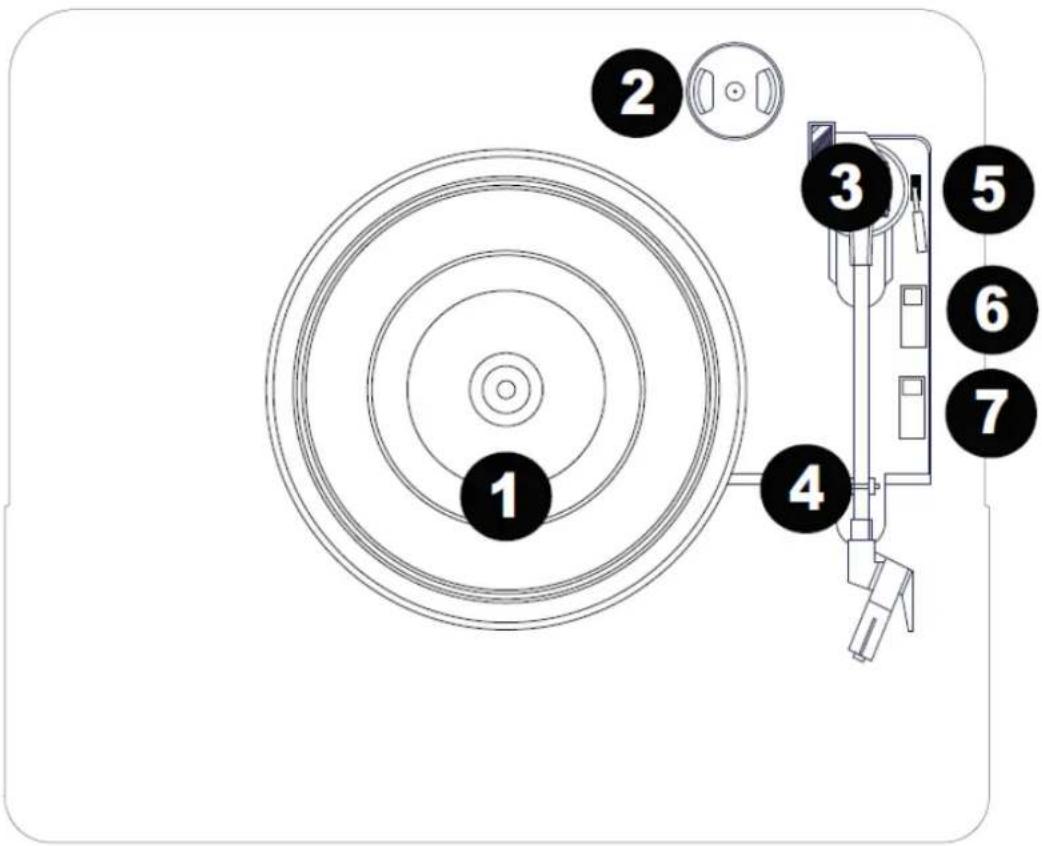
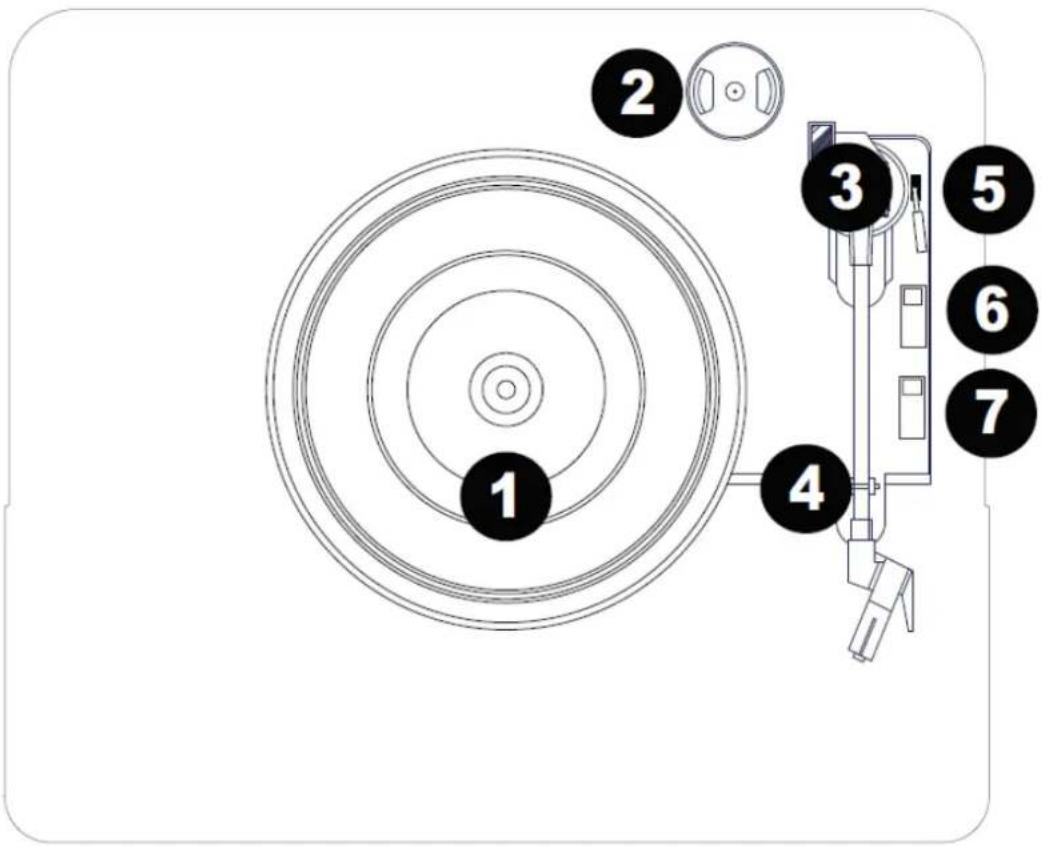
1 2 3 4 5 6 7- Platter: Place your record here.
- 45 RPM Adapter Holder: Holds the included 45 RPM adapter. When not using the adapter, please place it in this holder.
- Tonearm: The fixed tonearm can be raised and lowered by hand, or by moving the raise / lower lever.
- Arm Clip: This specially designed arm clip secures the tonearm while at rest or when not in use. The arm clip has been designed to remain in the up position while unlocked.
- Raise / Lower Lever: Raises and lowers the tonearm.
- Autostop switch: This switch turns autostop on or off. When autostop is on, the platter will start spinning when the tonearm is placed over the record and stop spinning when the record has reached the end. When Autostop is off, the platter will always spin regardless of the position of the tonearm.
Note: If your vinyl record stops before it reaches the end of the music, turn Autostop to the off position for this particular record. This is generally recommended for 45 RPM records.
- 33 / 45 / 78 RPM Switch: This switch controls the speed of the turntable platter.
Note: For best results when playing 78 RPM vinyl records, use a 78 RPM stylus (sold separately). Only use a 78 RPM stylus with 78 RPM vinyl records.
text_image
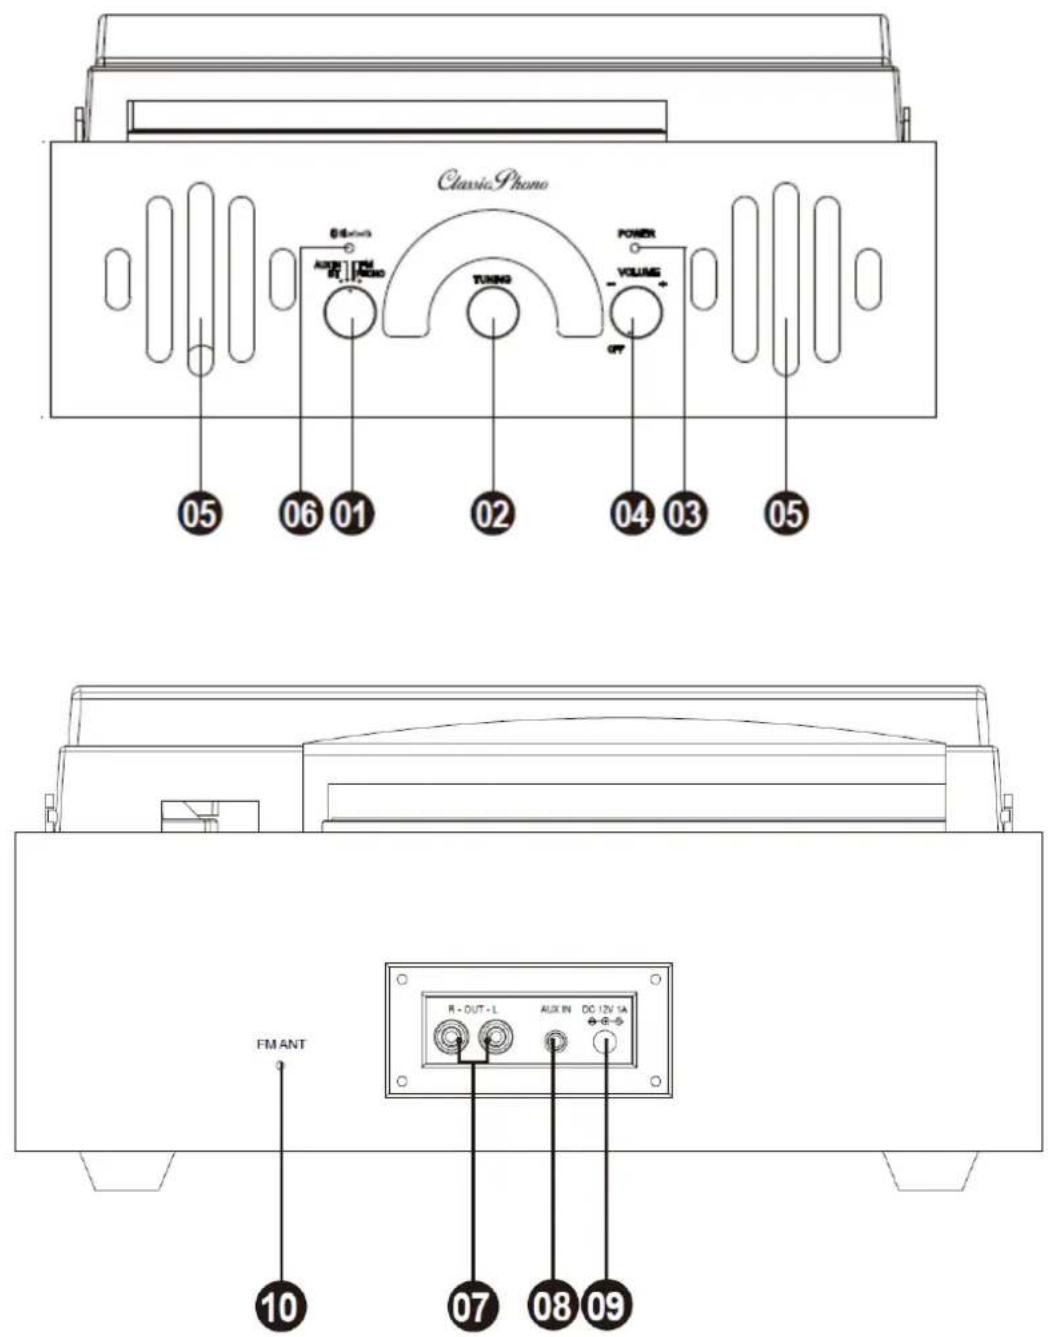
Classic Phone 05 06 01 02 04 03 05 AUX IN Tuning POWER VOLUME FM ANT R - OUT - L AUX IN DC 12V 1A 10 07 08 09- Mode: Turn this dial to select which source to use: BT. FM, Phono, or Aux In.
- Radio Frequency Selector (Tuning): Turn this dial to select the FM radio station frequency.
- Power LED: This LED illuminates when the power is turned on.
- Power ON/OFF and Volume: Switch On/Off and Adjusts the sound level for the internal speakers.
- Speakers: 2 stereo speakers if the source is stereo.
-
Bluetooth LED: This LED illuminates when the Bluetooth mode is turned on.
-
RCA Jack: Connect to external speaker (not included)
- AUX IN Jack: Connect to external audio device e.g. MP3, mobile phone etc to listen music in this unit
- Adaptor Jack: Connect power adaptor
- FM Antenna: FM Radio signal reception
Turntable Playback
Before use, please make sure to:
Remove the stylus protector. Reconnect the protective cap on the stylus when not in use. Ensure the tonearm is free to move from the tonearm rest. Lock the tonearm in place again when not in use.
- Set the Mode selector to Phono and lift the turntable dust cover.
- Place a record on the turntable, over the central spindle on the slipmat.
- Set the Speed selector to 33, 45, or 78 RPM depending on the record.
- Lift the tonearm from the tonearm rest by using the Raise Lever and slowly move it over the record.
The turntable platter will start turning.
- Place the tonearm on the desired location of the record.
- Gently lower the tonearm onto the record to start playing.
- When the record is finished playing, the tonearm will automatically stop. Lift the tonearm from the record and put it back on the rest.
- To manually stop the record, lift the tonearm from the record and return it to the rest.
Note: Do not stop or turn the platter manually. Moving or jarring the turntable without securing the tonearm clamp could result in damage to the tonearm.
Autostop Switch Operation
Certain types of records may have an autostop area outside the pre-set limit, so the turntable may stop before the last track finishes. If this occurs, set the Autostop switch to the Off position. This allows the record to play to the end, but it will not stop automatically. You must manually raise the tonearm and place it back in the rest and then turn the power off to stop the turntable from spinning.
AUX IN MODE
- Set the Mode selector to Aux In.
- Connect stereo audio cable (not included) from the Aux In Jack to the line output or headphone output of your external audio device to be able to listen to the external source through internal speakers.
- Adjust the volume to the desired level.
Note: If the line output of your external device is connected, you only need to adjust the system's volume control. If your external device's headphone output is connected, you may need to adjust the volume control on both your external device and TT-41 achieve the desired volume.
RADIO MODE
- Set the Mode selector to the FM position.
- Select the desired radio station by turning the Tuning knob.
- Adjust the volume to the desired level.
- When finished listening to the radio, set the Mode selector to the Phono position to turn off the radio.
Note: The receiver has a built-in FM antenna hanging at the rear cabinet. This wire should be fully uncoiled and extended for best reception.
BLUETOOTH MODE
- Set the Mode selector to the BT position. The Power Led Light Indicator will begin to flash BLUE.
- Turn your external device's Bluetooth Setting ON. Wait a moment, then look for the Bluetooth pairing name "TT-41"
- Select the Bluetooth pairing name, to connect the unit. Once connected, the BLUE Led light will stop flashing.
- You are now connected to your external device via Bluetooth
- The best is to put the volume level on your Bluetooth device (smartphone or tablet) on the maximum and adjust the desired listening volume with your turntable volume control switch.
CONNECT THE TT-41 TO EXTERNAL ACTIVE SPEAKERS OR EXTERNAL HIFI SET
Connect the RCA Output Jack to the external speaker system with the RCA cable (not provided) to enjoy vinyl records music on your speaker system.
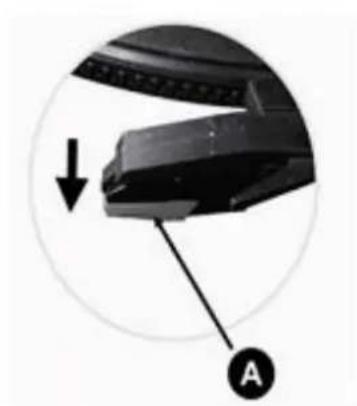
HOW TO REPLACE THE NEEDLE
To replace the needle, please refer to the instructions below.
Removing the needle from the cartridge
- Place a screwdriver at the tip of the stylus and push downward as shown in direction "A".
- Remove the stylus by pulling the stylus forward and pushing downward.
Installing the Stylus
- Hold the tip of the stylus and insert the stylus by pressing as shown in direction "B".
- Push the stylus upward as in direction "C" until the stylus locks into the tip position.
natural_image
Close-up of a mechanical component with a downward arrow and labeled point A (no text or symbols beyond labels)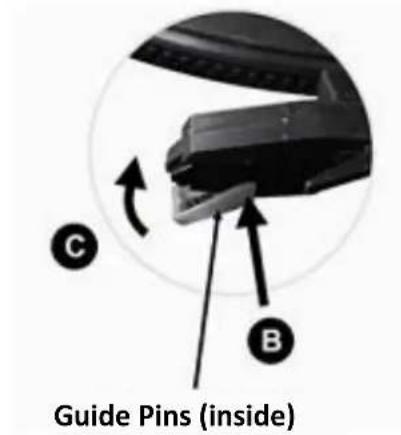
text_image
Guide Pins (inside)NOTES
We advise you to clean your records with an anti-static cloth to gain maximum enjoyment from them.
We would also point out that for the same reason your stylus should be replaced periodically (approximately every 250 playback hours)
TIPS FOR BETTER TURNTABLE PERFORMANCE
- When opening or closing the turntable cover, handle it gently, gripping it either at the Center or at each side.
- Do not touch the needle tip with your fingers; avoid bumping the needle against the turntable platter or record edge.
- Frequently clean the needle tip And use a soft brush in a "back-to-front" motion only.
- If you must use a needle cleaning fluid, use very sparingly.
- Gently wipe the turntable player housing with a soft cloth. Use only a small amount of mild detergent to clean the turntable player.
- Never apply harsh chemicals or solvents to any part of the turntable system.
SPECIFICATIONS
Power adaptor.
Output DC 12V 1A
Input AC 100-240V, 50/60Hz, 0.3A max.
Bluetooth: V5.0
BT Pairing name: TT-41
Aux in: 3.5mm
Aux out: RCA type
FM Frequency band 87.5 – 108MHz
Bluetooth Frequency 2402 - 2480MHz
Operating Temperature: 0°C-40°C
Storage Temperature: -20°C-70°C
Due to continuing improvement, the features and the design are subject to change without notice
Power supply adaptor (For EU only)
Use only the power supply listed in the user instructions
| Information | Value and precision |
| Manufacturers name or trademark, commercial registration and address | SHENZHEN SHI GUANGKAIYUAN TECHNOLOGY.,LTD.2 floor, 41 TianSheng Road,TianLiao village, GongMingStree, Guangming, Shenzhen,GuangDong, P.R.China |
| Model Identifier | GKYZA0100120EU |
| Input voltage | 100-240V |
| Input AC frequency | 50/60Hz |
| Output voltage | 12V |
| Output current | 1A |
| Output Power | 12W |
| Average active efficiency | 84.84% |
| No load Power consumption | 0.042W |
Guarantee
Lenco offers service and warranty in accordance to European law, which means that in case of repairs (both during and after the warranty period) you should contact your local dealer. Important note: It is not possible to send products that need repairs to Lenco directly.
Important note: If this unit is opened or accessed by a non-official service center in any way, the warranty expires.
This device is not suitable for professional use. In case of professional use, all warranty obligations of the manufacturer will be voided.
Disclaimer
Updates to Firmware and/or hardware components are made regularly. Therefore some of the instruction, specifications and pictures in this documentation may differ slightly from your particular situation. All items described in this guide for illustration purposes only and may not apply to particular situation. No legal right or entitlements may be obtained from the description made in this manual.
Disposal of the Old Device
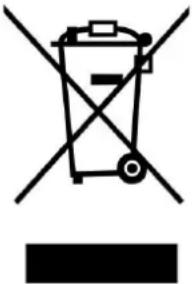
natural_image
Symbol of a trash bin crossed with a diagonal line, no text or labels presentThis symbol indicates that the relevant electrical product or battery should not be disposed of as general household waste in Europe. To ensure the correct waste treatment of the product and battery, please dispose them in accordance to any applicable local laws of requirement for disposal of electrical equipment or batteries. In so doing, you will help to conserve natural resources and improve standards of environmental protection in treatment and disposal of electrical waste (Waste Electrical and Electronic Equipment Directive).
CE Marking

Hereby, Commaxx B.V. Wiebachstraat 37, 6466 NG Kerkrade, The Netherlands, declares that this product is in compliance with the essential EU directive requirements.
The declaration of conformity may be consulted via techdoc@commaxxgroup.com
Service
For more information and helpdesk support, please visit www.lenco.com
Commaxx B.V. Wiebachstraat 37, 6466 NG Kerkrade, The Netherlands.
Nederlands
LET OP:
natural_image
Simple line drawing of an open book with no text or symbols visibleVoedingsadapter
natural_image
Line drawing of a mechanical device with a coiled cable and two ports (no text or symbols)natural_image
Close-up of a mechanical component with a downward arrow and labeled point A (no text or symbols beyond labels)
natural_image
Close-up of a mechanical device with labeled parts (B and C) and directional arrows indicating motion or movement (no readable text or symbols)natural_image
Symbol of a trash bin crossed with no visible text or labelsnatural_image
Simple line drawing of an open book with no text or symbols visibleNetzadapter

natural_image
Line drawing of a mechanical device with a coiled cable and two ports (no text or symbols)natural_image
Close-up of a mechanical component with a downward arrow and labeled point A (no text or symbols beyond labels)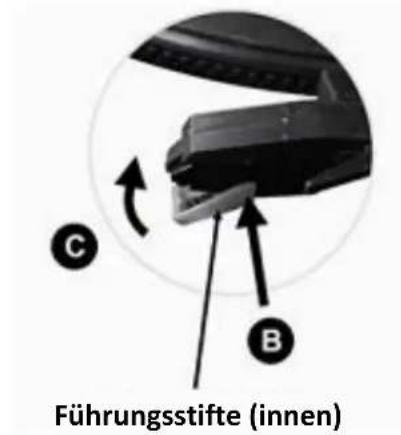
natural_image
Symbol of a trash bin crossed with no visible text or labelsnatural_image
Simple line drawing of an open book with no text or symbols visiblenatural_image
Technical line drawing of a mechanical device with a coiled cable and two ports (no text or symbols)natural_image
Close-up of a mechanical component with a downward arrow and labeled point A (no text or symbols beyond labels)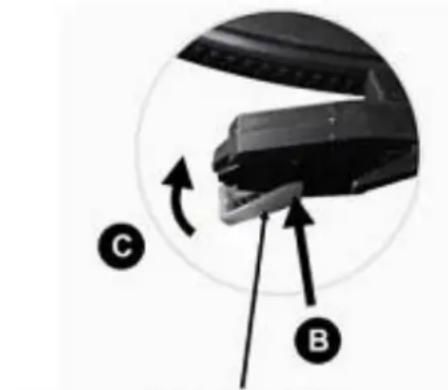
natural_image
Close-up of a mechanical component with labeled parts (B, C) and directional arrows indicating motion or assembly (no text or symbols beyond labels)natural_image
Symbol of a trash bin crossed with no visible text or labelsnatural_image
Simple line drawing of an open book with no text or symbols visiblenatural_image
Line drawing of a mechanical device with a coiled cable and two ports (no text or symbols)natural_image
Close-up of a mechanical component with a downward arrow and labeled point A (no text or symbols beyond labels)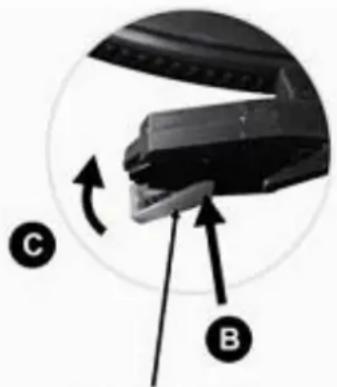
text_image
Diagram of a mechanical device with labeled parts C and B, showing directional arrows indicating movement or force.natural_image
Symbol of a trash bin crossed out by two crossed lines, with a solid black rectangle below (no text or labels)natural_image
Simple line drawing of an open book with no text or symbols visibleAlimentatore

natural_image
Technical line drawing of a mechanical device with a coiled cable and two ports (no text or symbols)Pozione dei comandi
text_image
1 2 3 4 5 6 7natural_image
Close-up of a mechanical component with a downward arrow and labeled point A (no text or symbols beyond labels)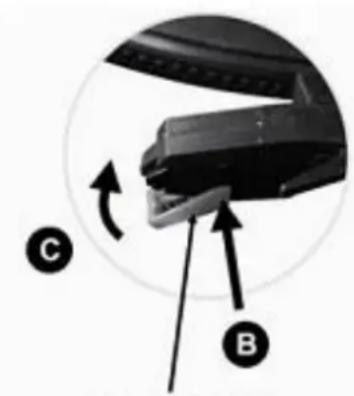
natural_image
Close-up of a mechanical component with labeled parts (B, C) and directional arrows indicating motion or movement (no readable text or symbols)natural_image
Symbol of a trash bin crossed with no visible text or labelsnatural_image
Simple line drawing of an open book with no text or symbols visibleАдаптер питания
natural_image
Technical line drawing of a mechanical device with a coiled cable and two ports (no text or symbols)