the Barista Express BES876 - Coffee machine BREVILLE - Free user manual and instructions
Find the device manual for free the Barista Express BES876 BREVILLE in PDF.
| Product Type | Espresso machine with built-in grinder |
| Brand | Breville |
| Model | the Barista Express BES876 |
| Power supply | 120 V ~ 60 Hz, 1750 W |
| Water tank capacity | 2 liters |
| Bean hopper capacity | 250 g |
| Grinder type | Precision conical burrs with 25 grind settings |
| Heating system | Stainless steel thermocoil with PID control |
| Included filter baskets | Single wall (1 cup and 2 cup) and dual wall (1 cup and 2 cup) |
| Portafilter diameter | 54 mm |
| Impress Puck System | Automatic dosing with memory, assisted tamping at 10 kg and 7° finishing rotation, dose level gauge |
| Pre-infusion | Manual, adjustable duration |
| Steam wand | 360° swivel, manual for microfoam |
| Hot water outlet | Dedicated, up to 240 ml |
| Extraction pressure gauge | Integrated, to monitor extraction |
| Extraction volume programming | Possible for 1 cup and 2 cups |
| Water filter | Included, replacement recommended every 3 months |
| Maintenance | Integrated cleaning and descaling cycles, conical burr cleaning possible |
| Included accessories | Stainless steel milk jug, Razor tool, cleaning tablets, descaling powder, brush, hex key, cleaning disc |
| Safety | Automatic shutdown in case of overheating, burn protection, hopper lock |
Frequently Asked Questions - the Barista Express BES876 BREVILLE
User questions about the Barista Express BES876 BREVILLE
0 question about this device. Answer the ones you know or ask your own.
Ask a new question about this device
Download the instructions for your Coffee machine in PDF format for free! Find your manual the Barista Express BES876 - BREVILLE and take your electronic device back in hand. On this page are published all the documents necessary for the use of your device. the Barista Express BES876 by BREVILLE.
USER MANUAL the Barista Express BES876 BREVILLE
the Barista Express® Impress
natural_image
Exterior view of a Bruvilla coffee maker with control knobs and vacuum tube (no visible text or symbols)EN
INSTRUCTION BOOK
FR-CA
MANUEL D'INSTRUCTIONS
ES-MX
2 Breville Recommends Safety First
8 Features
9 Components
11 Assembly
12 Functions
24 Care & Cleaning
29 Troubleshooting
BREVILLE® RECOMMENDS SAFETY FIRST
At Breville ^® we are very safety conscious. We design and manufacture consumer products with the safety of you, our valued customer, foremost in mind. In addition, we ask that you exercise a degree of care when using any electrical appliance and adhere to the following precautions.
IMPORTANT cULus SAFEGUARDS
READ ALL INSTRUCTIONS BEFORE USE AND SAVE FOR FUTURE REFERENCE
- Remove and discard any packaging materials safely before use.
- Ensure the product is properly assembled before first use and fully unwind the power cord before operating.
- Before using for the first time, please ensure that your electricity supply is the same as shown on the rating label on the underside of the appliance (120 V \~ 60 Hz 1750 W). If you have any concerns, please contact your local electricity company.
- The installation of a residual current safety switch is recommended to provide additional safety when using all electrical appliances. Safety switches with a rated operating current not more than
30mA are recommended. Consult an electrician for professional advice.
- For your maximum electrical safety, always use this espresso machine on a properly grounded circuit. It is recommended to use this machine on a dedicated circuit separate from other electrical appliances.
- Do not operate the appliance with a damaged cord or plug or after the appliance malfunctions or has been damaged in any manner. Return the entire appliance to the nearest authorised Breville® Service Centre for examination, replacement, or repair.
- Do not let the power cord hang over the edge of a counter or table. Do not let the power cord touch hot surfaces or become knotted.
- Do not touch hot surfaces. Use handles or knobs. Always ensure
the appliance has been allowed to cool; if the appliance is to be: - left unattended, cleaned, moved, assembled, or stored, always switch off the espresso machine by pressing the POWER button to OFF and unplug from the power outlet.
• To unplug, grasp the plug and pull from the outlet. Never pull from the power cord.
• Children must not play with the appliance. Do not leave the appliance unattended when in use. Do not move the appliance whilst in operation.
- Close supervision is necessary when any appliance is used by or near children. Keep the appliance and its cord out of reach of children.
• To eliminate a choking hazard for young children, discard the protective cover fitted to the power plug safely.
- Position the appliance on a stable, heat resistant, level, dry surface away from the counter edge, and do not operate on or near a heat source such as a heated oven, a hot gas or electric burner.
- Do not operate the appliance in an enclosed space, or inside a cupboard.
-
Do not use attachments other than those provided with the appliances. The use of attachments not sold or recommended by Breville® may cause fire, electric shock, or injury.
• This appliance is for household use only. Do not use the appliance for anything other than its intended purpose. Do not use in moving vehicles or boats. Do not use outdoors. Misuse may cause injury. -
Do not attempt to open or service the espresso machine. Servicing should only be performed by an authorised service representative.
- Improper use of the appliance incorrectly operated or unprofessionally repaired. In such a case, any warranty claim is void. No warranty claim for any damages can be accepted.
• The appliance is not intended to be operated by means of an external timer or separate remote-control system. -
Use caution when operating machine as metal surfaces are liable to get hot during use. Heating element is subject to residual heat after use.
• The steam wand must be positioned over the drip tray and away from persons before turning the steam dial to ON. -
Do not put fingers into the tamping chute when pushing down the tamping lever.
- Do not open the programming port, this is exclusively for authorised service personnel only.
- Do not operate the grinder without the hopper lid in position. Keep fingers, hands, hair, clothing, and utensils away from the hopper during operation. Always check the grinder hopper for presence of foreign objects before using. Do not touch moving parts.
- Ensure the portafilter is firmly inserted and secured into the group head before starting an extraction. Never remove the portafilter during the extraction process. Fail to follow this instruction may lead to scalding by hot steam or hot coffee.
-
Do not fill water tank with hot water.
-
Never use the appliance without water in the water tank.
- Wipe the outer surface with a soft, damp cloth and then polish with a soft, dry cloth. Keep the appliance and accessories clean. Follow the cleaning instructions provided.

WARNING
To avoid the risk of injury, do not open the brew chamber during the brew process.

CAUTION
To prevent damage to the appliance, do not use alkaline cleaning agents when cleaning, use a soft cloth and a mild detergent.

To protect against fire or electric shock, do not immerse the power cord, power plug or appliance in water or any other liquid.
NOTICE TO CUSTOMERS REGARDING MEMORY STORAGE
Please note that in order to better serve our customers, internal memory storage has been imbedded into your appliance. This memory storage consists of a small chip to collect certain information about your appliance including the frequency of use of the appliance and the manner in which your appliance is being used. In the event your appliance is returned for service, the information collected from the chip enables us to quickly and efficiently service your appliance. The information collected also serves as a valuable resource in developing future appliances to better serve the needs of our consumers. The chip does not collect any information regarding the individuals who use the product or the household where the product is used. If you have any questions regarding the memory storage chip please contact us at privacy@breville.com
SPECIFIC INSTRUCTIONS FOR WATER FILTER
- Filter cartridge should be kept out of reach of children.
- Store filter cartridges in a dry place in the original packaging.
- Protect cartridges from heat and direct sunlight.
- Do not use damaged filter cartridges.
- Do not open filter cartridges.
- If you are absent for a prolonged period of time, empty the water tank and replace the cartridge.
SHORT CORD INSTRUCTIONS
Your Breville appliance is fitted with a short power cord to reduce personal injury or property damage resulting from pulling, tripping or becoming entangled with a longer cord. Longer detachable power cords or extension cords are available and may be used if care is exercised. If an extension cord is used, (1) the marked electrical rating of the cord set or extension cord should be at least as great as the electrical rating of the appliance, (2) the cord should be arranged so that it will not drape over the counter-top or table where it can be pulled on by children or tripped over unintentionally and (3) the extension cord must include a 3-prong grounding plug.
BREVILLE ASSIST® PLUG
Your Breville appliance comes with a unique Assist® Plug, conveniently designed with a finger hole to ease removal from the power outlet.
FOR HOUSEHOLD USE ONLY SAVE THESE INSTRUCTIONS

Features
THERMOCOIL PRECISION HEATING SYSTEM
Integrated stainless steel water coil that accurately controls water temperature.
PRECISION CONICAL BURR GRINDER
Precision conical burrs maximise ground coffee surface area for a full espresso flavour.
LESS MESS
The portafilter remains secure in the same position as you grind, dose and tamp, reducing any potential grinds mess on your drip tray and bench top.
PID TEMPERATURE CONTROL
Electronic PID temperature control for increased temperature stability.
DEDICATED HOT WATERSPOUT
For making a cup of Americano and pre-heating cups.
MANUAL MICRO-FOAM TEXTURING WAND
360° swivel action steam wand that easily adjust to perfect position for milk texturing.
Simplifies the steps needed to grind, dose, and tamp to create an impressive puck. Less mess. Less fuss.
Intelligent Dosing
Dose is automatically calculated based on last grind.
Assisted Tamping with a 7° Barista Twist Finish
Precise 22lbs (10kg) impression with a professional 7-degree barista twist for a polished puck.
Precision Measurement Auto Corrects the Next Dose
Gauge indicates when correct level is achieved, and the system automatically remembers the adjustment for the next time.

Components
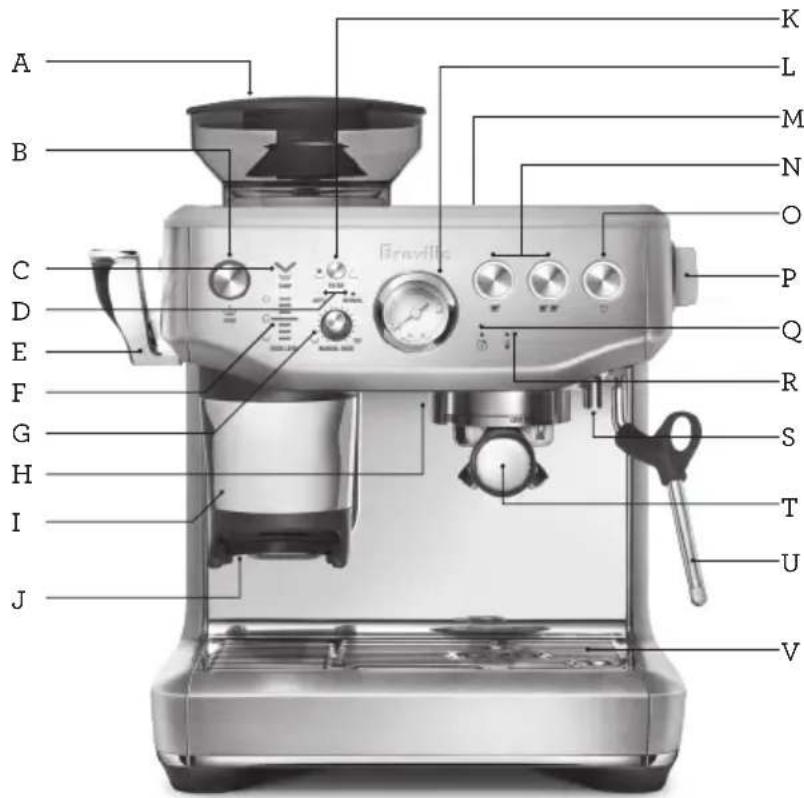
A. 8.8oz (250g) Bean Hopper
B. Dose Button (Grind Start) – Illuminates when portafilter is properly inserted. 'A Bit More' – When flashing.
C. Tamp Indicator – Flashes when ready to tamp.
D. Automatic | Manual Dose Light Indicators
E. Assisted Tamp Lever
F. Dose Level Indicator
G. Manual Dose Adjust Dial – Press to change to auto or manual dose mode. Rotate to adjust the manual dose amount.
H. Group Head
I. Removable Tamp Cover
J. Grinding Cradle
K. Filter Button – Single or double filter basket.
L. Espresso Extraction Pressure Gauge - Monitors extraction pressure.
M. 67fl.oz (2L) Removable Water Tank
N.1 CUP, 2 CUP Buttons
O. POWER Button
P. Steam | Hot Water Dial
Q. Maintenance Light Indicator
R. Water | Steam | Heating Light Indicator
S. Hot Water Outlet
T. 54mm Stainless Steel Portafilter
U. Steam Wand
V. Drip Tray
Tool storage tray – houses accessories when not in use. (see next page)
Rating Information
120 V \~ 60 Hz 1750 W
A
natural_image
Close-up of a mechanical switch or plunger device (no visible text or symbols)B
natural_image
Metallic pitcher with handle and side panel, no visible text or symbolsC

natural_image
Close-up of a black industrial rotary knob with a white base (no visible text or symbols)
D

E

F

G

H
I
J

L

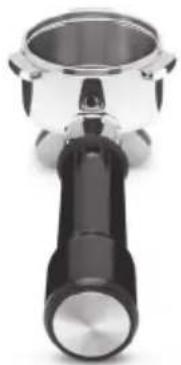
ACCESSORIES
A. 54mm Stainless Steel Portafilter
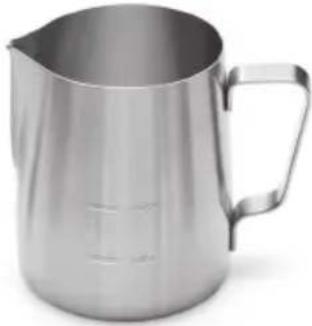
B. Stainless steel milk jug
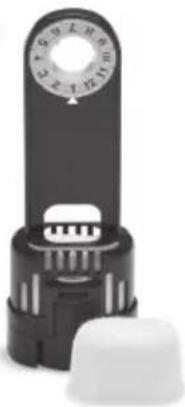
C. Water filter holder with filter
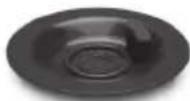
D. 1 CUP & 2 CUP single wall filter baskets
E. 1 CUP & 2 CUP dual wall filter baskets
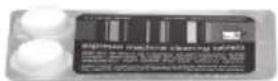
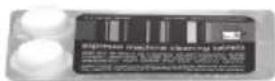
F. Cleaning tablets
G. The Razor ^™ precision dose trimming tool
H. Allen key
I. Cleaning tool for steam wand tip
J. Cleaning disc
K. Descaling powder
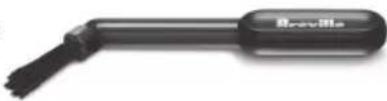
L. Cleaning brush

Assembly
BEFORE FIRST USE
Machine Preparation
Remove and discard all labels and packaging materials attached to your espresso machine.
Ensure you have removed all parts and accessories from the box before discarding the packaging.
Remove the water tank located at the back of the machine by pulling the water tank handle.
Clean parts and accessories (water tank, portafilter, filter baskets, jug) using warm water and a gentle dish washing liquid. Rinse well then dry thoroughly.

NOTE
For machines in color, drip tray protection guard included. DO NOT DISCARD.
natural_image
Simple line drawing of a cylindrical object with horizontal lines, no text or symbols presentINSTALLING THE WATER FILTER
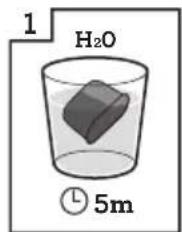
- Remove the water filter and water filter holder from the plastic bag.
- Soak the filter in cold water for 5 minutes.
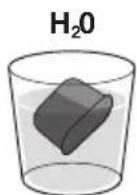
① 5m
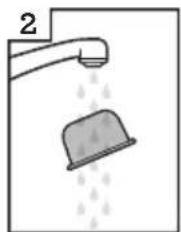
- Rinse the filter with cold water.

natural_image
Illustration of a showerhead spraying water with raindrops (no text or symbols)- Insert the filter into the filter holder.
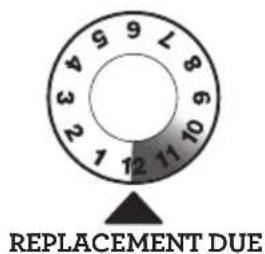
- Set the reminder for next month of replacement. It is recommend replacing the filter every 3 months.
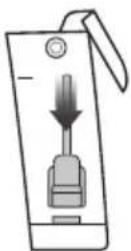
- To install the assembled filter holder into the water tank, align the base of the filter holder with the adapter inside the water tank. Push down to lock into place.

NOTE
Replacing the water filter every three months will reduce the need to descale the machine. Filters can be purchased from the Breville webpage.

Functions
Filling the Water Tank
- Ensure the water filter is securely fitted inside the water tank.
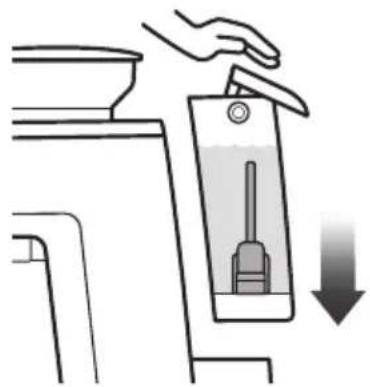
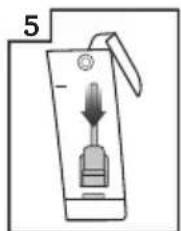
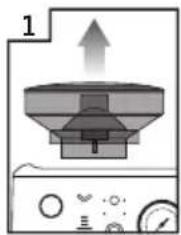
- Use the handle at the top of the water tank to assist in lifting the water tank and away from the machine.

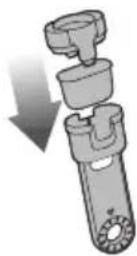
natural_image
Diagram showing a hand inserting a device into a container with an upward arrow (no text or symbols)- Fill the water tank with cold potable tap water up to the MAX marking indicated on the side of the water tank.
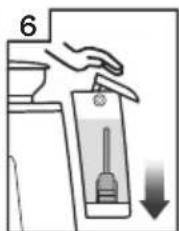
- Replace the water tank back on the machine, pressing down to ensure that it is properly positioned and attached to the machine.
natural_image
Illustration of a hand using a vacuum cleaner to clean water, with a downward arrow indicating action (no text or symbols present)
NOTE
If the water level in the water tank is below the minimum (MIN) marking, the espresso machine will not operate.
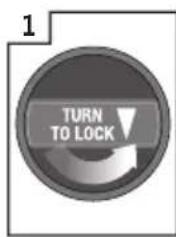
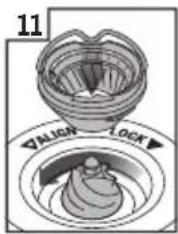
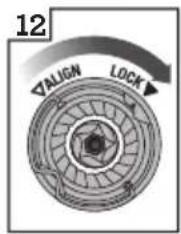
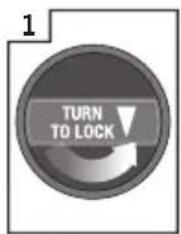
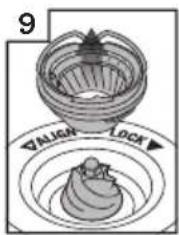
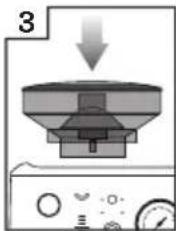
Attaching the Hopper
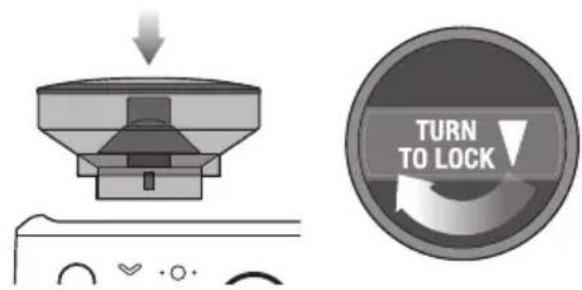
- Insert the bean hopper into position on top of the machine.
- Turn the dial to lock the hopper into place.
• Fill the hopper with fresh beans.

NOTE
The 'Filter' light flashes between single and double basket size when the bean hopper is not correctly locked into position.
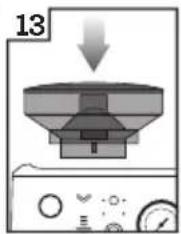
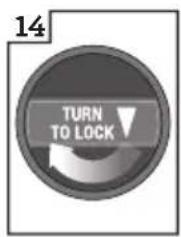
Attaching the Drip Tray
- Place the drip tray grill on top of the drip tray.
- For machine in color, attach the drip tray protection guard cover on the drip tray.
- Slide the drip tray into the machine.

natural_image
Technical line drawings of a device's internal components, showing top and side views with no visible text or symbols.GENERAL OPERATION
- Check the water tank is filled with cold tap water up to the maximum mark.
- Plug the power cord into the power outlet.
- Press the POWER button. The POWER button will flash while the machine is heating. (Light will flash for up to 55 seconds while the machine is heating.)
When the correct temperature has been reached, the 1 CUP and 2 CUP buttons and the POWER button on the control panel will illuminate.

First Use Priming and Flushing the Machine
It is recommended to complete a water flushing operation to ensure the machine has been conditioned.
When the machine has reached STANDBY mode, run the following steps.
- Place a cup under the group head and press the 2 CUP button to run hot water through the group head.
- Place a cup under the hot water spout. Rotate the dial to 'Hot Water' position and run water through the hot water outlet for 10 seconds.
- Position the steam wand over the drip tray. Rotate the dial to 'Steam' position and activate steam for 10 seconds.
• Discard the contents of the cup. - Repeat this cycle 3 times. Discard the contents of the drip tray and refill the water tank up to the max line.
- Insert the portafilter into the grinding cradle, press and hold 'Dose' button for 3 seconds. Remove the portafilter and discard any grinds.

NOTE
- Top up the water daily. The water tank should be filled with fresh, cold tap water before each use.
- DO NOT use highly filtered, demineralized, or distilled water in this machine. This may affect the taste of the coffee.
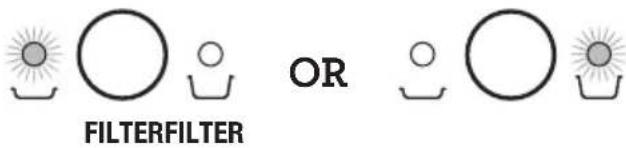
FILTER BASKETS
This machine includes both single and dual wall, 1 CUP and 2 CUP filter baskets.
Use the 1 CUP filter basket when brewing a single cup and the 2 CUP filter baskets when brewing 2 cups or a stronger single cup or mug.
Adjust the grind amount and size if switching from a single basket to a double basket, or vice versa.
The provided filter baskets are designed for:
1 CUP filter basket = 8-11g
2 CUP filter basket = 16-19g
Single Wall Filter Baskets
natural_image
Simple line drawing of a conical or dome-shaped object with a circular top and textured center (no text or symbols)
natural_image
Simple line drawing of a bowl-shaped object with a textured interior (no text or symbols)1 CUP 2 CUP
Single Wall filter baskets should be used when grinding fresh whole coffee beans.
These allows you to experiment with grind and dose to create a more balanced espresso.
Dual Wall Filter Baskets
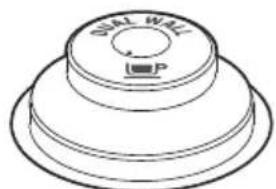
natural_image
Technical line drawing of a dual-way valve component (no text or symbols)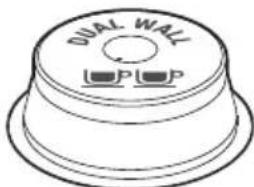
1 CUP 2 CUP
Dual Wall filter baskets should be used when using pre-ground coffee and older beans that are past the 30-day roast date.
These regulate the pressure and helps to optimize the extraction regardless of the grind, dose, or freshness.
THE GRIND
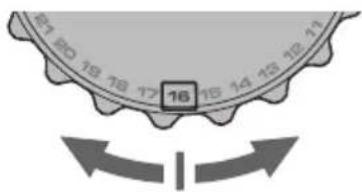
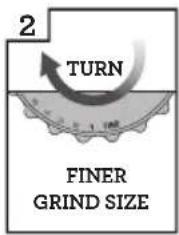
Setting the Grind Size

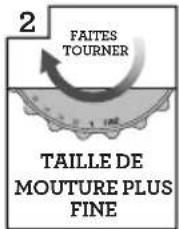
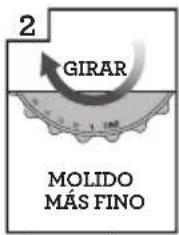
FINER
GRIND SIZE

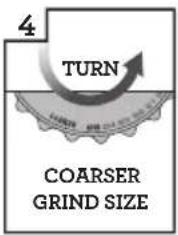
COARSER GRIND SIZE
The grind size will affect the rate of water flow through the coffee in the filter basket and the flavor of the espresso. When setting the grind size, it should be fine but not too fine and powdery.
There are 25 settings on the GRIND SIZE dial. To adjust the grind, rotate the dial to the back of the machine to go finer, or rotate the dial towards the front of the machine to go coarser. The smaller the number, the finer the grind size. The larger the number, the coarser the grind size. We recommend you start at the No.16 setting and adjust as required.

NOTE
- When making changes to the grind size, the new auto dosing time will be calculated after your next tamp and updated for the dose cycle following that.
- For most bean varieties, the grinder will automatically switch off when the beans get too low to complete a dose.

TIP
Changing the grind size affects the dose in the portafilter. A finer grind size may cause an under dose requiring 'A Bit More'. A coarser grind size may cause an over dose. To avoid an over dose, press and hold the 'Filter' button for 3 seconds, reducing the grind time by 3 seconds.
DOSING
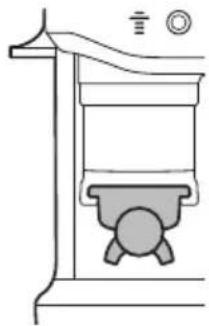
- Ensure the bean hopper is locked on the machine and filled with fresh coffee beans.
- Insert the filter basket required, into the portafilter.
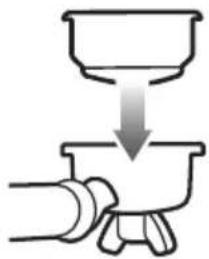
natural_image
Simple line drawing of a hand pouring liquid from a bowl into a pot (no text or symbols)- Press 'Filter' size button to select your filter size (single or double).
- Insert the portafilter securely into the dosing cradle.
natural_image
Technical line drawing of a mechanical device with no visible text or symbols- Press 'Dose' button to start grinding. The light blinks until grind cycle is completed.

NOTE
If the 'Dose' button is not illuminated, check that the portafilter is inserted securely in the cradle, the bean hopper is locked in position and the tamp lever is in the up-home position.
TAMPING
When the grind cycle is completed, the 'Tamp' light indicator blinks.
- Push the lever downwards to the end position until a beep sound plays. This will tamp the coffee grinds in the portafilter using a consistent amount of tamp force. Pushing the lever slowly and consistently will help to improve the puck appearance.
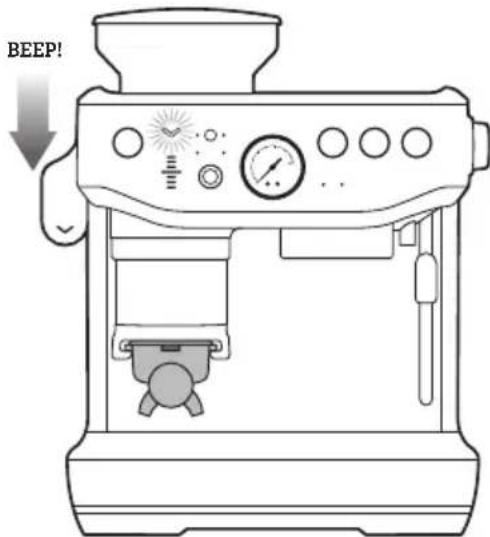
- Release the lever slowly upwards to the home position after tamping.

TIP
It is recommended to tamp twice to achieve a very polished coffee puck.
Below is a table of DOSE LEVEL indicator bars:

- The 😊 bar on the machine indicates ideal tamp level and the right amount of coffee grind is in the portafilter. This is the level that you are aiming for.
HOW TO CORRECT AN UNDER OR OVER DOSE?
An under or over dose can occur when fresh beans are added to the hopper; when coffee beans age; a different type of coffee bean is used or if a change is made to the grind size.
What to do when dose level is below the ideal middle bar?
- When tamp is below the ideal middle bar, the machine is switched to 'A Bit More' mode, the 'Dose' button light will flash.

- Press the 'Dose' button to add 'A Bit More' grinds to the portafilter, then complete a tamp for an updated dose level reading.
- When ideal dose level is reached, the machine will automatically update the auto dose time for the next cycle.
What to do when dose level is above the ideal middle bar?
- When tamp is above the ideal middle bar, remove the portafilter from the cradle.
- Use the Razor Trimming Tool. (refer to Trimming the Dose section)
- The machine will calculate how much to reduce the auto grind time and apply this for the next cycle.
DEDUCT TIME FROM AUTO DOSE
When an over dose is anticipated to occur before grinding, due to; changing to a coarser grind size, changing beans, or running out of beans on previous grind cycle; press and hold the 'Filter' button for 3 seconds.
DOSING MODES
Automatic Dosing

This is the default dose function of the machine and the mode that will be most commonly used.
The amount of coffee grinds will automatically dose into the portafilter, and the machine will provide guidance on achieving the ideal amount through the Dose Level Gauge.
The machine will adjust the ideal dose on the next grind.
Under Dose (A Bit More)
After tamping the 'Dose' button will flash to indicate more grinds is needed into the portafilter. Press the 'Dose' button to add 'A Bit More' coffee grinds.
Dose Top-up
This feature is ideal when the portafilter already has coffee but needs more.
For example, in situations where:
- Removing the portafilter during grinding and failing to re-insert within 5 seconds time out.
- Removing the portafilter after a full grind cycle without tamping skimming off the top of the coffee pile.
The machine can top up from that amount already in the portafilter basket preventing coffee waste, starting a fresh grind cycle, or updating the auto grind time. To initiate the top up, the portafilter will need to be inserted into the cradle and tamped. If the tamp level displays an under dose, the 'Dose' button will
blink indicating a top up. Press the 'Dose' button to start the grind and it will dose the right amount to get the ideal level.

NOTE
- This feature is only available on 'Auto' mode.
- This feature may require 2 to 3 top up cycles to reach an ideal dose.
- The set auto grind time will not be affected by this feature.
• Machine will not start a top up with an over dose or ideal level. Remove the portafilter and trim the excess with the razor.
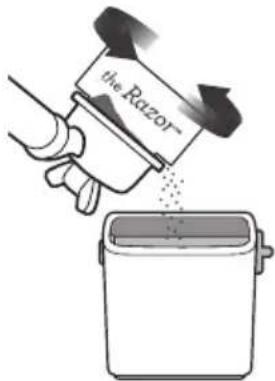
Over Dose (Trimming the Dose)

The Razor ^™ precision dose trimming tool allows you to trim the puck to the right level for a consistent extraction.
Insert the Razor ^™ into the coffee basket until the shoulders of the tool rest on the rim of the filter basket. The blade of the dosing tool should penetrate the surface of the tamped coffee.
Rotate the Razor ^™ dosing tool back and forth while holding the portafilter on an angle over the knock box to trim off excess coffee.
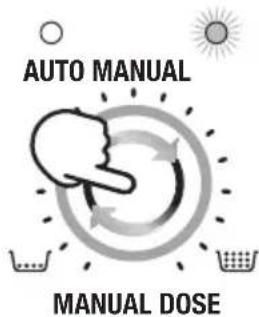
Manual Dosing

Press the 'Manual Dose' button to switch to manual dose mode. The light around the Manual Dose Dial and the Manual light will illuminate when in manual mode.
Select the dose amount by turning the dial clockwise for more or counterclockwise for less grind time.
Grinder Purge
It is recommended to purge the retained grinds left in the burrs or chute prior to making the first coffee of the day. Old grinds may affect the in-cup quality and coffee taste. Purging will ensure only fresh coffee makes it into your cup.
To purge, press and hold the 'Dose' button. The grind will start after 0.5 seconds, and it will stop once the 'Dose' button is released.
In auto mode, after doing a purge it is required to remove the portafilter, discard the grind from the basket and re-insert the portafilter into the grinding cradle to return the machine to its standby mode.
HOW TO MAKE COFFEE
Purging the Group Head
Before placing the portafilter into the group head, run a short flow of water through the group head by pressing the 1 CUP button. This will purge any ground coffee residue from the group head and stabilize the temperature prior to extraction.
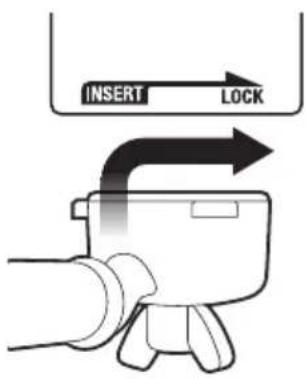
Inserting the Portafilter
Wipe excess coffee grinds from the rim of the filter basket to ensure a proper seal is achieved in the group head.
Place the portafilter underneath the group head so that the handle is aligned with the INSERT position. Insert the portafilter into the group head and rotate the handle towards the center until resistance is felt.
Extracting Espresso
- Place pre-warmed cup(s) beneath the portafilter and press the 1 CUP or 2 CUP button for the required volume.

- As a guide, the espresso will start to flow after 8-12 seconds (infusion time) and should be the consistency of dripping honey.
- If the espresso starts to flow before 7 seconds you have either under dosed the filter basket and/or the grind is too coarse. This is an UNDER-EXTRACTED shot.
- If the espresso starts to drip but doesn't flow after 12 seconds, then you have either over dose the filter basket and/or the grind is too fine. This is an OVER-EXTRACTED shot.
A great espresso is about achieving the perfect balance between sweetness, acidity, and bitterness.
The flavor of your coffee will depend on many factors, such as the type of coffee beans, degree of roast, freshness, coarseness or fineness of the grind, and the dose of ground coffee.
Experiment by adjusting these factors just one at a time to achieve the taste of your preference.
EXTRACTION GUIDE
GRIND GRIND DOSE SHOT TIME
OVER EXTRACTED
BITTER·ASTRINGENT
BALANCED
UNDER EXTRACTED
UNDERDEVELOPED·SOUR
TOO FINE TOO MUCH OVER 35 SEC
OPTIMUM
8-11g (1 CUP)
16-19g (2 CUP)
25-30 SEC
TOO COARSE TOO LITTLE UNDER 20 SEC
MANUAL PRE-INFUSION
- Press and hold the 1 CUP or 2 CUP button for the desired pre-infusion time.

OR

- Release the button to start the extraction.
- Press the 1 CUP or 2 CUP button again to stop the extraction.

NOTE
Pressing any button during extraction will stop extraction and the machine will return to standby mode.
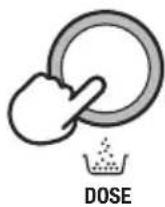
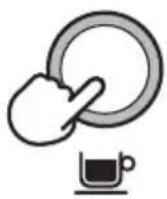
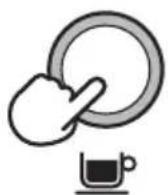
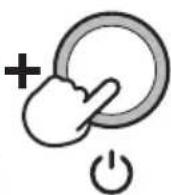
PROGRAMMING SHOT VOLUME
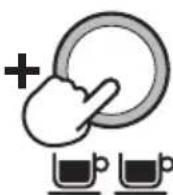
- Press and hold both the 1 CUP and 2 CUP buttons for 3 seconds, the buttons will illuminate and flash.
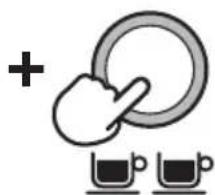
natural_image
Simple line drawing of a hand pressing a ring with two cups below (no text or symbols)
3s
To set the 1 CUP volume:
- Press the 1 CUP button to start the extraction.
- Press the 1 CUP button again to stop the extraction. The modified volume will be saved.
To set the 2 CUP volume, follow the above steps but select the 2 CUP button to start and stop the extraction.
USING HOT WATER
The machine has a dedicated hot water outlet.
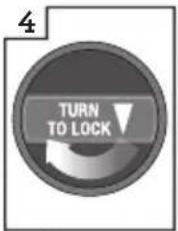
- Turn the dial on the right, from STANDBY to 🔒 HOT WATER.
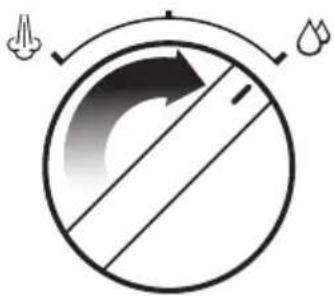
natural_image
Simple circular diagram with arrows and symbols, no readable text or labels- Turn the dial back to STANDBY to stop hot water flow.
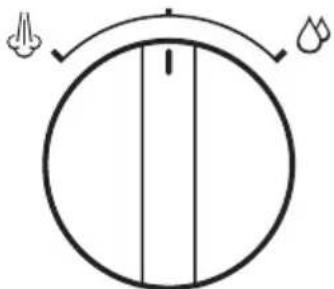
natural_image
Simple circular diagram with a vertical line and two small symbols at the top (no text or labels)• Maximum flow out of hot water volume is 8fl.oz (240ml).

WARNING
Cup temperature is approximately 194^ F ( 90^ C). Be careful in handling hot beverages.
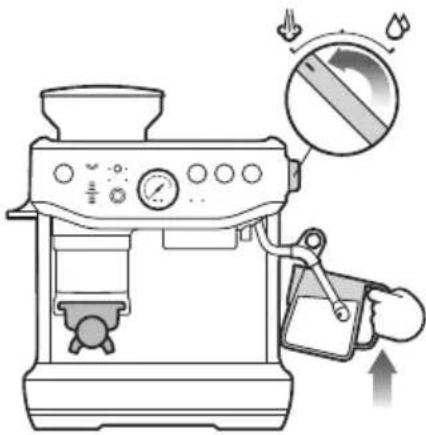
TEXTURING MILK
There are two phases to texturing milk, stretching, and heating. These two operations should blend into one with the goal being silky smooth textured milk at the correct temperature.
- Start with fresh cold milk of choice.
- Fill the milk jug between the min and max level.
- Position the steam tip over the drip tray and turn the dial from STANDBY to STEAM and wait until the steam is flowing strongly.
- Turn the steam dial to the STANDBY position to pause the steam, then within 8 seconds, insert steam wand tip into milk jug and turn dial back to STEAM position.
- Insert the steam tip 1-2cm below the surface of the milk close to the right-hand side of the jug at the 3 o'clock position.
-
Keep the tip just under the surface of the milk until the milk is spinning clockwise, producing a vortex (whirlpool effect).
-
With the milk spinning, slowly lower the jug. This will bring the steam tip to the surface of the milk and start to introduce air into the milk. You may have to gently break the surface of the milk with the tip to get the milk spinning fast enough.
- Keep the tip at or slightly below the surface, continuing to maintain the vortex. Texture the milk until sufficient volume is obtained.
- Lower the tip beneath the surface but keep the vortex of milk spinning. The milk is at the correct temperature 140 - 149^ (60-65°C) when the jug is hot to comfortably touch.
- Move the steam dial to the STANDBY position before taking the tip out of the milk.
- Set the jug to one side, turn dial to STEAM to purge out any residual milk from the steam wand and wipe steam wand with a damp cloth.
- Tap the jug on the bench to collapse any bubbles.
- Swirl the jug to polish and re-integrate the texture.
- Pour milk directly into the espresso.
- The key is to work quickly, before the milk begins to separate.

CAUTION: BURN HAZARD
Pressurized steam can still be released, even after machine has been switched off. Children must always be supervised.
Adjusting Water Temperature
Different beans may require different water temperatures to extract their optimum flavor. The temperature can be adjusted +/- 4°F (2°C) in 2°F (1°C) increments from the default setting:
- Turn the machine to OFF.
- Press and hold 'Filter', 1 CUP and 2 CUP then press and hold the POWER button.
- The machine will beep once and display the current temperature.
-
Press one of the below buttons within 5 seconds:
-
Increase 2^ (1^) - 2 CUP
- Increase 4^ (2^) - POWER
- Decrease 2^ (1^) - Manual Dose
-
Decrease 4^ (2^) -Dose
The machine will beep twice to confirm the change and return to standby mode. -
Return to default temperature - press 1 CUP button.
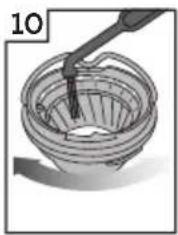
ADJUSTING CONICAL BURRS
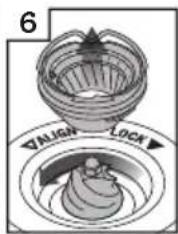
Some types of coffee may require a wider grind range to achieve an ideal extraction or brew. A feature of your Barista Express Impress ^™ is the ability to extend this range with an adjustable upper burr. We recommend making only one adjustment at a time.
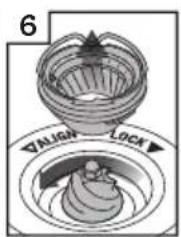
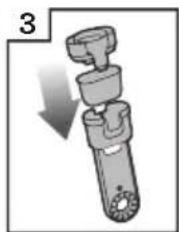
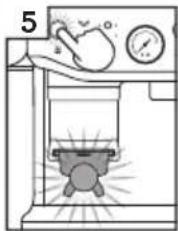
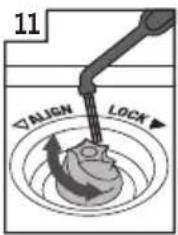
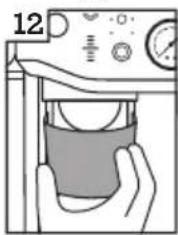
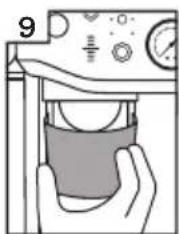
Unlock hopper
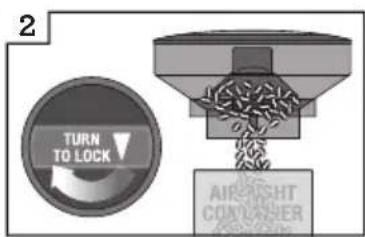
Hold hopper over container & turn dial to release beans into container
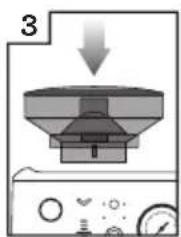
Align hopper into position
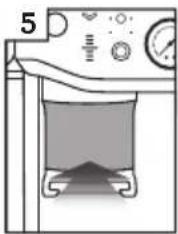
natural_image
Simple line drawing of a kitchen or washing machine with a bed, fan, and pressure gauge (no text or symbols)Run grinder until empty

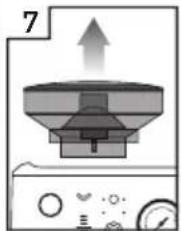
natural_image
Diagram of a kitchen appliance with an upward arrow and control panel (no text or symbols)Remove hopper
Remove upper burr
Remove wire handle from both sides of the burr

Move adjustable top burr, 1 number, coarser or finer
Align the number with the handle opening
Insert wire handle from both sides of the burr
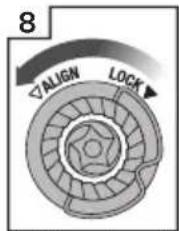
Push upper burr firmly into position
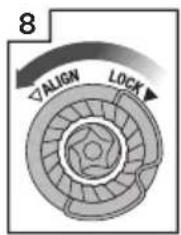
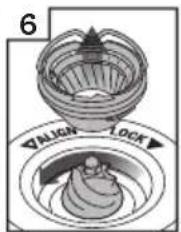
Lock upper burr
Align hopper into position
Lock hopper
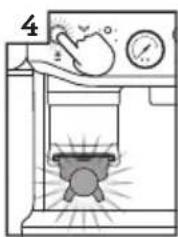
natural_image
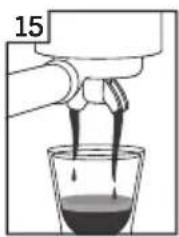
Illustration of a hand pouring liquid into a glass with dark liquid, labeled '15' (no text or symbols on the diagram itself)Check your extraction
RESET DEFAULT SETTINGS
Reset Auto Dose Time
Resetting the auto dose time is recommended if there is a significant change to the grind size or there is an accidental double dose into the portafilter.
The machine must be on STANDBY mode.
- Press and hold 'Manual Dose' button and 'Filter' button for 3 seconds to reset grind time to factory settings.
- The machine will confirm the reset when the control panel lights for filter, grind mode and dial will flash 3 times with beeping sounds.
- The machine will return to STANDBY mode.
Reset Extraction Time
The machine must be on STANDBY mode.
- Press and hold the 'Filter' and 1 CUP and 2 CUP buttons for 3 seconds.
• The machine will beep 3 times. - The machine will then go into ready mode.
ALERTS
No Hopper Warning
The 'Filter' lights flash between single and double basket size, the hopper is not attached correctly.
Check the hopper and ensure the bean hopper is inserted correctly and locked in place.
Low Coffee Beans Warning
The ‘Dose’ button and the ‘Dose Level’ lights will flash two red LEDS and will sound 3 beeps. Add coffee beans to the hopper.
Tamp Lever Not at Home Position
The machine beeps 3 times and pauses dose cycle. Return the lever to the up or home position and press 'Dose' button to continue.

Care & Cleaning
REPLACING THE WATER FILTER IN THE WATER TANK
Soak water filter for 5 mins
natural_image
Illustration of a faucet spraying water with a bucket (no text or symbols)Rinse water filter
natural_image
Mechanical device with a downward arrow indicating motion (no text or symbols)Place filter into filter holder
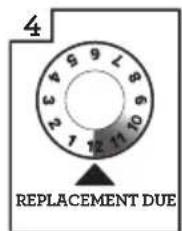
Set date 3 months ahead
Install filter in water tank
Insert & lock water tank
The provided water filter helps reduce the risk of scale build-up in and on many of the inner functioning components. Replacing the water filter every three months will reduce the need to descale the machine. If you live in a hard water area, it is recommended to change the water filter more frequently.

WARNING
After regular use, hard water can cause mineral build up in and on many of the inner functioning components, reducing the brewing flow, brewing temperature, power of the machine, and taste of the espresso.
- Remove the filter from the plastic bag, and soak in a cup of water for 5 minutes.
- Rinse the filter under cold running water for 5 seconds.
- Insert the filter into the filter holder.
- Set the date dial 3 months ahead.
• To install, push down the filter to lock into place.

NOTE
For replacement of water filters contact Breville Customer Service Centre or visit our website at www.breville.com
CLEANING CYCLE

NOTE
This is a back-flushing cycle and separate from descaling.
The CLEAN/DESCALE light i will flash when a cleaning cycle is required.
- Insert the 1 CUP filter basket into the portafilter, followed by the supplied cleaning disc, followed by one cleaning tablet.
- Lock the portafilter into the group head and place a large container beneath the portafilter spouts.
- Ensure the water tank is filled with cold water and the drip tray is empty.
- Press the POWER button to switch the machine off.
- Press and hold 1 CUP, 2 CUP and the POWER buttons for 3 seconds.

① 3s
- The cleaning cycle will commence and last for approximately 5 minutes. During this time, water will intermittently flush into the portafilter to dissolve the cleaning tablet and flush back into the group head.

NOTE
No water should come through the portafilter.
- Remove the portafilter and ensure the tablet has completely dissolved. If the tablet has not dissolved; repeat from step 4 of the cleaning cycle until the tablet is dissolved.
- Once the tablet has completely dissolved, remove the cleaning disc, reinsert the portafilter and press the 2 CUP button to rinse the brew head. It is recommended to place a container under the portafilter spout to avoid water splashing onto the machine. Once complete, make sure to wipe off any splashes with a soft dry cloth.
DESCALING

NOTE
- Ensure that the water filter is removed from the water tank before adding the descaling powder when descaling the machine.
- While the cleaning cycle is important for keeping the brew head clean from coffee oils; the descaling cycle is essential to ensure that the machine is kept clean on the inside and free from mineral build-up.
- Do not use bottled water when descaling. Most bottled water may contain dissolved solids that can leave deposits inside the machine.
The CLEAN / DESCALE light i will illuminate solid when descaling is required
- Fully dissolve one sachet of Breville descaling powder into 4 cups (34fl.oz | 1L) of water then fill the water tank (start the process after fully dissolving the powder).
- Ensure the machine is OFF; then press and hold the 2 CUP and POWER buttons simultaneously for 5 seconds to enter the descale mode.

The unit will heat up as part of commencing the descaling action, during the heating process, the POWER and 2 CUP buttons should flash continuously.
The machine will indicate it is ready for descaling when the POWER button, 2 CUP button, CLEAN / DESCALE indicator and HOT WATER / STEAM indicator are all illuminated solid.
Descaling the coffee component
- Press the 2 CUP button to start the descaling for the coffee component of the machine. Descaling coffee component takes approximately 25 seconds. The 2 CUP button should flash continuously and remain constant
once the descaling process has finished. To terminate the descaling within 25 seconds, press the 2 CUP button again.
Extraction will run for 25 seconds or the user press the 2 CUP button. The unit will confirm coffee component descale cycle with a beep and the 2 CUP light turns solid.
Descale the steam and hot water components
Descaling steam and hot water take approximately 13 seconds and 8 seconds respectively. Descaling can be terminated prematurely by turning the steam dial to STANDBY.
-
Descale Steam component by turning the steam dial RIGHT towards the STEAM icon.
-
Descale Hot water component by turning the steam dial to the LEFT towards the 🔒 HOT WATER icon.
Repeat processes to complete descaling
After the above processes about half (17fl.oz | 0.5L) of the descale solution should be left in the water tank.
- Repeat steps 3-5 above to complete the descaling process to empty the solution in the tank.
Descaling Solution Rinse
- After descaling, remove the water tank and rinse thoroughly then refill with fresh cold water to the maximum capacity (68fl.oz | 2L) and repeat steps 4-6 to further cleanse the machine of any residue of the cleaning solution thoroughly.
- Press POWER button to quit the descaling process. This will be indicated by the LED lights switching off.

NOTE
The machine turns off automatically if there is no action for 5 minutes in descaling mode. To resume descaling start from step 2.
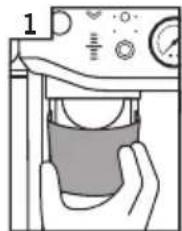
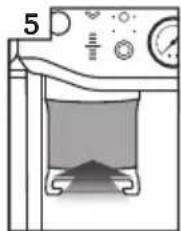
CLEANING CONICAL BURRS
Regular cleaning helps the burrs achieve consistent grinding results.
Unlock hopper
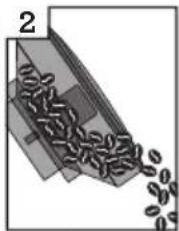
natural_image
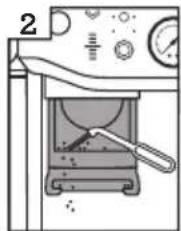
Diagram of a conveyor belt emitting granular material, labeled with number 2 (no text or symbols on the belt itself)Empty hopper
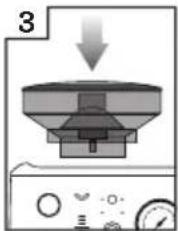
natural_image
Diagram of a kitchen appliance with a downward arrow indicating process (no text or symbols)Replace hopper
Lock hopper
Run grinder until empty

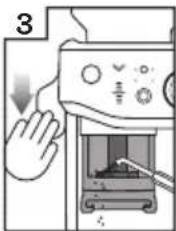
Unlock hopper
natural_image
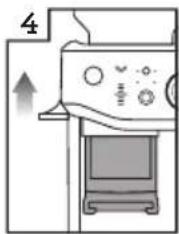
Diagram of a kitchen appliance with a funnel and fan, showing airflow direction (no text or symbols)Remove hopper
Unlock top burr
Remove top burr
natural_image
Illustration of a hand pouring liquid into a woven basket (no text or symbols)Clean top burr with brush
Clean lower burr with brush
natural_image
Illustration of a hand holding a glass with a circular object inside, next to a control panel (no text or symbols visible)Remove tamp cover
natural_image
Diagram of a mechanical device with a tool inside a chamber, no visible text or symbolsClean the chute with brush
natural_image
Diagram of a laboratory setup with a beaker and control panel (no text or symbols)Replace tamp cover
ADVANCED CLEANING FOR THE CONICAL BURR GRINDER
This step is only required if there is a blockage between the grinding burrs and the grinder outlet.
natural_image
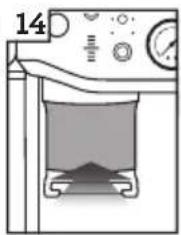
Diagram of a kitchen appliance with a conical top and upward arrow, no text or symbols presentRemove hopper
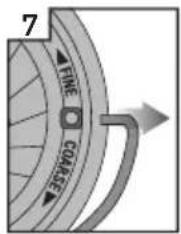
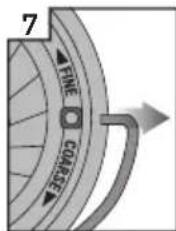
Set GRIND SIZE to 1 (finest)

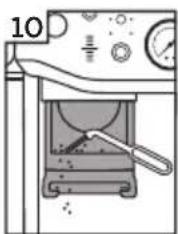
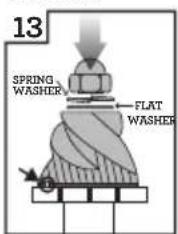
Use 10mm socket. Rotate clockwise to loosen the nut only
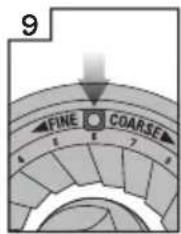
Set GRIND SIZE to 25 (coarsest)
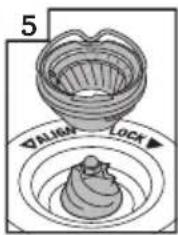
Unlock & remove top burr
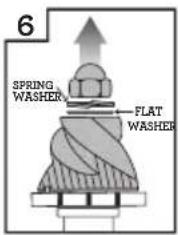
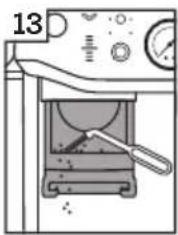
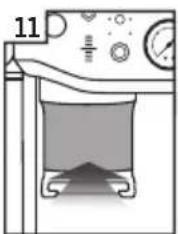
Remove nut, spring & flat washer. Carefully remove lower burr.
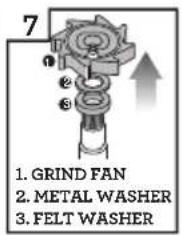
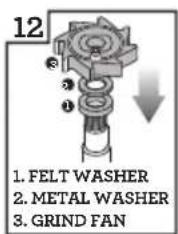
Remove grind fan & washers using long-nose pliers

Unblock the grinds exit chute using the brush or a pipe cleaner
natural_image
Illustration of a hand holding a glass over a container, with no visible text or symbolsRemove tamp cover
Clean the chute with brush
natural_image
Simple line drawing of a laboratory apparatus with a pot and control panel (no text or symbols)Replace tamp cover
Insert washers & grind fan using long-nose pliers
Insert lower burr (drive pin & cavity to align). Insert flat washer & spring washer.

Rotate counter-clockwise to tighten nut
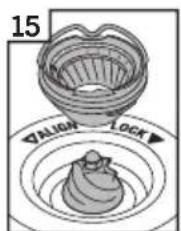
Insert & lock top burr
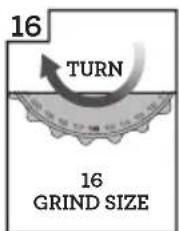
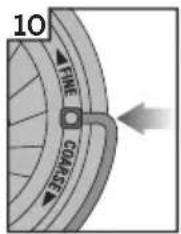
Set GRIND SIZE to 16
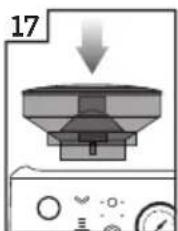
Replace hopper

Lock hopper

WARNING
Care should be taken as the grinder burrs are extremely sharp.
CLEANING THE TAMP SYSTEM
Remove tamp cover
Clean the chute with brush
Push down lever
natural_image
Diagram of a kitchen appliance with a monitor and directional arrow (no text or symbols)Release lever
natural_image
Diagram of a laboratory setup with a beaker, pressure gauge, and control panel (no text or labels)Replace tamp cover
- Remove the tamp cover.
- Brush clean the tamp face and cradle from any dust or grinds.
- Push down and hold the lever down, using the tamp cleaning brush, dust off grind residues in and around the tamp.
- Slowly release the lever back up making sure the cleaning brush is clear and out of the tamp system area.
CLEANING THE STEAM WAND
- The steam wand should always be cleaned after texturing milk. Wipe the steam wand with a damp cloth. Then with the steam wand tip directed over the drip tray, briefly set the STEAM / HOT WATER dial to the STEAM position. This will clear any remaining milk from inside the steam wand.
- If any of the holes in the tip of the steam wand become blocked, ensure the STEAM / HOT WATER dial is in the STANDBY position. Press the POWER button to switch the machine off and allow to cool. Use the pin on the end of the provided cleaning tool to unblock the hole(s).
- If the steam wand remains blocked, remove the tip using the integrated spanner in the cleaning tool and soak in hot water. Use the pin on the end of the provided cleaning tool to unblock the hole(s) before re-attaching to the steam wand.
CLEANING THE FILTER BASKETS AND PORTAFILTER
- The filter baskets and portafilter should be rinsed under hot water immediately after use to remove all residual coffee oils.
- If any of the holes in the filter basket become blocked, use the pin on the end of the provided cleaning tool to unblock the hole(s).
- If the hole(s) remain blocked, dissolve a cleaning tablet in hot water and soak filter basket and portafilter in solution for approximately 20 minutes.
- Rinse thoroughly.
- The group head interior and shower screen should be wiped with a damp cloth to remove any ground coffee particles.
• Periodically purge the machine. Place an empty filter basket and portafilter into the group head. - Press and hold the 1 CUP button and run a short flow of water to rinse out any residual coffee.
CLEANING THE DRIP TRAY & STORAGE TRAY
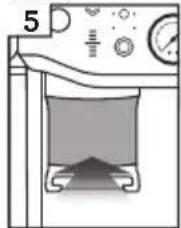
- The drip tray should be removed, emptied, and cleaned at regular intervals, particularly when the drip tray full indicator is visibly floating.
- Remove the grid from the drip tray. Lift the coffee grind separator and dispose of any coffee grounds. The drip tray full indicator can also be removed from the drip tray by pulling upwards to release the side latches. Wash all parts in warm soapy water with a soft cloth. Rinse and dry thoroughly.
- The storage tray (located behind the drip tray) can be removed and cleaned with a soft, damp cloth. Do not use abrasive cleansers, pads or cloths which can scratch the surface.

NOTE
All parts should be cleaned by hand using warm water and a gentle dish washing liquid.
Do not use abrasive cleansers, pads or cloths which can scratch the surface. Do not clean any of the parts or accessories in the dishwasher.
CLEANING THE OUTER HOUSING & CUP WARMING TRAY
- The outer housing and cup warming tray can be cleaned with a soft, damp cloth. Polish with a soft, dry cloth. Do not use abrasive cleansers, pads or cloths which can scratch the surface.
STORING YOUR MACHINE
- Before storing, press the POWER button to off, turn the steam dial to STANDBY switch Off at the power outlet and unplug. Remove unused beans from the hopper, clean the grinder, empty the water tank and the drip tray.
- Ensure the machine is cool, clean, and dry. Insert all accessories into position or into the storage tray. Store upright. Do not place anything on top.

WARNING
To prevent damage, do not use alkaline cleaning agents when cleaning. Use a soft cloth and a mild detergent.

WARNING
Do not immerse power cord, power plug or appliance in water or any other liquid. The water tank should never be removed or completely emptied during decalcifying.
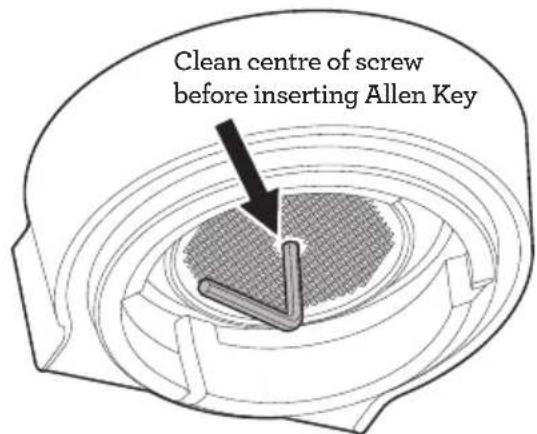
USING THE ALLEN KEY
Over time, the silicone seal surrounding the shower screen will need to be replaced to ensure optimum brewing performance.
- Press the POWER button to switch the machine off and unplug the cord from the power outlet.
- Carefully remove the water tank and drip tray, taking particular care if they are full.
-
Using a skewer or similar, clean the center of the screw of any residual coffee.
-
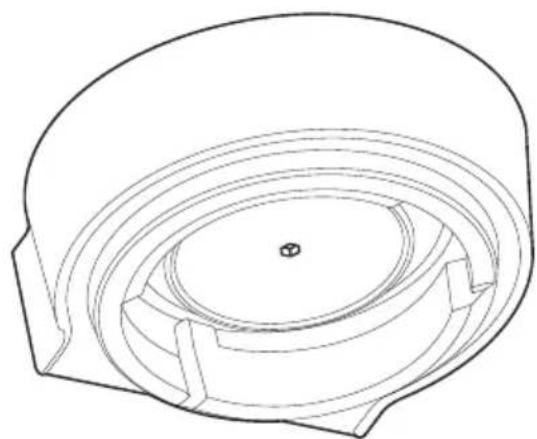
Insert the shorter end of the Allen Key into the center of the screw. Turn counterclockwise to loosen the screw.
- Once loosened, carefully remove, and retain the screw and stainless-steel shower screen. Make note of the side of the shower screen that is facing downwards. This will make re-assembly easier. Wash the shower screen in warm soapy water, then dry thoroughly.
- Remove the silicone seal with your fingers or a pair of long-nose pliers. Insert the new seal, flat side first, so the ribbed side is facing you.
natural_image
Technical line drawing of a mechanical component with concentric layers and a central hole (no text or symbols)-
Re-insert the shower screen, then the screw. With your fingers, turn the screw clockwise for 2-3 revolutions then insert the Allen Key to tighten until the screw is flush with the shower screen.
-
Re-insert the drip tray and water tank.

NOTE
Contact Breville Customer Service or visit www.breville.com for replacement silicone seals or for advice.

Troubleshooting
PROBLEM POSSIBLE CAUSES WHAT TO DO
| The machine is on but ceases to operate | Machine is too hot. Turn machine off. Wait for 30-60 minutes and turn machine back on. If problem persists, call Breville Consumer Support. | |
| Water does not flow from the group head | Machine has not reached operating temperature.Water tank is empty. Fill water tank.Water tank is not fully inserted and locked into position. | Allow time for the machine to reach operating temperature.Push water tank in fully and lock latch closed. |
| No hot water | Water tank is empty. Fill water tank. | |
| Grinder time out | The coffee grind is very fine. Clean out grinder using provided cleaning tool. Refer to page 26 ‘Cleaning Conical Burrs’. | |
| Grinding for a very long time | Chute is blocked. Clean chute using provided cleaning brush.Refer to page 26 ‘Cleaning Conical Burrs’. | |
| Will not grind / grind stops | Out of beans. Add more beans.Hopper not locked (dose light flashing back and forth).Portafilter not fully inserted in the grinding cradle.Lever is too low and the tamp blocks the chute.Coffee build-up stopping portafilter insertion. | Lock hopper.Fully insert the portafilter and see the ‘DOSE’ light button illuminates.Raise lever fully to home position.Clean grinding cradle with brush. |
| Pressure Gauge is not working | Incorrect dose or not enough coffee in the filter basket.Using coffee beans beyond expiry date. | Use dual wall baskets or use a finer grind size setting. If problem persist, call Breville Consumer Support.Use freshly roasted coffee beans with a ‘Roasted On’ date and consume between 5-20 days after that date. |
| Auto time not adjusting | Machine in ‘Manual’ mode. Press the manual dose dial to return to auto mode.In ‘Top-up’ mode. Do not remove the portafilter until grind has completed and ideal dose is reached. | |
PROBLEM POSSIBLE CAUSES WHAT TO DO
| Dose level is not updating | Machine in ‘Manual’ mode. Press the manual dose dial to return to auto mode. Refer to page 16 ‘Dosing Modes’. | |
| Grinder does not grind all beans | Not enough beans in hopper. Refill hopper or use manual mode. | |
| Severe overdose | Single basket used in double filter mode. | Select the correct filter size. |
| Severe underdose | Double basket used in single filter mode. | Select the correct filter size for your next dose, then ‘Reset Auto Dose Time’ - refer to page 23. |
| Underdosed | Grind adjusted to finer grind. Use ‘A Bit More’ to reach the ideal dose. | |
| Coffee is not running from the portafilter | The coffee grind is too fine. Refer to page 14 ‘Setting the Grind Size’ and refer to page 19 ‘Extraction Guide’.Water tank is empty. Fill water tank. | |
| Coffee runs out too quickly | The coffee grind is too coarse. Refer to page 14 ‘Setting the Grind Size’ and refer to page 19 ‘Extraction Guide’. | |
| Coffee runs out too slow | The coffee grind is too fine. Refer to page 14 ‘Setting the Grind Size’ and refer to page 19 ‘Extraction Guide’. | |
| No crema | Coffee beans are stale. Use freshly roasted coffee beans with a ‘Roasted On’ date and consume between 5-20 days after that date. | |
| Coffee is too cold | Cups are cold and causing temperature of extraction to reduce.Milk not heated enough (if making milk-based drink). | Pre-heat cups.When the base of the jug becomes hot to touch this is when the milk is heated at the correct temperature. Refer to pages 20-21 ‘Texturing Milk’ section. |
PROBLEM POSSIBLE CAUSES WHAT TO DO
| No steam | Steam wand is blocked. Use the pin on the end of the provided cleaning tool. If steam wand remains blocked, refer to page 27 'Cleaning the Steam Wand' for detailed cleaning process.Water tank is empty. Fill water tank. | |
| Water coming out of steam wand | Machine is heating up. Purge steam wand before texturing milk.Refer to pages 20-21 'Texturing Milk'. | |
| Hot water isn't continuously flowing | Machine is too hot after steaming. | Allow machine to cool down. |
| Lever very hard to tamp | Severe overdose. Use the Razor trimming tool* to correct current dose. Select the correct filter size.Coffee build-up in mechanism. Remove shroud (tamp) cover and clean using the cleaning brush provided. | |
| Puck surface is not flat and smooth | Coffee grinds stuck on tamp face. | Remove shroud (tamp) cover and clean using the cleaning brush provided. |
| Puck surface has some loose grounds on top | Coffee grinds caught on tamp. Push the tamp lever again for a very polished coffee puck.Coffee grinds caught on tamp from tamping too quickly. | Push the lever down slower. |
| Tamp height is not at desired level | Machine is on auto mode, that is for ideal height only. | Use Manual Mode for custom control. |
| Tamp light continues to flash and no height reading on gauge after tamping | Tamping action is not completed. | Push the tamp lever down until you hear the beep. |
| When maintenance light indicator i flashes | Cleaning cycle is required. The maintenance light indicator will flash when a cleaning cycle is required.Go to care & Cleaning section for cleaning and descaling instructions. | |
| When maintenance light indicator i illuminates solid | Descale cycle is required. The maintenance light indicator is on solid light when a descale cycle is required.Go to care & Cleaning section for cleaning and descaling instructions. | |
* Razor - See page 10 for accessories list.

Notes
the Barista Express® Impress

natural_image
Exterior view of a Bruvilla coffee maker with control knobs and vacuum tube (no visible text or symbols)FR-CA
MANUEL D'INSTRUCTIONS
Breville®

Table des matières
INSTRUCTIONS RELATIVES AU CORDON COURT DE VOTRE APPAREIL
natural_image
Close-up of a mechanical switch or plunger device (no visible text or symbols)B

natural_image
Metallic pitcher with handle and side panel, no visible text or symbolsC

natural_image
Close-up of a black industrial rotary knob with a white base (no visible text or symbols)
D


E
F
G


H
I

J

K
L
natural_image
Black handheld device with a textured handle and 'Breville' logo on top (no other text or symbols visible)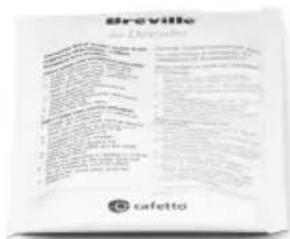
ACCESSOIRES
natural_image
Simple line drawing of a cylindrical object with horizontal lines, no text or symbols presentnatural_image
Illustration of a showerhead spraying water onto a dome-shaped object (no text or symbols)natural_image
Diagram showing a hand inserting a device into a container with an upward arrow (no text or symbols)natural_image
Illustration of a hand cleaning a kitchen sink with a water dispenser and downward arrow (no text or symbols)
REMARQUE
natural_image
Diagram of a mechanical component with a downward arrow, no visible text or symbols
natural_image
Technical line drawing showing a mechanical assembly with a lid and internal components, no text or symbols present.FONCTIONNEMENT GÉNÉRAL
natural_image
Three circular icons with cups and a power button, no text or symbols presentnatural_image
Two identical 3D-rendered white objects with textured surfaces, no text or symbols present.1 TASSE 2 TASSES
natural_image
Two identical mechanical component diagrams showing a dial with 'DUAL WALL' and a pressure gauge (no text or symbols)1 TASSE 2 TASSES
natural_image
Simple line drawing of a bowl being poured into a pot (no text or symbols)natural_image
Technical line drawing of a mechanical component or housing with no visible text or symbolsDosage manuel

natural_image
Simple circular diagram with arrows and symbols, no readable text or labelsnatural_image
Simple circular diagram with a vertical line and two droplets above it, no text or symbols present.natural_image
Line drawing of a coffee machine with a hand mixer and fan, showing no text or symbolsnatural_image
Diagram of a kitchen appliance with an upward arrow indicating motion (no text or symbols)Retirez la trémie
natural_image
Illustration of a hand pouring liquid into a glass with dark liquid, labeled '15' (no text or symbols on the diagram itself)natural_image
Illustration of a faucet with a bucket pouring liquid, labeled with number 2 (no text or symbols on the diagram itself)natural_image
Mechanical component diagram showing a downward arrow indicating assembly or force (no text or symbols)natural_image
Diagram of a kitchen appliance with an upward arrow and control panel (no text or symbols)Retirez la trémie
natural_image
Illustration of a hand holding a container with a lid, no text or symbols presentnatural_image
Simple line drawing of a laboratory setup with a beaker and pressure gauge (no text or symbols)natural_image
Illustration of a hand pressing a cup into a container with a control panel (no text or symbols)natural_image
Diagram of a kitchen appliance with a monitor and fan, showing no text or symbolsRelevez le levier
natural_image
Diagram of a portable stove with control panel and fan (no text or symbols)natural_image
Technical line drawing of a mechanical component with concentric layers and a central hole (no text or symbols)PROBLÈME CAUSES POSSIBLES CE QU'IL FAUT FAIRE
PROBLÈME CAUSES POSSIBLES CE QU'IL FAUT FAIRE
PROBLÈME CAUSES POSSIBLES CE QU'IL FAUT FAIRE
natural_image
Exterior view of a Bruvilla coffee maker with control knobs and vacuum tube (no visible text or symbols)ES-MX MANUAL DE INSTRUCCIONES
Breville®

Contenido
natural_image
Close-up of a mechanical switch or plunger device (no visible text or symbols)B

natural_image
Metallic pitcher with handle and side panel, no visible text or symbolsC
natural_image
Close-up of a black industrial rotary knob with a white base (no visible text or symbols)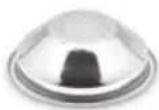
D


E

F
G


H
I

J

L

ACCESORIOS
natural_image
Simple line drawing of a cylindrical object with horizontal lines, no text or symbols presentnatural_image
Illustration of a showerhead spraying water onto a dome-shaped object (no text or symbols)natural_image
Diagram showing a hand inserting a device into a container with an upward arrow (no text or symbols)natural_image
Diagram of a hand holding a water dispenser with a downward arrow indicating flow or process (no text or symbols)
NOTA
natural_image
Technical line drawing showing two views of a device's internal structure, one with a handle and the other with a handle (no text or symbols present)natural_image
Simple line drawing of a conical container with a mesh lid (no text or symbols)
natural_image
Simple line drawing of a bowl-shaped object with a textured interior (no text or symbols)1 TAZA 2 TAZAS
natural_image
Technical line drawing of a conical component with concentric layers and a central circular feature (no text or symbols)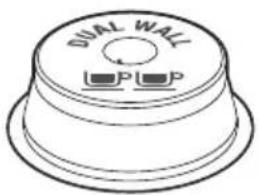
1 TAZA 2 TAZAS
natural_image
Simple line drawing of a hand pouring liquid from a bowl into a pot (no text or symbols)natural_image
Technical line drawing of a mechanical device with no visible text or symbolsDosificación manual
natural_image
Two circular diagrams showing hand positioning and magnifying glass, no text or symbols presentnatural_image
Simple line drawing of a hand pressing a ring with two cups below (no text or symbols)
3s
natural_image
Simple circular diagram with arrows and symbols, no readable text or labelsnatural_image
Simple circular diagram with a vertical line and two droplet symbols at the top (no text or labels)natural_image
Line drawing of a coffee machine with a hand holding a container, showing no text or symbols.natural_image
Simple line drawing of a kitchen appliance with a pot and fan (no text or symbols)natural_image
Diagram of a kitchen appliance with an upward arrow indicating motion (no text or symbols)Retire el depósito
Retire la muela superior
natural_image
Diagram of a kitchen appliance with a downward arrow indicating process (no text or symbols)natural_image
Illustration of a faucet with a bucket pouring liquid, labeled with number 2 (no text or symbols on the diagram itself)natural_image
Diagram of a handheld device with a downward arrow indicating compression or disassembly (no text or symbols present)natural_image
Diagram of a conveyor belt filled with granular material, emitting particles (no text or symbols)Vacíe el depósito
natural_image
Diagram of a kitchen appliance with a downward arrow indicating process (no text or symbols)natural_image
Diagram of a kitchen appliance with a funnel and fan, showing an upward arrow (no text or symbols)Retire el depósito
natural_image
Illustration of a hand holding a tool interacting with a basket (no text or symbols)natural_image
Illustration of a hand holding a glass over a container, with no visible text or symbolsnatural_image
Diagram of a kitchen oven with a tool inside, no text or symbols presentnatural_image
Diagram of a kitchen appliance with a pot and control panel (no text or symbols)natural_image
Diagram of a kitchen appliance with a funnel and control panel, no visible text or symbolsRetire el depósito
natural_image
Illustration of a hand holding a cup with a control panel (no text or symbols)natural_image
Simple line drawing of a laboratory apparatus with a beaker and control panel (no text or symbols)natural_image
Illustration of a hand holding a cup with a control panel (no text or symbols)natural_image
Diagram of a mechanical device with a tool inside, showing components like a fan or knob (no text or symbols present)natural_image
Diagram of a computer monitor with an upward arrow, no text or symbols presentLibere la palanca
natural_image
Diagram of a portable stove with control panel and fan (no text or symbols)natural_image
Technical line drawing of a mechanical component with concentric layers and a central hole (no text or symbols)Breville Service Center
USA Mail: Breville USA
19400 S. Western Ave, Torrance CA
90501-1119
Phone: 1-866-273-8455
1-866-BREVILLE
Web: breville.com/us/support
Canada Mail: Breville Canada
9800 Boulevard Cavendish,
Suite 250, Saint-Laurent
Québec, H4M 2V9
Phone: 1-855-683-3535
Web: breville.ca/support
Master Every Moment*
Breville is a registered trademark of Breville Pty. Ltd. A.B.N. 98 000 092 928.
Copyright Breville Pty. Ltd. 2023.
- Due to continued product improvement, the products illustrated/photographed in this brochure may vary slightly from the actual product.