
86651 - Pasta machine HAMILTON BEACH - Free user manual and instructions
Find the device manual for free 86651 HAMILTON BEACH in PDF.

| Product Type | Electric Pasta Machine |
| Brand | Hamilton Beach |
| Model | 86651 |
| Roller Material | Stainless Steel |
| Thickness Settings | 9 positions (1 = max, 9 = min) |
| Included Rollers | Smooth rollers, spaghetti cutter roller, fettuccine cutter roller |
| Speeds | Slow (II) and Fast (I) |
| Safety | Safety cover with switch, safety guards |
| Included Accessories | Cleaning brush, adjustable serrated wheel |
| Power Supply | Mains 120 V, 60 Hz |
| Power | Approx. 100 W (estimated) |
| Dimensions (W x D x H) | Approx. 30 x 20 x 15 cm (estimated) |
| Weight | Approx. 3 kg (estimated) |
| Usage | Household use only |
| Maintenance | Clean with brush and damp cloth; do not immerse |
| Warranty (Canada) | 5 years |
| Warranty (United States) | 1 year |
| Spare Parts Available | Yes, at hamiltonbeach.ca/parts |
| Repairability | Repair by manufacturer or authorized agent |
| Pasta Types | Spaghetti, fettuccine, lasagna, ravioli (with accessory) |
Frequently Asked Questions - 86651 HAMILTON BEACH
User questions about 86651 HAMILTON BEACH
0 question about this device. Answer the ones you know or ask your own.
Ask a new question about this device
Download the instructions for your Pasta machine in PDF format for free! Find your manual 86651 - HAMILTON BEACH and take your electronic device back in hand. On this page are published all the documents necessary for the use of your device. 86651 by HAMILTON BEACH.
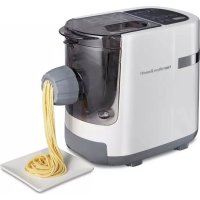
USER MANUAL 86651 HAMILTON BEACH
hamiltonbeach.com For recipes, tips and product information.
When using electrical appliances, basic safety precautions should always be followed to reduce the risk of fire, electric shock, and/or injury to persons, including the following:
- Read all instructions.
- This appliance is not intended for use by persons with reduced physical, sensory, or mental capabilities, or lack of experience and knowledge, unless they are closely supervised and instructed concerning use of the appliance by a person responsible for their safety.
- This appliance shall not be used by children. Keep the appliance and its cord out of reach of children.
- Close supervision is necessary when any appliance is used near children. Children should be supervised to ensure that they do not play with the appliance.
- To protect against risk of electrical shock, do not put cord, plug, base, or motor in water or other liquid.
- Turn the appliance OFF (0) then unplug from outlet when not in use, before putting on or taking off parts, and before cleaning. To unplug, grasp the plug and pull from the outlet. Never pull from the power cord.
- Avoid contacting moving parts.
- Always make sure the pasta maker is properly and completely assembled before the motor is turned ON.
-
Do not operate any appliance with a damaged supply cord or plug, or after the appliance malfunctions or has been dropped or damaged in any manner. Supply cord replacement and repairs must be conducted by the manufacturer, its service agent, or similarly qualified persons in order to avoid a hazard. Contact Customer Service for information on examination, repair, or adjustment as set forth in the Limited Warranty.
-
The use of attachments not recommended or sold by the appliance manufacturer may cause fire, electric shock, or personal injury.
- Do not use outdoors.
- Do not let cord hang over edge of table or counter or touch hot surfaces, including stove.
- Do not place on or near a hot gas or electric burner, or in a heated oven.
- Check that the appliance is OFF (0 before plugging cord into wall outlet. To disconnect, turn the control to OFF (0 then remove plug from wall outlet. To unplug, grasp the plug and pull from the outlet. Never pull from the power cord.
- Do not use appliance for other than intended purpose.
- Do not leave the pasta maker unattended while it is operating.
- Do not use the appliance if the cover, guards, cutters, rollers, or any other part is damaged.
- Always use the pasta maker on a dry, level surface.
- Do not attempt to defeat the cover interlock mechanism.
- CAUTION! In order to avoid a hazard due to inadvertent resetting of the thermal cut-out, this appliance must not be supplied through an external switching device, such as a timer, or connected to a circuit that is regularly switched on and off by the utility.
- Keep fingers and other objects out of the unit while in use. Slide the safety guards over the smooth rollers or cutters that are not in use.
SAVE THESE INSTRUCTIONS
Other Consumer Safety Information
This appliance is intended for household use only.
WARNING Electrical Shock Hazard: This appliance is provided with a grounded (3-prong) plug to reduce the risk of electric shock. The plug fits only one way into a grounded outlet. Do not defeat the safety purpose of the plug by modifying the plug in any way or by using an adapter. If the plug does not fit into the outlet, have an electrician replace the outlet.
The length of the cord used on this appliance was selected to reduce the hazards of becoming tangled in or tripping over a longer cord. If a longer cord is necessary, an approved extension cord may be used. The electrical rating of the extension cord must be equal to or greater than the rating of the appliance. The extension cord must be a grounding-type, 3-wire cord. Care must be taken to arrange the extension cord so that it will not drape over the countertop or tabletop where it can be pulled on by children or accidentally tripped over.
To avoid an electrical circuit overload, do not use another high-wattage appliance on the same circuit with this appliance.
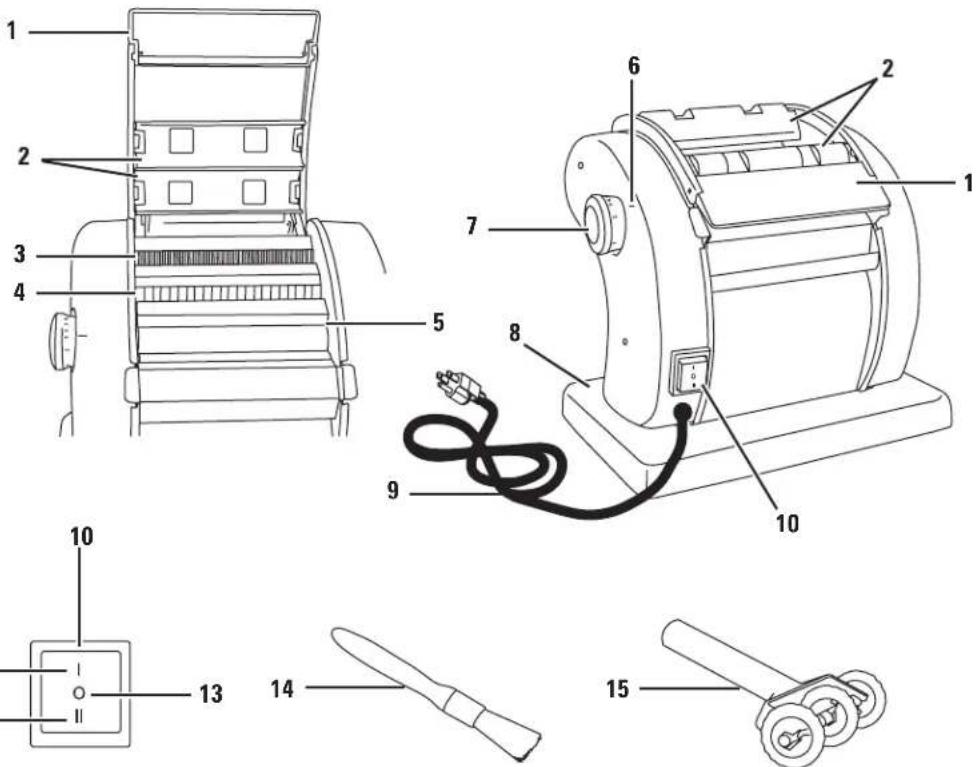
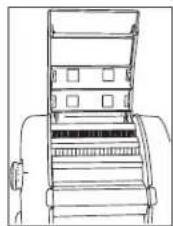
Parts and Features
To order parts, visit:
hamiltonbeach.com/parts
| 1 | Safety Cover |
| 2 | Sliding Safety Guards |
| 3 | paghetti Cutter |
| 4 | Fettuccine Cutter |
| 5 | Smooth Rollers (for kneading, broad noodles, or very thin sheets) |
| 6 | Setting Indicator |
| 7 | Adjustment Knob (Settings: 1=widest, 9=thinnest) |
| 8 | Base |
| 9 | Power Cord |
| 10 | Power Switch |
| 11 | Fast (I) |
| 12 | Slow (II) |
| 13 | OFF (O) |
| 14 | Cleaning Brush |
| 15 | Adjustable Wheel Pasta Cutter |
Before first use: Pass a small quantity of pasta dough through the Smooth Rollers and both Cutting Rollers. This will give you a feel for how your Pasta Machine operates, and will clean any debris from the Rollers.
Pasta Machine Features

NOTES:
- Do not run pasta maker longer than 15 minutes at a time. This will help prevent the motor from overheating.
- Always turn the Pasta Machine to OFF (O) before adjusting the Adjustment Knob. Never adjust settings while machine is operating.
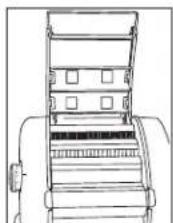
Safety Cover: Controls a safety switch. When Cover is open, Pasta Machine will not operate.
Sliding Safety Guards: Helps keep fingers and other objects out of the unit while in use. Slide the Safety Guards over the Smooth Rollers or Cutters that are not in use.
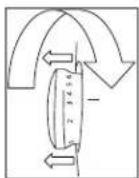
Adjustment Knob: Allows you to adjust the space between the Smooth Rollers. To adjust the spacing between the Smooth Rollers, pull the Adjustment Knob out slightly and rotate it until the desired setting number is aligned with the line on the base. Release the Adjustment Knob so that it rests against the base.
Adjustable Wheel Pasta Cutter: This tool is a pasta cutter with adjustable wheels. It cuts a zigzag pattern and is great for cutting a pasta sheet fast. You can easily select the width of your pasta with the adjustable wheels. The Adjustable Wheel Pasta Cutter is good for ravioli or lasagna as well.
How to Use
- Prepare dough recipe and cut into fist-size pieces. See "Before first use" on page 4.
NOTE: Avoid using salt in your dough, as this will damage the machine. - Place Pasta Machine on a flat, dry, stable surface.
- Ensure power switch is set to OFF and Safety Cover is closed.
- Plug into outlet.
- Set Adjustment Knob to 1. To do this, pull Adjustment Knob out and rotate it until "1" lines up with Setting Indicator. Release Adjustment Knob so it rests against the housing; setting 1 is widest setting.
- Move Sliding Safety Guards over the two Cutting Rollers.
- Turn Power Switch to Slow (II).
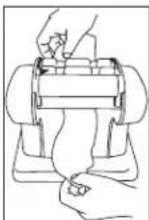
- Holding one of the dough pieces, pinch one end slightly flat to help ease it into Smooth Rollers.
- Gently push dough between Smooth Rollers, keeping fingers clear of Smooth Rollers, until it begins to feed through. Smooth Rollers will pull dough through the machine. Dough will emerge from back side of Pasta Machine. Place your hand under dough as it emerges from Smooth Rollers to guide it through the unit.
- Repeat this process with same dough 2-3 times. NOTE: Smooth Rollers complete the kneading process. As you continue to pass dough through Smooth Rollers, it will become smooth, shiny and elastic. If it sticks to Smooth Rollers, dust dough with flour and repeat step 9.
CAUTION Entanglement Hazard. Tie back loose hair and secure loose clothing.
- If dough seems to be too dry, put it back into a bowl or on a pastry board, and add several drops of water. Knead dough a few times by hand to distribute moisture evenly.
- Once you have passed dough through Smooth Rollers 2-3 times at widest setting "1", turn off Pasta Machine. Adjust Knob to setting "2" and pass dough through Smooth Rollers again. Continue adjusting to higher settings and pass dough through Smooth Rollers until the sheet is desired thickness.
NOTE: Settings may vary according to kind of dough,stiffness of dough,and temperature and humidity in room. - When dough is rolled out to the desired thickness, turn Pasta Machine OFF (
- Determine which type of pasta you are making, spaghetti or fettuccine. Place one Sliding Safety Guard over Smooth Rollers and other over Cutter that will not be in use.
- Turn Power Switch to Slow (II). Feed dough between Cutter until it begins to feed through. Cutter will pull dough through the machine. Dough will emerge from back side of Pasta Machine. Place your hand under dough as it emerges from Cutter to guide it through the unit.
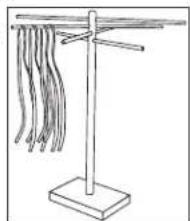
- Hang pasta on a drying rack or lay it flat on a pastry board. Pasta will dry faster if it is spread out.
- Follow recipe for cooking once pasta has dried.

Tips
- When using your pasta machine, always place it on a clean, stable surface, with Power Switch close to you for easy access.
- If cooking pasta right away, drying is not necessary. Simply rest pasta on pastry or cutting board until ready to cook.
-
To dry pasta, use a pasta drying rack to suspend the pasta. Separate strands as much as possible to prevent sticking.
Once pasta is dry, wrap it tightly in plastic wrap and store in a plastic bag. Pasta can be refrigerated for up to 24 hours. -
When cooking homemade pasta, be sure to use plenty of water to prevent pasta strands from sticking together. You can also add a small amount of oil to the cooking water, which prevents strands from clinging to one another.
- Fresh pasta typically cooks more quickly than packaged pasta. Your freshly made spaghetti will be done after boiling for 3-5 minutes. Fresh fettuccine will cook in 5-8 minutes, depending on desired doneness.
Care and Cleaning
- Unplug Pasta Maker.
- Set Adjustment Knob to setting 1, so Smooth Rollers are as far apart as possible for cleaning.
- Set aside for pieces of dough to dry.
WARNING Electrical Shock Hazard. Do not immerse pasta maker, cord, or plug in water or any other liquid.
- Using Cleaning Brush, or a clean, small, soft brush, clean any bits of dough that remain in Cutters and Rollers.
- Use a soft, damp cloth to clean all other surfaces of Pasta Machine. Do not use abrasive cleaners on unit.
- Never immerse Pasta Machine in water or other liquids. Pasta Machine is not dishwasher safe.
Recipe
Basic Egg Pasta
Ingredients:
3 large eggs
2 cups (250 grams) all-purpose flour
Directions:
- Place eggs and flour in bowl of Stand Mixer. Using Dough Hook Attachment and speed 1, mix until a shaggy dough is formed.
- Increase speed to speed 2. Knead until dough is smooth and elastic, about 5 minutes.
- Remove dough to a floured cutting board and cut into fist-size pieces. Cover with plastic wrap and let rest 15 minutes.
- Place Pasta Machine on a flat, dry, stable surface. Plug into outlet.
- Turn Power Switch to Slow (II).
- Holding one of the dough pieces, pinch one end slightly flat to help ease it into Smooth Rollers.
- Gently push dough between Smooth Rollers, keeping fingers clear of Smooth Rollers, until it begins to feed through. Smooth Rollers will pull dough through the machine. Dough will emerge from back side of Pasta Machine. Place your hand under dough as it emerges from Smooth Rollers to guide it through the unit.
- Repeat this process with same dough 2-3 times.
Makes: 1 pound (454 grams)
- Once you have passed dough through Smooth Rollers 2-3 times at widest setting "1", turn off Pasta Machine. Adjust Knob to setting "2" and pass dough through Smooth Rollers again. Continue adjusting to higher settings and pass dough through Smooth Rollers until the sheet is desired thickness. Do not pull the dough sheets through the Roller as they get longer, but rather support them lightly from underneath as they emerge from the Smooth Rollers; pulling dough sheets will stretch them out of shape. Keep the pieces of dough that are not being rolled covered with plastic wrap or a slightly damp towel.
- When dough is rolled out to the desired thickness, turn Pasta Machine OFF (O)
- Completely cover the dough sheets with lightly floured towels and let them rest about 30 minutes before cutting.
- Determine which type of pasta you are making, spaghetti or fettuccine. Place one Sliding Safety Guard over Smooth Rollers and other over Cutter that will not be in use. Flour lightly to keep pasta from sticking.
- Cook fresh pasta in boiling water 3 to 4 minutes.
Limited Warranty
This warranty applies to products purchased and used in the U.S. and Canada. This is the only express warranty for this product and is in lieu of any other warranty or condition.
This product is warranted to be free from defects in material and workmanship for a period of five (5) years from the date of original purchase in Canada and one (1) year from the date of original purchase in the U.S. During this period, your exclusive remedy is replacement of this product or any component found to be defective, at our option; however, you are responsible for all costs associated with our returning a product or component under this warranty to you. If the product or component is unavailable, we will replace with a similar one of equal or greater value.
This warranty does not cover glass, filters, wear from normal use, use not in conformity with the printed directions, or damage to the product resulting from accident, alteration, abuse, or misuse. This warranty extends only to the original consumer purchaser or gift recipient. Keep the original sales receipt, as proof of purchase is required to make a warranty claim. This warranty is void if the product is used for other than single-family household use or subjected to any voltage and waveform other than as specified on the rating label (e.g., 120V 60Hz ).
We exclude all claims for special, incidental, and consequential damages caused by breach of express or implied warranty. All liability is limited to the amount of the purchase price. Every implied warranty, including any statutory warranty or condition of merchantability or fitness for a particular purpose, is disclaimed except to the extent prohibited by law, in which case such warranty or condition is limited to the duration of this written warranty. This warranty gives you specific legal rights. You may have other legal rights that vary depending on where you live. Some states or provinces do not allow limitations on implied warranties or special, incidental, or consequential damages, so the foregoing limitations may not apply to you.
To make warranty claim, do not return this appliance to the store. Please write Hamilton Beach Brands, Inc., Customer Service Department, 4421 Waterfront Dr., Glen Allen, VA 23060, or visit hamiltonbeach.com/customer-service in the U.S. or hamiltonbeach.ca/ customer-service in Canada. For faster service, locate the model, type, and series numbers on your appliance.
PRECAUTIONS IMPORTANTES
Mixcoac, Benito Juarez
Brand : HAMILTON BEACH
Model : 86651
Category : Pasta machine