
86650 - Pasta machine HAMILTON BEACH - Free user manual and instructions
Find the device manual for free 86650 HAMILTON BEACH in PDF.

| Product Type | Automatic Pasta Maker |
| Brand | Hamilton Beach |
| Model | 86650 |
| Power | 120 V ~ 60 Hz |
| Maximum Flour Capacity | 600 g (1.5 lb) |
| Preset Programs | Quick Pasta (15-18 min) and Pasta (20-30 min) |
| Included Shaping Discs | Angel Hair, Spaghetti, Thick Spaghetti, Penne (5 discs total) |
| Built-in Scale | Yes, auto-tare, measures in grams |
| Digital Display | Yes, with progress bar and indicators |
| Manual Functions | Knead Dough and Extrude Pasta |
| Cleaning Removable Parts | Dishwasher safe (top rack) or hand wash with warm soapy water |
| Cleaning the Base | Wipe with a soft damp cloth, do not immerse |
| Safety | Automatic shut-off, lockable lid, polarized plug |
| Included Accessories | Measuring cup, cleaning tool, 5 shaping discs |
| Warranty | 5 years in Canada, 1 year in the US |
| Usage | Household use only |
Frequently Asked Questions - 86650 HAMILTON BEACH
User questions about 86650 HAMILTON BEACH
0 question about this device. Answer the ones you know or ask your own.
Ask a new question about this device
Download the instructions for your Pasta machine in PDF format for free! Find your manual 86650 - HAMILTON BEACH and take your electronic device back in hand. On this page are published all the documents necessary for the use of your device. 86650 by HAMILTON BEACH.
USER MANUAL 86650 HAMILTON BEACH
Visit www.hamiltonbeach.com for our complete line of products and Use and Care Guides - as well as delicious recipes, tips, and to register your product online.
Questions Please call us - our friendly associates are ready to help. USA:1.800.851.8900
When using electrical appliances, basic safety precautions should always be followed to reduce the risk of fire, electric shock, and/or injury to persons, including the following:
- Read all instructions.
- This appliance is not intended for use by children or by persons with reduced physical, sensory, or mental capabilities, or lack of experience and knowledge, unless they are closely supervised and instructed concerning use of the appliance by a person responsible for their safety.
- Close supervision is necessary when any appliance is used near children. Children should be supervised to ensure that they do not play with the appliance.
- To protect against risk of electric shock, do not immerse cord, plug, or motor base in water or other liquid.
- Turn the appliance OFF, then unplug from the outlet when not in use, before assembling or disassembling parts, and before cleaning. To unplug, grasp the plug and pull from the outlet. Never pull from the power cord.
- Avoid contacting moving parts. Do not operate without a Shaping Disc in position.
-
Always make sure the pasta maker is properly and completely assembled before the motor is turned ON.
-
Do not operate any appliance with a damaged supply cord or plug, or after the appliance malfunctions or has been dropped or damaged in any manner. Supply cord replacement and repairs must be conducted by the manufacturer, its service agent, or similarly qualified persons in order to avoid a hazard. Call the provided customer service number for information on examination, repair, or adjustment.
- The use of attachments not recommended or sold by the appliance manufacturer may cause fire, electric shock, or injury.
- Do not use outdoors.
- Do not let cord hang over edge of table or counter, or touch hot surfaces, including stove.
- Do not place on or near a hot gas or electric burner, or in a heated oven.
- Do not leave the pasta maker unattended while it is operating.
- Do not use the appliance if the mixing paddle, extruder, shaping disc, collar, or any part of the mixing bowl is damaged.
- Always use the pasta maker on a dry, level surface.
- Do not attempt to defeat the cover interlock mechanism.
SAVE THESE INSTRUCTIONS
Other Consumer Safety Information
This appliance is intended for household use only.
AWARNING Electrical Shock Hazard: This appliance is provided with a polarized plug (one wide blade) to reduce the risk of electric shock. The plug fits only one way into a polarized outlet. Do not defeat the safety purpose of the plug by modifying the plug in any way or by using an adapter. If the plug does not fit fully into the outlet, reverse the plug. If it still does not fit, have an electrician replace the outlet.
The length of the cord used on this appliance was selected to reduce the hazards of becoming tangled in or tripping over a longer cord. If a longer cord is necessary, an approved extension cord may be used. The electrical rating of the extension cord must be equal to or greater than the rating of the appliance. Care must be taken to arrange the extension cord so that it will not drape over the countertop or tabletop where it can be pulled on by children or accidentally tripped over.
Parts and Features
To order parts:
US:1.800.851.8900
www.hamiltonbeach.com
Canada: 1.800.267.2826
Mexico: 01 800 71 16 100
BEFORE FIRST USE: Wash all removable parts in hot, soapy water. Rinse and dry. Wipe base clean with a damp, soft towel. Do not immerse base in water or other liquid.
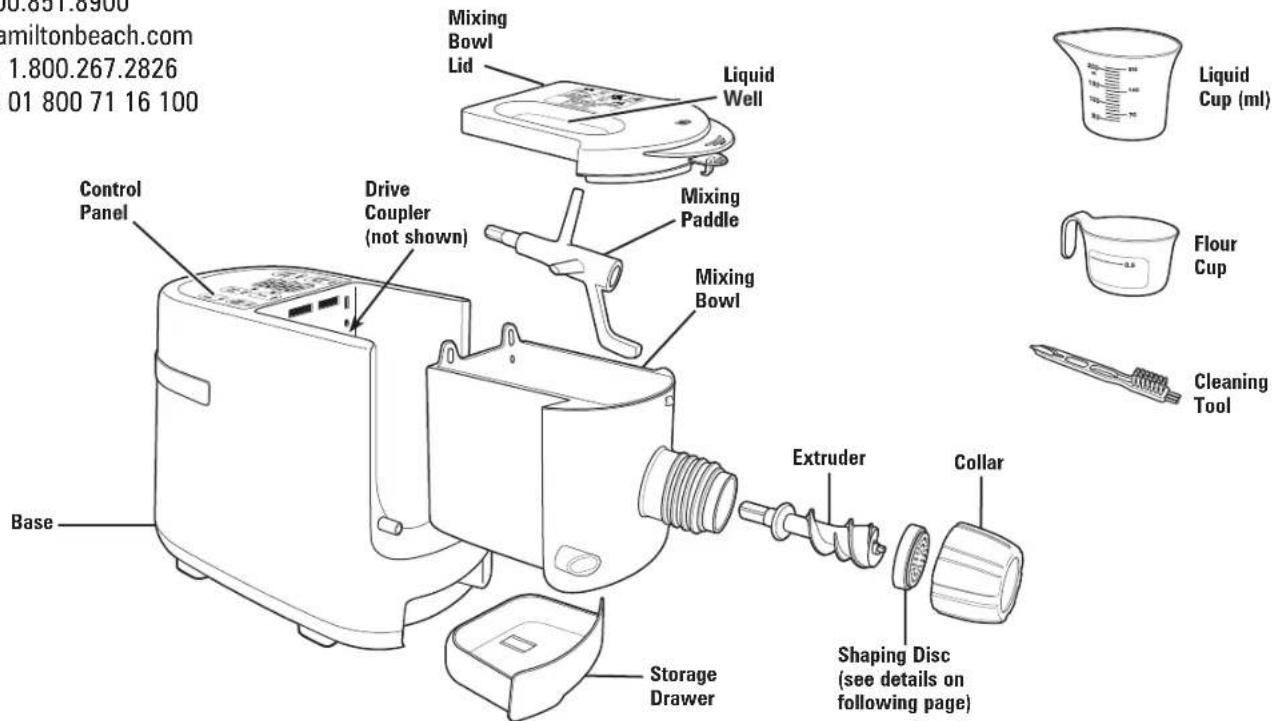
Parts and Features (cont.)
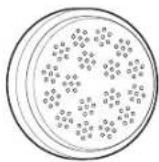
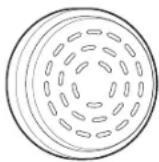
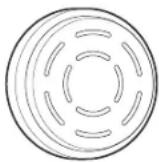
Shaping Discs
Angel Hair
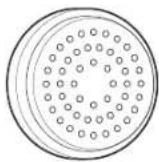
Spaghetti Thick Spaghetti
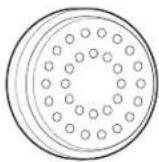
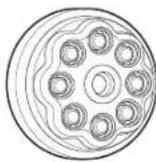
Penne (2-Piece Disc)

Fettuccine Wide Noodle
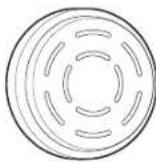

Lasagna (2-Piece Disc)
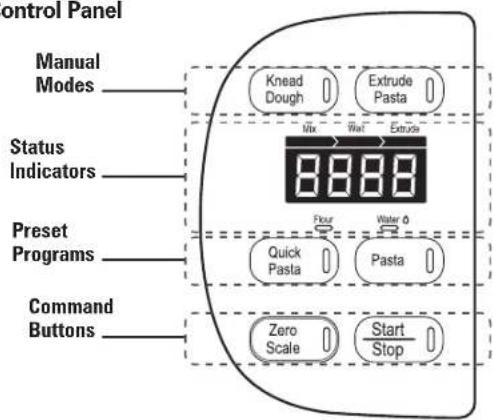
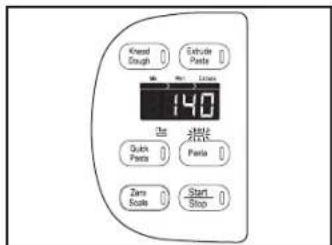
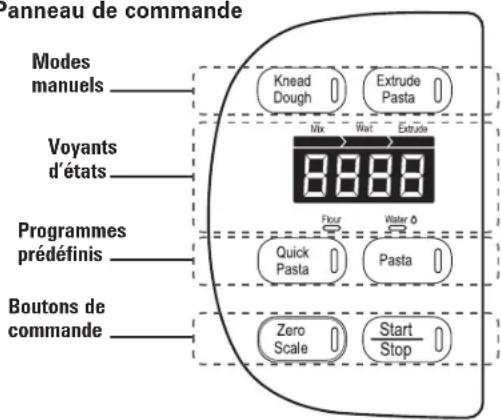
Control Panel
Manual Modes
- Kead Dough - Use to mix ingredients.
- Extrude Pasta - Use to extrude noodles through Shaping Disc.
Status Indicators
- Progress Bar - The progress bar will illuminate according to the stage.
- Digital Display - Displays weight of dry ingredients, amount of liquid to be added, and kneading time remaining.
- Flour (g), Water (ml) - The light below the word will illuminate to indicate which ingredient's measurement is being displayed.
Preset Programs
- Quick Pasta - Automatically mixes/kneads the ingredients before extruding, then stops when program is complete. Program takes 15-18 minutes.
- Pasta - Automatically mixes/kneads the ingredients and provides a rest period before extruding, then stops when program is complete. Program takes 20-30 minutes.
Command Buttons
- Zero Scale - Tares (zeros) the integrated scale used to weigh the flour or other dry ingredients. NOTE: Scale measures in grams only.
- Start/Stop - Press to start or stop the Pasta Maker.
Before You Start
Thank you for purchasing the Hamilton Beach Pasta Maker. With this Pasta Maker, you can create homemade pasta quicker, easier, and with less mess. Using the Pasta Maker is different from making pasta dough by hand, specifically when it comes to dough consistency. The pasta may be a little dry at the beginning of extrusion. As the Mixing Paddle continues to work the ingredients, the dough will become more pliable. If desired, simply trim off the first inch and discard.
The best part of making your own pasta is the ability to experiment; you can add spinach juice or puree, olive oil, chili peppers, ginger...the list is endless. This guide includes several recipes where the liquid-to-flour ratio may vary from the Simple Pasta Recipe below. This will happen when you use ingredients other than all-purpose flour, water, or eggs. Remember that the ratios below are only a guide when branching out to different ingredients; use the dough consistency tips below to help you find the right ratio for your recipe.
Simple Pasta Recipe
Ratios below use all-purpose flour and water. Ratio may vary if other types of flours and liquids are used.
| Pasta Amount Flour Weight Liquid Volume | ||
| Approx. 1 lb | 400 g 135 | ml |
| Approx. 1.5 lbs | 600 g 200 | ml |
TIPS
See page 7 for pasta recipes using eggs. Eggs provide liquid, as well as helping to give pasta a smooth texture and enriching the flavor.
- You may wish to lightly flour the pasta as it extrudes to prevent sticking.
- For smoother pasta, add 3-5 ml oil with liquid.
For chewier pasta, add 3-5 g salt.
Identifying the Correct Dough Consistency
Too dry. Add 5-10 ml liquid and continue to mix. Press KNEAD DOUGH button, if necessary.
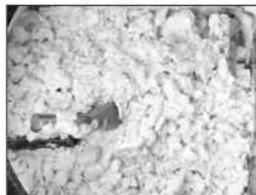
Just right. Dough should be moist and crumbly, not a soLid mass. Dough will look dry compared to handmade dough, but will form a tight consistency when extruded.
Too wet. Press START/STOP button and unplug. Remove Lid and break up any clumps or balls of dough with your hands. Add 2 tablespoons (30ml) of flour to dough. Replace Lid and plug back in. Press KNEAD DOUGH, then START/STOP button. Repeat as necessary for desired consistency.
Recipes
Spinach Pasta
Yield: 1 pound pasta
425 g all-purpose flour
- 1/2 cup (120 ml) spinach puree (see recipe below)
1 large egg, beaten
1 tablespoon (15 ml) water
1. Follow directions to assemble and tare Pasta Maker. Add flour and spinach purée to Pasta Maker Mixing Bowl.
2. Attach Lid and snap to close. Select PASTA and press START/STOP.
3. Combine egg and water in Liquid Measuring Cup. Pour egg mixture into Pasta Maker Liquid Well. Use a small rubber spatula to assist in draining egg mixture through Liquid Well.
4. If mixture appears dry during kneading, add 5 to 10ml water.
5. Cut pasta to desired length. Cook pasta in salted boiling water 3-4 minutes or until tender. Wrap and store unused pasta in the freezer.
To make spinach puree: Add 8 oz. (250 ml) fresh baby spinach to a microwave-safe bowl and sprinkle with 2 tablespoons (30 ml) water. Cover and cook on High in the microwave until spinach is wilted and bright green. Blend in a food processor or food chopper until smooth. Allow to cool before using to make pasta.
Whole Wheat Pasta
Yield: 1 pound pasta
400 g whole wheat flour
2 large eggs, beaten
- 1/4 cup (60 ml) water
1. Follow directions to assemble and tare Pasta Maker. Add flour to Pasta Maker Mixing Bowl.
2. Attach Lid and snap to close. Select PASTA and pressSTART/STOP.
3. Combine eggs and water in Liquid Measuring Cup. Pour egg mixture into Pasta Maker Liquid Well. Use a small rubber spatula to assist in draining egg mixture through Liquid Well.
4. If mixture appears dry during kneading, add 5 to 10ml water.
5. Cut pasta to desired length. Cook pasta in salted boiling water 3-4 minutes or until tender. Wrap and store unused pasta in the freezer.
Simple Egg Pasta
| Pasta Amount | Flour Weight | Liquid Volume Water mixed with egg (one large egg = 50 ml) |
| 1 pound | 400 g 140 | ml (90 ml water + 50 ml egg) |
| 1.5 pounds | 600 g 210 | ml (160 ml water + 50 ml egg) |
Gluten-Free Beet Pasta
Yield: 1 pound pasta
- 400 g gluten-free flour or brown rice flour
- 1 tablespoon (15 ml) xanthan gum
- 2 large eggs, beaten
-
6 tablespoons (89 ml) beet juice
-
Follow directions to assemble and tare Pasta Maker. Add flour and xanthan gum to Pasta Maker Mixing Bowl.
- Attach Lid and snap to close. Select PASTA and press START/STOP.
- Combine eggs and beet juice in Liquid Measuring Cup. Pour egg mixture into Pasta Maker Liquid Well. Use a small rubber spatula to assist in draining egg mixture through Liquid Well.
- If mixture appears dry during kneading, add 5 to 10ml beet juice.
- Cut pasta to desired length. Cook pasta in salted boiling water about 3 minutes or until tender. Wrap and store unused pasta in the freezer.
Using the Pasta Maker
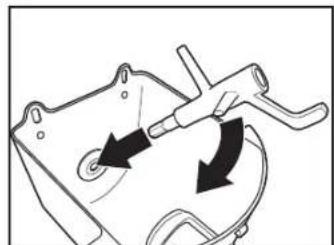
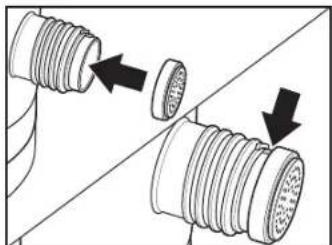
1. With the Mixing Bowl removed from the base, insert the Mixing Paddle into the bowl, extending the metal end through the opening at the rear of the bowl.
2. Slide the Mixing Bowl onto the base, aligning the Mixing Paddle with the Drive Coupler. You may need to slightly rotate the Mixing Paddle for the Mixing Bowl to Slide in flush against the base.
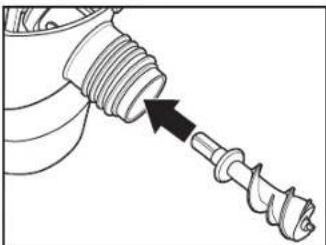
3. Insert Extruder, small end first, into the barrel end of the Mixing Bowl. Align the Extruder so that it fits into the end of the Mixing Paddle.
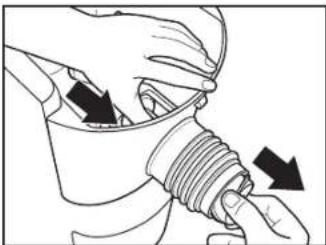
4. Select a Shaping Disc and position it on the barrel end, aligning the ribs on the barrel with the features on the disc. The ribs on the barrel prevent rotation of the disc during extrusion.
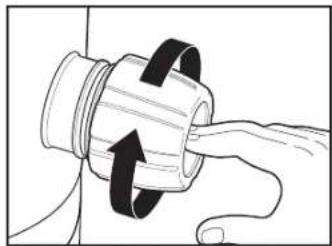
5. Hold the Shaping Disc in place while securing the Collar by rotating it clockwise.
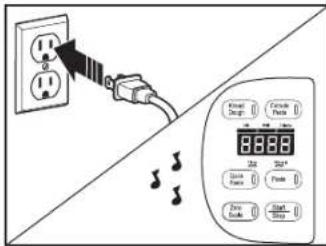
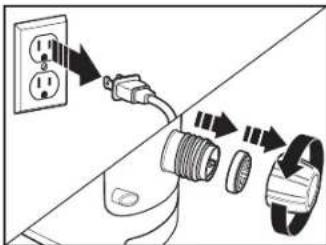
6. Plug into outlet; the Pasta Maker will chime once plugged in, and the Control Panel will light up.
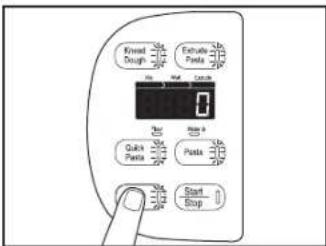
7. Press the ZERO SCALE button to tare the scale. The display will show "0" when taring is complete. Keep hands clear of Pasta Maker while zeroing the scale and adding dry ingredients.
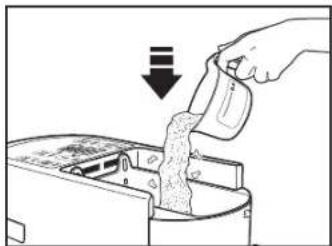
8. Add flour or other dry ingredients to the Mixing Bowl according to your selected recipe. The weight (in grams) of the ingredients will be displayed.
Using the Pasta Maker (cont.)
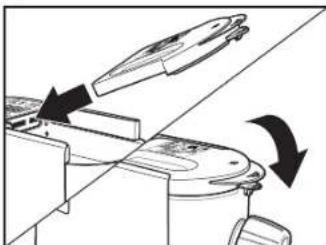
9. With the Mixing Bowl Lid at an angle, align the tabs at the end of the Lid with the slots on the base. Push down on the Lid until it snaps into place.
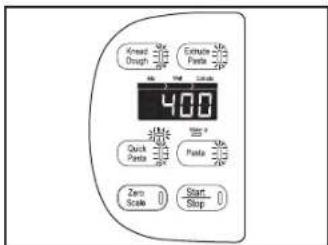
10. Select the desired program: Quick Pasta or Pasta.
11. The display will indicate the amount of liquid in milliliters (ml) to add to the Mixing Bowl.
To measure the liquid amount using the provided measuring cup:
- Break any eggs into the cup and beat the eggs until smooth.
- Add water, juice, or puree to the measuring cup until the amount indicated on the display is reached.
NOTE: The liquid volume measurement displayed on the scale will NOT change as the liquid is poured into the Pasta Maker.
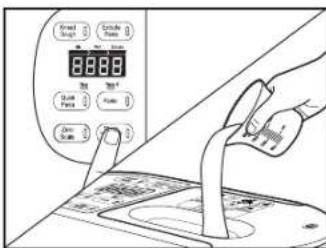
12. Press the START/STOP button. Slowly pour the liquid from the measuring cup through the Liquid Well in the Lid. Use a spatula to push any remaining egg through Liquid Well.
When using the preset programs: The Pasta Maker will automatically extrude the pasta through the Shaping Disc.
When using the manual mode: Kneading will stop automatically after 5 minutes. You can stop kneading at any time by pressing the Start/Stop button. Press the EXTRUDE PASTA button when ready to extrude.
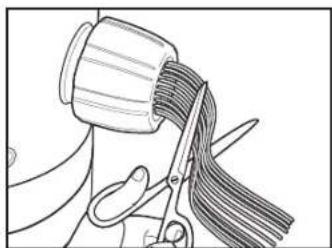
13. Cut pasta to desired length as it extrudes. After all pasta is extruded, the Pasta Maker will stop automatically. Unplug from outlet before removing or cleaning parts.
NOTES:
Once pasta is extruded, either cook pasta immediately, store in an airtight container in refrigerator for up to 3 days, or store in a freezer-safe container in the freezer for up to 3 months.
- To cook pasta, cook in salted boiling water until it floats, then check for doneness.
Care and Cleaning
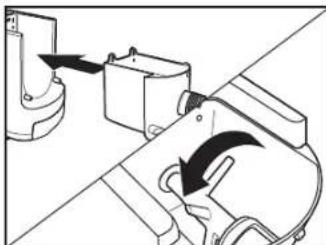
1. Unplug. Remove Collar by turning counterclockwise, then remove Shaping Disc.
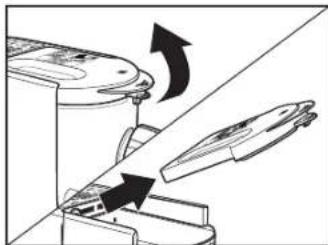
2. Open Lid and remove.
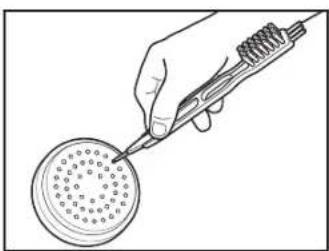
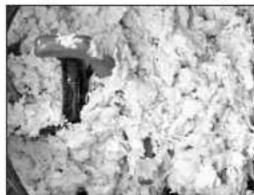
5. Use the cleaning tool to poke out any remaining pieces of dough from the Shaping Disc.
TIP: For easier cleaning, allow the dough to dry before using the cleaning tool. If dough will not come out easily, place disc in the freezer for 30-60 minutes, then try again.
WARNING Electrical Shock Hazard.
Disconnect power before cleaning. Do not immerse cord, plug, or base in any liquid.
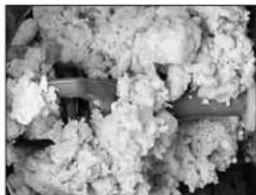
3. Remove Extruder by pushing it out of the barrel with your thumb, then pulling it out the rest of the way from the front of the bowl.
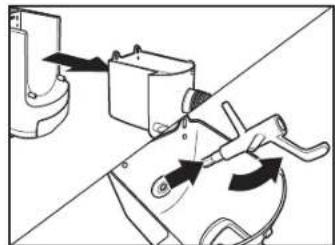
4. SLide Mixing Bowl away from base, then remove Mixing Paddle.
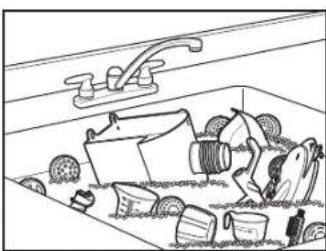
6. Wash the removable parts in hot, soapy water. Rinse and dry thoroughly before storing, or wash in the top rack of the dishwasher. Wipe base with a soft damp cloth, then dry.
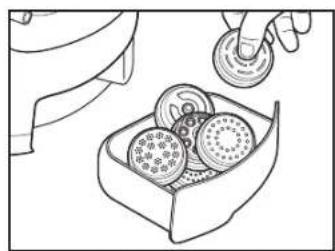
7. Store the Shaping Discs in the Storage Printer located at the bottom of the base.
Troubleshooting
The Pasta Maker may display an error message from time to time. Use the table below to quickly resolve the issue.
| Error Code Situation | Solution | |
| E02 | Mixing bowl Lid is not in place. Make sure Lid is snapped onto Mixing Bowl. | |
| E14 Too much flour in the Mixing Bowl. Remove some flour from Mixing Bowl. | ||
| E16 No liquid in the Mixing Bowl. Add correct amount of liquid. | ||
| E04, E05, E09, E15, E17 Call Customer Service at 1.800.851.8900. | ||
| none Dough is too wet. | 1. Press START/STOP button and unplug. 2. Remove Lid and break up any clumps or balls of dough with your hands. 3. Add 2 tablespoons (30 ml) of flour to dough, then replace Lid and plug back in. 4. Press KNEAD DOUGH, then START/STOP button. 5. Repeat as necessary for desired consistency. | |
| none | Dough is too dry. | Add 5–10 ml liquid and continue to mix. Press KNEAD DOUGH button, if necessary. |
If the Pasta Maker stops working:
- Unplug.
- Wait 5 seconds, and then plug back into outlet.
- Use Manual Mode to finish kneading or extruding pasta.
Limited Warranty
This warranty applies to products purchased and used in the U.S. and Canada. This is the only express warranty for this product and is in lieu of any other warranty or condition.
This product is warranted to be free from defects in material and workmanship for a period of five (5) years from the date of original purchase in Canada and one (1) year from the date of original purchase in the U.S. During this period, your exclusive remedy is repair or replacement of this product or any component found to be defective, at our option; however, you are responsible for all costs associated with returning the product to us and our returning a product or component under this warranty to you. If the product or component is no longer available, we will replace with a similar one of equal or greater value.
This warranty does not cover glass, filters, wear from normal use, use not in conformity with the printed directions, or damage to the product resulting from accident, alteration, abuse, or misuse. This warranty extends only to the original consumer purchaser or gift recipient. Keep the original sales receipt, as proof of purchase is required to make a warranty claim. This warranty is void if the product is used for other than single-family household use or subjected to any voltage and waveform other than as specified on the rating label (e.g., 120V 60Hz ).
We exclude all claims for special, incidental, and consequential damages caused by breach of express or implied warranty. All liability is limited to the amount of the purchase price. Every implied warranty, including any statutory warranty or condition of merchantability or fitness for a particular purpose, is disclaimed except to the extent prohibited by law, in which case such warranty or condition is limited to the duration of this written warranty. This warranty gives you specific legal rights. You may have other legal rights that vary depending on where you live. Some states or provinces do not allow limitations on implied warranties or special, incidental, or consequential damages, so the foregoing limitations may not apply to you.
To make a warranty claim, do not return this appliance to the store. Please call 1.800.851.8900 in the U.S. or 1.800.267.2826 in Canada or visit hamiltonbeach.com in the U.S. or hamiltonbeach.ca in Canada. For faster service, locate the model, type, and series numbers on your appliance.
CONSIGNES DE SECURITE IMPORTANTES
Fettuccine Nouille large
Lasagne
(disque 2 pcs)
Panneau de commande
16
Modes manuels
Ruperto Martinez No. 238 Ote
Centro MONTERREY, 64000 N.L.
Tel: 01 81 8343 6700
Jalisco
SERVICIOS DE MANTENIMIENTO CASTILLO
Garibaldi No. 1450
Ladrón de Guevara
GUADALAJARA 44660 Jal.
Tel: 01 33 3825 3480
Modelo:
86650
Tip:
PM01
\section*{Characteristicas electricas:}
120V\~ 60Hz 150W

- SAVE THESE INSTRUCTIONS
- Other Consumer Safety Information
- This appliance is intended for household use only.
- Parts and Features
- Parts and Features (cont.)
- Manual Modes
- Status Indicators
- Preset Programs
- Command Buttons
- Before You Start
- Simple Pasta Recipe
- TIPS
- Identifying the Correct Dough Consistency
- Recipes
- Spinach Pasta
- Whole Wheat Pasta
- Gluten-Free Beet Pasta
- Using the Pasta Maker
- Using the Pasta Maker (cont.)
- To measure the liquid amount using the provided measuring cup:
- When using the preset programs: The Pasta Maker will automatically extrude the pasta through the Shaping Disc.
- NOTES:
- Care and Cleaning
- Troubleshooting
- If the Pasta Maker stops working:
- Limited Warranty
- CONSIGNES DE SECURITE IMPORTANTES
- Panneau de commande
- Modes manuels
- Jalisco
Brand : HAMILTON BEACH
Model : 86650
Category : Pasta machine