
Olympus 4020830 - Sauna HARVIA - Free user manual and instructions
Find the device manual for free Olympus 4020830 HARVIA in PDF.

| Product type | Solid wood sauna cabin |
| Brand | Harvia |
| Model | Olympus 4020830 |
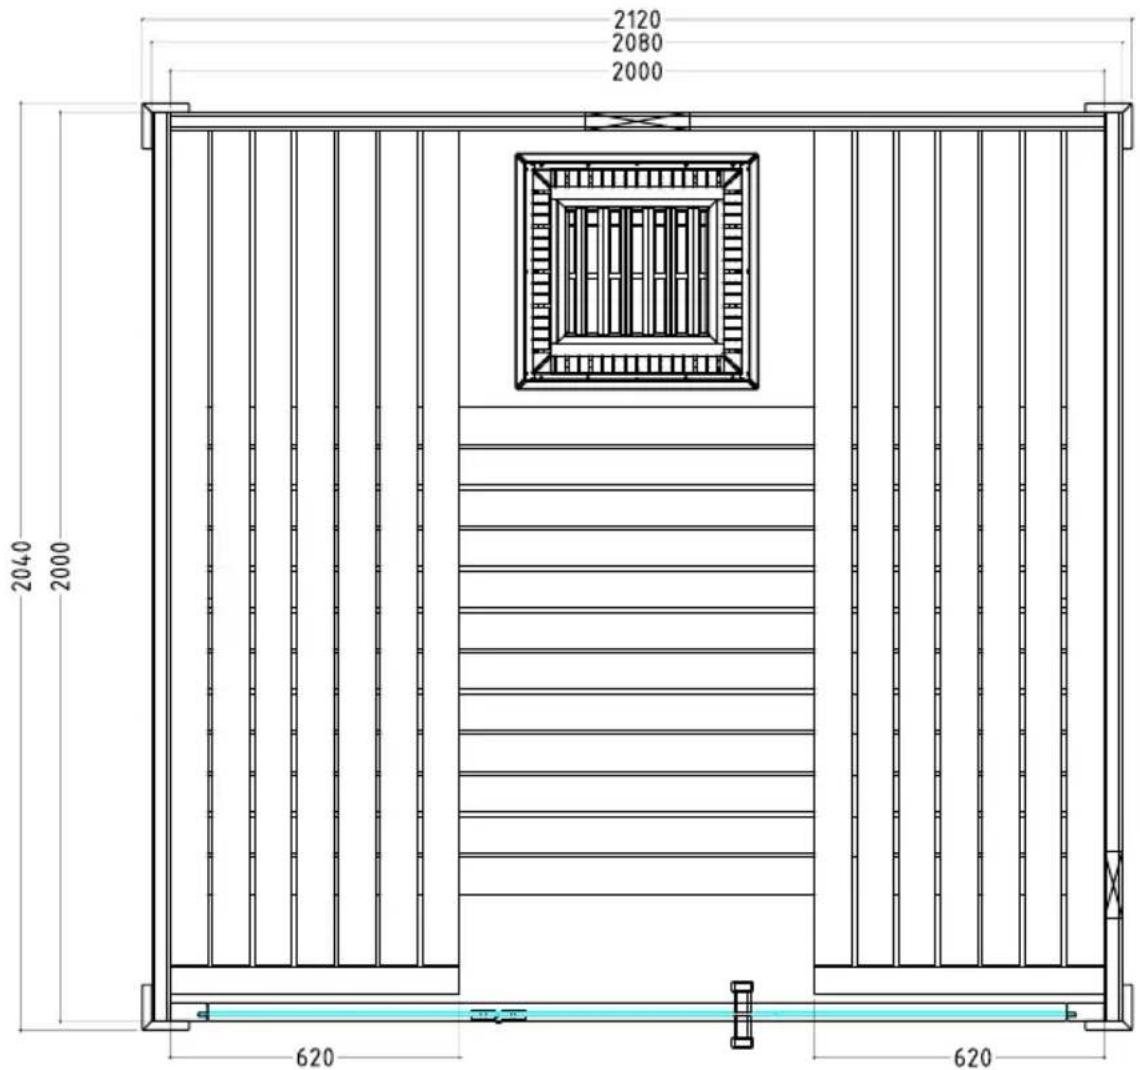
| Dimensions (W × D × H) | 2120 × 2040 × 2060 mm |
| Main material | Solid wood (spruce) |
| Door | Tempered glass with wood/stainless steel handle |
| Lighting | Integrated RGBW LED (pre-assembled) |
| Assembly | Requires assembly by two people |
| Recommended tools | Hammer, screwdriver, drill bit 3-30 mm, spirit level, 1.5 mm Allen key |
| Minimum room height | 230 cm |
| Recommended wall clearance | 5 cm minimum |
| Required floor | Horizontal, smooth, preferably stone or tile |
| Maintenance | Clean with hot water, no detergent |
| Wood treatment | No impregnation agent for the interior |
| Safety | Tempered glass, electrical connection by a professional |
| Repairability | Spare parts listed in the nomenclature |
| Included accessories | Floor grille, ventilation register, handle kit, hinges, door magnet |
| Disposal | According to local regulations, do not dispose with household waste |
Frequently Asked Questions - Olympus 4020830 HARVIA
User questions about Olympus 4020830 HARVIA
0 question about this device. Answer the ones you know or ask your own.
Ask a new question about this device
Download the instructions for your Sauna in PDF format for free! Find your manual Olympus 4020830 - HARVIA and take your electronic device back in hand. On this page are published all the documents necessary for the use of your device. Olympus 4020830 by HARVIA.
USER MANUAL Olympus 4020830 HARVIA
ASSEMBLY INSTRUCTION English
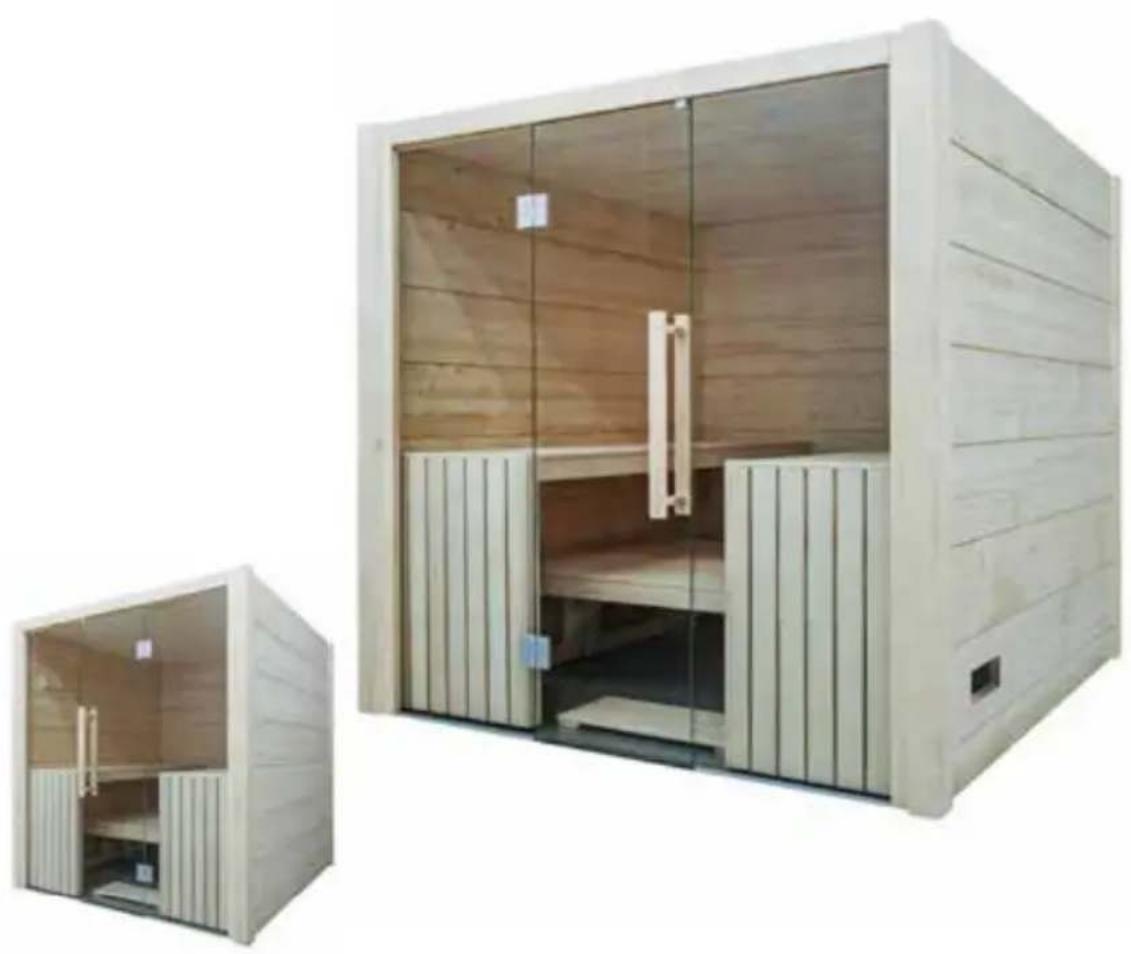
Table of Contents
1. Preparing for installation 3
1.1. Tools required 4
1.2. Maintenance and cleaning 5
1.3. Disposal 5
1.4 Parts list 6
2. Floor plan 8
3. Assembling the cabin 9
3.1. Assembling the base frame 9
3.2.Assembling the cabin walls 9
3.3. Assembling the glass elements 9
3.4. Assembling the benches 9
3.5. Assembling the roof elements 10
3.6. Mounting the cover slats 10
3.7.Installing glass door 10
3.8. Installing the cable cover slats 10
Assembly Pictures (according to the last language) 11
1. Preparing for installation
Read these assembly instructions carefully and keep them within reach when using the sauna so that you can look up product information at any time.

These assembly instructions can also be found in the downloads section of our website: www.harvia.fi.
Important note:
- Before you begin work, check the parts list to ensure that all the individual parts have been delivered. If you discover any missing parts, notify your dealer within 14 days of receiving the sauna cabin.
- The room that the sauna is installed in must be dry and ensure an appropriate amount of air circulation.
- The floor must be level and even, preferably a stone or tiled floor.
- A minimum room height of 230 cm is required for the cabin installation work.
- A distance of at least 5cm from the wall must be maintained.
- The inside of the wooden parts used must not be handled with any impregnating material.
- You need an assistant for the installation.
- Wood is a natural product that can swell, shrink or warp, despite good storage. For this reason, some force may be necessary during the installation.
- All screw fittings must be pre-drilled.
Attention!
The electrical connection may only be performed by a qualified electrician or similarly qualified person.
1.1. Tools required
- Hammer with a wooden head or a mallet
- Cordless screwdriver with bits for cross-head screws and Torx
- Roller tape measure
- Drill bits with a diameter of 3mm , 10mm , 20 - 30mm (for sauna heater power cable)
Spirit level
1.5 mm hexagonal socket wrench
Utility knife
Ladder

This symbol indicates tips and useful information
Pre-drill

Cut to real measurement with backsaw

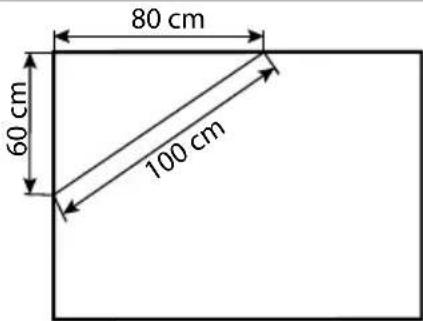
Check the right angle:

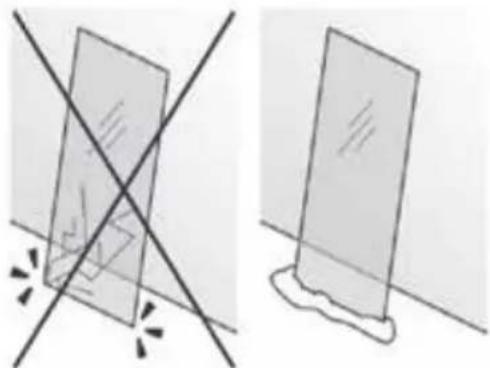
Handle glass with care: Special care must be taken with the edges of the glass - hardened glass can shatter into small pieces in the event of impact. Insert protective cushioning (e.g: cardboard box) under the edge of the glass.
1.2. Maintenance and cleaning
- The sauna should be cleaned with a damp cloth. Only use warm water – no cleaning products.
- We recommend heating the cabin once a month if the sauna is not used for a long time.

Pitch pockets are not grounds for return, since they can always appear in spruce wood and the depth at which they lie cannot be detected during the sorting-out process.
If these are just under the surface, heat can cause them to soften and "bleed".
The leaking pitch can be removed with a rag soaked in acetone. If only droplets of pitch occur, allow these to harden and then carefully scrape them off with a knife.
1.3. Disposal
- Dispose of packaging materials in accordance with the applicable waste disposal regulations.
- Used devices contain reusable materials as well as hazardous substances. Therefore, do not dispose of your used device with household waste, but do so in accordance with the locally applicable regulations.
1.4. Parts list
| No. of items Name | Dimensions |
| Base frame | |
| 1 Base frame with cut-out 200 × 13 × 4 cm | |
| 2 Base frame 200 × 13 × 4 cm | |
| Wall elements | |
| 6 Block planks for rear wall (without holes) 200 × 27 × 4 cm | |
| 11 Block plank 200 × 27 × 4 cm | |
| 1 Block plank with cut-out 200 × 27 × 4 cm | |
| 1 Block planks for rear wall (with groove for roof) 200 × 27 × 4 cm | |
| 2 Block planks (with groove for roof) 200 × 27 × 4 cm | |
| Corner posts | |
| 2 Corner post with slot for glass 205.5 × 8 × 4 cm | |
| 1 Solid slat above glass front 184 × 9.6 × 4 cm | |
| Roof elements | |
| 1 Roof element with LED 204 × 15 × 4 cm | |
| 1 Roof element, front 204 × 15 × 4 cm | |
| 6 Roof elements 204 × 27 × 4 cm | |
| Glass elements | |
| 1 Glass door 195.5 × 59 × 0.8 cm | |
| 1 Glass element with holes for door hinges | 198.5 × 63.8 × 0.8 cm |
| 1 Glass element | 198.5 × 63.8 × 0.8 cm |
| Support slats | |
| 4 Bench support slats | 58 × 4 × 4 cm |
| Cover strips | |
| 8 Corner cover slats | 205.5 × 10 × 2 cm |
| 1 Cable cover slats | 200 × 10 × 2 cm |
No. of
items Name Dimensions
Interior fittings
2 Bench left / right 183.5 × 62 × 9 cm
2 Bench foot left / right 91.5 × 62 × 6 cm
1 Foot step panel 190 × 62 × 6 cm
2 Foot step feet 60 × 43 × 4 cm
1 Foot step panel 190 × 43 × 9 cm
2 Foot step feet 41 × 43 × 4 cm
4 Foot step strut, 2 × 45^ diagonal 46 × 8 × 2 cm
1 Floor grid 70 × 26 × 4 cm
1 Ventilation slit 52 × 14 × 1.5 cm
Accessories
2 U aluminium profile 62.1 x 1.2 x 1.5 cm
1 Door handle set wood/stainless steel
1 2 door hinges 8652-02
1 Door magnet, sleeve plate
1 Sauna lighting LED RGBW (pre-assembled) 200 cm
14 Im Silicon cables: 5 × 2.5 ~mm^2
1 Installation material set
1 Assembly instruction
2. Floor plan
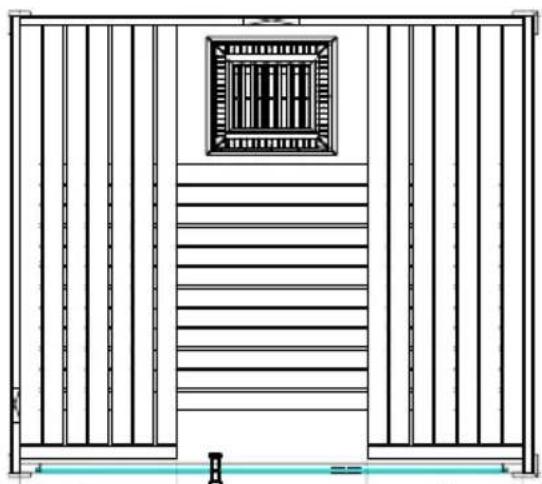
Option:
3. Assembling the cabin

ATTENTION!
Note the floor plan on page 8 and the illustrations from page 11 onwards.
3.1. Assembling the base frame
Start with the base frame with the cut-out and then add the left and right base frames. Screw the corners of the base frames.
3.2. Assembling the cabin walls
Start by mounting the block planks on the rear wall (block planks without holes).

Note the position of the ventilation slider in the 2nd row. It can be mounted on the left or right.
EN
Proceed row by row.
Screw the corners of the block planks.
Check that the block planks are at right angles before screwing the corners together (see page 4). Fit the ventilation slider.
3.3. Assembling the glass elements
Start by assembling the corner posts with grooves for glass. Screw them to the walls. Place the aluminium U-profiles in the groove as shown in the picture and put in the glass elements. Note that when installing the glass element "glass with holes drilled for door hinges", you are defining the direction in which the door will open. The bottom drill hole for the door hinge is 26.3cm high.
Then mount the solid strip above the glass front. This must be fixed to the corner post with diagonally drilled screws.

After the cabin is positioned correctly, bond the U-profiles to the floor using silicone or assembly adhesive.
3.4. Assembling the benches
Mount the bench support slats so that the top is at a height of 82.5cm . Screw the side benches to the bench support slat and the bench feet from below. Then screw the bench feet to the side walls.
3.5. Assembling the roof elements
Start at the back with the roof element with the LED light and pay attention to the cable outlet. After putting in the roof elements, they must be screwed to the walls.
3.6. Mounting the cover slats
Hold the corners of the cover slats on the outside and screw them on from the inside.
Screw the two door fittings onto the glass element, making sure that they are straight and that the doors open outward.
The door hand les are screwed together from the inside.

The bottom drill hole of the door handle is 92.4cm high.
The alignment of the fittings is achieved by adjusting / rotating both plastic inserts.
3.8. Installing the cable cover slats
After installing the electrical devices, the cables can be covered with the cable cover slat.
Massivsauna
Olympus
2120 × 2040 × 2060 ~mm
MONTAGEANLEITUNG
Deutsch

DE
Inhaltsverzeichnis
3.1. MoHTax paMbI OCHOBaHHa
Chaujana yctaHOBNTe 3JemeHT C Bblpe3OM, 3aTEM yCTaHOBNTe 3JIeMeHbI OCHOBAHnCJIeBa n cnpaba. 3aФNKcnpyIte pamy OCHOBAHn B yrrax C NOMOuBIO wypnoB.
3.2. MoHTaX CTeHOK ka6nHbI
YcTaHOBnte peiKn Ha 3aDHei CTeHKe (peiKn 6e3 OTBepCTn). PpOdoJkaIte Pra 3a PraDM.

YuHTbIbAaTe NIOJKeHne BeHTnJIaCNoHHo3aCNOHKN BO BTOpOM pAny!
OHa moKeT pacNoJaRaTbcr cIeBa nn cnpaBa.
3aФнксypуITE peKn B yrrax C nOMOuB O wypynoB.
Ipejde yem ykpenTb peiKn B yrJax, npOBepbTe npMble yrJIbI (yka3aHne Ha cTp. 4). YcTaHOBnTE BeHTnJaCIOHHyO 3acJIOHKy.
3.3. MoHTaX CTeKJIaHHbIX 3JIeMeHToB
YCTaHOBtE yrIOBbIe CToKn C Na3AMN NOc CTekNo. PpIKpyTnte Nx K CTeHKam. IIOJXITe aIOMmHHeBbI U-06pa3HbI npoΦnJIb Ha OdHO nPRAMO c Na3OM, KaK NOKa3aHO Ha NIIIOCTpaCNI, IN BCTaBBte CTEKJHHbIe 3JeMeHTbl. Ppr yCTaHOBKe CTeKJHHORO 3JeMeHtA «CTekNO C OTBepCTnM NOD NeTnN» CJIeDyET YUHTbIBaTB HAnpaBJIeHne OTKpbIBaHnA DBepei. HuxHee OTBepCTne JIra DBePHo NtTI paCNoIarAEcHa BBICote 26,3 cm.
Iocne 3Toro yctaHOBITE peiKy n3 MaccnBa NOBepx nepeDHe CTeKJIHHoI naHJI. PeiKa DoJXHa 6bITb 3aФNKcnpObaHa Ha yrNoBOI cToKe UwpynAMN, 3aKpyeHHbIMN IOd yrnom.

Ecnn Ka6nHa pacnoJoxKeHa npaBnIbHo, npNKneIe K noNy U-06pa3HbIe npoQnnCNIKOHOM nIN MOHTaXHbIM KNeem.
3.4. MoHTax cKaMeek
YCTaHOBnTe ONOpHbIe PIIaHKn IJRA CKaMbN TaK, YTO6bI BepXHn KpaI paCnoIarAICr Ha BbICote 82,5 cm. BoKOBbIe CkameiKn npIKpyuHaOTcR shypynAmK ONOpHBIM PIIaHKam N HOKKam CHn3y. 3aTeM HOKKn CkameiKn npIKpyTntb K 6OKOBbIM CTeHKam.
3.5. MoHTaX NOTOJIOUHbIX 3JIeMeHToB
Haatab c3aDi, C NOTOLOHORO 3JeMeHTa CO CBeTOIOHOH NOcCBETKo. YuNTbI-BaTb NOLOKeHne Ka6eJIbHoro BbIBOda. NocNe yCTaHOBKn NOTOLOHoro 3JeMeHTa npIKpyTITb erO wypynamK cTeHKam.
3.6. MoNTaX 3aUHTbIX HaKlaDOK
Iopndepxmba 3aunTHbIe HaknaKn ChapyKn, npNKpyTntb IX n3HyTpN.
3.7. MoNTax CTeKJIaHHoI DBePn
3aФИКСИРОВаТБ обe Деврьге НАклади Ha HENODBUNXHOM CTeKJIHHOM 3JIeMeHTe.Пу yCTAHOBKe yuHTbIBAIte,ЧTO HAKlaДК NdoJxHbI paCNoJaRaTbcr npЯMoN DBeP bdoJxHa OTKpbIBaTbcr Hayxy.

Huxhee OTBepCTne IyIaBepHO pyuKn paCnoJaraeTcHa Bblcote 92,4 cm.
BbipOBHnTe HaKnaAdKn, OtperyuInpOBAv nIe NOBepHyB oBe nIaCTIKOBblE BKJaADKn.


- Table of Contents
- Preparing for installation 3
- Floor plan 8
- Assembling the cabin 9
- Preparing for installation
- Important note:
- Attention!
- Tools required
- Maintenance and cleaning
- Disposal
- Parts list
- No. of
- items Name Dimensions
- Interior fittings
- Accessories
- Floor plan
- Assembling the cabin
- Assembling the base frame
- Assembling the cabin walls
- Assembling the glass elements
- Assembling the benches
- Assembling the roof elements
- Mounting the cover slats
- Installing the cable cover slats
- Massivsauna
- Olympus
- MONTAGEANLEITUNG
- Deutsch
- Inhaltsverzeichnis
- MoHTax paMbI OCHOBaHHa
- MoHTaX CTeHOK ka6nHbI
- MoHTaX CTeKJIaHHbIX 3JIeMeHToB
- MoHTax cKaMeek
- MoHTaX NOTOJIOUHbIX 3JIeMeHToB
- MoNTaX 3aUHTbIX HaKlaDOK
- MoNTax CTeKJIaHHoI DBePn
Brand : HARVIA
Model : Olympus 4020830
Category : Sauna