SCANJET 5500C - To scan HP - Free user manual and instructions
Find the device manual for free SCANJET 5500C HP in PDF.

User questions about SCANJET 5500C HP
0 question about this device. Answer the ones you know or ask your own.
Ask a new question about this device
Download the instructions for your To scan in PDF format for free! Find your manual SCANJET 5500C - HP and take your electronic device back in hand. On this page are published all the documents necessary for the use of your device. SCANJET 5500C by HP.
USER MANUAL SCANJET 5500C HP
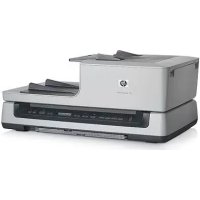
hp scanjet 4500c and 5500c series scanners
scanners hp scanjet série 4500c/5500c

natural_image
Black-and-white photo of a sunflower in a glass enclosure, no text or symbols visiblehp scanjet 4500c and 5500c series scanners
user's manual
copyright information
© Copyright Hewlett-Packard Company 2002
All rights reserved. Reproduction, adaptation, or translation without prior written permission is prohibited, except as allowed under copyright laws.
This product incorporates Adobe's PDF technology, which contains an implementation of LZW licensed under U.S. Patent 4,558,302.
trademark credits

Adobe and the Acrobat logo are either registered trademarks or trademarks of Adobe Systems Incorporated in the United States and/or other countries/regions.
Microsoft and Windows are registered trademarks of Microsoft Corporation.
All other product names mentioned herein may be trademarks of their
respective companies.
warranty
The information contained in this document is subject to change without notice.
Hewlett-Packard makes no warranty of any kind with respect to this information. HEWLETT-PACKARD SPECIFICALLY DISCLAIMS THE IMPLIED WARRANTY OF MERCHANTABILITY AND FITNESS FOR A PARTICULAR PURPOSE.
Hewlett-Packard shall not be liable for any direct, indirect, incidental, consequential, or other damage alleged in connection with the furnishing or use of this information.
The TWAIN Toolkit is distributed as is. The developer and distributors of the TWAIN Toolkit expressly disclaim all implied, express or statutory warranties including, without limitation, the implied warranties of merchantability, noninfringement of third party rights and fitness for a particular purpose. Neither the developers nor the distributors will be liable for damages, whether direct, indirect, special, incidental, or consequential, as a result of the reproduction, modification, distribution or other use of the TWAIN Toolkit.
NOTICE TO U.S. GOVERNMENT USERS: RESTRICTED RIGHTS COMMERCIAL COMPUTER SOFTWARE: "Use, duplication, or disclosure by the Government is subject to restrictions as set forth in subparagraph (c) (1) (ii) of the Rights in Technical Data Clause at DFARS 52.227-7013."
Material scanned by this product may be protected by governmental laws and other regulations, such as copyright laws. The customer is solely responsible for complying with all such laws and regulations.
product restricted material
This HP product contains the following materials that might require special handling at end-of-life:
- mercury in the fluorescent lamp in the scanner/transparent materials adapter/liquid crystal display (< 5 mg)
- lead in solder
For recycling information, you can contact http://www.hp.com/go/recycle, your local authorities, or the Electronics Industries Alliance at http://www.eiae.org.
For information about HP's environmental stewardship program, see the "Warranty and Specifications" section of the electronic Help for your scanner.
contents
install the scanner....1
before you begin 1
install the software and connect the scanner 2
connect the ADF 4
connect the APF 4
connect the TMA 5
scanner overview....6
how to use the scanner....7
scan pictures 7
post a picture on a website 8
save a document. 8
create a photo show and save it on CD 9
e-mail a scan 10
print copies 11
cancel a scan in progress. 11
use the power save button 11
enable instant scanning 11
scan from the ADF.... 12
scan from the APF 12
scan slides or negatives 12
installation problems - hp scanjet 4500c/5500c series 13
scanner is not working.... 13
scanner initialization failed. 14
scanner still does not work properly. 14
hp support....16
find hp help on the web.... 16
contact hp customer support 17
1
install the scanner
before you begin
Make sure that you have a universal serial bus interface connection (USB port) on your computer and that your computer is running Microsoft® Windows® 98 or later or Macintosh OS 9 or later.
text_image
USB portcheck the box contents
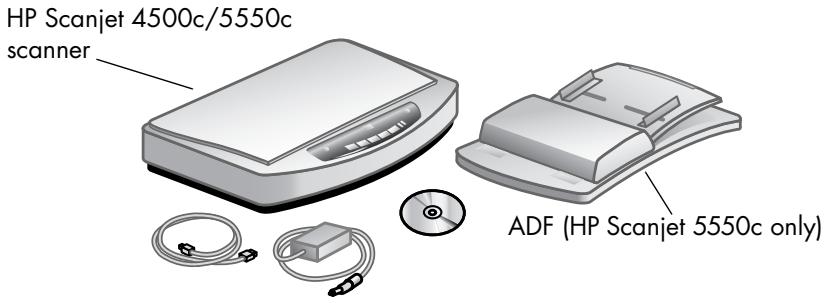
Your scanner box should contain the following items:
• HP Scanjet digital flatbed scanner
• HP Photo & Imaging software CD-ROM
- USB cable
- Power cable
• Automatic document feeder (ADF) (HP Scanjet 5550c only)
• Automatic photo feeder (APF) (HP Scanjet 5500c only)
• Transparent materials adapter (TMA) (HP Scanjet 4750c/5500c only)
text_image
HP Scanjet 4500c/5550c scanner ADF (HP Scanjet 5550c only)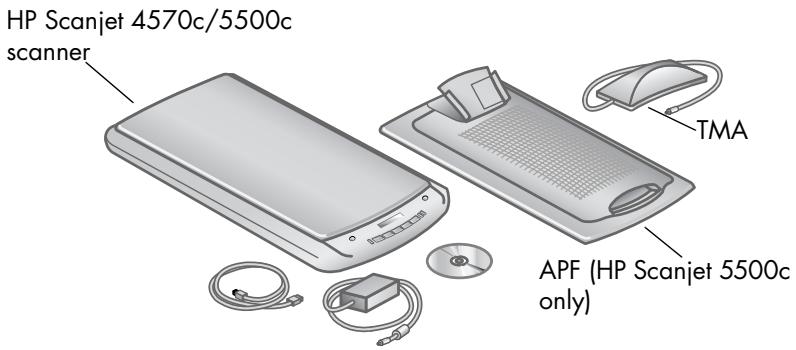
text_image
HP Scanjet 4570c/5500c scanner TMA APF (HP Scanjet 5500c only)install the software and connect the scanner
Set up your scanner in one of two ways: either install the software first or connect the scanner first. It is recommended that you install the software first, especially on a Macintosh computer.

If you experience difficulty installing your scanner, see installation problems - hp scanjet 4500c/5500c series on page 13.
install the software first (Windows and Macintosh)
1 Close all open programs on your computer.
2 Locate the HP Photo & Imaging software CD-ROM that is appropriate for your language and operating system and insert it into your computer.
3 For a Microsoft Windows computer: Follow the instructions on the screen. Or, if the installation program does not start automatically:
a. On the Start menu, click Run.
b. Type: x:setup.exe (where x is the letter of the CD-ROM drive).
For a Macintosh computer: Double-click the Installation Read Me file on the CD-ROM and follow the instructions.
4 If the instructions prompt you to shut down your computer, do so.
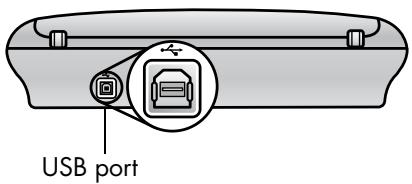
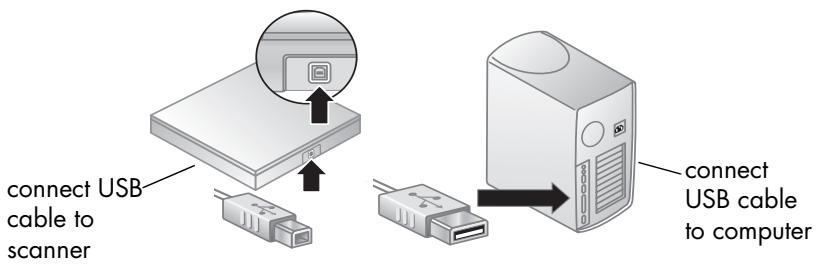
5 Connect the USB cable between the USB port on the scanner and the USB port on the computer.
6 Connect the power cable between the scanner and a surge protector or a grounded wall outlet that is easy to reach. This turns on the scanner.
7 If necessary, turn your computer on again.

A "00" in the LCD on the front panel of the scanner indicates that a USB connection error has occurred. Check that the USB cable is securely connected between the scanner and the computer.
text_image
connect USB cable to scanner connect USB cable to computerconnect the scanner first (Windows only)
1 Make sure that your computer is on and that the operating system is running.
2 Connect the USB cable between the USB port on the scanner and the USB port on the computer.
3 Connect the power cable between the scanner and a surge protector or a grounded wall outlet that is easy to reach. This turns on the scanner.
4 Follow the prompts in the New Hardware Found wizard.
5 Insert the HP Photo & Imaging software CD-ROM and click Next. If the wizard prompts you for a drive letter, select your CD-ROM drive.
6 In the HP Scanjet installation program, follow the instructions.
7 After installation is complete, another HP installation program starts. You can install additional software, register your scanner, and find additional help. To see if your scanner came with additional software, click Install software and follow the prompts.
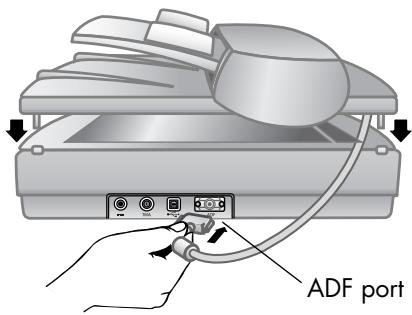
connect the ADF
If your scanner has an automatic document feeder (ADF), it allows you to scan multiple pages.
1 Disconnect the power cable from the scanner.
2 If your scanner has a lid attached to it, remove the lid by raising it and then pulling it straight up.
3 Attach the ADF by inserting the ADF hinges into the scanner hinge slots.
4 Connect the ADF cable to its port on the scanner.
5 Reconnect the power cable.
text_image
ADF portconnect the APF
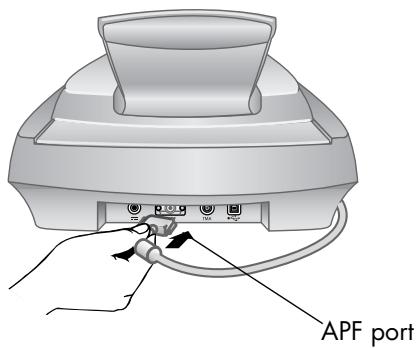
If your scanner has an automatic photo feeder (APF), it allows you to scan multiple photos.
1 Disconnect the power cable from the scanner.
2 If your scanner has a lid attached to it, remove the lid by raising it and then pulling it straight up.
3 Attach the APF by inserting the APF hinges into the scanner hinge slots.
4 Connect the APF cable to its port on the scanner.
5 Reconnect the power cable.
text_image
APF portconnect the TMA
If your scanner has a transparent materials adapter (TMA), it allows you to scan 35 mm slides or negatives.
1 Disconnect the power cable from the scanner.
2 On the back of the scanner, find the round TMA port:
- On the HP Scanjet 4500c and 5550c series scanners, the TMA port is the second port from the left.
- On the HP Scanjet 4570c and 5500c series scanners, the TMA port is the second port from the right.
3 Holding the TMA cable by its free end, align the connector so the arrow is on the top side.
4 Gently insert the connector into the TMA port.
5 Reconnect the power cable.
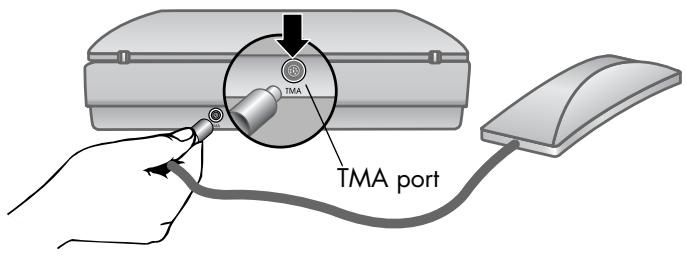
text_image
TMA TMA portThis section describes the buttons on the front panel of the scanner and available accessories.
| Feature | Description | |
 | SCAN button | Scans the item into the HP Photo & Imaging software. |
 | SHARE-TO-WEB button | Scans the item and sends it to a website. |
 | SAVE DOCUMENT TO DISC button | Scans the document and saves it to a CD or to your hard disk (HP Scanjet 4500c/5550c only). |
 | MEMORIES DISC CREATOR button | Scans the item to the Memories Disc Creator software, where you can create a photo show on a CD, along with background music and titles (HP Scanjet 4570c/5500c only). |
 | E-MAIL button | Scans the item using settings optimized for e-mail and sends the scan to your e-mail software (if the software is supported). |
 | COPY button | Scans the item and sends it to a printer to make copies. |
| [SAGC] | NUMBER OF COPIES button | Selects the number of copies to be printed with the COPY button. |
| [X7DC] | COLOR/BLACK & WHITE copy button | Determines whether items will be scanned in color or in black and white when you press the COPY button. |
| [CSX4] | POWER SAVE button | Turns off the scanner lamp, the LEDs, and the LCD. |
| [YYAB] | CANCEL button | Cancels a scan while the scanner is scanning, or cancels a series of scans from the ADF. |
| [BCZO] | 2-digit LCD | Displays the number of copies that will print with the COPY button. Also displays error codes that identify scanner problems. |
| HP Scanjet automatic document feeder (ADF) | Allows you to scan multiple pages automatically (HP Scanjet 4500c/5550c only). | |
| HP Scanjet automatic photo feeder (APF) | Allows you to scan multiple photos automatically (HP Scanjet 4570c/5500c only). | |
| HP Scanjet transparent materials adapter (TMA) | Scans 35 mm slides or negatives to the HP Photo & Imaging software, where you can preview or change the scanned image. | |
3
how to use the scanner
You can start your scanner projects in one of two ways: from the scanner buttons or from the HP Photo & Imaging software. The scanner buttons offer shortcuts to some of the software functions. Start from the software when you want more options and control or if your scanner model does not have all the buttons.

Macintosh users: For information about how to scan from the HP Macintosh software or change the button settings for your scanner, see the online help in the Apple Help Center.
The procedures in this section use the default button settings. For more information about changing the settings for one or more buttons, see change button settings in the HP Photo & Imaging software Help.

For more information about using the software, see the HP Photo & Imaging software Help.
scan pictures
You can scan pictures into the HP Photo & Imaging software by pressing the SCAN button ( ).
1 Close the HP Copying software if it is open on your computer.
2 Place the original face down on the scanner glass and close the lid.
3 Press the SCAN button on the front panel of the scanner.
4 Follow the instructions on your computer screen.
to change the original type
You can change the setting for the SCAN button so that it regularly scans using settings optimized for documents or pictures. For more information, see change button settings in the HP Photo and Imaging software Help.
to scan from the software
You can also preview and modify documents and pictures from the software.
1 On the Start menu, point to Programs, point to Hewlett-Packard, point to your scanner, and click hp photo & imaging director.
2 In the Director, click Scan Document or Scan Picture.
post a picture on a website
If you have an Internet connection, you can easily post your pictures to the Web from your scanner. After you set up a website by using HP Share-to-Web, you can give people an address where they can view your pictures.
1 Close the HP Scanning software and the HP Copying software if they are open on your computer.
2 Place the original item face down on the scanner glass and close the lid.
3 Press the SHARE-TO-WEB button (ww) on the scanner. The scanner scans the item using default settings optimized for the Web.
4 Follow the instructions on your computer screen.
You can also post scans to a website from the software. For more information, see the HP Photo & Imaging software Help.

If you want to place a scan on a website that is not enabled for HP Share-to-Web, save the scanned image as a file and then place the file on the site.
save a document
The HP Scanjet 4500c and 5550c scanners have a SAVE DOCUMENT TO DISC button ( ).
You can scan a document and send it directly to a compact disc (CD), if you have a read/write CD drive that supports direct writing to the CD. Alternatively, you can save the scan on your hard disk; by default the scan is saved in the My Documents folder if you have a Windows computer, in Documents if you have a Macintosh computer.
to save a document by using the Save Document to Disc button
1 Close the HP Scanning software and the HP Copying software if they are open on your computer.
2 Place the original face down on the scanner glass and close the lid.
3 Press the SAVE DOCUMENT TO DISC button on the scanner and follow the prompts on the computer screen. The software scans the document using default settings optimized for document storage.
When you use the SAVE DOCUMENT TO DISC button, your scan is saved as an Adobe® Portable Document Format (PDF) file. To save your scan with a different format, use the HP Photo & Imaging software. Open the Director and click SCAN DOCUMENT.
To change the location where a file is saved when you press the SAVE DOCUMENT TO DISC button, change the button's settings. You can also change the original size, resolution, and file name. For more information, see change button settings in the HP Photo and Imaging software Help.
If your scanner does not have this button, you can scan documents and save them on CD from the software. For more information, see the HP Photo & Imaging software Help.
save multiple pages
You can save multiple pages to a single file without pressing the SAVE DOCUMENT TO DISC button for each page.
After you scan a page by using the SAVE DOCUMENT TO DISC button, a message appears asking: Scan another page into the current document? Put a new page on the scanner glass, and then click Yes in the dialog box. When you have finished scanning multiple pages, click No in the dialog box to complete the procedure.
To turn off the prompt for additional pages, change the settings for the SAVE DOCUMENT TO DISC button. For more information, see change button settings in the HP Photo and Imaging software Help.

An automatic document feeder (ADF) allows you to scan multiple-page items quickly and easily. For more information about the ADF, see ADF - hp scanjet4500c/5550c series in the HP Photo & Imaging software Help.
create a photo show and save it on CD
The HP Scanjet 4570c and 5500c scanners have a MEMORIES DISC CREATOR button ( musical icon).
If you have a read/write CD drive and writable CDs, you can use your scanner to create personalized photo shows with music and titles. Then you can watch the photo show on your television using a compatible DVD player. You can also make photo reprints from the CD.
1 Close the HP Scanning software and the HP Copying software if they are open on your computer.
2 Place the original face down on the scanner glass and close the lid.
3 Press the MEMORIES DISC CREATOR button on the scanner and follow the instructions on the computer screen.
If your scanner does not have this button, you can create photo shows and save them on CD from the software. For more information, see the HP Photo & Imaging software Help.
If your scanner has an E-MAIL button (≡), you can e-mail a scan directly from your scanner. You must also have an Internet connection and a supported e-mail program.

The HP Photo & Imaging software supports many popular e-mail programs. If your e-mail program is supported, it opens automatically when you try to e-mail a scan. If you are using an unsupported e-mail program, the scanner cannot scan items directly into an e-mail message. In this case, save the scan to a file, and then attach it to your e-mail message.
1 Close the HP Scanning software and the HP Copying software if they are open on your computer.
2 Place the original face down on the scanner glass and close the lid.
3 Press the E-MAIL button on the scanner. The scanner scans the item using default settings optimized for e-mail.
4 Follow the instructions on your computer screen. If your e-mail program is supported, a screen appears where you can address and compose a message.
You can also e-mail a scan from the software. For more information, see the HP Photo & Imaging software Help.
to select original type for e-mail
If the software prompts you for an original type, you have two choices: Picture or Document. The scanner uses optimized scan settings for your item depending on your choice. Use the following guidelines to determine the best original type for your needs.
| If your original consists of | Select this original type | Receive this type of output |
| Text, or both text and graphics | Document | Adobe® Portable Document Format (PDF) file |
| A printed photograph or image | Picture | Joint Photographic Experts Group (JPG) file |

If you need to save the item as a file type other than JPG or PDF, scan and save the item by using the HP Scanning software.
to change the original type
If the software does not prompt you for an original type, you can change the setting for the E-MAIL button so that it regularly scans using settings optimized for either documents or pictures. For more information, see change button settings in the HP Photo and Imaging software Help.
print copies
If your scanner has a COPY button (☐), you can scan an item and send it directly to a printer to make copies.
1 Close the HP Scanning software if it is open on your computer.
2 Place the original face down on the scanner glass and close the lid.
3 If you want to print a color copy, select the color setting by pressing the COLOR/BLACK & WHITE button on the front panel of the scanner. The light adjacent to the current selection is lit. Use color copy only if you are printing to a color printer and want a color copy.
4 Select the number of copies by pressing the NUMBER OF COPIES button on the front panel of the scanner. The liquid crystal display (LCD) shows the number of copies selected. The default setting is one copy.
5 Press the COPY button on the scanner. The software scans the item using default settings optimized for printing, and then the number of copies specified in the scanner LCD window are printed on the default printer. If you want to reduce or enlarge the copies, lighten or darken them, or change printer settings, click Cancel in the copy progress dialog box. You can then make changes to settings in the HP Copying software.
You can also make copies from the HP Copying software. For more information, see the HP Photo & Imaging software Help.
cancel a scan in progress
The CANCEL button (▽) cancels a scan in progress. When you press the CANCEL button during a scan, the lamp returns to its starting position.
use the power save button
Use the POWER SAVE button ( ⏻ ) to turn off the lamp when you are not using the scanner. When you press the POWER SAVE button, the scanner lamp, the small indicator lights, and the LCD turn off, and the scanner lamp returns to its starting position.
To use the scanner again, press any button on the front panel of the scanner or start a scan from the computer. After a short warm-up cycle, the scan begins.
enable instant scanning
If the instant scanning feature is available on your scanner, you can start scanning right away, without waiting for the lamp to warm up. Your scanner has this feature if the Instant lamp warm-up option appears in the Quality vs. Speed tab, which you access by using the following procedure.
1 Open the Director and, on the Settings menu, click Scan Preferences.
2 Click the Quality vs. Speed tab.
- To eliminate the lamp warm-up time and enable instant scanning, select the Instant lamp warm-up check box.
- To reduce power consumption, clear the Instant lamp warm-up check box.

If instant scanning is enabled, you can scan right away even after you have pressed the POWER SAVE button.
Instant scanning does not function while you are using the TMA.
scan from the ADF
The HP Scanjet 4500c and 5550c scanners support the use of an automatic document feeder (ADF), which allows you to scan multiple-page items quickly and easily.
For more information about the ADF, see ADF - hp scanjet 4500c/5550c in the HP Photo & Imaging software Help.
scan from the APF
The HP Scanjet 4570c and 5500c scanners support the use of an automatic photo feeder (APF), which allows you to scan multiple photos quickly and easily.

To prevent damage to your photos:
- do not use the APF to scan photos that are fragile, damaged, or irreplaceable
- do not use the APF to scan the same photo more than 5 times
For more information about the APF, see APF - hp scanjet 4570c/5500c in the HP Photo & Imaging software Help.
scan slides or negatives
You can use the optional HP Scanjet transparent materials adapter (TMA) to scan 35 mm slides or negatives. To do so, use the HP Scanning software rather than the scanning buttons.
For more information about the TMA, see TMA - hp scanjet 4500c/5500c series in the HP Photo & Imaging software Help.
4
installation problems - hp scanjet 4500c/5500c series
This chapter contains solutions to common installation problems. For solutions to usage problems or maintenance issues, such as cleaning the scanner glass, see the troubleshooting section in the electronic Help.
scanner is not working
- First, check your computer:
- Make sure your computer meets the minimum system requirements that are listed on the scanner box.
- If you do not have enough hard-disk space, remove unnecessary files or install the software on a different disk drive.
- On a Microsoft® Windows® computer, if you receive a message such as "Destination Directory Is Invalid" or "Program Folder Is Invalid" during installation, do one of the following:
- Type a valid destination folder name. The destination folder cannot contain the following characters: /, \, :, ?, *, <, >, ", or |.
– Find a valid folder using the Browse button.
- Check the cables:
- Check that the power cable is securely connected between the scanner and a live electrical outlet or surge protector.
- If the power cable is connected to a surge protector, make sure the surge protector is plugged into an outlet and turned on.
- Make sure you use the USB cable that was included with the scanner. Another USB cable might not be compatible with the scanner.
- Check that the USB cable is securely connected between the scanner and the computer.
- Disconnect the power cable from the scanner and turn off the computer. After 30 seconds, reconnect the power cable to the scanner and then turn on the computer, in that order.
- On a Macintosh computer, use the Apple System Profiler to make sure the scanner is connected to the computer correctly.
• Test the scanner hardware:
a. Disconnect the USB cable and the power cable from the scanner. Make sure the power cable is still connected to the power source.
b. Press the E-MAIL (≡) and COPY (☐) buttons at the same time, while reconnecting the power cable to the scanner. (Hold the scanner buttons for less than 5 seconds.) The scanner lamp should turn on.
c. Press the SCAN (☐) button. (Hold the button for less than 5 seconds.) The carriage in the scanner should move forward and backward.
d. To end the test, disconnect the power cable.
If the scanner lamp does not turn on or the carriage does not move, a problem exists with the scanner hardware. Contact HP Customer Support.
scanner initialization failed
- If you receive a message that the scanner initialization failed, or if the HP Scanning software stops working after it has been functioning properly, try the following procedures.
a. Close the HP Scanning software if it is open.
b. Make sure that the cables connecting the computer and the HP scanner are securely fastened.
c. Turn the scanner off by disconnecting the power cable. Turn the scanner back on by reconnecting the power cable.
d. Turn the computer off and then on again.
- A "00" in the LCD on the front panel of the scanner indicates that a USB connection error has occurred. Check that the USB cable is securely connected between the scanner and the computer.
- If the scanner still fails to initialize, run the Repair utility (Windows computers only) as described in the next topic, scanner still does not work properly.
scanner still does not work properly
- If the scanner stops scanning or the buttons no longer work as they should, a software conflict might exist on your computer. You might need to reinstall the HP Photo & Imaging software. To do this, run the Repair utility (Windows computers only).
a. Click Start, point to Settings, and then click Control Panel (in Windows XP, click Start, and then click Control Panel).
b. Click Add/Remove Programs, and then select the HP Photo & Imaging software.
c. Click Add/Remove (or Change, depending on your version of Windows).
d. Follow the instructions on the computer screen, and then click Repair.
- If this does not work, install the scanner on another computer. This will help determine if the problem is related to the first computer or to the scanner.
- If the scanner still does not work, contact HP Customer Support.
If the troubleshooting information you need is not shown here, see the software ReadMe file for the most recent information, or review the troubleshooting section in the electronic Help.
For warranty and specifications, see the electronic Help for your scanner.
For regulatory information, see the regulatory_supplement.htm file on the CD-ROM that came with your scanner.
find hp help on the web
HP provides several resources on the Web to provide help with your scanner. These Web services are free and available to you 24 hours a day, 7 days a week.
hp product support
Visit http://www.hp.com/cposupport/loc/regional.html, select your region, and then type your scanner model in the "quick find" box, to find information about the following topics:
- setting up and using your scanner
- downloading drivers
- solving a problem
- ordering
- warranty
hp scanjet website
Visit http://www.hp.com and click "products and services" for the following information:
- Tips for using your scanner more effectively and creatively
• HP Scanjet driver updates and software
accessibility website
Customers with disabilities can get help by visiting http://www.hp.com/hpinfo/community/accessibility/prodserv/.
hp assistance
If you cannot find an answer to your question by using the websites listed above, visit http://www.hp.com/cposupport/mail_support.html. From there, you can discover how to contact HP by using e-mail, the telephone, and other methods.
contact hp customer support
Before contacting HP Customer Support, please see find hp help on the web. The website services described in that section are free and available to you around the clock. If you don't find what you need on the Web, please contact HP Customer Support.
You can contact HP by telephone or mail for support and service for your scanner. Prices, availability, and hours of support are subject to change without notice.
how hp can help
Hewlett-Packard's support hotline can help resolve problems with:
- setup
- installation
- configuration
operation
For questions relating to operating systems or network configurations, contact your point of purchase or internal support department. For help with non-HP hardware or software, please contact the manufacturer of the other product.
before you call
Please try the following steps before you call HP Customer Support:
- Review the "installation problems" chapter in the user's manual; for additional troubleshooting, see the "troubleshooting" module in the HP Photo & Imaging software Help.
- Review the troubleshooting information on the HP product support website.
when you call
If possible, be at the computer where the scanner is installed and have the following information ready when you call:
- serial number (found on the back or bottom of your scanner or under the scanner glass)
• product name (found on the scanner lid) - date of purchase
obtain support in the United States
For information about your warranty, see warranty and specifications in the electronic Help.
free telephone support for the duration of your warranty
Within the period of your warranty, telephone support is provided to you free of charge. If this is a long distance call for you, long distance charges will apply.
Call (208) 323-2551.
Our support staff is available from 6 am to 10 pm Mountain Time, Monday through Friday, and 9 am to 4 pm on Saturday.
after the warranty period
Call (208) 323-2551.
Charges are \$25.00 per issue, charged to your credit card.
If you think your HP product might need service, call HP Customer Support, which can help determine if service is required.
hewlett-packard upgraded warranty statement
You can buy an extended, comprehensive warranty for your HP product, but you must do so within 180 days of purchasing the product.
Upgrade your standard factory warranty to three years with the HP SupportPack. Service coverage begins on product purchase date and the pack must be purchased within the first 180 days of product purchase. HP will determine the hardware service offering based upon the outcome of system self-test programs run by the customer through the initial call to HP Customer Support. If during your technical support call it is determined that your product needs replacement, then HP will ship you this replacement product the next business day free of charge. This warranty upgrade offers maximized uptime and productivity, the convenience of door-to-door pickup and delivery, with all packaging and freight prepaid by HP.
Available in the US only. For more information call 1-888-999-4747 or visit http://www.homeandoffice.hp.com and select "warranty upgrades" under "product support."
obtain support worldwide
Telephone support is free for one year in Asia and the South Pacific, and for 30 days in the Middle East and Africa.
The information contained in this document and the applicable conditions for HP phone support are subject to change without notice. Please check for the latest information and conditions at http://www.hp.com/cposupport/loc/regional.html.
Alternatively, you can ask your dealer or call HP at the phone number listed in this document. For English support in Europe, contact +44 (0) 207 512 52 02.
| Algeria | +212 22404747 |
| Argentina | 0-810-555-5520 |
| Australia | 03 8877 8000 |
| Austria | 43 (0) 810 00 6080 |
| Belgium | Dutch: +32 (0)2 626 8806French: +32 (0)2 626 8807 |
| Brazil | (11) 3747 7799 (greater São Paulo)0800 157 751 (outside greater São Paulo) |
| Canada | 905 206-4663 |
| Chile | 800 22 5547 (Post-sales Business Computing)800 360 999 (Post-sales Home Computing) |
| China | +86 (10) 6564 5959 |
| Colombia | +9 800 114 726 |
| Czech Republic | +42 (0)2 6130 7310 |
| Denmark | +45 39 29 4099 |
| Egypt | +202 7956222 |
| Finland | +358 (0)203 47 288 |
| France | +33 (0)8 36 69 60 22 (Euro 0.34/min) |
| Germany | +49 (0)180 52 58 143 (Euro 0.12/min) |
| Greece | +30 1 60 73 603 |
| Guatemala | 1 800 999 5105 |
| Hong Kong SAR | +85 (2) 3002 8555 |
| Hungary | +36 (0)1 382 1111 |
| India | +91 11 682 6035 |
| Indonesia | +62 (21) 350 3408 |
| Ireland | +353 (0)1 662 5525 |
| Israel | +972 (0)9 952 48 48 |
| Italy | +39 02 264 10350 |
| Japan | +81 3 5344 7181 |
| Korea, Republic of | +82 (2) 3270 0700080-999-0700 (outside Seoul and Kyung Ki only) |
| Malaysia | 60 (3) 295 2566 (Penang)03 2695 2566 (Outside Penang) |
| Mexico | 52 58 9922 (Mexico City)01-800-472-6684 (outside Mexico City) |
| Morocco | +212 22404747 |
| Netherlands | +31 (0)20 606 8751 |
| New Zealand | +64 (9) 356 6640 |
| Norway | +47 22 11 6299 |
| Peru | 0 800 10111 |
| Philippines | +63 (2) 867 3551 |
| Poland | +48 22 865 98 00 |
| Portugal | +351 21 3176333 |
| Puerto Rico | 1 877 232 0589 |
| Romania | +40 1 315 44 4201 3154442 (local) |
| Russian Federation | +7 095 797 3520 (Moscow)+7 812 346 7997(St. Petersburg) |
| Singapore | +65 272 5300 |
| South Africa | 086 000 1030 (inside RSA)+27-11 258 9301 (outside RSA) |
| Spain | +34 902 321 123 |
| Sweden | +46 (0)8 619 2170 |
| Switzerland | +41 (0)848 80 11 11 |
| Taiwan | 0 800-01 0055 |
| Thailand | +66 (2) 661 4000 (Bangkok) |
| Tunisia | +212 22404747 |
| Turkey | +90 216 579 7171 |
| Ukraine | +7 (380-44) 490-3520 |
| United Arab Emirates | 971 4 883 8454 |
| United Kingdom and English internationally | +44 (0)207 512 52 02 |
| United States | (208) 323-2551 |
| Venezuela | 0800 4746 8368 |
| Viet Nam | +84 (0)8 823 4530 |
scanners hp scanjet série 4500c/5500c
© Copyright Hewlett-Packard Company 2002
NOTICE TO U.S. GOVERNMENT USERS: RESTRICTED RIGHTS COMMERCIAL COMPUTER SOFTWARE: "Use, duplication, or disclosure by the Government is subject to restrictions as set forth in subparagraph (c) (1) (ii) of the Rights in Technical Data Clause at DFARS 52.227-7013."