
Scanjet G4000 - To scan HP - Free user manual and instructions
Find the device manual for free Scanjet G4000 HP in PDF.
| Product type | Flatbed scanner |
| Model | HP Scanjet G4000 (G4010 and G4050) |
| Scanner type | Flatbed scanner with transparent materials adapter (TMA) |
| Dimensions (G4010) | 303 x 508 x 98 mm |
| Dimensions (G4050) | 303 x 508 x 108 mm |
| Weight (G4010) | 4.4 kg |
| Weight (G4050) | 5.3 kg |
| Power supply | 100-240 V AC, 50/60 Hz |
| Hardware resolution | 4800 x 9600 dpi |
| Interpolated resolution | Up to 999,999 dpi |
| Interface | USB 2.0 full speed (cable included) |
| Scanning element | CCD (charge-coupled device) |
| TMA adapter | Yes, for 35 mm slides and negatives (G4050: up to medium and large format) |
| Main functions | Scanning, copying, scanning to PDF |
| Included software | HP Photosmart (HP Solution Center) |
| Compatible operating systems | Windows (XP and later) and Mac OS X |
| Operating temperature | 10 °C to 35 °C |
| Operating relative humidity | 15% to 80% non-condensing |
| Warranty | 1 year |
| Box contents | Scanner, USB cable, power cord, HP Photosmart software CD, installation guide, TMA templates (G4050 only) |
| Recycling | Contains mercury (<5 mg) – do not dispose of with household waste |
Frequently Asked Questions - Scanjet G4000 HP
User questions about Scanjet G4000 HP
0 question about this device. Answer the ones you know or ask your own.
Ask a new question about this device
Download the instructions for your To scan in PDF format for free! Find your manual Scanjet G4000 - HP and take your electronic device back in hand. On this page are published all the documents necessary for the use of your device. Scanjet G4000 by HP.
USER MANUAL Scanjet G4000 HP
HP Scanjet G4000 series


Setup and Support Guide
© 2006 Copyright Hewlett-Packard Development Company, L.P.
I'adresse: www.hp.com/hpinfo/globalcitizenship/environment/recycle/
D. Législation locale
© 2006 Copyright Hewlett-Packard Development Company, L.P.
haar: www.hp.com/hpinfo/globalcitizenship/environment/recycle/
Setup and Support Guide
English
Copyright and license
© 2006 Copyright Hewlett-Packard Development Company, L.P.
Reproduction, adaptation or translation without prior written permission is prohibited, except as allowed under the copyright laws.
The information contained herein is subject to change without notice.
The only warranties for HP products and services are set forth in the express warranty statements accompanying such products and services. Nothing herein should be construed as constituting an additional warranty. HP shall not be liable for technical or editorial errors or omissions contained herein.
Trademark credits
Microsoft and Windows are registered trademarks of Microsoft Corporation.
Contents
1 Get started 4
Step 1. Check the box contents
Step 2. Install the software . 5
Step 3. Connect the TMA cable .5
Step 4. Connect the power supply . 6
Step 5. Connect the USB cable . 6
Step 6. Test the installation . 8
2 How to use the scanner 9
Where to get additional information 9
HP Photosmart Windows software 9
HP Photosmart Macintosh software 10
Front panel and accessories overview 10
Front-panel buttons 10
Transparent materials adapter (TMA) 10
3 Scanner installation troubleshooting 12
Uninstall and reinstall the software 12
Check the cables 13
4 Regulatory information and product specifications 14
Scanner specifications 14
Transparent materials adapter (TMA) specifications 15
Environmental specifications 15
Recycle and restricted material information 15
Disposal of Waste Equipment by Users in Private Households in the
European Union 16
5 Product support 17
Accessibility 17
HP Scanjet Web site 17
Getting assistance 18
6 Hewlett-Packard limited warranty statement 19
1 Get started
Follow these steps to set up the scanner:
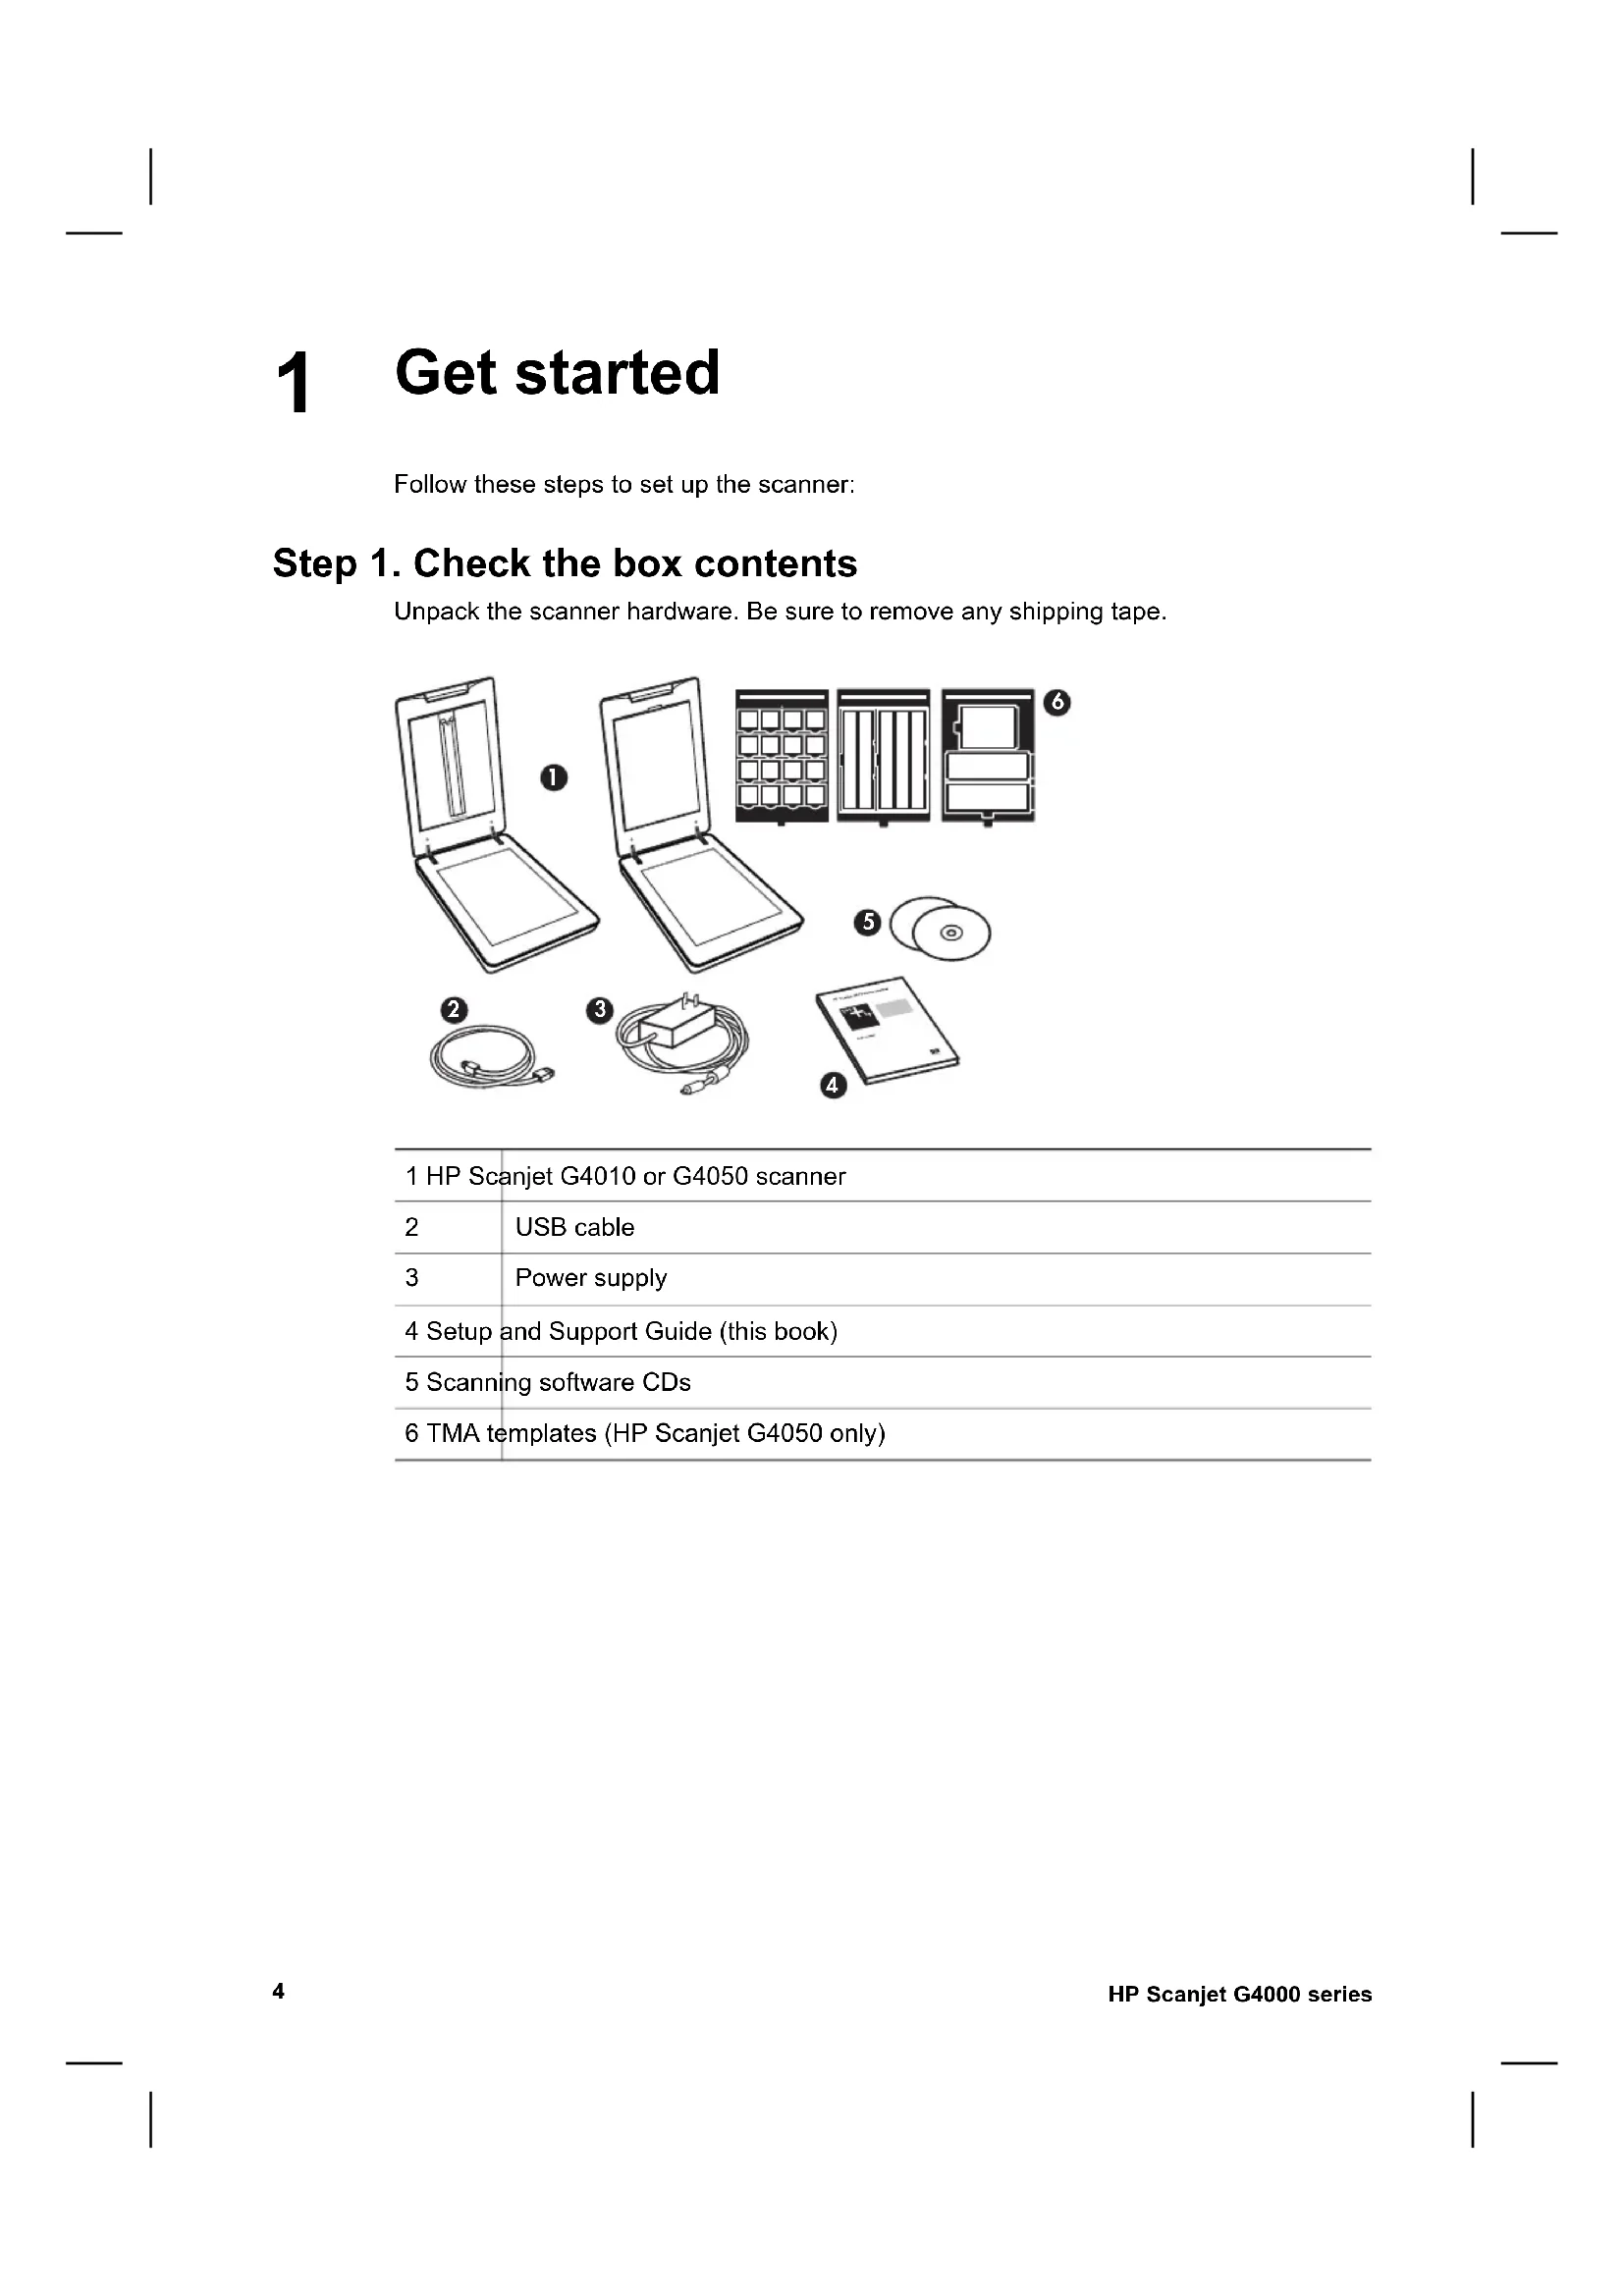
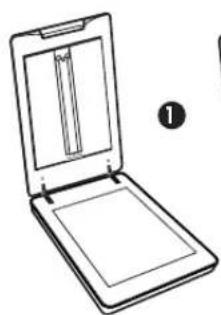
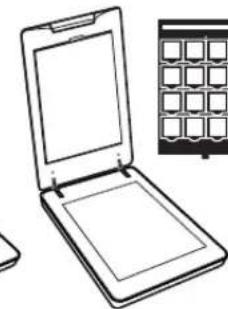
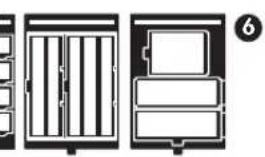
Step 1. Check the box contents
Unpack the scanner hardware. Be sure to remove any shipping tape.
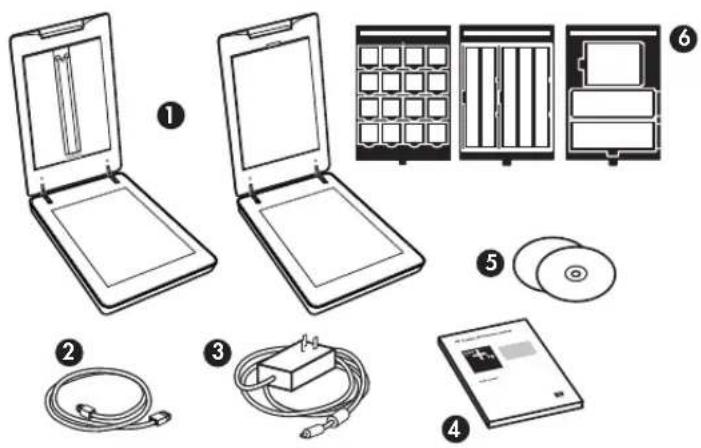
| 1 HP Scanjet G4010 or G4050 scanner | |
| 2 | USB cable |
| 3 | Power supply |
| 4 Setup and Support Guide (this book) | |
| 5 Scanning software CDs | |
| 6 TMA templates (HP Scanjet G4050 only) | |
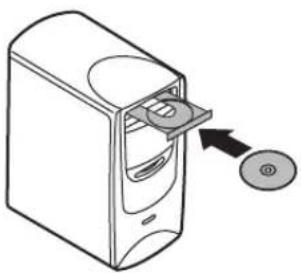
Step 2. Install the software

Caution If you are installing the software onto a Windows computer, do not connect the USB cable to the computer yet. Install the scanning software before connecting the USB cable. If you are installing the software into a Macintosh computer, you can connect the USB cable either before or after installing the software.
- Insert the HP Photosmart CD that came with the scanner into the computer CD drive.
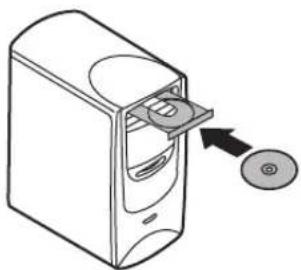
For Windows installations: Wait for the installation dialog box to display. If the installation dialog box does not display after a few moments, see Scanner installation troubleshooting on page 12.
For Macintosh installations: Double-click on the CD icon that appears on the desktop, and then double click on the HP Scanjet Scanner Install icon to start the installation.
- Click Install software to install the scanning software. Follow the onscreen instructions to complete the scanning software installation.
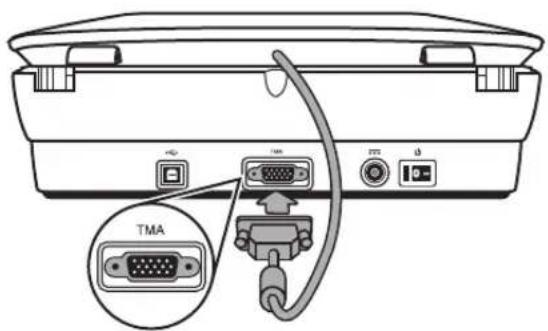
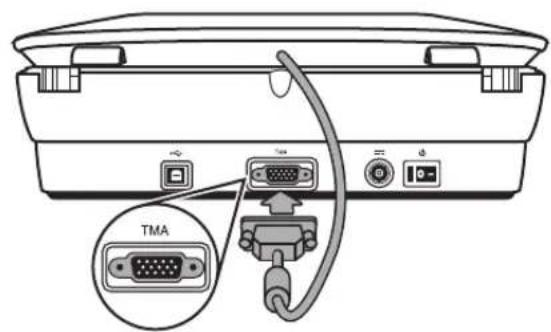
Step 3. Connect the TMA cable
Connect the TMA cable from the lid to the scanner base.
Step 4. Connect the power supply
The power supply has an attached cable that plugs into the back of the scanner.
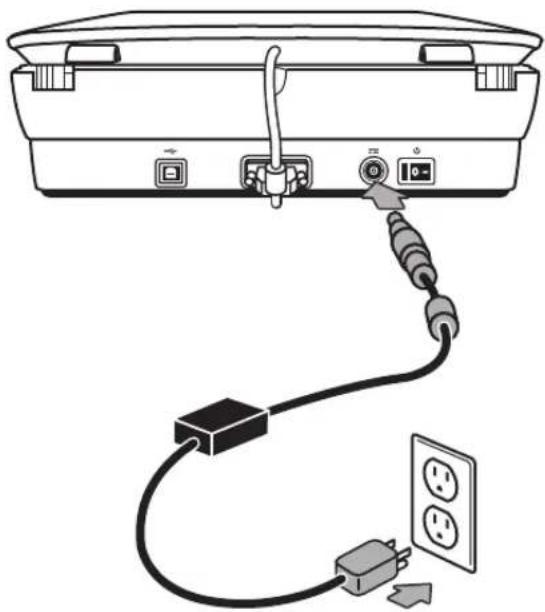
The power supply also has an AC cable that is connected to the power supply on one end and plugged into a power outlet or surge protector on the other end.
- Plug the AC cable into the back of the power supply.
- Plug the other end of the AC cable into a power outlet or a surge protector.
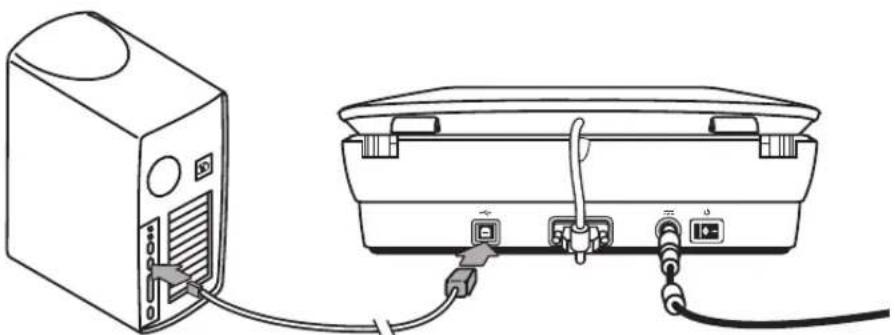
Step 5. Connect the USB cable

Caution If you are installing in a Windows environment, be sure you install the HP Photosmart software before connecting the scanner to your computer with the USB cable. See Step 2. Install the software on page 5. If you are installing in a Macintosh environment, you can connect the USB cable either before or after installing the software.
Use the USB cable that came with the scanner to connect the scanner to the computer.
- Connect the square end of the cable to the scanner.
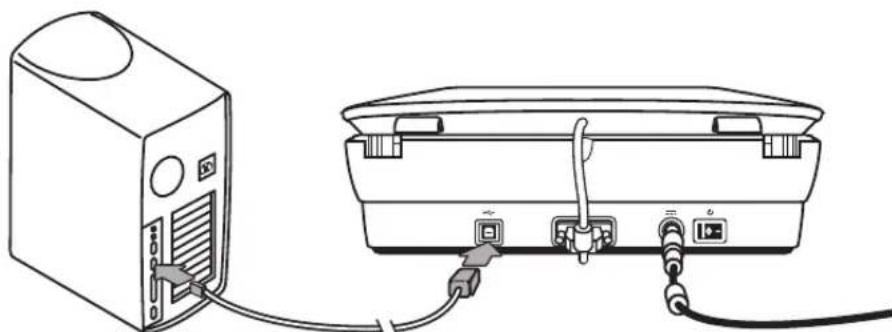
- Connect the rectangular end of the cable to the computer.
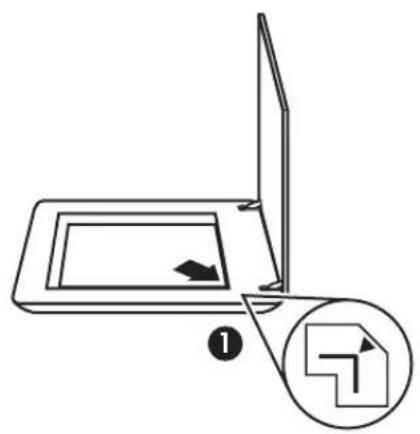
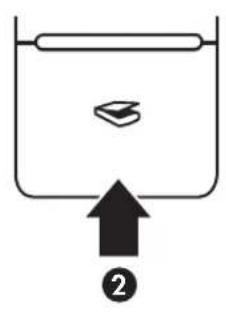
Step 6. Test the installation
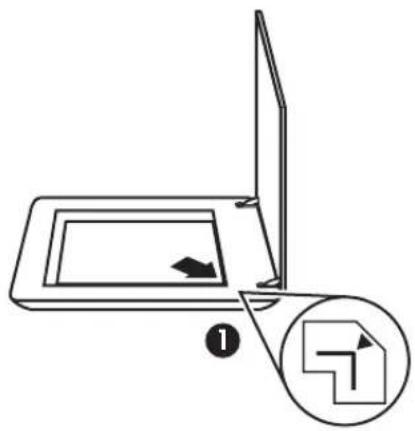

- Place a photo or document on the scanner glass as indicated by the reference mark on the scanner.
- Press the Scan ( ≈ ) button. If you are scanning using Windows software, the What are you scanning? dialog box appears. Follow the onscreen instructions to complete the scan.
If you are scanning using Macintosh software, the HP Scan Pro application opens and a preview of the scan is displayed. When the preview is accepted, the scanned image is sent to the destination that has been selected in the scanner settings.
If the What are you scanning? dialog box or the HP Scan Pro window does not appear, see Scanner installation troubleshooting on page 12.
2 How to use the scanner
This section presents an overview of the scanner and how to use it.
Where to get additional information
More information about the scanner and software can be found in the scanner Help file. If you have installed the HP Photosmart software that came with the scanner, double-click the HP Solution Center icon on your desktop, and then click Help and Support. Under the Documentation section, click Product Help.
To access an online version of the scanner user guide, click Start, point to Programs or All Programs, point to HP, Scanjet, G4000 series, and then click User Guide.
Macintosh users: For information about scanning procedures, open HP Device Manager, and then click on the question mark at the bottom of the dialog box.
HP Photosmart Windows software
When you install the HP Photosmart Windows software, two icons are added to your desktop. These icons open programs for scanning and editing your scans.
For information on how to use HP Solution Center and HP Photosmart software, see the scanner Help file. Double-click the HP Solution Center icon on your desktop, and then click Help and Support. Under the Documentation section, click Product Help.

HP Solution Center is the program that gets you started scanning pictures and documents. Use the HP Solution Center for all of the following:
- Perform scanning and copy functions
- Access help and troubleshooting information
- Access the HP Photosmart software to edit your scans
- Modify settings and preferences

HP Photosmart software is the program to use for manipulating, printing, archiving, and sharing your images after they have been scanned. You can get to the HP Photosmart software from the desktop icon or through HP Solution Center.
To start a scan:
Double-click the HP Solution Center icon on the desktop, click the tab for the scanner, and then click the task you want to perform.

Note If the HP Solution Center icon is not available on the desktop, click Start, point to Programs or All Programs, point to HP, and then click HP Solution Center.
HP Photosmart Macintosh software
When you install the HP scanning software on a Macintosh, two software programs are available in the Dock: HP Device Manager and HP Photosmart Studio. These programs are used for scanning and editing your scans.

HP Device Manager is the program that gets you started scanning pictures and documents. Use the Device Manager for all of the following:
- Perform scanning and copy functions
- Access help and troubleshooting information
- Access the HP Photosmart Studio to edit your scans
- Modify settings and preferences

HP Photosmart Studio is the program to use for manipulating, printing, archiving, and sharing your images after they have been scanned. You can open HP Photosmart Studio from the Dock, or from the HP Device Manager Applications menu.
Front panel and accessories overview
This section presents an overview of the scanner front panel and the transparent materials adapter (TMA).
Front-panel buttons
| Icon Feature name Description | ||
| Scan button | Scans pictures, graphics, documents, or objects. | |
| Scan Film button | Scans transparent positives (such as 35 mm slides) and negatives. Scanning film requires that you use the transparent materials adapter (TMA) located on the underside of the scanner lid. | |
| Copy button | Scans the item and sends it to the printer to make a copy. | |
| Scan to PDF button | Scans one or more pages and saves them as a PDF file for sharing or storing. | |

Note For more information on the default actions of these buttons in a Macintosh environment, open HP Device Manager, and then click on the question mark at the bottom of the dialog box.
Transparent materials adapter (TMA)
You can use the transparent materials adapter (TMA) to scan 35mm slides or negatives. With the HP Scanjet G4050 TMA you can also scan medium- and large-format film. For more information about the TMA, see the scanner user guide. For
information about how to find the user guide, see Where to get additional information on page 9.
3 Scanner installation troubleshooting
This section contains solutions for installation and setup problems.
Uninstall and reinstall the software
An incomplete software installation could cause the scanner not to be recognized or the software not to launch correctly. Try uninstalling and then reinstalling the HP Scanning software. To reinstall the HP Scanning software, you must have the HP Photosmart software CD.
Windows environment:
- Click Start, click Settings, and then click Control Panel (in Windows XP, click Start, and then click Control Panel).
- Click Add/Remove Programs (in Windows XP, this is called Add or Remove Programs) and then select HP Scanjet G4000 series.
- Click Remove.
- Click Add/Remove Programs (in Windows XP, this is called Add or Remove Programs) and then select the HP Photosmart software.
- Click Remove.
- Unplug the scanner USB cable from the computer.
- Reinstall the software, using the HP Photosmart software CD that came with your scanner. When you insert the CD, an installation interface launches automatically. Choose the HP Photosmart software to install.
- Reconnect the scanner USB cable after the software is installed. For more information see Step 5. Connect the USB cable on page 6.
Macintosh environment:
- Go to Applications/Hewlett-Packard and open HP Uninstaller.

Note You must have administrative privileges in order to uninstall the software.
- When prompted, type your username and password. The HP Uninstaller window opens and displays the products that are available to be uninstalled.
- Select the G4000 series product and click Next.
- Follow the onscreen instructions to complete the uninstall process.
- Reinstall the software, using the HP software CD that came with your scanner. After inserting the CD, click on the CD icon that appears on your desktop to begin the installation.
Check the cables
| Cable type Action | |
| Power cable The power cable is connected between the scanner and a power outlet. ·Ensure that the power cable is securely connected between the scanner and a live electrical outlet or surge protector. ·If the power cable is connected to a surge protector, ensure that the surge protector is plugged into an outlet and turned on. ·Turn off the scanner power switch and turn off the computer. After 60 seconds, turn the scanner back on and then turn on the computer, in that order. | |
| USB cable The USB cable is connected between the scanner and the computer. ·Use the cable that was included with the scanner. Another USB cable might not be compatible with the scanner. ·Ensure that the USB cable is securely connected between the scanner and the computer. ·If the USB cable is connected to a USB port on the front of the computer, move it to a USB port on the back of the computer. For additional USB troubleshooting information, see www.hp.com/support, select your country/region, and then use the search tool to find USB troubleshooting topics. | |
| TMA cable The TMA cable is connected between the TMA in the scanner lid and the scanner base. Ensure the cable is securely connected in the back of the scanner. | |
4 Regulatory information and product specifications
This section contains regulatory information and product specifications for the HP Scanjet G4000 series Photo Scanner and accessories.
Scanner specifications
| Name Description | |
| Scanner type Flatbed with transparent materials adapter (TMA) | |
| Size G4010: 303 mm x 5088 mm x 98 mm (11.93 x 20.00 x 3.86 inches)G4050: 303 mm x 5088 mm x 108 mm (11.93 x 20.00 x 4.25 inches) | |
| Weight G4010: 4.4kg (9.6 lbs)G4050: 5.3 kg (11.6 lbs) | |
| Scanning element Charged-coupled device | |
| Interface USB 2.0 Hi-Speed | |
| Hardware resolution | 4800 x 9600 dpi hardware resolution |
| Selectable resolution | 12 dpi to 999,999 enhanced dpi at 100 percent scaling |
| AC line voltage | 100-120 V 60 Hz – North America200-240 V 50 Hz – Continental Europe, United Kingdom,Australia100-240 V 50 Hz/60 Hz – Rest of the world |
| Regulatory information | Regulatory model identification number: For regulatory identification purposes, your product is assigned a Regulatory Model Number. The Regulatory Model Number for your product is FCLSD-0605. This regulatory number should not be confused with the product name (HP Scanjet G4010 or G4050) or product numbers (L1956A and L1957A). |
| ENERGY STAR | Energy usage drops significantly while in ENERGY STAR®mode, which saves natural resources, and saves money without affecting the high performance of this product. This product qualifies for ENERGY STAR (MOU v. 1.0), which is a voluntary program established to encourage the development of energy-efficient office products. |
| ENERGY STAR is a U.S. registered service mark of the U.S. EPA. As an ENERGY STAR partner, HP has determined that this product meets ENERGY STAR guidelines for energy efficiency. For more information on ENERGY STAR guidelines, go to the following Web site: www.energystar.gov | |
Transparent materials adapter (TMA) specifications
| Name Description | |
| Media types | G4010: Up to five 35 mm slides or six 35 mm negative frames G4050: Up to sixteen 35 mm slides, thirty 35 mm negative frames, up to two medium format film frames (120 roll film), or one large format film frame (220 roll film). |
| Power requirements 12 Volts/400 mA max | |
| Power consumption and regulatory information | For power consumption data, information on power supplies, and regulatory information, see the regulatorySUPplement.htm file on the HP Photosmart software CD. |
Environmental specifications
| Name Description | |
| Temperature Operating the scanner and TMA: 10° to 35°C (50° to 95°F) | |
| Storage: -40° to 60°C (-40° to 140°F) | |
| Relative humidity Operating the scanner and TMA: 15% to 80% noncondensing 10° to 35°C (50° to 95°F) | |
| Storage: up to 90% noncondensing at 0° to 60°C (32° to 140°F) | |
Recycle and restricted material information
Recycling
HP offers an increasing number of product return and recycling programs in many countries/regions, and partners with some of the largest electronics recycling centers throughout the world. HP conserves resources by reselling some of its most popular
Chapter 4
products. For more information regarding recycling of HP products, please visit: www.hp.com/hpinfo/globalcitizenship/environment/recycle/
Product restricted material
This HP product contains the following material that might require special handling at end-of-life: Mercury in the scanner fluorescent lamp and transparent materials adapter (< 5mg)
For recycling information, contact www.hp.com/go/recycle, your local authorities, or the Electronic Industries Alliance at www.eiae.org.
Disposal of Waste Equipment by Users in Private Households in the European Union

This symbol on the product or on its packaging indicates that this product must not be disposed of with your other household waste. Instead, it is your responsibility to dispose of your waste equipment by handing it over to a designated collection point for the recycling of waste electrical and electronic equipment. The separate collection and recycling of your waste equipment at the time of disposal will help to conserve natural resources and ensure that it is recycled in a manner that protects human health and the environment. For more information about where you can drop off your waste equipment for recycling, please contact your local city office, your household waste disposal service, or the shop where you purchased the product.
5 Product support
This section describes the options for product support.
Accessibility
The following accessibility options are available on this scanner:
Windows environment:
- To prevent buttons from being accidentally pushed, you can use the Button Disable Utility to disable the buttons. You can use the same utility to re-enable the buttons.
For more information about the Button Disable Utility, see the scanner User Guide.
- The scanner User Guide is also available in a Help format that is readable by most screen readers. To find this file, double-click the HP Solution Center icon on your desktop, and then click Help and Support. Under the Documentation section, click Product Help.
Macintosh environment:
- To prevent buttons from being accidentally pushed, use the Button Disable Utility to disable the buttons. You can use the same utility to re-enable the buttons. For more information about the Button Disable Utility, see the HP Scanjet Scanner Help.
- The HP Scanjet Scanner Help is available in a format that is readable by most screen readers. To find this file, open HP Device Manager, and then click on the question mark at the bottom of the dialog box.
Customers with disabilities can get help by
visiting www.hp.com/hpinfo/community/accessibility/prodserv/ (English only).
HP Scanjet Web site
Visit www.hp.com and select your country/language at the top of the page. On the country page, select scanners from the list of products. Use this site for a variety of information:
Find solutions to technical issues.
- Learn tips for scanning more effectively and creatively.
- Update your HP drivers and software.
- Register your product.
- Subscribe to newsletters, driver and software updates, and support alerts.
Purchase HP supplies and accessories.
Getting assistance
In order to get the best from your HP product, please consult the following standard HP support offerings:
-
Please consult the product documentation that came with the product.
-
Review the troubleshooting section or electronic Help of this manual/CD.
-
Review the electronic Help section within the software.
-
Visit the HP online support at www.hp.com/support or contact your point of purchase.
HP online support is available to all HP customers. It is the fastest source for up-to-date product information and expert assistance, including the following features:
- Fast E-mail access to qualified online support specialists
- Software and driver updates for your product
- Valuable product and troubleshooting information for technical issues
- Proactive product updates, support alerts, and HP newsletters (available when you register your product)
3. HP support by phone
- Support options and fees vary by product, country and language.
- Fees and policies are subject to change without notice. Please check the
Web site www.hp.com/support for the latest information.
4. Post-warranty period
After the limited warranty period, help is available online at www.hp.com/support.
5. Extending or upgrading your warranty
If you would like to extend or upgrade the product's warranty, please contact your point of purchase or check the HP Care Pack Services at www.hp.com/support.
- If you already purchased an HP Care Pack Service, please check the support conditions in your contract.
6 Hewlett-Packard limited warranty statement
The following information outlines the warranty information for this product.
| Product | Duration of limited warranty |
| HP Scanjet G4000 series scanner | 1 year |
A. Extent of limited warranty
- Hewlett-Packard (HP) warrants to the end-user customer (Customer) that each HP product specified above (Product) shall be free from defects in material and workmanship for the period specified above. The warranty period begins on the date of purchase by Customer.
- For each software product, HP's limited warranty applies only to a failure to execute programming instructions. HP does not warrant that the operation of any Product will be uninterrupted or error free.
- HP's limited warranty covers only those defects that arise as a result of normal use of a Product, and does not cover any other problems, including those that arise as a result of:
a. Improper use, maintenance, storage, handling, or modification;
b. Software, media, parts, accessories, supplies, or power adapters or sources not provided or supported by HP; or,
c. Operation or other conditions outside a Product's specifications.
- If HP receives, during the applicable warranty period, notice of a defect in a Product, HP shall at its option either replace or repair the defective Product.
- If HP cannot replace or repair a defective Product that is covered by HP's limited warranty, HP may, within a reasonable time after being notified of the defect, provide either another product similar in performance or a refund of the purchase price prorated based on usage and other appropriate factors.
- HP shall have no obligation to replace, repair, or refund until Customer returns the defective Product to HP and provides a valid proof of purchase.
- Any replacement product may be either new or like-new, provided it has functionality at least equal to that of the Product being replaced.
- A Product may contain remanufactured parts, components, or materials equivalent to new in performance.
- HP's limited warranty is valid in any country or locality where HP has a support presence for the Product and has marketed the Product. The level of warranty service may vary according to local standards. Upgraded warranty services, such as next day exchange, on-site service, and accident protection, may be purchased from HP.
B. Limitations of Warranty
TO THE EXTENT ALLOWED BY LOCAL LAW, NEITHER HP NOR ITS THIRD PARTY SUPPLIERS MAKE ANY OTHER WARRANTY OR CONDITION OF ANY
KIND, WHETHER EXPRESS OR IMPLIED, WITH RESPECT TO A PRODUCT, AND SPECIFICALLY DISCLAIM THE IMPLIED WARRANTY OR CONDITIONS OF MERCHANTABILITY, SATISFACTORY QUALITY, AND FITNESS FOR A PARTICULAR PURPOSE.
C. Limitations of Liability
- To the extent allowed by local law, the remedies provided in this Limited Warranty Statement (LWS) are Customer's sole and exclusive remedies.
- TO THE EXTENT ALLOWED BY LOCAL LAW, EXCEPT FOR THE OBLIGATIONS SPECIFICALLY SET FORTH IN THIS LWS, IN NO EVENT SHALL HP OR ITS THIRD PARTY SUPPLIERS BE LIABLE FOR DIRECT, INDIRECT, SPECIAL, INCIDENTAL, OR CONSEQUENTIAL DAMAGES, WHETHER BASED ON CONTRACT, TORT, OR ANY OTHER LEGAL THEORY AND WHETHER ADVISED OF THE POSSIBILITY OF SUCH DAMAGES.
D. Local Law
- This LWS gives Customer specific legal rights. Customer may also have other rights that vary from state to state in the United States, from province to province in Canada, and from country to country elsewhere in the world.
- To the extent this LWS is inconsistent with local law, this LWS shall be deemed modified to be consistent with local law. Under local law, certain disclaimers and limitations of this LWS may not apply to Customer. For example, the federal government of the United States, some states in the United States, and some governments outside the United States (including provinces in Canada), may:
a. Grant Customer additional warranty rights;
b. Preclude the disclaimers and limitations in this LWS from limiting the statutory rights of a consumer (e.g., the United Kingdom);
c. Otherwise restrict the ability of a manufacturer to enforce such disclaimers or limitations;
d. Specify the duration of implied warranties that the manufacturer cannot.
disclaim; or,
e. Disallow limitations on the duration of implied warranties
- Customer may have additional statutory rights based on its purchase agreement. Those rights are not in any way affected by this LWS.
- For consumer transactions in the United States, any implied warranties imposed by law are limited in duration to the express warranty period.
- FOR CONSUMER TRANSACTIONS IN AUSTRALIA AND NEW ZEALAND, THE TERMS IN THIS LWS, EXCEPT TO THE EXTENT LAWFULLY PERMITTED, DO NOT EXCLUDE, RESTRICT, OR MODIFY, AND ARE IN ADDITION TO, THE MANDATORY STATUTORY RIGHTS APPLICABLE TO THE SALE OF A PRODUCT TO SUCH CUSTOMERS.
You may have additional statutory rights against the seller based on your purchase agreement. Those rights are not in any way affected by this HP Limited Warranty.
You will find on the inside front cover of this book the names and address of the HP entity responsible for the performance of the HP Limited Warranty in your country.
|
a1ggaal 2
yjglal jglal 10o ydsall ailll jay gill jolal jnl jolal jn j
Jll Jnnn nn nnnn
ailll jy Jgic 1i pi gll lal jll alitly, gall jgal ay caay la jla
aillllgaiiieiiee iia
a 1
(2) = ( x1,y1) , = ( x2,y2)
i 1
100 100 100 100 100 100 100 100 100 100 100
A
J 1
- iio ojdoal 1
ailll l 1
(1) HP j (Lall) (HP) Hewlett-Packard 1
i 1
Jaeall Jie jue
y. aaii jie iie 1000000000000000000000000000000000000000
1 10
JL Jau 2y 100
i 1
paill y jy jil g jolll g jjill g jilll
a aal ylo jlll 1 1 1 1 1 1 1 1 1 1 1 1
1sIglaJoa2aiaal yHP Jia
.
JHHPJ 4
Adu! j 1
a a a a a a a a a a a a a a a a a a a a a
#
HP 1000000000000000000000000000000000000000000
a a a a a a a
a 1
y
HHP online support
www.hp.com/support
LdDn no jay gill jnuall g w o. HP dae Jsi ci jy HP peo aoe
aill l jall jaii la 1jll sclue gle jssllgiall ne aie caglae
-
auii jaiil jaiil jaiil jaiil jaiil jaiil
aill 2xally gbiy lalg sllg xla gai bai ai Sui iai jai yao clog
()HPJg
HP
ailllglllg 1111111111111111111
gagall aegy jy yj yj yj yj yj yj yj yj yj yj yj yj yj yj yj yj yj yj yj yj yj yj yj yj yj yj yj yj yj yj yj yj yj yj yj yj yj yj yj
AisaiyLoj
. www.hp.com/support
4a jgi aiesi yai .
HP Care a
. www.hp.com/support 1 (HP eae aeg aeaia) Pack Services
Buroj r jy (x) HP Care Pack Service
.
eaiell 2011 1111 11
aaii iiaai j
aallll llll y jn no jnnn nnnn nn nnnn nnnn nnnn nnnn nnnn nnnn nnnn nnnn nnnn
:Windows
J (j) Jb) Button Disable Utility.
JrjRjSsOeSsOeSsOeSsOeSsOeSsOeSsOeSsOeSsOeSsOeSsOeSsOeSsOeSsOeSsOeSsOeSsOeSsOeSsOeSsOeSsOeSsOeSsOeSsOeSsOeSsOee
J 1 (j) Button Disable Utility sL2 J G a
aagaiil aalully jolll
a a a a a a a a a a a a a a a a a a a a a a a a a a a a a
Jgj) HP Solution Center jol j jjcll lje jll
(HP)
(1) Product Help (2) Documentation
:Macintosh
Jn (j) Button Disable Utility.
jrrnssrnnn rnrnnn nnnnne
Cai J (J) Button Disable Utility 1
1.HP Scanjet Scanner Help
HP Scanjet Scanner Help
Ple 1 (HP 0 1) HP Device Manager
J 1
gall gall jj Jds noeell 1e Jssll aalll lss s
(1) /www. hp.com/ Hpinfo/community/accessibility/prodserv
HP Scanjet
aegalllllal lgl aagaae gaaaalg aagaaalg aagaaalg www. hp.com
Joo 100
aill sall
i 1
HP
a
a 1
HP cldao, cljia
Jae
aaii i 1
(5)

a 1 1 1 1 1 1 1 1 1 1 1 1 1 1 1 1 1 1 1 1 1 1 1 1 1 1 1 1 1 1 1 1 1 1 1 1 1 1 1 1 1 1 1 1 1 1 1

aalaaalalalalalalal
| الإستعمال | |
| الإستعمال الحرفية الحرفية الحرفية الحرفية الحرفية الحرفية الحرفية الحرفية الحرفية الحرفية الحرفية الحرفية الحرفية الحرفية الحرفية الحرفية الحرفية الحرفية الحرفية الحرفية الحرفية الحرفية الحرفية الحرفية الحرفية الحرفية الحرفية الحرفية الحرفية الحرفية الحرفية الحرفية الحرفية الحرفية EX. | الإستعمال |
| الإستعمال الحرفية EX. | الإستعمال |
| الإستعمال الحرفية EX. REGULATORY SUPPLEMENT.htm http://alldb.org/HP Photosmart http://alldb.org/HP Photosmart http://alldb.org/HP Photosmart http://alldb.org/HP Photosmart http://alldb.org/HP Photosmart http://alldb.org/HP Photosmart http://alldb.org/HP Photosmart http://alldb.org/HP Photosmart http://alldb.org/HP Photosmart http://alldb.org/HP Photosmart http://alldb.org/HP Photos Mart http://alldb.org/HP Photos Mart http://alldb.org/HP Photos Mart http://alldb.org/HP Photos Mart http://alldb.org/HP Photos Mart http://alldb.org/HP Photos Mart http://alldb.org/HP Photos Mart http://alldb.org/HP Photos Mart http://alldb.org/HP Photos Mart http://alldb.org/HP Photos Mart http://alldb.org/HP PhotosMart http://alldb.org/HP PhotosMart http://alldb.org/HP PhotosMart http://alldb.org/HP PhotosMart http://alldb.org/HP PhotosMart http://alldb.org/HP PhotosMart http://alldb.org/HP PhotosMart http://alldb.org/HP PhotosMart http://alldb.org/HP PhotosMart http://alldb.org/HP PhotosMart http://alldb.org/HP Photos Mart http://alldb.org/HP Photos Mart http://alldb.org/HP Photos Mart http://alldb.org/HP Photos Mart http://alldb.org/HP Photos Mart http://alldb.org/HP Photos Mart http://alldb.org/HP Photos Mart http://alldb.org/HP Photos Mart http://alldb.org/HP Photos Mart http://alldb.org/HP Photos mart http://alldb.org/HP Photos Mart http://alldb.org/HP Photos Mart http://alldb.org/HP Photos Mart http://alldb.org/HP Photos Mart http://alldb.org/HP Photos Mart http://alldb.org/HP Photos Mart http://alldb.org/HP Photos Mart http://alldb.org/HP Photos Mart http://alldb.org/HP Photos Mart http://alldb.org/HP Photosart http://alldb.org/HP Photosart http://alldb.org/HP Photosart http://alldb.org/HP Photosart http://alldb.org/HP Photosart http://alldb.org/HP Photosart http://alldb.org/HP Photosart http://alldb.org/HP Photosart http://alldb.org/HP Photosart http://alldb.org/HP Photosart http://alldb.org/HP Photosartin http://alldb.org/HP Photosartin http://alldb.org/HP Photosartin http://alldb.org/HP Photosartin http://alldb.org/HP Photosartin http://alldb.org/HP Photosartin http://alldb.org/HP Photosartin http://alldb.org/HP Photosartin http://alldb.org/HP Photosartin http://alldb.org/HP Photosartin http://alldb.org/HP Photosinert http://alldb.org/HP Photosinert http://alldb.org/HP Photosinert http://alldb.org/HP Photosinert http://alldb.org/HP Photosinert http://alldb.org/HP Photosinert http://alldb.org/HP Photosinert http://alldb.org/HP Photosinert http://alldb.org/HP Photosinert http://alldb.org/HP Photosinerthttp://alldb.org/HP Photosinert http://alldb.org/HP Photosinert http://alldb.org/HP Photosinert http://alldb.org/HP Photosinert http://alldb.org/HP Photosinert http://alldb.org/HP Photosinert http://alldb.org/HP Photosinert http://alldb.org/HP Photosinert http://alldb.org/HP Photosinert http:/alldb.org/HP Photosinert http://alldb.org/HP Photosinert http://alldb.org/HP Photosinert http://alldb.org/HP Photosinert http://alldb.org/HP Photosinert http://alldb.org/HP Photosinert http://alldb.org/HP Photosinert http://alldb.org/HP Photosinert http://alldb.org/HP Photosinert http:// alldb.org/HP Photosinert http://alldb.org/HP Photosinert http://alldb.org/HP Photosinert http://alldb.org/HP Photosinert http://alldb.org/HP Photosinert http://alldb.org/HP Photosinert http://alldb.org/HP Photosinert http://alldb.org/HP Photosinert http://alldb.org/HP Photosinert http://altdb.org/HP Photosinert http://alldb.org/HP Photosinert http://alldb.org/HP Photosinert http://alldb.org/HP Photosinert http://alldb.org/HP Photosinert http://alldb.org/HP Photosinert http://alldb.org/HP Photosinert http://alldb.org/HP Photosinert http://alldb.org/HP Photosinert http://allda.org/HP Photosinert http://allda.org/HP Photosinert http://allda.org/HP Photosinert http://allda.org/HP Photosinert http://allda.org/HP Photosinert http://allda.org/HP Photosinert http://allda.org/HP Photosinert http://allda.org/HP Photosinert http://allda.org/HP Photosinert http://allda. org/HP Photosinert http://allda.org/HP Photosinert http://allda.org/HP Photosinert http://allda.org/HP Photosinert http://allda.org/HP Photosinert http://allda.org/HP Photosinert http://allda.org/HP Photosinert http://allda.org/HP Photosinert http://allda.org/HP Photosinert http://allda.org /HP Photosinert http://allda.org/HP Photosinert http://allda.org/HP Photosinert http://allda.org/HP Photosinert http://allda.org/HP Photosinert http://allda.org/HP Photosinert http://allda.org/HP Photosinert http://allda.org/HP Photosinert http://allda.org/HP Photosinert http://allda.org/ HP Photosinert http://allda.org/HP Photosinert http://allda.org/HP Photosinert http://allda.org/HP Photosinert http://allda.org/HP Photosinert http://allda.org/HP Photosinert http://allda.org/HP Photosinert http://allda.org/HP Photosinert http://allda.org/HP Photosinert http://allda.org/HP photosinert http://allda.org/HP photosinert http://allda.org/HP photosinert http://allda.org/HP photosinert http://allda.org/HP photosinert http://allda.org/HP photosinert http://allda.org/HP photosinert http://allda.org/HP photosinert http://allda.org/HP photosinert http://allda.org/HP photos inerment http://allda.org/HP photos inerment http://allda.org/HP photos inerment http://allda.org/HP photos inerment http://allda.org/HP photos inerment http://allda.org/HP photos inerment http://allda.org/HP photos inerment http://allda.org/HP photos inerment http://allda.org/HP photos inerment http://aldda.org/HP photos inerment http://allda.org/HP photos inerment http://allda.org/HP photos inerment http://allda.org/HP photos inerment http://allda.org/HP photos inerment http://allda.org/HP photos inerment http://allda.org/HP photos inerment http://allda.org/HP photos inerment http://allda.org/ HP photos inerment http://allda.org/HP photos inerment http://allda.org/HP photos inerment http://allda.org/HP photos inerment http://allda.org/HP photos inerment http://allda.org/HP photos inerment http://allda.org/HP photos inerment http://allda.org/HP photos inerment http://allda.org/HP photos inermet http://allda.org/HP photos inerment http://allda.org/HP photos inerment http://allda.org/HP photos inerment http://allda.org/HP photos inerment http://allda.org/HP photos inerment http://allda.org/HP photos inerment http://allda.org/HP photos inerment http://allda.org/HP photos inerment http://altda.org/HP photos inerment http://allda.org/HP photos inerment http://allda.org/HP photos inerment http://allda.org/HP photos inerment http://allda.org/HP photos inerment http://allda.org/HP photos inerment http://allda.org/HP photos inerment http://allda.org/HP photos inerment http://allda.org/MP photos inerment http://allda.org/MP photos inerment http://allda.org/MP photos inerment http://allda.org/MP photos inerment http://allda.org/MP photos inerment http://allda.org/MP photos inerment http://allda.org/MP photos inerment http://allda.org/MP photos inerment http://allda.org/MP photos inermet http://allda.org/MP photos inerment http://allda.org/MP photos inerment http://allda.org/MP photos inerment http://allda.org/MP photos inerment http://allda.org/MP photos inerment http://allda.org/MP photos inerment http://allda.org/MP photos inerment http://allda.org/MP photos inerment http://aldda.org/MP photos inerment http://allda.org/MP photos inerment http://allda.org/MP photos inerment http://allda.org/MP photos inerment http://allda.org/MP photos inerment http://allda.org/MP photos inerment http://allda.org/MP photos inerment http://allda.org/MP photos inerment http://allda.org/ MP photos inerment http://allda.org/ MP photos inerment http://allda.org/ MP photos inerment http://allda.org/ MP photos inerment http://allda.org/ MP photos inerment http://allda.org/ MP photos inerment http://allda.org/ MP photos inerment http://allda.org/ MP photos inerment http://allda.org/ MP photos inermet http://allda.org/ MP photos inerment http://allda.org/ MP photos inerment http://allda.org/ MP photos inerment http://allda.org/ MP photos inerment http://allda.org/ MP photos inerment http://allda.org/ MP photos inerment http://allda.org/ MP photos inerment http://allda.org/ MP photos inerment http://aldda.org/ MP photos inerment http://allda.org/ MP photos inerment http://allda.org/ MP photos inerment http://allda.org/ MP photos inerment http://allda.org/ MP photos inerment http://allda.org/ MP photos inerment http://allda.org/ MP photos inerment http://allda.org/ MP photos inerment http://allda.org/MP photos inerment http://allda.org/ MP photos inerment http://allda.org/ MP photos inerment http://allda.org/ MP photos inerment http://allda.org/ MP photos inerment http://allda.org/ MP photos inerment http://allda.org/ MP photos inerment http://allda.org/ MP photos inermet http://allda.org/ MP photos inermet http://allda.org/ MP photos inermet http://allda.org/ MP photos inermet http://allda.org/ MP photos inermet http://allda.org/ MP photos inermet http://allda.org/ MP photos inermet http://allda.org/ MP photos inermet http://allda.org/ MP photos inermet http://aldda.org/ MP photos inermet http://allda.org/ MP photos inermet http://allda.org/ MP photos inermet http://allda.org/ MP photos inermet http://allda.org/ MP photos inermet http://allda.org/ MP photos inermet http://allda.org/ MP photos inermet http://allda.org/ MP photos inermet http://allda.org/MP photos inermet http://allda.org/ MP photos inermet http://allda.org/ MP photos inermet http://allda.org/ MP photos inermet http://allda.org/ MP photos inermet http://allda.org/ MP photos inermet http://allda.org/ MP photos inermet http://allda.org/ MP photos inermet http://allda.org/ MP photos inerment http://allda.org/ MP photos inerment http://allda.org/ MP photos inerment http://allda.org/ MP photos inerment http://allda.org/ MP photos inerment http://allda.org/ MP photos inerment http://allda.org/ MP photos inerment http://aldda.org/ MP photos inerment http://aldda.org/ MP photos inerment http://allda.org/ MP photos inerment http://allda.org/ MP photos inerment http://allda.org/ MP photos inerment http://allda.org/ MP photos inerment http://allda.org/ MP photos inerment http://allda.org/ MP photos inerment http://allda.org/MP photos inerment http://allda.org/MP photos inerment http://allda.org/ MP photos inerment http://allda.org/ MP photos inerment http://allda.org/ MP photos inerment http://allda.org/ MP photos inerment http://allda.org/ MP photos inerment http://allda.org/ MP photos inermet http://allda.org/ MP photos inerment http://allda.org/ MP photos inermet http://allda.org/ MP photos inerment http://allda.org/ MP photos inerment http://allda.org/ MP photos inerment http://allda.org/ MP photos inerment http://allda.org/ MP photos inerment http://allda.org/ MP photos inerment http://aldda.org/ MP photos inerment http://allda.org/ MP photos inerment http://aldda.org/ MP photos inerment http://allda.org/ MP photos inerment http://allda.org/ MP photos inerment http://allda.org/ MP photos inerment http://allda.org/ MP photos inerment http://allda.org/ MP photos inerment http://allda.org/MP photos inerment http://allda.org/ MP photos inerment http://allda.org/MP photos inerment http://allda.org/ MP photos inerment http://allda.org/ MP photos inerment http://allda.org/ MP photos inerment http://allda.org/ MP photos inerment http://allda.org/ MP photos inerment http://allda.org/ MP photos inermet http://allda.org/ MP photos inermet http://allda.org/ MP photos inerment http://allda.org/ MP photos inerment http://allda.org/ MP photos inerment http://allda.org/ MP photos inerment http://allda.org/ MP photos inerment http://allda.org/ MP photos inerment http://aldda.org/ MP photos inerment http://aldda.org/ MP photos inerment http://aldda.org/ MP photos inerment http://allda.org/ MP photos inerment http://allda.org/ MP photos inerment http://allda.org/ MP photos inerment http://allda.org/ MP photos inerment http://allda.org/ MP photos inerment http://allda.org/MP photos inerment http://allda.org/MP photos inerment http://allda.org/MP photos inerment http://allda.org/ MP photos inerment http://allda.org/ MP photos inerment http://allda.org/ MP photos inerment http://allda.org/ MP photos inerment http://allda.org/ MP photos inermet http://allda.org/ MP photos inerment http://allda.org/ MP photos inerment http://allda.org/ MP photos inermet http://allda.org/ MP photos inerment http://allda.org/ MP photos inerment http://allda.org/ MP photos inerment http://allda.org/ MP photos inerment http://allda.org/ MP photos inerment http://aldda.org/ MP photos inerment http://allda.org/ MP photos inerment http://allda.org/ MP photos inerment http://aldda.org/ MP photos inerment http://allda.org/ MP photos inerment http://allda.org/ MP photos inerment http://allda.org/ MP photos inerment http://allda.org/ MP photos inerment http://allda.org/MP photos inerment http://allda.org/ MP photos inerment http://allda.org/ MP photos inerment http://allda.org/MP photos inerment http://allda.org/ MP photos inerment http://allda.org/ MP photos inerment http://allda.org/ MP photos inerment http://allda.org/ MP photos inerment http://allda.org/ MP photos inermet htp://allda.org/ MP photos inerment htp://allda.org/ MP photos inerment htp://allda.org/ MP photos inerment htp://allda.org/ MP photos inerment htp://allda.org/ MP photos inerment htp://allda.org/ MP photos inerment htp://allda.org/ MP photos inerment htp://allda.org/ MP photos inerment htp://allda.org/MP photos inerment htp://allda.org/ MP photos inerment htp://allda.org/ MP photos inerment htp://allda.org/ MP photos inerment htp://allda.org/ MP photos inerment htp://allda.org/ MP photos inerment htp://allda.org/ MP photos inerment htp://allda.org/ MP photos inerment htp://aldda.org/ MP photos inerment htp://allda.org/ MP photos inerment htp://allda.org/ MP photos inerment htp://allda.org/ MP photos inerment htp://allda.org/ MP photos inerment htp://allda.org/ MP photos inerment htp://allda.org/ MP photos inerment htp://allda.org/ MP photos inerment |
a
/www. hp.com/ Hpinfo/globalcitizenship/environment/recycle
aal 1g
) Control Panel (C) Settings (D) Start (F) ((P) Control Panel (G) Start (H) Windows XP (I) (J) Windows XP (K) Add/Remove Programs (L) .HP Scanjet G4000 series ((J) Add or Remove Programs
.(A)Remove 1WindowsXP()Add/RemovePrograms .HPPhotosmart
.(4)Remove 0
.
HP Photosmart Jp jn Hs s a s a s a s a s a s a s a s a s a s a s a s a s a s a s a s a s a s a s a s a s a s a s a s a s a s a s a s a s a s a s a s a s a s a s a s a s a s a s a s a s a s a s a s a s a s a s a s a s a s a s
:Macintosh aHP (Hewlett-Packard/ Applications/Hewlett-Packard .1. (HP Uninstaller
aal aal aal na Jaa 1Jaaal aai j

HP Uninstaller jblg i 100000000000000000000000000000
H
(1) Next G4000
gaii gai i 1
J 10
Macintosh HP Photosmart
Gawdll kall hgs lgey jyBnJg .Macintosh JyBssk HHP 100000000000000000000000000000000000000000000000000000000000000000000
aalalalalalalalalalalalalalalalalalalal
.(TMA) aall gao aygaiiaa aalal yaleyaiyaiyaiyaiyaiyaiyaiyaiyaiyaiyaiyaiyaiyaiyaiyaiyaiyaiyaiyaiyaiyaiyaiyaiyaiyaiyaiyaiyaiyaiyaiyaiyaiyaiyaiyaiyaiyaiyaiyaiyaiyai
aalaa aai j
| الإستعمال | الإستعمال | الترجمة |
| الإستعمال ص響ت بعسانيات و مصحيى بعسانيات الحرفية للاundry مصحيى بعسانيات | مبيح SCAN رززه(الإستعمال) | الإستعمال |
| الإستعمال (من 10 مصحيى بعسانيات مصحيى بعسانيات الحرفية للاundry مصحيى بعسانيات الحرفية للاundry مصحيى بعسانيات الحرفية للاundry مصحيى بعسانيات الحرفية للاundry مصحيى بعسانيات الحرفية للاundry مصحيى بعسانيات الحرفية للاundry مصحيى بعسانيات الحرفية لlea بعسانيات الحرفية لlea بعسانيات الحرفية لlea بعسانيات الحرفية لlea بعسانيات الحرفية لlea بعسانيات الحرفية لlea بعسانيات الحرفية لlea بعسانيات الحرفية لlea بعسانيات الحرفية لlea بعسانيات الحرفية لlea بعسانيات الحرفية لxa بعسانيات الحرفية لxa بعسانيات الحرفية لxa بعسانيات الحرفية لxa بعسانيات الحرفية لxa بعسانيات الحرفية لxa بعسانيات الحرفية لxa بعسانيات الحرفية لxa بعسانيات الحرفية لxa بعسانيات الحرفية لxa بعسانيات الحرفية ل xa بعسانيات الحرفية لxa بعسانيات الحرفية لxa بعسانيات الحرفية لxa بعسانيات الحرفية لxa بعسانيات الحرفية لxa بعسانيات الحرفية لxa بعسانيات الحرفية لxa بعسانيات الحرفية لxa بعسانيات الحرفية لxa بعسانيات الحرفية لxia بعسانيات الحرفية لxia بعسانيات الحرفية لxia بعسانيات الحرفية لxia بعسانيات الحرفية لxia بعسانيات الحرفية لxia بعسانيات الحرفية لxia بعسانيات الحرفية لxia بعسانيات الحرفية لxia بعسانيات الحرفية لxia بعسانيات الحرفية ل Xia بعسانيات الحرفية ل Xia بعسانيات الحرفية ل Xia بعسانيات الح字第 1/2/3/4/5/6/7/8/9/10/11/12/13/14/15/16/17/18/19/20/21/22/23/24/25/26/27/28/29/30/31/32/33/34/35/36/37/38/39/40/41/42/43/44/45/46/47/48/49/50/51/52/53/54/55/56/57/58/59/60/61/62/63/64/65/66/67/68/69/70/71/72/73/74/75/76/77/78/79/80/81/82/83/84/85/86/87/88/89/90/91/92/93/94/95/96/97/98/99/100/101/102/103/104/105/106/107/108/109/110/111/112/113/114/115/116/117/118/119/120/121/122/123/124/125/126/127/128/129/130/131/132/133/134/135/136/137/138/139/140/141/142/143/144/145/146/147/148/149/150/151/152/153/154/155/156/157/158/159/160/161/162/163/164/165/166/167/168/169/170/171/172/173/174/175/176/177/178/179/180/181/182/183/184/185/186/187/188/189/190/191/192/193/194/195/196/197/198/199/200/201/202/203/204/205/206/207/208/209/210/211/212/213/214/215/216/217/218/219/220/221/222/223/224/225/226/227/228/229/230/231/232/233/234/235/236/237/238/239/240/241/242/243/244/245/246/247/248/249/250/251/252/253/254/255/256/257/258/259/260/261/262/263/264/265/266/267/268/269/270/271/272/273/274/275/276/277/278/279/280/281/282/283/284/285/286/287/288/289/290/291/292/293/294/295/296/297/298/299/300/301/302/303/304/305/306/307/308/309/310/311/312/313/314/315/316/317/318/319/320/321/322/323/324/325/326/327/328/329/330/331/332/333/334/335/336/337/338/339/340/341/342/343/344/345/346/347/348/349/350/351/352/353/354/355/356/357/358/359/360/361/362/363/364/365/366/367/368/369/370/371/372/373/374/375/376/377/378/379/380/381/382/383/384/385/386/387/388/389/390/391/392/393/394/395/396/397/398/399/400/401/402/403/404/405/406/407/408/409/410/411/412/413/414/415/416/417/418/419/420/421/422/423/424/425/426/427/428/429/430/431/432/433/434/435/436/437/438/439/440/441/442/443/444/445/446/447/448/449/450/451/452/453/454/455/456/457/458/459/460/461/462/463/464/465/466/467/468/469/470/471/472/473/474/475/476/477/478/479/480/481/482/483/484/485/486/487/488/489/490/491/492/493/494/495/496/497/498/499/500/501/502/503/504/505/506/507/508/509/510/511/512/513/514/515/516/517/518/519/520/521/522/523/524/525/526/527/528/529/530/531/532/533/534/535/536/537/538/539/540/541/542/543/544/545/546/547/548/549/550/551/552/553/554/555/556/557/558/559/560/561/562/563/564/565/566/567/568/569/570/571/572/573/574/575/576/577/578/579/580/581/582/583/584/585/586/587/588/589/590/591/592/593/594/595/596/597/598/599/600/601/602/603/604/605/606/607/608/609/610/611/612/613/614/615/616/617/618/619/620/621/622/623/624/625/626/627/628/629/630/631/632/633/634/635/636/637/638/639/640/641/642/643/644/645/646/647/648/649/650/651/652/653/654/655/656/657/658/659/660/661/662/663/664/665/666/667/668/669/670/671/672/673/674/675/676/677/678/679/680/681/682/683/684/685/686/687/688/689/690/691/692/693/694/695/696/697/698/699/700/701/702/703/704/705/706/707/708/709/710/711/712/713/714/715/716/717/718/719/720/721/722/723/724/725/726/727/728/729/730/731/732/733/734/735/736/737/738/739/740/741/742/743/744/745/746/747/748/749/750/751/752/753/754/755/756/757/758/759/760/761/762/763/764/765/766/767/768/769/770/771/772/773/774/775/776/777/778/779/780/781/782/783/784/785/786/787/788/789/790/791/792/793/794/795/796/797/798/799/800/801/802/803/804/805/806/807/808/809/810/811/812/813/814/815/816/817/818/819/820/821/822/823/824/825/826/827/828/829/830/831/832/833/834/835/836/837/838/839/840/841/842/843/844/845/846/847/848/849/850/851/852/853/854/855/856/857/858/859/860/861/862/863/864/865/866/867/868/869/870/871/872/873/874/875/876/877/878/879/880/881/882/883/884/885/886/887/888/889/890/891/892/893/894/895/896/897/898/899/900/901/902/903/904/905/906/907/908/909/910/911/912/913/914/915/916/917/918/919/920/921/922/923/924/925/926/927/928/929/930/931/932/933/934/935/936/937/938/939/940/941/942/943/944/945/946/947/948/949/950/951/952/953/954/955/956/957/958/959/960/961/962/963/964/965/966/967/968/969/970/971/972/973/974/975/976/977/978/979/980/981/982/983/984/985/986/987/988/989/990/991/992/993/994/995/996/997/998/999) | [ ] |
HPSHPSOLUHHP SPPsHP SPPsHP SPPsHP SPPsHP SPPsHP SPPsHP SPPsHP SPPsHP SPPsHP SPPsHP SPPsHP SPPsHP SPPsHP SPPsHP SPPsHP SPPsHP SPPsHP SPPsHP SPPsHP SPPsHP SPPsHP SPPsHP SPPsHP SPPsHP SPPsHP SPPSHP SPPSHP SPPSHP SPPSHP SPPSHP SPPSHP SPPSHP SPPSHP SPPSHP SPPSHP SPPSHP SPPSHP SPPSHP SPPSHP SPPSHP SPPSHP SPPSHP SPPSHP SPPSHP SPPSHP SPPSHP SPPSHP SPPSHP SPPSHP SPPSHP SPPsHP SPPsHP SPPsHP SPPsHP SPPsHP SPPsHP SPPsHP SPPsHP SPPsHP SPPsHP SPPsHP SPPsHP SPPsHP SPPsHP SPPsHP SPPsHP SPPsHP SPPsHP SPPsHP
S! (HPJJglj) HP Solution Center Jg) HP Solution Center 1

Klll j (HP Jg) HP Solution Center 15 a.
(2) All Programs (J) Programs (I) Start qqqqqq HP Solution Center qq qq HP

g j 1
aasall aalall
alall allllly yall yll (y) (y) Scan j
. (G) What are you scanning? Windows
aaii aieae eae ae eae
HP Scan Pro Macintosh
g g aal gall jll ay iay al galeaal paaal lae y
Aaalll aalall lall 1
HP 105 (g) yll yale) What are you scanning?
11 11 11 11 11 11 11 11 11 11 11 11 11 11 11 11 11 11 11 11 11 11 11 11
1
sll 1
aai aaiy
J 1

V
aal 10
aaii aaii 1

a a a a a a a a a a a a a a a a a a a a a a a a a a a
a
aalal 1s jg jj 1
J 1
USB
HP Photosmart Windows 4.0 Windows 3.0 Windows 2.0 Windows 1.0

Jaaill
aaii
Windows 11.0 Windows 11.0 Windows 11.0 Windows 11.0 Windows 11.0 Windows 11.0 Windows 11.0 Windows 11.0 Windows 11.0 Windows 11.0 Windows 11.0 Windows 11.0 Windows 11.0 Windows 11.0 Windows 11.0 Windows 11.0 Windows 11.0 Windows 11

HHPoosmart
11 1
H P Scanjet Scanner Install j J (Scanjet
aaiiaaii jao aai iaae
aalall aalld ael (TMA) alall alall Jus
ailll cglal gllg aagall aal
a
aaii i aaii i aaii i aaii
2
3

5
| G4050 scanner 1 HP Scanjet G4010 LaSousaia LaSousaia LaSousaia LaSousaia LaSousaia LaSousaia LaSousaia LaSousaia LaSousaia LaSousaia LaSousaia LaSousaia LaSousaia LaSousaia LaSousaia LaSousaia LaSousaia LaSousaia LaSousaia LaSousaia LaSousaiah PEGHP Scanjet G4050 TMA 20000000000000000000000000000000000000000000000000000000000000000000000000000000000000000000000000000 | |
| USB KJL | 2 |
| KJL CkL T A L D A L L P L A C H E | 3 |
| (1) kL CkL T A L D A L L P L A C H E (1) kL CkL T A L D A L L P L A C H E (1) kL CkL T A L D A L L P L A C H E (1) kL CkL T A L D A L L P L A C H E (1) kL CkL T A L D A L L P L A C H E (1) kL CkL T A L D A L L P I L A C H E (1) kL CkL T A L D A L L P I L A C H E (1) kL CkL T A L D A L L P I L A C H E (1) kL CkL T A L D A L L P I L A C H E (1) kL CkL T A L D A L L P I L A C H E (1) kL CK L T A L D A L L P I L A C H E (1) kL CkL T A L D A L L P I L A C H E (1) kL CkL T A L D A L L P I L A C H E (1) kL CkL T A L D A L L P I L A C H E (1) kL CkL T A L D A L L P I L A | 4 |
| (2) kL CkL T A L D A L L P L A C H E (2) kL CkL T A L D A L L P L A C H E (2) kL CkL T A L D A L L P L A C H E (2) kL CkL T A L D A L L P L A C H E (2) kL CkL T A L D A L L P L A C H E (2) kL CkL T A L D A L L P I L A C H E (2) kL CkL T A L D A L L P I L A C H E (2) kL CkL T A L D A L L P I L A C H E (2) kL CkL T A L D A L L P I L A C H E (2) kL CkL T A L D A L L P I L A C H E (2) kL C kL T A L D A L L P I L A C H E (2) kL C kL T A L D A L L P I L A C H E (2) kL C kL T A L D A L L P I L A C H E (2) kL C kL T A L D A L L P I L A C H E (2) kL C kL T A L D A L L P I LA C H E (2) kL C kL T A L D A L L P I L A C H E (2) kL C kL T A L D A L L P I L A C H E (2) kL C kL T A L D A L L P I L A C H E (2) kL C kL T A L D A L L P I L A C H E (2) kL C kLT A L D A L L P I L A C H E (2) kL C kL T A L D A L L P I L A C H E (2) kL C kL T A L D A L L P I L A C H E (2) kL C kL T A L D A L L P I L A C H E (2) kL C kL T A L D A L L P I L A C h E (2) kL C kL T A L D A L L P I L A C h E (2) kL C kL T A L D A L L P I L A C h E (2) kL C kL T A L D A L L P I L A C h E (2) kL C kL T A L D A L L P I L A C h E (2) kL C kL T A I L D A L L P I L A C h E (2) kL C kL T A I L D A L L P I L A C h E (2) kL C kL T A I L D A L L P I L A C h E (2) kL C kL T A I L D A L L P I L A C h E (2) kL C kL T A I L D A L L P I I A C h E (2) kL C kL T A I L D A L L P I I A C h E (2) kL C kL T A I L D A L L P I I A C h E (2) kL C kL T A I L D A L L P I I A C h E (2) kL C kL T A I L D A L L P I I A C h E (2) |
1
1.
.
0
7 1
USB Jls Jg
A. 120
4 4
9.
Windows HP Photosmart
.. Macintosh HP Photosmart
1.
1
1.
11.
11 4
1
14 2
14 2
15 2
1 2
1 8
10. 11
17
17 2
HP Scanjet
1Y 1
1A. Hewlett-Packard 4s

Development Company, L.P. ©
y 1
yj 1
j
yill 1i 15
j
a
HP
P 1
g 1
HP
i 1
1
a
Windows, Microsoft
Microsoft is
Corporation

|
© 2006 Hewlett-Packard Development Company, L.P.
www.hp.com