
ScanJet Pro N4000 snw1 - Scanner HP - Free user manual and instructions
Find the device manual for free ScanJet Pro N4000 snw1 HP in PDF.


| Product Type | Sheet-fed scanner |
| Model | HP ScanJet Pro N4000 snw1 |
| Scan Speed | Up to 40 ppm (simplex) / 80 ipm (duplex) |
| Optical Resolution | 600 dpi |
| Daily Duty Cycle | Up to 4,000 pages |
| Automatic Document Feeder (ADF) | 80-sheet capacity |
| Scan Sizes | Minimum: 2.0 x 2.0 in; Maximum: 8.5 x 122 in (long page) |
| Connectivity | USB 3.0, Ethernet, Wi-Fi (optional) |
| Dimensions (W x D x H) | 310 x 190 x 180 mm (12.2 x 7.5 x 7.1 in) |
| Weight | 3.2 kg (7.1 lb) |
| Power Supply | External AC adapter (input: 100-240 VAC, output: 24 VDC) |
| Power Consumption | Active: 9.5 W; Sleep: 1.5 W; Off: 0.1 W |
| Scan Resolution Settings | 75, 100, 150, 200, 300, 600 dpi |
| Output File Formats | PDF, JPG, TIFF, BMP, PNG, DOCX, XLSX, TXT |
| Supported Operating Systems | Windows, macOS, Linux (via TWAIN) |
| Scanner Maintenance | Clean ADF rollers and glass regularly; use HP cleaning kit |
| Replacement Parts | ADF roller kit, pick roller, separation pad |
| Safety Certification | IEC 60950-1, CE, FCC |
| Warranty | 1-year limited hardware warranty |
Frequently Asked Questions - ScanJet Pro N4000 snw1 HP
User questions about ScanJet Pro N4000 snw1 HP
0 question about this device. Answer the ones you know or ask your own.
Ask a new question about this device
Download the instructions for your Scanner in PDF format for free! Find your manual ScanJet Pro N4000 snw1 - HP and take your electronic device back in hand. On this page are published all the documents necessary for the use of your device. ScanJet Pro N4000 snw1 by HP.
USER MANUAL ScanJet Pro N4000 snw1 HP


HP ScanJet Pro 2000 s2, 3000 s4, N4000 snw1 HP ScanJet Enterprise Flow 5000 s5, 7000 s3, N7000 snw1
User Guide
Copyright and License
© Copyright 2020 HP Development Company, L.P.
Reproduction, adaptation, or translation without prior written permission is prohibited, except as allowed under the copyright laws.
The information contained herein is subject to change without notice.
The only warranties for HP products and services are set forth in the express warranty statements accompanying such products and services. Nothing herein should be construed as constituting an additional warranty. HP shall not be liable for technical or editorial errors or omissions contained herein.
Edition 1, 4/2020
Trademark Credits
Adobe®, Adobe Photoshop®, Acrobat®, and PostScript® are trademarks of Adobe Systems Incorporated.
Apple and the Apple logo are trademarks of Apple Inc., registered in the U.S. and other countries.
macOS is a trademark of Apple Inc., registered in the U.S. and other countries.
AirScan is a trademark of Apple Inc., registered in the U.S. and other countries.
Google™ and Gmail™ are trademarks of Google Inc.
Microsoft®, Windows®, Windows® XP, SharePoint®, and Internet Explorer® are U.S. registered trademarks of Microsoft Corporation.
UNIX® is a registered trademark of The Open Group.
Yahoo!® is a registered trademark of OATH Inc.
Table of contents
1 Product overview .... 1
Product views 2
Front view (2000 s2, 3000 s4 and N4000 snw1 models) ...... 2
Front view (5000 s5, 7000 s3 and N7000 snw1 models) 3
Back view (2000 s2 models) 3
Back view (3000 s4 models) 4
Back view (5000 s5 and 7000 s3 models) 4
Back view (N4000 snw1 models) 5
Back view (N7000 snw1 models) 6
Serial number and product number location 6
Control panel view (2000 s2 and 3000 s4 models) 6
Control panel view (5000 s5 and 7000 s3 models) 7
Touch panel view (N4000 snw1 and N7000 snw1 models) 9
Touch screen menu structure 9
Buttons on the touch panel 9
Product specifications 11
Supported operating systems 11
Product dimensions 12
Power consumption, electrical specifications, and acoustic emissions 12
Operating environmental range 12
Product hardware setup and software installation 12
Scanner software (Windows) 14
HP Scan software 15
HP Scanner Tools Utility 15
HP TWAIN 15
ISIS 15
WIA 15
Scanner software (macOS) 16
HP Easy Scan 16
HP Utility 16
Embedded Web Server 16
HP Web Jetadmin 16
Sleep Mode and auto-off settings 17
Change the default sleep and auto-off settings using the HP Scanner Tools Utility 17
Change the default auto-off setting using the HP Utility 17
2 Use the scanner 19
Set up the scanner (N4000 snw1 and N7000 snw1 models) 20
Set up Scan to Email 21
Step one: Check the network connection and gather SMTP information .... 21
Step two: Access the HP Embedded Web Server (EWS) 21
Step three: Configure the Scan to Email feature 22
Step four: Add contacts to the Email Address Book 23
Step five: Configure the default settings for Scan to Email 23
Set up Scan to Network Folder 24
Step one: Gather network information 24
Step two: Access the HP Embedded Web Server (EWS) 24
Step three: Configure the Scan to network feature 25
Set up Scan to USB Drive 27
Step one: Access the HP Embedded Web Server (EWS) 27
Step two: Enable Scan to USB Drive 27
Step three: Configure the default settings for Scan to USB Drive 28
Set up Scan to SharePoint 29
Step one: Prepare 29
Step two: Access the HP Embedded Web Server (EWS) 29
Step three: Enable Scan to SharePoint 30
Step four: Configure the Scan to SharePoint feature 30
Set up access control 31
Load originals 33
Document loading tips 33
Supported paper sizes and types 34
Load documents (2000 s2, 3000 s4, and N4000 snw1 models) 35
Load documents (5000 s5, 7000 s3, and N7000 snw1 models) 37
Load cards (2000 s2, 3000 s4, and N4000 snw1 models) 40
Load cards (5000 s5, 7000 s3, and N7000 snw1 models) 41
Load folded media (5000 s5, 7000 s3, and N7000 snw1 models) 43
Start a scan from the hardware 44
Scan from the control panel buttons (2000 s2 and 3000 s4 models) 44
Scan from the control panel buttons (5000 s5 and 7000 s3 models) 44
Scan from the touch screen (N4000 snw1 and N7000 snw1 models) 46
Scan to a computer 46
Scan to a network location 46
Scan to email 46
Scan to a Microsoft SharePoint site 47
Scan to a USB flash drive 47
Use the scanning software (Windows) 48
Work with scan shortcuts 49
View scan shortcuts 49
Create scan shortcuts 49
Modify shortcuts 49
Scan to a picture 49
Scan to a PDF 50
Scan text for editing (OCR) 50
Scan to email 50
Scan to cloud 50
Scan to FTP 51
Scan to SharePoint 51
Scan long or extra-long documents 51
Detect multi-feeds 51
Everyday Scan 52
Automatically delete blank pages 52
Automatically adjust page orientation 52
Reserved Jobs (N4000 snw1 and N7000 snw1 models) 52
Filter out color from a document (color dropout) 53
Automatically detect page size 53
Automatically crop or pad scanned image to selected page size 53
Automatically detect color 54
Scan using text-enhanced black and white mode 54
Automatically straighten scanned images 54
Add or remove a device 55
Scan by using other scan software 55
Use the scanning software (macOS) 56
Scan to email 56
HP Easy Scan 56
Scan from other applications 56
Advanced configuration with HP Utility (macOS) 58
Open HP Utility 58
HP Utility features 58
Mobile scanning (N4000 snw1 and N7000 snw1 models) 58
Scanning tips 59
Optimize scanning and task speeds 59
Scanning fragile originals 59
3 Care and maintenance 61
Test and calibrate the touch screen 61
Clean the product 62
Clean the scanning strips 62
Clean the paper path 63
Clean the rollers 64
Replace parts 68
Replace the roller kit (2000 s2, 3000 s4 and N4000 snw1 models) 69
Replace the pickup roller module 69
Replace the separation rollers 70
Replace the roller kit (5000 s5, 7000 s3 and N7000 snw1 models) 72
Replace the pickup roller module 72
Replace the separation rollers 73
Order parts and accessories 74
4 Solve problems 75
Basic troubleshooting tips 75
Reset the scanner (N4000 snw1 and N7000 snw1 models) 76
Interpret control panel lights and patterns (2000 s2 and 3000 s4 models) 77
Scanner installation problems 78
Check the cables 78
Uninstall and then reinstall the HP ScanJet drivers and tools (Windows) 78
Power issues 80
Check that the scanner has power 80
The scanner will not turn on 80
The scanner has paused or shut down 81
The scanner keeps turning off 82
Paper jams 83
Clear jams from the document feeder 83
An item loaded in the scanner jams repeatedly 83
Paper feed issues 84
Paper jamming, skewing, misfeeds, or multiple-page feeds 84
Paper does not feed from the scanner 84
Image quality problems 85
The scanned images are not straight 85
The scanned images have streaks or scratches 85
The scanned image is fuzzy 85
The scanned image is completely black or completely white 85
The bottom of the scanned image is cut off 86
The scanned image cannot be enlarged 86
Scanner operation problems 87
Connection issues 88
Check the USB connection 88
Check the ethernet connection (N4000 snw1 and N7000 snw1 models) 88
Check the wireless connection (N4000 snw1 and N7000 snw1 models) 89
Buttons are not working properly 89
LCD issues (5000 s5 and 7000 s3 models) 91
The LCD is having display issues 91
The scanner buttons are not working as expected 91
The touch panel display issues (N4000 snw1 and N7000 snw1 models) 91
Scanning performance issues 92
The scanner does not scan immediately 92
The scanner is scanning items very slowly 92
The scanner scans only one side of a two-sided page 92
Scanned pages are missing at the scan destination 92
Scanned pages are out of order at the scan destination 92
Scanned files are too large 92
Issues with text recognition (OCR) (Windows) 93
Email problems (N4000 snw1 and N7000 snw1 models) 95
Validate the SMTP gateway address 95
Validate the LDAP gateway (Windows) 95
Additional troubleshooting 95
Index 97
1 Product overview
This user guide covers important information about the scanner.
Product views Product specifications • Product hardware setup and software installation - Scanner software (Windows) • Scanner software (macOS) - Embedded Web Server HP Web Jetadmin • Sleep Mode and auto-off settings
The following information is correct at the time of publication. For current information, visit the support home page for the scanner:
• 2000 s2 models: www.hp.com/support/sj2000s2 • 3000 s4 models: www.hp.com/support/sj3000s4 • N4000 snw1 models: www.hp.com/support/sjn4000snw1 • 5000 s5 models: www.hp.com/support/sjflow5000s5 • 7000 s3 models: www.hp.com/support/sjflow7000s3 • N7000 snw1 models: www.hp.com/support/sjflown7000snw1
HP's all-inclusive help for this product includes the following:
• Install and configure • Learn and use • Solve problems • Download software updates • Join support forums • Find warranty and regulatory information
Product views
This section describes the physical components of the scanners.
• Front view (2000 s2, 3000 s4 and N4000 snw1 models) • Front view (5000 s5, 7000 s3 and N7000 snw1 models) • Back view (2000 s2 models) • Back view (3000 s4 models) • Back view (5000 s5 and 7000 s3 models) • Back view (N4000 snw1 models) • Back view (N7000 snw1 models) • Serial number and product number location • Control panel view (2000 s2 and 3000 s4 models) • Control panel view (5000 s5 and 7000 s3 models) • Touch panel view (N4000 snw1 and N7000 snw1 models)
Front view (2000 s2, 3000 s4 and N4000 snw1 models)
Identify the parts on the front of the scanner.


Table 1-1 Front view (2000 s2, 3000 s4 and N4000 snw1 models)
| Callout Description |
| 1 Document feeder latch |
| 2 Control panel |
| 3 Document output tray with extension |
| 4 Paper guides |
| 5 Document input tray with extension |
Front view (5000 s5, 7000 s3 and N7000 snw1 models)
Identify the parts on the front of the scanner.


Table 1-2 Front view (5000 s5, 7000 s3 and N7000 snw1 models)
| Callout Description |
| 1 Document feeder latch |
| 2 Control panel |
| 3 Document output tray with extension |
| 4 Thick media switchWhen the button is in the unfolded position, the scanner is set to scan unfolded media, which is the default setting.When the button is in the folded position, the scanner is set to scan folded media or heavier, smaller media, such as embossed cards. |
| 5 Paper guides |
| 6 Document input tray with extension |
Back view (2000 s2 models)
Identify the parts on the back of the scanner.

Table 1-3 Back view (2000 s2 models)
| Callout Description |
| 1 Slot for a cable-type security lock |
| 2 USB 3.0 interface port |
| 3 Power supply input |
Back view (3000 s4 models)
Identify the parts on the back of the scanner.
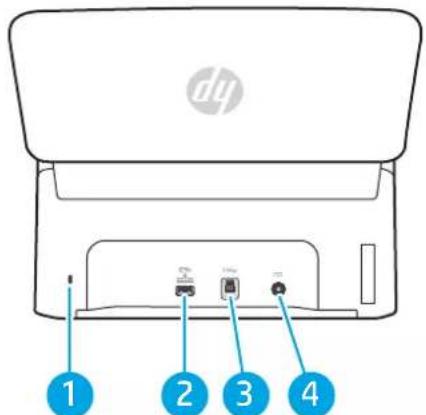
Table 1-4 Back view (3000 s4 models)
| Callout Description |
| 1 Slot for a cable-type security lock |
| 2 USB host for USB flash drive |
| 3 USB 3.0 interface port |
| 4 Power supply input |
Back view (5000 s5 and 7000 s3 models)
Identify the parts on the back of the scanner.

Table 1-5 Back view (5000 s5 and 7000 s3 models)
| Callout Description |
| 1 Slot for a cable-type security lock |
| 2 USB host for USB flash drive |
| 3 USB 3.0 interface port |
| 4 Power supply input |
Back view (N4000 snw1 models)
Identify the parts on the back of the scanner.

Table 1-6 Back view (N4000 snw1 models)
| Callout Description |
| 1 Slot for a cable-type security lock |
| 2 LAN port |
| 3 USB host for USB flash drive |
| 4 USB 3.0 interface port |
| 5 Power supply input |
Back view (N7000 snw1 models)
Identify the parts on the back of the scanner.

Table 1-7 Back view (N7000 snw1 models)
| Callout Description |
| 1 Slot for a cable-type security lock |
| 2 LAN port |
| 3 USB host for USB flash drive |
| 4 USB 3.0 interface port |
| 5 Power supply input |
Serial number and product number location
The serial and product numbers label is located on the rear cover.

Control panel view (2000 s2 and 3000 s4 models)
Use the buttons on the control panel to start or cancel a scan, and to turn the unit on and off.

Table 1-8 Control panel view (2000 s2 and 3000 s4 models)
| Callout Name Description | |
| 1 Power button and LEDPress the Power button to turn on the scanner. Press and hold the Power button for three seconds to turn off the scanner.A lit Power LED indicates that the scanner is turned on. | |
| 2 Scan button Press the Scan button to initiate a scan. | |
| 3 Error LED A blinking or lit Error LED indicates that an error has occurred. | |
| 4 Cancel button Press the Cancel button to cancel a scan in progress. | |
Control panel view (5000 s5 and 7000 s3 models)
Use the buttons on the control panel to start or cancel a scan, and to turn the unit on and off.

Table 1-9 Control panel view (5000 s5 and 7000 s3 models)
| Callout Name | Description |
| 1 | Up arrow button Use the Up arrow button to increase settings values or navigate menu items. |
| 2 | Down arrow button Use the Down arrow button to decrease settings values or navigate menu items. |
| 3 | Duplex Scan button Press the Duplex Scan button to initiate a two-sided scan. |
| 4 | Simplex Scan button Press the Simplex Scan button to initiate a one-sided scan. |
| 5 | Cancel × button Press the Cancel × button to cancel a scan in progress. |
| 6 | Tools × button Press the Tools × button to open the HP Scanner Tools Utility. |
Table 1-9 Control panel view (5000 s5 and 7000 s3 models) (continued)
| Callout Name Description |
| 7 Power button and LEDPress the Power button to turn on the scanner. Press and hold thePower button for three seconds to turn off the scanner. |
| 8 LCD area Watch the two-line display to view product status and error messages. |
Touch panel view (N4000 snw1 and N7000 snw1 models)
Identify the buttons on the control panel.
- Touch screen menu structure
- Buttons on the touch panel
Touch screen menu structure
Identify the features on the touch panel.

![graph TD A["To Share Point"] --> B["To USB Drive"] B --> C["To Secreted"] C --> D["Output"] style A fill:#000,stroke:#000,color:#fff style B fill:#000,stroke:#000,color:#fff style C fill:#000,stroke:#000,color:#fff style D fill:#000,stroke:#000,color:#fff](/content/2026/06/1356472/images/d5601ca0891ef7bc22712b3c6ff507b43766bc16843018bdc29b141b95684a76.jpg)
Table 1-10 Touch screen menu
| Callout Description |
| 1 Ready |
| 2 Starts a scan to a connected computer |
| 3 Starts a scan to an email address |
| 4 Starts a scan to a network folder |
| 5 Starts a scan to Sharepoint |
| 6 Starts a scan to a USB flash drive |
| 7 Select a scan shortcut |
| 8 Network connection status |
| 9 Settings |
| 10 Reserved jobs |
| 11 Go to previous or next page |

NOTE: The features that appear on the Home screen can vary, depending on the scanner configuration.
Buttons on the touch panel
Use the buttons on the touch panel to start or cancel a scan, and to power the unit on and off.

Table 1-11 Buttons on the touch panel
| Callout Name Description | |
| 1 Touch panel | |
| 2 Back | → |
| 3 Home | ↑ |
| 4 Power/Sleep | ◎ |
| 5 Help | ? |
Product specifications
This section introduces the product specifications.
• Supported operating systems • Product dimensions • Power consumption, electrical specifications, and acoustic emissions • Operating environmental range
Supported operating systems
The following information applies to the scanner-specific Windows and HP scan drivers for macOS and to the software installer.
Windows: See the software installation notes for more information.
macOS: Mac computers are supported with this scanner. Download the software from the product support home page, and then use it to install the HP scan driver.
- Go to the product support home page.
- Follow the steps provided to download the scanner software. Linux: For information and scan drivers for Linux, go to www.hp.com/go/linuxprinting.

NOTE: For a current list of supported operating systems, go to the product support home page for HP's all-inclusive help for the scanner:
• 2000 s2 models: www.hp.com/support/sj2000s2 • 3000 s4 models: www.hp.com/support/sj3000s4 • N4000 snw1 models: www.hp.com/support/sjn4000snw1
• 5000 s5 models: www.hp.com/support/sjflow5000s5
• 7000 s3 models: www.hp.com/support/sjflow7000s3
N7000 snw1 models: www.hp.com/support/sjflown7000snw1
Table 1-12 Minimum system requirements
| Windows 10, 8.1, 7 macOS Catalina v10.15, macOS Mojave v10.14, macOS High Sierra v10.13 | Mobile devices, iOS, Android | |
| •32-bit or 64-bit•2 GB of available hard disk space•Microsoft Internet Explorer•Internet connection•USB port | •2 GB of available hard disk space•Internet connection | Router connection not requiredwww.hp.com/go/mobileprinting |
Product dimensions
Make sure your scanner environment is large enough to accommodate the scanner.

Table 1-13 Product dimensions
| Model 1. Height 2. Depth 3. Width Weight | |
| 2000 s2, 3000 s4 and N4000 snw1 models | 154 mm (6.1 in) 172 mm (6.8 in) 300 mm (11.8 in) 2.7 kg (6 lb) |
| 5000 s5, 7000 s3 and N7000 snw1 models | 190 mm (7.5 in) 198 mm (7.8 in) 310 mm (12.2 in) 4.0 kg (8.8 lb) |
Power consumption, electrical specifications, and acoustic emissions
In order to operate properly, the scanner must be in an environment that meets certain power specifications.
See www.hp.com/support for current information.
Ensure to connect the power cord of power adapter to a socket-outlet with earthing connection.
CAUTION: Power requirements are based on the country/region where the product is sold. Do not convert operating voltages. This will damage the product and void the product warranty.
Operating environmental range
Review the recommended operating-environment specifications for your scanner.
Table 1-14 Operating environmental range
| Environment Recommended Allowed |
| Temperature 17.5° to 25°C (63.5° to 77°F) 10° to 35°C (50° to 95°F) |
| Relative humidity 30% to 70% relative humidity (RH) 10% to 80% RH |
| Altitude Not applicable 0 to 3048 m (0 to 10,000 ft) |
Product hardware setup and software installation
For basic setup instructions, see the Installation Guide that came with the product. For additional instructions, go to HP support on the web.
Go to the product support home page for HP's all-inclusive help for the product:
• 2000 s2 models: www.hp.com/support/sj2000s2 • 3000 s4 models: www.hp.com/support/sj3000s4 • N4000 snw1 models: www.hp.com/support/sjn4000snw1 • 5000 s5 models: www.hp.com/support/sjflow5000s5 • 7000 s3 models: www.hp.com/support/sjflow7000s3 • N7000 snw1 models: www.hp.com/support/sjflown7000snw1
HP's all-inclusive help for the product includes the following:
• Install and configure • Learn and use • Solve problems • Download software and firmware updates • Join support forums • Find warranty and regulatory information
Scanner software (Windows)
The scanner comes with a variety of Windows scanning software and drivers, including HP Scan.
HP Scan software HP TWAIN • ISIS WIA
HP Scan software
Use the HP Scan software to complete the following tasks:
HP Scanner Tools Utility • Scan to a PDF • Scan to a JPEG • Email as a PDF • Email as a JPEG • Scan text for editing (OCR) • Scan to cloud • Everyday scan
HP Scanner Tools Utility
Use the HP Scanner Tools Utility to complete the following tasks:
- Set maintenance and status update notification options
- Change the scanner's power management settings • View scanner information (firmware version, serial number, total number of pages scanned)
- Modify scan profiles
- Modify properties of Scan to USB Drive
To open the utility, do one of the following:
- Windows 8.1 and 10: On the Start screen, click the HP Scanner Tools Utility tile.
- Launch HP Scan Assistant from your desktop, and then select Tools.
HP TWAIN
HP TWAIN provides a software interface between imaging/scanning hardware and TWAIN-compliant software applications. Not all TWAIN-compliant software works in the same way, so consult the software documentation for details on how to acquire scans.
ISIS
ISIS (Image and Scanner Interface Specification) provides a software interface between imaging/scanning hardware and ISIS based software applications. ISIS drivers provide a consistent interaction with all ISIS-compliant scanners.
WIA
WIA provides a software interface between imaging/scanning hardware and WIA-compliant software applications. Not all WIA-compliant software works in the same way, so consult the software documentation for details on how to acquire scans.
Scanner software (macOS)
The product is compliant with Apple AirScan functionality. Without installing any additional software, you can scan using Image Capture or other ICA-compliant applications.
HP Easy Scan HP Utility
To take advantage of all features of your scanner, HP recommends installing the HP provided scan solution, including HP Easy Scan and HP Utility.
HP Easy Scan
Scan documents and photos, and manage scan shortcuts.
HP Utility
You can use the HP Utility when the scanner is connected with a USB cable.
The Maintenance pane in HP Utility displays the scanner usage, maintenance history, and notifies the user when maintenance is due. The notification displays in HP Utility when the Maintenance pane is selected.
HP Utility allows you to configure the scanner and assign the Scan ◆ button workflow on a Mac. HP Utility is available in the Applications > HP folder.
Embedded Web Server
The product is equipped with an Embedded Web Server, which provides access to information about product and network activities. This information appears in a Web browser, such as Microsoft Internet Explorer, Mozilla Firefox, or Google Chrome.
The Embedded Web Server resides on the product. It is not hosted on a network server.
The Embedded Web Server provides an interface to the product that anyone who has a network-connected computer and a standard Web browser can use. No special software is installed or configured, but you must have a supported Web browser on your computer. To gain access to the Embedded Web Server, type the IP address for the product in the address line of the browser. To find the IP address, touch the Network (IP) icon in the top right corner of the home screen, and then touch Wireless or Wired (LAN).
HP Web Jetadmin
HP Web Jetadmin is an award-winning, industry-leading tool for efficiently managing a wide variety of networked HP products, including printers, multifunction printers, and digital senders. This single solution allows you to remotely install, monitor, maintain, troubleshoot, and secure your printing and imaging environment — ultimately increasing business productivity by helping you save time, control costs, and protect your investment.
HP Web Jetadmin upgrades are periodically made available to provide support for specific product features. Go to www.hp.com/go/webjetadmin for more information.
Sleep Mode and auto-off settings
By default, the scanner will enter Sleep Mode prior to 15 minutes of inactivity, and will turn off automatically after two hours of inactivity to conserve power.
- Change the default sleep and auto-off settings using the HP Scanner Tools Utility • Change the default auto-off setting using the HP Utility
Change the default sleep and auto-off settings using the HP Scanner Tools Utility
Windows: To change the default sleep and auto-off settings, use the HP Scanner Tools Utility.
- Start the HP Scanner Tools Utility.
- Click the Settings tab.
- Select the desired values from the Turn off the scanner after drop-down list and the Put the scanner to sleep after drop-down list.
Change the default auto-off setting using the HP Utility
macOS: To change the default auto-off setting, use the HP Utility Energy pane.
- Start HP Utility.
- Click the Energy icon.
- Select a Lamp Mode setting.
- Select an auto-off time setting from the Automatically power off the scanner: drop-down box.
2 Use the scanner
The following topics describe how to set up and use the scanner.
- Set up the scanner (N4000 snw1 and N7000 snw1 models)
- Load originals • Start a scan from the hardware • Use the scanning software (Windows) • Use the scanning software (macOS) • Advanced configuration with HP Utility (macOS) • Mobile scanning (N4000 snw1 and N7000 snw1 models)
- Scanning tips
Set up the scanner (N4000 snw1 and N7000 snw1 models)
The following topics describe how to set up the scanner.
- Set up Scan to Email • Set up Scan to Network Folder
- Set up Scan to USB Drive
- Set up Scan to SharePoint
- Set up access control
Set up Scan to Email
The following steps describe how to set up Scan to Email.
- Step one: Check the network connection and gather SMTP information
- Step two: Access the HP Embedded Web Server (EWS) Step three: Configure the Scan to Email feature
- Step four: Add contacts to the Email Address Book
- Step five: Configure the default Settings for Scan to Email
Step one: Check the network connection and gather SMTP information
To set up the Scan to Email feature, the product must have an active network connection to the same network as the computer that will run the setup process.
Gather the following information before beginning the configuration process:
• Administrative access to the product - SMTP server (e.g., smtp.mycompany.com)
NOTE: If you do not know the SMTP server name, SMTP port number, or authentication information, contact the email/Internet service provider or system administrator for the information. SMTP server names and port names are typically found by doing an Internet search. For example, use terms like "Gmail smtp server name" or "Yahoo smtp server name" to search.
- SMTP server authentication requirements for outgoing email messages, including the user name and password used for authentication, if applicable.
NOTE: Consult your email service provider's documentation for information on digital sending limits for your email account. Some providers may temporarily lock your account if you exceed your sending limit.
Step two: Access the HP Embedded Web Server (EWS)
To access the HP Embedded Web Server (EWS), complete the following steps:
- From the Home screen on the product control panel, touch the Network (↑) or icon according to your network connection method, and then touch Wireless or Wired (LAN) to display the IP address or host name.
- Open a web browser, and in the address line, type the IP address or host name exactly as it displays on the product control panel. Press the Enter key on the computer keyboard. The EWS opens.
Figure 2-1 Example of an IP address in a web browser

NOTE: If the web browser displays a message indicating that accessing the website might not be safe, select the option to continue to the website. Accessing this website will not harm the computer.
Figure 2-2 Example of the EWS screen
Step three: Configure the Scan to Email feature
Use Scan to E-mail Setup in the HP Embedded Web Server (EWS) for basic configuration.
- Among the EWS top navigation tabs, click the Scan tab.
- In the left navigation pane, click Scan to E-mail Setup.
- In the E-mail Address area, enter the sender's email address for the new outgoing email profile in the From E-mail Address field.
- In the SMTP Server Settings area, complete the following fields:
• In the SMTP Server field, enter the address of the SMTP server.
• In the SMTP Port field, enter the SMTP port number.

NOTE: In most cases, the default port number does not need to be changed.

NOTE: If you are using a hosted SMTP service such as Gmail, verify the SMTP address, port number, and SSL settings from the service provider's website or other sources. Typically, for Gmail, the SMTP address is smtp.gmail.com, port number 465, and the SSL should be enabled. Please refer to online sources to confirm these server settings are current and valid at the time of configuration.
- If you are using Gmail for email service, select the Always use secure connection (SSL/TLS) check box.
- If the SMTP server requires authentication to send an email, complete the following fields in the SMTP Authentication area:
• In the SMTP User ID field, enter the user ID for the SMTP server. • In the SMTP Password field, enter the password for the SMTP server.
- Review all the information, and then click one of the following options:
- Save and Test: Select this option to save the information and test the connection.
- Save Only: Select this option to save the information without testing the connection.
Step four: Add contacts to the Email Address Book
In the left navigation pane, click E-mail Address Book Setup to add email addresses to the address book accessible from the product.
To add an individual email address:
- In the E-mail Address field, enter the email address of the new email contact.
- Click Save.
Step five: Configure the default Settings for Scan to Email
In the left navigation pane, click Scan Settings to configure the default Scan to Email settings.
- In the Default Settings for Scan to E-Mail area, configure the following email settings:
Table 2-1 Email settings
| Option Description |
| Subject Provide a default subject line for the email messages. |
| Body Text Create a custom default message for all emails sent from the product. |
- Configure the following file scan settings:
Table 2-2 File scan settings
| Option Description | |
| File Name Prefix | Enter a file name prefix (e.g., MyScan). |
| File Type | Select the default file type for the scanned document. |
| PDF Type Select the default PDF type for the scanned document. | |
| Resolution Select the default scan resolution for the scanned document. | |
| NOTE: Higher resolution images have more dots per inch (dpi), so they show more detail. Lower resolution images have fewer dots per inch and show less detail, but the file size is smaller. | |
| Color | Select whether scanned files will be in black and white or in color. |
| De-skew | Select On or Off to enable or disable image skew correction. |
| Delete Blank Page | Select On or Off to indicate whether blank pages should be removed from the scanned output. |
| Misfeed Detection | Select On or Off to enable or disable the detection of multiple pages fed simultaneously into the document feeder. |
| Combine Documents | Select On or Off to indicate whether multiple documents should be combined into one scanned output file. |
| JPEG file compression | Select a compression value for JPEG file. |
- Click Apply at the bottom of the screen.
Set up Scan to Network Folder
The following steps describe how to set up Scan to Network Folder.
• Step one: Gather network information - Step two: Access the HP Embedded Web Server (EWS) - Step three: Configure the Scan to network feature
Step one: Gather network information
Before you begin to set up the Scan to Network Folder feature, gather the following information and get prepared.

NOTE: To set up the Scan to Network Folder feature, the product must have an active network connection to the same network as the computer that will run the setup process.
Administrators need the following items before beginning the configuration process.
• Administrative access to the product The fully-qualified domain name (FQDN) (e.g., \\servername.us.companyname.net\scans) of the destination folder or the IP address of the server (e.g., \\16.88.20.20\scans).

NOTE: The use of the term "server" in this context refers to the computer where the shared folder resides.
Step two: Access the HP Embedded Web Server (EWS)
To access the HP Embedded Web Server (EWS), complete the following steps:
- From the Home screen on the product control panel, touch the Network (1) or icon according to your network connection method, and then touch Wireless or Wired (LAN) to display the IP address or host name.
- Open a web browser, and in the address line, type the IP address or host name exactly as it displays on the product control panel. Press the Enter key on the computer keyboard. The EWS opens.
Figure 2-3 Example of an IP address in a web browser
https://10.10.XXXXX/

NOTE: If the web browser displays a message indicating that accessing the website might not be safe, select the option to continue to the website. Accessing this website will not harm the computer.
Figure 2-4 Example of the EWS screen
Step three: Configure the Scan to network feature
Use Network Folder Setup in the HP Embedded Web Server (EWS) for basic configuration.
- Among the EWS top navigation tabs, click Scan.
- In the left navigation pane, click Network Folder Setup.
- On the Network Folder Setup page, click the New button.
- In the Scan Settings area, complete the following fields:
Table 2-3 File scan settings
| Option Description | |
| File Name Prefix | Enter a file name prefix (e.g., MyScan). |
| File Type | Select the default file type for the scanned document. |
| PDF Type Select the default PDF type for the scanned document. | |
| Resolution Select the default scan resolution for the scanned document. | |
| NOTE: Higher resolution images have more dots per inch (dpi), so they show more detail. Lower resolution images have fewer dots per inch and show less detail, but the file size is smaller. | |
| Color | Select whether scanned files will be in black and white or in color. |
| De-skew | Select On or Off to enable or disable image skew correction. |
| Delete Blank Page | Select On or Off to indicate whether blank pages should be removed from the scanned output. |
| Misfeed Detection | Select On or Off to enable or disable the detection of multiple pages fed simultaneously into the document feeder. |
| Combine Documents | Select On or Off to indicate whether multiple documents should be combined into one scanned output file. |
| JPEG file compression | Select a compression value for JPEG file. |
- In the Network Folder Information area, complete the following fields:
• In the Display Name field, enter the name to display for the folder. • In the Network Path field, enter the network path to the folder. • In the Username field, enter the user name needed to access the folder on the network. • In the Password field, enter the password needed to access the folder on the network.
- Review all the information, and then click one of the following options:
- Save and Test: Select this option to save the information and test the connection.
- Save Only: Select this option to save the information without testing the connection.
- Cancel: Select this option to quit the configuration without saving.
Set up Scan to USB Drive
The product can scan a file and save it on a USB flash drive. Before using this feature, follow the steps below to enable and configure it.
- Step one: Access the HP Embedded Web Server (EWS)
- Step two: Enable Scan to USB Drive
- Step three: Configure the default settings for Scan to USB Drive
Step one: Access the HP Embedded Web Server (EWS)
To access the HP Embedded Web Server (EWS), complete the following steps:
- From the Home screen on the product control panel, touch the Network (1) or icon according to your network connection method, and then touch Wireless or Wired (LAN) to display the IP address or host name.
- Open a web browser, and in the address line, type the IP address or host name exactly as it displays on the product control panel. Press the Enter key on the computer keyboard. The EWS opens.
Figure 2-5 Example of an IP address in a web browser
https://10.10.XXXXX/

NOTE: If the web browser displays a message indicating that accessing the website might not be safe, select the option to continue to the website. Accessing this website will not harm the computer.
Figure 2-6 Example of the EWS screen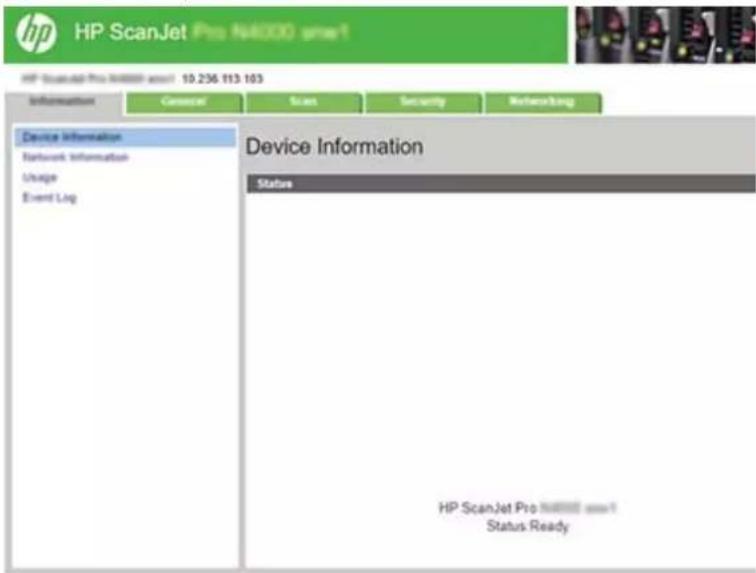
Step two: Enable Scan to USB Drive
To enable Scan to USB Drive:
- Among the EWS top navigation tabs, click the Security tab.
- In the left navigation pane, click Access Control.
- Check the current user account. If USB is not checked, click Edit, select Enable USB, and then click OK.
Step three: Configure the default settings for Scan to USB Drive
To configure the default Scan to USB Drive settings:
- Among the EWS top navigation tabs, click the Scan tab.
- In the left navigation pane, click Scan Settings.
- In the Default Settings for Scan to USB area, enter a folder name for Stored Folder, and then configure the following settings:
Table 2-4 File scan settings
| Option Description | |
| File Name Prefix | Enter a file name prefix (e.g., MyScan). |
| File Type | Select the default file type for the scanned document. |
| PDF Type Select the default PDF type for the scanned document. | |
| Resolution Select the default scan resolution for the scanned document. | |
| NOTE: Higher resolution images have more dots per inch (dpi), so they show more detail. Lower resolution images have fewer dots per inch and show less detail, but the file size is smaller. | |
| Color | Select whether scanned files will be in black and white or in color. |
| De-skew | Select On or Off to enable or disable image skew correction. |
| Delete Blank Page | Select On or Off to indicate whether blank pages should be removed from the scanned output. |
| Misfeed Detection | Select On or Off to enable or disable the detection of multiple pages fed simultaneously into the document feeder. |
| Combine Documents | Select On or Off to indicate whether multiple documents should be combined into one scanned output file. |
| JPEG file compression | Select a compression value for JPEG file. |
- Click Apply at the bottom of the screen.
Set up Scan to SharePoint
The following steps describe how to set up Scan to SharePoint.
- Step one: Prepare • Step two: Access the HP Embedded Web Server (EWS) • Step three: Enable Scan to SharePoint
- Step four: Configure the Scan to SharePoint feature
Step one: Prepare
Before you begin to set up the Save to SharePoint feature, make the following preparations.
Administrators need the following items before beginning the configuration process.
- Administrative access to the product.
- The destination folder that the scanned files will be saved to must exist on the SharePoint site, and write access must be enabled to the destination folder.
Step two: Access the HP Embedded Web Server (EWS)
To access the HP Embedded Web Server (EWS), complete the following steps:
- From the Home screen on the product control panel, touch the Network (↑) or icon according to your network connection method, and then touch Wireless or Wired (LAN) to display the IP address or host name.
- Open a web browser, and in the address line, type the IP address or host name exactly as it displays on the product control panel. Press the Enter key on the computer keyboard. The EWS opens.
Figure 2-7 Example of an IP address in a web browser

NOTE: If the web browser displays a message indicating that accessing the website might not be safe, select the option to continue to the website. Accessing this website will not harm the computer.
Figure 2-8 Example of the EWS screen
Step three: Enable Scan to SharePoint
To enable Scan to SharePoint:
- Among the EWS top navigation tabs, click the Security tab.
- In the left navigation pane, click Access Control.
- Check the current user account. If SharePoint is not checked, click Edit, select Enable SharePoint, and then click OK.
Step four: Configure the Scan to SharePoint feature
Use SharePoint Setup in the HP Embedded Web Server (EWS) for basic configuration.
- Among the EWS top navigation tabs, click the Scan tab.
- In the left navigation pane, click SharePoint Setup.
- On the SharePoint Setup page, click the New button.
- In the Scan Settings area, complete the following fields:
Table 2-5 File scan settings
| Option Description | |
| File Name Prefix | Enter a file name prefix (e.g., MyScan). |
| File Type | Select the default file type for the scanned document. |
| PDF Type Select the default PDF type for the scanned document. | |
| Resolution Select the default scan resolution for the scanned document. | |
| NOTE: Higher resolution images have more dots per inch (dpi), so they show more detail. Lower resolution images have fewer dots per inch and show less detail, but the file size is smaller. | |
| Color | Select whether scanned files will be in black and white or in color. |
| De-skew | Select On or Off to enable or disable image skew correction. |
| Delete Blank Page | Select On or Off to indicate whether blank pages should be removed from the scanned output. |
| Misfeed Detection | Select On or Off to enable or disable the detection of multiple pages fed simultaneously into the document feeder. |
| Combine Documents | Select On or Off to indicate whether multiple documents should be combined into one scanned output file. |
| JPEG file compression | Select a compression value for JPEG file. |
- In the SharePoint Information area, complete the following fields:
• In the Display Name field, enter the name to display for the SharePoint path. • In the Network Path field, enter the SharePoint path. - If you want the product to overwrite an existing file that has the same file name as the new file, select Overwrite existing files. • In the Windows Domain field, enter the domain name. - In the Username field, enter the user name needed to access the SharePoint path. • In the Password field, enter the password needed to access the SharePoint path.
- Review all the information, and then click one of the following options:
- Save and Test: Select this option to save the information and test the connection.
- Save Only: Select this option to save the information without testing the connection.
- Cancel: Select this option to quit the configuration without saving.
Set up access control
The Access Control option in the HP Embedded Web Server (EWS) provides controls to manage the scanner features users can access.

NOTE: If the administrator has set a password to limit access to the EWS, the password is required before setting up access control.
- From the Home screen on the product control panel, touch the Network (up arrow) or icon according to your network connection method, and then touch Wireless or Wired (LAN) to display the IP address or host name.
- Open a web browser, and in the address line, type the IP address or host name exactly as it displays on the product control panel. Press the Enter key on the computer keyboard. The EWS opens.
Figure 2-9 Example of an IP address in a web browser

NOTE: If the web browser displays a message indicating that accessing the website might not be safe, select the option to continue to the website. Accessing this website will not harm the computer.
- Among the EWS top navigation tabs, click the Security tab.
- In the left navigation pane, click Access Control.
- Select Enable Access Control.
- If you want to use the current user account, click Edit to set a PIN code and select scanner features that you want the current user account to access.
- If you want to create a new user account, click New. Enter an account name, set a PIN code, and then select scanner features that you want this user account to access.
- Click OK.
Once the access control has been set up, users cannot access the disabled scanner features and need to enter the PIN to use the enabled scanner features.
Load originals
The following topics describe how to load originals into the input tray.
• Document loading tips • Supported paper sizes and types - Load documents (2000 s2, 3000 s4, and N4000 snw1 models) - Load documents (5000 s5, 7000 s3, and N7000 snw1 models) - Load cards (2000 s2, 3000 s4, and N4000 snw1 models) - Load cards (5000 s5, 7000 s3, and N7000 snw1 models) - Load folded media (5000 s5, 7000 s3, and N7000 snw1 models)
Document loading tips
Use the following tips to load originals correctly.
- The maximum capacity of the input tray is 50 sheets of 75 g/m² (20 lb) paper (2000 s2, 3000 s4, and N4000 snw1 models) or 80 sheets of 75 g/m² (20 lb) paper (5000 s5, 7000 s3, and N7000 snw1 models). When using heavier paper, the maximum capacity is decreased.
TIP: Use the lines on the input tray paper guides to help you to not exceed the input tray capacity.
- The maximum name card capacity is approximately 9 or 10 cards. For rigid cards, bank cards, and embossed cards, load only one card at a time.
- Be sure that original documents are within these guidelines:
Table 2-6 Supported paper size and weight
| Item Size | |
| Width: 50.8 to 216 mm (2 to 8.5 in) | |
| Length: 50.8 to 3100 mm (2 to 122 in) | |
| Weight: | 2000 s2, 3000 s4, and N4000 snw1 models: 40 g/m2 (10.7 lb) to 210 g/m2 (56 lb) |
| 5000 s5, 7000 s3, and N7000 snw1 models:43 g/m2 (11.4 lb) to 350 g/m2 (93.3 lb) | |
• Scanning the following types of documents might result in paper jams or damage to the documents.
Table 2-7 Inappropriate types of documents
| Example Document type Example Document type | |||
 | Wrinkled or creased documents Curled dc |  | |
 | Torn documents Documents with paper |  | clips or staples |
 | Carbon paper Coated paper |  | |
 | Extremely thin, translucent paper Paper v |  | notes or flags attached |
 | Photos Overhead |  | transparencies |
 | Papers that are stuck together Paper whe |  | has not fully dried, or with wet substances such as glue or correction fluid |
- Smooth out any folds or curls in your documents before placing them into the feeder. If the leading edge of a document is curled or folded, it might cause a paper jam.
- To scan fragile documents (such as photos or documents on wrinkled or very lightweight paper), place the document in a clear, heavyweight document sleeve no wider than 216 mm (8.5 in) before loading them into the input tray.
TIP: If you do not have an appropriately-sized document sleeve, consider using a sleeve intended for use in a ring binder. Trim the ring-side edge so the sleeve is no more than 216 mm (8.5 in) wide. Also, disable multipick detection before scanning, as the document sleeve will trigger a multipick error.
- Make sure that the document feeder hatch is securely latched. To properly close the hatch, press firmly on both sides of the hatch.
- Adjust the paper guides to the width of the documents. Make sure that the paper guides touch the edges of the original. If there is any clearance between the paper guides and the edges of the documents, the scanned image might be skewed.
- When placing a stack of documents into the feeder, gently set the stack in the input tray. Do not drop the stack into the tray and do not tap the top edge of the stack after you have placed the stack in the input tray.
- Clean the scan rollers if the rollers are visibly dirty or after scanning a document written with or written on with pencil.
Supported paper sizes and types
Supported paper types and sizes for the product are shown below.
• U.S.-Letter: 215.9 x 279.4 mm (8.5 x 11 in) • U.S.-Legal: 215.9 x 355.6 mm (8.5 x 14 in) • U.S.-Executive: 184.2 x 266.7 mm (7.25 x 10.5 in) • ISO A4: 210 x 297 mm (8.3 x 11.7 in)
• JIS B5: 182 x 257 mm (7.2 x 10.1 in) • ISO B5: 176 x 250 mm (7 x 9.9 in) • ISO A5: 148 x 210 mm (5.8 x 8.3 in) ISO A6: 105 x 148 mm (4.1 x 5.8 in) • ISO A7: 74 x 104 mm (2.9 x 4.1 in) • ISO A8: 52 x 74 mm (2 x 2.9 in) Custom
- Minimum: 50.8 × 50.8 mm (2 × 2 in)
- Maximum: 216 × 3100 mm (8.5 × 122 in)
Load documents (2000 s2, 3000 s4, and N4000 snw1 models)
To load documents into the input tray, follow these steps:
- Open the document input and output trays, and then extend the tray extensions.

For the output tray, slide the tray out from underneath the scanner, unfold the first extension, and then slide the second extension outward.

NOTE: For sheets longer than Letter or A4, such as Legal, leave the second extension folded.
- Adjust the paper guides on the input tray to the width of the documents. Take care not to over tighten the guides, which can restrict paper feeding.

When scanning small originals such as checks, it is especially important that the paper guides fit snugly against the edges of the original yet not restrict paper feeding.
- Fan the stack of document pages to ensure that the pages do not stick together. Fan the edge that will be pointing into the feeder in one direction, and then fan that same edge in the opposite direction.

- Align the edges of the documents by tapping the bottom of the stack against the table top. Rotate the stack 90 degrees and repeat.

- Gently set the stack in the input tray. Load the pages face down with the top of the pages pointing into the feeder.
IMPORTANT: For best results, do not drop the stack into the feeder and do not tap the top edge of the stack after you have placed it in the input tray.

TIP: Avoid feeding a document with a leading edge that has been folded or frayed.
- Verify that the paper guides are aligned with the edges of the stack.

Load documents (5000 s5, 7000 s3, and N7000 snw1 models)
To load documents into the input tray, follow these steps:
- Open the document input and output trays, and then extend the tray extensions.

For the output tray, slide the tray out from underneath the scanner, unfold the first extension, slide the second extension outward, and then rotate the small third tab 90 degrees.

NOTE: For sheets longer than Letter or A4, such as Legal, leave the small tab folded.
- Verify that the thick media switch is set to the unfolded media icon.

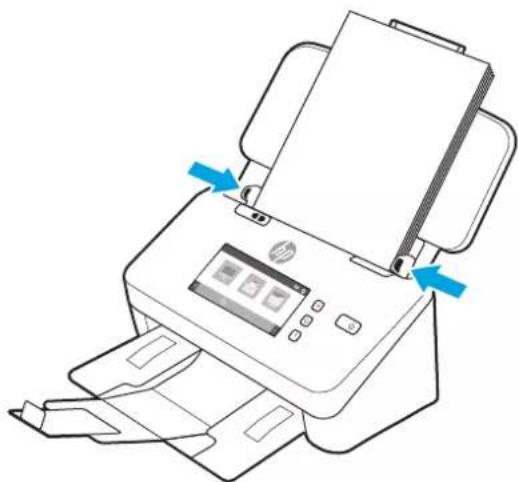
- Adjust the paper guides on the input tray to the width of the documents. Take care not to overtighten the guides, which can restrict paper feeding.

When scanning small originals such as checks, it is especially important that the paper guides fit snugly against the edges of the original yet not restrict paper feeding.
- Fan the stack of document pages to ensure that the pages do not stick together. Fan the edge that will be pointing into the feeder in one direction, and then fan that same edge in the opposite direction.

- Align the edges of the documents by tapping the bottom of the stack against the table top. Rotate the stack 90 degrees and repeat.
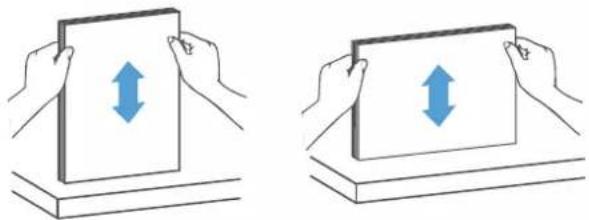
- Gently set the stack in the input tray. Load the pages face down with the top of the pages pointing into the feeder. For best results, do not drop the stack into the feeder and do not tap the top edge of the stack after you have placed it in the input tray.

TIP: Avoid feeding a document with a leading edge that has been folded or frayed.
- Verify that the paper guides are aligned with the edges of the stack.
Load cards (2000 s2, 3000 s4, and N4000 snw1 models)
To load cards into the input tray, follow these steps:
- Load the stack of cards face down in landscape orientation, with the short dimension parallel to the paper guides.

NOTE: To ensure the best scan quality, load rigid or embossed cards in this orientation, and load only one at a time.
- Adjust the paper guides to center the cards, making sure the paper guides touch the edges of the cards.

Load cards (5000 s5, 7000 s3, and N7000 snw1 models)
To load cards into the input tray, follow these steps:
- Load the stack of cards face down in landscape orientation, with the short dimension parallel to the paper guides.

NOTE: To ensure the best scan quality, load rigid or embossed cards in this orientation, and load only one at a time.
- Adjust the paper guides to center the cards, making sure the paper guides touch the edges of the cards.

- Set the output tray small media guide.
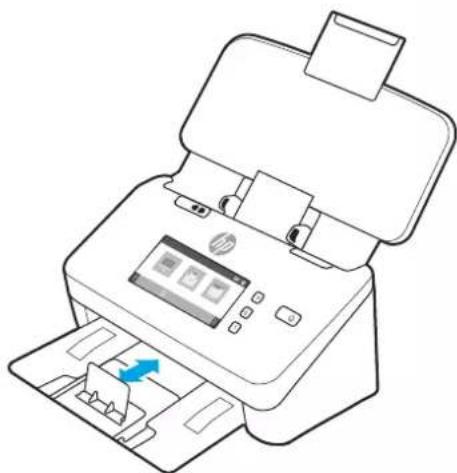
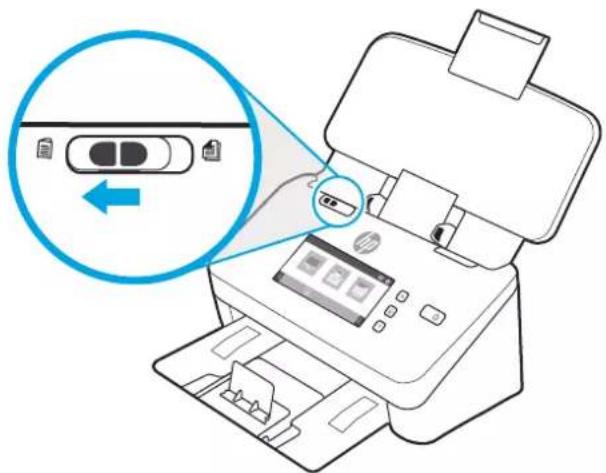
- For thicker, more rigid cards, slide the thick media switch to the disabled position to avoid causing a multipick error.
Load folded media (5000 s5, 7000 s3, and N7000 snw1 models)
The scanner supports A3 merging by folding an A3 page into A4 size and then feeding the page through scanner using the scanning software on the computer. The scanning software can merge the two A4 scanned images into one A3 scanned image.
When using the A3 merging feature, follow these general guidelines:
- Feed only one folded A3 sheet at any one time. Feeding more than one folded A3 page will cause the paper jam or will prevent a successful final merged A3 scanned image.
- Do not use thicker, heavier paper. Using thicker A3 folded paper might result in skew in the final scanned images.
To enable A3 merging with HP Scan, follow these steps:
- Open the HP Scan software.
- Select a scan profile, select a duplex scan setting from the Page Sides drop-down list, and then click More.
- On the Scan tab, click Merge.
- Select the Merge sides of a 2-sided (duplex) scan into single page check box, select an option to specify the location of the front side, and then click OK.
- Click Misfeed, clear the Misfeed (multipick) detection check box, and then click OK.
- Load the folded A3 media, which is now an A4 size, into the scanner input tray.
- Make sure that the folded edge of the A3 media is aligned to the scanner right paper guide.
- Slide the thick media switch to the disabled position (to the left side) before scanning the folded A3 media.

NOTE: If the thick media switch is not set correctly, it will cause the scanner to damage the folded A3 paper.

NOTE: Content that is located where the document is folded might appear missing or corrupted in the final merged A3 scanned image.
Start a scan from the hardware
Learn how to start a scan from the control panel.
- Scan from the control panel buttons (2000 s2 and 3000 s4 models)
- Scan from the control panel buttons (5000 s5 and 7000 s3 models)
- Scan from the touch screen (N4000 snw1 and N7000 snw1 models)
Scan from the control panel buttons (2000 s2 and 3000 s4 models)
To scan from the control panel, follow these steps:
- Load the original into the input tray.
- Press the Scan button.
TIP: To cancel a scan, press the Cancel button on the control panel.
Scan from the control panel buttons (5000 s5 and 7000 s3 models)
To scan from the control panel, follow these steps:
- Load the original into the input tray.
- Use the arrow buttons to select the scan profile you want. If you refrain from selecting a profile, the scanner will use the default scan profile.
- Press the Simplex Scan button or the Duplex Scan button. TIP: To cancel a scan, press the Cancel button on the control panel.
The thick media switch is a mechanical switch on the scanner to enable or disable paper separation.
Figure 2-10 Thick media switch
By default, it is enabled for most media. It should be disabled before scanning folded sheets or fragile originals placed in a plastic carrier sheet. Only one folded page or plastic carrier sheet can be loaded at any one time.

NOTE: Disabling this switch might cause multi-pick errors or a paper jam.
Enabling this switch with folded paper might cause damage to the sheet.
Scan from the touch screen (N4000 snw1 and N7000 snw1 models)
The following topics describe how to scan from the touch screen.
- Scan to a computer
- Scan to a network location
- Scan to email • Scan to a Microsoft SharePoint site
- Scan to a USB flash drive
Scan to a computer
To scan to a computer, follow these steps:
- Load the original into the input tray.
- From the Home screen on the product control panel, touch To Computer.
- The scanner displays a list of computers that have the HP software installed and are enabled to receive scans from the scanner. Select a computer to receive the scan.
- If you want to change scan settings:
- Touch Shortcut to select a different scan shortcut.
- Touch Sides to switch between one-sided and two-sided settings.
- Touch Scan. The scan will be sent to the selected computer.
Scan to a network location
To scan to a network location, follow these steps:
- Load the original into the input tray.
- From the Home screen on the product control panel, touch To Network Folder.
- If you have set up multiple network destinations, the scanner displays a list of network folders. Select a network folder to receive the scan.
- If prompted, enter PIN password.
- If you want to configure scan settings:
- Touch Options to change file type, resolution, color, or other advanced settings.
- Touch Sides to switch between one-sided and two-sided settings.
- Touch Scan.
Scan to email
To scan to an email, follow these steps:
- Load the original into the input tray.
- From the Home screen on the product control panel, touch To Email.
- Follow the onscreen instructions to select or enter an email address.
- If you want to configure scan settings:
- Touch Options to change file type, resolution, color or other advanced settings.
- Touch Sides to switch between one-sided and two-sided settings.
- Touch Scan.
Scan to a Microsoft SharePoint site
Use Save to SharePoint to scan documents directly to a Microsoft SharePoint site. This feature eliminates the need to scan the documents to a network folder, USB flash drive, or email message, and then manually upload the files to the SharePoint site.
- Load the original into the input tray.
- From the Home screen on the product control panel, touch Scan to SharePoint.
- If you have set up multiple SharePoint destinations, the scanner displays a list of SharePoint folders. Select a SharePoint folder to receive the scan.
- If you want to configure scan settings:
- Touch Options to change file type, resolution, color, or other advanced settings.
- Touch Sides to switch between one-sided and two-sided settings.
- Touch Scan.
Scan to a USB flash drive
The product can scan a file and save it on a USB flash drive. Before using this feature, use the HP Embedded Web server to enable and configure it.
- Load the original into the input tray.
- Insert the USB flash drive into the USB port.
- From the Home screen on the product control panel, touch Scan to USB Drive.
- If you want to configure scan settings:
- Touch Options to change file type, resolution, color, or other advanced settings.
- Touch Sides to switch between one-sided and two-sided settings.
- Touch Scan.
Use the scanning software (Windows)
The following topics describe how to use the scanning software.
• Work with scan shortcuts - Scan to a picture - Scan to a PDF • Scan text for editing (OCR) - Scan to email - Scan to cloud - Scan to FTP - Scan to SharePoint - Scan long or extra-long documents • Detect multi-feeds • Everyday Scan • Automatically delete blank pages • Automatically adjust page orientation • Reserved Jobs (N4000 snw1 and N7000 snw1 models) • Filter out color from a document (color dropout) • Automatically detect page size • Automatically crop or pad scanned image to selected page size • Automatically detect color • Scan using text-enhanced black and white mode • Automatically straighten scanned images - Add or remove a device • Scan by using other scan software
Work with scan shortcuts
Scan shortcuts provide a fast, efficient way to select the settings for frequently performed scanning tasks. Use HP Scan software to create and modify scan shortcuts.
• View scan shortcuts • Create scan shortcuts Modify shortcuts
View scan shortcuts
To view existing scan shortcuts, open HP Scan. Existing scan shortcuts will display in a list to the left.
Create scan shortcuts
To create a scan shortcut, follow these steps:
- Open the HP Scan software.
- Click Create New Scan Shortcut.
- Enter a name for the new shortcut.
- Choose to create the new shortcut from current settings, or a previous existing shortcut.
- Click Create.
- Modify the settings for the new scan shortcut. Click More for more settings.
- Click the Save icon next to the name of the new shortcut in the shortcut list to save the modifications to the shortcut, or click the Undo icon to undo modifications.
Modify shortcuts
To modify a scan shortcut, follow these steps:
- Open the HP Scan software.
- Select the shortcut to be modified from the list to the left.
- Change settings on the right side of the screen. Click More for more settings.
- Click the Save icon to the right of the shortcut name to save changes.
Scan to a picture
To save your scan as a picture, follow these steps:
- Load the document into the input tray.
- Open the HP Scan software.
- Follow one of the steps:
- Select Save as JPEG or Email as JPEG, and then click Scan.
- Choose any other scan shortcut, change the Item Type to Photo, select a picture file type from the File Type drop-down list, and then click Scan.
Scan to a PDF
To save your scan as a PDF, follow these steps:
- Load the document into the input tray.
- Open the HP Scan software.
- Follow one of the steps:
- Select Save as PDF or Email as PDF, and then click Scan.
- Choose any other scan shortcut and select PDF, Searchable PDF (.PDF), or PDF/A (.PDF) from the File Type drop-down list, and then click Scan.
Scan text for editing (OCR)
The HP Scan software uses optical character recognition (OCR) to convert text on a page to text that can be edited on a computer. The OCR software comes with the HP Scan and ReadIris Pro software. For information about using the OCR software, see scan text for editing in the online Help.
Scan to email
Learn how to scan to email by using the HP Scan software.

NOTE: To scan to email, make sure there is an Internet connection.
- Load the document into the input tray.
- Open the HP Scan software.
- Follow one of the steps:
- Select Email as PDF or Email as JPEG, and then click Scan.
- Choose any other scan shortcut and select Email from the Send To drop-down list, and then click Scan.
Scan to cloud
Learn how to scan to cloud by using the HP Scan software.

NOTE: To scan to the cloud, make sure there is an Internet connection.
- Load the document into the input tray.
- Open the HP Scan software.
- Select Send to Cloud, and then select the file destination, such as Google Drive or DropBox.
- Select Scan.
Scan to FTP
You can upload a scanned image to a FTP folder by using the HP Scan software.
- Load the document into the input tray.
- Open the HP Scan software.
- Select a scan shortcut. From the Destination area, select Send to.
- Select a FTP folder as destination. If this is the first time you have used this feature, click Add to set up an FTP destination first.
- Click OK, and then click Scan.
Scan to SharePoint
You can upload a scanned image to a SharePoint site directly by using the HP Scan software.
- Load the document into the input tray.
- Open the HP Scan software.
- Select a scan shortcut. From the Destination area, select Send to.
- Select a SharePoint site as destination. If you haven't set up this feature before, click Add to set up a SharePoint site destination first.
- Click OK, and then click Scan.
Scan long or extra-long documents
By default, the scanner automatically detects page size using the Detect Size selection for page lengths less than or equal to 356 mm (14 in).
For long or extra-long documents, select Long (8.50 x 34 inches) or Extra Long (8.50 x 122 inches) from the page size drop-down list in the scan shortcut settings.

NOTE: Only one page at a time can be scanned when using a long or extra-long page setting.
If the scanner is set to scan long or extra-long pages, it will scan one page at a time. Using this setting to scan regular pages will slow down the process and should only be used to scan pages longer than 356 mm (14 in).
Detect multi-feeds
The multi-feed detection feature stops the scan process if it senses that multiple pages are fed into the scanner at one time. This feature is enabled by default.
Disabling this feature might be helpful when scanning:
- Multipart forms (a use that HP does not recommend).
- Documents which have labels or sticky notes attached to them.

NOTE: Use the ISIS, WIA, or TWAIN user interface to enable multi-feed detection when scanning from non-HP software.
Everyday Scan
The Everyday Scan shortcut allows users to define and save a scan shortcut for their everyday needs. The following Scan Shortcut Settings are customizable when the Everyday Scan shortcut is selected:
- Item Type, Page Sides, Page Size, Color Mode
- Destination/File Type
Automatically delete blank pages
When the Delete blank pages feature is enabled, scanned pages are evaluated for content. Pages detected as blank show up in the viewer with a delete notation on them. These detected blank pages are deleted automatically when the scan is saved to the destination.
- Open the HP Scan software.
- Select a scan shortcut.
- Click More. Select the Document tab, select Delete blank pages from the Adjust documents drop-down box, and then click OK.
TIP: The Sensitivity slider allows you to adjust the sensitivity value on how blank pages are detected and deleted. At the lower end of the slider, more pages are detected as blank and deleted. At the upper end of the slider, pages must be almost completely blank to be detected and deleted. The sensitivity value can be also set by entering a value or clicking the arrow buttons.
Automatically adjust page orientation
Use this feature to automatically adjust page orientation by language.
- Open the HP Scan software.
- Select a scan shortcut.
- Click More. Under the Scan tab, select the Page Orientation drop-down box, and then select the Auto Orient check box.
- Select a document language, click OK, and then start scan.
Reserved Jobs (N4000 snw1 and N7000 snw1 models)
The Reserved Jobs feature allows you to initiate a job from the HP Scan software on the computer with preset options, and then trigger the job on the scanner, saving trips between the scanner and the computer.
- If this is the first time you have used this feature, you need to reserve a scan job from the HP Scan software first.
a. On your computer, open the HP Scan software, and then click Job Reservation. b. In the Job Reservation Settings dialog box, select Enable Reservation. c. If you want to set a PIN, select Use PIN, enter a PIN, and then click OK.
- Select a scan shortcut, change settings if needed, and then click Scan.
- Go to the scanner. Load the original into the input tray.
- From the Home screen on the control panel, touch Reserved Jobs to start scan.
Filter out color from a document (color dropout)
You can filter out a color channel (red, green, or blue) or up to three individual colors. For specific colors, the sensitivity setting controls how closely a scanned color must approximate the specified color.
Removing colors from the scan might reduce the scan file size and improve optical character recognition (OCR) results.
To select colors to eliminate from a scan in HP Scan software, follow these steps:
- Open the HP Scan software.
- Scan a sample page, which has the colors to be dropped, into the viewer.
- Click the More button, and then click the Image tab and select the Color Dropout feature.
- Enable a color to drop and select the color from the preview using the eyedropper tool. Be sure to save the colors.
Only the color dropout options available for your scanner are selectable.
For information about the color dropout settings, see the online help for the scanning software that you are using.
Automatically detect page size
The HP Scan software is capable of automatically detecting page size using the Detect Size option. When the Detect Size option is selected from the Page Size drop-down list, the scanned image is cropped to the size of the detected page and any skewed content is straightened.
Automatically crop or pad scanned image to selected page size
Use this feature to crop or pad a scanned image to a selected page size.
To automatically crop or pad a scanned image to a selected page size, follow these steps:
- Open the HP Scan software.
- Select a scan shortcut, and then click More for more settings.
- Select your crop option from the Input Page Size drop-down list.
• To automatically crop to the content of the document, select Detect Content on Page. • To automatically crop to the dimensions of the document, select Detect Size.
NOTE: Use the ISIS or TWAIN user interface to set crop options when scanning from non-HP scanning software.
For information about the auto-crop settings, see the online help for the scanning software that you are using.
- Make sure the Same as Input option is selected for Output Page Size, and then click Scan.
Automatically detect color
Use this feature to reduce the size of the scanned file by only saving pages that contain color as color scans, and saving all other pages as black and white.
To automatically detect color in a scanned image, follow these steps:
- Open the HP Scan software.
- Select a scan shortcut.
- To adjust the Auto Detect Color sensitivity and output mode settings, click More, select Image.
- Click on the Color Mode drop-down box, and then select Auto Detect Color.
- Select the Auto Detect Color drop-down box, change settings, and then click OK.
- Click Scan.
NOTE: For information about the automatic color detection settings, see the online help for the scanning software that you are using.
Use the ISIS, WIA, or TWAIN user interface to automatically detect color when scanning from non-HP scanning software.
Scan using text-enhanced black and white mode
Use this feature to enhance the scanned image when scanning black and white text. To use this feature, complete the following steps:
- Open the HP Scan software.
- Select a scan shortcut.
- Click More, select the Image tab, and then select Black/White (1 bit) from the Color Mode drop-down box.
- Select Threshold for Black/White, select Enhance Content, and then click OK.
Automatically straighten scanned images
Use the Straighten Content feature to straighten content that is skewed relative to the page dimensions in the source document. Use the Detect Size feature to deskew page images that might have become skewed during the scanning process.
- Open the HP Scan software.
- Select a scan shortcut.
- Click More, select the Document tab, and then select Straighten Content.
Add or remove a device
You can use the HP Scan software to add or remove a device on the computer.
- Open the HP Scan software.
- Click the Settings icon to open the Device Settings window.
- Do one of the following:
- To add a device, click the Plus + icon, click Connect a new device, and then follow the onscreen instructions.
- To remove a device, select the scanner name from the existing scanner list, and then click the Delete button.
TIP: You can select multiple scanners to delete them at once.
TIP: You can also use HP Scan Assistant to add a new device. Launch HP Scan Assistant from the computer desktop, click Tools, click Device Setup & Software, and then select Connect a new device.
Scan by using other scan software
The following third-party applications are also supported by the scanner:
• Readiris Pro: OCR application. • Cardiris: Business card application. • Third-party applications that support TWAIN, ISIS, and WIA.
Use the scanning software (macOS)
The following topics describe how to scan by using the scanning software.
- Scan to email HP Easy Scan
- Scan from other applications
Scan to email
To scan to an email, complete these steps:

NOTE: To scan to email, make sure there is an Internet connection.
- Load the document into the input tray.
- In the Applications folder, double-click the Apple Image Capture icon.
- In the Image Capture window, select your scanner from the Devices list. TIP: For more Apple Image Capture scanning options, click Show Details.
- Select Mail in the Scan To list to automatically attach the scan to an email message.


NOTE: If you use an email application other than Apple Mail, you can scan the document to a file and manually attach it to an email, or you can add your email application to the Scan To list.
To add your email application to the list, select Other, select your email application, and then click Choose.
- On the resulting email message, enter the email address, subject, and any message text, and then send the email.
HP Easy Scan
To scan from HP Easy Scan:
- Load the document into the input tray.
- In the Applications folder, double-click the HP Easy Scan icon.
- Find the product by its name and ensure it is the selected scanner.
- Select a scan preset appropriate for the scan job.
- Click the Scan button.
- Once all the pages have been scanned, click File and then Save.
- Specify how and where the file is to be saved, and then click Save.
Scan from other applications
An image can be scanned directly into any ICA-compliant application. In the application, look for options to import or acquire images from a scanner.

NOTE: The HP software does not support TWAIN scanning. If the application has import or acquire functions but your HP scanner is not listed, the application might only be searching for scanners that support TWAIN.
Advanced configuration with HP Utility (macOS)
Use the HP Utility to check scanner status or to view or change scanner settings from your computer. You can use the HP Utility when the scanner is connected with a USB cable.
Open HP Utility HP Utility features
Open HP Utility
To open HP Utility, follow these steps:
- At the computer, open the Applications folder.
- Select HP, and then select HP Utility.
HP Utility features
The HP Utility toolbar includes these items:
• Devices: Click this button to show or hide Mac products found by the HP Utility. All Settings: Click this button to return to the HP Utility main view. HP Support: Click this button to open a browser and go to the HP support website. • Supplies: Click this button to open the HP SureSupply website. - Registration: Click this button to open the HP registration website. • Recycling: Click this button to open the HP Planet Partners Recycling Program website.
HP Utility consists of pages that you open by clicking in the All Settings list.
Mobile scanning (N4000 snw1 and N7000 snw1 models)
HP offers multiple mobile solutions to enable easy scanning to an HP scanner from a tablet, smart phone, or other mobile device.
For more information, go to www.hp.com/support/sjn4000snw1 or www.hp.com/support/sjflown7000snw1.
Scanning tips
Use the following tips to optimize scanning performance and scan fragile originals.
- Optimize scanning and task speeds • Scanning fragile originals
Optimize scanning and task speeds
Several settings influence the total time for a scanning job. To optimize scanning performance, consider the following information.
- To optimize performance, make sure the computer meets the recommended system requirements. To view minimum and recommended system requirements, see www.hp.com, and then search for the scanner model plus the word specifications. Saving a scanned image to a searchable format (for example, searchable PDF) takes more time than saving to an image format because the scanned image is analyzed using optical character recognition (OCR). Verify the need for a searchable output file before selecting a searchable scan format.
- Scanning at a higher resolution than necessary increases scanning time and creates a larger file with no additional benefit. If scanning at a high resolution, set the resolution to a lower level to increase scanning speed.
Scanning fragile originals
To scan fragile document (such as photos or documents on wrinkled or very lightweight paper), place the document in a clear carrier sheet before loading it into the input tray.
5000 s5, 7000 s3, and N7000 snw1 models: Before starting scan, slide the thick media switch to the disabled position (to the left side).
3 Care and maintenance
This section presents information about how to care for and maintain the scanner.
• Test and calibrate the touch screen - Clean the product - Replace parts • Order parts and accessories
For the latest maintenance information, visit the product support home page:
•2000 s2 models: www.hp.com/support/sj2000s2 •3000 s4 models: www.hp.com/support/sj3000s4 •N4000 snw1 models: www.hp.com/support/sjn4000snw1
5000 s5 models: www.hp.com/support/sjflow5000s5 7000 s3 models: www.hp.com/support/sjflow7000s3 N7000 snw1 models: www.hp.com/support/sjflown7000snw1
Test and calibrate the touch screen
To test and calibrate the touch screen, do the following:
- Select the Settings icon.
- Select Display.
- Scroll down and select Screen Recalibration.
- Follow the onscreen instructions to perform the calibration.
- Recalibration complete will display when the process is completed.
Clean the product
Occasional cleaning of the scanner helps ensure high-quality scans. The amount of care necessary depends on several factors, including the amount of use and the environment. Perform routine cleaning as necessary.
• Clean the scanning strips Clean the paper path Clean the rollers
Clean the scanning strips
To clean the scanning strip components, follow these steps:
- Press the Power ⏻ button to turn off the scanner, and then disconnect the USB cable and power supply from the scanner.
- Pull forward on the latch to open the document feeder hatch.

- Clean the scanning strips with a soft, lint-free cloth that has been sprayed with a mild glass cleaner.
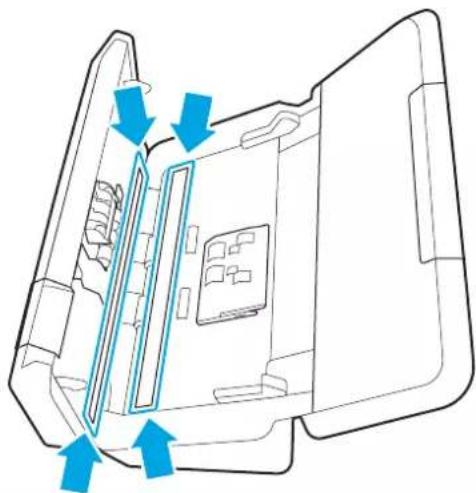
CAUTION: Use only glass cleaner to clean the scanning strips. Avoid cleaners that contain abrasives, acetone, benzene, and carbon tetrachloride, all of which can damage the scanning strips. Avoid isopropyl alcohol because it can leave streaks on the scanning strips.
Do not spray the glass cleaner directly on the scanning strips.
- Dry the scanning strips with a dry, soft, lint-free cloth. Wipe the strips of gray, reflective material on each strip.
- Close the document feeder, reconnect the USB cable and power supply to the scanner, and then press the Power button to turn on the scanner. The scanner is now ready to use.
Clean the paper path
If scanned images have streaks or scratches, use an HP paper path cleaning cloth to clean the paper path.

NOTE: If you experience repeated document jams, clean the rollers.
To clean the paper path, follow these steps:
- Open the sealed HP paper path cleaning cloth container, starting at the notch. Take care not to tear the cleaning cloth.
- Remove the cleaning cloth and unfold it.
- Load the unfolded cloth into the input tray.

- Windows: Launch the HP Scanner Tools Utility, and then click the Maintenance tab.
- Feed the cloth through the scanner.
Windows: Under Clean Paper Path, click Clean to feed the cloth through the scanner.
macOS (2000 s2 and 3000 s4 models): Press the Scan button to feed the cloth through the scanner.

NOTE: In addition to feeding the cloth through the scanner, the Mac will perform the scan shortcut assigned to the Scan button.

CAUTION: Wait two minutes for the components to dry before proceeding to the next step.
- Place up to five pages of printed paper in the scanner. Scan and view the results.
- If streaks still appear, repeat steps 3 through 6.
The cleaning cloth can be cycled through the scanner up to five times within 30 minutes. After that, the cloth will dry out. If repeated cycling of the cleaning cloth does not remove the streaks from the scanned images, clean the rollers.
- Windows: Under Record Cleaning Paper Path, click Record Cleaning to log this cleaning activity and update the paper path cleaning history.
Clean the rollers
Clean the rollers under the following conditions:
- Windows: The HP Scanner Tools Utility indicates that cleaning is needed.
- You experience repeated document jams.
- The document feeder does not pull pages into the paper path.
- The scanned images are elongated.
- You frequently scan any of the following types of documents: coated paper, chemically treated documents such as carbonless paper, documents with a large amount of calcium carbonate, documents written with or written on with pencil, documents on which the toner has not fused.
To clean the rollers, follow these steps:
- Press the Power ⏻ button to turn off the scanner, and then disconnect the USB cable and power supply from the scanner.
- Pull forward on the latch to open the document feeder hatch.
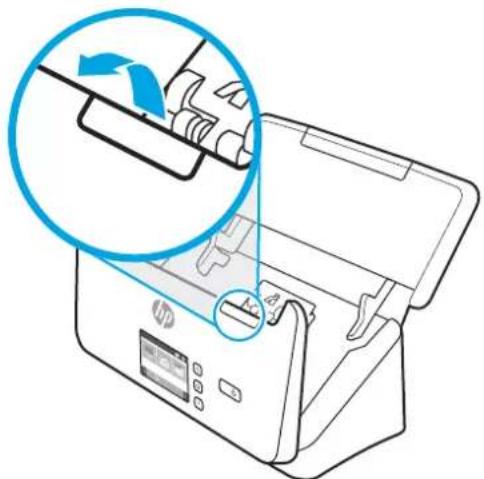
- On the rear of the open document feeder, use a fingertip to press the tab at the upper right corner of the pickup roller cover, and then forward to open the cover and expose the pickup rollers.

- Using an HP paper path cleaning cloth or a clean, lint-free cloth moistened with isopropyl alcohol, wipe the pickup rollers.
Wipe the rollers from the top down, rotating the rollers a full 360 degrees to ensure that you wipe the complete surface, and then close the roller cover.

- Below the pickup rollers, wipe the rollers above and below the scanning strip.
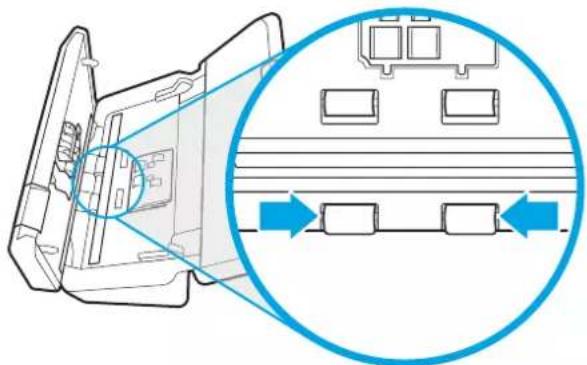
- Open the separation rollers cover, and then wipe the separation rollers.

- Close the separation rollers cover. Below the separation rollers, wipe the rollers above and below the scanning strip.

- Press on both sides of the document feeder hatch at the same time to close the hatch, and then reconnect the USB cable and power supply to the scanner.

CAUTION: Wait two minutes for the feed rollers to dry before loading documents into the document feeder.
- Press the Power button to turn on the scanner.
- Windows: Update the scanner maintenance history.
a. Launch the HP Scanner Tools Utility, and then click the Maintenance tab.
b. Under Record Cleaning Rollers, click Record Cleaning to log this cleaning activity and update the roller cleaning history.
For more information, see the HP Scanner Tools Utility Help.
Replace parts
Replacing parts when necessary helps ensure high-quality scans. Parts might need to be replaced when indicated by the HP Scanner Tools Utility, or if the scanner is not working correctly.
- Replace the roller kit (2000 s2, 3000 s4 and N4000 snw1 models)
- Replace the roller kit (5000 s5, 7000 s3 and N7000 snw1 models)
The roller replacement kit includes the following replacement parts:
- Pickup rollers
- Separation rollers
The replacement kit also includes detailed instructions for replacing each of these parts.
Replace the roller kit (2000 s2, 3000 s4 and N4000 snw1 models)
The following topics describe how to replace the roller kit.
- Replace the pickup roller module
- Replace the separation rollers
Replace the rollers under the following conditions:
Windows: When the Maintenance Recommended dialog indicates they are due for maintenance. - If the scanner experiences repeated document jams.

NOTE: HP recommends replacing the rollers every 100,000 scans.
Windows: The HP Scanner Tools Utility can provide a reminder when service is needed, which depends on many conditions and might be sooner than this replacement interval.

NOTE: The roller replacement kit is a consumable and is not covered under warranty or standard service agreements.
Replace the pickup roller module
To replace the roller module, follow these steps:
- Press the Power button to turn off the scanner, and then disconnect the USB cable and power supply from the scanner.
- Pull forward on the latch to open the document feeder hatch.

- Release the pickup roller cover tab.

- Remove and replace the rollers as described in the instructions that were included with the replacement kit.

Replace the separation rollers
To replace the separation rollers, follow these steps:
- Release the separation roller cover tab.
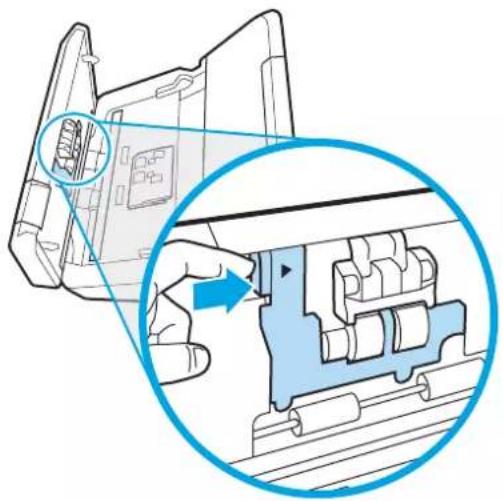
- Remove and replace the rollers as described in the instructions included with the replacement kit.
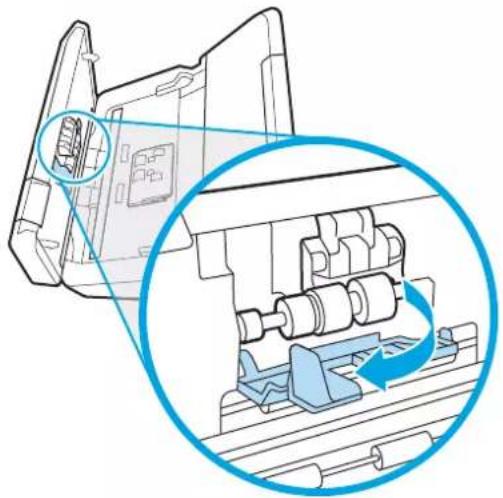
- Press firmly on both sides of the document feeder hatch at the same time to close the hatch.
- Press the Power button to turn on the scanner.
- Windows: Update the scanner maintenance history.
a. Open the HP Scanner Tools Utility.
b. Under Record Replacement, click Record Replacement to log this replacement activity and update the roller replacement history.
Replace the roller kit (5000 s5, 7000 s3 and N7000 snw1 models)
The following topics describe how to replace the roller kit.
- Replace the pickup roller module
- Replace the separation rollers
Replace the rollers under the following conditions:
- Windows: When the Maintenance Recommended dialog indicates they are due for maintenance.
- If the scanner experiences repeated document jams.

NOTE: HP recommends replacing the rollers every 100,000 scans.
Windows: The HP Scanner Tools Utility can provide a reminder when service is needed, which depends on many conditions and might be sooner than this replacement interval.

NOTE: The roller replacement kit is a consumable and is not covered under warranty or standard service agreements.
Replace the pickup roller module
To replace the roller module, follow these steps:
- Press the Power ⏻ button to turn off the scanner, and then disconnect the USB cable and power supply from the scanner.
- Pull forward on the latch to open the document feeder hatch.

- Release the pickup roller cover tab.

- Remove and replace the rollers as described in the instructions that were included with the replacement kit.

Replace the separation rollers
To replace the separation rollers, follow these steps:
- Release the separation roller cover tab.
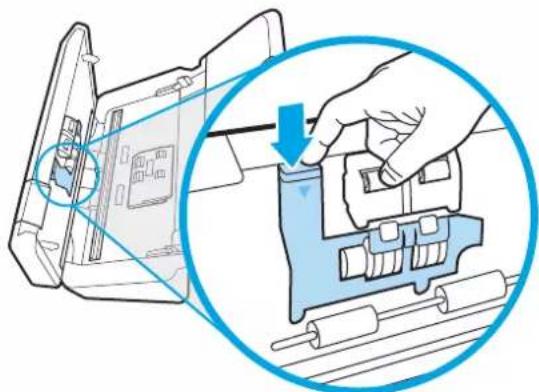
- Remove and replace the rollers as described in the instructions included with the replacement kit.

- Press firmly on both sides of the document feeder hatch at the same time to close the hatch.
- Press the Power ⏻ button to turn on the scanner.
- Windows: Update the scanner maintenance history.
a. Open the HP Scanner Tools Utility.
b. Under Record Replacement, click Record Replacement to log this replacement activity and update the roller replacement history.
Order parts and accessories
The maintenance parts in the following table can be ordered online.
To order maintenance parts for the scanner, see the HP scanner parts website at www.hp.com/buy/parts.
Table 3-1 Roller replacement kit
| Item Description Part number | |
| Roller replacement kit Replacement pickup and separation rollers for 2000 s2, 3000 s4 and N4000 snw1 models. | 6FW06-60001 |
| Roller replacement kit Replacement pickup and separation rollers for 5000 s5, 7000 s3 and N7000 snw1 models. | L2755-60001 |
4 Solve problems
This section contains solutions for common problems with the scanner. For additional troubleshooting, see the Help for the HP scanning program being used.
• Basic troubleshooting tips - Reset the scanner (N4000 snw1 and N7000 snw1 models) • Interpret control panel lights and patterns (2000 s2 and 3000 s4 models) • Scanner installation problems • Power issues • Paper jams • Paper feed issues • Image quality problems • Scanner operation problems • Additional troubleshooting
Basic troubleshooting tips
Simple issues such as smudges on the scanning strips or loose cables can cause the scanner to produce fuzzy scans, operate in an unexpected manner, or fail to operate. Always check the following items when encountering scanning problems.
- If scanning a document that will be analyzed using optical character recognition (OCR), make sure that the original document is clear enough to be analyzed. • Make sure that the USB and power cables are firmly seated in their respective connectors on the back of the scanner, and that the power cord is plugged into a working electrical outlet or surge protector.
- Make sure the scanner has not automatically powered off. If it has, press the Power ⏻ button to turn on the scanner.
- Ensure that the scanner is receiving power.
—Check that the Power LED on the control panel is on.
- If the Power LED is not on, ensure that power is available to the power outlet or surge protector that the power supply is plugged into.
- If power is available to the power outlet or surge protector but the Power LED is still not on, the power supply might be defective. Go to the product support home page for assistance:
- 2000 s2 models: www.hp.com/support/sj2000s2 - 3000 s4 models: www.hp.com/support/sj3000s4 - N4000 snw1 models: www.hp.com/support/sjn4000snw1 - 5000 s5 models: www.hp.com/support/sjflow5000s5 - 7000 s3 models: www.hp.com/support/sjflow7000s3 - N7000 snw1 models: www.hp.com/support/sjflown7000snw1
- If the scanning software displays a "Scanner not found" message when trying to use the scanner, turn off the scanner, wait 30 seconds, and then turn on the scanner. If the message still displays, the scanner might need to be reset.
- If the scanner is connected to the computer through a USB hub or through a USB port on the front of the computer, disconnect the scanner and then reconnect it to a USB port on the back of the computer.
- Windows: Make sure that the Scan button, the Simplex Scan button, or the Duplex Scan button is enabled from the HP scanning software.
- Turn off the scanner, wait 30 seconds, and then turn on the scanner.
• Make sure the document feeder hatch is closed.
- Restart the computer.
If problems continue, it is possible that the HP scanning software, firmware, or associated drivers are out of date or have become corrupted. Visit the product support home page to locate software, firmware, and driver updates for the scanner:
- 2000 s2 models: www.hp.com/support/sj2000s2 - 3000 s4 models: www.hp.com/support/sj3000s4 - N4000 snw1 models: www.hp.com/support/sjn4000snw1 - 5000 s5 models: www.hp.com/support/sjflow5000s5 - 7000 s3 models: www.hp.com/support/sjflow7000s3 - N7000 snw1 models: www.hp.com/support/sjflown7000snw1
Reset the scanner (N4000 snw1 and N7000 snw1 models)
To reset the scanner, follow these steps:
- Close the HP Scan software if it is open.
- Touch the Settings icon from the Home screen on the control panel, select Reset, and then touch Reset.
- Wait 30 seconds. The scanner resets.
Interpret control panel lights and patterns (2000 s2 and 3000 s4 models)
If the scanner requires attention, the Error light either blinks or is solidly lit on the control panel display. The following table describes the solution to follow, based on the possible cause of the Error light blinking.
Table 4-1 Cause and solution
| Cause Solution | |
| The user pressed the Scan button while the USB cable was disconnected. | 1. Turn off the scanner.2. Reconnect the USB cable.3. Turn on the scanner. |
| The image sensor is not properly calibrated. | 1. Turn off the scanner.2. Turn on the scanner. |
| There is a jam in the document feeder. 1. Turn off the scanner. | 2. Pull forward on the latch to open the document feeder hatch.3. Clear the jam.4. Turn on the scanner. |
| The document feeder hatch is not properly closed. | ▲ Press firmly on both sides of the document feeder hatch at the same time to close the hatch. |
Scanner installation problems
Review the following information about resolving scanner installation problems.
- Check the cables
- Uninstall and then reinstall the HP ScanJet drivers and tools (Windows)
Check the cables
Table 4-2 Check cable
| Cable type Action | |
| Power cable The power cable is connected between the scanner and a power outlet.Ensure that the power cable is securely connected between the scanner and a live electrical outlet or surge protector.If the power cable is connected to a surge protector, ensure that the surge protector is plugged into an outlet and turned on.Press the Power button to turn off the scanner, and then turn off the computer. After 30 seconds, turn on the scanner and then turn on the computer, in that order. | |
| USB cable The USB cable is connected between the scanner and the computer.Use the cable that was included with the scanner. Another USB cable might not be compatible with the scanner.Ensure that the USB cable is securely connected between the scanner and the computer.If the USB cable is connected to a USB port on the front of the computer, move it to a USB port on the back of the computer.For additional USB troubleshooting information, visit the product support home page, select your country/region, and then use the search tool to find USB troubleshooting topics.2000 s2 models: www.hp.com/support/sj2000s23000 s4 models: www.hp.com/support/sj3000s4N4000 snw1 models: www.hp.com/support/sjn4000snw15000 s5 models: www.hp.com/support/sjflow5000s57000 s3 models: www.hp.com/support/sjflow7000s3N7000 snw1 models: www.hp.com/support/sjftown7000snw1 | |
| Ethernet cable (N4000 snw1 and N7000 snw1 models) | Ensure that the Ethernet cable is securely connected between the scanner and your network port.For additional Ethernet troubleshooting information, see www.hp.com/support, select your country/region, and then use the search tool to find Ethernet troubleshooting topics. |
Uninstall and then reinstall the HP ScanJet drivers and tools (Windows)
If checking the scanner cable connections did not solve the problem, the problem might have occurred because of an incomplete installation. Try uninstalling and then reinstalling the HP ScanJet drivers and tools.
- Press the Power ⏻ button to turn off the scanner, and then disconnect the USB cable and power cable from the scanner.
- On the computer, open Control Panel and use the Programs and Features tool to uninstall the following applications:
● HP ScanJet Basic Device Software ● HP ScanJet ISIS Driver - HP Scan - HP ScanJet Plugin
- Restart the computer.
- Reinstall the HP ScanJet Drivers and Tools.
- Turn off the scanner, wait 30 seconds, and then turn on the scanner. The required software and drivers should install automatically.
- If the drivers and tools do not install automatically, install them manually.
- Reconnect the USB cable and power cable to the scanner, and then press the Power ⏻ button to turn on the scanner.
Power issues
Review the following information about resolving power issues.
- Check that the scanner has power • The scanner will not turn on • The scanner has paused or shut down • The scanner keeps turning off
Check that the scanner has power
The power cable is connected between the scanner and a power outlet.
- Ensure that the power cable is securely connected between the scanner and a live electrical outlet.
- If the power cable is connected to a surge protector, ensure that the surge protector is plugged into an outlet and turned on.
- Ensure that the scanner is receiving power.
Check that the Power LED on the control panel is on.
- If the Power LED is not on, ensure that power is available to the power outlet or surge protector that the power supply is plugged into. If power is available to the power outlet or surge protector but the Power LED is still not on, the power supply might be defective. Go to the product support home page for assistance:
- 2000 s2 models: www.hp.com/support/sj2000s2 - 3000 s4 models: www.hp.com/support/sj3000s4 - N4000 snw1 models: www.hp.com/support/sjn4000snw1
- - 5000 s5 models: www.hp.com/support/sjflow5000s5
- - 7000 s3 models: www.hp.com/support/sjflow7000s3
- - N7000 snw1 models: www.hp.com/support/sjflown7000snw1
The scanner will not turn on
If the scanner will not turn on after pressing the Power button, check the following:
- The scanner might have been unplugged. Check to see that the power supply has not become disconnected from the scanner or unplugged from the power source.
- The power supply might not be working.
Check that the Power LED on the control panel is on.
- If the Power LED is not on, ensure that power is available to the power outlet or surge protector that the power supply is plugged into.
- If power is available to the power outlet or surge protector but the Power LED is still not on, the power supply might be defective. Go to the product support home page for assistance:
- 2000 s2 models: www.hp.com/support/sj2000s2
- 3000 s4 models: www.hp.com/support/sj3000s4
- N4000 snw1 models: www.hp.com/support/sjn4000snw1
- 5000 s5 models: www.hp.com/support/sjflow5000s5
- 7000 s3 models: www.hp.com/support/sjflow7000s3
- N7000 snw1 models: www.hp.com/support/sjflown7000snw1
The scanner has paused or shut down
If the scanner stops scanning, follow these steps. After each step, start a scan to see if the scanner is working. If the problem persists, proceed with the next step.
- A cable might be loose. Ensure that both the USB cable and power supply are properly connected.
Use the cable that was included with the scanner. Another USB cable might not be compatible with the scanner.
- Ensure that the scanner is receiving power.
a. Check that the Power LED on the control panel is on. b. If the Power LED is not on, ensure that power is available to the power outlet or surge protector that the power supply is plugged into. c. If power is available to the power outlet or surge protector but the Power LED is still not on, unplug the power cable from the power source, wait 30 seconds, and then plug it back in. d. If the issue is not fixed, the power supply might be defective. Go to the product support home page for assistance:
- 2000 s2 models: www.hp.com/support/sj2000s2
- 3000 s4 models: www.hp.com/support/sj3000s4 ● N4000 snw1 models: www.hp.com/support/sjn4000snw1
• 5000 s5 models: www.hp.com/support/sjflow5000s5 • 7000 s3 models: www.hp.com/support/sjflow7000s3 • N7000 snw1 models: www.hp.com/support/sjflown7000snw1
- Restart your computer.
- Windows: On the computer, open Control Panel and use the Programs and Features tool to uninstall the following applications:
● HP ScanJet Basic Device Software ● HP ScanJet ISIS Driver
- HP ScanJet Plugin
- HP Scan
- Reconnect the USB cable and power supply to the scanner, and then press the Power ⏻ button to turn on the scanner. Reinstall the HP ScanJet software and drivers.
The scanner keeps turning off
If the scanner keeps turning off, try these steps according to your operating system.
By default, the scanner will enter Sleep Mode prior to 15 minutes of inactivity, and will turn off automatically after two hours of inactivity to conserve power.
Windows: To change the defaults, complete these steps:
- Launch the HP Scanner Tools Utility.
- Click the Settings tab, and then select the appropriate Sleep Mode and Auto-Off settings.
- To specify the period of inactivity after which the scanner goes into Sleep Mode, select 15 minutes or 1 hour from the Put the scanner to sleep after drop-down list.
- To specify the period of inactivity after which the scanner automatically turns off, select the appropriate value (1 hour, 2 hours, 4 hours, or 8 hours) from the Turn off the scanner after dropdown list.
- Click Apply.
macOS: Use HP Utility to change these defaults.
Paper jams
Review the following information about clearing paper jams.
• Clear jams from the document feeder
• An item loaded in the scanner jams repeatedly

NOTE: Scanning damp or wet pages can cause paper jams. Make sure that the pages being fed are completely dry (such as, the toner is dry, or there are no wet substances such as glue or correction fluid on the page).
Clear jams from the document feeder
To clear a paper jam, complete these steps:
- Pull forward on the latch to open the document feeder hatch.

- Remove any pages from the input tray.
- Remove the originals or any obstructions from the paper path.
- Remove any visible debris (for example, paper, staples, or clips) from the paper path.
- Inspect the four rollers on the front and five rollers on the rear of the document feeder hatch, and remove any visible debris.
- Press firmly on both sides of the document feeder hatch at the same time to close the hatch.
- Reload all originals in the input tray and scan again.
An item loaded in the scanner jams repeatedly
Check the following for resolving the issue.
- The item might not meet the guidelines for acceptable originals.
- The item might have something on it, such as staples or self-adhesive notes on the original that must be removed.
- Make sure the paper guides touch the edges of the original.
Paper feed issues
Review the following information about resolving paper feed issues.
• Paper jamming, skewing, misfeeds, or multiple-page feeds • Paper does not feed from the scanner
Paper jamming, skewing, misfeeds, or multiple-page feeds
Review the following information for resolving the issue.
- Scanning damp or wet pages can cause paper jams. Make sure that the pages you are feeding are completely dry (toner is dry, there are no wet substances such as glue or correction fluid).
- Check that all rollers are in place and that the roller door and document feeder hatch are closed.
- If the pages look skewed as they feed into the scanner paper path, check the resulting scanned images in the software to ensure that they are not skewed.
- The pages might not be placed correctly. Straighten the pages and adjust the paper guides to center the stack.
- The paper guides must be touching the sides of the paper stack to work properly. Please ensure that the paper stack is straight and the guides are against the paper stack.
- The input tray or output tray might contain more than the maximum number of pages. Load fewer pages in the input tray, and remove pages from the output tray.
- Clean the scanner paper path to help reduce misfeeds. If misfeeds still occur, clean the rollers. If misfeeds still occur, replace the rollers.
Paper does not feed from the scanner
If paper does not feed from the scanner, try the following:
Reload the pages into the input tray, ensuring that they make contact with the rollers.
The document feeder hatch might not be securely latched. Open the hatch and then close it, pressing firmly on both sides to ensure the hatch is closed.
A problem with the scanner hardware might exist. Follow this procedure to test the scanner:
- Ensure that the power supply is securely connected between the scanner and a live electrical outlet or surge protector. Check that the Power LED on the control panel is on to verify that the power supply is functional.
- If the power supply is connected to a surge protector, ensure that the surge protector is plugged into an outlet and turned on.
- Press the Power ⏻ button to turn off the scanner, disconnect the power supply from the scanner, and then turn off the computer to which the scanner is connected. Wait 30 seconds, reconnect the power supply to the scanner, press the Power ⏻ button to turn on the scanner, and then turn on the computer.
- Try to rescan.
Image quality problems
Review the following information about resolving image quality problems.
• The scanned images are not straight • The scanned images have streaks or scratches • The scanned image is fuzzy • The scanned image is completely black or completely white • The bottom of the scanned image is cut off • The scanned image cannot be enlarged
The scanned images are not straight
Check the following to resolve the issue.
- Verify that the paper guides are centered on the scanner and set to an appropriate width for the original being scanned. Make sure the paper guides touch the edges of the original.
- Windows: Use the Straighten Content feature to straighten content that is skewed relative to the page dimensions in the source document. Use the Detect Size feature to deskew page images that might have become skewed during the scanning process.
The scanned images have streaks or scratches
Try the following to resolve the issue.
- Check that the originals are clean and unwrinkled.
- Clean the scanner strips. For information on cleaning the scanner, see Care and maintenance on page 61.
The scanned image is fuzzy
Check the following to resolve the issue.
- Check for any obstructions in the scanner paper path and make sure the paper guides are positioned appropriately. Try another scan.
- Verify that the document is not fuzzy.
- Dust can build up on the scanning strips inside the document feeder and cause low-quality scans. Clean the scanning strips with a soft, lint-free cloth that has been sprayed with a mild glass cleaner.
The scanned image is completely black or completely white
Check the following to resolve the issue.
- The item might not be placed correctly in the input tray. Make sure that the item being scanned is placed face down in the input tray.
- Windows: If scanning to a black and white image, make sure neither the black nor the white threshold is set to extreme. Setting the threshold to an extreme will result in an image that is all white or all black.
- macOS: If scanning to a text image using the Image Capture application, set Image Correction to Manual and use the Threshold slider bar to adjust the threshold.
By default, the scanning software can scan media that is up to 356 mm (14 in) long.
Verify that the page size selected in the scanning software (or the scan shortcut selected) will accommodate the length of the document being scanned.
The scanned image cannot be enlarged
The software might be setting the exposure for the entire scan area instead of for one small original. Select and drag the handles around the selection area until you see the image area you want to scan.
Scanner operation problems
Review the following information about resolving scanner operation problems.
- Connection issues
- Buttons are not working properly • LCD issues (5000 s5 and 7000 s3 models) • The touch panel display issues (N4000 snw1 and N7000 snw1 models) • Scanning performance issues
- Issues with text recognition (OCR) (Windows)
- Email problems (N4000 snw1 and N7000 snw1 models)
Connection issues
Review the following information about resolving connection issues.
- Check the USB connection
- Check the ethernet connection (N4000 snw1 and N7000 snw1 models)
- Check the wireless connection (N4000 snw1 and N7000 snw1 models)
Check the USB connection
Follow these steps to check the USB connection.
Check the physical connection to the scanner.
- Use the cable that was included with the scanner. Another USB cable might not be compatible with the scanner.
- Ensure that the USB cable is securely connected between the scanner and the computer. The trident icon on the USB cable faces down when the cable is properly connected to the scanner.
If the problem persists after verifying the above items, try the following:
- Do one of the following tasks depending on how the scanner is connected to the computer:
- If the USB cable is connected to a USB hub or a docking station for a laptop, disconnect the USB cable from the USB hub or the docking station, and then connect the USB cable to a USB port on the back of the computer.
- If the USB cable is directly connected to the computer, plug it into a different USB port on the back of the computer.
- Remove all other USB devices from the computer except for the keyboard and the mouse.
- Press the Power ⏻ button to turn off the scanner, wait 30 seconds, and then turn on the scanner.
- Restart the computer.
- After the computer has restarted, try using the scanner.
- If the scanner works, reconnect any additional USB devices one at a time; try the scanner after connecting each additional device. Disconnect any USB devices that prevent the scanner from working.
- Windows: If the scanner does not work, uninstall and then reinstall the HP ScanJet drivers and software.
Check the ethernet connection (N4000 snw1 and N7000 snw1 models)
Follow these steps to check the ethernet connection.
- Ensure that the Ethernet cable is firmly connected between the product and a router, Ethernet jack, or Ethernet switch.
- If the Ethernet cable is connected to a network router or Ethernet switch, try connecting it to a different port on the router or switch.
- Press the Power ⏻ button to turn off the scanner, wait 30 seconds, and then turn on the scanner.
Check the wireless connection (N4000 snw1 and N7000 snw1 models)
Review the following to check the wireless connection.
- Verify that the network cable is not connected.
- Verify that the scanner and the wireless router are turned on and have power. Also make sure that the wireless radio in the scanner is turned on.
- Verify that the service set identifier (SSID) is correct. If you are not sure the SSID is correct, run the wireless setup again.
- With secured networks, verify that the security information is correct. If the security information is incorrect, run the wireless setup again.
- If the wireless network is working correctly, try accessing other computers on the wireless network. If the network has Internet access, try connecting to the Internet over a wireless connection.
- Verify that the encryption method (AES or TKIP) is the same for the scanner as it is for the wireless access point (on networks using WPA security).
- Verify that the scanner is within the range of the wireless network. For most networks, the scanner must be within 30 m (100 ft) of the wireless access point (wireless router).
- Verify that obstacles do not block the wireless signal. Remove any large metal objects between the access point and the scanner. Make sure poles, walls, or support columns containing metal or concrete do not separate the scanner and wireless access point.
- Verify that the scanner is located away from electronic devices that might interfere with the wireless signal. Many devices can interfere with the wireless signal including motors, cordless phones, security system cameras, other wireless networks, and some Bluetooth devices.
- Verify that the scan driver is installed on the computer.
- Verify that the computer and scanner connect to the same wireless network.
- For macOS, verify that the wireless router supports Bonjour.
Buttons are not working properly
If the buttons are not working properly, complete the following steps.
- A cable might be loose. Ensure that the USB cable and the power supply are securely connected.
- Turn off the scanner, wait 30 seconds, and then turn the scanner back on.
- Restart the computer.
- If the problem still persists, there might be a problem with the control panel. Contact HP Support at:
• 2000 s2 models: www.hp.com/support/sj2000s2 • 3000 s4 models: www.hp.com/support/sj3000s4 • N4000 snw1 models: www.hp.com/support/sjn4000snw1 • 5000 s5 models: www.hp.com/support/sjflow5000s5
• 7000 s3 models: www.hp.com/support/sjflow7000s3 • N7000 snw1 models: www.hp.com/support/sjflown7000snw1
LCD issues (5000 s5 and 7000 s3 models)
Review the following information to resolve LCD issues.
• The LCD is having display issues • The scanner buttons are not working as expected
The LCD is having display issues
The following symptoms indicate a problem with the scanner control panel.
- LCD issues: The display is blank, or part of the display content is missing.
- LED issues: LEDs are not working, or are staying in the wrong state.
If the scanner exhibits any of these problems, contact HP support at www.hp.com/support.
The scanner buttons are not working as expected
The following symptoms indicate a problem with the scanner control panel.
- Button issues: Buttons are unresponsive, or the wrong action occurs when you press a button. For example, you get a single-sided scan when you press the Duplex Scan button.
- LED issues: LEDs are not working, or are staying in the wrong state.
If the scanner exhibits any of these problems, contact HP support at www.hp.com/support.
The touch panel display issues (N4000 snw1 and N7000 snw1 models)
The following symptoms indicate a problem with the scanner touch panel.
- Touch panel issues: The display is blank, or part of the display content is missing.
- Button issues: Buttons are unresponsive, or the wrong action occurs when you press a button (for example, you get a single-sided scan when you press the Duplex Scan button).
If the scanner exhibits any of these problems, contact HP support at www.hp.com/support.
Scanning performance issues
Review the following information about resolving scanning performance issues.
• The scanner does not scan immediately • The scanner is scanning items very slowly • The scanner scans only one side of a two-sided page • Scanned pages are missing at the scan destination • Scanned pages are out of order at the scan destination • Scanned files are too large
The scanner does not scan immediately
Make sure the document feeder hatch is closed, and that the scanner is turned on.
The scanner is scanning items very slowly
When scanning to edit text, the optical character recognition (OCR) causes the scanner to scan more slowly, which is normal. Wait for the item to scan.

NOTE: Windows: For the best OCR results, scanner compression should be set to the minimum compression level or be disabled.
Scanning at a higher resolution than necessary increases scanning time and creates a larger file with no additional benefit. If you are scanning at a high resolution, set the resolution to a lower level to increase scanning speed.
The scanner scans only one side of a two-sided page
Verify that the selected scan shortcut specifies two-sided scanning.
Scanned pages are missing at the scan destination
When scanning, pages that stick together are scanned as one item. Check to confirm that scanned pages are not stuck together.
Scanned pages are out of order at the scan destination
If scanned pages are out of order at the scan destination, check the following.
- Verify that the page order of the original document is correct before placing the document face down into the input tray.
- Make sure that there are no staples, paper clips, or any other attached material (such as adhesive notes) that might cause the pages to feed incorrectly.
- Verify that pages are not stuck together.
Scanned files are too large
If scan files are too large, check the following.
- Most scanning software allows a smaller file size to be selected when selecting the output file type. For more information, see the Help for the scanning software being used.
- Verify the scan resolution setting (for more information, see the Help for the scanning software being used):
- 200 dpi is sufficient for storing documents as images.
- For most fonts, 300 dpi is sufficient for using optical character recognition (OCR) to create editable text.
- For Asian fonts and small fonts, choosing a higher resolution is recommended.

NOTE: For some special black dot background scans, saving the image as a .tif file might make the image smaller.
Scanning at a higher resolution than necessary creates a larger file with no additional benefit.
- Color scans create larger files than do black and white scans. - If scanning a large number of pages at one time, consider scanning fewer pages at a time to create more, smaller files.
Issues with text recognition (OCR) (Windows)
The scanner uses optical character recognition (OCR) to convert text on a page to text that can be edited on a computer.
- If text can be scanned but cannot be edited, make the following selections before scanning:
- Select a scan shortcut that supports OCR. The following scan shortcuts support OCR:
- Save as PDF
- Email as PDF
- Save as Editable Text (OCR)
- Send to Cloud
- Everyday Scan
- Select one of the following OCR-based, output-file types from the File Type drop-down box:
- Text (.txt)
- Rich Text (.rtf)
- Word (.doc, .docx)
- Excel (.xls, .xlsx)
- CSV (.csv)
- XML (.xml)
- Searchable PDF (.pdf)
- PDF/A (.pdf)

NOTE: If an OCR-based, output-file type is not selected, the document is scanned as a graphic and the text is not editable.
- Check the originals
- The software might not recognize text that is tightly spaced. For example, if the text that the software converts has missing or combined characters, "rn" might appear as "m".
- The accuracy of the software depends on the image quality, text size, and structure of the original and the quality of the scan itself. Make sure that the original has good image quality.
—Colored backgrounds can cause images in the foreground to blend too much.
- If the scanner strips are dirty, the scan file does not have optimum clarity. Make sure the scanner strips are clean.
Email problems (N4000 snw1 and N7000 snw1 models)
To resolve email problems, try the following.
- Validate the SMTP gateway address
- Validate the LDAP gateway (Windows)
Validate the SMTP gateway address
Open the Embedded Web Server to confirm that the SMTP gateway address is correct. Also confirm that the email address being used is valid.
Validate the LDAP gateway (Windows)
Use the following procedure to validate the LDAP gateway in Windows.
- Open Windows Explorer. In the address bar, type LDAP: // immediately followed by the LDAP gateway address. For example, type LDAP: // 12.12.12.12 where "12.12.12.12" represents the LDAP gateway address.
- Press the Enter key. If the LDAP gateway address is valid, the Find People dialog box opens.
- If the LDAP gateway address is not valid, contact the network administrator.
Additional troubleshooting
Table 4-3 Additional troubleshooting support
| Support Where to get | |
| Get telephone support for your country/regionHave the product name, serial number, date of purchase, and problem description ready. | Country/region phone numbers are on the flyer that was in the box with the product or atwww.hp.com/support. |
| Get 24-hour Internet support, and download software utilities, drivers, and electronic information | Product support home page:•2000 s2 models:www.hp.com/support/sj2000s2•3000 s4 models:www.hp.com/support/sj3000s4•N4000 snw1 models:www.hp.com/support/sjn4000snw1•5000 s5 models:www.hp.com/support/sjftow5000s5•7000 s3 models:www.hp.com/support/sjftow7000s3•N7000 snw1 models:www.hp.com/support/sjftown7000snw1 |
Order additional HP service or maintenance agreements www.hp.com/support
Index
A
acoustic specifications 1, 11, 12
Auto color detect 19, 48
automatically crop or pad scanned image to selected page size 19, 48
automatically detect page size 19, 48, 53
B
black scans
troubleshoot 75, 85
blurry images 75, 85
buttons
Cancel 1, 2, 7
Duplex Scan 7
Power 1, 2, 6, 7
Scan 1, 2, 6
scanner control panel 1, 2, 6, 7
scanner touch panel 9
Simplex Scan 7
C
cables
troubleshoot 75, 78
Cancel button 1, 2, 7
clean
paper path 61, 62
rollers 61, 62
cleaning cloth 61, 62
cloud, scan to 19, 48
control panel
buttons 7
locating 1, 2, 3
crooked images 75, 85
crop or pad scanned image to selected page size 19, 48
customer support online 75, 95
cut-off images
troubleshoot 75, 85, 86
D
detect multi-feeds 19, 48, 51
detect page size 19, 48, 53
display problems 91
drivers
paper sizes 19, 33, 34
Duplex Scan button 7
E
electrical specifications 1, 11, 12
extra-long-page support 19, 48, 51
F
features
auto color detect 19, 48
crop or pad scanned image to selected page size 19, 48
detect page size 19, 48, 53
extra-long-page support 19, 48, 51
long-page support 19, 48, 51
multi-feed detection 19, 48, 51
scan shortcuts 49
scan shortcuts 49
feeding problems 75, 83
fragile items, scanning 19, 59
fuzzy images 75, 85
H
HP Customer Care 75, 95
HP paper path cleaning cloth 61, 62
HP Scan Extended software about 1, 14, 15
HP Scanner Tools Utility
uses for 1, 14, 15
HP TWAIN 1, 14, 15
HP Utility 19, 56, 58
HP Utility for Mac
Bonjour 19, 56, 58
features 19, 56, 58
HP Utility, Mac 19, 56, 58
HP Web Jetadmin 16
input and output trays locating 1, 2
input tray
load cards 19, 33
load documents 19, 33
locating 3
tips on loading 19, 33
install software
troubleshoot 75, 78
ISIS 1, 14, 15
J
jams
troubleshoot 75, 83
Jetadmin, HP Web 16
L
LCD problems 91
LED
error 75, 77
long-page support 19, 48, 51
M
Macintosh
HP Utility 19, 56, 58
macOS software 1, 16
maintenance
clean paper path 61, 62
clean rollers 61, 62
manage power settings 75, 80
media
jams 75, 83
misfeeds 75, 84
not feeding 75, 84
troubleshoot 75, 84
memory
included 1, 11
minimum system requirements 11
misfeeds
troubleshoot 75, 84
multi-feed detection 19, 48, 51
multiple-page feeds 75, 84
N
networks
HP Web Jetadmin 16
supported 1, 11
0
on/off button, locating 1, 2, 3
online support 75, 95
operating systems (OS)
supported 1, 11
operating systems, supported 11
order
roller replacement kit 61, 68, 69, 72
supplies 61, 74
OS (operating system)
supported 1, 11
output tray
locating 1, 2, 3
P
pages missing, troubleshoot 75, 87, 92
pages out of order 75, 87, 89, 92
pages per minute 1, 11
paper
jams 75, 83
misfeeds 75, 84
not feeding 75, 84
supported sizes 19, 33, 34
troubleshoot 75, 84
paper guides, locating 1, 2, 3
paper path
clean 61, 62
feeding problems 75, 83
parts
order 61, 68, 69, 72
power
consumption 1, 11, 12
Power button 1, 2, 6, 7
power button, locating 1, 2, 3
Power LED 1, 2, 7
power management 75, 80
power supply
troubleshoot cable 75, 78
problems with LCD 91
problems with touch panel 91
product
auto-off 1,17
Sleep Mode 1, 17
product info 1
R
replace rollers 61, 68, 69, 72
roller kit
replace 61, 68, 69, 72
rollers
clean 61, 62
replace 61, 68, 69, 72
S
Scan 46
scan
cards 19, 33
feeding problems 75, 83
files too large 75, 87, 92
fragile items 19, 59
originals 19, 33
Scan button 1, 2, 6
scan shortcuts 49
scan to cloud 19, 48
Scan to Email
configuration 20
Scan to Network Folder
initial setup 20, 24
Scan to SharePoint
enabling 20
Scan to USB Drive
enabling 20, 27
scanner
control panel 1, 2, 6
touch panel 9
scanner software
Mac 1, 16
Windows 1, 14
Simplex Scan button 7
skewed images 75, 85
Sleep Mode 1, 17
software
HP Utility 19, 56, 58
Mac 1, 16
troubleshoot installation 75, 78
uninstall and reinstall 75, 78, 80
Windows 1, 14
specifications
electrical and acoustic 1, 11, 12
speed
troubleshoot 75, 87, 92
speed, troubleshoot 19, 59
status
HP Utility, Mac 19, 56, 58
streaks
troubleshoot 75, 85
supplies
order 61, 74
status, viewing with HP Utility for
Mac 19, 56, 58
support
online 75, 95
supported operating systems 11
system requirements
minimum 11
T
technical support
online 75, 95
touch panel problems 91
trays
capacity 1, 11
included 1, 11
troubleshoot
basic tips 75
black scans 75, 85
cables 75, 78
check power 75, 80
crooked images 75, 85
cut-off images 75, 85, 86
feeding problems 75, 83
fragile items 19, 59
fuzzy images 75, 85
installation 75, 78
jams 75, 83
large scan files 75, 87, 92
misfeeds 75,84
page order 75, 87, 89, 92
pages missing 75, 87, 92
paper not feeding 75, 84
power 75,80
scanning fragile items 19, 59
speed 19, 59, 75, 87, 92
stops working 75, 80
streaks 75,85
two-sided scans 75, 87, 92
uninstall and reinstall software
75, 78, 80
white scans 75, 85
troubleshooting
buttons 91
display 91
LCD 91
touch panel 91
turn on scanner
troubleshoot 75, 80
TWAIN 1, 14, 15
two-sided scans
troubleshoot 75, 87, 92
U
uninstall and reinstall software 75, 78, 80
USB cable
troubleshoot 75, 78
W
Web sites
HP Web Jetadmin, downloading 16
websites
customer support 75, 95
order supplies 61, 74
replacement parts 61, 68, 69, 72
white scans
troubleshoot 75, 85
Windows software 1, 14

- COPYRIGHT AND LICENSE
- TRADEMARK CREDITS
- TABLE OF CONTENTS
- PRODUCT OVERVIEW
- CARE AND MAINTENANCE
- SOLVE PROBLEMS
- PRODUCT VIEWS
- FRONT VIEW (2000 S2, 3000 S4 AND N4000 SNW1 MODELS)
- FRONT VIEW (5000 S5, 7000 S3 AND N7000 SNW1 MODELS)
- BACK VIEW (2000 S2 MODELS)
- BACK VIEW (3000 S4 MODELS)
- BACK VIEW (5000 S5 AND 7000 S3 MODELS)
- BACK VIEW (N4000 SNW1 MODELS)
- BACK VIEW (N7000 SNW1 MODELS)
- SERIAL NUMBER AND PRODUCT NUMBER LOCATION
- CONTROL PANEL VIEW (2000 S2 AND 3000 S4 MODELS)
- CONTROL PANEL VIEW (5000 S5 AND 7000 S3 MODELS)
- TOUCH PANEL VIEW (N4000 SNW1 AND N7000 SNW1 MODELS)
- TOUCH SCREEN MENU STRUCTURE
- BUTTONS ON THE TOUCH PANEL
- PRODUCT SPECIFICATIONS
- SUPPORTED OPERATING SYSTEMS
- PRODUCT DIMENSIONS
- POWER CONSUMPTION, ELECTRICAL SPECIFICATIONS, AND ACOUSTIC EMISSIONS
- OPERATING ENVIRONMENTAL RANGE
- PRODUCT HARDWARE SETUP AND SOFTWARE INSTALLATION
- SCANNER SOFTWARE (WINDOWS)
- HP SCAN SOFTWARE
- HP SCANNER TOOLS UTILITY
- HP TWAIN
- ISIS
- WIA
- SCANNER SOFTWARE (MACOS)
- HP EASY SCAN
- HP UTILITY
- EMBEDDED WEB SERVER
- HP WEB JETADMIN
- SLEEP MODE AND AUTO-OFF SETTINGS
- CHANGE THE DEFAULT SLEEP AND AUTO-OFF SETTINGS USING THE HP SCANNER TOOLS UTILITY
- CHANGE THE DEFAULT AUTO-OFF SETTING USING THE HP UTILITY
- USE THE SCANNER
- SET UP THE SCANNER (N4000 SNW1 AND N7000 SNW1 MODELS)
- SET UP SCAN TO EMAIL
- STEP ONE: CHECK THE NETWORK CONNECTION AND GATHER SMTP INFORMATION
- STEP TWO: ACCESS THE HP EMBEDDED WEB SERVER (EWS)
- STEP THREE: CONFIGURE THE SCAN TO EMAIL FEATURE
- STEP FOUR: ADD CONTACTS TO THE EMAIL ADDRESS BOOK
- STEP FIVE: CONFIGURE THE DEFAULT SETTINGS FOR SCAN TO EMAIL
- SET UP SCAN TO NETWORK FOLDER
- STEP ONE: GATHER NETWORK INFORMATION
- STEP THREE: CONFIGURE THE SCAN TO NETWORK FEATURE
- SET UP SCAN TO USB DRIVE
- STEP ONE: ACCESS THE HP EMBEDDED WEB SERVER (EWS)
- STEP TWO: ENABLE SCAN TO USB DRIVE
- STEP THREE: CONFIGURE THE DEFAULT SETTINGS FOR SCAN TO USB DRIVE
- SET UP SCAN TO SHAREPOINT
- STEP ONE: PREPARE
- STEP THREE: ENABLE SCAN TO SHAREPOINT
- STEP FOUR: CONFIGURE THE SCAN TO SHAREPOINT FEATURE
- SET UP ACCESS CONTROL
- LOAD ORIGINALS
- DOCUMENT LOADING TIPS
- SUPPORTED PAPER SIZES AND TYPES
- LOAD DOCUMENTS (2000 S2, 3000 S4, AND N4000 SNW1 MODELS)
- LOAD CARDS (2000 S2, 3000 S4, AND N4000 SNW1 MODELS)
- LOAD CARDS (5000 S5, 7000 S3, AND N7000 SNW1 MODELS)
- LOAD FOLDED MEDIA (5000 S5, 7000 S3, AND N7000 SNW1 MODELS)
- START A SCAN FROM THE HARDWARE
- SCAN FROM THE CONTROL PANEL BUTTONS (2000 S2 AND 3000 S4 MODELS)
- SCAN FROM THE CONTROL PANEL BUTTONS (5000 S5 AND 7000 S3 MODELS)
- SCAN FROM THE TOUCH SCREEN (N4000 SNW1 AND N7000 SNW1 MODELS)
- SCAN TO A COMPUTER
- SCAN TO A NETWORK LOCATION
- SCAN TO EMAIL
- SCAN TO A MICROSOFT SHAREPOINT SITE
- SCAN TO A USB FLASH DRIVE
- USE THE SCANNING SOFTWARE (WINDOWS)
- WORK WITH SCAN SHORTCUTS
- VIEW SCAN SHORTCUTS
- CREATE SCAN SHORTCUTS
- MODIFY SHORTCUTS
- SCAN TO A PICTURE
- SCAN TO A PDF
- SCAN TEXT FOR EDITING (OCR)
- SCAN TO CLOUD
- SCAN TO FTP
- SCAN TO SHAREPOINT
- SCAN LONG OR EXTRA-LONG DOCUMENTS
- DETECT MULTI-FEEDS
- EVERYDAY SCAN
- AUTOMATICALLY DELETE BLANK PAGES
- AUTOMATICALLY ADJUST PAGE ORIENTATION
- RESERVED JOBS (N4000 SNW1 AND N7000 SNW1 MODELS)
- FILTER OUT COLOR FROM A DOCUMENT (COLOR DROPOUT)
- AUTOMATICALLY DETECT PAGE SIZE
- AUTOMATICALLY CROP OR PAD SCANNED IMAGE TO SELECTED PAGE SIZE
- AUTOMATICALLY DETECT COLOR
- SCAN USING TEXT-ENHANCED BLACK AND WHITE MODE
- AUTOMATICALLY STRAIGHTEN SCANNED IMAGES
- ADD OR REMOVE A DEVICE
- SCAN BY USING OTHER SCAN SOFTWARE
- USE THE SCANNING SOFTWARE (MACOS)
- SCAN FROM OTHER APPLICATIONS
- ADVANCED CONFIGURATION WITH HP UTILITY (MACOS)
- OPEN HP UTILITY
- HP UTILITY FEATURES
- MOBILE SCANNING (N4000 SNW1 AND N7000 SNW1 MODELS)
- SCANNING TIPS
- OPTIMIZE SCANNING AND TASK SPEEDS
- SCANNING FRAGILE ORIGINALS
- TEST AND CALIBRATE THE TOUCH SCREEN
- CLEAN THE PRODUCT
- CLEAN THE SCANNING STRIPS
- CLEAN THE PAPER PATH
- CLEAN THE ROLLERS
- REPLACE PARTS
- REPLACE THE ROLLER KIT (2000 S2, 3000 S4 AND N4000 SNW1 MODELS)
- REPLACE THE PICKUP ROLLER MODULE
- REPLACE THE SEPARATION ROLLERS
- REPLACE THE ROLLER KIT (5000 S5, 7000 S3 AND N7000 SNW1 MODELS)
- ORDER PARTS AND ACCESSORIES
- BASIC TROUBLESHOOTING TIPS
- RESET THE SCANNER (N4000 SNW1 AND N7000 SNW1 MODELS)
- INTERPRET CONTROL PANEL LIGHTS AND PATTERNS (2000 S2 AND 3000 S4 MODELS)
- SCANNER INSTALLATION PROBLEMS
- CHECK THE CABLES
- UNINSTALL AND THEN REINSTALL THE HP SCANJET DRIVERS AND TOOLS (WINDOWS)
- POWER ISSUES
- CHECK THAT THE SCANNER HAS POWER
- THE SCANNER WILL NOT TURN ON
- THE SCANNER HAS PAUSED OR SHUT DOWN
- THE SCANNER KEEPS TURNING OFF
- PAPER JAMS
- CLEAR JAMS FROM THE DOCUMENT FEEDER
- AN ITEM LOADED IN THE SCANNER JAMS REPEATEDLY
- PAPER FEED ISSUES
- PAPER JAMMING, SKEWING, MISFEEDS, OR MULTIPLE-PAGE FEEDS
- PAPER DOES NOT FEED FROM THE SCANNER
- IMAGE QUALITY PROBLEMS
- THE SCANNED IMAGES ARE NOT STRAIGHT
- THE SCANNED IMAGES HAVE STREAKS OR SCRATCHES
- THE SCANNED IMAGE IS FUZZY
- THE SCANNED IMAGE IS COMPLETELY BLACK OR COMPLETELY WHITE
- THE SCANNED IMAGE CANNOT BE ENLARGED
- SCANNER OPERATION PROBLEMS
- CONNECTION ISSUES
- CHECK THE USB CONNECTION
- CHECK THE ETHERNET CONNECTION (N4000 SNW1 AND N7000 SNW1 MODELS)
- CHECK THE WIRELESS CONNECTION (N4000 SNW1 AND N7000 SNW1 MODELS)
- BUTTONS ARE NOT WORKING PROPERLY
- LCD ISSUES (5000 S5 AND 7000 S3 MODELS)
- THE LCD IS HAVING DISPLAY ISSUES
- THE SCANNER BUTTONS ARE NOT WORKING AS EXPECTED
- THE TOUCH PANEL DISPLAY ISSUES (N4000 SNW1 AND N7000 SNW1 MODELS)
- SCANNING PERFORMANCE ISSUES
- THE SCANNER DOES NOT SCAN IMMEDIATELY
- THE SCANNER IS SCANNING ITEMS VERY SLOWLY
- THE SCANNER SCANS ONLY ONE SIDE OF A TWO-SIDED PAGE
- SCANNED PAGES ARE MISSING AT THE SCAN DESTINATION
- SCANNED PAGES ARE OUT OF ORDER AT THE SCAN DESTINATION
- SCANNED FILES ARE TOO LARGE
- ISSUES WITH TEXT RECOGNITION (OCR) (WINDOWS)
- EMAIL PROBLEMS (N4000 SNW1 AND N7000 SNW1 MODELS)
- VALIDATE THE SMTP GATEWAY ADDRESS
- VALIDATE THE LDAP GATEWAY (WINDOWS)
- ADDITIONAL TROUBLESHOOTING
- INDEX
- A
- B
- C
- D
- E
- F
- H
- J
- L
- M
- N
- P
- R
- S
- T
- U
- W
Brand : HP
Model : ScanJet Pro N4000 snw1
Category : Scanner