
Scanjet 8390 - To scan HP - Free user manual and instructions
Find the device manual for free Scanjet 8390 HP in PDF.
| Product type | Flatbed scanner with automatic document feeder (ADF) and transparent media adapter (TMA) |
| Brand | HP |
| Model | Scanjet 8390 |
| Optical resolution | 4800 x 4800 dpi |
| Scanning element | Charge-coupled device (CCD) |
| Maximum document size (flatbed) | 216 x 297 mm (A4) |
| Automatic document feeder (ADF) capacity | 100 sheets (80 g/m²) |
| Supported film formats (TMA) | 35 mm negatives (3 strips of 6 frames), 35 mm slides (8), medium format (120/220 up to 6x9 cm), large format (4x5 inches) |
| Interface | USB 2.0 Hi-Speed |
| Power supply | 100-240 V~, 50/60 Hz, 1.5 A |
| Power consumption | ENERGY STAR® compliant (details in regulatory_supplement.htm file) |
| Dimensions (W x D x H) | 625 x 415 x 265 mm |
| Weight | 15 kg |
| Included software | HP Photosmart, HP Scan Pro (Mac), HP Smart Document Scan Software (Windows), Readiris, PaperPort, Adobe Photoshop Elements |
| Button functions | Copy, Scan To, Power Save, Cancel, 4 customizable buttons, Button Settings |
| Maintenance and cleaning | Regular cleaning of the flatbed, ADF and TMA with a soft cloth. Avoid sharp objects and sticky substances. |
| Warranty | 1 year (Asia/Pacific, Americas); 3 years (Europe/Middle East/Africa). Extension possible via HP Care Pack. |
| Operating temperature | 10 to 35 °C |
| Operating relative humidity | 15 to 80% (non-condensing) |
| Recycling and disposal | Contains mercury in the lamp (<5 mg). Do not dispose of with household waste. Deposit at a WEEE collection point. |
Frequently Asked Questions - Scanjet 8390 HP
User questions about Scanjet 8390 HP
0 question about this device. Answer the ones you know or ask your own.
Ask a new question about this device
Download the instructions for your To scan in PDF format for free! Find your manual Scanjet 8390 - HP and take your electronic device back in hand. On this page are published all the documents necessary for the use of your device. Scanjet 8390 by HP.
USER MANUAL Scanjet 8390 HP
HP Scanjet 8300 series Scanner

Setup and Support Guide
Canada 1-(800)-474-6836
Chile 800-360-999
Colombia (Bogota) 571-606-9191
Colombia 01-8000-51-4746-8368
Costa Rica 0-800-011-1046
Ecuador (Andinatel) 1-999-119
800-711-2884
Ecuador (Pacifitel) 1-800-225-528
800-711-2884
El Salvador 800-6160
Guatemala 1-800-711-2884
Jamaica 1-800-711-2884
Mexico (Mexico City) 55-5258-9922
Mexico 01-800-472-68368
Panama 1-800-711-2884
Paraguay 0098005410006
Peru 0-800-10111
Puerto Rico 1-877-232-0589
Republica Dominicana 1-800-711-2884
Trinidad & Tobago 1-800-711-2884
United States 1-(800)-474-6836
Uruguay 0004-054-177
Venezuela (Caracas) 58-212-278-8666
Venezuela 0-800-474-68368
Setup and Support Guide
English

Copyright and license
© 2005 Copyright Hewlett-Packard Development Company, L.P.
Reproduction, adaptation or translation without prior written permission is prohibited, except as allowed under the copyright laws.
The information contained herein is subject to change without notice.
The only warranties for HP products and services are set forth in the express warranty statements accompanying such products and services. Nothing herein should be construed as constituting an additional warranty. HP shall not be liable for technical or editorial errors or omissions contained herein.
Trademark credits
ENERGY STAR is a U.S. registered service mark of the United States Environmental Protection Agency.
Microsoft and Windows are registered trademarks of Microsoft Corporation.
Contents
1 Get started. 4
Step 1. Check the box contents. 4
Step 2. Connect the automatic document feeder (ADF). 5
Step 3. Install the software.. 7
Step 4. Connect the power cable. 8
Step 5. Connect the USB cable. 9
Step 6. Test the installation.. 9
2 How to use the scanner buttons 10
Customizable buttons. 10
Button Settings button. 11
Copy buttons. 11
Scan Document To buttons 12
Power Save button. 12
Cancel button. 12
3 Other scanner materials. 13
Scanning software CDs. 13
Film templates. 16
Customizable button labels 17
How to remove the automatic document feeder (ADF). 17
4 Where to get additional information 19
Windows. 19
Macintosh. 19
5 Care and maintenance 20
6 Troubleshooting 21
Installation dialog box does not display (Windows). 21
Scanner error messages 21
Other sources for help. 21
Scanner does not work after installation. 21
7 Product support. 24
Accessibility Web site 24
HP Scanjet Web site. 24
Support process 24
8 Regulatory information and product specifications 26
Scanner specifications 26
Transparent materials adapter (TMA) specifications 26
Automatic document feeder (ADF) specifications. 27
Environmental specifications. 27
Regulatory information 27
Recycle and restricted material information. 28
Disposal of Waste Equipment by Users in Private Households in the European
Union 28
9 Hewlett-Packard limited warranty statement 29
Regions. 30
1 Get started
Follow these steps to set up the scanner:
- Check the box contents.
- Connect the automatic document feeder (ADF).
- Install the software.
- Connect the power cable.
- Connect the USB cable.
- Test the installation.
Step 1. Check the box contents
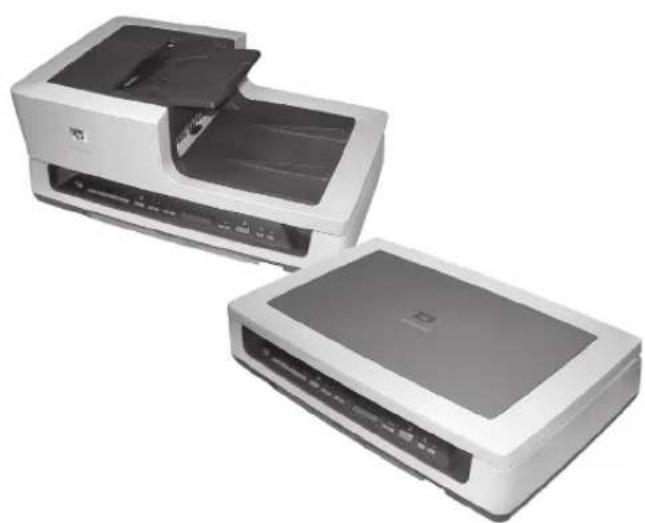
Unpack the scanner hardware. Be sure to remove any shipping tape.
| 1 HP Scanjet 8300 series scanner | |
| 2 Power cable | |
| 3 USB cable | |
| 4 | Scanning software CDs (For more information, see Scanning software CDs on page 13.) |
| 5 Customizable button labels | |
| 6 Film templates (stored in the scanner storage slot) | |
| 7 Automatic document feeder (ADF) and ADF input tray (HP Scanjet 8350 Flatbed Document Scanner and HP Scanjet 8390 Flatbed Document Scanner only) | |
| 8 Scanner lid (HP Scanjet 8300 Professional Image Scanner only) | |
| (continued) | |
| 9 | Automatic document feeder (ADF) cleaning cloth (HP Scanjet 8350 Flatbed Document Scanner and HP Scanjet 8390 Flatbed Document Scanner only) |
| 10 Setup and Support Guide (this book) | |
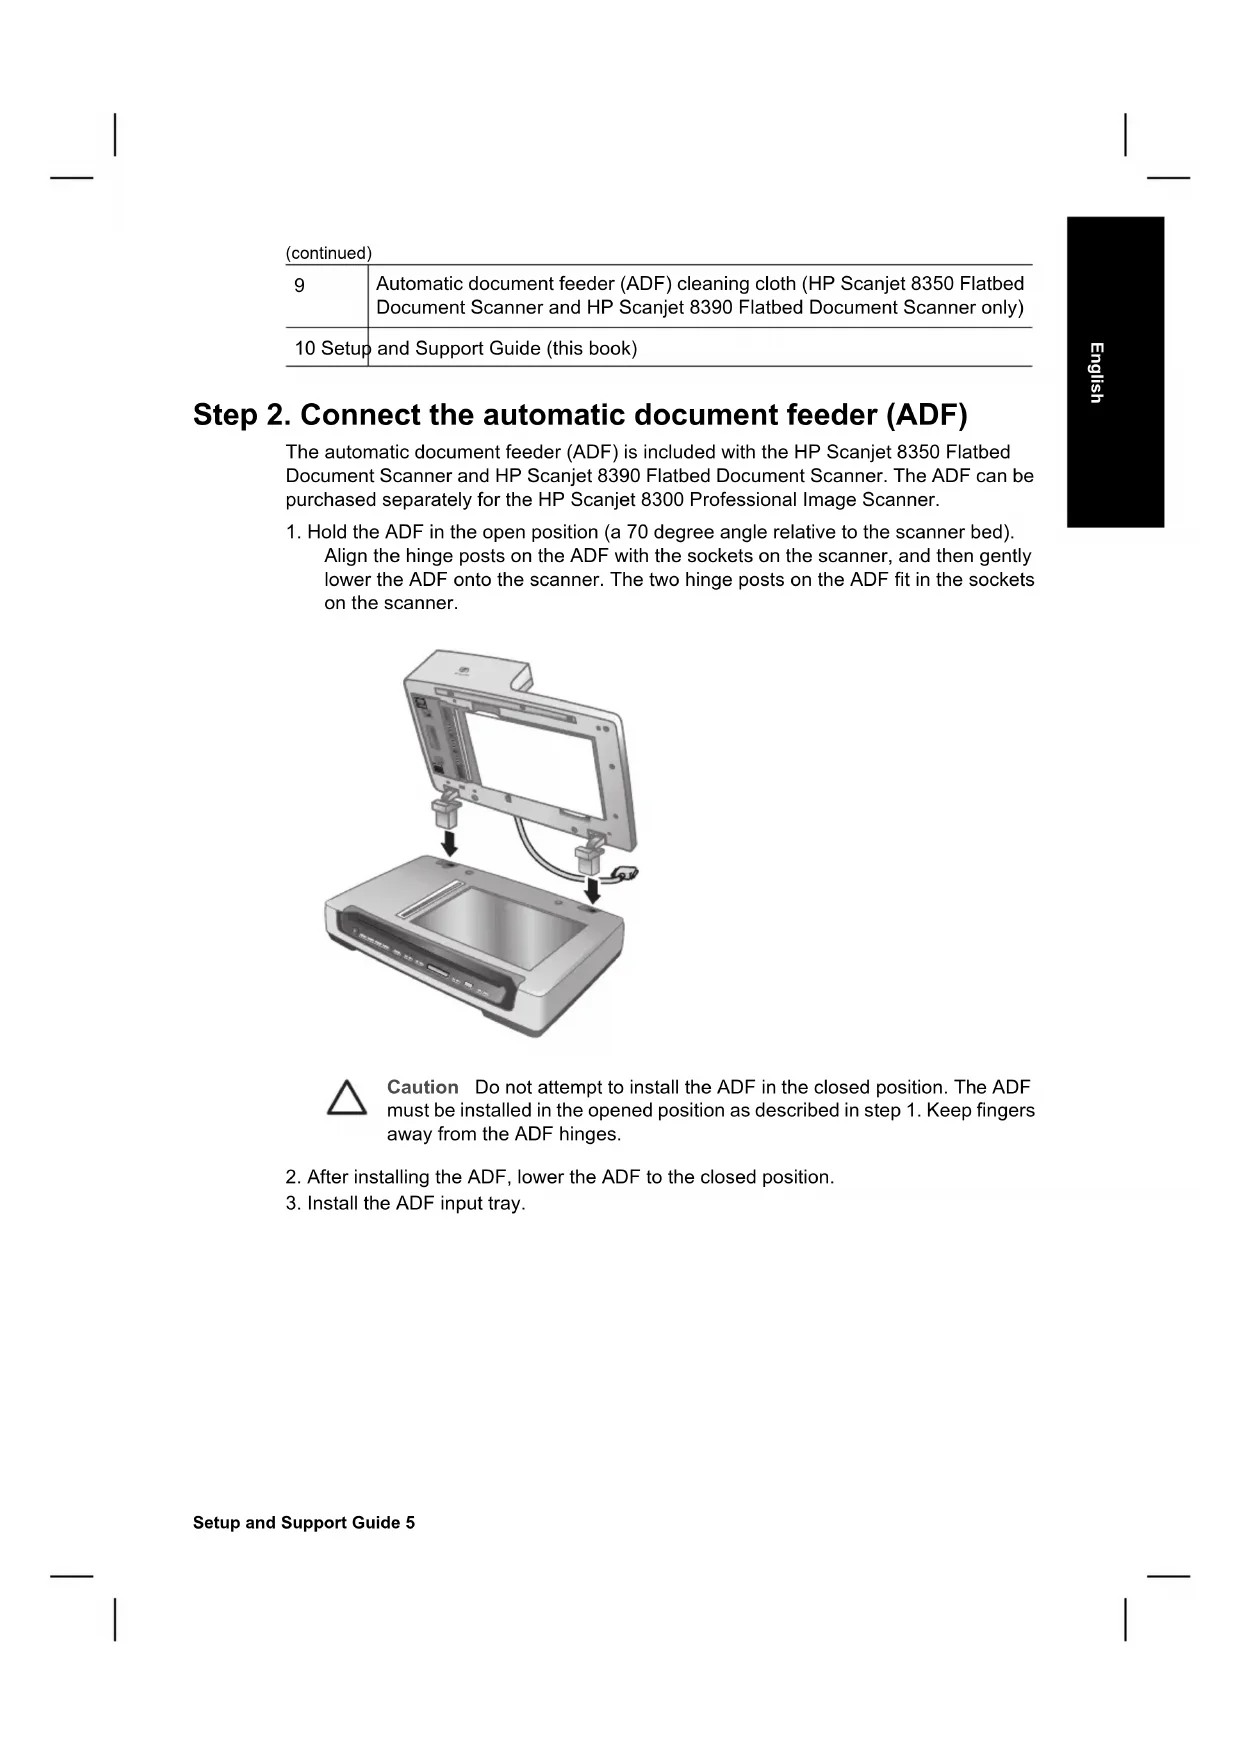
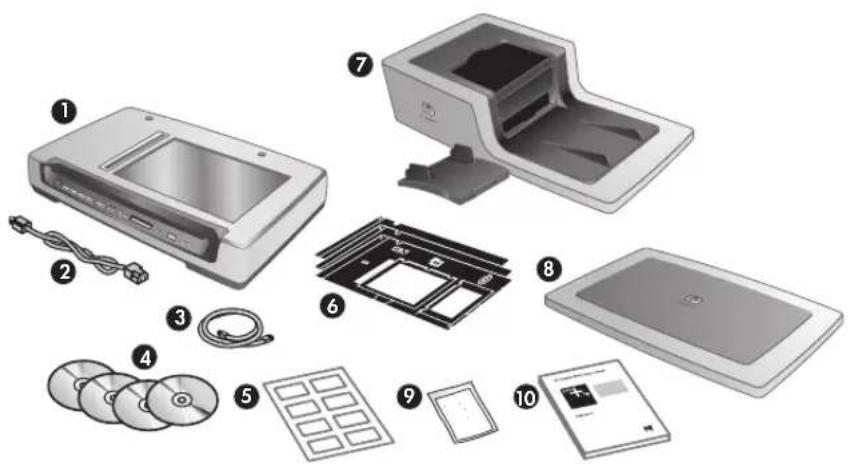
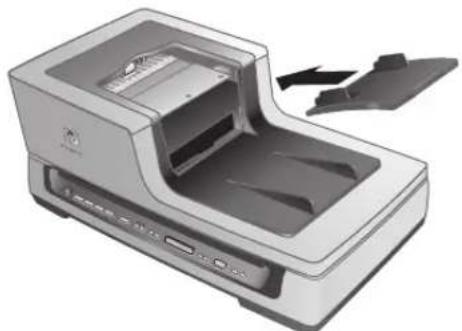
Step 2. Connect the automatic document feeder (ADF)
The automatic document feeder (ADF) is included with the HP Scanjet 8350 Flatbed Document Scanner and HP Scanjet 8390 Flatbed Document Scanner. The ADF can be purchased separately for the HP Scanjet 8300 Professional Image Scanner.
- Hold the ADF in the open position (a 70 degree angle relative to the scanner bed). Align the hinge posts on the ADF with the sockets on the scanner, and then gently lower the ADF onto the scanner. The two hinge posts on the ADF fit in the sockets on the scanner.

Caution Do not attempt to install the ADF in the closed position. The ADF must be installed in the opened position as described in step 1. Keep fingers away from the ADF hinges.
- After installing the ADF, lower the ADF to the closed position.
- Install the ADF input tray.
Chapter 1
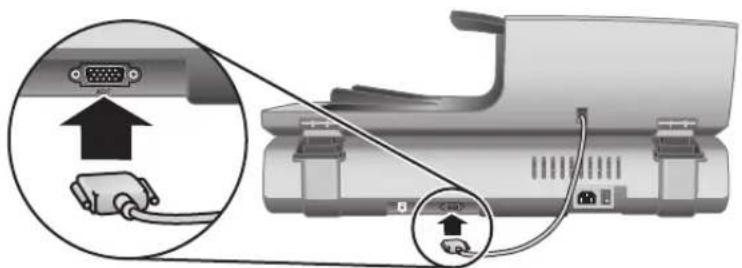
- Connect the accessory cable to the accessory cable port on the scanner. Turn the thumbscrews on the connector until they are tight.

Note For help uninstalling the ADF, see How to remove the automatic document feeder (ADF) on page 17.
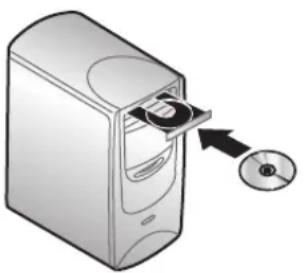
Step 3. Install the software

Caution If you are installing the scanner on a Windows computer, do not connect the USB cable to the computer yet. Install the scanning software before connecting the USB cable.
Windows
- Find HP CD 1 that came with the scanner.
- Insert HP CD 1 into the computer CD drive.
Wait for the installation dialog box to display. If the installation dialog box does not display, see Installation dialog box does not display (Windows) on page 21.
- Click Install Software to install the scanning software. Follow the onscreen instructions to complete the scanning software installation.
If you are installing an HP Scanjet 8350/8390 scanner, the software will prompt you to insert HP CD 2 in the computer CD drive after you have installed the software from HP CD 1.

Note If you have any questions about what scanning software to install, click the How do I choose? button.
Macintosh
- Find the HP CD 1 for Macintosh that came with the scanner.
- Insert the HP CD 1 for Macintosh in the computer CD drive.
- Double-click the HP Scanjet Scanner Install icon. Follow the onscreen instructions to complete the software installation.
Chapter 1
Step 4. Connect the power cable
- Use the power cable to connect the scanner to an electrical outlet.
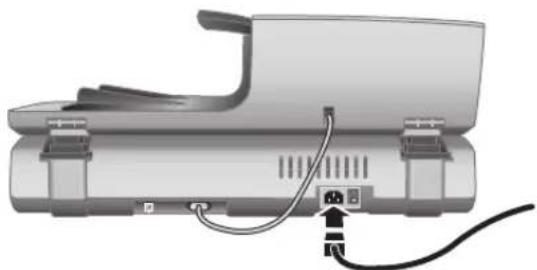
- Press the Power switch on the back of the scanner to turn the scanner on.
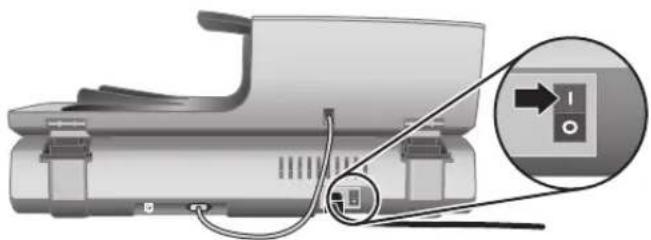

Note After using the scanner, press the Power Save (U) button on the scanner front panel to put the scanner in power save mode. You do not need to use the Power switch on the back of the scanner after the scanner is set up and operational.
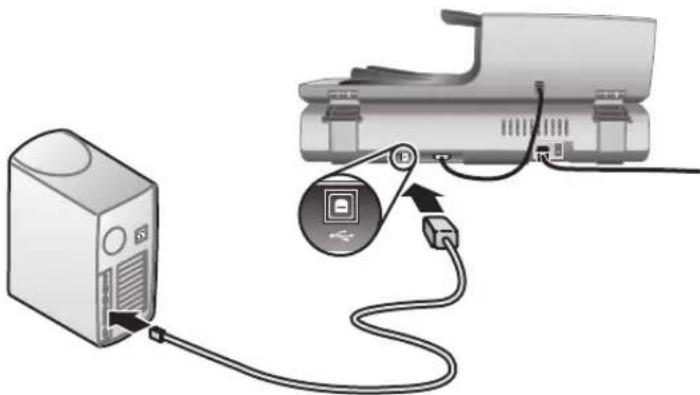
Step 5. Connect the USB cable

Caution If you are connecting the scanner to a Windows computer and you have not inserted HP CD 1 in the computer CD drive, do so before connecting the scanner to the computer.
Use the USB cable that came with the scanner to connect the scanner to the computer.
Step 6. Test the installation
- Place a single document in the ADF or on the scanner glass.
- Make sure that a printer is attached to the computer or is available over the network.
- Press the Copy ( ) button.
- A copy is sent to the default printer. If a printer is not attached to the computer, an error message is displayed.
If an error message is displayed, see Troubleshooting on page 21.
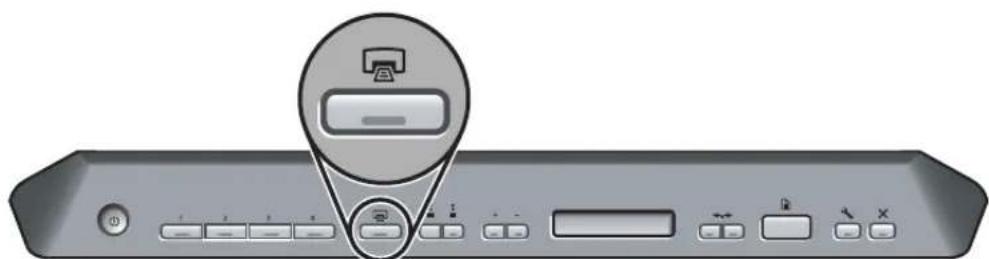
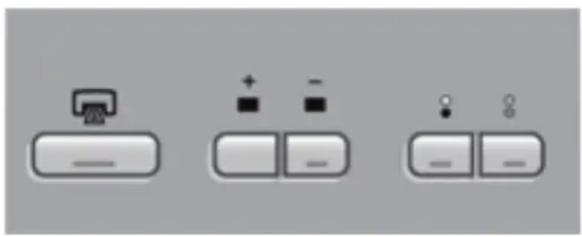
2 How to use the scanner buttons
Use the buttons on the scanner front panel to start a scan, select a destination for a scan, and configure some scanner settings.

1 Power Save button
2 Customizable buttons
3 Copy buttons
4 Scan Document To buttons
5 Button Settings button
6 Cancel button
Depending on the scanner model and the software installed, the buttons exhibit certain behaviors.
For more information about the scanner buttons than is provided in this chapter, see the scanner user guide. For information about the scanner user guide, see Where to get additional information on page 19.
The customizable buttons are labeled 1, 2, 3, and 4. You can use these buttons to automate your most frequent scanning tasks, such as:
- Scan a document to a searchable PDF
- Send a scan directly to an e-mail program
- Scan a document for editable text
- Scan film or photos to a folder for archiving

Note If either HP Smart Document Scan Software or HP Solution Center are not installed on a Windows computer, these buttons have no function.
Button Settings button

Use the Button Settings button to view and change the settings for the scanner buttons, including the four customizable buttons.
Windows
If both HP Smart Document Scan Software and HP Photosmart Software are installed on the computer, use the Button Settings button to open the Button Settings Utility.
Otherwise, press the Button Settings button to open the HP Photosmart Software Button Settings dialog box or HP Smart Document Scan Software depending on which program is installed on the computer.
Macintosh
Press the Button Settings button to open the HP Scanner Preferences.
Copy buttons
You can use the Copy button to quickly copy documents and images. You can also specify how many copies to make and whether to make the copies black-and-white or color.
Chapter 2
Scan Document To buttons

Windows
If HP Photosmart Software is installed on the computer, you can use the Scan Document To button (B) to send a scan to a software program. If only HP Smart Document Scan Software is installed on the computer, you can press the Scan Document To button to open HP Smart Document Scan Software so that you can select a scan profile to use.
Macintosh
Use the Scan Document To button to send a scan to a software program.
Power Save button
| Press the Power Save button to turn off the lamp and put the scanner in power-saving mode when you are not using the scanner. When you are ready to begin scanning again, just press one of the front panel scan buttons to turn the lamp back on and begin scanning immediately. |
Cancel button
| × | Press the Cancel button to cancel a scan in progress, or to cancel a series of scans when you are scanning from the ADF. |
3 Other scanner materials
Scanning software CDs
The scanner comes with several software CDs. The number of software CDs packaged with the scanner varies according to scanner model. Also, the programs available on the CDs vary according to computer operating system and language. Before installing any of the software, see Step 3. Install the software on page 7.
There might be several non-HP software programs included with the scanner. These software programs are not offered as substitutes for HP software. For help with a non-HP software program, see the documentation for that program.

Note Some of the software programs described in this section are not available for all scanner models and countries/regions. The software included with your scanner might be different than the software described in this section.
HP Smart Document Scan Software CD (Windows)
This software CD comes with the HP Scanjet 8350/8390 scanner models only.
| Programs | Software use Supported operating systems | Windows 98SE, Me, 2000, and XP This program is not available in Asian languages for Windows 98SE and Me. |
| HP Smart Document Scan Software | You can use HP Smart Document Scan Software to create high-quality scans from multi-page documents and to automate scanning tasks you perform often. | |
| Kofax Virtual Rescan Software | Use Kofax Virtual Rescan Software to create clearer and more readable scans from colored or damaged documents. | Windows 2000, and XP |
| HP Scanjet 8300 Series Performance Document Scanning software | This software includes the ISIS/ TWAIN drivers necessary for using the scanner with standard business applications and customized software. | Windows 98SE, Me, 2000, and XP |
HP Photosmart Software CD (Windows)
HP recommends that Windows users install one of the choices on this CD. HP image-scanning software provides higher scan resolution and better color management than HP Smart Document Scan Software.
Chapter 3
| Programs Software | use Supported operating | systems |
| HP Scanjet 8300 Series Picture and General Scanning Software (including HP Solution Center) | This is the minimum software that you must install in order to use the transparent media adapter (TMA) to scan slides and negatives. | Windows 98SE, Me, 2000, and XP |
| HP Photosmart Software | Use HP Photosmart Software to manage, edit, and share images. This program is available in two versions: HP Photosmart Essential and HP Photosmart Premier. HP Photosmart Premier has advanced image-editing features not included with HP Photosmart Essential. | Windows 98SE, Me, 2000, and XPHP Photosmart Premier software is not available for Windows 98SE and Me. |
HP Macintosh scanning software CD
| Programs | Software use Supported operating systems | systems |
| HP Photosmart Software | Use HP Photosmart Software to manage, edit, and share images. | Mac OS 10.2.8, 10.3, and 10.4 |
| HP Scan Pro Use HP | Scan Pro to scan pictures, documents, and film. | Mac OS 10.2.8, 10.3, and 10.4 |
| IRIS Readiris Use Readiris to scan documents for editable text. | Mac OS 10.2.8, 10.3, and 10.4 | |
| NewSoft Presto! PageManager | Use NewSoft Presto! PageManager to organize, find, and share paper and PDF documents. | Mac OS 10.2.8, 10.3, and 10.4 |
ScanSoft PaperPort CD
| Programs | Software use Supported operating systems | Windows 98SE, Me, 2000, and XP for most languages. Some languages support only Windows 2000 and XP. |
| ScanSoft PaperPort 10 | Use ScanSoft PaperPort 10 to organize, find, and share paper and PDF documents. |
IRIS Readiris Pro CD
| Programs | Software use Supported operating systems | systems |
| IRIS Readiris Pro 10 | Use Readiris Pro 10 to scan documents for editable text. | Windows 98SE, Me, 2000, and XP |
Adobe Photoshop Elements CD
| Programs | Software use Supported operating systems | Windows 98SE, Me, 2000, and XP, and Mac OS 10.2.8, 10.3, and 10.4 |
| Adobe Photoshop Elements 3.0 | Use Adobe Photoshop Elements 3.0 to edit images and digital photos. |
Chapter 3
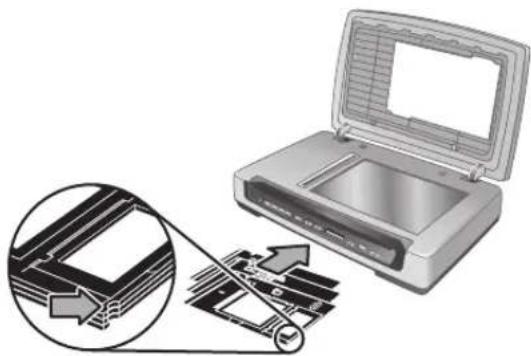
Film templates
The templates for scanning slides and negatives are stored in a storage slot underneath the scanning bed.
Before using the film templates, follow these steps:
- Remove the templates from the storage slot.
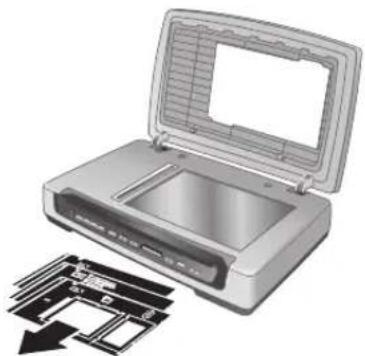
- Remove the protective tissue from the templates.
- Insert the templates in the storage slot. Be sure that the tabs on the templates face out from the scanner.
Customizable button labels
Use the customizable button labels to note what scanning task is associated with each customizable button (1, 2, 3, and 4). The label can be attached directly to the scanner or to another object in the scanner working area.

For more information about configuring the customizable buttons, see How to use the scanner buttons on page 10.
How to remove the automatic document feeder (ADF)
Follow these steps to uninstall the automatic document feeder (ADF):
- Turn the thumbscrews on the connector until they are loose. Disconnect the accessory cable from the accessory cable port on the scanner.
- Remove the ADF input tray.
- Lift the ADF to the open position.

Caution Do not attempt to uninstall the ADF in the closed position. The ADF must be uninstalled in the opened position. Keep fingers away from the ADF hinges.
- Grasp the ADF by the sides.
Chapter 3
English
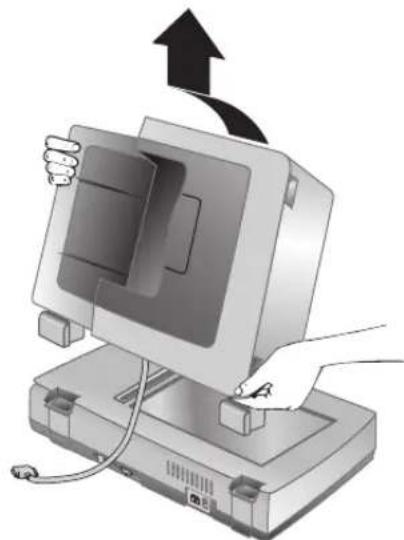
- Lift the ADF upwards while slightly tilting it away from you until the hinge posts are pulled out of the sockets on the scanner bed.
4 Where to get additional information
The scanner comes with several sources of information about using the scanner and the scanning software.
Windows
Windows users can refer to these additional sources of information:
HP Scanjet 8300 series User Guide: The scanner user guide provides the information you need to know for using, maintaining, and troubleshooting the scanner. The scanner user guide is the primary source for scanner information. The user guide is a PDF, so you can print all or parts of it. To open the scanner user guide, do one of the following depending on scanner model and software installation:
- Double-click the HP Solution Center icon on the desktop, select the tab for the scanner, click Onscreen Guide, and then select the user guide.
- Click Start, point to Programs or All Programs, point to HP, point to Scanjet, point to 8350, 8390, and then click User Guide.
HP Photosmart Software help: You can use HP Photosmart Software help to learn more about HP Photosmart Software. To open HP Photosmart Software help, double-click the HP Solution Center icon on the computer desktop. Click the tab for the scanner, click Onscreen Guide, and then select HP Photosmart Software help.
HP Smart Document Scan Software help: You can use HP Smart Document Scan Software help to learn how to use HP Smart Document Scan Software features, such as creating and editing scan profiles. To open HP Smart Document Scan Software help, click Help on the HP Smart Document Scan Software toolbar.
- Button Settings Utility help: If HP Smart Document Scan Software is installed on the computer, you can use the Button Settings Utility help to learn what options are available for configuring the scanner customizable buttons. To open the Button Settings Utility help, click Help on the Button Settings Utility dialog box.
Macintosh
Macintosh users can refer to these additional sources of information:
HP Scanjet 8300 series User Guide: The scanner user guide provides the information you need to know for using, maintaining, and troubleshooting the scanner. The scanner user guide is the primary source for scanner information. The user guide is a PDF, so you can print all or parts of it. To view the scanner user guide, open the Applications folder, open the Hewlett-Packard folder, open the HP Scanjet Scanner folder, and then double-click the User Guide icon.
HP Device Manager help: To open HP Device Manager help, click the HP Device Manager icon in the Dock, and then click the Help button.
HP Scan Pro help: Open the Applications folder, open the Hewlett-Packard folder, and then double-click the HP Scan Pro icon. After HP Scan Pro opens, click Help in the menubar, and then click HP Scan Pro help.
5 Care and maintenance
Occasional cleaning of the scanner helps ensure higher-quality scans. The amount of care necessary depends upon several factors, including the amount of use and the environment. You should perform routine cleaning as necessary.
Routine cleaning and maintenance should include cleaning the scanner glass, the transparent materials adapter (TMA), and the automatic document feeder (ADF).
For in-depth instructions about maintaining the scanner, see the scanner user guide. For information about the scanner user guide, see Where to get additional information on page 19.

Caution Avoid placing items that have sharp edges in the scanner. Doing so can damage the scanner. Before placing an item on the scanner glass, make sure that the item does not contain wet glue, correction fluid, or other substances that can be transferred to the glass.
6 Troubleshooting
Installation dialog box does not display (Windows)
Follow these steps if the installation dialog box does not display:
- Double-click the My Computer icon on the computer desktop.
- Right-click the HP CD icon, and then click Explore.
- Double-click the setup.exe file.
Scanner error messages
The scanner displays error messages on the scanner front panel when it encounters a problem, such as a paper jam. A list of the scanner error codes and their meanings is available in the scanner user guide. For information about the scanner user guide, see Where to get additional information on page 19.
Other sources for help
For more troubleshooting help with the scanner hardware or software, see Where to get additional information on page 19.
Scanner does not work after installation
If the scanner does not work after installation, you might see one of the following messages displayed on the computer:
The scanner could not be initialized.
The scanner could not be found.
- An internal error has occurred.
The computer cannot communicate with the scanner.
Try the following to fix the problem.
Step 1. Check the cables
Verify that the cable connections are in working order.
Power cable
The power cable is connected between the scanner and a power outlet.
- Ensure that the power cable is securely connected between the scanner and a live electrical outlet or surge protector.
- If the power cable is connected to a surge protector, ensure that the surge protector is plugged into an outlet and turned on.
- Ensure that the power switch on the back of the scanner is in the On position. For more information, see Step 4. Connect the power cable on page 8.
- Disconnect the power cable from the scanner and turn off the computer. After 60 seconds, reconnect the power cable to the scanner and then turn on the computer, in that order.
Chapter 6
If the problem persists after verifying the above items, try the following:
- Disconnect the power cable from the scanner.
- Wait 60 seconds.
- Reconnect the power cable to the scanner.
USB cable
Check the physical connection to the scanner:
- Use the cable that was included with the scanner. Another USB cable might not be compatible with the scanner.
- Ensure that the USB cable is securely connected between the scanner and the computer or USB hub. The trident icon on the USB cable faces up when the cable is properly connected to the scanner.
Troubleshooting the USB connection:
-
Do one of the following tasks depending on how the scanner is connected to the computer:
-
If the USB cable is connected to a USB hub or a docking station for a laptop, disconnect the USB cable from the USB hub or the docking station, and then connect the USB cable directly to the computer.
- If the USB cable is directly connected to the computer, plug it into another USB port on the computer.
-
Remove all other USB devices from the computer except for the keyboard and the mouse.
-
Turn the scanner off and then on.
- Restart the computer.
- After the computer has restarted, try using the scanner.
If the scanner works and you changed the way it was connected to the computer in step 1, the communication problem might involve the USB hub or docking station. Leave the scanner directly connected to the computer.
If the scanner does not work and you are a Windows user, uninstall and then reinstall the HP scanning software.
Accessory cable
The accessory cable is connected between the TMA/ADF in the scanner lid and the scanner base.
Ensure the cable is securely connected in the back of the scanner. For more information, see Step 2. Connect the automatic document feeder (ADF) on page 5.
Step 2. Uninstall and then reinstall the HP scanning software (Windows)
If checking the scanner cable connections did not solve the problem, the problem might have occurred because of an incomplete installation. Try uninstalling and then reinstalling the HP scanning software.
-
Disconnect the USB cable from the computer.
-
Do one of the following tasks to open the Control Panel:
-
Windows XP: Click Start, and then click Control Panel.
-
Windows 98SE, Me, or 2000: Click Start, point to Settings, and then click Control Panel.
-
Double-click the Add/Remove Programs icon.
A list of currently installed programs is displayed.
- Select HP Scanjet Scanner Drivers 6.0, and then click Remove or Change/Remove.
-
Follow the onscreen instructions. If prompted to remove or repair the software, click Remove. If prompted to restart the computer, click No.
-
After the HP scanning software is removed, unplug the scanner from the electrical outlet.
-
Restart the computer.
- Insert HP CD 1 in the computer CD drive.
- Follow the onscreen instructions to install the HP scanning software.
- After the HP scanning software has installed, connect the scanner to an electrical outlet, turn on the scanner, and then use the USB cable to connect the scanner to the computer.
- Follow the onscreen instructions.
7 Product support
Accessibility Web site
Customers with disabilities can get help by visiting www.hp.com/ Hpinfo/community/ accessibility/prodserv/.
HP Scanjet Web site
Visit www.hp.com/sbso/busproducts_imaging.html for a variety of information:
- Learn tips for scanning more effectively and creatively.
- Gain access to HP Scanjet driver updates and software.
- Register your product.
- Subscribe to newsletters, driver and software updates, and support alerts.
Purchase scanner supplies.
Support process
The HP support process works most effectively if you perform the following steps in the order specified:
- Review the onscreen Help for the software and scanner, including the troubleshooting sections.
- If you have access to the Internet, you can obtain a wide range of information about your scanner. Visit the HP Technical Support Web site for product help, drivers, and software updates at www.hp.com/support.
- Use HP e-support. If you have access to the Internet, connect with HP by going to www.hp.com/support. Select Support and Troubleshooting, enter the scanner model information, and then click the double arrows. At the bottom of the next page, select e-mail under Collaborative Resources. You will receive a personal reply from an HP Product Support technician. E-mail support is available in the languages listed at that Web site.
- If you are a customer in the United States, go to step 5. Otherwise, contact your local HP dealer. If your scanner has a hardware failure, take it to your local HP dealer for a solution. Service is free during your scanner's limited warranty period. After the warranty period, the dealer will quote a service charge.
-
Contact the HP Product Support Center for support by phone. Please consult the following Web site to check the details and conditions of phone support in your country/region: www.hp.com/support. Call HP while you are in front of your computer and scanner. For faster service, please be prepared to provide the following information:
-
Scanner model number (located on the scanner)
- Scanner serial number (located on the scanner)
- Computer operating system
- Version of the scanner software (located on the scanner's CD label)
- Messages displayed at the time the situation occurred
The applicable conditions for HP phone support are subject to change without notice.
Telephone support is free from the date of purchase for the period specified unless otherwise noted.
8 Regulatory information and product specifications
This section contains regulatory information and product specifications for the HP Scanjet 8300 series scanner and accessories.
Scanner specifications
| Name Description | |
| Scanner type Flatbed with transparent materials adapter (TMA) | |
| Size | HP Scanjet 8300: 625 mm x 415 mm x 130 mm (24.61 x 16.34 x 5.12 inches) HP Scanjet 8350/8390: 625 mm x 415 mm x 265 mm (24.61 x 16.34 x 10.43 inches) |
| Weight HP Scanjet | 8300: 8.9 kg (19.58 lbs) HP Scanjet 8350/8390: 15 kg (33 lbs) |
| Scanning element | Charged-coupled device |
| Interface USB 2.0 Hi-Speed | Hi-Speed |
| Optical resolution | 4800 x 4800 dpi hardware |
| AC power 100-240V~, 50/60Hz, 1.5A | |
| Power consumption | For power consumption data see the regulatory_complement.htm file on the HP Photosmart Software CD. |
| ENERGY STAR | Your HP scanner is ENERGY STAR® compliant. As an ENERGY STAR® partner, Hewlett-Packard Company has determined that this product meets the ENERGY STAR® guidelines for energy efficiency. |
Transparent materials adapter (TMA) specifications
| Name Description | |
| Media types | Negative strips: Three 35 mm strips each containing six frames35 mm slides: Eight slidesMedium (120/220) film: Up to 6 x 9 cm frameLarge format: One 4 x 5 inch frame |
| Media capacity Slide: 1.05 mm to 3.26 mm thick and 49.8 mm to 50.8 mm on any side | |
| Power requirements | 24Vdc, 700 mA |
Automatic document feeder (ADF) specifications
| Name Description | |
| Size 625 mm x 415 | mm x 160 mm (24.61 x 16.34 x 6.30 inches) |
| Weight with scanner | 15 kg (33 lbs) |
| Paper tray capacity | 100 pieces of 83 g/m² (18.2-lb bond) |
| Maximum paper size | 210 mm x 355.6 mm (8.5 x 14 inches) |
| Minimum paper size | 148 mm x 148 mm (5.8 x 5.8 inches) |
| Maximum paper weight | 105g/m² (28 lbs) |
| Power requirements | • 5Vdc, 830mA • 18Vdc, 310mA • 32Vdc, 1260mA |
Environmental specifications
| Name Description | |
| Temperature Operating | storing the scanner and TMA: 10° to 35°C (50° to 95°F) |
| Storage: -40° to 60°C (-40° to 140°F) | |
| Relative humidity Operating | operating the scanner and TMA: 15 percent to 80 percent noncondensing 10° to 35°C (50° to 95°F) |
| Storage: up to 90 percent at 0° to 60°C or (32° to 140°F) |
Regulatory information
Regulatory Model Identification Number: For regulatory identification purposes your product is assigned a Regulatory Model Number. The Regulatory Model Number for your product is FCLSD-0503. This regulatory number should not be confused with the marketing name (HP Scanjet 8300 series) or product numbers (L1960A, L1965A,
Chapter 8
L1966A, L1967A). Additional regulatory information about your scanner can be found on the regulatory_supplement.htm file on the HP Photosmart Software CD.
Recycle and restricted material information
Recycling
Recycling, energy consumption, and environmental information is located on the HP Photosmart Software CD that comes with the scanner. On the CD, browse for the file named recycleSUPplement.pdf
Product restricted material
This HP product contains the following material that might require special handling at end of-life: Mercury in the scanner fluorescent lamp and transparent materials adapter (< 5mg)
For recycling information, contact www.hp.com/go/recycle, your local authorities, or the Electronic Industries Alliance at www.eiae.org.
Disposal of Waste Equipment by Users in Private Households in the European Union
区
This symbol on the product or on its packaging indicates that this product must not be disposed of with your other household waste. Instead, it is your responsibility to dispose of your waste equipment by handing it over to a designated collection point for the recycling of waste electrical and electronic equipment. The separate collection and recycling of your waste equipment at the time of disposal will help to conserve natural resources and ensure that it is recycled in a manner that protects human health and the environment. For more information about where you can drop off your waste equipment for recycling, please contact your local city office, your household waste disposal service or the shop where you purchased the product.
9 Hewlett-Packard limited warranty statement
HP Scanjet 8300 series scanner
Duration of limited warranty
| Model Asia/Pacific | Americas Europe/Middle | East/Africa |
| 8300 1 year 1 year 1 | year | |
| 8350 1 year 1 year 1 | year | |
| 8390 1 year 1 year 3 | years |
- HP warrants to you, the end-user customer, that HP hardware, accessories, and supplies will be free from defects in materials and workmanship after the date of purchase, for the period specified above. If HP receives notice of such defects during the warranty period, HP will, at its option, either replace or repair products which prove to be defective. Replacement products may be either new or equivalent in performance to new.
- HP warrants to you that HP software will not fail to execute its programming instructions after the date of purchase, for the period specified above, due to defects in material and workmanship when properly installed and used. If HP receives notice of such defects during the warranty period, HP will replace software which does not execute its programming instructions due to such defects.
- HP does not warrant that the operation of HP products will be uninterrupted or error free. If HP is unable, within a reasonable time, to repair or replace any product to a condition as warranted, you will be entitled to a refund of the purchase price upon prompt return of the product.
- HP products may contain remanufactured parts equivalent to new in performance or may have been subject to incidental use.
- This warranty does not apply to defects resulting from (a) improper or inadequate maintenance or calibration, (b) software, interfacing, parts, or supplies not supplied by HP, (c) unauthorized modification or misuse, (d) operation outside of the published environmental specifications for the product, or (e) improper site preparation or maintenance.
- TO THE EXTENT ALLOWED BY LOCAL LAW, THE ABOVE WARRANTY ARE EXCLUSIVE AND NO OTHER WARRANTY OR CONDITION, WHETHER WRITTEN OR ORAL, IS EXPRESSED OR IMPLIED, AND HP SPECIFICALLY DISCLAIMS ANY IMPLIED WARRANTY OR CONDITIONS OF MERCHANTABILITY, SATISFACTORY QUALITY, AND FITNESS FOR A PARTICULAR PURPOSE. Some countries, states, or provinces do not allow limitations on the duration of an implied warranty, so the above limitation or exclusion might not apply to you. This warranty gives you specific legal rights, and you might also have other rights that vary from country to country, state to state, or province to province.
Chapter 9
- HP's limited warranty is valid in any country or locality where HP has a support presence for this product and where HP has marketed this product. The level of warranty service you receive may vary according to local standards. HP will not alter the form, fit, or function of the product to make it operate in a country in which it was never intended to function for legal or regulatory reasons.
- TO THE EXTENT ALLOWED BY LOCAL LAW, THE REMEDIES IN THIS WARRANTY STATEMENT ARE YOUR SOLE AND EXCLUSIVE REMEDIES. EXCEPT AS INDICATED ABOVE, IN NO EVENT WILL HP OR ITS SUPPLIERS BE LIABLE FOR LOSS OF DATA OR FOR DIRECT, SPECIAL, INCIDENTAL, CONSEQUENTIAL (INCLUDING LOST PROFIT OR DATA), OR OTHER DAMAGE, WHETHER BASED IN CONTRACT, TORT, OR OTHERWISE. Some countries, states, or provinces do not allow the exclusion or limitation of incidental or consequential damages, so the above limitation or exclusion may not apply to you.
- THE WARRANTY TERMS CONTAINED IN THIS STATEMENT, EXCEPT TO THE EXTENT LAWFULLY PERMITTED, DO NOT EXCLUDE, RESTRICT, OR MODIFY AND ARE IN ADDITION TO THE MANDATORY STATUTORY RIGHTS APPLICABLE TO THE SALE OF THIS PRODUCT TO YOU.
Regions
Asia Pacific
Service and support
Hewlett Packard Technical Support is your easy, fast and direct web resource for product assistance, diagnostics and driver downloads. It is your source for all service and support needs. Receive award winning assistance 24 hours per day, 7 days a week at www.hp.com/support.
Post-Warranty period service and support
After the warranty period of your HP product, you have different options depending on the region where you reside. See Call Options and Service Options for more information.
Call options
You can call the support center, however there will be a "per incident" fee.
Service options
You can replace the hardware for a fee. You will have access to Hewlett Packard Technical Support at www.hp.com/support for 3 years.
Upgraded warranty option
You can upgrade your standard factory warranty to three years "Next business day" exchange with the HP Care Pack service. Service coverage begins on product purchase date and the pack must be purchased and registered by HP within the first year of product purchase.
This warranty upgrade offers maximized uptime and productivity, the convenience of door-to-door pickup with delivery, packaging and freight prepaid by HP.
For more information please refer to: www.hp.com/hps/index_support
Americas
Service and support
Hewlett Packard Technical Support is your easy, fast and direct web resource for product assistance, diagnostics and driver downloads. It is your source for all service and support needs. Receive award winning assistance 24 hours per day, 7 days a week at www.hp.com/support.
Post-Warranty period service and support
After the warranty period of your HP product, you have different options depending on the region where you reside. See Call Options and Service Options for more information.
Call options
Latin America: You can call the support center. No fee in the year 2005, but in 2006 a fee will be charged.
United States and Canada: You can call the support center, however there will be a "per incident" fee.
Service options
Latin America: You can repair or return for a fee OR upgrade replacement for a fee.
United States: You can replace hardware for a fee OR upgrade for a fee.
Canada: You can repair or return and for a fee have a 3-5 day turn-around time.
Any customer will have access to Hewlett Packard Technical Support at www.hp.com/support for 3 years.
Upgraded warranty options
You can select the following upgraded warranty options (available in the U.S. only):
Standard Next Day Exchange
Europe, Middle East, and Africa
Names and addresses of the HP entities which grant HP's Limited Warranty (manufacturer's warranty) in your country are available.
You may also have statutory legal rights against the seller on the basis of the purchase agreement in addition to the manufacturer's warranty, which are not restricted by this manufacturer's warranty.
Service and support
Hewlett Packard Technical Support is your easy, fast and direct web resource for product assistance, diagnostics and driver downloads. It is your source for all service and support
Chapter 9
needs. Receive award winning assistance 24 hours per day, 7 days a week at www.hp.com/support.
Post-warranty period service and support
After the warranty period of your HP product, you have different options depending on the region where you reside. See Call Options and Service Options for more information.
Call options
You can go back to the dealer or call the customer call center, however there will be a "per incident" fee.
Service options
You can take product back to dealer or call support center for replacement of product for a fee. You will have access to Hewlett Packard Technical Support at www.hp.com/ support for 3 years.
Upgraded warranty option
For the 8300 and 8350 models, you can upgrade you can upgrade your standard factory warranty to three years Next business day exchange with the HP Care Pack service. For the 8390 model, a three year warranty period is automatic.
Service coverage begins on product purchase date and the pack must be purchased and registered by HP within the first year of product purchase. You will benefit from a dedicated access (phone number) to HP hardware technical support. In case it is determined that your product needs replacement, HP will ship you this replacement product next contracted business day free of charge.
This warranty upgrade offers maximized uptime and productivity, the convenience of door-to-door pickup with delivery, packaging and freight prepaid by HP.
Europe/Middle East/Africa warranty upgrade Web sites
- www.hp.com/fr/extension-garantee for France
www.hp.com/uk/warranty-extension for UK
www.hp.nl/garantie-uitbreiding for Holland
www.hp.com/it/extensione-garanzia for Italy - www.hp.com/es/extensiones-garantia for Spain
www.hp.com/de/garantie-erweiterung for Germany
www.hp.com/se/garantiforlangning for Sweden
www.hp.com/dk/garantiudvidelse for Denmark
www.hp.com/fi/takuunlaajennus for Finland
www.hp.com/be/garantie-uitbreiding for Belgium (dutch)
www.hp.com/be/extension-garantie for Belgium (french)
www.hp.com/pt/extensao-de-garantia for Portugal
www.hp.com/je/warranty-extension for Ireland
Countries not listed : For more information, please check with your local reseller.
© 2005 Copyright Hewlett-Packard Development Company, L.P.
Windows. 19
Macintosh. 19
7 Assistance products 25
Services et assistance
Services et assistance post-garantie
Services et assistance
Services et assistance post-garantie
Services et assistance
Services et assistance post-garantie
© 2005 Copyright Hewlett-Packard Development Company, L.P.
18 HP Scanjet series 8300
Escaner HP Scanjet series 8300
Puede llamar al centro de asistencia技术水平, except for the fact that he has been involved in a number of projects.
Capitulo 9
© 2005 Copyright Hewlett-Packard Development Company, L.P.
Windows. 19
Macintosh. 19
Pinted on at least 50% total recycled fibers in at least 10% post-consumer paper
Printed in U.S.A or Mexico
© 2005 Hewlett-Packard Development Company, L.P.
www.hp.com
