OG5096 - Motion detector IFM - Free user manual and instructions
Find the device manual for free OG5096 IFM in PDF.


| Product type | Photoelectric barrier (motion detector) from the efector200 series |
| Detection range | Variable according to the label on the device (maximum range set at factory) |
| Power supply | Galvanically isolated power supply with overload protection (UL 508 limited voltage category) |
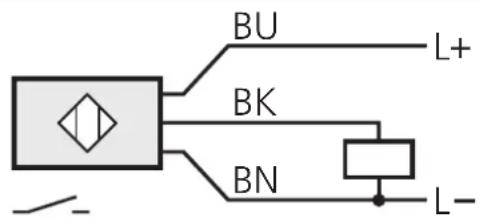
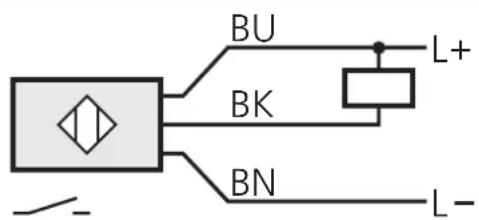
| Electrical connection | 3 wires: BN (brown) = L+, BU (blue) = L-, BK (black) = output |
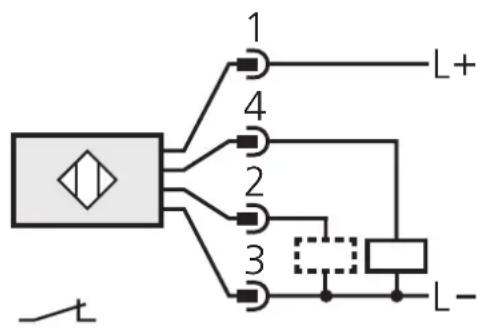
| Output function | Programmable by wiring (see label or page 17) |
| Diagnostic output | 10 mA max., switches in case of detection error, short circuit or internal error |
| LED indicators | Green (device operational), Yellow (output switched), Red (error), combinations (short circuit, internal error) |
| Sensitivity adjustment | By push button: adjustment for static or moving objects, maximum sensitivity adjustment |
| Lock / Unlock | Long press of 10 seconds to lock or unlock the cell |
| Mounting | Receiver (OGE-...) and emitter (OGS-...) with mounting bracket, precise orientation required |
| Commissioning | Plug and play, factory set to maximum range |
| Maintenance | Clean lenses without solvents or abrasive products |
| Integrated protections | Short circuit protection, LED indication, diagnostic output |
| Operating temperature | Not specified (estimate: typical for IFM: -25°C to +60°C) |
| Protection rating | Not specified (estimate: IP67 for the efector200 series) |
Frequently Asked Questions - OG5096 IFM
User questions about OG5096 IFM
0 question about this device. Answer the ones you know or ask your own.
Ask a new question about this device
Download the instructions for your Motion detector in PDF format for free! Find your manual OG5096 - IFM and take your electronic device back in hand. On this page are published all the documents necessary for the use of your device. OG5096 by IFM.
USER MANUAL OG5096 IFM
natural_image
Technical line drawing of two mechanical components with threaded ends and flanges (no text or symbols)Functions and features
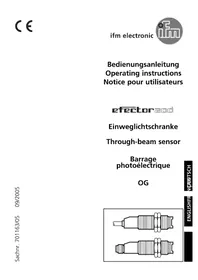
The through-beam sensor detects objects and materials without contact and indicates their presence by a switched signal.
Range (r): see type label.
Electrical connection

The device shall be supplied from an isolating source and protected by an overcurrent device such that the limited voltage circuit requirements in accordance with UL 508 are met.
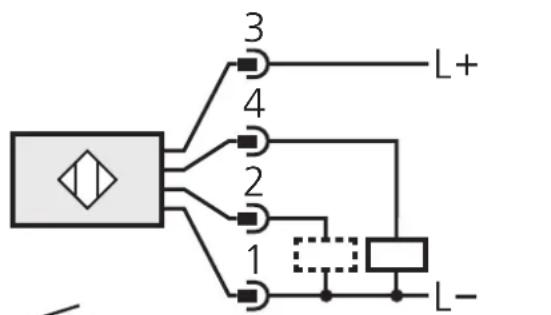
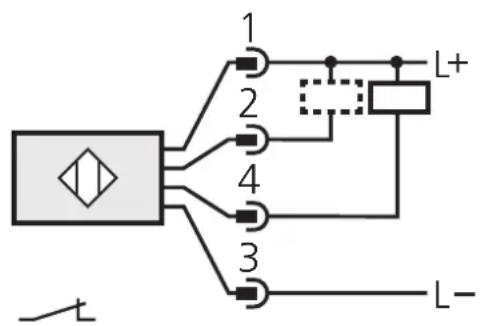
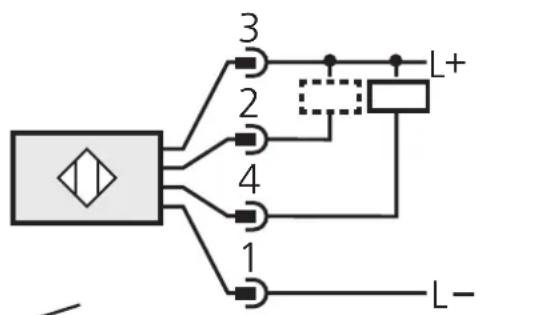
Isolate power, then connect the unit (see page 17 or type label). Core colours (for sensors with cable connection): BN = brown, BU = blue, BK = black.
Programming of the output function by wiring (see page 17 or type label). Load of the function check output (fc output): max. 10mA.
Installation
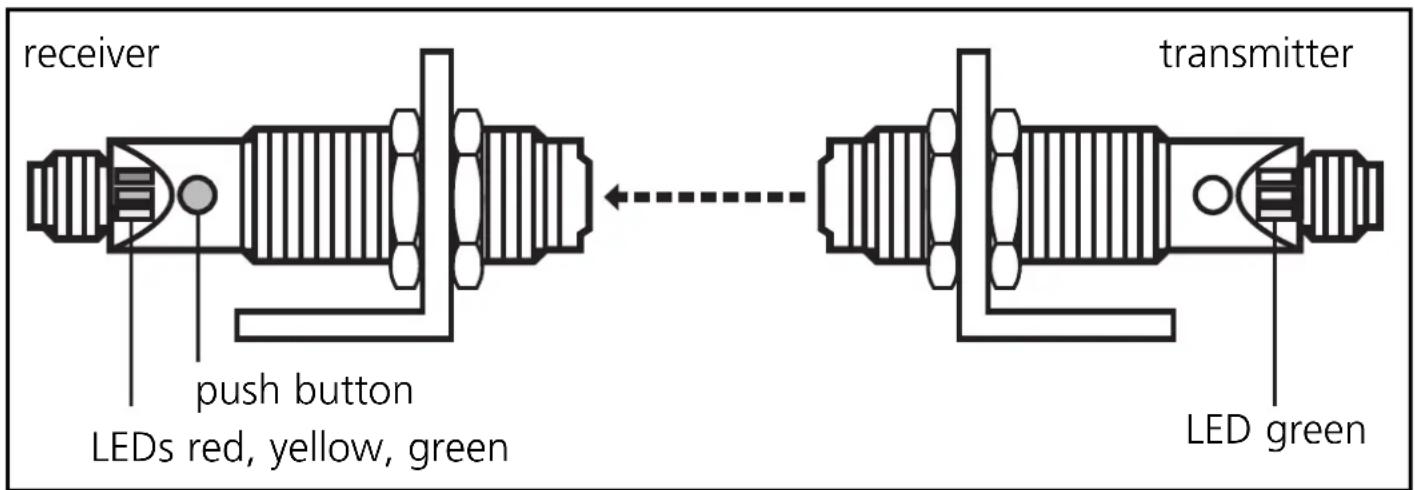
Fix the receiver (type OGE-...) in position.
Align the transmitter (type OGS-...) towards the receiver and tighten in the same way. Maximum range is only possible with precise alignment.
NB: Commissioning
The through-beam sensor is supplied ready to operate (plug and play) set at the max. sensing range. This is sufficient if the through-beam sensor can operate with maximum excess gain (highest contrast). The following setting procedures should only be necessary in less straightforward applications, for example if partly transparent objects must be detected.
Setting of the sensitivity with stationary objects
| 1 | Activate the programming mode of the unit. Press for about 2s until the red LED flashes. Press for about 2s until the red LED flashes. |
| The red LED goes out; the yellow and green LEDs flash alternately.The unit is in the programming mode. |
| 2 | Set the sensitivitywithobject. Press once. Press once. |
| The yellow and green LEDs go out for approx. 1s,then flash again alternately. |
| 3 | Set the sensitivitywithoutobject. Press once. Press once. |
| The yellow and green LEDs go out for approx. 1s,then the green LED is on.The unit is in the operating mode. |
You can also proceed in reverse order: first setting without the object, then with the object.

If the setting of the sensitivity is not possible (e.g. object signal and background signal are about the same), the red LED flashes after step 3 for approx. 2s. The unit then passes into the operating mode with the sensitivity being unchanged.
Setting of the sensitivity with moving objects
| 1 | Activate the programming mode of the unit. Press for about 2s until the red LED flashes. Press for about 2s until the red LED flashes. |
| The red LED goes out; the yellow and green LEDs flash alternately.The unit is in the programming mode. |
| 2 | During the measurement (approx. 1s) allow at least two objects to move through the sensing area of the lens.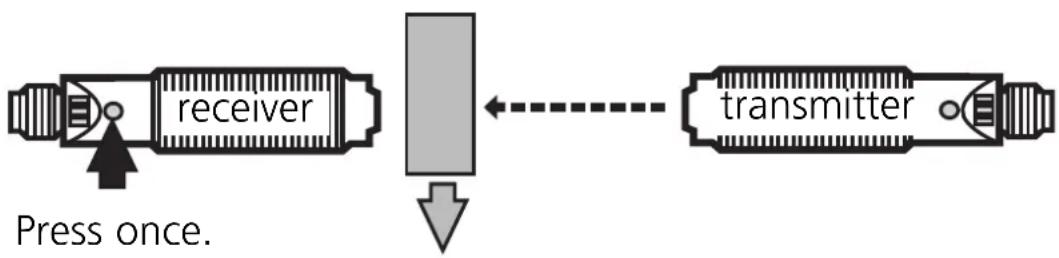 |
| The yellow and green LEDs go out for approx. 1s, then flash again alternately. |
| 3 | During the measurement (approx. 1s) allow at least two objects to move through the sensing area of the lens.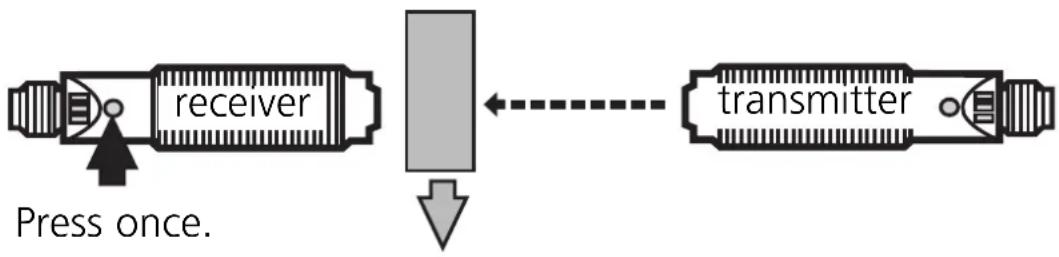 |
| The yellow and green LEDs go out for approx. 1s, then the green LED is on.The unit is in the operating mode. |

If the setting of the sensitivity is not possible (e.g. object signal and background signal are about the same), the red LED flashes after step 3 for approx. 2s. The unit then passes into the operating mode with the sensitivity being unchanged.
Setting of the maximum sensitivity
- Go into the programming mode (step 1).
- Interrupt the light beam.
- Press the setting button twice (see steps 2 and 3).
Locking/Unlocking:
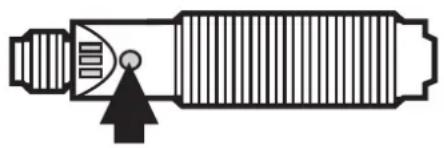 Press for 10s. Press for 10s. | The red LED lights for a short time, then the yellow and green LEDs flash alternately; after 10s the LEDs go out, the unit is locked. | |
 | ||
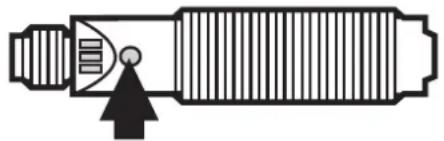 Press for 10s. Press for 10s. | After 10s the LEDs go out, locking is annulled. | |
 | ||
Operation
Check the safe functioning of the through-beam sensor. Display by LEDs and by the function-check output.
| LED green is lit unit is ready for operation | |
| LED yellow is lit output is switched | |
| LED red is lit | error in object detection, e.g. maladjustment, soiling of the lenses |
| LEDs yellow + red | flashing alternately, 2 Hz: output short-circuited flashing alternately, 1 Hz: internal malfunction (output is not switched) |
Function check output
(not for sensors with cable connection)
- Switches in the case of incorrect object detection (error in object detection, maladjustment, soiling of the lenses) after approx. 4 s, it switches back approx. 4 s after the object is again correctly detected.
- Immediately switches in the case of a short circuit of the switching output, it switches back approx. 2 s after the fault has been rectified.
- Immediately switches in the case of an internal fault, it is only switched back by turning off the operating voltage and then on again.
Maintenance
Keep the lens of the sensor free from soiling. For cleaning do not use any solvents or cleaning agents which could damage the plastic lenses.
flowchart
graph TD
    A["Input"] --> B["1"]
    A --> C["2"]
    A --> D["3"]
    B --> E["L+"]
    C --> F["L-"]
    D --> G["L-"]
    H["t"] --> A
flowchart
graph TD
    A["Diamond Symbol"] --> B["Component 1"]
    A --> C["Component 2"]
    A --> D["Component 3"]
    A --> E["Component 4"]
    B --> F["L+"]
    C --> G["L-"]
    D --> H["L+"]
    E --> I["L-"]
    style A fill:#f9f,stroke:#333
    style B fill:#ccf,stroke:#333
    style C fill:#ccf,stroke:#333
    style D fill:#ccf,stroke:#333
    style E fill:#ccf,stroke:#333
    style F fill:#dfd,stroke:#333
    style G fill:#dfd,stroke:#333
    style H fill:#dfd,stroke:#333
    style I fill:#dfd,stroke:#333
PIN 2 = fc-output
flowchart
graph TD
    A["Switch L"] --> B["Gate 1"]
    A --> C["Gate 2"]
    A --> D["Gate 3"]
    A --> E["Gate 4"]
    B --> F["L+"]
    C --> G["Ground"]
    D --> H["Ground"]
    E --> I["L-"]
flowchart
graph TD
    A["Component 1"] --> B["Component 2"]
    A --> C["Component 3"]
    A --> D["Component 4"]
    B --> E["L+"]
    C --> E
    D --> E
    E --> F["L-"]
PIN 2 = fc-output
Brand : IFM
Model : OG5096
Category : Motion detector