Volta - Camcorder GOPRO - Free user manual and instructions
Find the device manual for free Volta GOPRO in PDF.

| Product type | Power Grip/Tripod/Remote |
| Brand | GOPRO |
| Model | Volta |
| Category | Camcorder |
| Power supply | Lithium-ion battery 4900 mAh |
| Input voltage | 5 V / 3 A (15 W max) |
| Output voltage | 5 V / 2.4 A (12 W max) |
| Charging time | 2.5 hours with 5 V/3 A charger |
| Battery life | Varies by use, extends camera battery |
| Operating temperature range | -10 °C to 35 °C |
| Charging temperature range | 0 °C to 35 °C |
| Connectivity | Bluetooth, USB-C (for charging and wired connection) |
| Controls | Built-in buttons: Mode/Power, Shutter, Bluetooth, Battery status; wired or wireless use |
| Integrated tripod | Yes, with 3 deployable legs |
| Mounts | Rotating and retractable mounting shafts, 1/4-20 thread, wrist strap included |
| Compatibility | GoPro cameras with USB passthrough door (except HERO11 Black Mini requires door sold separately) |
| Weather resistance | Rain and snow resistant with USB door closed and sealed, but not waterproof (not allowed underwater) |
| LED indicators | 5 LEDs to indicate battery charge level |
| Reset | Press and hold Mode/Power and Shutter buttons simultaneously for 8 seconds |
| Package contents | Volta, USB cable, wrist strap, USB passthrough door, documentation |
Frequently Asked Questions - Volta GOPRO
User questions about Volta GOPRO
0 question about this device. Answer the ones you know or ask your own.
Ask a new question about this device
Download the instructions for your Camcorder in PDF format for free! Find your manual Volta - GOPRO and take your electronic device back in hand. On this page are published all the documents necessary for the use of your device. Volta by GOPRO.
USER MANUAL Volta GOPRO
You may need to upgrade your camera's software before you can use Volta. For step-by-step instructions, go to gopro.com/update.
The Basics
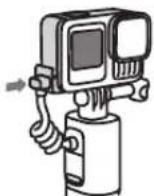
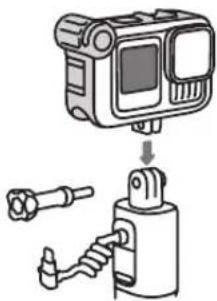
Volta (Battery Grip/Tripod/Remote

Thumb Screw Secures your GoPro to Volta.

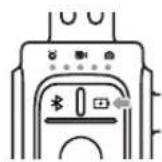
- Swiveling Camera Mounting Fingers
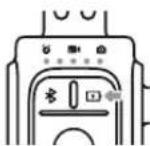
- LED Battery/Camera Status Indicators
- Bluetooth® Button
- Flip-Out Mounting Fingers
- Mode + Power Button
- Tripod Legs
- 1/4-20 Mounting Threads
- Camera Cable
- Battery Status Button
10.ShutterBullon - USB Charging Port (Under Port Cover)
- Lanyard Attachment Point
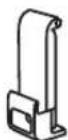
USB Pass-Through Door
Lets you plug Voita
into your GoPro while
keeping it weather
resistant (sold separately
for HERO11 Black Mini).
Charging Volta
- Flip open the USB charging port cover.
- Insert the Included USB cable into the port. Connect the other end of the cable to a USB power source.
- Push the Battery Status button to start charging.
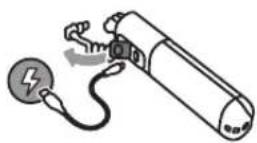
The blinking LED shows the battery status while Volta is charging. All LEDs will be it when the battery is fully charged. Press the Battery Status button to check the charge level when Volta is not charging.
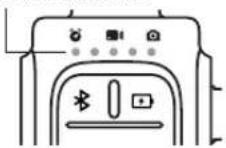
LED Power Indicators

LED1-20%

LED2 21-40%

LED341-60%

LED461-80%

LED581-99%
TECH SPECS
Battery capacity: 4900 mAh
Power input: 5VDC/3A (15W max)
Power output: 5VDC/2.4A (12W max)
Charge time: 2.5 hours with a 5V / 3A charger.
A fully charged Volta will dramatically boost a fully charged camera's normal battery life. Battery life may vary based on usage and other external conditions.
CAUTION: To keep Volta weather resistant, be sure the USB port cover is fully closed and the seal is tight after charging.
Mounting Your GoPro Mounting Your GoPro
INSTALLING THE USB PASS-THROUGH DOOR
Replace the standard door with the included USB Pass-Through Door (sold separately for HERO11 Black Mini).
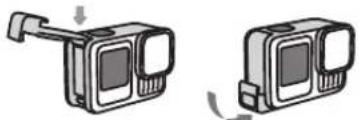
- Unlock the latch and flip the door open.

- With the door in the horizontal position, gently pull outward until the door snaps off.

- Line the USB Pass-Through Door up with the small silver bar.
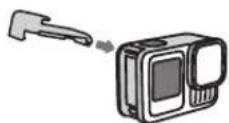
- Press the door tightly into the small silver bar until it snaps into place and is securely attached.

WARNING: Using the USB Pass-Through Door with the Volta camera cable plugged in will protect Volta and your camera from rain and snow, but is not waterproof. Using the USB Pass-Through Door underwater with your GoPro will damage your camera and void the warranty.
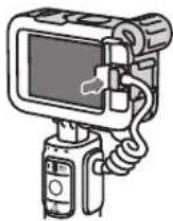
ATTACHING YOUR CAMERA
- Use your camera's mounting fingers or a Magnetic Latch Mount (sold separately) to attach your camera to Volta's top mounting fingers.
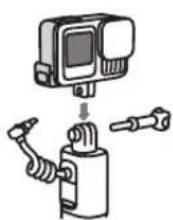
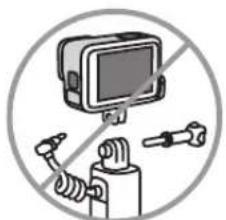
Heads Up: Be sure to insert your GoPro Into the mounting fingers with the USB Pass-Through Door on the side opposite the Thumb Screw. Rotate the mounting fingers if needed to ensure that your camera is mounted properly.
- Plug Voita's USB cable into your GoPro.
- Press the Battery Status button to start sending power to your camera.
Heads Up: After it's plugged into your camera, Volta will check to see if it needs a software update. The update will start automatically if necessary. You can check your camera's screen for the update status.
Using Volta to Control Your GoPro Using Volta to Control Your GoPro
Volta can be used to control your GoPro whether it's mounted or detached from the grip. Be sure to set up wireless control now so you can simply detach your GoPro anytime you see a great shot that needs a wireless setup.
WIRED CONTROL
Voita's integrated camera buttons give you easy one-hand control of your GoPro.
- Press the Battery Status button to wake Volta.
- Press Volta's Mode + Power button to turn your GoPro on.
- Press Volta's Mode + Power button repeatedly to cycle to the mode that you want.
- Press Volta's Shutter button to start capturing.
- To stop capturing video or time lapse, press Volta's Shutter button again.
- Press and hold Volta's Mode + Power button to turn your GoPro off.
For HERO1 Black Mini-Use Volta's Mode Power button the same way you would use your Mini's Status/Pair button Volta's Shutter button also works the same way as your Mini's Shutter button.
WIRELESS CONTROL
Use Bluetooth to turn VoTa into a wireless remote. Wireless control is also used to control your GoPro if you're using VoTa with Media Mod. Detach your GoPro from VoTa and follow these setup instructions:
-
On your camera, complete these steps:
-
Swipe down on the rear screen to access the Dashboard, and then swipe left to pair/add device.
For HERO11 Black Mini-With your camera off, press and hold the Status/Pair button 3 seconds to put it into pairing mode. -
Press and hold the Bluetooth button Volta for 4 seconds. Your camera will automatically begin pairing. Voita's center LED will blink blue while it's searching for the camera and turn solid blue when it's connected. After pairing, Voita and your camera will wirelessly connect automatically when they are both on and not connected via the camera cable.
PRO TIP: After detaching your GoPro, plug Volta's USB cable into the charging port to keep it out of the way.

WARNING: Volta is not weather resistant when used as a wireless remote or any time the USB cable is disconnected from your camera.
Tripod
Flip out the built-in tripod legs any time you need to set Voita down to capture stationary shots. You can swivel or tilt your camera to adjust the capture angle.
PRO TIP: Volta's additional battery power and tripod legs make it great for capturing extra-long time lapse shots.
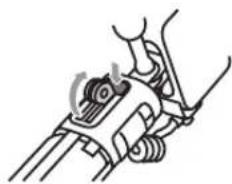
Mounting Volta
RETRACTABLE MOUNTING FINGER Press the mounting finger release button to use Volta's retractable mounting fingers. They make it easy to attach Volta to GoPro backpack straps and other mounts.
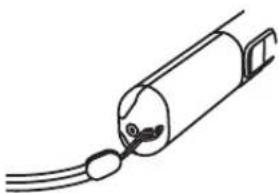
1/4-20 MOUNTING
Volta has 1/4-20 mounting threads built into its base for added mounting flexibility.
LANYARD
Use the hole in Volta's base to secure the included wrist lanyard.


Using Volta With Media Mod
Insert your GoPro into Media Mod (sold separately) as you normally would and follow these steps:
- Use your camera's mounting fingers or a Magnetic Latch Mount (sold separately) to attach your GoPro to Volta.
Heads Up: Insert your camera into the mounting fingers with the Media Mod's USB port on the same side as the camera cable and Thumb Screw. Rotate the mounting fingers if needed to ensure that your camera is mounted properly.
- Plug Volta's USB cable into the USB port on the back of your Media Mod.
- Connect Volta to your camera via Bluetooth® to use Volta's built-in camera controls.

WARNING: Volta is not weather resistant when used with Media Mod.
Resetting Volta
Press and hold the Mode + Power button
and Shutter button

simultaneously for 8 seconds if you need to reset Volta.
Heads Up: You will not have to re-pair your camera if you reset Volta.
Notes
Here are a few important things to keep in mind while you're using Volta:
Volla will enter power save mode if it is not used for 24 hours. Press any button to wake it up.
- Disconnect Volta's Bluetooth® connection to your camera if you want to connect your camera to the GoPro Quik app. Press the Bluetooth® button to disconnect.
Volta can only pair and connect to one camera at a time.
- Volta's operating ambient temperature range is 14^ - 95^ (-10°C - 35°C). Its normal charging temperature range is 32^ - 95^ (0°C - 35°C). Volta will automatically shut down if it's too hot or too cold. The LEDs will blink red 4x to show that it needs to return to its normal operating temperature before the camera control buttons and camera charging will work. You can check its status by pressing any button. The LEDs will blink red if it's not ready.

WARNING: Volta is not waterproof. Using it under water will
damage both Volta and your camera.
Regulatory Information
To see additional information regarding country certifications, refer to the Important Product + Safety Instructions included with your remote.
The Bluetooth word mark and logos are registered trademarks owned by Bluetooth SIG, Inc., and any use of such marks is under license.

GoPro

Volta
MANUEL DE L'UTILISATEUR