VMODC5240SS - Microwave Oven VIKING - Free user manual and instructions
Find the device manual for free VMODC5240SS VIKING in PDF.

| Brand | Viking |
| Model | VMODC5240SS |
| Product Type | Convection Microwave Oven (Convection DrawerMicro) |
| Power Supply | 120 V, 20 A, dedicated grounded circuit |
| Cooking Functions | Microwave, Convection (baking, roasting, broil), Quick Cook, Air Fry, Broil, Proof, Reheat, Keep Warm |
| Automatic Programs | Sensor (popcorn, reheat, cook), Auto Defrost, Additional Menus (melt, soften, reheat, beverage, hot water, cereal) |
| Control Type | Glass touch controls with digital display |
| Included Accessories | Upper rack, lower rack, baking pan/drip tray |
| Drawer Opening | Motorized, OPEN/CLOSE key |
| Interior Lighting | Yes, drawer lights |
| Safety | Control lock, safety shut-off system, sensor steam detection |
| Care and Cleaning | Clean sealing surfaces with mild non-abrasive soap; racks and pan dishwasher safe |
| Warranty | 2 years parts and labor, 5 years limited on magnetron |
| Spare Parts and Repairability | Contact an authorized Viking Range, LLC service agent; model and serial number required |
| General Information | 84-page user manual; manual available for download; phone support at 1-888-845-4641 |
Frequently Asked Questions - VMODC5240SS VIKING
User questions about VMODC5240SS VIKING
0 question about this device. Answer the ones you know or ask your own.
Ask a new question about this device
Download the instructions for your Microwave Oven in PDF format for free! Find your manual VMODC5240SS - VIKING and take your electronic device back in hand. On this page are published all the documents necessary for the use of your device. VMODC5240SS by VIKING.
USER MANUAL VMODC5240SS VIKING
Convection DrawerMicro™ Oven
VMODC5240SS
Service Information
If service is required:
- Call your authorized service agency.
- Have the following information readily available:
a. Model number
b. Serial number
c. Date purchased
d. Name of dealer from whom purchased - Clearly describe the problem you are having.
If you are unable to obtain the name of an authorized service agency or continue to have service problem, contact Viking Range, LLC at (888) 845-4641 or write to:
VIKING RANGE, LLC
PREFERRED SERVICE
111 Front Street
Greenwood, Mississippi (MS) 38930 USA
Record the information indicated below. You will need it if service is ever required. The model and serial number for your oven are located on the left side of the oven cavity on an identification label.
Model Number ____ Serial Number ____
Date of Purchase ____ Date Installed ____
Dealer's Name ____
Address
If service requires installation of parts, use only authorized parts to ensure protection under the warranty.
PLEASE RETAIN THIS MANUAL FOR FUTURE REFERENCE
Table of Contents
2 SERVICE INFORMATION
3 TABLE OF CONTENTS
3 PRECAUTIONS TO AVOID POSSIBLE EXPOSURE TO EXCESSIVE MICROWAVE ENERGY
4 IMPORTANT SAFETY INSTRUCTIONS
6 INFORMATION YOU NEED TO KNOW
6 ABOUT UNPACKING AND YOUR CONVECTION
DRAWERMICRO OVEN
6 RADIO OR TV INTERFERENCE
6 ABOUT YOUR CONVECTION DRAWERMICRO OVEN
7 ABOUT MICROWAVE COOKING
7 ABOUT CHILDREN AND THE MICROWAVE
7 ABOUT SAFETY
8 ABOUT FOODS
8 ABOUT UTENSILS AND COVERINGS
10 PART NAMES
12 ACCESSORIES
13 BEFORE OPERATING
13 TO SET THE CLOCK
13 TIME INCREMENTS - CONVECTION VS. MICROWAVE
13 STOP/CLEAR
13 OPEN OR CLOSE CONVECTION DRAWERMICRO OVEN
25 CONVECTION COOKING - MANUAL
25 CONVECTION BAKE
26 CONVECTION ROAST
27 CONVECTION GRILL
28 CONVECTION WARM
28 CONVECTION TOAST
28 CONVECTION AIR FRY
30 SPEED COOK - MICROWAVE & CONVECTION COMBINATION
30 SPEED COOK WITH PREHEAT
31 SPEED COOK WITHOUT PREHEAT
32 OTHER FEATURES
32 TIMER/SETTINGS
32 ADD-30-SEC
33 CONTROL LOCK
33 MICROWAVE MULTIPLE SEQUENCE COOKING
33 MORE OR LESS TIME ADJUSTMENT
33 STANDBY MODE
33 HELP
33 OTHER FEATURES
34 CLEANING AND CARE
35 BEFORE YOU CALL FOR SERVICE
36 QUICK GUIDE
38 OVEN WARRANTY
PRECAUTIONS TO AVOID POSSIBLE EXPOSURE TO EXCESSIVE MICROWAVE ENERGY
(a) Do not attempt to operate this microwave oven with the door open since open-door operation can result in harmful exposure to microwave energy. It is important not to defeat or tamper with the safety interlocks.
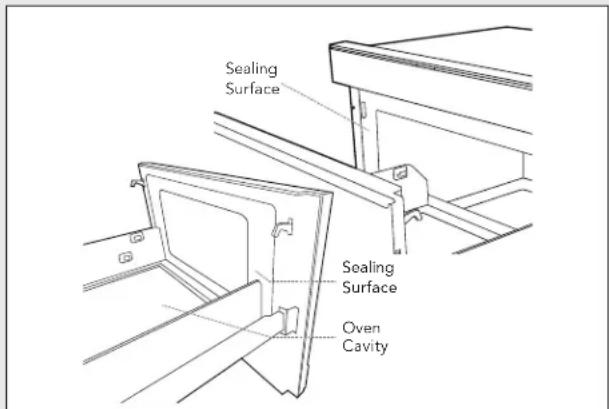
(b) Do not place any object between the microwave oven front face and the door or allow soil or cleaner residue to accumulate on sealing surfaces.
(c) Do not operate the microwave oven if it is damaged. It is particularly important that the microwave oven door close properly and that there is no damage to the: (1) door (bent), (2) hinges and latches (broken or loosened), (3) door seals and sealing surfaces.
(d) The microwave oven should not be adjusted or repaired by anyone except properly qualified service personnel.
IMPORTANT SAFETY INSTRUCTIONS
READ ALL INSTRUCTIONS BEFORE USING
When using the appliance, basic safety precautions should be followed, including the following:
WARNING To reduce the risk of burns, electric shock, fire, injury to persons or exposure to excessive microwave energy:
1 Read all instructions before using the appliance.
2 Read and follow the specific PRECAUTIONS TO AVOID POSSIBLE EXPOSURE TO EXCESSIVE MICROWAVE ENERGY on page 3.
3 This appliance must be properly grounded. See page 6 for GROUNDING INSTRUCTIONS.
4 Install or locate this appliance only in accordance with the provided Installation Guide.
5 Some products, such as whole eggs in shell and sealed containers like closed glass jars, can rupture and should not be heated in the appliance.
6 Use this appliance only for its intended use as described in this manual. Do not use corrosive chemicals or vapors in this appliance. This appliance is specifically designed to heat, cook or dry food. It is not designed for use in industrial, laboratory or marine environments.
7 As with any appliance, close supervision is necessary when used by children.
8 Do not operate this appliance if it has a damaged cord or plug, if it is not working properly or if it has been damaged or dropped.
9 This appliance should be serviced only by qualified service personnel. Contact nearest Viking Range, LLC Authorized Servicer for examination, repair or adjustment.
10 Do not cover or block any openings on the appliance.
11 Do not store or use this appliance outdoors. Do
not use this product near water—for example, near a kitchen sink, in a wet basement, near a swimming pool or similar locations.
12 Do not immerse cord or plug in water.
13 Keep cord away from heated surfaces.
14 Do not climb or sit on the appliance.
15 Be sure fingers or other objects or materials are not around the appliance opening when the appliance is closed.
16 Do not let cord hang over edge of table or counter.
17 Do not put fingers or clothes around the drawer guides when the appliance is opened or closed. They could be caught in the guides when the appliance is closed.
18 Ensure the food and container are shorter than the drawer before closing it. Refer to the height of the side walls of the drawer.
19 When cleaning appliance sealing surfaces that come together on closing the drawer, use only mild, nonabrasive soaps or detergents applied with a sponge or soft cloth. See page 34 for CLEANING INSTRUCTIONS.
20 To reduce the risk of fire in the appliance cavity:
a Do not overcook food. Carefully attend appliance when paper, plastic or other combustible materials are placed inside the appliance to facilitate cooking.
b Remove wire twist-ties from paper or plastic bags before placing bag in appliance.
c If materials inside the appliance ignite, keep appliance door closed, turn off microwave and shut off power at the fuse or circuit breaker panel.
d Do not use the appliance for storage purposes. Do not leave paper products, cooking utensils or food in the appliance when not in use.
IMPORTANT SAFETY INSTRUCTIONS
21 Liquids, such as water, coffee or tea, can be overheated beyond the boiling point without appearing to boil due to surface tension of the liquid. Visible bubbling or boiling when the container is removed from the appliance is not always present. THIS COULD RESULT IN VERY HOT LIQUIDS SUDDENLY BOILING OVER WHEN A SPOON OR OTHER UTENSIL IS INSERTED INTO THE LIQUID.
To reduce the risk of injury to persons:
a Do not overheat the liquid.
b Stir the liquid both before and halfway through heating it.
c Do not use a straight-sided container with a narrow neck. Use a wide-mouthed container.
d After heating, allow the container to stand in the appliance for at least for 20 seconds before removing the container.
e Use extreme care when inserting a spoon or other utensil into the container.
22 If arcing (sparks inside the oven cavity) occurs, touch STOP/CLEAR.
Check the following:
a Ensure all cookware is microwave-safe if using MICROWAVE or SPEED COOK functions.
b If using the top or bottom racks (for Convection and Speed Cook functions), ensure they are properly placed inside of the oven cavity and not touching the walls of the oven interior.
c If using aluminum foil, ensure foil is properly molded on top of the food item with no edges turned up.
d Ensure no metal twist-ties, poultry pins or cookware with metal decorative trim are used inside the oven.
e Ensure no recycled paper towels are used as a cover or to clean the oven, as recycled paper towels may contain bits of metal particles.
23 When using Speed Cook functions, the exterior of the appliance may also become hot.
24 If the appliance light fails, consult a Viking Range, LLC authorized servicer.
SAVE THESE INSTRUCTIONS
Information You Need To know
ABOUT UNPACKING AND YOUR CONVECTION DRAWERMICRO OVEN
A minimum of two people are required to handle the oven. Use the two handles located on each side of the oven to lift.
1 Remove all packing materials from inside the Convection DrawerMicro oven and on the Drawer door.
2 Remove the feature sticker, if there is one. Check the drawer for any damage, such as misaligned or bent drawer, damaged drawer seals and sealing surfaces, broken or loose drawer guides and dents inside the cavity or on the front of the drawer. If there is any damage, do not operate the Convection DrawerMicro oven and contact your dealer or a Viking Range, LLC authorized servicer.
RADIO OR TV INTERFERENCE
Should there be any interference caused by the Convection DrawerMicro oven to your radio or TV, check that the Convection DrawerMicro oven is on a different electrical circuit, relocate the radio or TV as far away from the drawer as feasible or check position and signal of receiving antenna.
GROUNDING INSTRUCTIONS
The electrical requirements are a 120 volt 60 Hz, AC only, 20 amp. or more protected electrical supply. It is recommended that a separate circuit serving only the Convection DrawerMicro oven be provided.
This appliance must be grounded. The Convection DrawerMicro oven is equipped with a cord having a grounding wire with a grounding plug. It must be plugged into a wall receptacle that is properly installed and grounded in accordance with the National Electrical Code and local codes and ordinances. In the event of an electrical short circuit, grounding reduces risk of electric shock by providing an escape wire for the electric current.
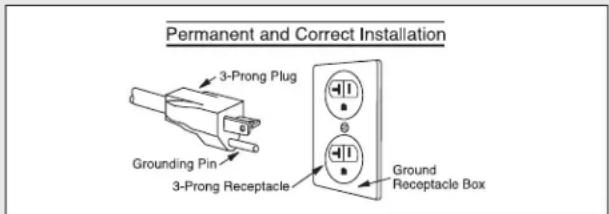
WARNING Improper use of the grounding plug can result in a risk of electric shock. Do not use an extension cord. If the power supply cord is too short, have a qualified electrician or serviceperson install an outlet near the appliance.
If you have any questions about the grounding or electrical instructions, consult a qualified electrician or serviceperson.
ABOUT YOUR CONVECTION DRAWERMICRO OVEN
When the Convection DrawerMicro oven is on, ALWAYS have food in it to absorb the microwave energy.
The vent under the Convection DrawerMicro oven must not be blocked. During microwaving, steam may come from the left side lower vent (when facing the product).
Condensation is a normal part of microwave cooking, and the amount being vented is directly related to the moisture content of the food and room humidity. A cooler room will produce more condensation. Attention should be paid to the vented area after each use of the product and wiped down if needed.
When using the Convection DrawerMicro oven at power levels below 100%, you may hear the magnetron cycling on and off.
It is normal for the exterior of the Convection Drawer-Micro oven to be warm to the touch when cooking or reheating.
After using Convection or Speed Cook, you will hear the sound of the cooling fan. The fan may continue to operate for an extended period of time, depending on the oven temperature.
Unlike microwave-only ovens, convection-microwave ovens tend to become hot during use of Convection and Speed Cook.
The oven is for food preparation only. It should not be used to dry clothes or newspapers.
When using recipes or package directions, check food a minute or two before the minimum time and add time accordingly.
Information You Need To know
When opening or closing the Convection DrawerMicro oven quickly, food in the Convection DrawerMicro oven may be spilled. See page 34 for CLEANING INSTRUCTIONS.
ABOUT MICROWAVE COOKING
- Arrange food carefully. Place thickest areas toward outside of dish.
- Watch cooking time. Cook for the minimum time indicated and add more as needed. Food severely overcooked can smoke or ignite.
- Do not use metal dishes for microwave cooking. There is a risk of electric discharge or ignition.
- Cover foods before cooking. Covers prevent splattering and help foods cook evenly. Follow recipe or cookbook suggestions for covers, such as paper towels, wax paper, microwave-safe plastic wrap or a lid.
- Stir foods from outside to center of dish once or twice during cooking, if possible.
- Turn foods over once during microwaving to speed cooking of foods like chicken and hamburgers. Large items like roasts must be turned over at least once.
- Rearrange foods like meatballs both from top to bottom and from left to right half way through cooking.
- Add standing time to allow the food to finish cooking without overcooking. At the end of cooking time, remove food from Convection DrawerMicro oven, stir, if possible, and cover for standing time.
- Check for doneness. Look for signs indicating that cooking temperatures have been reached. Doneness signs include:
- Food steams throughout, not just at edge.
- Center bottom of dish is very hot to the touch.
- Poultry thigh joints move easily.
- Meat and poultry show no pinkness.
- Fish is opaque and flakes easily with a fork.
ABOUT CHILDREN AND THE MICROWAVE
Children can safely use the Convection DrawerMicro if they understand and follow safety precautions, including:
- Use potholders to handle dishes.
- Remove coverings carefully to avoid steam burns.
- Be careful with packages that crisp food, as they may be extra hot.
Young children or children without cooking experience should be supervised when using the Convection DrawerMicro. A child who has mastered some cooking skills may still need help and supervision for some tasks to avoid accident and injury.
To avoid spills and burns, a child must be able to reach the Convection DrawerMicro oven comfortably.
ABOUT SAFETY
Always cook foods to the safe temperatures recommended by United States Department of Agriculture.
145°F - Fish
160°F - Pork, ground beef/veal/lamb, egg dishes
165°F - Whole, pieces and ground turkey/chicken/duck, leftovers, ready-to-reheat refrigerated food, deli food and carry-out fresh food
To test for doneness, insert a meat thermometer in a thick or dense area away from fat or bone. NEVER leave the thermometer in the food during cooking unless it is approved for microwave use.
- ALWAYS use potholders to prevent burns when handling utensils in contact with hot food. Enough heat from the food can transfer through utensils to cause skin burns.
- Avoid steam burns by directing steam away from the face and hands. Slowly lift the farthest edge of a dish cover and carefully open popcorn and oven cooking bags away from the face.
- After cooking, the surfaces of the drawer, oven cavity and oven guides will be extremely hot. Use caution and avoid skin contact with hot surfaces to prevent burns and injury.
- Stay near the Convection DrawerMicro oven while in use and check cooking progress frequently so there is no chance of overcooking food.
- NEVER use the Convection DrawerMicro oven for storing cookbooks or other items.
- Select, store and handle food carefully to preserve its high quality and minimize the spread of foodborne bacteria.
Information You Need To know
ABOUT FOODS
| FOOD DO DON'T | ||
| Eggs, sausages, fruits and vegetables | · Puncture egg yolks before cooking to prevent bursting.· Pierce skins of potatoes, apples, squash, hot dogs and sausages before cooking to release steam. | · Cook eggs in shells.· Reheat whole eggs.· Dry nuts or seeds in shells. |
| Popcorn · Use popcorn specially bagged for microwave cooking.· Use the Popcorn pad.· Listen for the popping to slow to 1 or 2 seconds between pops. | · Pop popcorn in regular brown bags or glass bowls.· Exceed maximum time on popcorn package. | |
| Baby food · Transfer baby food to small dish and heat carefully, stirring often. Check temperature before serving.· When heating baby bottles, test temperature on wrist before feeding. | · Heat disposable bottles.· Heat bottles with nipples on.· Heat baby food in jars. | |
| General · Cut filled baked goods after heating to release steam.· Stir liquids briskly before and after heating to avoid eruption.· Use deep bowls when cooking liquids or cereals to prevent boilovers. | · Heat or cook in closed glass jars or airtight containers.· Use the microwave for canning. Harmful bacteria may not be destroyed.· Deep fat fry.· Dry wood, gourds, herbs or wet papers.· Cook food taller than the Convection DrawerMicro oven. | |
ABOUT UTENSILS AND COVERINGS
It is not necessary to buy all new cookware. Many pieces already in your kitchen can be used successfully in your in your new Convection DrawerMicro oven. The chart below will help you decide what utensils and coverings should be used in each mode.
| UTENSILS AND COVERINGS | MICROWAVE ONLY CONVECTION SPEED COOK | ||
| Aluminum foil | NO | Yes, for shielding | Yes, for shielding |
| Aluminum containers | NO | Yes, uncovered | Yes, uncovered, only filled to 3/4 capacity, with at least 1 inch space between utensil and oven walls |
| Browning dish | NO | NO | NO |
| Glass ceramic (Pyroceram®) | Yes, excellent | Yes, excellent | Yes, excellent |
| Heat-Resistant Glass | Yes, excellent | Yes, excellent | Yes, excellent |
| Non-Heat-Resistant Glass | NO | NO | NO |
| Glass Lids | Yes | YesNo lids or covers in GRILL | Yes |
| Metal Lids | NO | YesNo lids or covers in GRILL | NO |
| Metal cookware | NO | Yes | NO |
Information You Need To know
| UTENSILS AND COVERINGS | MICROWAVE ONLY CONVECTION SPEED COOK | ||
| Metal, dishes with metal trim, screws, bands or handles, metal twist ties | NO NO NO | ||
| Oven cooking bags | Yes, without metal twist ties Yes Yes, with | out metal twist ties | |
| GRILL - NO | |||
| Paper plates Yes, for | reheating NO NO | ||
| Paper towels Yes, for | coveringDo not use recycled paper towels that may contain metal particles | NO NO | |
| Oven-safe paper Yes | Yes, up to 400°F Yes, up to 400°F | ||
| Food storage bags, brown paper bags | NO NO NO | ||
| Microwave-safe plastic containers | Yes, for reheating and defrostingFollow manufacturer's guidance on suitability for cooking foods with high fat or sugar content | NO NO | |
| Plastic, Thermoset® | Yes Yes, up to 425°F Yes, up to 425°F | ||
| Plastic wrap | Yes, if specially marked for microwave use | NO NO | |
| Pottery, porcelain stoneware | Yes, if specially marked for microwave use | Yes Yes, if specially marked for microwave use | |
| Styrofoam | Yes, for reheating NO NO | ||
| Microwave-safe thermometers | Yes NO NO | ||
| Regular cooking thermometers | NO Yes NO | ||
| Wax paper | Yes, for covering | NO | NO |
| Wicker, wood, straw | Yes, for short cooking timesDo not use with high fat or high sugar content foods | NO NO | |
ACCESSORIES:
- The Convection DrawerMicro oven comes with 3 accessories (top and bottom racks and cook/drip tray). See page 12 for ACCESSORIES.
Note: The provided accessories are specifically designed to be used safely with microwave cooking functions. DO NOT place any other metal cookware inside the oven cavity when using Microwave-only and Speed Cook (convection and microwave power) cook functions.
- There are many microwave accessories available for purchase. Evaluate carefully before you purchase so they meet your needs. A microwave-safe thermometer will assist you in determining correct doneness and assure you foods have been cooked to safe temperatures when using microwave-only cooking. Viking Range, LLC is not responsible for any damage to the oven when accessories not supplied by Viking Range, LLC are used.
Part Names
CONVECTION DRAWERMICRO OVEN
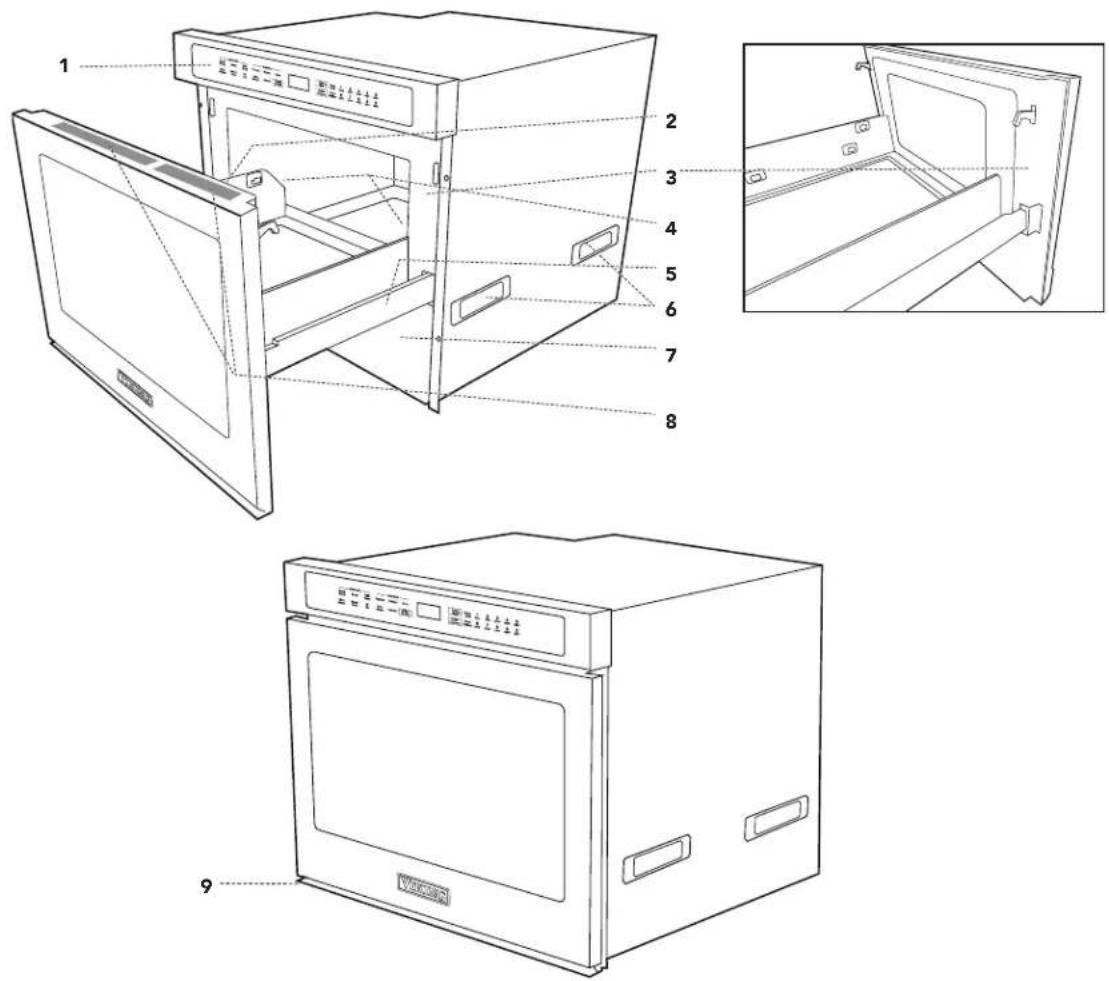
1 Glass touch control
2 Nameplate, on the bottom left side of the oven face plate
3 Drawer sealing surfaces
4 Drawer lights
5 Convection DrawerMicro oven guides
6 Handles
7 Vent
8 Menu labels
9 Built-in flush mount
Part Names
GLASS TOUCH CONTROL
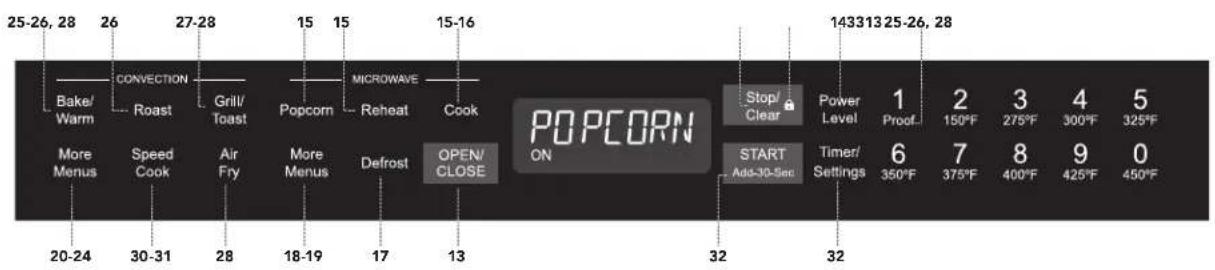
Numbers next to the glass touch control illustration indicate pages that include feature descriptions and usage information.
MENU LABELS

| MICROWAVE | ||||||||
| COOK | MORE MENUS | DEFROST | ||||||
| 1. Baked Potato 2. Sweet Potato 3. Fish/Seafood 4. Brown Rice | 5. White Rice 6. Quick Fresh Vegetables 7. Longer Fresh Vegetables | 8. Frozen Vegetables 9. Ground Meat 10. Frozen Entree | Melt 1. Butter 2. Chocolate | Soften 3. Ice Cream 4. Cream Cheese | Warm 5. Syrup 6. Dessert Toppings | 7. Beverage Reheat 8. Hot Water 9. Hot Cereal | 1. Ground Meat 2. Steaks/Chops 3. Boneless Poultry | 4. Bone-in Poultry 5. Roast 6. Casserole and Soup |
Part Names
ACCESSORIES
The top and bottom racks and cook/drip tray are designed specifically for use in the Convection Drawer-Micro oven with Microwave-only, Convection and Speed Cook modes.
Note: The provided accessories are specifically designed to be used safely with microwave cooking functions. DO NOT place any other metal cookware inside the oven cavity when using Microwave-only and Speed Cook (convection and microwave power) functions.
| Top Rack | 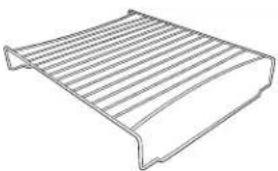 |
| Bottom Rack | 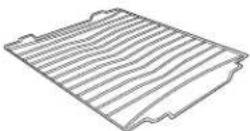 |
| Cook/Drip Tray | 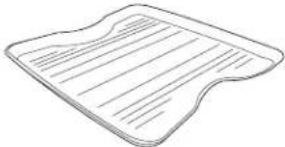 |
- Always use microwave-safe and oven-safe cookware when using Speed Cook functions as the oven combines microwave and conventional oven power.
• Always use potholders to prevent burns when handling utensils in contact with hot food. Enough heat from the food can transfer through utensils to cause skin burns. - Ensure accessories are clean and free of any food residue before each use to avoid damage to the accessories.
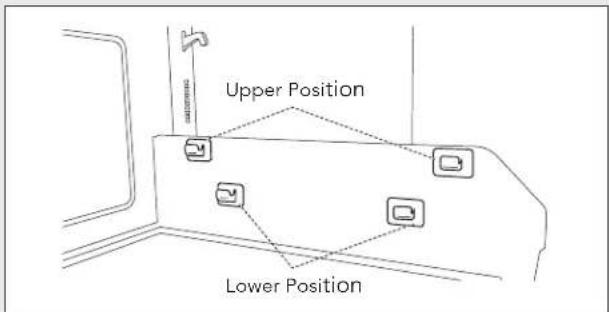
Use the correct accessories provided for each cooking mode. Place accessories in the correct installation position and direction.
CONVECTION BAKE AND SPEED BAKE
- For two level cooking, use both racks.
- For one level cooking of smaller food items, place the top rack in the lower position.
- For one level cooking of larger food items, place the bottom rack in the lower position.
CONVECTION ROAST AND SPEED ROAST
- Place the cook/drip tray in the bottom of the oven cavity to collect juices.
- For one level cooking of smaller food items, set food items directly on the cook/drip tray, place either the top or bottom rack in the lower position and place the cook/drip tray on the rack.
- For one level cooking of larger food items, place the bottom rack in the lower position and set the cook/drip tray in the bottom of the oven.
CONVECTION GRILL AND SPEED GRILL
- Use the top rack in either the upper or lower position.
- Use the bottom rack in the lower position.
- Use the cook/drip tray to collect juices in the bottom of the oven.
AIR FRY
- Use the top rack in the lower position.
DEFROST
- For defrosting, always use microwave-safe cookware. All Defrost modes use microwave power.
- For easier clean up, use the cook/drip tray to defrost ground meat, steaks/chops, poultry and roast.
- For casserole/soup, place the cookware directly on the bottom of the oven.
Before Operating
Before operating your new Convection DrawerMicro oven, read this Use & Care Manual completely and follow these steps:
1 Plug in the Convection DrawerMicro oven. ENJOY YOUR OVEN TOUCH CLEAR will appear.
2 Touch the STOP/CLEAR pad. : will appear.
3 Set clock.
TO SET THE CLOCK
1 Touch TIMER/SETTINGS pad once.
2 Touch number pads for correct time of day.
3 Touch START/ADD-30-SEC.
This is a 12 hour clock. If you attempt to enter an incorrect clock time, ERROR will appear in the display. Touch the STOP/CLEAR pad and re-enter the time.
If the electrical power supply to your Convection DrawerMicro oven is interrupted, the display will intermittently show ENJOY YOUR OVEN TOUCH CLEAR after the power is reinstated. If this occurs during cooking, the program will be erased. The time of day will also be erased. Simply touch STOP/CLEAR pad and reset the clock.
Note:
Programs can be set with the drawer of the Convection DrawerMicro open, except for START/ADD-30-SEC. Close the drawer to start a program.
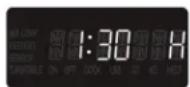
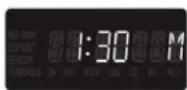
TIME INCREMENTS - CONVECTION VS. MICROWAVE
The Convection DrawerMicro oven contains two different categories of cooking: convection and microwave. Due to their inherent differences, the time increments needed for their cooking are not the same. Convection items tend to cook longer, and microwave items tend to cook quicker. Depending on which category is in use, the display provides an indicator to easily distinguish which time increment is being used.
In convection modes, "H" will be displayed. This represents the time increments of Hours and Minutes. (Hours will be shown to the left of the colon, and Minutes to the right.)
In microwave modes, "M" will be displayed. This represents the time increments of Minutes and Seconds. (Minutes will be shown to the left of the colon, and Seconds to the right.)
STOP/CLEAR
Touch the STOP/CLEAR pad to:
1 Erase a programming mistake.
2 Cancel Timer.
3 Stop the Convection DrawerMicro oven temporarily during timed cooking.
4 Return the time of day to the display.
5 Cancel a program during cooking. Touch the STOP/CLEAR pad twice to cancel timed cooking.
OPEN OR CLOSE CONVECTION DRAWERMICRO OVEN
- To open, touch the OPEN/CLOSE pad on the glass touch control.
- Do not pull the drawer by hand, except in the case of a power failure.
- To close, touch the OPEN/CLOSE pad again or gently push the drawer.
Microwave Oven Cooking
TIME COOKING
Your Convection DrawerMicro oven can be programmed for 99 minutes 99 seconds (99.99). Always enter the seconds after the minutes, even if they are both zeros.
- Suppose you want to cook for 5 minutes at 100% .
1 Enter cooking time 500.
2 To cook at 100% power (High), touch START/ADD-30-SEC pad.
TO SET POWER LEVEL
There are eleven preset power levels.
Using lower power levels increases the cooking time, which is recommended for foods like cheese and milk and slow cooking of meats. Consult a microwave cookbook or recipes for specific recommendations.
- Suppose you want to defrost for 5 minutes at 30% .
1 Enter defrost time 500.
2 Touch POWER LEVEL pad 8 times.
3 Touch START/ADD-30-SEC pad.
| TOUCH POWER LEVEL PAD NUMBER OF TIMES FOR DESIRED POWER | APPROXIMATE PERCENTAGE OF POWER | COMMON WORDS FOR POWER LEVELS |
| POWER LEVEL x 1 100% High | ||
| POWER LEVEL x 2 90% | ||
| POWER LEVEL x 3 80% | ||
| POWER LEVEL x 4 70% Medium High | ||
| POWER LEVEL x 5 60% | ||
| POWER LEVEL x 6 50% Medium | ||
| POWER LEVEL x 7 40% | ||
| POWER LEVEL x 8 30% Med Low/Defrost | ||
| POWER LEVEL x 9 20% | ||
| POWER LEVEL x 10 10% Low | ||
| POWER LEVEL x 11 0% |
SENSOR SETTINGS
Sensor is a semi-conductor device that detects the vapor (moisture and humidity) emitted from the food as it heats. Sensor adjusts the cooking times and power levels for various foods and quantities.
USING SENSOR SETTINGS:
1 After the Convection DrawerMicro oven is plugged in, wait 2 minutes before using any Sensor setting.
2 Ensure the exterior of the cooking container and the interior of the Convection DrawerMicro oven are dry. Wipe off any moisture with a dry cloth or paper towel.
3 Sensor works with foods at normal storage temperature. For example, popcorn would be at room temperature.
4 Any Sensor selection can be programmed with More or Less Time Adjustment. See page 33 for MORE OR LESS TIME ADJUSTMENT.
5 More or less food than the quantity listed in the charts should be cooked following the guidelines in any microwave cookbook.
6 During the first part of Sensor use, the food name will appear on the display. Do not open the Convection DrawerMicro oven or touch STOP/CLEAR during this part of the cycle, as the measurement of vapor will be interrupted. If this occurs, an error message will appear. To continue cooking, touch the STOP/CLEAR pad and cook manually.
When Sensor detects the vapor emitted from the food, the remaining cooking/reheating time will appear. The Convection DrawerMicro oven may be opened when the remaining time appears on the display. At this time, stir or season food as desired.
7 Except for Popcorn, if Sensor does not detect vapor properly when cooking other foods, ERROR will be displayed and the microwave will turn off.
8 Check food temperature after cooking. If additional time is needed, continue to cook manually.
9 Each food has a cooking hint. Touch the TIMER/SETTINGS pad when the HELP indicator is lighted in the display.
Microwave Oven Cooking
COVERING FOODS:
Some foods cook best when covered. See pages 8–9 for ABOUT UTENSILS AND COVERINGS. Refer to the hints by touching the TIMER/SETTINGS pad.
- Plastic wrap: Use plastic wrap specially marked for microwave cooking. Cover the dish loosely so plastic wrap does not touch food, leaving an approximately 1/2" gap for steam to escape.
- Wax paper: Cover the dish completely, overlapping two pieces at least an inch if the dish is too wide, and fold excess wrap under the dish to secure.
- Remove any covering by carefully lifting at the furthest corner to allow steam to escape away from you.
SENSOR
POPCORN, REHEAT, COOK
You can cook or reheat many foods without calculating cooking time or power level.
- Suppose you want to cook baked potatoes.
1 Touch COOK pad once.
2 See Menu Label. Select desired food by touching number pad. Ex: Touch 1 for baked potatoes.
3 Touch START/ADD-30-SEC pad.
Note:
- To heat or cook other foods or foods above or below the quantity allowed on the chart, cook manually.
POPCORN, REHEAT CHART
| FOOD AMOUNT PROCEDURE | ||
| Popcorn | Only 1 package at a time | Only cook one microwave popcorn package at a time with the appropriate side facing up. After cooking, remove and open carefully to allow steam to escape. |
| 2.85 - 3.5 oz (Regular/Regular light) | Touch POPCORN pad once. | |
| 1.2 - 1.75 oz (Mini/Snack) | Touch POPCORN pad twice. | |
| Reheat 4 - | 36 oz Use microwave-safe | cookware and cover with lid, plastic wrap or wax paper.After reheating, stir well, if possible. Re-cover and allow to stand 2 to 3 minutes.Note:The tighter the cover, the hotter the food will be. Leave a small vent for steam to escape from the food as it heats. |
Microwave Oven Cooking
COOK CHART
| FOOD AMOUNT PROCEDURE | ||
| 1 Baked Potatoes2 Sweet Potatoes | 1 - 6 medium1 - 6 medium | Pierce the potatoes at least 3 times each on the top, bottom and sides. Piercing allows steam to escape. Place on paper towel in DrawerMicro oven. After cooking, remove from microwave, wrap in aluminum foil and let stand 5 to 10 minutes. |
| 3 Fish/Seafood | 0.50 - 2.0 lb | Arrange fish or seafood in a ring in a shallow glass dish (roll fillet edges underneath). Cover with vented plastic wrap. After cooking, let stand, covered, for 3 minutes. |
| 4 Brown Rice5 White Rice | 0.5 - 2.0 cups0.5 - 2.0 cups | Place rice into a deep casserole and add double quantity of water. Cover with lid or plastic wrap. After cooking, stir, cover and let stand 3 to 5 minutes or until all liquid has been absorbed.Rice Water Size of casserole0.5 cup...... 1 cup...... 1.5 quarts1 cup...... 2 cups ......2 quarts1.5 cups ...... 3 cups ......2.5 or 3 quarts2 cups ...... 4 cups ......3 quarts or larger |
| 6 Quick Fresh VegetablesBroccoliBrussels sproutsCabbageCauliflower (flowerets)Cauliflower (whole)SpinachZucchiniBaked apples | 0.25 - 2.0 lb0.25 - 2.0 lb0.25 - 2.0 lb0.25 - 2.0 lb1 medium0.25 - 1.0 lb0.25 - 2.0 lb2 - 4 medium | Wash and place in casserole. Add no water if vegetables have just been washed. Cover with lid for tender vegetables. Cover with plastic wrap for tender-crisp vegetables. After cooking, stir, if possible, and let stand, covered, for 2 to 5 minutes. |
| 7 Longer Fresh VegetablesCarrots, slicedCorn on the cobGreen beansWinter squash:dicedhalves | 0.25 - 1.5 lb2 - 40.25 - 1.5 lb0.25 - 1.5 lb1 - 2 | Place in casserole. Add 1 - 4 tablespoons water. Cover with lid for tender vegetables. Cover with plastic wrap for tender-crisp vegetables. After cooking, stir, if possible, and let stand, covered, for 2 to 5 minutes. |
| 8 Frozen Vegetables | 0.25 - 1.25 lb | Place in casserole and add no water. Cover with lid or plastic wrap. After cooking, stir and let stand, covered, for 3 minutes. |
| 9 Ground Meat | 0.25 - 2.0 lb | Place ground meat in a casserole and cover with wax paper or plastic wrap. Place patties on a microwave-safe dish and cover with wax paper. When cooking pauses, stir meat or flip patties. Re-cover and touch START/ADD-30-SEC. After cooking, let stand, covered, for 2 to 3 minutes. |
| 10 Frozen Entrée | 6 - 17 oz | Remove entrée from outer packaging and follow package directions for covering. After cooking, let stand, covered, for 1 to 3 minutes. |
Microwave Oven Cooking
DEFROST
Use this feature to defrost the foods shown in the DEFROST CHART below.
1 Touch DEFROST pad.
2 See Menu Label. Select desired food by touching the number pad. Ex: Touch 2 for steaks/chops.
3 Enter weight by touching number pads.
4 Touch START/ADD-30-SEC pad.
5 The oven will stop so the food can be checked. After the first stage, open the Convection DrawerMicro oven to turn steak over. Close the Convection DrawerMicro oven. Touch START/ADD-30-SEC pad.
6 After each audible signal, turn food over and touch START/ADD-30-SEC again.
After defrost cycle ends, cover and let stand as indicated in the chart below.
Note:
- Defrost can be programmed with More or Less Time Adjustment. See page 33 for MORE OR LESS TIME ADJUSTMENT.
- To defrost other foods or foods above or below the weights allowed on the DEFROST CHART, see MANUAL DEFROST below.
- Check foods when oven signals. After final stage, small sections may still be icy. Let stand to continue thawing. Do not cook until all ice crystals are thawed.
DEFROST CHART
| FOOD AMOUNT | PROCEDURE | |
| 1 Ground Meat | 0.5 - 2.0 lb | After each audible signal, remove any thawed pieces and touch START/ADD-30-SEC again. After cooking, let stand, covered, for 5 to 10 minutes. |
| 2 Steaks/Chops | 0.5 - 3.0 lb | After each audible signal, turn food over and touch START/ADD-30-SEC again. After cooking, let stand, covered, for 10 to 20 minutes. |
| 3 Boneless Poultry | 0.5 - 2.0 lb | After each audible signal, turn food over and touch START/ADD-30-SEC again. After cooking, let stand, covered, for 10 to 20 minutes. |
| 4 Bone-in Poultry | 0.5 - 3.0 lb | After each audible signal, turn food over and touch START/ADD-30-SEC again. After cooking, let stand, covered, for 10 to 20 minutes. |
| 5 Roast | 2.0 - 4.0 lb | After each audible signal, turn food over and touch START/ADD-30-SEC again. After cooking, let stand, covered, for 30 to 60 minutes. |
| 6 Casserole Soup | 2 - 6 cups1 - 6 cups | After each audible signal, break apart and remove any defrosted part and touch START/ADD-30-SEC again. After cooking, stir well and let stand, covered, for 5 to 10 minutes. |
MANUAL DEFROST
If the food you wish to defrost is not listed on the DEFROST CHART or is above or below the limits in the AMOUNT column on the DEFROST CHART, defrost manually.
Defrost any frozen food, either raw or previously cooked, by using POWER LEVEL at 30%. See page 14 for the 3-step procedure in TO SET POWER LEVEL. Estimate defrosting time and touch POWER LEVEL pad eight times for 30% power.
For either raw or previously cooked frozen food, the defrosting time is approximately 4 minutes per pound. For example, defrost 1 pound of frozen spaghetti sauce for 4 minutes.
Always stop the oven periodically to remove or separate the defrosted portions. If food is not defrosted at the end of the estimated defrosting time, program the oven in 1 minute increments on POWER LEVEL 30% until totally defrosted.
When using plastic containers from the freezer, defrost only long enough to remove from the plastic, then place in a microwave-safe dish.
Microwave Oven Cooking
These features automatically compute the correct heating time and microwave power level for melting, softening and warming foods shown in the chart below.
- Suppose you want to melt 1 square of chocolate.
1 Touch MORE MENUS pad once.
2 See Menu Label. Select desired food by touching number pad. Ex: Touch 2 for chocolate.
3 Repeat touching same number pad to select quantity. Ex: Touch 2 two more times for 1 square.
4 Touch START/ADD-30-SEC pad.
Note:
- Melt/Soften/Warm can be programmed with More or Less Time Adjustment. See page 33 for MORE OR LESS TIME ADJUSTMENT.
- To melt, soften or warm other food or foods above or below the quantity allowed on the MELT/SOFTEN/WARM CHART, use manual operation.
MELT/SOFTEN/WARMCHART
| FOOD AMOUNT | PROCEDURE | |
| Melt Use a glass measuring cup. Cover with plastic wrap. | ||
| 1 Butter 2 tbsp | 0.5 cup | After touching MORE MENUS, touch 1 two times for 2 tbsp.After touching MORE MENUS, touch 1 three times for 0.5 cup. |
| 2 Chocolate 1 cup chips | 1 square | After touching MORE MENUS, touch 2 two times for 1 cup chips.After touching MORE MENUS, touch 2 three times for 1 square. |
| Soften DO NOT COVER. | ||
| 3 Ice cream | 1 pint1.5 qt | After touching MORE MENUS, touch 3 two times for 1 pint.After touching MORE MENUS, touch 3 three times for 1.5 quarts. |
| 4 Cream cheese | 3 oz8 oz | After touching MORE MENUS, touch 4 two times for 3 oz.After touching MORE MENUS, touch 4 three times for 8 oz. |
| Warm | ||
| 5 Syrup | 0.25 cup0.5 cup | Use a glass measuring cup. DO NOT COVER.After touching MORE MENUS, touch 5 two times for 0.25 cup.After touching MORE MENUS, touch 5 three times for 0.5 cup. |
| 6 Dessert Toppings | 0.25 cup0.5 cup | After touching MORE MENUS, touch 6 two times for 0.25 cup.After touching MORE MENUS, touch 6 three times for 0.5 cup. |
Microwave Oven Cooking
BEVERAGE REHEAT/HOT WATER/HOT CEREAL
These features enable you to reheat coffee or tea to restore to a better drinking temperature or to make instant coffee, tea or hot cereal.
- Suppose you want to make 2 cups of coffee.
1 Touch MORE MENUS pad once.
2 See Menu Label. Select desired item by touching number pad. Ex: Touch 8 to make coffee.
3 Repeat touching same number pad to select quantity. Ex: Touch 8 two more times for 2 cups of coffee.
4 Touch START/ADD-30-SEC pad.
Note:
- Beverage Reheat/Hot Water/Hot Cereal can be programmed with More or Less Time Adjustment. See page 33 for MORE OR LESS TIME ADJUSTMENT.
- If you attempt to enter more or less than the allowed amount, an error message will appear in the display.
BEVERAGE REHEAT/HOT WATER/HOT CEREAL CHART
| FOOD AMOUNT | PROCEDURE | |
| 7 Beverage Reheat | 0.5 - 2 cups | This setting is good for restoring a cooled beverage to a better drinking temperature. Touch number 7 pad to increase amount in increments of 0.5 cup. Stir after heating. |
| 8 Hot Water | 1 - 6 cups | Use this setting for heating COLD TAP WATER to just under boiling temperature to make instant coffee or tea. Touch number 8 pad to increase amount in increments of 1 cup. Stir liquid briskly before and after heating to avoid eruption. |
| 9 Hot Cereal | 1 - 6 servings | Use individual packets or bulk cereal in your favorite variety: oatmeal, oat bran, cream of wheat, farina or wheatena. Follow the package directions for the correct amount of water or milk. To prevent boilovers, it is very important to choose a large container because microwave cooking of cereal causes high boiling. Touch number 9 pad to increase number of servings. If the oven stops, stir and touch START/ADD-30-SEC. After cooking, stir and let stand, covered, for 2 minutes. |
Convection Cooking - Presets
Viking Range, LLC's innovative Drawer design now combines convection and microwave cooking to create dishes that range from convenience food items to delicious gourmet meals.
MORE MENUS (CONVECTION)
The following pages provide instructions for using the Convection cooking modes available in More Menus to Bake, Grill and Roast foods with preset temperature and cooking times.
Touch TIMER/SETTINGS pad anytime HELP is illuminated on the oven display for details on food selection quantity.
CAUTION The oven cabinet, cavity, door, tray, racks and dishes will become hot. To prevent burns, use thick oven gloves when removing the food from the oven.
CONVECTION BAKE
Convection Bake automatically bakes breads, desserts, seafood, pizza and air fry foods.
- To bake biscuits:
1 Touch MORE MENUS pad.
2 See Menu Label. Select desired item by touching number pad. Ex: Touch 1 for biscuits.
3 Touch START/ADD-30-SEC pad to begin preheating. After the preheat cycle ends, an audible signal of 4 beeps will indicate the preheat cycle is complete. Open the drawer to place food inside the oven.
4 Touch START/ADD-30-SEC pad to begin cooking.
CONVECTION ROAST
Convection Roast automatically roasts certain cuts of beef, pork and poultry.
• To roast pork tenderloin:
1 Touch the MORE MENUS pad.
2 Select desired item by touching number pad. Ex: touch 18 for pork tenderloin. See Menu Label.
3 Touch START/ADD-30-SEC pad to begin preheating.
After the preheat cycle ends, an audible signal of 4 beeps will indicate the preheat cycle is complete. Open the drawer to place food inside the oven.
4 Touch START/ADD-30-SEC pad to begin cooking.
CONVECTION GRILL
Convection Grill automatically grills certain cuts of fish and seafood, beef, pork and burger patties.
• To grill hamburgers:
1 Touch the MORE MENUS pad.
2 See Menu Label. Select desired item by touching number pad. Ex: Touch 10 for turkey burgers.
3 Touch START/ADD-30-SEC pad to begin preheating.
After the preheat cycle ends, an audible signal of 4 beeps will indicate the preheat cycle is complete. Open the drawer to place food inside the oven.
4 Touch START/ADD-30-SEC pad to begin cooking.
MORE MENUS (CONVECTION) CHART
| SETTING/FOOD | AMOUNT METHOD PROCEDURE | |
| 1 Biscuits (Canned) | 6 - 12 pcs Convection Bake | Preheat drawer. Place 6 to 12 large canned biscuits evenly spaced on a sheet tray. Place sheet tray on the bottom rack in the lower position after preheating the drawer. Different sizes and brands vary in time. Biscuits are done when golden brown on top. To cook more than 12 pcs, put the additional biscuits on a sheet tray on the top rack in the upper position. |
| 2 Dinner Rolls (Frozen) | 10 - 20 pcs Convection Bake | Follow package instructions to thaw and proof yeast dinner rolls (generally set out for 3 hours at room temperature). Preheat drawer. Place 10 to 20 thawed/proofed dinner rolls evenly spaced on a sheet tray. Place sheet tray on the bottom rack in the lower position after preheating the drawer. Different sizes and brands vary in time. Dinner rolls are done when golden brown on top. Brush the tops with melted butter when hot out of the drawer for added flavor. To cook more than 20 pcs, put the additional dinner rolls on a sheet tray on the top rack in the upper position. |
Convection Cooking - Presets
MORE MENUS (CONVECTION) CHART
| SETTING/FOOD | AMOUNT METHOD PROCEDURE | ||
| 3 Crescent Rolls (Canned) | 4 - 8 pcs Convection Bake | Preheat drawer. Place 4 to 8 canned crescent rolls evenly spaced on a sheet tray. Place sheet tray on the bottom rack in the lower position after preheating the drawer. Different sizes and brands vary in time. Crescent rolls are done when golden brown on top. To cook more than 8 pcs, put additional rolls on a sheet tray on the top rack in the upper position. | |
| 4 Cookies | 6 - 12 pcs | Convection Bake | Preheat drawer. Use prepackaged cookie dough mix, follow spacing guidelines on package and place 6 to 12 cookies on a sheet tray. Place sheet tray on the bottom rack in the lower position after preheating the drawer. Different sizes and brands vary in time. Cookies are done when the edges are firm. To cook more than 12 pcs, put additional cookies on a sheet tray on the top rack in the upper position. |
| 5 Brownies 1 pan (8 x 8-inch) | Speed Bake | Place the top rack in the lower position of the drawer and begin preheating. ALWAYS use glass or silicone bakeware and microwave-safe dishes with SPEED COOK, as the drawer uses microwave and convection during cooking. Grease an 8 x 8-inch microwave-safe baking dish and add brownie mix. Place dish on the rack after preheating the drawer. Different sizes and brands vary in time. Brownies are done when a toothpick inserted in the center comes out clean. Placing the rack in the drawer during preheat allows for faster and more even cooking. | |
| 6 Layered Cake | 1 or 2 pans (8-inch round) | Convection Bake | Place the top rack in the upper position and the bottom rack in the lower position and begin preheating. If only baking 1 pan, use the top rack in the lower position. Grease 8-inch round cake pans and place in the center of racks after preheating the drawer. Different sizes and brands vary in time. The cake is done when a toothpick inserted in the center comes out clean. Placing the racks in the drawer during preheat allows for faster and more even cooking. |
| 7 Fish Fillet 2 - 4 fillets (6 - 10 oz each) | Convection Roast | Preheat drawer. Season as desired and evenly space 2 to 4 fillets on the cook/drip tray. Place on the top rack in the lower position after preheating the drawer. Different thickness of fillets cook differently; monitor doneness during cooking. This setting works well for thicker fillets, such as salmon and cod. | |
| 8 Breaded Shrimp | 6 - 18 pcs Convection Roast | Preheat drawer. Evenly space 6 to 18 breaded shrimp on a sheet tray. Place sheet tray on top rack in the lower position after preheating the drawer. Different sizes and brands vary in time. The shrimp are done when golden brown. | |
| 9 Beef Burger | 2 - 6 patties (1/2-inch thick, 6 oz each) | Convection Grill | Place the cook/drip tray on the top rack in the lower position and begin preheating. Season as desired and evenly space 2 to 6 patties on the cook/drip tray after preheating the drawer. When drawer pauses, flip patties over and touch START/ADD-30-SEC. After cooking, let stand for 2 to 3 minutes. Different thicknesses of patties vary in time; monitor doneness during cooking. For cheeseburgers, add cheese on top of patty and let stand in the drawer with door closed for an additional 2 to 3 minutes. Placing the cook/drip tray in the drawer during preheat allows for faster and more even cooking. |
Convection Cooking - Presets
MORE MENUS (CONVECTION) CHART
| SETTING/FOOD | AMOUNT METHOD PROCEDURE | ||
| 10 Turkey Burger | 2 - 6 patties (1/2-inch thick, 6 oz each) | Convection Grill | Place the cook/drip tray on the top rack in the lower position and begin preheating. Season as desired and evenly space 2 to 6 patties on the cook/drip tray after preheating the drawer. When drawer pauses, flip patties over and touch START/ADD-30-SEC. After cooking, let stand for 2 to 3 minutes. Different thicknesses of patties vary in time; monitor doneness during cooking. For cheeseburgers, add cheese on top of patty and let stand in the drawer with door closed for an additional 2 to 3 minutes. Placing the cook/drip tray in the drawer during preheat allows for faster and more even cooking. |
| 11 Veggie Burger | 2 - 6 patties (3 - 4 oz each) | Convection Grill | Place the cook/drip tray in the bottom of the drawer. Place the top rack in the upper position and begin preheating. Season as desired and evenly space 2 to 6 patties directly on top of rack after preheating the drawer. When drawer pauses, flip patties over and touch START/ADD-30-SEC. After cooking, let stand for 2 to 3 minutes. Different thicknesses of patties vary in time; monitor doneness during cooking. For cheeseburgers, add cheese on top of patty and let stand in the drawer with door closed for an additional 2 to 3 minutes. Placing the cook/drip tray in the drawer during preheat allowing for faster and more even cooking. |
| 12 Frozen Thin Crust Pizza | 1 (12-inch) Convection Roast | Place the cook/drip tray in the bottom of the drawer. Place the top rack in the lower position and begin preheating. Place one 12-inch frozen pizza directly on the rack after preheating the drawer. Different sizes and brands vary in time. The pizza is done when the cheese is melted and the crust is golden brown. Placing the cook/drip tray in the drawer during preheat allows for faster and more even cooking. | |
| 13 Frozen Classic Crust Pizza | 1 (12-inch) Convection Roast | Place the cook/drip tray in the bottom of the drawer. Place the top rack in the lower position and begin preheating. Place one 12-inch frozen pizza directly on the rack after preheating the drawer. Different sizes and brands vary in time. The pizza is done when the cheese is melted and the crust is golden brown. Placing the cook/drip tray in the drawer during preheat allowing for faster and more even cooking. | |
| 14 Frozen Rising Crust Pizza | 1 (12-inch) Convection Roast | Place the cook/drip tray in the bottom of the drawer. Place the top rack in the lower position and begin preheating. Place one 12-inch frozen pizza directly on the rack after preheating the drawer. Different sizes and brands vary in time. The pizza is done when the cheese is melted and the crust is golden brown. Placing the cook/drip tray in the drawer during preheat allow for faster and more even cooking. | |
| 15 Fresh Pizza on Pizza Stone | 1 (12-inch) Convection Roast | Place the top rack in the lower position, place a 12-inch pizza stone on rack and begin preheating. Allow an extra 30 minutes for pizza stone to come to the correct temperature. Gently stretch premade or homemade raw dough into a 12-inch round. Transfer dough to floured pizza peel and add desired toppings. Coming carefully from the side of the oven drawer, use peel to slide pizza onto pizza stone. Use caution when using the pizza stone, as it will be very hot. Pizza is done when the cheese is melted and the crust is golden brown. | |
| 16 Beef Roast | 2 - 4 lb Convection Roast | Place the bottom rack in the lower position of the drawer. Use the slider bar to select the weight and begin preheating. Set roast on the cook/drip tray and season roast as desired. Place the cook/drip tray on the rack after preheating the drawer. Covering the roast with foil and letting it stand after cooking allows the juices to redistribute, creating a moist interior while maintaining a crispy, browned exterior. | |
Convection Cooking - Presets
MORE MENUS (CONVECTION) CHART
| SETTING/FOOD | AMOUNT METHOD PROCEDURE | ||
| 17 Flank Steak | 1.5 - 2.0 lb Convection Grill | Place the cook/drip tray on the top rack in the upper position and begin preheating. Season steak as desired and place in the center of cook/drip tray after preheating the drawer. When drawer pauses, turn steak over and touch START/ADD-30-SEC. After cooking, let stand for 3 to 5 minutes. Placing the cook/drip tray in the drawer during preheat aids in browning of the steak and allows for faster and more even cooking. If using a glaze or sauce with high sugar content like barbeque sauce, use the top rack in the lower position to prevent burning of glaze or sauce. | |
| 18 Pork Tenderloin | 0.75 - 1.5 lb Convection Roast | Place the cook/drip tray in the bottom of the drawer. Place the bottom rack in the lower position and begin preheating. Season as desired and place the tenderloin directly on the rack after preheating the drawer. Different thickness tenderloins vary in time; use an instant-read thermometer to check for doneness. Pork is done when it reaches 160°F. Placing the rack in the drawer during preheat allows for faster and more even cooking. | |
| 19 Pork Chop (Boneless) | 2 - 5 pcs (1/2-inch thick, 6 - 9 oz each) | Convection Grill | Place the cook/drip tray on the top rack in the upper position and begin preheating. Season chops as desired and place in the center of cook/drip tray after preheating the drawer. When drawer pauses, turn chops over and touch START/ADD-30-SEC. Different thickness pork chops vary in time; use an instant-read thermometer to check for doneness. Pork is done when it reaches 160°F. After cooking, let stand for 3 to 5 minutes. Placing the cook/drip tray in the drawer during preheat aids in browning of the chops and allows for faster and more even cooking. If using a glaze or sauce with high sugar content like barbeque sauce, use the top rack in the lower position to prevent burning of glaze or sauce. |
| 20 Bacon | 3 - 8 slices | Speed Cook - Bake | Place bacon on the cook/drip tray and set directly on the bottom of the drawer. If using another dish instead of provided cook/drip tray, ensure it is oven-safe and ALWAYS use glass or silicone bakeware and microwave-safe dishes with SPEED COOK as the drawer uses microwave and convection during cooking. When drawer pauses, turn bacon over and touch START/ADD-30-SEC. After cooking, let stand for 2 to 3 minutes. Different thicknesses of bacon vary in time; monitor during cooking for desired level of crispness. This setting works well for thin and regular cuts of bacon. For crispy bacon, let the drawer run a full cook cycle of 20 minutes. Never pour bacon grease in the sink. Allow grease to cool to room temperature and safely discard it. |
| 21 Chicken Drummies | 1.0 - 2.5 lb (3 - 6 large drumsticks) | Convection Grill | Place the cook/drip tray on the top rack in the lower position and begin preheating. Season drumsticks as desired and evenly space on top of cook/drip tray after preheating the drawer. When drawer pauses, turn chops over and touch START/ADD-30-SEC. Different sizes of drumsticks vary in time; use an instant-read thermometer to check for doneness. Chicken is done when it reaches 165°F. After cooking, let stand for 2 to 3 minutes. This setting works well for pre-marinated or plain drumsticks. Placing the cook/drip tray in the drawer during preheat allows for faster and more even cooking. |
Convection Cooking - Presets
MORE MENUS (CONVECTION) CHART
| SETTING/FOOD | AMOUNT METHOD PROCEDURE | ||
| 22 Chicken Breast (Boneless) | 1.0 - 3.5 lb (1 - 3 large breast pieces) | Convection Grill | Place the top rack in the lower position and begin preheating. Season the chicken breast pieces and place on top of cook/drip tray. Place cook/drip tray on top of top rack after preheating the drawer. When drawer pauses, turn chops over and touch START/ADD-30-SEC. Different sizes of chicken pieces vary in time; use an instant-read thermometer to check for doneness. Chicken is done when it reaches 165°F. After cooking, let stand for 2 to 3 minutes. This setting works well for skin-on or skinless cuts of chicken. Placing the rack in the drawer during preheat allows for faster and more even cooking. |
| 23 Whole Chicken | 2.5 - 7.5 lb Speed Cook - Roast | Place the cook/drip tray in the bottom of the drawer. Place the bottom rack in the lower position. Use the slider bar to select the weight and begin preheating. Season the chicken as desired and place directly on the rack after preheating the drawer. ALWAYS use glass or silicone bakeware and microwave-safe dishes with SPEED COOK as the drawer uses microwave and convection during cooking. Use an instant-read thermometer to check for doneness by inserting it deep into the breast. Chicken is done when it reaches 165°F. | |
| 24 Turkey Breast | 1.0 - 3.5 lb Convection Roast | Place the top rack in the lower position. Use the slider bar to select the weight and begin preheating. Set turkey breast on top of the cook/drip tray and season as desired. Place the cook/drip tray on top of the bottom rack after preheating the drawer. Use an instant-read thermometer to check for doneness by inserting it deep into the breast. Turkey is done when it reaches 165°F. Covering the turkey breast with foil and letting it stand after cooking allows the juices to redistribute, creating a moist interior while maintaining a crispy, browned exterior. | |
Convection Cooking - Manual
CAUTION The oven cabinet, cavity, door, tray, racks and dishes will become hot. To prevent burns, use thick oven gloves when removing the food from the oven.
During convection heating, hot air is circulated throughout the oven cavity to brown and crisp foods quickly and evenly. This oven can be programmed for ten different preset convection cooking temperatures for up to 2 hours.
RECIPE CONVERSION
When using Convection cooking, adjustments from recipes are recommended for temperature and time to avoid overcooking.
Temperature - Reduce by 25°F
Time - Monitor foods regularly for doneness, because convection ovens cook more rapidly than conventional ovens.
CONVECTION BAKE
| BAKE 90°F | - 450°F 2 hour | max cook time | Cookies, cakes, biscuits, pizzas and chicken nuggets |
| BAKE PROOF (number 1 pad) | 90°F 2 hour | max cook time | Use for proofing bread doughs |
BAKE WITH PREHEAT
1 Touch BAKE/WARM pad once.
2 Touch 1 pad to preheat.
3 Select desired temperature by touching number pads 1-0. Ex: To bake at 450^ F, touch the 0 pad.
4 Touch START/ADD-30-SEC pad to begin preheating the oven.
An audible signal of 4 beeps will indicate the preheat cycle is complete. Carefully open the drawer and set food inside of the oven.
Note: If the oven drawer is not opened within 20 minutes after preheating has completed, the oven will turn OFF automatically.
5 Enter desired cook time in HOURS and MINUTES by touching number pads. Ex: Touch 1 2 5 to bake for 1 hour and 25 minutes. Time will display as 1:25 H.
IMPORTANT: If you wish to change the time entry, simply touch the pads to enter new desired time WHILE TIME DISPLAY IS BLINKING on the oven. DO NOT TOUCH STOP/CLEAR. Touching STOP/CLEAR will cancel the Convection Cook cycle. If time is entered after STOP/CLEAR is touched, a microwave cycle will be
initiated. This can be dangerous if non-microwavable cookware is being used.
6 Touch START/ADD-30-SEC pad to begin cooking.
To adjust temperature before starting the cook cycle, touch BAKE/WARM again before touching START/ADD-30-SEC.
Note:
- The maximum cooking time available is 2 hours. If you enter a time above 2 hours, the following message will display: ERROR 2 HOUR MAX TIME TOUCH CLEAR.
- The oven displays cooking countdown in Hours and Minutes. Touch BAKE/WARM during the cooking cycle to view temperature.
- Time and temperature cannot be adjusted once cooking cycle has started. In order to modify time or temperature, touch STOP/CLEAR to cancel current settings and end cooking cycle.
BAKE WITHOUT PREHEAT
1 Touch BAKE/WARM pad once.
2 Touch 2 pad to select no preheat.
3 Select desired temperature by touching number pads 2-0. Ex: To bake at 375^ F, touch the 7 pad.
4 Enter desired cook time in HOURS and MINUTES by touching number pads. Ex: Touch 1 2 5 to bake for 1 hour and 25 minutes. Time will display as 1:25 H.
IMPORTANT: If you wish to change the time entry, simply touch the pads to enter new desired time WHILE TIME DISPLAY IS BLINKING on the oven. DO NOT TOUCH STOP/CLEAR. Touching STOP/CLEAR will cancel the Convection Cook cycle. If time is entered after STOP/CLEAR is touched, a microwave cycle will be initiated. This can be dangerous if non-microwavable cookware is being used.
5 Place food inside the oven. Touch START/ADD-30-SEC pad to begin cooking.
To adjust temperature before starting the cook cycle, touch BAKE/WARM again before touching START/ADD-30-SEC.
Note:
- If the oven drawer is not opened within 10 minutes after the time entry has been selected, the oven will turn OFF automatically. The oven does not give instruction to open the drawer and set food inside, only to touch START/ADD-30-SEC.
- The maximum cooking time available is 2 hours. If you enter a time above 2 hours, the following message will display: ERROR 2 HOUR MAX TIME TOUCH CLEAR.
- The oven displays cooking countdown in Hours and Minutes. Touch BAKE/WARM during the cooking cycle to view temperature.
Convection Cooking - Manual
- Time and temperature cannot be adjusted once cooking cycle has started. In order to modify time or temperature, touch STOP/CLEAR to cancel current settings and end cooking cycle.
BAKE PROOF BREADS
1 Touch and hold the BAKE/WARM pad for 3 seconds. WARM will display on the oven.
2 Touch 1 pad to proof at 90°F.
3 Enter desired time in HOURS and MINUTES by touching number pads. Ex: Touch 1 1 5 to proof dough for 1 hour and 15 minutes. Time will display as 1:15 H.
IMPORTANT: If you wish to change the time entry, simply touch the pads to enter new desired time WHILE TIME DISPLAY IS BLINKING on the oven. DO NOT TOUCH STOP/CLEAR. Touching STOP/CLEAR will cancel the Convection Cook cycle. If time is entered after STOP/CLEAR is touched, a microwave cycle will be initiated. This can be dangerous if non-microwavable cookware is being used.
4 Touch START/ADD-30-SEC pad to begin proofing.
Note:
- If the oven drawer is not opened within 10 minutes after the time entry has been selected, the oven will turn OFF automatically. The oven does not give instruction to open the drawer and set food inside, only to touch START/ADD-30-SEC.
- The maximum cooking time available is 4 hours. If you enter a time above 4 hours, the following message will display: ERROR 4 HOUR MAX TIME TOUCH CLEAR.
- Proof is also available as one of the Convection Warm functions. See page 28 for CONVECTION COOKING.
CONVECTION ROAST
| 375°F - 450°F 2 | hour max cook time | Turkey, poultry and pork |
ROAST WITH PREHEAT
1 Touch ROAST pad once.
2 Touch 1 pad to select preheat.
3 Select desired temperature by touching number pads 7-0. Ex: To roast at 375^ F, touch the 7 pad.
4 Touch START/ADD-30-SEC pad to begin preheating the oven.
An audible signal of 4 beeps will indicate the preheat cycle is complete. Carefully open the drawer and set food inside of the oven.
Note: If the oven drawer is not opened within 20 minutes after preheating has completed, the oven will turn OFF automatically.
5 Enter desired cook time in HOURS and MINUTES by touching number pads. Ex: Touch 2 0 0 to roast for 2 hours. Time will display as 2:00 H.
IMPORTANT: If you wish to change the time entry, simply touch the pads to enter new desired time WHILE TIME DISPLAY IS BLINKING on the oven. DO NOT TOUCH STOP/CLEAR. Touching STOP/CLEAR will cancel the Convection Cook cycle. If time is entered after STOP/CLEAR is touched, a microwave cycle will be initiated. This can be dangerous if non-microwavable cookware is being used.
6 Touch START/ADD-30-SEC pad to begin cooking.
To adjust temperature before starting the cook cycle, touch ROAST again before touching START/ADD-30-SEC.
Note:
- The maximum cooking time available is 2 hours. If you enter a time above 2 hours, the following message will display: ERROR 2 HOUR MAX TIME TOUCH CLEAR.
- The oven displays cooking countdown in Hours and Minutes. Touch ROAST during the cooking cycle to view temperature.
- Time and temperature cannot be adjusted once cooking cycle has started. To modify time or temperature, touch STOP/CLEAR to cancel current settings and end cooking cycle.
ROAST WITHOUT PREHEAT
1 Touch ROAST pad once.
2 Touch 2 pad to select no preheat.
3 Select desired temperature by touching number pads 7-0. Ex: To roast at 375^ F, touch the 7 pad.
4 Enter desired cook time in HOURS and MINUTES by touching number pads. Ex: Touch 3 5 to roast for 35 minutes. Time will display as :35 H.
IMPORTANT: If you wish to change the time entry, simply touch the pads to enter new desired time WHILE TIME DISPLAY IS BLINKING on the oven. DO NOT TOUCH STOP/CLEAR. Touching STOP/CLEAR will cancel the Convection Cook cycle. If time is entered after STOP/CLEAR is touched, a microwave cycle will be initiated. This can be dangerous if non-microwavable cookware is being used.
5 Place food inside the oven. Touch START/ADD-30-SEC pad to begin cooking.
To adjust temperature before starting the cook cycle, touch ROAST again before touching START/ADD-30-SEC.
Note:
- If the oven drawer is not opened within 10 minutes after the time entry has been selected, the oven will turn OFF automatically.
Convection Cooking - Manual
- The maximum cooking time available is 2 hours. If you enter a time above 2 hours, the following message will display: ERROR 2 HOUR MAX TIME TOUCH CLEAR.
- The oven does not give instruction to open the drawer and set food inside, only to touch START/ADD-30-SEC.
- The oven displays cooking countdown in Hours and Minutes. Touch ROAST during the cooking cycle to view temperature.
- Time and temperature cannot be adjusted once cooking cycle has started. To modify time or temperature, touch STOP/CLEAR to cancel current settings and end cooking cycle.
CONVECTION GRILL
| 450°F 30 minutes max cook time | Sautéed fish, vegetables, burgers and steaks |
GRILL WITH PREHEAT
1 Touch GRILL/TOAST pad once.
2 Touch 1 pad to select preheat.
3 Touch START/ADD-30-SEC pad to begin preheating the oven.
An audible signal of 4 beeps will indicate the preheat cycle is complete. Carefully open the drawer and set food inside of the oven.
Note: If the oven drawer is not opened within 20 minutes after preheating has completed, the oven will turn OFF automatically.
4 Enter desired cook time in MINUTES by touching number pads. Ex: Touch 20 to grill for 20 minutes. Time will display as :20 H.
IMPORTANT: If you wish to change the time entry, simply touch the pads to enter new desired time WHILE TIME DISPLAY IS BLINKING on the oven. DO NOT TOUCH STOP/CLEAR. Touching STOP/CLEAR will cancel the Convection Cook cycle. If time is entered after STOP/CLEAR is touched, a microwave cycle will be initiated. This can be dangerous if non-microwavable cookware is being used.
5 Touch START/ADD-30-SEC pad to begin cooking.
Note:
- The maximum cooking time available is 30 minutes. If you enter a time above 30 minutes, the following message will display: ERROR 30 MINUTES MAX TIME TOUCH CLEAR.
- The oven displays cooking countdown in Minutes. Touch GRILL/TOAST during the cooking cycle to view temperature.
- Time cannot be adjusted once cooking cycle has started. To modify time, touch STOP/CLEAR to cancel current settings and end cooking cycle.
GRILL WITHOUT PREHEAT
1 Touch GRILL/TOAST pad once.
2 Touch 2 pad to select no preheat.
3 Enter desired cook time in MINUTES by touching number pads. Ex: Touch 20 to grill for 20 minutes. Time will display as :20 H.
IMPORTANT: If you wish to change the time entry, simply touch the pads to enter new desired time WHILE TIME DISPLAY IS BLINKING on the oven. DO NOT TOUCH STOP/CLEAR. Touching STOP/CLEAR will cancel the Convection Cook cycle. If time is entered after STOP/CLEAR is touched, a microwave cycle will be initiated. This can be dangerous if non-microwavable cookware is being used.
4 Place food inside the oven. Touch START/ADD-30-SEC pad to begin cooking.
Note:
- If the oven drawer is not opened within 10 minutes after the time entry has been selected, the oven will turn OFF automatically. The oven does not give instruction to open the drawer and set food inside, only to touch START/ADD-30-SEC.
- The oven displays cooking countdown in Minutes. Touch GRILL/TOAST during the cooking cycle to view temperature.
- Time cannot be adjusted once cooking cycle has started. To modify time, touch STOP/CLEAR to cancel current settings and end cooking cycle.
Convection Cooking - Manual
CONVECTION WARM
Proof bread doughs and keep cooked food warm for up to 4 hours while preserving texture and flavor to deliver meals that taste fresh-from-the-oven. There is no preheat with Warm.
Dishes should be covered to retain moisture. Plastic wrap, foil and glass lids are recommended. See page 8 for ABOUT UTENSILS AND COVERINGS.
| 90°F - 200°F | |
| [1] 90°F Proofing dough and warming plates | |
| [2] 150°F Roasts, pastries, breads, quiches and vegetable casserole dishes | |
| [3] 200°F Poultry, pork, mashed potatoes, dense casseroles, e.g., lasagna |
1 Touch and hold the BAKE/WARM pad for 3 seconds. WARM will display on the oven.
2 See Menu Label. Select desired item by touching number pads 1-3.
To change temperature, touch STOP/CLEAR to begin again.
3 Enter desired time in HOURS and MINUTES by touching number pads. Ex: Touch 3 3 0 to warm for 3 hours and 30 minutes. Time will display as 3:30 H.
IMPORTANT: If you wish to change the time entry, simply touch the pads to enter new desired time WHILE TIME DISPLAY IS BLINKING on the oven. DO NOT TOUCH STOP/CLEAR. Touching STOP/CLEAR will cancel the Convection Cook cycle. If time is entered after STOP/CLEAR is touched, a microwave cycle will be initiated. This can be dangerous if non-microwavable cookware is being used.
4 Place food inside the oven. Touch START/ADD-30-SEC pad to begin warming.
Note:
- The maximum warming time available is 4 hours. If you enter a time above 4 hours, the following message will display: ERROR 4 HOURS MAX TIME TOUCH CLEAR.
- Touch BAKE/WARM during the cooking cycle to view temperature (once cooking has started, it is not necessary to hold the pad for 3 seconds).
CONVECTION TOAST
Toast breads and bagels perfectly by selecting desired level of browning with pre-timed options. There is no preheat with TOAST. Temperature: 450°F.
| TOAST: 1 - 4 pieces |
| Presets:[1] Light[2] Medium light[3] Medium[4] Medium dark[5] Dark |
1 Touch and hold the GRILL/TOAST pad for 3 seconds. TOAST will display on the oven.
2 See Menu Label. Select desired item by touching number pads 1-5. Ex: Touch 3 to select Medium browning. Place food inside the oven.
3 Touch START/ADD-30-SEC to begin cooking.
Time will display as : 05 H.
Note:
- To change desired level of browning, touch STOP/CLEAR to begin again.
- Touch GRILL/TOAST during the cooking cycle to view selected browning level (once cooking has started, it is not necessary to hold the pad for 3 seconds).
CONVECTION AIR FRY
Air Fry uses convection fans for 4 preset convenience food options with moist, soft interiors and perfectly crisped exteriors without the use of cooking oil.
1 Touch AIR FRY pad once.
2 See Menu Label. Select desired item by touching number pad 1-4. Ex: Touch 3 to for mozzarella sticks. To change menu item, touch STOP/CLEAR to begin again.
3 Touch START/ADD-30-SEC pad to begin preheating the oven.
An audible signal of 4 beeps will indicate the preheat cycle is complete. Carefully open the drawer and set food inside of the oven.
Note: If the oven drawer is not opened within 20 minutes after preheating has completed, the oven will turn OFF automatically.
4 Touch START/ADD-30-SEC pad to begin cooking.
Convection Cooking - Manual
AIR FRY CHART
| SETTING/FOOD AMOUNT PRESET TIME PROCEDURE | |||
| 1 Chicken Tenders | 3 - 8 pcs 18 minutes Place | a crisper or sheet tray on the top rack in the lower position and begin preheating. Evenly space 3 to 8 chicken tenders on top of the tray after preheating the drawer. Leave space between pieces to allow for crisping. For crispier texture, use a crisper pan instead of sheet tray. If using crisper pan, place the cook/drip tray in the bottom of the drawer. | |
| 2 French Fries | 10 - 24 oz | 23 minutes | Place a crisper or sheet tray on the top rack in the lower position and begin preheating. Evenly space french fries on top of the tray after preheating the drawer. Leave space between pieces to allow for crisping. Different size cuts of fries vary in time; monitor while cooking. Curly and waffle fries may require additional cooking time while shoestring fries will require less. For crispier texture, use a crisper pan instead of sheet tray. If using crisper pan, place the cook/drip tray in the bottom of the drawer. |
| 3 Mozzarella Sticks | 4 - 12 pcs | 12 minutes | Place a crisper or sheet tray on the top rack in the lower position and begin preheating. Evenly space 4 to 12 mozzarella sticks on top of the tray after preheating the drawer. Leave space between pieces to allow for crisping. Heat dipping sauce in a microwave-safe dish using the microwave mode if desired. For crispier texture, use a crisper pan instead of sheet tray. If using crisper pan, place the cook/drip tray in the bottom of the drawer. |
| 4 Tater Tots | 10 - 24 oz | 18 minutes | Place a crisper or sheet tray on the top rack in the lower position and begin preheating. Evenly space tater tots on top of the tray after preheating the drawer. Leave space between pieces to allow for crisping. For crispier texture, use a crisper pan instead of sheet tray. If using crisper pan, place the cook/drip tray in the bottom of the drawer. |
Speed Cook – Microwave & Convection Combination
The oven has three pre-programmed combination Speed Cook modes to cook with convection and microwave automatically: Speed Bake, Speed Roast and Speed Grill.
ALWAYS use microwave-safe and oven-safe cookware when using Speed Cook functions as the oven combines microwave and conventional oven power. See pages 8–9 for ABOUT UTENSILS AND COVERINGS.
Speed Cook provides great results for most items that do not require conventional oven methods.
The combination of microwave power with convection heat decreases cooking time while producing moist and juicy interiors and perfectly browned and crisped exteriors.
- Speed Bake is recommended for delicate items such as cake, breads and fish.
- Speed Roast works wonderfully for dense meats, larger pieces of poultry, beef and pork.
- Speed Grill is ideal for burgers, chicken drumsticks and thick pork chops.
The temperatures for Speed Bake and Speed Roast may be adjusted; Speed Grill temperature is preset. Microwave power levels for Speed Bake, Speed Roast and Speed Grill are preset.
For instructions on rack and tray placement, see page 12 for ACCESSORIES.
| SPEED COOK | OVEN TEMP. | MICROWAVE POWER | COOK TIME MAX. |
| 1 Speed Bake | Auto Set for 350°FAdjustable from 90°F - 450°F | 20% 2 hours | |
| 2 Speed Roast | Auto Set for 425°FAdjustable from 375°F - 450°F | 30% 2 hours | |
| 3 Speed Grill | 450°F 20% 30 minutes |
SPEED COOK WITH PREHEAT
1 Touch SPEED COOK pad once.
2 See Menu Label. Touch number pads 1-3 to select Bake, Roast or Grill mode. Ex: Touch 3 to cook with SPEED GRILL.
3 Touch 1 pad to select preheat.
4 Touch START/ADD-30-SEC pad to begin preheating the oven.
An audible signal of 4 beeps will indicate the preheat cycle is complete. Carefully open the drawer and set food inside of the oven.
Note: If the oven drawer is not opened within 20 minutes after preheating has completed, the oven will turn OFF automatically.
5 Enter desired time in MINUTES by touching the number pads. Ex: Touch 20 to grill for 20 minutes. Time will display as :20 H.
IMPORTANT: If you wish to change the time entry, simply touch the pads to enter new desired time WHILE TIME DISPLAY IS BLINKING on the oven. DO NOT TOUCH STOP/CLEAR. Touching STOP/CLEAR will cancel the Convection Cook cycle. If time is entered after STOP/CLEAR is touched, a microwave cycle will be initiated. This can be dangerous if non-microwavable cookware is being used.
6 Touch START/ADD-30-SEC pad to begin cooking.
Note:
- Refer to the chart at the left to view maximum cooking times available. An error message will display if a time above the maximum cook time allowed is entered.
- Touch SPEED COOK to view oven temperature and microwave power.
- Time cannot be adjusted once cooking cycle has started. To modify time, touch STOP/CLEAR to cancel current settings and end cooking cycle.
Speed Cook – Microwave & Convection Combination
SPEED COOK WITHOUT PREHEAT
1 Touch SPEED COOK pad once.
2 See Menu Label. Touch number pads 1-3 to select Bake, Roast or Grill mode. Ex: Touch 1 to cook with SPEED BAKE.
3 Touch 2 pad to select no preheat.
4 Enter desired time in HOURS and MINUTES by touching the number pads. Ex: Touch 30 to bake for 30 minutes. Time will display as :30 H.
IMPORTANT: If you wish to change the time entry, simply touch the pads to enter new desired time WHILE TIME DISPLAY IS BLINKING on the oven. DO NOT TOUCH STOP/CLEAR. Touching STOP/CLEAR will cancel the Convection Cook cycle. If time is entered after STOP/CLEAR is touched, a microwave cycle will be initiated. This can be dangerous if non-microwavable cookware is being used.
5 Place food inside the oven. Touch START/ADD-30-SEC pad to begin cooking at the preset temperature of 350°F.
To adjust temperature before starting, touch BAKE/WARM again before touching START/ADD-30-SEC to begin the cook cycle. Ex: To change the temperature, touch BAKE/WARM then touch 3 to change temperature to 275°F. Then touch START/ADD-30-SEC to begin cooking or touch pads 2-0 to select a different temperature.
Note:
- If the oven drawer is not opened within 10 minutes after the time entry has been selected, the oven will turn OFF automatically. The oven does not give instruction to open the drawer and set food inside, only to touch START/ADD-30-SEC
- An error message will display if a time above the maximum cook time allowed is entered. See page 31 for SPEED COOK chart.
- Touch SPEED COOK to view oven temperature and microwave power.
- Time and temperature cannot be adjusted once cooking cycle has started. In order to modify time or temperature, touch STOP/CLEAR to cancel current settings and end cooking cycle.
Other Features
TIMER/SETTINGS
If the electrical power supply to your Convection DrawerMicro oven should be interrupted, the display will intermittently show ENJOY YOUR OVEN TOUCH CLEAR after the power is reinstated. If this occurs, the SETTINGS option you input will be erased. Simply touch STOP/CLEAR pad and reset.
TIMER
1 Touch TIMER/SETTINGS pad 2 times.
2 Enter time.
3 Touch START/ADD-30-SEC pad.
To cancel timer, touch STOP/CLEAR.
AUDIBLE SIGNAL ELIMINATION
At the end of timed cook, beeps will sound. The audible signal can be turned off if you prefer quiet operation.
TO TURN SOUND OFF
1 Touch TIMER/SETTINGS pad 3 times.
2 Touch START/ADD-30-SEC pad. The display shows SOUND OFF.
TO RESTORE SOUND
1 Touch TIMER/SETTINGS pad 3 times.
2 Touch START/ADD-30-SEC pad. The display shows SOUND ON.
END OF COOKING REMINDER
From the end of timed cooking until the STOP/CLEAR pad is touched, the microwave will signal every 10 seconds for the first minute and then every 3 minutes for up to an hour.
TO TURN REMINDER OFF
3 Touch TIMER/SETTINGS pad 4 times. The display shows REMIND SIGNAL OFF? TOUCH START.
4 Touch START/ADD-30-SEC pad. The display shows REMIND SIGNAL OFF.
To program the Convection DrawerMicro oven to begin cooking automatically at a designated time of day, follow this procedure:
1 Touch TIMER/SETTINGS pad 5 times. The display shows AUTO START TOUCH START.
2 Touch START/ADD-30-SEC pad.
3 Enter start time.
4 Touch TIMER/SETTINGS pad.
5 Touch the number pads to enter cooking time. Touch POWER LEVEL pad repeatedly until the desired power level is reached.
6 Touch START/ADD-30-SEC pad.
DEMONSTRATION MODE
TO SELECT DEMO MODE
1 Touch TIMER/SETTINGS pad 6 times. The display shows DEMO ON? HOLD START 3 SEC.
2 Hold START/ADD-30-SEC pad for 3 seconds. The display shows DEMO ON.
TO CANCEL DEMO MODE
1 Touch TIMER/SETTINGS pad 6 times. The display shows DEMO OFF? TOUCH START.
2 Touch START/ADD-30-SEC pad. The display shows DEMO OFF.
Note:
- Convection DrawerMicro oven doesn't heat in Demo Mode.
- Display counts down quickly in Demo Mode.
ADD-30-SEC
(ADDITIONAL TIME FOR MICROWAVE COOKING)
ADD-30-SEC may be used to add additional time by touching the START/ADD-30-SEC pad if it is being used to cook. Touch the START/ADD-30-SEC pad to cook for 30 seconds at 100% power. Cooking time can be extended in increments of 30 seconds by repeatedly touching the START/ADD-30-SEC pad.
Note:
- To use ADD-30-SEC, touch pad within 3 minutes after end of timed cooking, after closing the drawer or after touching the STOP/CLEAR pad once.
- If the STOP/CLEAR pad is touched twice prior to the end of cooking, ADD-30-SEC cannot be activated until the drawer has been opened and closed.
Other Features
- SENSOR, DEFROST and MORE MENUS: Additional time may be added by touching the START/ADD-30-SEC pad only after the cooking cycle has completed.
- MANUAL: Additional time may be added by touching the START/ADD-30-SEC pad during the cooking cycle or within 3 minutes after the end of timed cooking.
CONTROL LOCK
The Control Lock prevents unwanted drawer operation, such as by small children. The Convection DrawerMicro oven can be set so that the control panel and the automatic drawer mechanism are deactivated or locked.
TO LOCK
Touch STOP/CLEAR pad and hold for 3 seconds. The display shows LOCK ON.
TO UNLOCK
Touch STOP/CLEAR pad and hold for 3 seconds. The display shows LOCK OFF.
The Control Lock is canceled when the electrical power supply to your oven is interrupted. Set the Control Lock again when power to the oven is restored.
MICROWAVE MULTIPLE SEQUENCE COOKING
Microwave cooking can be programmed for up to 4 automatic cooking sequences, switching from one power level setting to another automatically.
Sometimes cooking directions tell you to start on one power level and then change to a different power level. Your Convection DrawerMicro oven can do this automatically.
1 Enter cooking time, then touch POWER LEVEL pad once for 100% cooking or repeatedly for a lower power level.
2 Enter second cooking time. Repeat touching POWER LEVEL pad for desired level. You can follow this procedure up to 4 times.
3 Touch START/ADD-30-SEC pad.
Note:
- If POWER LEVEL pad is touched once, HIGH will be displayed.
- If 100% is selected as the final sequence, it is not necessary to touch the POWER LEVEL pad.
- To view power level during cooking, simply touch the POWER LEVEL pad. The power level will be displayed until the POWER LEVEL pad is no longer being touched.
Note: Multiple sequence cooking is not available for use with convection cooking mode.
MORE OR LESS TIME ADJUSTMENT
If you prefer any of the REHEAT or DEFROST settings slightly more done, touch the POWER LEVEL pad once after touching your selection. The display will show MORE. For slightly less done, touch the POWER LEVEL pad twice after touching your selection. The display will show LESS.
STANDBY MODE
This Convection DrawerMicro oven will go into standby mode after a period of inactivity. The backlight of the display will automatically dim after 3 minutes if the unit has not been in operation. If the display is in standby mode, simply touch the control panel or open/close the door to return the backlight to maximum brightness.
HELP
Each setting of Popcorn, Reheat, Cook, Defrost and Beverage has a cooking hint. To view, touch TIMER/ SETTINGS whenever HELP is lighted in the Interactive Display for these and other manual operation hints.
Cleaning and Care
- ENSURE THE CONVECTION DRAWERMICRO OVEN IS OFF BEFORE CLEANING TO PREVENT BURNS.
- NEVER USE HARSH, ABRASIVE OR COMMERCIAL GRADE CLEANERS ON ANY PART OF THE OVEN.
EXTERIOR
The outside surface is precoated metal and glass. Clean the outside with mild soap and water, rinse and dry with a soft cloth. Do not use any type of household or abrasive cleaner.
STAINLESS STEEL SURFACE
The exterior should be wiped often with a soft damp cloth and polished with a soft dry cloth to maintain its beauty. There are also a variety of products designed especially for cleaning and shining the stainless exterior of the oven. We recommend that the cleaner be applied to a soft cloth and then carefully used on the stainless exterior rather than sprayed directly on to it. Follow package directions carefully.
FRONT SIDE OF THE DRAWER
Wipe the window on both sides with a soft damp cloth to remove any spills or splatters. Metal parts will be easier to maintain if wiped frequently with a soft damp cloth. Avoid the use of spray and other harsh cleaners as they may stain, streak or dull the drawer surface.
TOUCH CONTROL PANEL
The touch pads may be deactivated before cleaning. See page 33 for CONTROL LOCK. Wipe the panel with a cloth dampened slightly with water only. Dry with a soft cloth. Do not scrub or use any sort of chemical cleaners. Close drawer and turn off Control Lock. Touch STOP/CLEAR.
INTERIOR
Before cleaning the Convection DrawerMicro oven, touch and hold the STOP/CLEAR button for 3 seconds to lock the control pad and the automatic door mechanism. The drawer can be locked in either the open or closed position. The display will show LOCK ON. This will prevent the drawer from accidentally opening or closing during cleaning. After cleaning, touch and hold the STOP/CLEAR button for 3 seconds to turn the lock off. The display will show LOCK OFF. Keep the interior of the oven clean and free of any food particles or liquid spills that can build up on the oven walls decreasing the cooking efficiency of the appliance.
Never use a metal scouring pad or recycled paper towels that may flake off and leave metal particles inside the cavity.
INTERIOR - AFTER MICROWAVE COOKING
Cleaning is easy because no heat is generated to the interior surfaces. Therefore, there is no baking and setting of spills or splattering. To clean the interior surfaces, including drawer sealing surfaces, wipe with a soft damp cloth. DO NOT USE ABRASIVE OR HARSH CLEANERS OR SCOURING PADS. For heavier soil, use mild soap and wipe clean with a soft damp cloth. Do not use any chemical oven cleaners.
INTERIOR - AFTER CONVECTION, ROAST, GRILL, SPEED COOK OR AIR FRY
Splatters may occur because of moisture and grease. Wash immediately after use with hot, soapy water.
Rinse and polish dry. Harder to remove splatters may occur if oven is not thoroughly cleaned or if there is long time/high temperature cooking.
After cleaning the interior thoroughly, residual grease may be removed from the interior ducts and heater by simply operating the oven on 450°F for 20 minutes without food. Ventilate the room if necessary.
CONVECTION DRAWERMICRO OVEN GUIDES
Remove the food crumbs from the Convection Drawer-Micro oven guides. Wipe with a soft dry cloth in order to keep the Convection DrawerMicro oven opening and closing smoothly.
Occasionally a cooking odor may remain in the oven. To remove, combine 1 cup water, grated peel and juice of 1 lemon and several whole cloves in a 2-cup glass measuring cup. Boil for several minutes using 100% power. Let stand in microwave oven until cool. Wipe interior with a soft cloth.
Note: Do not run the microwave power if the cavity is empty, as the microwaves will not be absorbed, increasing risk of fire in the cavity.
TOP AND BOTTOM RACKS/TRAY
The racks and tray can be removed for easy cleaning. Wash them in mild, sudsy water. For stubborn stains, use a mild cleanser and a non-abrasive scouring sponge. The racks and tray are also dishwasher safe. The racks may be washed in either the upper or lower section of the dishwasher, and the tray may be washed in the lower section. Do not use a self-cleaning oven to clean the racks or tray.
Before You Call For Service
Please check the following before calling for service. It may save you time and expense.
| PROBLEM POSSIBLE CAUSE SOLUTION | ||
| 1 Part or all of Convection DrawerMicro oven does not operate. | Power cord of Convection DrawerMicro oven is not completely connected to the electrical outlet.Power outage.Fuse/circuit breaker at home doesn't work.Demo Mode is on. | Make sure the power cord is tightly connected to the outlet.Check house lights to be sure. Call your local electric company for service.Replace the fuse or reset the circuit breaker.See page 32 for DEMO MODE. |
| 2 Food in Convection DrawerMicro oven is not heated. | No power to the appliance.Drawer controls improperly set.Demo Mode is on. | See SOLUTION for PROBLEM 1.Check if the controls have been properly set.See page 32 for DEMO MODE. |
| 3 Convection Drawer-Micro oven light does not work. | Light bulb is loose or burned out. Call for service. | |
| 4 Touch controls will not operate. | Control Lock is on. See page 33 for CONTROL LOCK. | |
| 5 Display flashes. | Power failure. | Touch STOP/CLEAR pad and reset the clock. If the Convection DrawerMicro oven was in use, reset the cooking function. |
| 6 Steam from the vent. | During microwaving water vapor may come from the left side of the vent (when facing the microwave). | |
| 7 Fan noise | After using Convection or Speed Cook, you will hear the sound of the cooling fan. The fan may continue to operate for an extended period of time, depending on the oven temperature. | Once the oven has been properly cooled, the fan will turn off. |
For more complete information and safety precautions, refer to your Use & Care Manual.
CONVECTION COOKING
MORE MENUS (CONVECTION)
CONVECTION - BAKE, ROAST, GRILL
1 Touch the MORE MENUS pad.
2 See Menu Label. Select desired item by touching number pad. Example, touch 1 for biscuits.
3 Touch START/ADD-30-SEC pad to begin preheating.
After the preheat cycle ends, an audible signal of 4 beeps will indicate the preheat cycle is complete. Open the drawer to place food inside the oven.
4 Touch START/ADD-30-SEC pad to begin cooking.
CONVECTION BAKE OR ROAST
WITH PREHEAT
1 Touch desired function (BAKE or ROAST) pad once.
2 Touch 1 pad to preheat.
3 Select desired temperature by using the number pads (2-0 for Bake, 7-0 for ROAST).
4 Touch START/ADD-30-SEC pad to begin preheating the oven.
After the preheat cycle ends, an audible signal of 4 beeps will indicate the preheat cycle is complete. Open the drawer to place food inside the oven.
5 Enter desired cook time in HOURS and MINUTES by using number pads.
6 Touch START/ADD-30-SEC pad.
WITHOUT PREHEAT
1 Touch desired function (BAKE or ROAST) pad once.
2 Touch 2 pad to select no preheat.
3 Select desired temperature by using the number pads (2-0 for Bake, 7-0 for ROAST).
4 Enter desired cook time in HOURS and MINUTES by using number pads.
5 Touch START/ADD-30-SEC pad.
CONVECTION GRILL
WITH PREHEAT
1 Touch GRILL pad once.
2 Touch 1 pad to preheat.
3 Touch START/ADD-30-SEC pad to begin preheating the oven.
After the preheat cycle ends, an audible signal of 4 beeps will indicate the preheat cycle is complete. Open the drawer to place food inside the oven.
4 Enter desired cook time in MINUTES by using number pads.
5 Touch START/ADD-30-SEC pad.
WITHOUT PREHEAT
1 Touch GRILL pad once.
2 Touch 2 pad to select no preheat.
3 Enter desired cook time in MINUTES by using number pads.
4 Touch START/ADD-30-SEC pad.
BAKE PROOF BREADS
1 Touch and hold BAKE/WARM pad for 3 seconds.
2 Touch 1 pad to proof at 90°F.
3 Enter desired cook time in HOURS and MINUTES by using number pads.
4 Touch START/ADD-30-SEC pad.
CONVECTION WARM
1 Touch and hold the BAKE/WARM pad for 3 seconds.
2 Select desired temperature by using number pads 1-3.
3 Enter desired cook time in HOURS and MINUTES by using number pads.
4 Touch START/ADD-30-SEC pad.
CONVECTION TOAST
Touch and hold GRILL/TOAST pad for 3 seconds. Toast 1-4 pieces. Select from menu below:
1 Light
2 Medium light
3 Medium
4 Medium dark
5 Dark
CONVECTION AIR FRY
1 Touch AIR FRY pad once.
2 Select desired preset food item by using number pads 1-4.
3 Touch START/ADD-30-SEC pad.
SPEED COOK
WITH PREHEAT
1 Touch SPEED COOK pad once.
2 Select modes by using number pads 1-3: Bake, Roast or Grill.
3 Touch 1 pad to select preheat.
4 Touch START/ADD-30-SEC pad to begin preheating the oven. An audible signal of 4 beeps will indicate the preheat cycle is complete. Carefully open the drawer and set food inside of the oven.
5 Enter desired time in HOURS and MINUTES by using number pads.
6 Touch START/ADD-30-SEC pad.
WITHOUT PREHEAT
1 Touch SPEED COOK pad once.
2 Select modes by using number pads 1-3: Bake, Roast or Grill.
3 Touch 2 pad to select no preheat.
4 Enter desired time in HOURS and MINUTES by using number pads.
5 Touch START/ADD-30-SEC pad.
For more complete information and safety precautions, refer to your Use & Care Manual.
1 Enter cooking time by touching number pads.
2 Touch START/ADD-30-SEC pad.
1 Enter cooking time by touching number pads.
2 Touch POWER LEVEL pad until desired power level is in the display.
3 Touch START/ADD-30-SEC pad.
SENSOR (POPCORN, REHEAT, COOK)
Sensor automatically computes the correct time and power level to cook foods on the Menu Label perfectly.
1 Touch Cook pad once.
2 See Menu Label. Select desired food by touching number pad. Ex: Touch 1 for baked potatoes.
3 Touch START/ADD-30-SEC pad.
DEFROST
Use this feature to defrost the foods shown on the Menu Label.
1 Touch DEFROST pad.
2 See Menu Label. Select desired food by touching the number pad. Ex: Touch 2 for steaks/chops.
3 Enter weight by touching number pads.
4 Touch START/ADD-30-SEC pad.
5 After the first stage, open the Convection DrawerMicro oven to turn steak over. Close the Convection DrawerMicro oven. Touch START/ADD-30-SEC pad.
6 After each audible signal, turn food over and touch START/ADD-30-SEC again.
MORE MENUS - MELT/SOFT/WARM
Use these features to melt, soften or warm the foods shown on the Menu Label.
1 Touch MORE MENUS pad once.
2 See Menu Label. Select desired food by touching number pad. Ex: Touch 2 for chocolate.
3 Repeat touching same number pad to select quantity. Ex: Touch 2 two more times for 1 square.
4 Touch START/ADD-30-SEC pad.
BEVERAGE REHEAT/HOT WATER/HOT CEREAL
Use this feature for coffee, tea or hot cereal to reheat.
1 Touch MORE MENUS pad once.
2 See Menu Label. Select desired item by touching number pad. Ex: Touch 8 to make coffee.
3 Repeat touching same number pad to select quantity. Ex: Touch 8 two more times for 2 cups of coffee.
4 Touch START/ADD-30-SEC pad.
TO SET THE CLOCK
1 Touch TIMER/SETTINGS pad once.
2 Touch number pads for correct time of day.
3 Touch START/ADD-30-SEC.
If the electrical power supply to your Convection DrawerMicro oven should be interrupted, the display will intermittently show ENJOY YOUR OVEN TOUCH CLEAR after the power is reinstated.
ADD-30-SEC
Touch START/ADD-30-SEC to heat for 30 seconds at 100% microwave power or to add 30 seconds during manual cooking. Continue to touch for additional 30 seconds.
TIMER/SETTINGS
Touch TIMER/SETTINGS pad.
1 time for Clock.
2 times for Timer.
3 times for Sound On/Off.
4 times for End of Cooking Reminder On/Off.
5 times for Auto Start.
6 times for Demo Mode On/Off.
CONTROL LOCK
The Control Lock prevents unwanted drawer operation, such as by small children. The Convection DrawerMicro oven can be set so that the control panel and the automatic drawer mechanism are deactivated or locked.
TO LOCK
Touch STOP/CLEAR pad and hold for 3 seconds. The display shows LOCK ON.
TO UNLOCK
Touch STOP/CLEAR pad and hold for 3 seconds. The display shows LOCK OFF.
STANDBY MODE
This Convection DrawerMicro oven will go into standby mode after a period of inactivity. The backlight of the display will automatically dim after 3 minutes if the unit has not been in operation. If the display is in standby mode, simply touch the control panel or open/close the door to return the backlight to maximum brightness.
Oven Warranty
TWO YEAR FULL WARRANTY
Convection/Speed Microwave Ovens and all of their component parts, except as detailed below*, are warranted to be free from defective materials or workmanship in residential housed hold use for a period of two (2) years from the date of original retail purchase. Viking Range, warrantor, agrees to repair or replace at its option, any part which fails or is found to be defective during the warranty period. Warranty service must be performed by a Viking Range LLC authorized service agency or representative.
* 90 Day Cosmetic Warranty: Products are warranted to be free from cosmetic defects in material or workmanship for a period of 90 days from the date of original retail purchase. This warranty covers manufacturing based defects only and does not cover issues resulting from handling or installation. Inspection of the product should be made at time of delivery. Any defects must be reported to the selling dealer within the 90 day period. Viking Range LLC uses the most up to date processes and the best materials available to produce all color finishes. However, slight color variation may be noticed because of the inherent differences in painted parts and porcelain parts as well as differences in product location and natural or artificial lighting. Warranty service must be performed by a Viking Range LLC authorized service agency or representative.
* 90 Day Residential Plus: Viking products are designed and certified for residential use only. They are not intended for use in commercial applications. Viking products should only be used in accordance to national and local codes.
Viking is not responsible for property damage or injury resulting from use in a commercial application. To support the manufacturing quality of its appliance's Viking will provide a full 90 day warranty for products used in "Residential Plus" applications. This "Residential Plus" warranty applies to applications where use of the product extends beyond residential use but is in compliance with national and local code. In some jurisdictions these applications are zoned as residential. Examples of, but not limited to, such applications covered by this warranty are bed and breakfasts, fire stations, private clubs, churches, condominium/apartment common areas etc. Under this "Residential Plus" warranty, the product, its components and accessories are warranted to be free from defective material or workmanship for a period of ninety (90) days from the date of original retail purchase. Viking Range, LLC, warrantor, agrees to repair or replace, at its option, any part which fails or is found to be defective during the warranty period. This warranty covers parts and labor. This warranty excludes use of the product in all commercial locations such as restaurants, food service locations and institutional food service locations.
FIVE YEAR LIMITED WARRANTY
If the magnetron tube fails due to defective materials or workmanship in normal household use during the third through fifth year from the date of original retail purchase it will be repaired or replaced, free of charge for the part itself, with the owner paying all other costs, including labor.
WARRANTY TERMS
This warranty extends to the original retail purchaser of the product warranted hereunder and to each transferee owner of the product during the term of the original purchaser's warranty. The warranty is transferable by the original retail purchaser via home sale only. If a transferee owner is unable to provide proof of purchase from the original purchaser and the product has not been previously registered, the production date of the product, located in the serial number on the product, will serve as the effective warranty start date.
The activation date of the warranty begins from the date of original retail purchase. In the case of new product purchase via building development sales, activation begins from the earlier date of either certificate of occupancy or 24 months from date of manufacture. Note date of manufacture is identified by serial tag on product.
This warranty does not cover units purchased as b-stock, liquidation, salvage, seconds, refurbished, as-is, used products.
This warranty shall apply to products purchased in the United States and Canada. Products must be purchased in the country where service is requested. Warranty service must be performed by a Viking Range LLC authorized service agency or representative. Warranty shall not apply to damage resulting from abuse, accident, natural disaster, loss of electrical power to the product for any reason, alteration, improper installation, improper operation, or repair service of the product by anyone other than a Viking Range LLC authorized service agency or representative. This warranty does not apply to commercial usage. Warrantor is not responsible for consequential or incidental damage whether arising out of breach of warranty, breach of contract or otherwise. Some jurisdictions do not allow the exclusion or limitation of incidental or consequential damages, so the above limitations do not apply to you.
Owner shall be responsible for proper installation, providing normal care and maintenance, providing proof of purchase upon request, and making the product reasonably accessible for service. If the product or one of its component parts contains a defect or malfunction during the warranty period, after a reasonable number of attempts by the warrantor to remedy the defects or malfunctions, the owner is entitled to either a refund or replacement, at the warrantor's discretion of the product or its component part or parts. Warrantor's liability on any claim of any kind, with respect to the goods or services covered hereunder, shall in no case exceed the price of the goods or service or part thereof which gives rise to the claim.
WARRANTY SERVICE
Under the terms of this warranty, service must be performed by a Viking Range LLC authorized service agent or representative. Service will be provided during normal business hours Labor performed at overtime or premium rates shall not be covered by the warranty. To obtain warranty service contact Viking Range LLC Customer Care at 1-888-845-4641. Please have model number, serial number, and date of original purchase available when calling. IMPORTANT: retain proof of original purchase to establish warranty period. The return of the owner registration card is not a condition of warranty coverage. You should, however, return the owner registration card so Viking Range LLC can contact you should any question of safety arise which could affect you. Any implied warranties of merchantability and fitness applicable to the above described burner assemblies, infrared rotisserie burners, grill grates, and stainless steel parts are limited in duration to the period of coverage of the applicable express written limited warranties set forth above. Some jurisdictions do not allow limitations on how long an implied warranty lasts, so the above limitations may not apply to you. This warranty gives you specific legal rights, and you may also have other rights which may vary from jurisdiction to jurisdiction.
Specifications subject to change without notice.
14 STOP/CLEAR (ARRÊT/EFFACER)
14 OUVRIR OU FERMER LE FOUR À CONVECTION DRAWERMICRO
STOP/CLEAR (ARRÊT/EFFACER)
BEVERAGE REHEAT/HOT WATER/HOT CEREAL
(RÉCHAUFFER UNE BOISSON/EAU CHAUDE/CÉRÉALES CHAUDES)
LEVAGE DES PAINS AU FOUR
LEVAGE DES PAINS AU FOUR
CONDITIONS DE LA GARANTIE
For product information
call 1-888-845-4641
or visit our web site at vikingrange.com