— Radio — Mode d'emploi PDF")
LIFE P66220 (MD 45220) - Radio MEDION - Free user manual and instructions
Find the device manual for free LIFE P66220 (MD 45220) MEDION in PDF.

| Product type | Job site radio |
| Brand | Medion |
| Model | LIFE P66220 (MD 45220) |
| Dimensions (W x H x D) | Approx. 282 x 235 x 180 mm |
| Weight | Approx. 1.94 kg |
| Mains power supply | AC adapter 100-240 V ~ 50/60 Hz, DC output 9 V 1 A |
| Built-in battery | Li-ion 7.4 V, 2000 mAh, 14.8 Wh (non-removable) |
| Output power | 1 x 5 W RMS |
| Radio reception | DAB/DAB+ (Band III: 174-240 MHz) and FM (87.5-108 MHz) |
| Bluetooth | Version 5.0, 2402-2480 MHz, max. power -7.45 dBm |
| Station memory | Up to 30 DAB and 30 FM stations |
| Comfort functions | Sleep timer (15/30/45/60/90 min), countdown timer NAP (10/15/30/45/60/90/120 min), equalizer (Pop, Jazz, Classic, Normal, Rock), LED work light |
| Display | Backlit display with brightness adjustment |
| Connectivity | AUX input (3.5 mm jack), DC IN 9 V port |
| Protection rating | IP44 (protected against water splashes and dust) |
| Package contents | Job site radio, AC adapter, 3.5 mm jack cable, DAB antenna, user manual, warranty card |
| Cleaning | Soft dry cloth, avoid solvents and chemicals |
| Safety | Do not open the casing, do not expose to water (except IP44 with flap closed), do not look directly at the LED light |
Frequently Asked Questions - LIFE P66220 (MD 45220) MEDION
User questions about LIFE P66220 (MD 45220) MEDION
0 question about this device. Answer the ones you know or ask your own.
Ask a new question about this device
Download the instructions for your Radio in PDF format for free! Find your manual LIFE P66220 (MD 45220) - MEDION and take your electronic device back in hand. On this page are published all the documents necessary for the use of your device. LIFE P66220 (MD 45220) by MEDION.
USER MANUAL LIFE P66220 (MD 45220) MEDION
natural_image
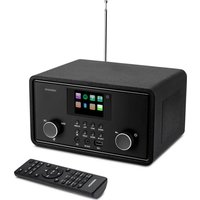
Black handheld electronic device with speaker grille and control panel (no visible text or symbols on body)DAB+/Bluetooth®-Baustellenradio DAB+/Bluetooth® job site radio
Radio de chantier DAB+/Bluetooth®
Radio da cantiere DAB+/Bluetooth®
• NAP (Countdown-Zeit)
natural_image
Technical line drawing of a mechanical device with no visible text or symbolsnatural_image
Technical line drawing of a device with a curved arrow indicator and antenna (no text or symbols)natural_image
Technical line drawing of a mechanical or electrical component with no visible text, numbers, or symbols.natural_image
Technical line drawing of a device interior with no visible text or symbols1. Information about this user manual....43
1.1. Explanation of symbols ....43
2. Proper use
3. Safety information
3.1. Setting up the device safely 47
3.2. Power supply 47
3.3. Handling the rechargeable batteries ....49
3.4. Cleaning and storage 49
3.5. Water spray protection 50
4. EU Declaration of Conformity....50
5. Trademark information
6. Package contents
7. Device overview
7.1. Front....52
7.2. Rear ....54
8. Getting started
8.1. Mains operation....55
8.2. Battery operation/charging the device ....55
8.3. Switching the device on/off ....56
8.4. Setting the language ....56
8.5. Setting the time/date ....57
8.6. Starting the DAB station search for the first time ....59
8.7. Setting the volume 59
8.8. Switching off energy-saving mode on the device 59
8.9. Standby mode....59
8.10. Selecting the mode....59
9. DAB mode.... 60
9.1. Selecting a station 60
9.2. Displaying station information ....60
9.3. Storing a radio station 61
9.4. Playing a stored station....61
9.5. Starting the station search ....61
9.6. Setting the DRC function ....62
9.7. Deleting inactive stations ....62
9.8. Setting the TA function 62
10. FM mode....63
10.1. Selecting the signal quality for the station search....63
10.2. Starting the station search....63
10.3. Setting the station manually....63
10.4. Selecting a station 63
EN
10.5. Displaying station information ....64
10.6. Storing a radio station ....64
10.7. Playing a stored station 64
11. Bluetooth mode 64
11.1. Connecting Bluetooth devices for the first time 65
11.2. Start/pause playback 65
11.3. Managing calls....66
12. AUX mode 66
12.1. Connecting an external playback device ....66
13. Convenience functions 68
13.1. Equalizer....68
13.2. Using the sleep timer ....68
13.3. Using the NAP timer 69
13.4. Using the work light....69
13.5. Dimming the display lighting 70
13.6. Battery charge level....71
14. Service functions 71
14.1. Resetting the device to factory settings ....71
14.2. Displaying the software version ....71
15. Cleaning 72
- Troubleshooting 72
- Disposal 73
- Technical specifications 74
- Service information 76
- Privacy statement 77
1. Information about this user manual

Thank you for choosing our product. We hope you enjoy using this device.
Please read the safety instructions and the user manual carefully before using the device for the first time. Note the warnings on the device and in the user manual.
Always keep the user manual close to hand. If you sell the device or give it away, please ensure that you also pass on this user manual. It is an essential component of the product.
1.1. Explanation of symbols
If a block of text is marked with one of the warning symbols listed below, the hazard described in that text must be avoided to prevent the potential consequences described there from occurring.

DANGER!
Warning: risk of fatal injury!

WARNING!
Warning: risk of possible fatal injury and/or serious irreversible injuries!

CAUTION!
Warning: risk of minor and/or moderate injuries!

WARNING!
Warning: risk of electric shock!

NOTICE!
Follow these instructions to prevent damage to the device!

More detailed information about using the device!

Follow the instructions in the user manual!
- Bullet point/information on steps during operation
▶ Instruction to be carried out

Protection class II
Electrical devices in protection class II are devices that have double and/or reinforced insulation throughout, and do not have an option for connecting a protective earth. The housing of an electrical device in protection class II, with surrounding insulating material, might either form all of the additional or reinforced insulation, or part of it.

Indoor use
Devices with this symbol are intended solely for indoor use.
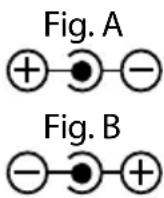
Polarity markings
On devices with coaxial power connectors, these symbols indicate the polarity of the connector. There are two types of polarity: either positive inside and negative outside (Fig. A), or negative inside and positive outside (Fig. B).

CE labelling
Products that feature this symbol meet the requirements of the EU directives (see section entitled "Declaration of conformity").

Products that feature this symbol meet the requirements of the German Product Safety Act.
Symbol for direct current (DC)
Symbol for alternating current (AC)
2. Proper use
This is an entertainment electronics device.
The site radio is used to play audio material which can be played via Bluetooth or AUX. In addition, radio stations can be played.
The specified reception frequency range represents the technical possibilities of the device. Information received outside this range may not be used or further distributed. The respective national laws must be observed.
Please note that we shall not be liable in cases of improper use:
- Do not modify the device without our consent and do not use any auxiliary equipment that we have not approved or supplied.
- Only use replacement parts or accessories that we have supplied or approved.
- Comply with all the information in this user manual, especially the safety information. Any other use is considered improper and can cause personal injury or property damage.
- Do not use the device in potentially explosive atmospheres. This includes petrol stations, fuel storage areas and areas where solvents are processed. This device must also not be used in areas with particle-laden air (for example flour or wood dust).
- Do not use the device outdoors.
- Do not expose the device to extreme conditions. Avoid:
– High humidity or wet conditions
- Extremely high and low temperatures
- Direct sunlight
- Open flames
3. Safety information

WARNING!
Risk of injury!
Risk of injury to children and persons with limited physical, sensory or mental abilities (for example, partially disabled people or older people with limited physical and mental abilities) or to those without experience and knowledge (such as older children).
- Keep the device and its accessories out of the reach of children.
This device can be used by children over the age of 8 and by persons with reduced physical, sensory or mental abilities or by those without experience and/or knowledge, if they are supervised or have been instructed in the safe use of the device and have understood the dangers that result from it. Children must not be allowed to play with the device.
▶ Cleaning and user maintenance must not be carried out by children.
Children do not recognise the dangers that can arise when handling electrical devices. Please be particularly careful while using the device if there are children nearby.
Children younger than 8 should be kept away from the device and the mains cable.
▶ Keep all packaging materials used (bags, pieces of polystyrene etc.) out of the reach of children.
3.1. Setting up the device safely
If the device has been moved from a cold room to a warm room, wait before connecting it to the power supply. The resulting condensation may damage the device. The device can be operated safely as soon as it has reached room temperature.
▶ Make sure that you do the following:
- Allow at least 10 cm clearance at the sides and top of the device if it is placed in a rack or a similar enclosed space.
- Do not expose the device to direct sources of heat (e.g. heaters).
- Do not leave the device in direct sunlight.
- Do not expose the device to extreme temperatures.
- Do not place the device close to magnetic fields (for example, televisions or other loudspeakers).
- Do not place naked flames (for example, lit candles) near or on the device.
- Do not place containers filled with liquid, such as vases, on or near the device. Such containers may tip over and the liquid may impair the electrical safety of the device.
3.2. Power supply
The device must be close to the mains socket, which must always be easily accessible. Position the cables so that no one can tread on them or trip over them.
▶ To disconnect the device from the power supply, remove the plug from the mains socket. Always hold the plug firmly when unplugging it. To prevent damage, never pull on the cable.
▶ Only operate the device from an earthed, easily accessible 100–240 V \~ 50/60 Hz mains socket. Contact the local energy supplier if you have any questions about the power supply at the installation location.
- Do not use the power cable if either of the plugs or the cable is damaged.
When the plug is plugged into a live mains socket, the site radio is constantly supplied with power in order to charge the battery, even in standby mode.

WARNING!
Risk of injury!
▶ Never open the device housing. Touching live parts or attempting to modify the device’s electrical or mechanical functionality puts you at risk, and may also damage the device.

Unplug the device from the power socket if it is not going to be used for a longer period of time, or during a thunderstorm.
If the device is not in use, unplug the plug from the mains socket or use a switchable multi-outlet strip to prevent the device from using electricity when it is switched off.
The site radio plug serves as a separating device. As long as the site radio is connected to the power supply, the parts inside it also carry current when switched off.
▶ Do not touch the power cable or plugs with wet hands.
▶ Do not insert any objects into the openings. Danger of an electric shock!
Do not use the site radio and accessories if they are damaged, generate smoke or emit unusual operating noises. In this case, disconnect the power supply immediately.
The light source for this light is not replaceable. When the light source has reached the end of its life, the entire device must be replaced.
3.3. Handling the rechargeable batteries
The site radio is powered by a built-in rechargeable battery and users cannot simply replace it themselves. Never attempt to replace the battery yourself. Please note the following:

WARNING!
Risk of explosion!
There is a risk of explosion if the rechargeable battery is replaced incorrectly. Replace batteries only with the same or equivalent type.
▶ Do not throw the device into a fire, and do not short-circuit it or dismantle it.
The site radio should not be left unattended while it is being charged.
3.4. Cleaning and storage
Before cleaning, pull the mains adapter out of the mains socket.
▶ Use a soft, dry cloth to clean the device. Do not use chemical solutions or cleaning agents because these may damage the device's surface or the labels on it.
▶ If the device is not going to be used for a long period of time, pull the plug out of the mains socket.
3.5. Water spray protection
The radio is protected against damage from dust and water spray according to IP44.

The mains adapter is not protected against damage from water spray. The protection against water spray is only guaranteed if the mains adapter connection is sealed with the rubber protective flap.

NOTICE!
Risk of damage!
Risk of damage to the device if installed incorrectly.
▶ Please note that protection against water spray is only guaranteed when the site radio is in the upright (normal) position.
4. EU Declaration of Conformity
Medion AG hereby declares that this device complies with the fundamental requirements and the other relevant provisions of the following:
• RE Directive 2014/53/EU
• Ecodesign Directive 2009/125/EC
• RoHS Directive 2011/65/EU.
You can download the complete EU Declaration of Conformity at www.medion.com/conformity.
5. Trademark information
The Bluetooth® word mark and logos are registered trademarks of Bluetooth SIG, Inc. and are used by Medion AG under license.
Other trademarks are the property of their respective owners.
6. Package contents

DANGER!
Risk of choking and suffocation!
There is a risk of choking and suffocation due to swallowing or inhaling small parts or plastic wrap.
- Keep the plastic packaging out of the reach of children.
Remove the product from the packaging and remove all packaging material.
▶ Please check your purchase to ensure that all items are included. If anything is missing, please contact us within 14 days of purchase.
The following items are supplied with your product:
- Site radio
- DAB antenna
- 3.5 mm jack cable
- Mains adapter
- User manual and warranty card
7. Device overview
7.1. Front
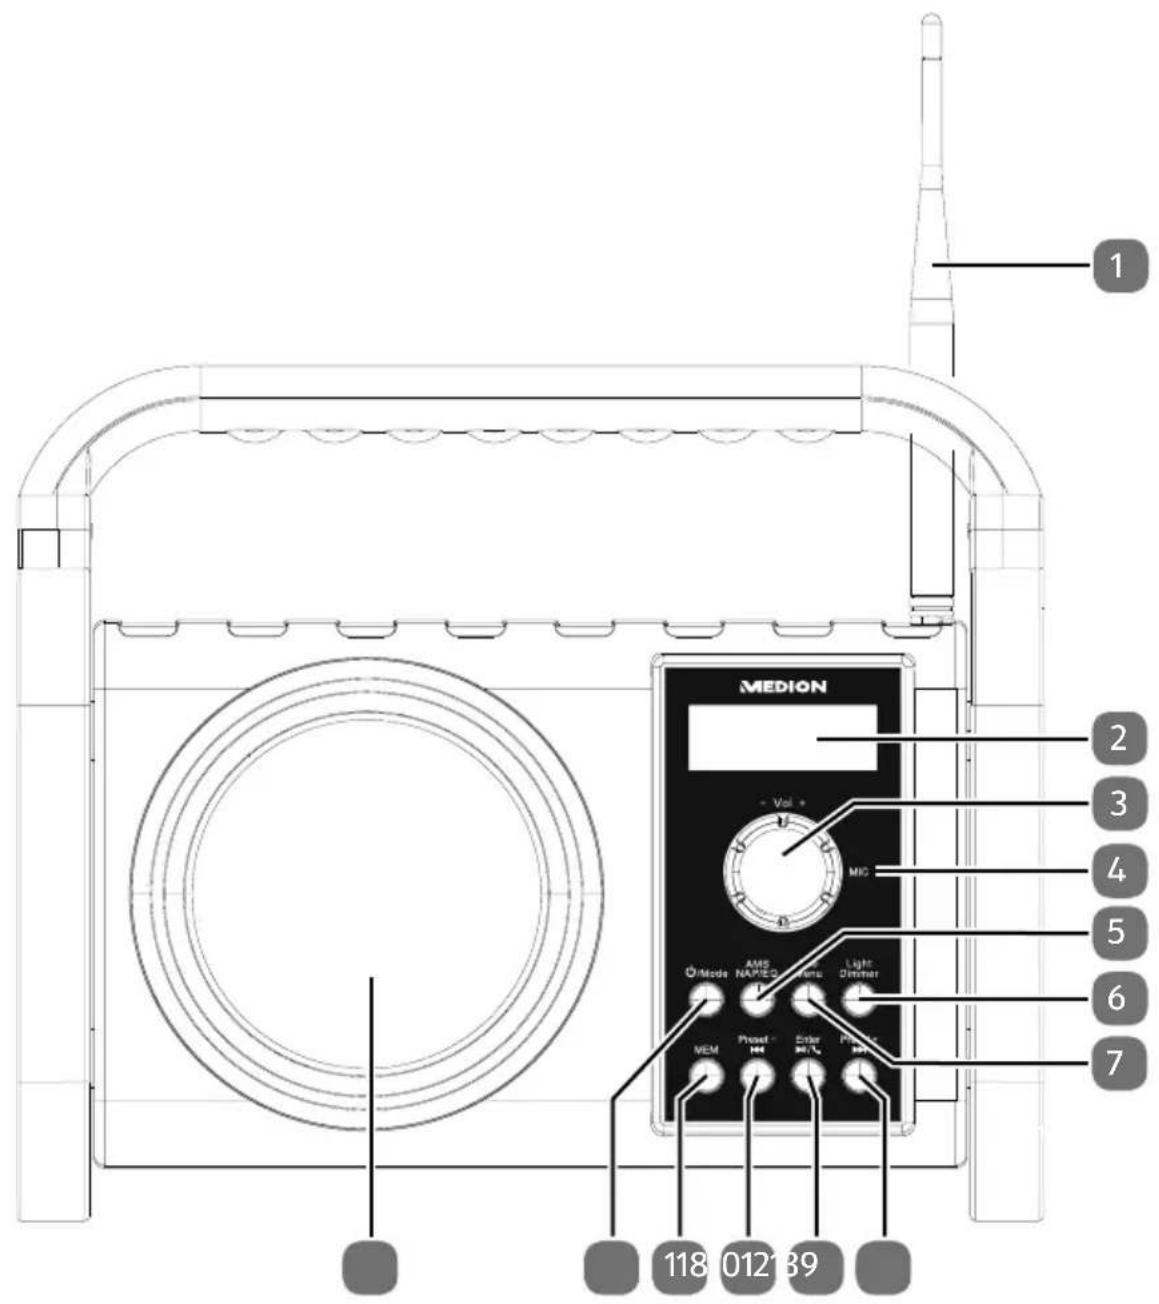
text_image
MEDION Vol MIC O/Mode AMS NAMES Meters Light Dimmer MEM Power Net Enter BILK Power Net 118 012 391 Aerial
2 Display
3 - Vol +
4 Microphone
5 AMS NAP/EQ
Display the time/date, operating mode, radio station, system settings, volume
Reduce/increase volume
• AMS (automatic station search)
• NAP (countdown time)
• EQ (sound effects/sound control)
| 6 | Light Dimmer | Switch light on/offSet dimmer for display lightingSystem settingsSelect higher-level menuInformation about the current station |
| 7 | Info Menu | Station searchNavigate in the menusBattery charge levelSleep timer |
| 8 | Preset + | · Navigate in the menu, next track/station |
| 9 | Enter | · Start/stop playback |
| · Accept/end/reject a call | ||
| · Open menu, confirm entry |
| 10 • Navigate in the menu, previous track/station |
| 11 | MEM | • Store/call up a station• Perform station search |
| • Switch the device on/off | ||
| 12 | Mode | • Switch the device to standby mode• Select the operating mode• Station search (when using the device for the first time) |
| 13 Loudspeaker |
7.2. Rear
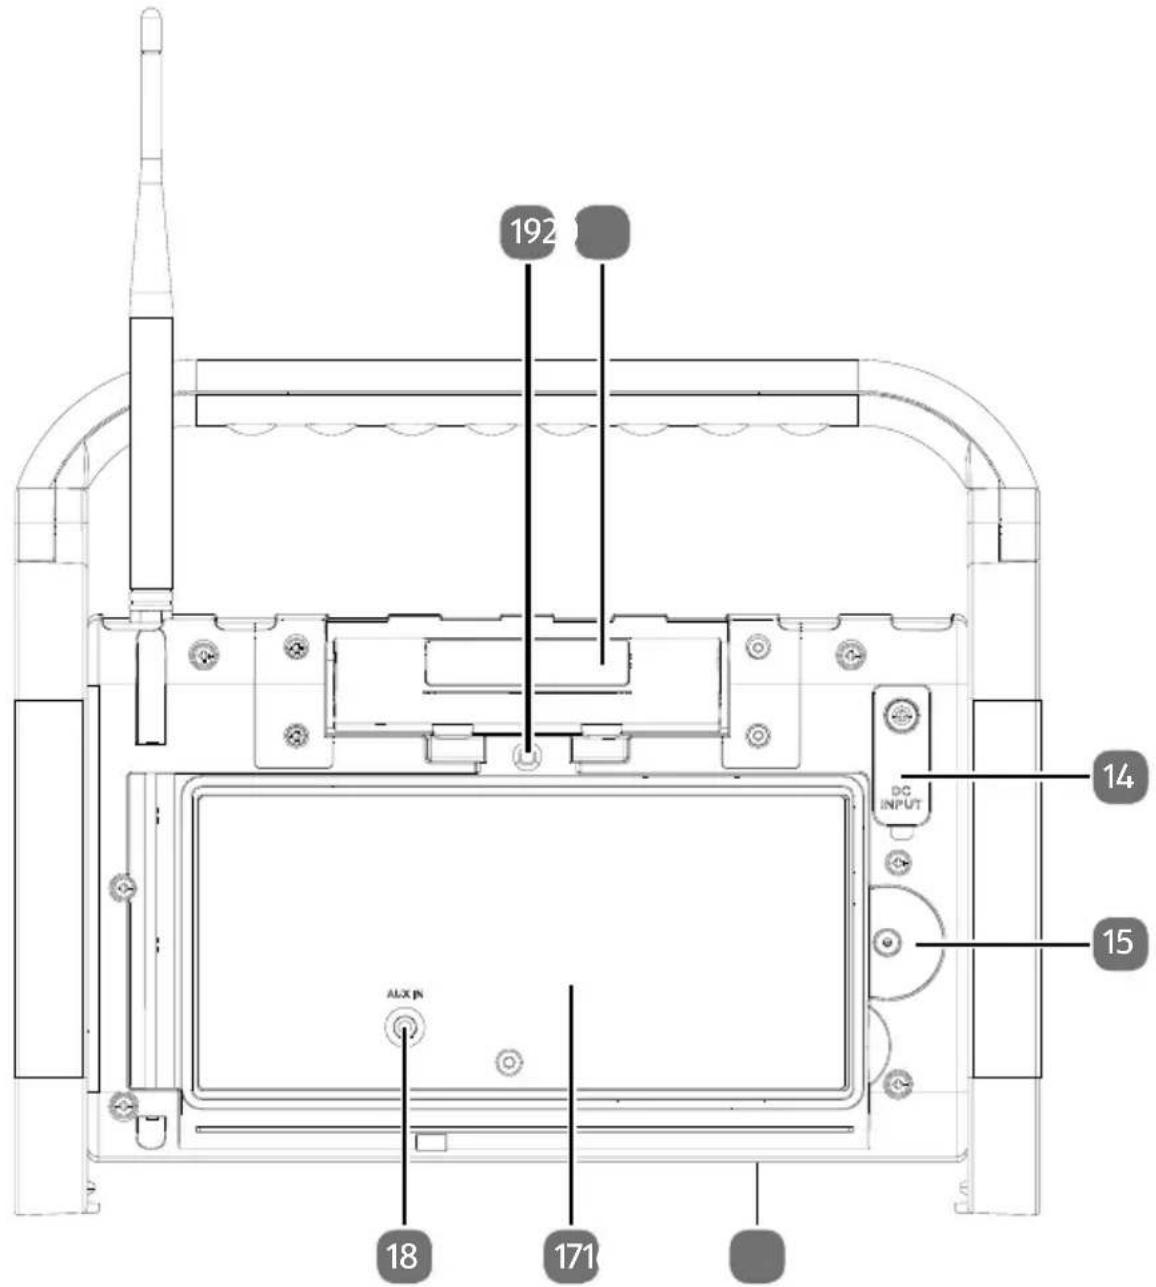
text_image
192 DC INPUT 14 15 ALUX IN 18 17114 DC IN 9V Connection for mains adapter
15 Catch for storage compartment lock
16 Type plate (underneath)
17 Storage compartment for external devices
18
AUX IN
Audio connection for external device (in storage compartment)
19 Knurled screw for storage compartment lock
20 LED work light
8. Getting started
8.1. Mains operation
Only use the supplied mains adapter to connect the radio. The mains adapter has a type plate with the corresponding information on it.
Connect the mains adapter plug to the device's DC IN 9V power cable connection.
Plug the mains adapter into an easily accessible 100–240 V \~ 50–60 Hz mains socket.

If you do not need to use the device for a long period of time, please take it out of operation. Unplug the mains adapter from the wall socket.
8.2. Battery operation/charging the device
The device can also be operated without an external power source via the integrated rechargeable battery.
Low charge and power off:
- As soon as the battery reaches a low charge level, the indicator on the display begins to flash.
- If the device remains in operation with a low charge level, Battery low is shown on the display and the device switches off automatically once the threshold has been reached.

Only charge the device when it is dry and indoors. Ensure that the device is completely dry before charging.
To charge the battery, connect the mains adapter as described in the previous chapter.
During charging, lights up on the display. To extend the battery life, disconnect the device from the external power source when the battery is fully charged.

If the device is in standby mode, it switches to energy-saving mode after approx. 30 seconds. The display switches off.
8.3. Switching the device on/off
8.3.1. Switching the device on
▶ Press the/Button to switch on the device. The time and date are visible on the display.
8.3.2. Switching the device off
▶ Press and hold the Nbutton to switch the device to standby mode.

When the device is in standby mode during battery operation, the device automatically switches to energy-saving mode after 30 seconds.
▶ Press button to switch the device from energy-saving mode to standby mode.
The time and date are visible on the display.
8.4. Setting the language

The language is set to "English" when the device is used for the first time or after it has been reset to factory conditions.
The device is switched on or in standby mode.
▶ Press and hold the Info menu button.
The Standby
▶ Press the Enter button.
The System
Press the Preset + or Preset - button several times to switch to the
▶ Press the Enter button.
Press the ▶ or ▶ button several times to select the language.
▶ Press the Enter button to confirm the selection.
The language is now set.
8.5. Setting the time/date
8.5.1. Setting the time/date manually
The device is switched on or in standby mode.
▶ Press and hold the Info menu button.
The Standby
▶ Press the Enter button.
The System
Press the Preset + or Preset - button several times to switch to the
▶ Press the Enter button.
The Time
▶ Press the button.
The hour value flashes.
Press the Preset + or Preset - button several times to set the hour.
▶ Press the Enter button.
Press the ▶ or button several times to set the minutes.
▶ Press the Enter button.
Press the Preset + or Preset - button several times to set the day.
▶ Press the Enter button.
Press the Preset + or Preset - button several times to set the month.
▶ Press the button.
Press the ▶ or button several times to set the year.
▶ Press the Enter button.
The time and date have been set.
8.5.2. Setting the time/date automatically

The time and date are set automatically when the
▶ Press and hold the Info Men.
The Standby
▶ Press the button.
The System
Press the ▶ or button several times to switch to the
The Time
▶ Press the or button several times to switch to the
▶ Press the Enter button.
▶ Select
▶ Select
The time and date are set automatically according to your selection.
8.5.3. Setting the hour format/date format
▶ Press and hold the Info Menu button.
The Standby
▶ Press the Enter button.
The System
Press the ▶ or button several times to switch to the
The "Time"
Hour format (12 hour/24 hour)
Press the ▶ or button several times to switch to the
▶ Press the Enter button.
▶ Select the hour format
▶ Press the Enter button.
The hour format is now set.
Date format (DD-MM-YYYY)
▶ Press the + or - button several times to switch to the
▶ Press the button.
▶ Select the date format
▶ Press the Enter button.
The date format is now set.
8.6. Starting the DAB station search for the first time
The device is switched on or in standby mode.
▶ Press the/No button.
The DAB station search starts.
Once the search has ended
- the number of stored stations is displayed;
- the stations are sorted alphabetically in the station list;
- the first DAB station from the station list is played automatically;
- the station name is displayed;
- the current track is displayed as scrolling text.
8.7. Setting the volume
When the device is in use, turn the - Vol + controller to - to decrease the volume.
When the device is in use, turn the - Vol + controller to + to increase the volume.
The volume set is shown on the display for approx. 6 seconds.
8.8. Switching off energy-saving mode on the device
The device is only set to energy-saving mode during battery operation.
If the device is in standby mode and no entry is made for 30 seconds, the device switches to energy-saving mode.
▶ Press the按钮.
The welcome text, time and date are displayed. If no further entries are made, the device switches back to energy-saving mode after 30 seconds.
8.9. Standby mode
The device can only be set to standby mode during mains operation. If no entry is made, the device is not switched from standby mode to energy-saving mode after 30 seconds. The time and date are shown on the display permanently.
8.9.1. Switching the device out of standby mode
▶ Press the button.
The last operating mode to be set prior to standby mode is displayed.
8.9.2. Switching the device to standby mode
▶ Press and hold the ⏻/Mode button until Standby is shown on the display.
The time and date are displayed.
8.10. Selecting the mode
The following operating modes can be set:
| Mode Description | |
| DAB Digital radio station playback | |
| FM Analogue radio station playback | |
| Auxiliary input | Playback of an external audio source via the AUX connection |
| Bluetooth pairing | • Playback of an audio source from an external Bluetooth-enabled device• Call control for a Bluetooth-enabled mobile phone |
▶ Press the Mode button several times in succession until the desired mode is shown on the display.
9. DAB mode
9.1. Selecting a station
▶ Select DAB mode.
The current DAB station is played.
Press the ▶ or button.
The Station list menu is shown on the display.
Press the Preset + or Preset - button until the desired DAB station is shown on the display.
▶ Press the Enter button.
The desired DAB station is played.
9.2. Displaying station information
▶ Press the Info Menu button several times to display the following information:
- Transmission power, station type, transmission area, station frequency
- Signal fault
- Transmission speed/DAB standard
-Time/date - Current track
9.3. Storing a radio station
You can store up to 30 DAB stations.
▶ Select the DAB station you want to store.
▶ Press the MEM button.
The Call up progr. menu is shown on the display.
Press the 🎨 or 🎨 button several times until a free or occupied and numbered memory slot is shown on the display.
▶ Press and hold the MEM button until Store progr. is shown on the display.
▶ Press the Enter button.
The DAB station is stored under the numbered memory slot.
9.4. Playing a stored station
▶ Press the MEMutton.
▶ Press the or button several times until the desired DAB station is shown on the display.
▶ Press the Enter button.
The selected DAB station is played.
9.5. Starting the station search
Automatic station search (using the Info Button)
▶ Press and hold the Info Menu button.
The DAB
▶ Press the Enter button.
The DAB station search starts.
Automatic station search (using the AMS NAP/EQ button)
▶ Press and hold the AMS NAP/EQ button.
The DAB station search starts.
Once the search has ended
• the number of stored stations is displayed;
- the stations in the station list are sorted alphabetically;
- the first DAB station from the station list is played automatically;
• the station name is displayed;
- the current track is displayed as scrolling text.
Manual station search
▶ Press and hold the Info menu button.
The DAB
Press the ▶ or buttons several times until
▶ Press the Enter button.
The Manual setting menu and the current DAB frequency are shown on the display.
Press the ▶ or ▶ button several times to set the desired DAB frequency.
▶ Press the Enter button.
The new DAB frequency is now set.
9.6. Setting the DRC function
DRC (Dynamic Range Compression) is a function that reduces the volume of louder sounds and boosts the volume of quieter sounds.
▶ Press and hold the Info button.
The DAB
Press the ▶ or button several times until
▶ Press the Enter button.
▶ Select
▶ Select
▶ Press the Enter button.
The DRC function is now set.
9.7. Deleting inactive stations
The device features the option to delete DAB stations from the station list that are no longer transmitting or that have changed frequency.
▶ Press and hold the Info menu button.
The DAB
Press the Preset + or Preset - button several times until
▶ Press the Enter button.
▶ Press the ▶ button.
▶ Press the Enter button.
Inactive DAB stations are deleted from the station list.
9.8. Setting the TA function
The device features the option to receive automatic updates on traffic conditions.
▶ Press and hold the Info menu button.
The DAB
▶ Press the + or - button several times until
▶ Press the Enter button.
▶ Select
▶ Select
▶ Press the Enter button.
The TA function is now set.
10. FM mode
10.1. Selecting the signal quality for the station search
▶ Press and hold the Info button.
The FM
▶ Press the Enter button.
In the Search settings menu, select
In the Search settings menu, select to search for only FM stations with a strong signal.
10.2. Starting the station search
▶ Press and hold the button.
The FM station search starts.
Once the search has ended
- the number of stored stations is displayed;
- the station frequencies in the station memory are stored in ascending numerical order;
- the first FM station from the station memory is played automatically;
- the station frequency and, for certain stations, the station name are displayed,
- the current track is displayed as scrolling text for certain stations.
10.3. Setting the station manually
Press the Preset + or Preset - button to change the frequency in 0.5 MHz increments.
▶ Press the Enter button if a FM station with satisfactory quality is played.
The FM station is stored under the current station memory slot number.
10.4. Selecting a station
▶ Select the operating mode FM.
The current FM station is played.
▶ Press the EButton.
Press the ▶ or button until the desired FM station is displayed.
▶ Press the Enter button.
The desired FM station is played.
10.5. Displaying station information
▶ Press the Info Menu button several times to display the following information:
– Station type/station frequency/current track
- Time/date
10.6. Storing a radio station
You can store up to 30 FM stations.
▶ Select the FM station you want to store.
▶ Press and hold the MEM button.
The Store program menu is shown on the display.
Preset + Preset -
Press the ▶ or button several times until a free or occupied and numbered memory slot is shown on the display.
Enter
▶ Press the button.
The FM station is stored under the numbered memory slot.
10.7. Playing a stored station
▶ Press the MEMutton.
Preset + Preset -
▶ Press the 🎥 or 🎥 button several times until the desired FM station is shown on the display.
Enter button.
The selected FM station is played.
11. Bluetooth mode
You can use Bluetooth to play tracks wirelessly from external devices (such as MP3 players or mobile phones with Bluetooth) on this site radio.
When the site radio is connected to a mobile phone via Bluetooth you can take incoming calls and use the site radio as a hands-free system.
11.1. Connecting Bluetooth devices for the first time

Known external devices, which have already been paired once, will be connected again automatically in the future. It is not necessary to pair the devices again. To reconnect, simply activate Bluetooth mode on both devices.
▶ Select the operating mode Bluetooth pairing.
▶ Activate the device search on your Bluetooth device.
The Bluetooth device has detected the site radio once the identifier MD45220 is listed on your Bluetooth device.
▶ Set the appropriate settings on your Bluetooth device to pair it with the site radio.
Your Bluetooth device has been paired successfully when Bluetooth connected is shown on the display. Audio playback begins automatically.
Ending Bluetooth playback
▶ Switch off Bluetooth on the external device.
or
▶ Press the ⏻/Mode button and switch to a different mode.
11.2. Start/pause playback
▶ Press the Enter button briefly to start playing tracks.
▶ To pause playback, press the Enter button again.
Playback pauses.
▶ Press the button again to resume playback.
11.2.1. Track selection
▶ Press the Preset button to return to the previous track.
▶ Press the + button to skip to the next track.
11.3.Managing calls

Incoming calls are announced by an acoustic signal from the site radio and interrupt audio playback.
11.3.1. Accepting a call
▶ Press the Enter button.
Voice transmission takes place via the microphone and speaker.
11.3.2. Ending a call
▶ Press and hold the Enter button.
The call is ended and audio playback resumes.
11.3.3. Rejecting a call
▶ Press and hold the button while the acoustic signal sounds.
The call is rejected and audio playback resumes.
12. AUX mode
You can use the AUX IN jack with a cable connection to external playback device (for example a CD player or MP3 player).
12.1. Connecting an external playback device
▶ Switch the site radio to standby mode.
▶ Switch off your external device.
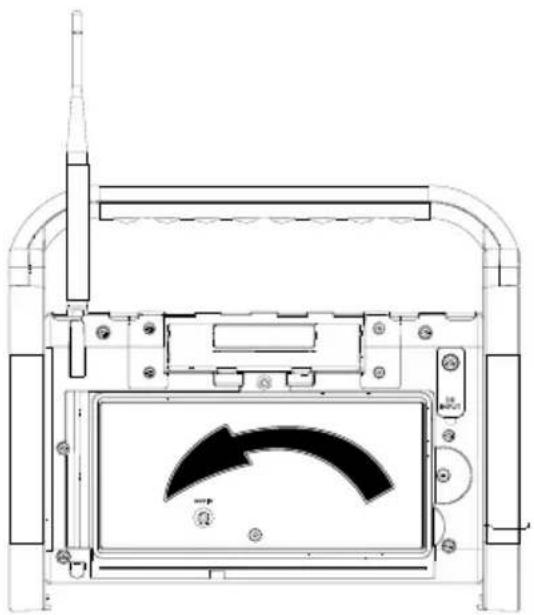
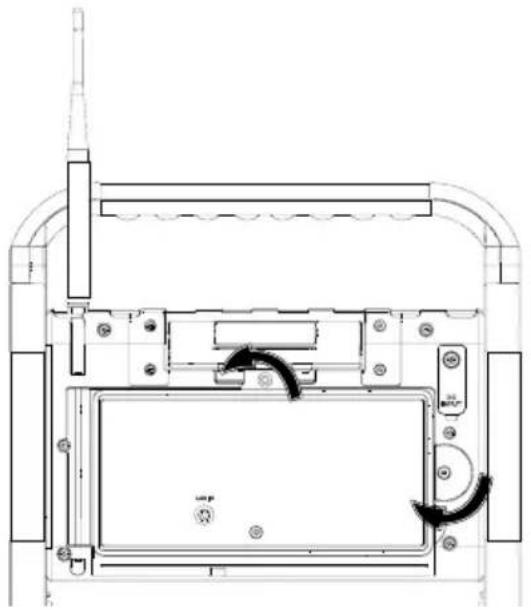
▶ Unlock the storage compartment door on the back of the site radio. To do this, loosen the knurled nut and twist the catch.
natural_image
Technical line drawing of a mechanical device with internal components and directional arrows (no text or symbols)▶ Open the storage compartment door.

natural_image
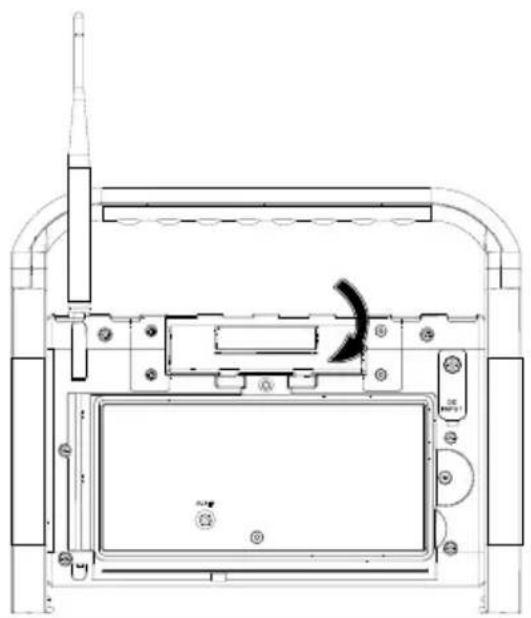
Technical line drawing of a device interior with a curved arrow indicator (no text or symbols)Insert a 3.5 mm jack cable into the AUX IN jack on the site radio.
Insert the other connector on the jack cable into the AUX output on your external device.
▶ Switch on the external device.
▶ Start audio playback on your external device.
Place the external device inside the storage compartment door.
▶ Close the storage compartment door.
- Lock the storage compartment door.
To do this, twist the catch and tighten the knurled screw.
▶ Switch on the site radio.
▶ Press the ⏻/Mode button and select Auxiliary input mode. The audio signal from your external device is played.
13. Convenience functions
13.1. Equalizer
During operation, press the AMS NAP button.
The current sound effect (e.g. FLAT) is shown on the display.
- Press the ▶ or ▶ button until the desired sound effect POP, JAZZ, CLAS-SIC, FLAT or ROCK is shown on the display. - Press the ▶/□ button to store the set sound effect.
The set sound effect remains stored even when the device is switched off and back on.
13.2. Using the sleep timer
The device features a delay timer that you can enable in the respective modes DAB, FM, Bluetooth and Auxiliary input (AUX). The device is switched to standby mode once the set time has elapsed (Off, 15 min., 30 min., 45 min., 60 min. or 90 min.).
▶ Press and hold the Info menu button.
The DAB, FM, Bluetooth or Auxiliary input menu is shown on the display.
- Press the ▶ or button several times until
- Press the 🎥 or 🎥 button several times until
Time setting Sleep is shown on the display.
Press the ▶ or button until the desired time is shown on the display. Press the ▶/ ▶ button.
The device is switched to standby mode once the set time has elapsed, regardless which mode is set.
13.3. Using the NAP timer
The device features a countdown timer (e.g. as an indication of the end of a break) that you can enable in the respective modes DAB, FM, Bluetooth and Auxiliary input (AUX). An intermittent acoustic signal sounds once the set time has elapsed (off, 10 min., 15 min., 30 min., 45 min., 60 min., 90 min. or 120 min.).

The NAP timer can only be set in standby mode.
▶ Ensure that the device is in standby mode.
▶ Press the AMS
EAP/EQ button several times until the desired time is shown on the display.
An intermittent acoustic signal sounds once the set time has elapsed.
▶ Press any button to switch off the intermittent acoustic signal.
13.4. Using the work light
You can enable the work light.

WARNING!
Risk of damage to the eyes!
Do not look directly into the light source for a longer period of time during operation. This can damage your eyes.
▶ Do not look directly into the light source.
▶ Switch off the work light when it is not being used.
13.4.1. Switching on the work light.
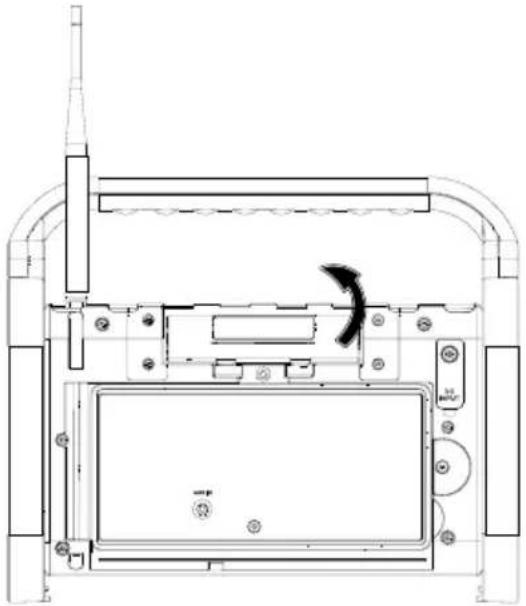
▶ Turn the work light so that it is pointing away from the device.
natural_image
Technical line drawing of a mechanical device with no visible text or symbols▶ Press and hold the Light Dimmer button until the work light is switched on.
13.4.2. Switching off the work light
▶ Press and hold the Light Dimmer button until the work light is switched off.
▶ Turn the work light so that it is pointing towards the device.
natural_image
Technical line drawing of a device interior with no visible text or symbols13.5. Dimming the display lighting
You can set the display lighting to "bright" and "dim" and switch it off.
▶ Press the Light temmer button repeatedly to set the display lighting
13.6. Battery charge level

The battery charge level can only be viewed during battery operation.
▶ Ensure that the device is powered by the battery.
▶ DAB mode: Press the Info Menu button 7 times in succession to display the battery charge level.
▶ FM mode: Press the Info menu button 3 times in succession to display the battery charge level.
Bluetooth mode: Press the Info menu button once to display the battery charge level. In Auxiliary input (AUX) mode it is not necessary to enter an input to display the battery charge level.
14. Service functions
14.1. Resetting the device to factory settings
The current device settings can be reset to the factory settings. This process resets the following settings:
- Language
- Time and date
• DAB/FM station and station memory
The device can be reset to factory settings from all modes.
▶ Press and hold the Info menu button.
Press the ▶ or button several times until
▶ Press the Enter button.
Press the ▶ or button several times until
▶ Press the Enter button.
▶ Press the + button to select the entry
▶ Press the Enter button.
The device is restarted and reset to factory settings.
▶ Set up the device for the first time.
14.2. Displaying the software version
If the device malfunctions, information regarding the device's software version is extremely useful for our Customer Service team. The software version can be called up from all modes.
▶ Press and hold the Info reeno button.
▶ Press the ▶ or button several times until
▶ Press the Enter button.
Press the ▶ or button several times until
▶ Press the Enter button.
The software version is shown on the display.
15. Cleaning
Before cleaning, pull the plug out of the mains socket. Use a soft, dry cloth to clean the device. Do not use chemical solutions or cleaning agents because these may damage the device's surface or the labels on it.
16. Troubleshooting
| PROBLEM POSSIBLE CAUSE REMEDY | ||
| The device cannot be switched on. | The battery may be dead.The mains adapter is not connected properly. | · Ensure that the mains adapter is properly connected. |
| Incorrect display of time and date | The time/date is set incorrectly. | · Set the desired time.· In the settings, select automatic time synchronisation. |
| The device switches off when it is in use. | The battery may be dead. | · Operate the device via the mains adapter or charge the battery.· Change the sleep timer settings. |
| No or poor radio reception | The station signals are too weak. | · Adjust the frequency of the stations.· If necessary, change the location of the device. |
| No sound | The volume is set too low. | · Increase the volume as required. |
17. Disposal

PACKAGING
Your device has been packaged to protect it from damage in transit. The packaging is made of materials that can be recycled in an environmentally friendly manner.

DEVICE
The device is fitted with an integrated rechargeable battery. At the end of its service life, do not dispose of the device in the normal household rubbish. Instead, contact your local authority to find out how to dispose of it in an environmentally friendly manner at collection points for electrical and electronic scrap.
The rechargeable battery is an integral component of the device, which means that users cannot simply replace it themselves.
18. Technical specifications
| Mains adapter | |
 | |
| Manufacturer Hung Kay | |
| Model name HKP12-0901000dV | |
| Input voltage/current/input AC frequency | AC 100-240V ~ 50/60Hz 0,3A MAX |
| Output voltage/current | DC 9V = 1A, 9W ⊖ ⊕ ⊕ |
| Average efficiency during operation | 84.67 % |
| Power consumption with zero load | 0,05 W |
| Rechargeable battery | |
| Manufacturer Huizhou Huiyi New Energy Co., Ltd | |
| Model CH 18650 2INR19/66 | |
| Output voltage DC 7.4 V | ——2000 mAh, 14.8 Wh |
| Radio | |
| Power supply DC 9 V 1 A | —— |
| Output power 1x 5 W RMS | |
| DAB/DAB+ frequency band Band III | 174–240 MHz |
| FM frequency band 87.5–108 MHz | |
| Bluetooth operating frequency Version | 5.0/2402–2480 MHz |
| Bluetooth max. transmission power | -7.45 dBm |
| Environmental conditions | In operation: 10°C ~ +45°C < 90% humidityNot in operation: -10°C ~ +55°C < 90% Humidity |
| Protection class IP44 | |
| Dimensions (W x H x D) Approx. 282 | x 235 x 180 mm |
| Weight Approx. 1.94 kg | |
DE
EN
FR
IT
NL
19. Service information
Please contact our Customer Service team if your device ever stops working in the way you want or expect it to. There are several ways for you to contact us:
- In our Service Community, you can meet other users as well as our staff, and you can also share your experiences and pass on your knowledge.
You will find our Service Community at http://community.medion.com.
• Alternatively, use our contact form at www.medion.com/contact. - You can also contact our Service team via our hotline or by post.
| Germany | |
| Opening times Household & home electronics | |
| Mon – Fri: 07:00 – 23:00Sat – Sun: 10:00 – 18:00 | 1 +49 (0)201 22099-222 |
| Service address | |
| MEDION AG45092 EssenGermany | |
Germany

You can download these and many other user manuals from our service portal at www.medion.com/de/service/start/.
You will also find drivers and other software for a wide range of devices there.
You can scan the QR code on the left to download the user manual onto your mobile device from the service portal.
Legal notice
Copyright © 2020
Date: 18.02.2020
All rights reserved.
This user manual is protected by copyright.
Mechanical, electronic and any other forms of reproduction are prohibited without the written permission of the manufacturer.
Copyright is owned by the company:
MEDION AG
Am Zehnthof 77
45307 Essen
Germany
Please note that you cannot use the above address for returns. Please always contact our Customer Service team first.
20. Privacy statement
Dear customer,
We wish to inform you that we, MEDION AG, Am Zehnthof 77, 45307 Essen, Germany process your personal data as a data controller.
For matters regarding data protection, we are supported by our company data protection officer who can be contacted at MEDION AG, Datenschutz, Am Zehnthof 77, D – 45307 Essen; datenschutz@medion.com. We process your data for the purpose of warranty processing and associated processes (e.g. repairs) and therefore rely on processing your data for the sales contract concluded with us.
Your data will be provided to repairers contracted to us for the purpose of warranty processing and associated processes. We generally store your personal data for a period of three years in order to fulfil your legal warranty rights.
You have the right to be informed of the personal data concerned as well as the right to rectification, deletion, restriction of processing, the right to object to processing, as well as the right to data portability.
In case of access and cancellation rights, restrictions apply according to S 34 and S 35 of BDSG (Federal Data Protection Act) (Art. 23 GDPR). In addition, there is a right of appeal to a competent data protection supervisory authority (Article 77 GDPR in conjunction with S 19 BDSG). The state official for data protection and freedom of information for MEDION AG is Nordrhein Westfalen, P box 200444, 40212 Düsseldorf, Germany. www.ldi.nrw.de.
The processing of your data is necessary for warranty processing: it is not possible to process the warranty without the provision of the required data.
Inhalt
natural_image
Technical line drawing of a mechanical assembly with no visible text or symbolsnatural_image
Technical line drawing of a device interior with no visible text or symbolsnatural_image
Technical line drawing of a mechanical device with no visible text or symbolsnatural_image
Technical line drawing of a device interior with no visible text or symbolsnatural_image
Technical line drawing of a mechanical device with no visible text or symbolsnatural_image
Technical line drawing of a device front view with a curved arrow indicator (no text or symbols)natural_image
Technical line drawing of a mechanical device with no visible text or symbolsnatural_image
Technical line drawing of a device interior with no visible text or symbolsnatural_image
Technical line drawing of a mechanical device with no visible text or symbols▶ Open de klep.