USER MANUAL DESKJET 460WBT HP
Getting started guide
© 2005 Copyright Hewlett-Packard Development Company, L.P.
Reproduction, adaptation or translation without prior written permission is prohibited, except as allowed under the copyright laws.
The information contained herein is subject to change without notice.
The only warranties for HP products and services are set forth in the express warranty statements accompanying such products and services. Nothing herein should be construed as constituting an additional warranty. HP shall not be liable for technical or editorial errors or omissions contained herein.
1, 6/2005
Trademark Credits
Microsoft and Windows are registered trademarks or trademarks of Microsoft Corporation in the United States and/or other countries/regions.
The Bluetooth trademarks are owned by Bluetooth SIG, Inc., U.S.A. and used by Hewlett-Packard under license.

The SD Logo is a trademark.

Always follow basic safety precautions when using this product to reduce risk of injury from fire or electric shock.
- Read and understand all instructions in the documentation that comes with the printer.
- Observe all warnings and instructions marked on the product.
- Unplug this product from wall outlets before cleaning.
- Do not install or use this product near water, or when you are wet.
- Install the product securely on a stable surface.
- Install the product in a protected location where no one can step on or trip over the line cord, and the line cord cannot be damaged.
- If the product does not operate normally, see "Maintaining and troubleshooting" in the onscreen user's guide on the Starter CD.
- There are no user-serviceable parts inside. Refer servicing to qualified service personnel.
© 2005 Copyright Hewlett-Packard Development Company, L.P.
HP Deskjet 460 series printer.
This printer provides quick, professional mobile printing. You can print directly via USB cable from computers and PictBridge cameras, from digital camera memory cards or USB flash drives with DPOF files, or wirelessly from 802.11 or Bluetooth®-enabled devices.
HP Deskjet 460 Series Drucker
HP Deskjet 460 series printer
natural_image
3D model of a silver electronic device casing with labeled component (no text or symbols beyond label)
For detailed information, see the onscreen user's guide on the Starter CD. 1) PictBridge/USB Host Port, 2) Universal serial bus (USB) port, 3) Wireless profile switch, 4) CompactFlash™ card slot/Memory card slot, 5) Card holder.
Check the package contents.
1) HP Deskjet 460 series printer, 2) power adapter,
3) power cord, 4) black and tricolor print cartridges,
5) printed documentation,
HP Deskjet
460cb, 460wf, 460wbt
7
HP Deskjet
460wbt

8
HP Deskjet 460wf

9
6) Starter CD (software and electronic documentation),
7) Battery (included with HP Deskjet 460cb, 460wf, and 460wbt), 8) Bluetooth printer card (HP Deskjet 460wbt)
9) 802.11 printer card (HP Deskjet 460wf).
natural_image
Illustration of a printer with a curved arrow indicating compression or disassembly (no text or symbols)
Step 1: Remove the packing tape.
Remove all packing tape from the printer.
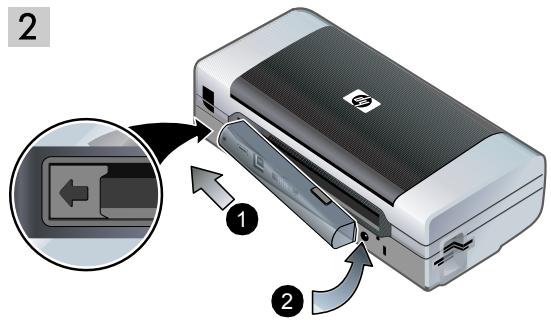
Step 2: Battery.
1) Slide the battery into the battery slot at an angle until the battery is flush with the contacts. 2) Push the battery into the battery slot until the battery clicks into place.
natural_image
Illustration of a portable printer connected to a cable with a power outlet (no text or symbols)
Note: Use only the battery specifically designed for use with this printer. See the onscreen user's guide on the Starter CD for more information.
natural_image
Illustration of a printer with a magnified inset showing a tip detail (no text or symbols)
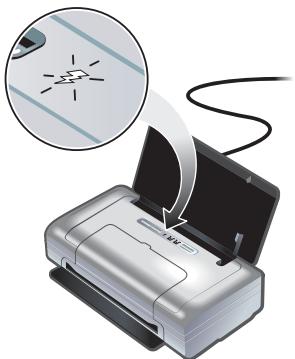
Fully charge the battery before using (approximately 4 hours for the first charge, 2 hours for subsequent charges). When the battery is charging, the battery charging light is green. If the light is red while charging, the battery might be faulty and need to be replaced. See the onscreen user's guide on the Starter CD for instructions on replacing the battery.
natural_image
Illustration of a printer with an arrow pointing to a device inside a circular inset showing the printer's internal structure (no text or symbols present)
Step 3: Install the wireless printer card (HP Deskjet 460wf or HP Deskjet 460wbt).
1) Insert the HP 802.11 printer card or Bluetooth card, with the lights facing up, into the CompactFlash™ card slot.
Note: If you are installing a Bluetooth card, make sure that your Bluetooth host device and operating system are supported by the printer. For more information, refer to http://www.hp.com/support/dj460.
Step 4: Connect the power cord.
1) Connect the power adapter to the printer. 2) Connect the power cord to the power adapter. 3) Connect the other end of the power cord to an alternating current (AC) power outlet.
5 1
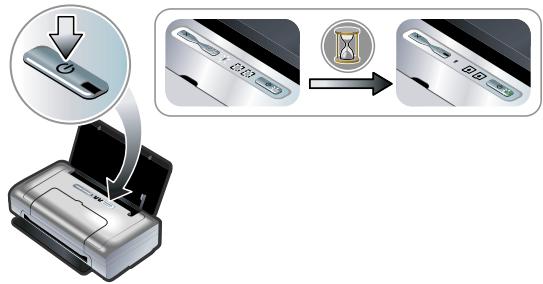
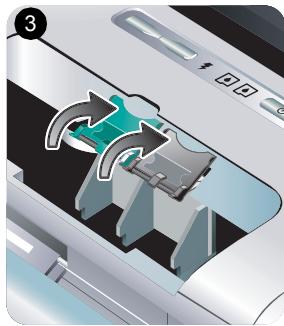
Step 5: Turn on the printer and install the print cartridges.
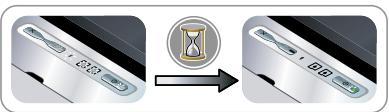
1) Press and hold the ⏻ (power button) to turn on the printer. Printer lights will lash in sequence. Note: Wait until the power light is the only printer light that remains lit.
natural_image
Two-step illustration of a printer's internal structure showing paper feeding and packaging (no text or symbols)
4) Remove each print cartridge from its package, and then remove the protective tape from the print cartridge. 5) Insert the color print cartridge into the left cradle compartment and the black print cartridge into the right cradle compartment. Press down on both cartridges to ensure they are seated completely in the cradles.
6) Snap the cartridge latches onto the print cartridges.
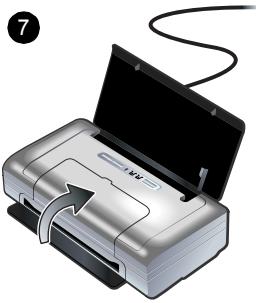
7) Close the front access cover. Note: Do not open the front access cover until the printer has finished initializing.
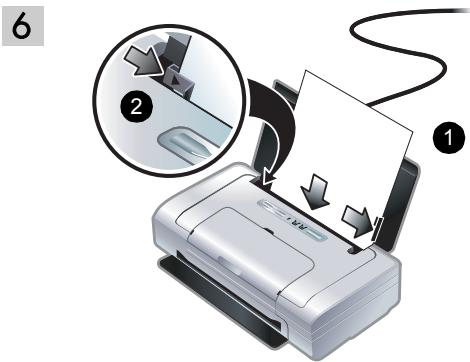
Step 6: Load paper in the input tray.
1) Insert up to 50 sheets of plain paper or 10 sheets of photo paper into the tray.
2) Slide the paper guide snugly against the edge of the paper.
6) Rasten Sie die Verriegelungen über den Druckpatronen ein. 7) Schließen Sie die vordere Abdeckung.
Hinweis: Öffnen Sie die vordere Abdeckung erst, wenn der Drucker initialisiert ist.
Schritt 6: Einlegen von Papier
1) Legen Sie bis zu 50 Blatt Normalpapier oder 10 Blatt Fotopapier ins Zufuhrfach ein. 2) Schieben Sie die Papierführung mit leichtem Druck gegen das Papier.
6) Refermez les loquets de la cartouche sur la cartouche d'impression. 7) Fermez le capot avant.
Remarque : N'ouvrez le capot avant tant que l'initialisation de l'imprimante n'est pas terminée.
Etape 6 : Charger le papier dans le bac d'alimentation.
1) Insérez jusqu'à 50 feuilles de papier ordinaire ou 10 feuilles de papier photo dans le bac. 2) Faites glisser le guide-papier pour qu'il soit bien calé contre les bords du papier.
6) Klap de inktpatroonklemmen dicht over de inktpatronen.
7) Sluit de voorste toegangsklep. N.B. Open de voorste toegangsklep pas nadat de printerinitialisatie is voltooid.
Stap 6: Laad papier in de invoerlade.
1) Plaats maximaal 50 vellen gewoon papier of 10 vellen fotopapier in de lade. 2) Schuif de papiergeleider goed tegen de rand van het papier aan.
7

natural_image
Illustration of a laptop with an open CD inside and a download arrow indicating file direction (no text or symbols)
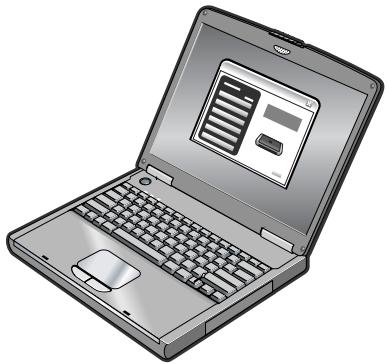
Step 7: Connect the printer.
Close any running applications and insert the Starter CD into the CD drive. The CD menu starts automatically. If the CD menu does not start automatically, double-click the Setup icon on the Starter CD.
natural_image
Illustration of a laptop with a generic document icon on the screen (no text or symbols)
natural_image
Illustration of a device with cable and connector, showing internal wiring and a magnified view of the connector (no text or symbols present)
USB connection: Windows ^® . Connect the USB cable when prompted. Mac OS. Connect the USB cable after the software is installed.
natural_image
Illustration of a laptop with an open screen displaying a music note (no text or symbols on the device)
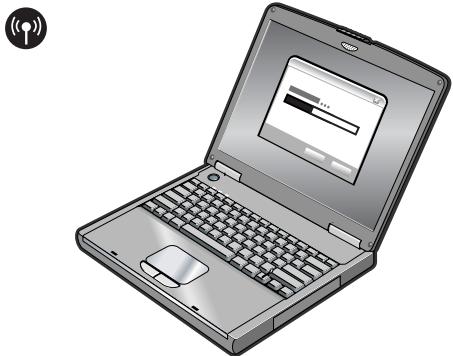
802.11 wireless connection: Windows and Mac OS. Have a USB cable nearby to connect the printer when prompted and then remove it after setup. Mac OS only. Complete the installation using the Setup program and HP Deskjet 460 Network Setup Tool.
Note: The printer will turn off and on when it receives the settings through the USB cable. Remove the USB cable when prompted.
Note: Current 802.11 settings will be saved to the current position of the wireless profile switch. The wireless profile switch is used to switch between 802.11 profile settings when changing wireless networks. See "About 802.11 wireless printing" on 25 for information about configuring wireless settings.
natural_image
Illustration of a laptop with an open screen showing a progress bar (no text or symbols on the device)
Bluetooth wireless connection: Windows. 1) Select Other Port when prompted for the port and Skip when prompted to connect the printer and complete printer driver installation. 2) Using the Bluetooth configuration software on your computer, locate the COM port number for the Bluetooth Client assigned to your Bluetooth device.
natural_image
Illustration of a laptop with the Windows logo displayed on its screen (no text beyond branding)
For example, if you are using a 3Com Bluetooth adapter on your computer, open the Bluetooth Connection Manager, select COM ports from the Tools menu, and take note of the COM port number of the 3Com Bluetooth Serial Client port.
3) From the Windows desktop, click the Start button, point to Settings, and then click Printers or Printers and Faxes. 4)
Right-click the printer icon, and then click Properties. 5) Click the Ports tab and select the COM port as identified in step 2.
6) Click Apply, and then click OK.
natural_image
Three different mobile phones shown from different angles: a standard Windows emulator, a handheld device with a logo, and a generic iPad (no text or symbols visible on devices themselves)
natural_image
Illustration of a silver printer with paper and a circuit board, emitting a sheet of paper (no text or symbols visible)
Step 8: Test the software installation.
To test the software installation and printer connection, print a document from an application you use frequently. See "Problems installing software" on 24 if you are unable to print.
9
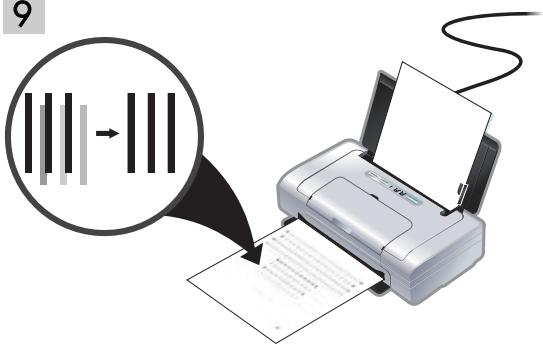
Step 9: Align the print cartridges.
Whenever you install a new print cartridge, you should align the print cartridges for the best possible print quality.
natural_image
Illustration of a laptop with the Windows logo displayed on its screen (no text beyond logo)
Windows: 1) Click Start, point to Programs, point to HP Deskjet 460 Series, and then click the Toolbox icon.
2) Click the Printer Services tab, and then click Align Print Cartridges. The printer prints an alignment page.
3) Follow the onscreen instructions to complete the alignment procedure.
Mac OS X: 1) Make the Finder active by clicking on the Finder icon located in the Dock. Click File and select New Finder Window. 2) Select Library, Printer, hp, Utilities, and then select HP Printer Selector to open the HP Printer Utility. Click Align. The printer prints an alignment page. 3) Follow the onscreen instructions to complete the alignment procedure.
natural_image
Illustration of a desktop computer with a globe displayed on its screen and a file cabinet beside it (no text or symbols)
Step 10: Register the printer.
Register the printer to receive important support and technical information. If you did not register your printer while installing the software, you can register later at http://www.register.hp.com.
flowchart
graph TD
    A[" floppy disk"] --> B[" question mark "]
    B --> C[" server "]
    C --> D[" global website www.hp.com/support/dj460 "]
Congratulations!
Your printer is ready to use.
For information about using the printer and troubleshooting, refer to the following resources:
- Onscreen documentation on the Starter CD
- HP Instant Support (see the onscreen user's guide)
• Product support site: http://www.hp.com/support/dj460
The following tips will help you prepare for traveling with your printer:
- If you are bringing an extra black or photo print cartridge, follow these guidelines: For a partially used black print cartridge, or a partially used or full photo print cartridge, store it in the travel holder to prevent ink leakage. A newly opened black print cartridge will leak slightly at high altitudes (such as in airplanes). To avoid this, wait to install new black cartridges until you reach your destination. Until then, keep them in their original, taped packaging.
- Turn off the printer using the power button. This ensures that the print cartridges return to the home position at the left side of the printer and lock in place.
- If you need to buy print cartridges while traveling to another country/region, see the online help called "Traveling with your HP mobile printer", available through the Toolbox or HP Printer Utility, for regional cartridge compatibility information.
- Use only the power adapter that is supplied with the printer. Do not use any other voltage transformer or converter. The power adapter can be used with AC power sources of 100 to 240 volts, 50 or 60 Hz.
- Remove the battery if you will not be using the printer for more than a month.
- When traveling with photo paper, pack it flat so it doesn't warp or curl. Photo paper should be flat before printing. If the corners of the photo paper curl more than 10mm (3/8 inch), flatten the paper by putting it in the resealable storage bag, then rolling the bag on a table edge until the paper is flat.
The printer lights indicate printer status and are useful for diagnosing printing problems. This chapter provides a list of light status light combinations, what they indicate and how to solve the problem.

- ✗ (Cancel button) – Cancels the current print job. The time it takes to cancel depends on the size of the print job. Press this button only once to cancel a queued print job.
- (Resume button) – Resumes a print job that is waiting or after temporary interruption (for example, when adding print media to the printer).
- Resume light – Lights up in amber when a print job is waiting, and blinks or turns on to relay status or a need for intervention (see the table below).
-
Battery charging light – Lights up in green when the battery is charging.
-
Left print cartridge light –Blinks when the left print cartridge is absent or improperly functioning. Turns on solid when the ink is low or empty.
- Right print cartridge light –Blinks when the right print cartridge is absent or improperly functioning. Turns on solid when the ink is low or empty.
- ⏻ (Power button) – Turns the printer off or on.
- Power light – Lights up in green when the printer is turned on using the AC adapter or a 41-100% charged battery. When powered by battery, lights up in amber when battery is 10-40% charged, and red when battery is below 10% charged. Blinks during printing.
Printer light patterns
Light description and light pattern
Explanation and recommended action
Power light is green.

If using AC power: Printer is turned on and idle. If using battery power: Battery is 41-100% charged and printer is turned on and idle.
• No action required.
Power light is amber.

Battery is 10-40% charged and printer is turned on and idle.
- Plug in the power adapter to begin recharging the battery.
See the onscreen user's guide on the Starter CD for more information.
Power light is red.

Battery is less than 10% charged and printer is turned on and idle.
- Plug in the power adapter to begin recharging the battery.
See the onscreen user's guide on the Starter CD for more information.
Battery charge light is green.

Battery is charging.
• No action required.
Battery charge light is red.

Battery is faulty.
- Replace the battery.
See the onscreen user's guide on the Starter CD for more information.
Power light is green and Resume light blinks.

natural_image
Pure electrical circuit components without any symbols
Printer is paused either to wait for media to dry, out of paper, or processing Digital Print Order Format (DPOF) printing.
- If out of paper, load paper. Press 📄 (Resume button) to continue the print job.
Left print cartridge light blinks.

The left print cartridge needs attention.
- Reinstall the print cartridge and try to print. If the error persists, replace the cartridge. See the onscreen user's guide on the Starter CD for more information.
Light description and light pattern
Explanation and recommended action
Right print cartridge light blinks.

The right print cartridge needs attention.
- Reinstall the print cartridge and try to print. If the error persists, replace the cartridge. See the onscreen user's guide on the Starter CD for more information.
Left print cartridge light on.

Tri-color print cartridge is low on ink.
- Replace the print cartridge. See the onscreen user's guide on the Starter CD for more information.
Right print cartridge light on.

Right print cartridge is low on ink.
- Replace the print cartridge. See the onscreen user's guide on the Starter CD for more information.
Power light off, resume light blinks.

Power light blinks, resume light blinks.

Power light blinks, resume light blinks, left and right print cartridge lights on.

Media jam or paper motor stall.
- Clear the jammed paper. See the onscreen user's guide on the Starter CD for more information. After clearing the jam, press (Resume button) to continue the print job.
If no paper jam exists, press 📄 (Resume button). If this does not work, try turning the printer off and then on again, and resend the print job.
Resume light blinks, left and right print cartridge lights on.

Resume light blinks, left and right print cartridge lights cycle.

natural_image
Pure electrical circuit symbols without any text or labels
Light description and light pattern
Explanation and recommended action
Power light on, resume light blinks, right print cartridge light turns on twice as long as off.

Power light on, resume light on, right print cartridge light turns on twice as long as off.

Ink service module almost full.
- If you have a replacement for the ink service module, replace it immediately by following the instructions that come with it.
- Otherwise, visit: http://www.hp.com/support/dj460 or call Customer Support to get a replacement.
In the meantime, you can press 📋 (Resume button) to continue printing, but this light error state will remain until the ink service module is replaced. When the ink service module is full, the printer will stop printing.
Solving installation problems
This section provides troubleshooting suggestions for some of the most common problems associated with hardware and software installation.
Problems printing
Check the printer to ensure the following
- Power light is on and not blinking. When the printer is first turned on, it takes about a minute to initialize.
- No lights on the control panel are lit or blinking and that the printer is in the Ready state. If lights are lit or blinking, see page 21.
- Ensure power cord and other cables are working and firmly connected to the printer.
• All packing tape and shipping materials are removed from the printer.
- Print cartridges are properly installed in their correct carriage compartments. Press down firmly on each one to ensure proper contact.
- Ensure you have removed the tape from each print cartridge.
• Ensure that the cartridges are not damaged.
• Print cartridge latches and covers are closed.
• Media is loaded correctly in the input tray and is not jammed in the printer.
Problems installing software
Check the computer requirements
- Make sure the computer meets the system requirements. See the onscreen user's guide on the Starter CD.
Check the installation preliminaries
• Before installing software on a Windows computer, ensure all other programs are closed.
- If the computer does not recognize the path to the CD drive that you type, ensure you are specifying the correct drive letter.
- If the computer cannot recognize the Starter CD in the CD drive, inspect the CD for damage. You can download the printer driver from http://www.hp.com/support/dj460.
• In the Windows device manager, make sure that the USB drivers have not been disabled.
Reinstall the printer software
- If you are using Windows and the computer cannot detect the printer, run the Scrubber utility (located in the Utils\Scrubber folder on the Starter CD) to perform a clean driver uninstallation. Restart your computer, and reinstall the printer driver. See "To uninstall the printer software" in the onscreen user's guide on the Starter CD.
Problems setting up 802.11 or Bluetooth wireless communication
If you have problems printing from an 802.11 or Bluetooth wireless connection, try the following suggestions:
Check the wireless printer card
• Make sure the wireless printer card is inserted properly.
• Make sure you inserted the wireless printer card before or after, and not during, printer initialization.
• If the light on the wireless printer card is not on, do the following:
a. Remove the wireless printer card.
b. Turn off the printer, wait a few seconds, and then turn it back on again.
c. Reinsert the card when the printer is in the Ready state. If there is no response, repeat this procedure a few times. If there is still no response, contact HP.
- To see if the wireless printer card is working, try printing using another wireless device. If you still cannot print, the wireless printer card might be faulty. Replace the card if necessary.
Check the wireless settings
• Make sure the wireless profile switch on the back of the printer is switched to the correct wireless profile you are using. Make sure you are using a profile that was configured during installation.
- If you cannot communicate with the printer after completing the software installation and removing the USB cable, then one or more of the following wireless settings might be incorrect:
• Network Name (SSID)
• Communication Mode (infrastructure or ad hoc)
• Channel (ad hoc networks only)
• Security settings (such as Authentication Type and Encryption)
- To configure Bluetooth settings or monitor printer status (such as ink levels) using the Toolbox (Windows), you must connect the printer to your computer using a USB cable.
Check the wireless signal
Wireless communication can be interrupted or unavailable if there is signal interference, distance or signal strength problems, or if the printer is not ready for some reason.
- Make sure the printer is within range of the 802.11 or Bluetooth sending device. 802.11 printing allows wireless printing up to 100 meters (300 feet). Bluetooth printing allows wireless printing up to 10 meters (30 feet).
- If a document doesn't print, there could be signal interruption. If a message appears on the computer explaining that there is a signal problem, cancel the print job and then resend it from the computer.
General wireless troubleshooting tips
- Delete and re-add the printer in the Print Center (Mac OS).
- PING the printer: If turning off the printer and turning it back on again does not solve the problem (or, deleting and re-adding the printer in the Print Center doesn't work on the Mac OS), do the following:
a. Print a wireless configuration page: hold ✗ (Cancel button) down for two seconds.
b. PING the printer using MS-DOS (Windows) or Terminal (Mac OS) to verify network communication.
• Manually assign the IP address for the printer in the Ports tab of the printer properties.
- Boxes might appear when trying to print Asian fonts from a mobile phone on printers purchased outside Asia. Asian fonts for Bluetooth mobile phone printing are only supported by models purchased in Asia.
- Printing larger files using a Bluetooth wireless connection can result in printing issues. Try printing a smaller file.
• Wireless communication drains power from the printer battery. Check the battery charge level.
See the onscreen user's guide on the Starter CD for more wireless network troubleshooting and configuration information.
About 802.11 wireless printing
This section provides a quick overview of factory default 802.11 wireless communication with the printer.
See the onscreen user's guide on the Starter CD to:
- Set up the printer on an infrastructure network.
- Set up multiple printers at one time using the 802.11 Wireless Profile Configuration Utility.
- Solve problems with 802.11 connections that do not use the factory default configuration.
- Set up the printer with an 802.11 connection without using a USB cable.
802.11 wireless printing using factory defaults
The setup instructions describe setting up a single printer for wireless communication using an ad-hoc network and factory defaults.
The factory default Wireless Network settings are:
• Communication mode: ad hoc
• Network Name (SSID): hpsetup
• Security (encryption): disabled
Once the printer is connected to the computer, either wirelessly or through the USB cable, you can change the SSID by configuring wireless profiles using the HP Toolbox (Windows) or HP Deskjet 460 Network Setup Tool (Mac OS).
Communication mode
On an “ad hoc” network, the network communication mode is set to ad hoc, and the printer communicates directly with other wireless devices without the use of a wireless access point (WAP).
Network name (SSID)
By default, the printer looks for an ad hoc network with the network name, or Service Set Identifier (SSID), "hpsetup."
Wireless security settings
The printer's factory default setting is open network and security (encryption) disabled. The printer will attempt to detect and automatically associate to open wireless network named "hpsetup". The network does not require security for authentication or encryption.
All devices on the ad hoc network must:
• Be 802.11-compatible
• Have ad hoc as the communication mode
• Have the same network name (SSID)
- Be on the same subnet
- Be on the same channel
• Have the same 802.11 security settings
Wireless profile switch
The printer includes an 802.11 wireless profile switch so you can store settings for up to three 802.11 computers or networks. This allows you to easily move the printer from home to office or between any three wireless network environments. The “current” profile is the one associated with the current position (1, 2, or 3) of the wireless profile switch on the printer. For more information, see the onscreen user’s guide on the Starter CD.
Hewlett-Packard limited warranty statement
| HP product | Duration of Limited Warranty |
| Software | 90 days |
| Accessories | 90 days |
| Print cartridges | Until the HP print cartridge has been depleted of HP ink, or until the “end of warranty” date printed on the cartridge, whichever occurs first. |
| Printer peripheral hardware (see below for details) | 1 year |
*For more detailed warranty information, see http://www.hp.com/support/inkjet_warranty
Extent of limited warranty
- Hewlett-Packard warrants to the end-user customer that the HP products specified above will be free from defects in materials and workmanship for the duration specified above, which duration begins on the date of purchase by the customer.
- For software products, HP's limited warranty applies only to a failure to execute programming instructions. HP does not warrant that the operation of any product will be uninterrupted or error free.
- HP's limited warranty covers only those defects that arise as a result of normal use of the product, and does not cover any other problems, including those that arise as a result of:
a. Improper maintenance or modification;
b. Software, media, parts, or supplies not provided or supported by HP; or
c. Operation outside the product's specifications.
d. Unauthorized modification or misuse.
-
For HP printer products, the use of a non-HP ink cartridge or a refilled ink cartridge does not affect either the warranty to the customer or any HP support contract with the customer. However, if printer failure or damage is attributable to the use of a non-HP or refilled ink cartridge, HP will charge its standard time and materials charges to service the printer for the particular failure or damage.
-
If HP receives, during the applicable warranty period, notice of a defect in any product which is covered by HP's warranty, HP shall either repair or replace the product, at HP's option.
-
If HP is unable to repair or replace, as applicable, a defective product which is covered by HP's warranty, HP shall, within a reasonable time after being notified of the defect, refund the purchase price for the product.
-
HP shall have no obligation to repair, replace, or refund until the customer returns the defective product to HP.
-
Any replacement product may be either new or like new, provided that it has functionality at least equal to that of the product being replaced.
-
HP products may contain remanufactured parts, components, or materials equivalent to new in performance.
-
HP's Limited Warranty Statement is valid in any country/region where the covered HP product is distributed by HP. Contracts for additional warranty services, such as on-site service, are available from any authorized HP service facility in countries/regions where the product is distributed by HP or by an authorized importer.
Limitations of warranty
TO THE EXTENT ALLOWED BY LOCAL LAW, NEITHER HP NOR ITS THIRD PARTY SUPPLIERS MAKES ANY OTHER WARRANTY OR CONDITION OF ANY KIND, WHETHER EXPRESS OR IMPLIED WARRANTIES OR CONDITIONS OF MERCHANTABILITY, SATISFACTORY QUALITY, AND FITNESS FOR A PARTICULAR PURPOSE.
Limitations of liability
- To the extent allowed by local law, the remedies provided in this Warranty Statement are the customer's sole and exclusive remedies.
- TO THE EXTENT ALLOWED BY LOCAL LAW, EXCEPT FOR THE OBLIGATIONS SPECIFICALLY SET FORTH IN THIS WARRANTY STATEMENT, IN NO EVENT SHALL HP OR ITS THIRD PARTY SUPPLIERS BE LIABLE FOR DIRECT, INDIRECT, SPECIAL, INCIDENTAL, OR CONSEQUENTIAL DAMAGES, WHETHER BASED ON CONTRACT, TORT, OR ANY OTHER LEGAL THEORY AND WHETHER ADVISED OF THE POSSIBILITY OF SUCH DAMAGES.
Local law
-
This Warranty Statement gives the customer specific legal rights. The customer may also have other rights which vary from state to state in the United States, from province to province in Canada, and from country/region to country/region elsewhere in the world.
-
To the extent that this Warranty Statement is inconsistent with local law, this Warranty Statement shall be deemed modified to be consistent with such local law. Under such local law, certain disclaimers and limitations of this Warranty Statement may not apply to the customer. For example, some states in the United States, as well as some governments outside the United States (including provinces in Canada), may:
a. Preclude the disclaimers and limitations in this Warranty Statement from limiting the statutory rights of a customer (e.g. the United Kingdom);
b. Otherwise restrict the ability of a manufacturer to enforce such disclaimers or limitations; or
c. Grant the customer additional warranty rights, specify the duration of implied warranties which the manufacturer cannot disclaim, or allow limitations on the duration of implied warranties.
- FOR CONSUMER TRANSACTIONS IN AUSTRALIA AND NEW ZEALAND, THE TERMS IN THIS WARRANTY STATEMENT, EXCEPT TO THE EXTENT LAWFULLY PERMITTED, DO NOT EXCLUDE, RESTRICT, OR MODIFY, AND ARE IN ADDITION TO, THE MANDATORY STATUTORY RIGHTS APPLICABLE TO THE SALE OF THE HP PRODUCTS TO SUCH CUSTOMERS.
Reisetips
natural_image
Pure electrical circuit components without any symbols
natural_image
Pure electrical circuit symbols without any text or labels
http://www.hp.com/support/inkjet_warranty
- FOR CONSUMER TRANSACTIONS IN AUSTRALIA AND NEW ZEALAND, THE TERMS IN THIS WARRANTY STATEMENT, EXCEPT TO THE EXTENT LAWFULLY PERMITTED, DO NOT EXCLUDE, RESTRICT, OR MODIFY, AND ARE IN ADDITION TO, THE MANDATORY STATUTORY RIGHTS APPLICABLE TO THE SALE OF THE HP PRODUCTS TO SUCH CUSTOMERS.
Conseils de voyage
natural_image
Pure electrical circuit symbols without any text or labels
http://www.hp.com/support/inkjet_warranty
Vastgelopen afdrukmateriaal of stilgevallen papiermotor.
natural_image
Pure electrical circuit symbols without any text or labels
http://www.hp.com/support/inkjet_warranty
natural_image
3D model of a silver electronic device with labeled component (no text or symbols beyond label)
natural_image
Illustration of a printer with a curved arrow indicating motion or rotation (no text or symbols)
natural_image
Illustration of a portable air conditioner unit connected to a power outlet and cable (no text or symbols)
natural_image
Illustration of a printer with a magnified inset showing a small diagram (no text or symbols present)
natural_image
Illustration of a printer with an arrow pointing to a device inside a circular inset (no text or symbols)
natural_image
Illustration of a printer with an open lid and internal components (no text or symbols visible)
natural_image
Close-up of a smartphone's internal mechanical component with directional arrows indicating motion (no text or symbols)
natural_image
Illustration of a printer's printing process showing paper feeding into a printer with arrows indicating process flow (no text or symbols)
natural_image
Diagram of a printer's internal structure showing internal components and arrows indicating flow (no text or symbols)
natural_image
Illustration of a silver USB flash drive with a cable inserted, showing internal components and an arrow indicating motion (no text or symbols)
natural_image
Illustration of a laptop with an open CD inside, showing the next CD and mouse (no text or symbols)
natural_image
Illustration of a laptop with an open screen displaying a generic document icon (no text or symbols present)
natural_image
Illustration of a printer with cable being inserted, showing internal components and a magnified view (no text or symbols)
natural_image
Illustration of a laptop with a progress bar and open screen (no text or symbols)
natural_image
Illustration of a laptop computer with a screen showing progress (no text or symbols visible)
natural_image
Illustration of a laptop with the Windows logo displayed on its screen (no text beyond branding)
natural_image
Illustration of three different mobile phones: a standard Windows logo, a printer with a logo, and a smartphone displaying the same logo (no text or symbols on devices themselves)
natural_image
Illustration of a silver printer with paper and a card, emitting a sheet of paper (no text or symbols visible)
natural_image
Illustration of a laptop with the Windows logo displayed on its screen (no text or symbols beyond branding)
natural_image
Illustration of a desktop computer with a globe and server, no text or symbols present
flowchart
graph TD
    A["Physical Drive"] --> B["Question Mark"]
    B --> C["Global Website"]
    C --> D["www.hp.com/support/dj460"]
Congratulazioni!
natural_image
Pure electrical circuit symbols without any text or labels
natural_image
Pure electrical circuit symbols without any text or labels
natural_image
Pure electrical circuit symbols without any text or labels
http://www.hp.com/support/inkjet_warranty
(ad hoc ∪ ∪ ∪ ∪ ∪ ∪ ∪ ∪ ∪ ∪ ∪ ∪ ∪ ∪ ∪ ∪ ∪ ∪ ∪ ∪ ∪ ∪ ∪ ∪ ∪ ∪ ∪ ∪ ∪ ∪ ∪ ∪ ∪ ∪ ∪ ∪ ∪ ∪ ∪ ∪ ∪ ∪ ∪ ∪ ∪ ∪ ∪ ∪ ∪ ∪ ∩
(afقط ad hoc) ال restaurants (ش bikeات)
أ http://www.hp.com/support/dj460
natural_image
Illustration of a laptop with the Windows logo displayed on its screen (no text beyond branding)
flowchart
graph TD
    A["Physical Media Icon"] --> B["Question Mark"]
    B --> C["Document Icon"]
    C --> D["www.hp.com/support/dj460"]
natural_image
Illustration of a desktop computer with a globe icon and 'WWW' text, next to a file cabinet (no readable text beyond the logo)
natural_image
Illustration of three different mobile phones: a standard Windows, a handheld device with a card, and a generic Naimi smartphone (no text or symbols visible on devices themselves)
natural_image
Illustration of a printer with paper and a small card, no text or symbols present
natural_image
Illustration of a laptop with a progress bar on screen (no text or symbols)
natural_image
Illustration of a laptop with the Windows logo displayed on its screen (no text beyond logo)
(3) من سطح المكتب بنظام Windows (عُدْمَّدَّة، ”ثُم انْفَرْ فَقْ زَر “بِّادًا” وَأَشْر إِلَى
(4) انْفَرْ فَقْ رَر “طُابِعَات” ”و“الُطُابِعَات وَالْفَالِكِسِّات”
(5) انْفَرْ فَقْ خُصَانِّصٍ” (6) انْفَرْ فَقْ تُمْ مُواِقْمِتٍ مُّتَّطَيْبِّةٌمُّتَّمْ مُواِقْمِتٍ مُّتَّمْ مُواِقْمِتٍ مُّتَّمْ مُواِقْمِتٍ مُّتَّمْ مُواِقْمِتٍ مُّتَّمْ مُواِقْمِتٍ مُّتَّمْ مُواِقْمِتٍ مُّتَ"
natural_image
Illustration of a laptop with an open screen displaying a generic document icon (no text or symbols present)
natural_image
Illustration of a laptop with an open CD and an arrow indicating file direction (no text or symbols)
natural_image
Illustration of a laptop with a progress bar on screen (no text or symbols)
natural_image
Illustration of a printer with cable and connector, showing internal wiring and a magnified view of the device (no text or symbols present)
flowchart
graph TD
    A["Receipts"] --> B{Deposit}
    B --> C["Recycle"]
    C --> D["Recycle"]
    D --> E["Recycle"]
    E --> F["Recycle"]
    F --> G["Recycle"]
    G --> H["Recycle"]
    H --> I["Recycle"]
    I --> J["Recycle"]
    J --> K["Recycle"]
    K --> L["Recycle"]
    L --> M["Recycle"]
    M --> N["Recycle"]
    N --> O["Recycle"]
    O --> P["Recycle"]
    P --> Q["Recycle"]
    Q --> R["Recycle"]
    R --> S["Recycle"]
    S --> T["Recycle"]
    T --> U["Recycle"]
    U --> V["Recycle"]
    V --> W["Recycle"]
    W --> X["Recycle"]
    X --> Y["Recycle"]
natural_image
Two-step illustration of a printer being opened, showing internal structure and motion arrows (no text or symbols)
natural_image
Illustration of a printer with an arrow pointing to a device inside a circular inset showing the printer's internal structure (no text or symbols present)
.http://www.hp.com/support/dj460
natural_image
Illustration of a printer with a download icon and arrow indicating action (no text or symbols)
natural_image
Illustration of a device with a curved arrow and a small symbol on the cover (no text or labels)
natural_image
Illustration of a printer with a paper airplane being inserted, showing internal components and a magnified view of the printer's tip (no text or symbols present)
natural_image
Illustration of a portable electronic device connected to a power outlet and cable (no text or symbols)
natural_image
3D model of a rectangular electronic device with labeled component (no text or symbols visible)
.HP Deskjet 460 series طابعة
© 2005 Hewlett-Packard Development Company, L.P.
Printed in Germany
www.hp.com/support/dj460

invent

