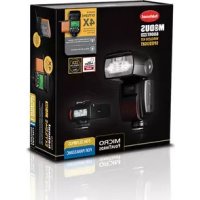
MODUS 600RT MK II (Micro 43) - Lamp Hähnel - Free user manual and instructions
Find the device manual for free MODUS 600RT MK II (Micro 43) Hähnel in PDF.



| Product Type | Speedlight (cobra flash) for Micro Four Thirds cameras |
| Model | MODUS 600RT MK II (Micro 43) |
| Brand | Hähnel |
| Guide Number (GN) at 100 ISO / 200 mm | 60 (approx.) |
| Power Source | Rechargeable Li-ion battery HLX-MD1 (included) |
| Battery Life | Approx. 500 flashes at full power (1/1) |
| Recycling Time | Approx. 1.5 s at full power (with new battery) |
| Flash Modes | Intelligent TTL, Manual (M), Multi (stroboscopic) |
| Flash Exposure Compensation | ±3 EV in 1/3 EV steps |
| Synchronization | High-speed (HSS/FP), rear curtain |
| Zoom Coverage (motorized) | 20-200 mm (135 format) / 10-100 mm (Micro 4/3); wide panel 14 mm / 7 mm |
| Wireless Control | 2.4 GHz radio (master/slave, range 100 m) and optical (O1/O2, range 15 m) |
| Wireless Groups | Master + 3 groups (A/B/C) |
| Channels | Automatic DCM (Digital Channel Matching) |
| Display | Dot-matrix LCD with backlight |
| Sync Socket | 2.5 mm jack |
| USB Port | Micro USB (for firmware update) |
| Special Features | Bounce flash (tilting head 90° vertical, 360° horizontal), catch light panel, AF assist beam |
| Dimensions (approx.) | 190 x 77 x 52 mm (without battery) |
| Weight (approx.) | 380 g (without battery) / 480 g (with battery) |
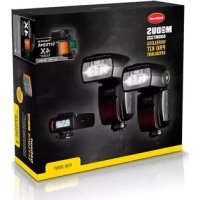
| Kit Contents | Speedlight, Li-ion battery, charger, protective case, mini stand, Micro USB cable, manual; Wireless kit additionally includes Viper TTL transmitter, mini tripods, AA batteries for transmitter |
| Maintenance | Clean with a soft dry cloth; do not use solvents; avoid shocks; firmware update via USB |
| Safety | Overheat protection (auto shut-off), temperature indicator; do not point flash at eyes; use at least 1 m from face; adhere to temperatures (0-40°C) |
| Warranty | 1 year (excluding consumables such as flash tube) |
Frequently Asked Questions - MODUS 600RT MK II (Micro 43) Hähnel
User questions about MODUS 600RT MK II (Micro 43) Hähnel
0 question about this device. Answer the ones you know or ask your own.
Ask a new question about this device
Download the instructions for your Lamp in PDF format for free! Find your manual MODUS 600RT MK II (Micro 43) - Hähnel and take your electronic device back in hand. On this page are published all the documents necessary for the use of your device. MODUS 600RT MK II (Micro 43) by Hähnel.
USER MANUAL MODUS 600RT MK II (Micro 43) Hähnel
Wireless Speedlight for Micro FourThirds
Foreword
Thank you for purchasing the hähnel Modus 600RT.
GB
The Modus 600RT is a speedlight for Micro FourThirds DSLR series cameras and is compatible with the Olympus/Panasonic TTL Auto flash system.
- Before starting to shoot, be sure to read this manual
- When reading this manual also refer to the camera's Instruction Manual
Conventions & assumptions
- The manual is based on the assumption that all devices including the camera are switched on
• Reference page numbers are indicated by (page **) - The caution symbol indicates a warning to prevent shooting problems
• The Note symbol gives supplemental information
1 Introduction
- Safety precaution - Warnings & Cautions 6
- Nomenclature
• Body 8
• Control Panel 9
• LCD Panel in three modes 11
• Viper TTL Transmitter 12
2 Getting started
• What's in the Modus 600RT? 14
• What's in the Modus 600RT Wireless Kit?.....14
- Battery and charger 14
- Attaching to camera 17
• Power Management 17
- Flash Mode - TTL Autoflash
- FEC (Flash Exposure Compensation)....18
• HSS (High Speed Sync) 19
- 2nd Curtain Sync 20
- Flash Mode - Manual Flash 20
- Flash output power range 21
• Optical O1 Secondary unit setting 21
• Optical O2 Secondary unit setting 21
- Flash Mode - MULTI: Stroboscopic Flash.....21
- Calculating the shutter speed 22
- Number of flashes / flash frequency = shutter speed 22
3 Wireless Flash Photography: (2.4GHz) Control
• Master/Slave wireless flash lighting 24
- Wireless multiple flash shooting 25
- Wireless settings
- Master unit Setting 26
- Slave unit Setting 26
• Master unit flash ON/OFF 26 - Setting the group mode: TTL / M / off 26
• DCM (Digital channel matching) 27
• Master - Viper TTL or Modus 600RT 27
- Slave - Modus 600RT 27
- Modus 600RT Reset 28
- TTL - Fully automatic wireless flash shooting 28
• Using Automatic wireless flash with multiple slave units 30
- Aдвanced setting with fully automatic wireless flash 30
- Multiple master unit 31
• M: Wireless Flash Shooting with Manual Flash 31
- MULTI: Wireless Flash Shooting with repeating flash stroboscopic 31
- M/A/B/C: Wireless flash shooting with different flash modes for each goup 32
4 Wireless Flash Photography: Optical Transmission
• Optical O1 Secondary unit setting 34
• Optical O2 Secondary unit setting 34
5 Wireless Flash Photography: (2.4GHz) using Viper TTL Transmitter
- Wirelesssetting 36
• DCM (Digital Channel Matching) 36
• Viper TTL group Mode Setting 36
• Group Power Control setting for Manual and TTL FEC 36
- Multi Mode 37
6 Other Applications
- SyncTriggering 38
- Bounce Flash 38
- Catchlight Panel 39
- Zoom – Setting the Flash Coverage and using Wide Panel 39
• C.Fn – Setting Custom Functions 40 - Protection Functions 41
• Technical Data 43 - Troubleshooting 44
- Firmware Upgrade 45
- Maintenance 45
⚠️Warnings:
Failure to observe the instructions below may result in loss of life or serious bodily injury. To prevent fire, excessive heat, chemical leakage, explosions, and electrical shock, follow the safeguards below:
- Do not insert any foreign metallic objects into the electrical contacts of the product, accessories, connecting cables, etc
- Do not use any batteries, power sources, or accessories not specified in the instruction manual. Do not use any deformed or modified batteries, or the product if it is damaged
- Do not short-circuit, disassemble, or modify the product or batteries. Do not apply heat or solder to the batteries. Do not store batteries with metal objects. Do not expose the batteries to fire or water. Do not subject the batteries to strong impact or continuous mechanical shock
- Do not place batteries in a microwave, cooker or high-pressure container
- Do not use the product in locations where there is flammable gas
- Do not fire the flash at anyone driving a car or other vehicle
- Do not disassemble or modify the equipment. High-voltage internal parts may cause electrical shock. If you drop the equipment and the casing breaks open to expose the internal parts, do not touch the exposed parts. There is a possibility of an electrical shock
- Do not store the product in dusty or humid places or locations with lots of oil smoke. Do not store the battery in a charger
- Keep the batteries and other accessories out of the reach of children and infants
- Do not drop the product or battery into fire or water
-
Do not expose the product or battery to excessive temperature (below 0°C or above 40°C) or strong direct sunlight
-
Battery temperature while on charge or in use should never increase above 60° C/140°F. If higher temperature occurs, stop using and stop charging immediately
- Do not use paint thinner, benzene, or other organic solvents to clean the product
GB
Caution:
- Failure to observe the instructions below may result in serious bodily injury or damage to property
- When the product is not in use for a prolonged period, make sure to remove the batteries before storing
- When disposing of a battery, insulate the electrical contacts with tape. Contact with other metallic objects or batteries may cause a fire or an explosion. Dispose of batteries in accordance with the appropriate local regulations
- Do not store or leave the product or battery in the trunk, or on the dashboard of a vehicle or in direct sunlight or with a high interior temperature as overheating can result in burns if touched, leaking, fire or explosion
- Do not fire the flash with the flash head (light-emitting unit) in contact with a human body or any object as doing so may result in the risk of burns and fire
- Do not fire the flash near the eyes. Keep the flash unit at least 1m (3.3 feet) away from face. It may hurt or damage the eyes. Using bounce flash to reduce light intensity is also recommended
B
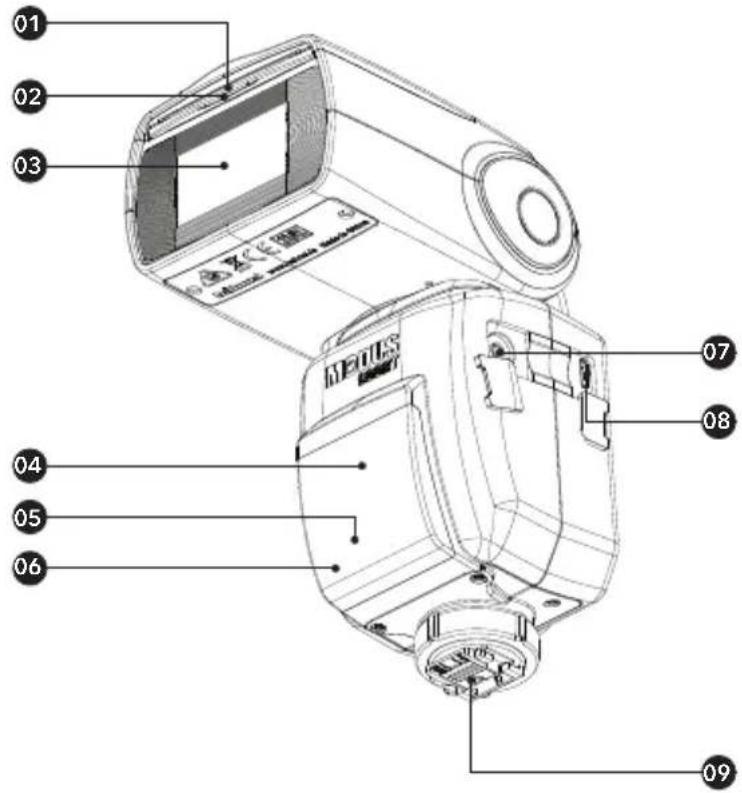
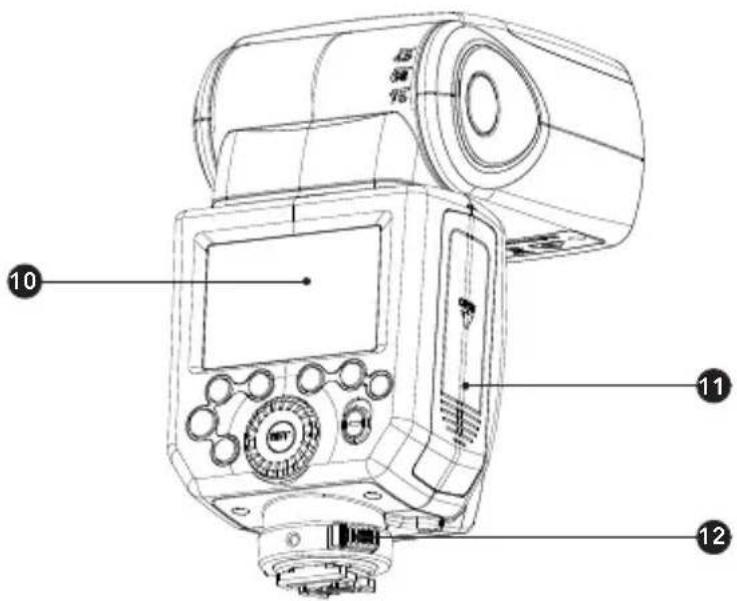
Nomenclature - Body
- Catchlight Panel
- Built-in Wide Panel
- Flash Head
- Optical Control Sensor
- Focus Assist Beam
- Slave Flash Ready Indicators 12. Quick Lock
- USB Port
- Hotshoe
-
Quick Lock
-
Sync Cord Jack
- Dot-matrix LCD Panel
- Battery Compartment
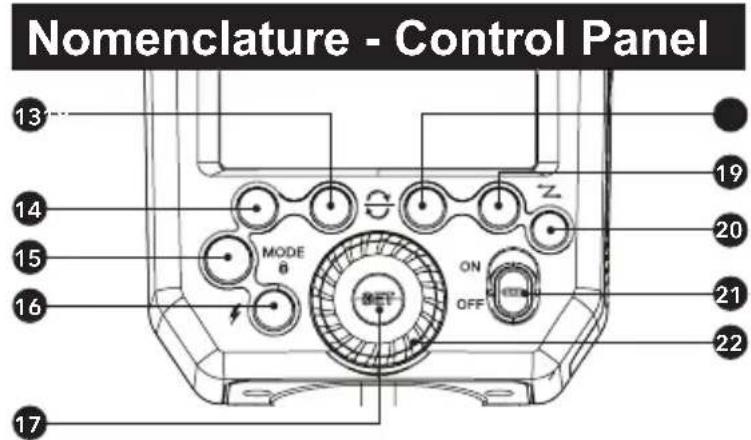
- Function Button 2
- Function Button 1
Mode Selection Button / Lock button - <⚡> Test Button / Flash Ready Indicator
-
Set Button -
Function Button 3
- Function Button 4
Wireless Mode/Master/Slave - ON/OFF Power Switch
- Select Dial
Nomenclature - LCD Panel
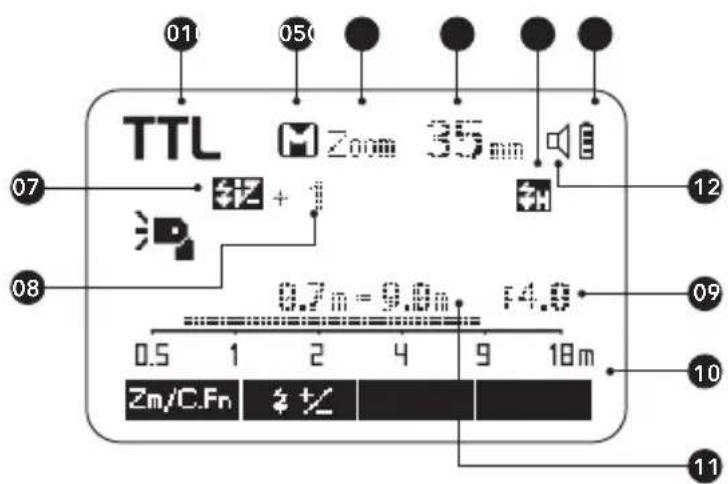
(1) TTL Autoflash
01.TTL: TTL autoflash
02.A Automatic
M : Manual
03.Zoom: zoom display
04. Focus Distance
05. : High-speed sync
06. Battery level indicator
07. Flash exposure compensation
- Flashexposure
compensation amount - Aperture
- Distance indicator scale
- Effective flash range
- Beep on/off (C. Fn 7)
• The display will only show the settings currently applied.
- The functions displayed above function buttons 1 to 4, such as SYNC and + change according to settings' status.
- When a button or dial is operated, the LCD panel is illuminated.
(2) Manual Flash
O1: Standard Optical. 02: Preflash Optical

M : Manual flash Manual flash output power
(3) Multi: Multi Stroboscopic Flash

(4) Radio Control Shooting
(a) Master Unit - Flash Mode

- Radio control wireless shooting
- Flash mode :
, -
Master unit flash ON 21 :Master unit flash OFF :Master unit bounce ON
-
High Speed Sync - Maser
- Master Group: Mode
- A/B/C Group: Mode
(b) Slave Unit

GB
LCD Panel in three Modes
(1) Attached to the Camera

(2) 2.4GHz Radio Control: As a Master Unit

(3) 2.4GHz Radio Control: As a Slave Unit Group A

Nomenclature - Viper TTL Transmitter

(A) Group A
(B) Group B
(C) Group C
(1) ON/OFF - switch
(2) SEL - select button
(3) Adjust Dial - To adjust settings
(4) Lock Wheel
(5) LCD Screen
(6) Power / Status LED
(7) Hot shoe
(8) Test - button
(9) Micro USB - firmware update
Transmitter LCD Screen


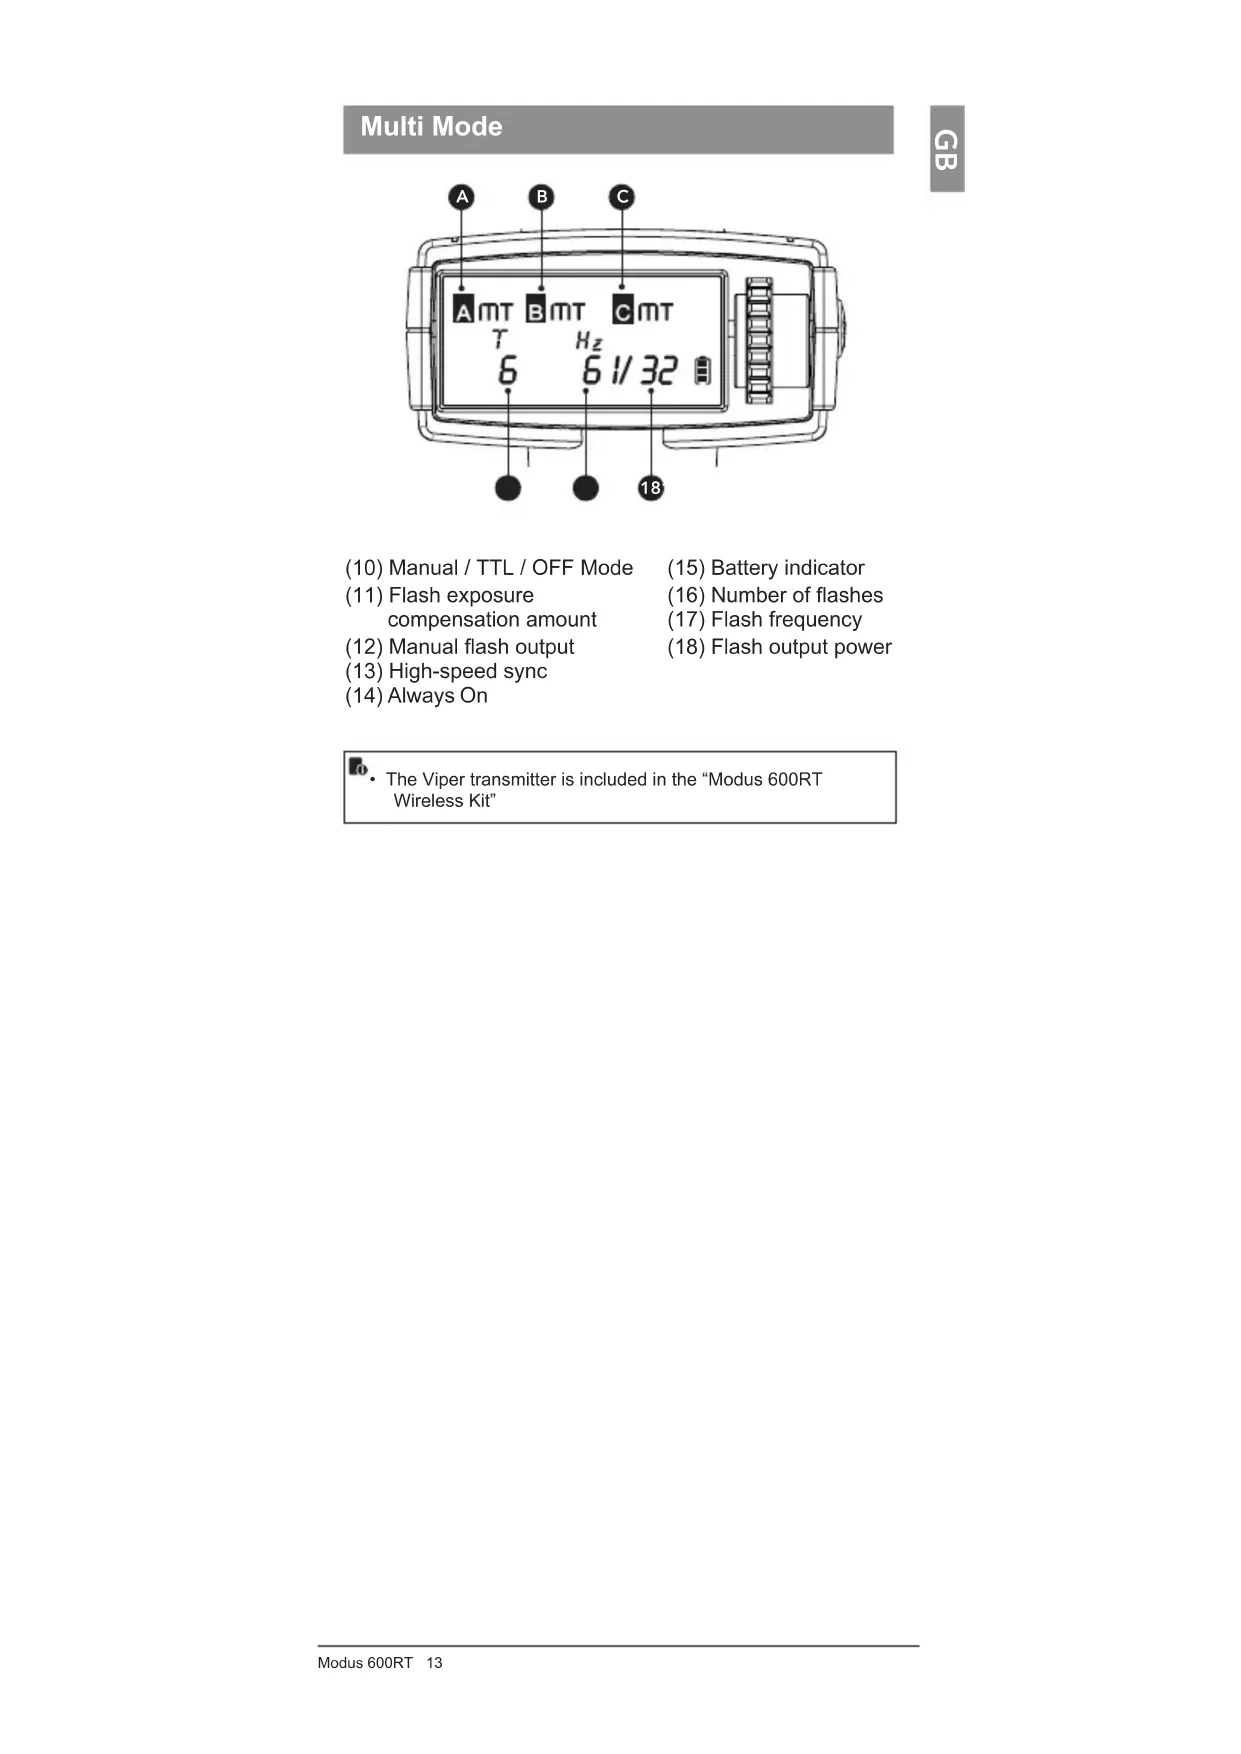
(10) Manual / TTL / OFF Mode
(11) Flash exposure compensation amount
(12) Manual flash output
(13) High-speed sync
(14) Always On
(15) Battery indicator
(16) Number of flashes
(17) Flash frequency
(18) Flash output power
- The Viper transmitter is included in the "Modus 600RT Wireless Kit"
2
Getting Started
What's in the Modus 600RT?
- Modus 600RT Speedlight
- Mini Stand
- Li-ion Battery Pack
- Protection Case
- Battery Charger
- Instruction Manual
- Micro USB Cable
What's in the Modus 600RT Wireless Kit?
- Modus 600RT Speedlight
- Mini Stand
- Viper TTL Transmitter
- Protection Case
- Li-ion Battery Pack
- Instruction Manual
- Battery Charger
- 2 x AA Batteries
- Micro USB Cable
Battery and Charger
- The Modus 600RT uses a lithium ion battery HLX-MD1 and it must be charged before use
- Use only the MD1 charger to charge the battery
- Remove battery from the charger when charging is finished and disconnect the charger from the mains
A fully charged battery will offer approx 500 flashes at full power and even more when the power level is reduced. The composition and construction of the MD1 battery pack offers very reliable and fast refresh time for the speedlight.
How to store the battery
When not in use remove the battery from the charger or the speedlight and store the battery in a cool and dry place. Exposing the battery to higher temperatures can shorten the lifetime of the battery. Store the battery almost empty (one bar in the battery level indicator) when not used for a long period of time. For optimum battery life, use battery regularly and if not used for more than 6 months, charge the battery fully and use it with the Modus 600RT until the battery level is down to 1 bar again before storage.
Battery Lifetime
The lifetime of a recharable battery is limited. The capacity will drop progressively with use and the age of the battery pack. Replace the battery pack when the flash cycle time becomes longer or the number of flashes reduces noticeably. The battery lifetime can vary substantially depending on storage, operation conditions and exposure to unsuitable environmental conditions

Caution
- Do not short circuit the battery
- Do not drop the battery into water or fire
- Do not drop or dismantle or subject the batteries to strong impact or continuous mechanical shock
- Stop using the battery if the battery has any signs of damage or bulging to the housing and dispose of the battery in accordance with the appropriate local regulations
How to charge the battery
The HLX-MD1 battery must be charged before use. Use the supplied MD1 MKII charger to charge the battery. Connect the MD1 MKII charger to a USB adapter (min 5V 2 Amp) with the supplied Micro USB Cable. To start the charge insert the HLX-MD1 battery into the MD1 MKII charger and the green LED bars will illuminate, indicating that the battery is charging. 4 green LED's on indicates full charge. Remove the battery from charger when fully charged.

Fitting and Removing the Battery

- To fit the battery, push the battery compartment cover downward and open it.

- According to the triangle sign on the battery pack, insert it into the compartment until a white clip locks the battery with a click sound.

- To remove the battery, tap the white clip and the battery pack will pop out. Then close the compartment.
Battery Level Indication
Make sure the battery pack is securely fitted in the flash. Check the battery level indication on the LCD panel to see the remaining battery level.
Low Battery Warning

| Battery Level Indication | Meaning |
| 3 bars | Full |
| 2 bars | Middle |
| 1 bar | Low |
| No bars | Lower battery, please recharge it |
| Blinking | The battery level is going to be used out immediately.Note: Please recharge the battery as soon as possible (within 10 days). Then, the battery can be used or stored as detailed in the “How to store the battery” section. |
Attaching to Camera
GB
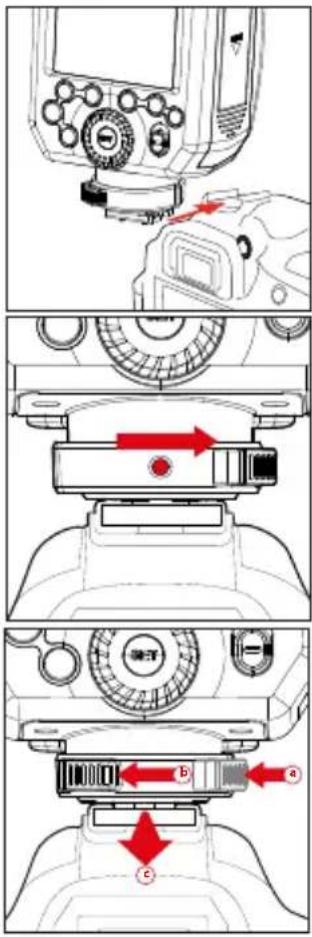
- Attach the Speedlight to the camera.
Slip the flash's mounting foot into the camera's hotshoe all the way.
-
Secure the Speedlight Push the release button to rotate the lock ring on the mounting foot until it locks in position to the right.
-
Detach the Speedlight:
a) Push the release button.
b) Rotate the lock ring to the left until it is loosened.
c) Slide the speedlight off the camera hotshoe
Power Management
Use the ON/OFF Power Switch to power the flash unit on or off. Switch off if it will not be used for an extended period of time. Set as a master flash, it will turn the power off automatically after a certain period (approx. 90 seconds) of idle use. Pressing the camera shutter halfway or pressing any flash button will wake up the flash unit. Set as a slave flash, it will enter sleep mode after a certain period (adjustable, 60 minutes by default) of idle use. Pressing any flash button will wake it up.

C.Fn Disabling Auto Power Off function is recommended when the flash is used off camera. (C.Fn-APO)
C.Fn Slave Auto Power Off Timer is set to 60 minutes by default. Another option "30 minutes" is available. (C.Fn-Sv APOT, Page 42)
Flash Mode - TTL Autoflash
This flash has three flash modes: TTL, Manual (M), and MULTI (Stroboscopic). In TTL mode, the camera and the flash will work together to calculate the correct exposure for the subject and the background. In this mode, multiple TTL functions are available.

* Press < MODE > Mode Selection Button and three flash modes will display on the LCD panel one by one with each pressing.
TTL Mode
Press
- Press the camera release button halfway to focus. The aperture and effective flash range will be displayed in the LCD panel.
- When the shutter button is fully pressed, the flash will fire a preflash which the camera will use to calculate the correct flash output power the instant before the photo is taken.

FEC: Flash Exposure Compensation
With FEC function, you can adjust the calculated level from -3 to +3 in 1/3 stops. It is useful in situations where minor adjusting of the TTL system is needed based on the lighting environment.

Setting FEC:
- Press Function Button
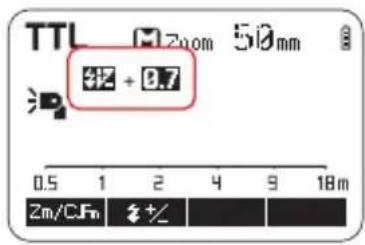
2 < ☐ >. The icon < ☐ > and flash exposure compensation amount will be highlighted on the LCD panel.
-
Set the flash exposure compensation amount.
-
Turn the Select Dial to set the amount.
- "0.3" means 1/3 step, "0.7" means 2/3 step.
-
To cancel the flash exposure compensation, set the amount to “+0”.
-
Press < SET > button again to confirm the setting.


High-Speed Sync
High Speed Sync (FP flash) enables the flash to synchronize with all camera shutter speeds. This is convenient when you want to use aperture priority for fill-flash portraits.

- Press Function Button 4
so that <34 is displayed
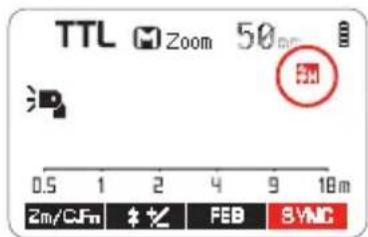
- Check that <→ or
is displayed in the viewfinder

Panasonic cameras may be out of sync when using HSS flash in wireless remote-control mode

The HSS (High Speed Sync) is enabled /disabled by the Modus 600 RT or Viper TTL and not through the camera menu
• Over-Temperature protection may be activated after 15 consecutive HSS flashes
- Disable HSS for extended flash tube life

With slow motion shutter speed, you can create a light trail following the subject. The flash fires right before the shutter closes.
Setting Second-Curtain Sync
Use the flash setting on the camera menu to activate the second curtain sync.

For more details please refer to camera instruction manual
Flash Mode - Manual Flash
The flash output is adjustable from 1/1 full power to 1/128th power in 1/3rd stop increments. To obtain a correct flash exposure, use a hand-held flash meter to determine the required flash output.
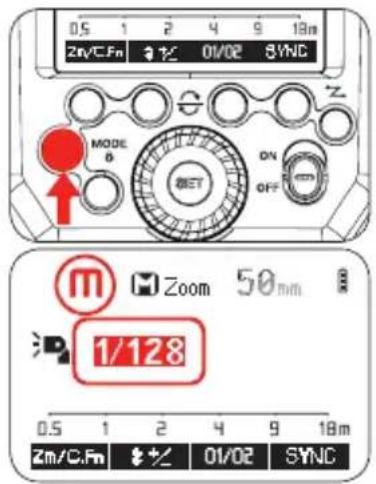
- Press
button so that is displayed
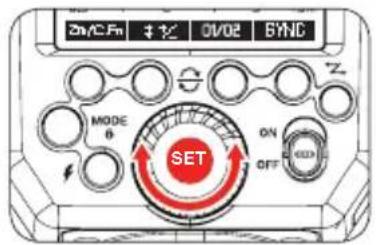
-
Turn the Select Dial to choose a desired flash output amount
-
Press < SET > button again to confirm the setting
Flash Output Power Range
The following table makes it easier to see how the stop changes in terms of f/stop when you increase or decrease the flash output.
For example, when you decrease the flash output: 1/2, 1/2-0.3, or 1/2-0.7, or increase the flash output: 1/2, 1/2+0.3, 1/2+0.7, 1/1.
Figures displayed when reducing flash output level→

←Figures displayed when increasing flash output level
Optical O1 Secondary Unit Setting
In M manual flash mode, press
Optical O2 Secondary Unit Setting
In M manual flash mode, press
Po. O1 and O2 optic triggering is only available in M manual flash mode when the Modus 600 RT is off camera
- Press function button 4 < SYNC > to activate the "HSS" when in 01/02 mode
Flash Mode: MULTI (Stroboscopic Flash)
With stroboscopic flash, a rapid series of flashes is fired. It can be used to capture multiple images of a moving subject in a single photograph.
You can set the firing frequency (number of flashes per sec.expressed as Hz), the number of flashes, and the flash output power.
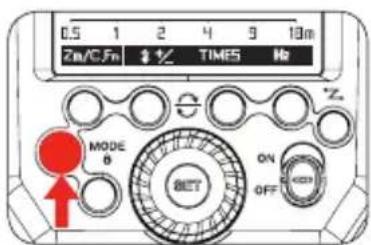
-
Press
button so that is displayed -
Turn the Select Dial to choose a desired flash output power


-
Set the flash frequency and number of flashes
-
Press < Times > button
- Turn the Select Dial to set the number of flashes
- Press the < Hz >
- Turn the Select Dial to choose a desired flash firing frequency
• After you finish the setting, pressbutton and all the settings will be displayed.
Calculating the Shutter Speed
During stroboscopic flash, the shutter remains open until the firing stops. Use the formula below to calculate the shutter speed and set it on the camera.
Number of Flashes / Flash Frequency = Shutter Speed
For example, if the number of flashes is 10 and the firing frequency is 5 Hz, the shutter speed should be at least 2 seconds.

• To avoid overheating and deteriorating the flash head, do not use stroboscopic flash more than 10 times in succession
- After 10 times, allow the speedlight to rest for at least 15 minutes. If you try to use the stroboscopic flash more than 10 times in succession, the firing might stop automatically to protect the flash head. If this happens, allow at least 15 minutes' rest for the speedlight
- Stroboscopic flash is most effective with a highly reflective subject against a dark background
• Using a tripod and a remote control is recommended.
- A flash output of 1/1 and 1/2 cannot be set for stroboscopic flash
- Stroboscopic flash can be used with "buLb"
- If the number of flashes is displayed as “--”, the firing will continue until the shutter closes or the battery is exhausted. The number of flashes will be limited as shown by the following table.
• HSS is disabled in Multi Mode
Maximum Stroboscopic Flashes:
| Flash output\Hz | 1 | 2 | 3 | 4 | 5 | 6-7 | 8-9 |
| 1/4 | 7 | 6 | 5 | 4 | 4 | 3 | 3 |
| 1/8 | 14 | 14 | 12 | 10 | 8 | 6 | 5 |
| 1/16 | 30 | 30 | 30 | 20 | 20 | 20 | 10 |
| 1/32 | 60 | 60 | 60 | 50 | 50 | 40 | 30 |
| 1/64 | 90 | 90 | 90 | 80 | 80 | 70 | 60 |
| 1/128 | 100 | 100 | 100 | 100 | 100 | 90 | 80 |
| Flash output Hz | 10 | 11 | 12-14 | 15-19 | 20-50 | 60-199 |
| 1/4 | 2 | 2 | 2 | 2 | 2 | 2 |
| 1/8 | 4 | 4 | 4 | 4 | 4 | 4 |
| 1/16 | 8 | 8 | 8 | 8 | 8 | 8 |
| 1/32 | 20 | 20 | 20 | 18 | 16 | 12 |
| 1/64 | 50 | 40 | 40 | 35 | 30 | 20 |
| 1/128 | 70 | 70 | 60 | 50 | 40 | 40 |
If the number of flashes is displayed as "--", the maximum number of flashes will be as shown in the following table regardless of the flash frequency.
| Flash Output | 1/4 | 1/8 | 1/16 | 1/32 | 1/64 | 1/128 |
| Number of Flashes | 2 | 4 | 8 | 12 | 20 | 40 |


Wireless Flash Photography: (2.4GHz) Control
Master/Slave wireless flash lighting

- The "Modus 600RT" attached to the Camera Hot shoe is called the "Master" unit. A second "Modus 600RT" which is wirelessly controlled is called the "Slave" unit
- You can also wirelessly control the Modus 600RT as a "Slave" unit using a "Viper TTL" transmitter as a "Master" unit attached to the camera hotshoe
Using (Master/Slave) with wireless 2.4GHz control function allows you to easily perform shooting with advanced wireless multiple flash lighting in the same way as TTL autoflash photography. The system is designed so that the settings of the “Master” attached to the camera are automatically applied to the wireless slave speedlights. Therefore you do not need to operate or adjust the slaves during shooting
Positioning and Operation Range (Example of wireless flash shooting)
- Master/Slave wireless flash lighting


- The "Master" attached to the camera can be a "Modus 600RT" or "Viper TTL transmitter"
- Use the supplied mini stand to hold the Slave unit in upright position
• Before shooting perform a test flash and test shooting - The transmission distance may vary depending on the position of the slave speedlight, environment and weather conditions
Wireless multiple flash shooting
You can divide the slave units into one, two or three groups and perform TTL autoflash. In addition, you can set and shoot with a different flash mode for each firing group, for up to 3 groups, plus master.
• Auto Shooting with Two Slave Groups
![graph TD A["SLAVE GROUP A"] --> B["Master"] B --> C["SLAVE GROUP B"] C --> D["Master"] style A fill:#f9f,stroke:#333 style B fill:#bbf,stroke:#333 style C fill:#bfb,stroke:#333 style D fill:#ffb,stroke:#333](/content/2026/04/594216/images/da46849adbff4a21231f5c3dd914027b1a83c91c7213f1bb5114f4ebd44b3c05.jpg)
• Auto Shooting with Three Slave Groups

Wireless shooting using radio transmission has advantages over wireless shooting using optical control, such as being less affected by obstacles, and not having to point the slave unit's wireless sensor toward the master unit. The main functional differences are as follows:
| Function | Radio Control Optical Control | |
| Distance | 100m | 15m |
| Channel | DCM | 1~4 |
| A/B/C Power | OFF, 1/128~1/1 | 1/128~1/1 |
| Interference | Hard | Easy |
| Group | A/B/C | A/B/C |
Wireless Settings
You can switch between normal flash and wireless flash. For normal flash shooting, be sure to set the wireless setting to OFF
Master Unit Setting

Press < Z button so that < (☐) > and < MASTER > are displayed on the LCD panel.
Slave Unit Setting
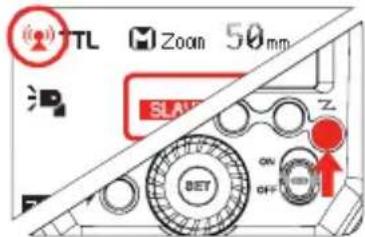
Press < Z > button so that < (☐) > and < SLAVE > are displayed on the LCD panel
Master Unit Flash ON/OFF
You can switch ON or OFF the "Master" unit flash that is controlling the wireless "Slave" units. When Master flash is ON, it will flash as group M

- Press Function Button 4 < Gr > and one Group M/A/B or C will be highlighted
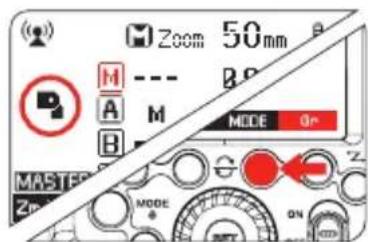
-
Press Function Button 4 < Gr > again until < M > is highlighted
-
Press Function Button 3 < MODE > until < M > is <--->. The master speedlight is now OFF
Setting the group mode - TTL / M / OFF
From the "Master" Modus Speedlight each Group M (master speedlight) / A / B / C "mode" setting can be adjusted individually.

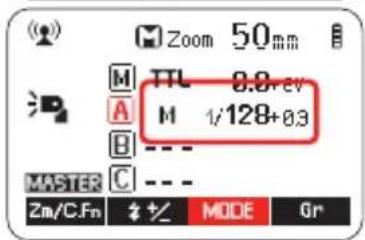
- Press Function Button
4 lt; Gr gt
- Keep pressing Button 4
lt; Gr gt; until lt; A gt; is highlighted
- Press Function Button
3 lt; MODE gt; and select the desired Mode
TTL lt; TTL gt; / Manual lt; M gt; / Off lt; - - gt
GB
Setting the DCM (Digital Channel Matching)
Initially the Modus 600RT wireless 2.4GHz is set to a general "open channel" and can be used as it is. To avoid interference with other wireless flash systems we recommend to DCM (digital channel match) your Modus 600RT speedlight's and Viper TTL.
Master – Viper TTL or Modus 600RT

- If you have a Viper TTL, start the DCM matching with the Viper TTL
- Turn
• The Viper LCD will show < Co di ng>
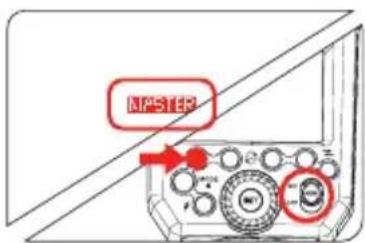
- If you are not using a Viper TTL and only wish to DCM several Modus 600RT, then use any Modus 600RT as the Master unit
- Press
• A green LCD on the Modus600RTwillshow
Slave - Modus 600RT
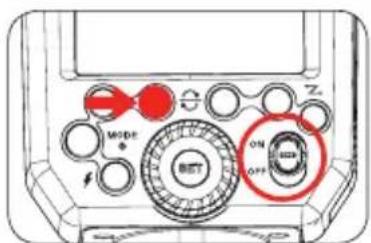
- Press
whilst turing power to the slave Modus 600RT

-
A red LCD will show "Slave OK". This slave Modus 600 RT is now DCM matched
-
DCM match the same way, any additional slave Modus 600RT while the Master is still on
Once all slave units are DCM matched, reboot all master and slaves by turning OFF/ON
- Once all devices are DCM matched they will memorize the unique ID even it power is removed. Therefore you only need to DCM your set once
- If you add more speedlights or Viper TTL units to your range then you need to carry out the DCM matching for all your units again
Modus 600 RT - Reset

- To reset the Modus 600RT to factory default settings press function buttons 3 & 4 at the same time and hold until the LCD shows < RESET > release the buttons
- When the Modus 600RT is reset the DCM is also reset back to open channel and the previous DCM is lost
TTL Fully Automatic Wireless Flash Shooting
Basic Automatic Wireless Flash shooting with a Single Slave Unit

1. Master Unit Setting
- Attach a Modus 600RT to the camera and set it as the master unit (Page 26)
- The Viper TTL Transmitter can also be used as a master unit to control the wireless slave Modus 600RT (Page 38)
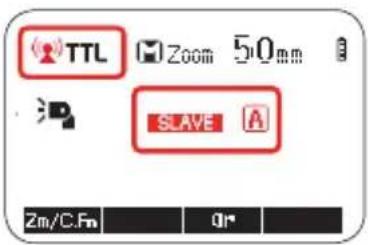
2. Slave Unit setting
- Set the slave Modus 600RT to < SLAVE > setting (Page 26)

3. Position of camera and speedlight
- Position the camera with the master unit attached and the Modus slave within radio range
4. Set the Group A flash mode to
- Check that group is set to
- Check that the slave unit is set automatically to
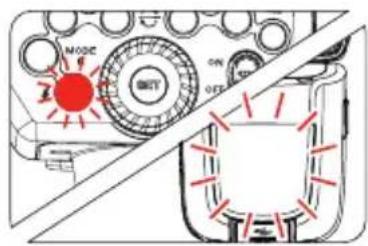
5 Check Master/Slave units are ready
- Check master speedlight, ready indicator is lighting and that the slave flash ready indicators are blinking

6 Check the Master slave speedlight operation
- Press the master unit's <⚡> test button
- The slave speedlight will flash. If it does not fire, check the position or distance of slave from master
- You are now ready to take a photo with the wireless flash lighting
Using Automatic Wireless Flash with Multiple Slave Units
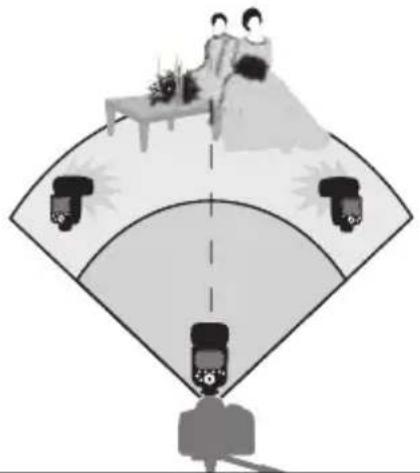
When stronger flash output or more convenient lighting operation is needed, increase the number of slave speedlight's. To add slave units, use the same steps as setting "automatic wireless flash with a single slave unit" (Page 28). Any slave speedlight can be set as group (A/B/C).
When the number of slave units is increased or the master flash firing is set to ON, automatic control is performed to fire all flashes at the correct flash output to ensure that the total flash output results in the standard exposure.

- If the slave units auto power off takes effect, press the master unit's test flash button to turn on the slave unit. Note that the test flash cannot be performed while the camera's metering timer, etc. is operating
- The slave units auto power off setting can be changed (C.Fn-Sv / APOT page 42)
- In the C.Fn settings you can enable a beeper to sound when a Modus 600RT is recharged and ready to fire again
Advanced setting with fully automatic wireless flash
With the wireless system the following functions set on the master unit will automatically be adjusted on the slave unit. For this reason you do not need to operate the slave unit (s) and can operate it from the master in the same way as normal flash photography.
- Flash Exposure Compensation < 1/2 > (Page 18)
• Manual Flash (Page 20)
• MULTI: Stroboscopic Flash (Page 21)
Multiple Master Unit
You can use two or more cameras with master flash units on each to change camera shooting while keeping the same lighting setup (slave units) in wireless flash photography.
M: Wireless Flash Shooting with Manual Flash
This describes wireless using manual flash. You can shoot with a different flash output setting for each slave unit (firing group). Set all parameters on the master unit.

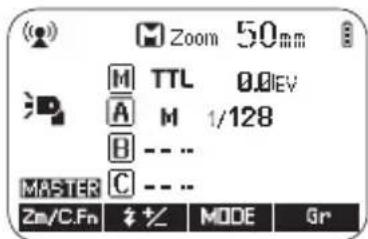
- Setting the manual flash mode to
- Press Function Button 4 < Gr > to choose the group
- Then press Function Button 3 < MODE > to set the
- Setting manual flash output power
- Press Function Button 2 < +∠ >. Turn the Select Dial to adjust the flash output of the group
- Press
-
Setting individual group flash output power
-
Each group M (Master speedlight) / A / B / C can be set individually to different power level
- Set any group to <--> to turn off the power of this group
MULTI: Wireless shooting with Multi repeating flash stroboscopic
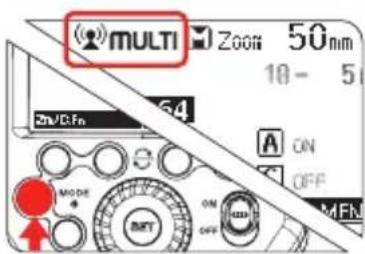
- Setting
stroboscopic flash
- On the Master
Speedlight press
- Turn the Select Dial to adjust the flash output power. Press
B

2. Turning ON/OFF group M (master speedlight) / A / B / C
- Press Function Button 3 < Gr >. Then turn the Select Dial to set the group ON/OFF
- Press Function Button
3 < Gr > again to select the next group.
Press
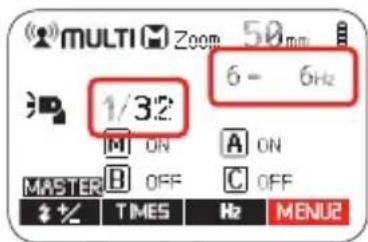
3. Setting the stroboscopic flash parameters
- Press Function Button 4 < MENU1 >. This will display < MENU2 > which enables selecting of power < +/− >, number flashes < Times > and frequency < Hz > - Press < +/− > or < Times > or < Hz > to adjust the relevant setting
M/A/B/C: Wireless flash shooting with different flash modes for each goup
You can shoot with different flash modes set for each firing group (M/A/B/C). The flash modes that can be set are TTL auto flash / manual / OFF. When the flash mode is in TTL exposure is controlled to result in standard exposure for the main subject as a single group. This function is for advanced user who are very knowledgeable and experienced in lighting.


1. Set master Unit
- Press the
GB

2. Set the firing group of the slave units
• Operate and set the slave units one by one
- Press Function Button
< Gr > to assign the speedlight to group , or

3. Set the flash modes
- Set the flash mode of each firing group by the operation of the master speedlight. See Page 27

4. Set the flash output and flash exposure compensation amount
- While a firing group is selected, press Function Button 3 < + / >
- Turn the Select Dial to set the flash function corresponding to flash mode, and press
- When using the
- When using the
- Repeat step 4 to set the flash function of all groups
- Press Function Button 4 to return to the shooting-ready state

Wireless Flash Photography:
Optical Transmission
Optical O1 Secondary Unit Setting
In M manual flash mode, press <01/02> button so that this flash can function as an optical 01 secondary off camera flash using its optical sensor. With this function, the flash will fire synchronously when a second main flash fires on the camera. This is the same effect as using a radio trigger to fire the flash off camera. This helps create multiple lighting effects.
Optical O2 Secondary Unit Setting
In M manual flash mode, press
- O1 and O2 optic triggering is only available in M manual flash mode when the Modus 600 RT is off camera
- Press function button 4 < SYNC > to activate the "HSS" when in 01/02 mode

Wireless Flash Photography: (2.4GHz) using Viper TTL Transmitter
Wireless Settings
DCM (Digital Channel Matching)
- DCM (Digital Channel Matching). Carry out the DCM matching, see page 27
- Set the Modus 600RT to 2.4GHz as Slave Unit - Group A, see page 27
- Press Viper
08 button to confirm that Modus Speedlight is triggered wirelessly
Viper TTL group Mode Setting
Press buttons A or B or C to change the MODE setting of each group to
Take a test photograph now and the Viper transmitter will send a wireless signal to each Modus 600RT. The Speedlight will then be set automatically to the same Viper TTL selected group mode setting.
• The Viper LCD 05 will show the setting of each group
• A group is turned OFF if the LCD is not showing the group
- A group is in Manual mode when
- A group is in TTL mode when
• Each group A, B or C is set independently and it is possible to use simultaneously different setting for each group (e.g. Group A may be in
Group Power Control setting for Manual and TTL FEC
From the Viper TTL transmitter you can adjust the power level and the FEC of each group.
- Press
02 select button and all three icons , and will flash. - Press one button A or B or C to select which group you want to adjust the power. Now only the selected group icon will flash
- Use the adjust dial to set the power output in < M > mode and FEC in TTL mode
- Press the
button to lock your selection
Multi Mode
- Press and hold the
• For more detail on operation of the viper TTL visit www.hahnel.ie

6
Other
Applications
Sync Triggering
- The Sync Cord Jack is a 2.5mm plug. Insert a trigger plug here and the flash will be fired synchronously with the camera shutter.

- To avoid overheating and deteriorating the flash head, do not fire the modeling flash for more than 10 consecutive times. If you fire the modeling flash 10 consecutive times, allow at least 10 minutes' break for the camera flash.
Bounce Flash
By pointing the flash head toward a wall or ceiling, the flash will bounce off the surface before illuminating the subject. This can soften shadows behind the subject for a more natural-looking shot. This is called bounce flash.
To set the bounce direction, hold the flash head and turn it to the required angle.
If the wall or ceiling is too far away, the bounced flash might be too weak and result in underexposure.
- The wall or ceiling should be a plain, white color for high reflectance. If the bounce surface is not white, a color cast may appear in the picture.

Catchlight Panel
GB
With the catchlight panel, you can create a catchlight in the subject's eyes to add life to the facial expression.
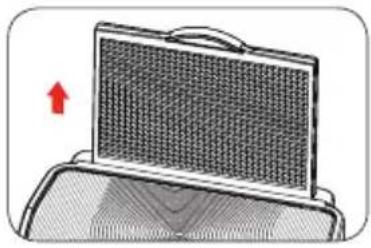
- Point the flash head upward by 90°
- Pull out the wide panel. The catchlight panel will come out at the same time

- Push the wide panel back in
- Push in only the wide panel
- Follow the same procedures as for bounce flash
ZOOM: Setting the Flash Coverage and Using the Wide Panel
The flash coverage can be set automatically or manually. It can be set to match the lens focal length from 20 mm to 200mm in 135 or 10mm to 100mm in 4/3. Also, with the built-in wide panel, the flash coverage can be expanded to 14mm/7mm for wide-angle lenses.
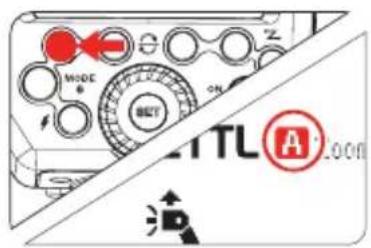
In Manual Zoom mode, press the
- Turn the Select Dial to change the flash coverage
- If < A> is displayed, the flash coverage will be set automatically by the camera
• If you set the flash coverage manually, make sure it covers the lens focal length so that the picture will not have a dark periphery.
Using the Wide Panel

Pull out the wide panel and place it over the flash head as shown. The flash coverage will then be extended to 14 mm for 135 and to 7mm for 4/3.
• The catchlight panel will come out at the same time. Push the catchlight panel back in.
- The
C.Fn: Setting Custom Functions
The following table lists the available and unavailable custom functions of this flash.
| C Fn Custom Functions | ||||
| Custom Function Signs | Function | Setting No. | Settings & Description | Custom Functions No. |
| m/ft | Distance indicator | m | m | C.Fn-00 |
| ft | feet | |||
| APO | Auto power off | ON | ON | C.Fn-01 |
| OFF | OFF | |||
| Zoom | 4/3 10mm 100mm | |||
| 135 20mm 200mm | ||||
| Sv APOT | Slave auto power off timer | 60min | 60min | C.Fn-10 |
| 30min | 30min | |||
| Sv LED | Slave Flash Indicators | ON | ON | |
| OFFOFF | ||||
| BEEP | Beeper | ON | ON | C.Fn-20 |
| OFF | OFF | |||
| LIGHT | Backlighting time | 12sec | Off in 12 sec. | C.Fn-22 |
| OFF | Always off | |||
| ON | Always lighting | |||
| LCD | LCD contrast ratio | 0~9 | 10 levels | |
1. Software Version
Press
2. Select the Custom Function No
- Turn the Select Dial to select the Custom Function number
3. Change the Setting
- Press
- Turn the Select Dial to set the desired option. Pressing
- Press function on button 4 to set the C.Fn menu.
4. C.Fn Default
In the C.Fn menu, a long press of the "Clear" button for 2 seconds until "OK" is displayed on the panel, means the values in C.Fn are reset to their default options
Protection Functions
GB
1. Over-Temperature Protection
- To avoid overheating and deteriorating the flash head, do not fire more than 30 continuous flashes in fast succession at 1/1 full power. After 30 continuous flashes, allow a rest time of at least 10 minutes
- If you fire more than 30 continuous flashes and then fire more flashes in short intervals, the inner over-temperature protection function may be activated and make the recycling time over 10 seconds. If this occurs, allow a rest time of about 10 minutes, and the flash unit will then return to normal
- When the over-temperature protection is active,

Number of flashes that will activate over-temperature protection:
| Power Output level | Number of Flashes |
| 1/1 | 30 |
| 1/2 +0.7 | 40 |
| 1/2 +0.3 | 50 |
| 1/2 | 60 |
| 1/4(+0.3,+07) | 100 |
| 1/8(+0.3,+07) | 200 |
| 1/16(+0.3,+07) | 300 |
| 1/32(+0.3,+07) | 500 |
| 1/64(+0.3,+07) | 1000 |
| 1/128(+0.3,+07) |
Number of flashes that will activate over-temperature protection in high-speed sync triggering mode:
| Power Output Times | |
| 1/1 | 15 |
| 1/2(+0.3,+07) | 20 |
| 1/4(+0.3,+07) | 30 |
| 1/8(+0.3,+07) | |
| 1/16(+0.3,+07) | 40 |
| 1/32(+0.3,+07) | |
| 1/64(+0.3,+07) | 50 |
| 1/128(+0.3,+07) | |
2. Other Protections
The system provides real-time protection to secure the device and your safety. The following lists prompts for your reference:
| Prompts on LCD Panel | Meaning |
| E1 | A failure occurs on the recycling system so that the flash cannot firePlease restart the flash unit. If the problem still exists, please send this product to a maintenance center |
| E2 | The system gets excessive heat.Please allow a rest time of 10 minutes |
| E3 | The voltage on two outlets of the flash tube is too high. Please send this product to a maintenance center |
| E9 | There are some errors occurred during the upgrading process. Please use the correct firmware upgrade method |
Technical Data
| Model Modus 600RT | ||
| Compatible Cameras | Micro FourThirds Cameras | |
| Guide No.(1/1 output@ 200mm) | 60 (m ISO 100)190 (feet ISO 100) | |
| Flash Coverage | 10 to 100mm/20 to 200mm (7/14mm with wide panel)• Auto zoom (Flash coverage set automatically to match the lens focal length and image size)• Manual zoom• Swinging/titting flash head (bounce flash): O to 360' horizontally and -7' to 90' vertically | |
| FlashDuration | 1/300 to 1/20000 seconds | |
| Exposure control system | TTL autoflash and manual flash | |
| Flash exposure compensation (FEC) | ±3 stops in 1/3 stop increments | |
| Sync mode | High-speed sync (up to 1/8000 seconds),first-curtain sync, and second-curtain sync | |
| Multi flash | Provided (up to 100 times, 200Hz) | |
| • Wireless Flash | ||
| Wireless flash function | Master, Slave, Off | |
| Controllable Opticalslave groups 2.4GHz | O1/O2M/A/B/C | |
| Transmission range(approx.) | Optical | Indoors: 12 to 15 m / 39.4 to 49.2 ft.Outdoors: 8 to 10 m / 26.2 to 32.8 ft.Master unit reception angle: ±40' horizontally,±30' vertically |
| 2.4GHz | Up to 100m | |
| Channels | ||
| 2.4GHz | Digital Channel Matching | |
| Slave-ready indicator | Two red indicators blink | |
| Modeling flash | Fired with camera's depth-of-field preview button | |
| • Auto Focus Assist Beam | ||
| Effective range (approx.) | Center: 0.6-10m / 2.0-32.8 feetPeriphery: 0.6-5m / 2.0-16.4 feet | |
| • Power Supply | ||
| Power source | 10.8V/2040mAh Li-ion battery | |
| Recycle time | 1.5 seconds. RED LED indicator will light up when the flash is ready | |
| Full power flashes | Approx. 500 | |
| Power saving | Power off automatically after approx. 90 seconds of idle operation. (60 minutes if set as slave) | |
| • Sync Triggering Mode | Hotshoe, 2.5mm sync line, Wireless control | |
| • Color Temperature | 5600±200k | |
| • Dimensions | ||
| W x H xD | 64*76*190 mm | |
| Weight without battery | 430g | |
| Weight with battery | 540g | |
B
Troubleshooting
If there is a problem, refer to this Troubleshooting Guide. The Camera Flash does not fire.
- The camera flash is not attached securely to the camera.
- → Attach the camera's mounting foot securely to the camera.
- The electrical contacts of the Camera Flash and camera are dirty.
• →Clean the contacts. - <> or <H> is not displayed in the view finder of camera.
- → Wait until the flash is fully recycled and the flash ready indicator lights up.
- →If the flash ready indicator lights up, but < ↗> or < ↘ is not displayed in the view finder, check whether this flash unit is securely attached to the camera hotshoe.
- → If the flash ready indicator does not light up after a long wait, check whether the battery power is enough. If the battery power is low, <> will appear and blink on the LCD panel. Please replace the battery immediately.
The power turns off by itself.
- After 90 seconds of idle operation, auto power off took effect if the flash is set as master.
- → Press the shutter button halfway or press any flash button to wake up.
- After 60 minutes (or 30 minutes) of idle operation, the flash unit will enter sleep mode if it is set as slave.
- → Press any flash button to wake up.
•
Auto zoom does not work
- The camera flash is not attached securely to the camera.
- → Attach the camera flash's mounting foot to the camera.
The flash exposure is underexposed or overexposed.
- There was a highly reflective object (e.g. glass window) in the picture.
- You used high-speed sync.
- → With high-speed sync, the effective flash range will be shorter. Make sure the subject is within the effective flash range displayed.
- You used Manual Flash mode.
- → Set the flash mode to TTL or modify the flash output.
Photos have dark corners or only parts of the target subject are illuminated.
- The focal length of lens exceeds the flash coverage.
- → Check the flash coverage you set. This flash unit
Firmware Upgrade
This flash supports firmware upgrade through the USB port. Update information will be released on our official website.
- USB connection cable is not included in this product. The USB port is a standard Micro USB socket. Common USB connection cable is suitable.
Compatible Camera Models
• For up to date compatibility of all camera models check www.hahnel.ie
Maintenance
- Shut down the device immediately should abnormal operation be detected
- Avoid sudden impacts and the product should be cleaned regularly
- It is normal for the flash tube to be warm when in use. Avoid continuous flashes if unnecessary
- Maintenance of the flash must be performed by our authorized maintenance department which can provide original accessories
- This product, except consumables e.g. flash tube, is supported with a one-year warranty
- Unauthorized service will void the warranty
- If the product has malfunctioned or has been damaged by water do not use until it is repaired by a professional
- Changes made to the specifications or designs may not be reflected in this manual
This Product complies with the EU Radio Equipment Directive 2014/53/EU. For compliance data visit www.hahnel.ie

MODUS 60ORT MKII

Speedlight sans fil de Micro FourThirds
FR
Avant-propos


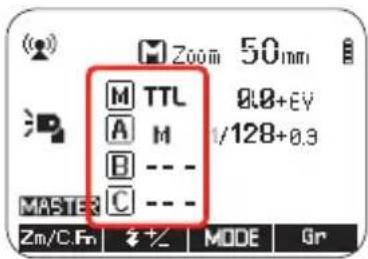
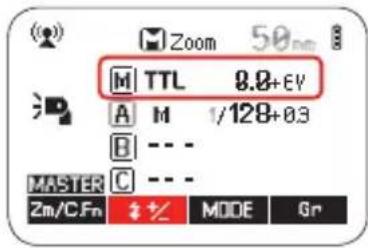
1. Master Unit Setting

| C Fn Fonctions personnalisées | ||||
| Custom Function Signs | Function | Setting No. | Settings & Description | Custom Functions No. |
| m/ft | Distance indicator | m | m | C.Fn-00 |
| ft | feet | |||
| APO | Auto power off | ON | ON | C.Fn-01 |
| OFF | OFF | |||
| Zoom | 4/3 10mm 100mm | |||
| 135 20mm 200mm | ||||
| Sv APOT | Slave auto power off timer | 60min | 60min | C.Fn-10 |
| 30min | 30min | |||
| Sv LED | Slave Flash Indicators | ON | ON | |
| OFFOFF | ||||
| BEEP | Beeper | ON | ON | C.Fn-20 |
| OFF | OFF | |||
| LIGHT | Backlighting time | 12sec | Off in 12 sec. | C.Fn-22 |
| OFF | Always off | |||
| ON | Always lighting | |||
| LCD | LCD contrast ratio | 0~9 | 10 levels | |
| Model Modus 600RT | ||
| Compatible Cameras | Micro FourThirds DSLR cameras | |
| Guide No.(1/1 output@ 200mm) | 60 (m ISO 100)190 (feet ISO 100) | |
| Flash Coverage | 10 to 100mm/20 to 200mm (7/14mm with wide panel)• Auto zoom (Flash coverage set automatically to match the lens focal length and image size)• Manual zoom• Swinging/titting flash head (bounce flash): O to 360' horizontally and -7' to 90' vertically | |
| FlashDuration | 1/300 to 1/20000 seconds | |
| Exposure control system | TTL autoflash and manual flash | |
| Flash exposure compensation (FEC) | Manual. FEB: ±3 stops in 1/3 stop increments(Manual FEC and FEB can be combined.) | |
| Sync mode | High-speed sync (up to 1/8000 seconds),first-curtain sync, and second-curtain sync | |
| Multi flash | Provided (up to 100 times, 199Hz) | |
| • Wireless Flash | ||
| Wireless flash function | Master, Slave, Off | |
| Controllable Opticalslave groups 2.4GHz | O1/O2M/A/B/C | |
| Transmission range(approx.) | Optical | Indoors: 12 to 15 m / 39.4 to 49.2 ft.Outdoors: 8 to 10 m / 26.2 to 32.8 ft.Master unit reception angle: ±40' horizontally,±30' vertically |
| 2.4GHz | Up to 100m | |
| Channels | ||
| 2.4GHz | Digital Channel Matching | |
| Slave-ready indicator | Two red indicators blink | |
| Modeling flash | Fired with camera's depth-of-field preview button | |
| • Auto Focus Assist Beam | ||
| Effective range (approx.) | Center: 0.6-10m / 2.0-32.8 feetPeriphery: 0.6-5m / 2.0-16.4 feet | |
| • Power Supply | ||
| Power source | 10.8V/2040mAh Li-ion battery | |
| Recycle time | 1.5 seconds. RED LED indicator will light up when the flash is ready | |
| Full power flashes | Approx. 500 | |
| Power saving | Power off automatically after approx. 90 seconds of idle operation. (60 minutes if set as slave) | |
| • Sync Triggering Mode | Hotshoe, 2.5mm sync line, Wireless control | |
| • Color Temperature | 5600±200k | |
| • Dimensions | ||
| W x H xD | 64*76*190 mm | |
| Weight without battery | 430g | |
| Weight with battery | 540g | |
[Unreadable]
Dépannage


DE


| Model Modus 600RT | ||
| Compatible Cameras | Nikon DSLR cameras (TTL auto flash) | |
| Guide No.(1/1 output@ 200mm) | 60 (m ISO 100)190 (feet ISO 100) | |
| Flash Coverage | 10 to 100mm/20 to 200mm (7/14mm with wide panel)• Auto zoom (Flash coverage set automatically to match the lens focal length and image size)• Manual zoom• Swinging/titting flash head (bounce flash): O to 360' horizontally and -7' to 90' vertically | |
| FlashDuration | 1/300 to 1/20000 seconds | |
| Exposure control system | TTL autoflash and manual flash | |
| Flash exposure compensation (FEC) | ±3 stops in 1/3 stop increments | |
| Sync mode | High-speed sync (up to 1/8000 seconds),first-curtain sync, and second-curtain sync | |
| Multi flash | Provided (up to 100 times, 200Hz) | |
| • Wireless Flash | ||
| Wireless flash function | Master, Slave, Off | |
| Controllable Opticalslave groups 2.4GHz | O1/O2M/A/B/C | |
| Transmission range(approx.) | Optical | Indoors: 12 to 15 m / 39.4 to 49.2 ft.Outdoors: 8 to 10 m / 26.2 to 32.8 ft.Master unit reception angle: ±40' horizontally,±30' vertically |
| 2.4GHz | Up to 100m | |
| Channels | ||
| 2.4GHz | Digital Channel Matching | |
| Slave-ready indicator | Two red indicators blink | |
| Modeling flash | Fired with camera's depth-of-field preview button | |
| • Auto Focus Assist Beam | ||
| Effective range (approx.) | Center: 0.6-10m / 2.0-32.8 feetPeriphery: 0.6-5m / 2.0-16.4 feet | |
| • Power Supply | ||
| Power source | 10.8V/2040mAh Li-ion battery | |
| Recycle time | 1.5 seconds. RED LED indicator will light up when the flash is ready | |
| Full power flashes | Approx. 500 | |
| Power saving | Power off automatically after approx. 90 seconds of idle operation. (60 minutes if set as slave) | |
| • Sync Triggering Mode | Hotshoe, 2.5mm sync line, Wireless control | |
| • Color Temperature | 5600±200k | |
| • Dimensions | ||
| W x H xD | 64*76*190 mm | |
| Weight without battery | 430g | |
| Weight with battery | 540g | |
DE
Fehlersuche

DE

FR
SP

IT

PT

IL

PL

CZ

SE
Scan QR code for more info & other languages
All brands, trademarks and registered trademarks are the property of their respective holders. Copyright © hähnel industries Ltd, Ireland.
www.hähnel.ie
- FOREWORD
- CONVENTIONS & ASSUMPTIONS
- 1 INTRODUCTION
- 2 GETTING STARTED
- 3 WIRELESS FLASH PHOTOGRAPHY: (2.4GHZ) CONTROL
- 4 WIRELESS FLASH PHOTOGRAPHY: OPTICAL TRANSMISSION
- 5 WIRELESS FLASH PHOTOGRAPHY: (2.4GHZ) USING VIPER TTL TRANSMITTER
- 6 OTHER APPLICATIONS
- ⚠️WARNINGS
- CAUTION
- NOMENCLATURE - BODY
- TTL AUTOFLASH
- MANUAL FLASH
- MULTI: MULTI STROBOSCOPIC FLASH
- RADIO CONTROL SHOOTING
- LCD PANEL IN THREE MODES
- NOMENCLATURE - VIPER TTL TRANSMITTER
- TRANSMITTER LCD SCREEN
- 2
- GETTING STARTED
- WHAT'S IN THE MODUS 600RT
- WHAT'S IN THE MODUS 600RT WIRELESS KIT
- BATTERY AND CHARGER
- HOW TO STORE THE BATTERY
- BATTERY LIFETIME
- HOW TO CHARGE THE BATTERY
- FITTING AND REMOVING THE BATTERY
- BATTERY LEVEL INDICATION
- LOW BATTERY WARNING
- ATTACHING TO CAMERA
- POWER MANAGEMENT
- FLASH MODE - TTL AUTOFLASH
- TTL MODE
- FEC: FLASH EXPOSURE COMPENSATION
- SETTING FEC
- HIGH-SPEED SYNC
- SETTING SECOND-CURTAIN SYNC
- FLASH MODE - MANUAL FLASH
- FLASH OUTPUT POWER RANGE
- OPTICAL O1 SECONDARY UNIT SETTING
- OPTICAL O2 SECONDARY UNIT SETTING
- FLASH MODE: MULTI (STROBOSCOPIC FLASH)
- CALCULATING THE SHUTTER SPEED
- NUMBER OF FLASHES / FLASH FREQUENCY = SHUTTER SPEED
- WIRELESS FLASH PHOTOGRAPHY: (2.4GHZ) CONTROL
- MASTER/SLAVE WIRELESS FLASH LIGHTING
- POSITIONING AND OPERATION RANGE (EXAMPLE OF WIRELESS FLASH SHOOTING)
- WIRELESS MULTIPLE FLASH SHOOTING
- WIRELESS SETTINGS
- MASTER UNIT FLASH ON/OFF
- SETTING THE GROUP MODE - TTL / M / OFF
- SETTING THE DCM (DIGITAL CHANNEL MATCHING)
- MASTER – VIPER TTL OR MODUS 600RT
- SLAVE - MODUS 600RT
- MODUS 600 RT - RESET
- TTL FULLY AUTOMATIC WIRELESS FLASH SHOOTING
- MASTER UNIT SETTING
- SLAVE UNIT SETTING
- POSITION OF CAMERA AND SPEEDLIGHT
- SET THE GROUP A FLASH MODE TO
- 5 CHECK MASTER/SLAVE UNITS ARE READY
- 6 CHECK THE MASTER SLAVE SPEEDLIGHT OPERATION
- USING AUTOMATIC WIRELESS FLASH WITH MULTIPLE SLAVE UNITS
- ADVANCED SETTING WITH FULLY AUTOMATIC WIRELESS FLASH
- MULTIPLE MASTER UNIT
- M: WIRELESS FLASH SHOOTING WITH MANUAL FLASH
- MULTI: WIRELESS SHOOTING WITH MULTI REPEATING FLASH STROBOSCOPIC
- TURNING ON/OFF GROUP M (MASTER SPEEDLIGHT) / A / B / C
- TIMES HZ MENU2
- SETTING THE STROBOSCOPIC FLASH PARAMETERS
- M/A/B/C: WIRELESS FLASH SHOOTING WITH DIFFERENT FLASH MODES FOR EACH GOUP
- SET MASTER UNIT
- SET THE FIRING GROUP OF THE SLAVE UNITS
- SET THE FLASH MODES
- SET THE FLASH OUTPUT AND FLASH EXPOSURE COMPENSATION AMOUNT
- WIRELESS FLASH PHOTOGRAPHY
- OPTICAL TRANSMISSION
- WIRELESS FLASH PHOTOGRAPHY: (2.4GHZ) USING VIPER TTL TRANSMITTER
- DCM (DIGITAL CHANNEL MATCHING)
- VIPER TTL GROUP MODE SETTING
- GROUP POWER CONTROL SETTING FOR MANUAL AND TTL FEC
- MULTI MODE
- 6
- OTHER
- APPLICATIONS
- SYNC TRIGGERING
- BOUNCE FLASH
- CATCHLIGHT PANEL
- ZOOM: SETTING THE FLASH COVERAGE AND USING THE WIDE PANEL
- USING THE WIDE PANEL
- C.FN: SETTING CUSTOM FUNCTIONS
- SOFTWARE VERSION
- SELECT THE CUSTOM FUNCTION NO
- CHANGE THE SETTING
- C.FN DEFAULT
- PROTECTION FUNCTIONS
- OVER-TEMPERATURE PROTECTION
- OTHER PROTECTIONS
- TROUBLESHOOTING
- THE POWER TURNS OFF BY ITSELF
- AUTO ZOOM DOES NOT WORK
- THE FLASH EXPOSURE IS UNDEREXPOSED OR OVEREXPOSED
- PHOTOS HAVE DARK CORNERS OR ONLY PARTS OF THE TARGET SUBJECT ARE ILLUMINATED
- FIRMWARE UPGRADE
- COMPATIBLE CAMERA MODELS
- MAINTENANCE
- MODUS 60ORT MKII
- AVANT-PROPOS
- DÉPANNAGE
- FEHLERSUCHE
Brand : Hähnel
Model : MODUS 600RT MK II (Micro 43)
Category : Lamp