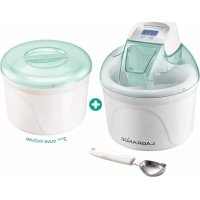
Glaçons Transparence 489003 - Ice machine LAGRANGE - Free user manual and instructions
Find the device manual for free Glaçons Transparence 489003 LAGRANGE in PDF.

| Product type | Ice cube maker |
| Brand | Lagrange |
| Model | Ice Cube Transparence 489003 (Type 489) |
| Production capacity | 15 kg of ice cubes per 24 hours (approximately 24 ice cubes every 25 minutes) |
| Water tank capacity | 2.5 L |
| Ice cube drawer capacity | 600 g |
| Ice cube sizes | 2 selectable sizes (small and large) |
| Dimensions (W x D x H) | 357 x 289 x 352 mm |
| Net weight | 11.5 kg |
| Power supply | 230 V ~ 50 Hz, 150 W |
| Refrigerant | R600a (21 g) |
| Climate class | N/SN |
| Insulation foaming agent | Cyclopentane (C5H10) |
| Cord length | H05VV-F 3G 0.75 mm² (length not specified, standard) |
| Lid material | Transparent plastic |
| Main functions | Automatic ice cube making, automatic stop when drawer is full, water shortage detection, size selection, pause/resume |
| Cleaning and maintenance | Clean with damp sponge and white vinegar; regular draining; do not immerse the appliance |
| Safety instructions | Do not use on hot surface, fully unwind the cord, use with grounded outlet, do not submerge in water |
| Warranty | 2 years (extension to 3 years possible via registration at lagrange.fr) |
| Spare parts and repairability | Spare parts availability guaranteed for 5 years from manufacturing date (subject to country of purchase) |
Frequently Asked Questions - Glaçons Transparence 489003 LAGRANGE
User questions about Glaçons Transparence 489003 LAGRANGE
0 question about this device. Answer the ones you know or ask your own.
Ask a new question about this device
Download the instructions for your Ice machine in PDF format for free! Find your manual Glaçons Transparence 489003 - LAGRANGE and take your electronic device back in hand. On this page are published all the documents necessary for the use of your device. Glaçons Transparence 489003 by LAGRANGE.
USER MANUAL Glaçons Transparence 489003 LAGRANGE
CONDITIONS DE GARANTIE
BESCHRIJVING VAN HET APPARAAT
STAP 7: DE PRODUCTIE STOPPEN
SCHRITT 8:ENTLEEREN DES GERATES
- Do not move the unit when it is operating.
- Do not embed the unit.
- Never cover the unit with a cloth when it is operating.
- Do not drop the unit as it could be damaged
- Do not use any accessory that is not supplied with the unit during its functioning.
- These units are not intended to be operated by means of an exterior timer or by a separate remote control system.
- When the unit is not being used or is left without surveillance and before assembly, dismantling or cleaning, disconnect it from the electrical power supply.
- Never turn the product over and do not incline it by more than 45^ .
- Do not put objects too close to the unit (8 cm minimum distance) to allow for proper release of heat.
-
Do not start the unit frequently (5 minutes interval minimum before pressing the on/off button a second time), to avoid damaging the compressor.
-
Never insert metallic or electrical objects into the unit to avoid all risk of fire or short circuit.
- Do not store explosive substances such as aerosols with an inflammable gas in this unit.
- Do not use purified water but rather tap water or spring water.
- Do not clean with scouring powder or any utensil that could damage the unit.
- Do not touch the metallic parts of the unit during operation because they could be hot. It is normal that the condenser and the compressor reach high temperatures and the areas in contact with them can also become hot.
Because of the rapid freezing, the ice cubes can appear cloudy. This is due to air trapped in the ice cubes, which does not affect the quality on the taste of the ice. - The refrigerant and insulation blowing gas is flammable, when disposing of the appliance, do so only at an authorized waste disposal center. Do not expose to flame.

*WARNING: keep ventilation openings, in the appliance enclosure or in the built-in structure, clear of obstruction.
Warning: do not use mechanical devices or other means to accelerate to defrosting process other than those recommended by LAGRANGE.
WARNING: do not damage the refrigerant circuit.
WARNING: do not use electrical appliances inside the food storage compartments of the appliance unless they are of the type recommended by LAGRANGE.
If your unit is damaged, do not use it and contact the LAGRANGE After-Sale Service Department.
For your safety, use only LAGRANGE accessories and spare parts adapted to your unit.
This unit is exclusively intended for household use. Any other use (professional) is excluded. The manufacturer declines all liability in the event of non-observation of this principle.
47


Ice cube maker "Transparency" Type 489.
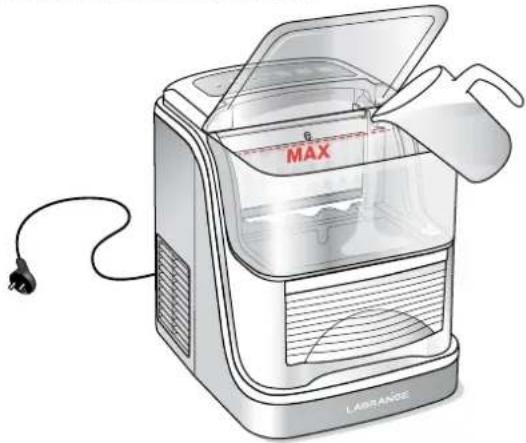
DESCRIPTION OF THE UNIT
- Plug
- Transparent cover
- Ice making tray / Evaporators
- Ice-making plate
- Control panel
- Transparent water tank
- Ice cube bin
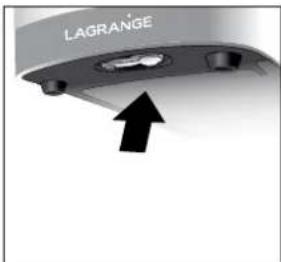
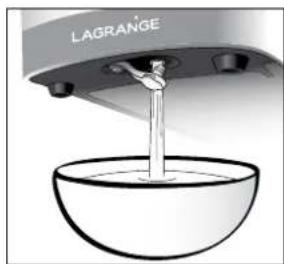
- Drain plug
- Water level float
- Ice cube scoop
THE CONTROL PANEL

CHARACTERISTICS
- Capacity: 15 kg in 24 hours or about 24 ice cubes every 25 minutes.
- Capacity of water tank: 2.5 L.
- Capacity of the ice cube tank: 600 g.
- 2 sizes of ice cubes.
- Electronic control panel.
- Autonomous refrigeration unit.
- Ice cube scoop.
* Climate class: N / SN - Insulating foaming agent: C5H10 (Cyclopentane)
*Power: 230 V - 50 Hz - 150 W. - Refrigerant (refrigerant gas): R600a - weight 21g
*Net weight: 11.5 kg. - Dimensions of the unit: 357(l) × 289(p) × 352(h) mm.
*The cord used is a HO5VV-F 3 G 0.75 mm².
These units are in compliance with directives 2014/30/UE, 2014/35/UE, WEEE 2012/19/UE, RoHs 2011/65/UE and the CE food contact regulation 1935/2004.
ENVIRONMENT
Protection of the environment - DIRECTIVE 2012/19/UE DEEE.
In order to protect our environment and our health, electrical units at the end of their working lives must be disposed of according to very specific rules requiring the involvement of everyone, both suppliers and users. That is why your unit, as indicated by the symbol on its
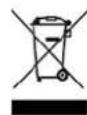
nameplate, must not be put into a public or private garbage can intended for household wastes. At the time of its disposal, it is your responsibility to bring your unit to a public collection center designated for the recycling of electrical and electronic equipment. If you need information about centers for the collection and recycling of discarded units, please contact the local authorities in your region, the household waste collection services or the store where you bought your unit.
BEFORE USING THE UNIT
Before the first use, leave the unit for 12 hours on a flat surface without plugging it in and leave the cover of the unit open for at least 12 hours.
Failure to do so could damage the compressor and the cooling system of the unit.
START-UP AND USE
1STUSE
- When you unpack the unit, make sure that you remove all of the packaging materials.
- Make sure that all of the parts and accessories are present and intact.
- Before using your unit, thoroughly clean all of the parts (see upkeep section).
- Completely unwind the cord and examine it carefully before use.
When you turn the unit on, the On/Off indicator light blinks. This means that the unit is awaiting instructions.
USE OF THE CONTROL PANEL
On/off: The on/off button indicator light will blink once the unit has been plugged in. The unit is then in standby mode. To start the unit, press the on/off button again, the indicator light will turn on. You can then select the desired ice cube size. You can stop the making of ice cubes at any time by pressing the same button again to put the unit in standby. The indicator light will start blinking.

Ice cubes format: This button is used to select the ice cube format. By default, the ice cube size will be large. Select the desired ice cube size by pressing successively. An indicator light will blink below the corresponding illustration.
N.B.: By selecting the smallest ice cube size, the exterior shape of the ice cubes does not change, but the density is decreased and the production cycle is faster. By selecting the largest ice cube size, the exterior shape of the ice cubes does not change, but the density is increased and the production cycle is slower.

Pause/Start: After choosing the desired ice cube size, press this button to start making ice cubes. The indicator light will go on below the illustration of the ice cube size chosen. Press this button again to pause the process. The indicator light will then start blinking. Press this button again to resume making ice cubes. The indicator light will then go back on.

Bin full: When the ice cube bin is full, the indicator light goes on and the machine stops working. Empty the ice cube bin and then put it back in place. The indicator light will turn off as soon as there is enough room on the bin. The unit will automatically make new ice cubes.
51


Lack of water: When there is not enough water in the tank to run another cycle, the indicator light blinks and the machine stops working. Add water to the tank and then press the on/off button which puts the unit in standby and turns off the "lack of water" indicator light. To restart the unit, press the on/off button again and select the desired ice cube size.
MAKING ICE CUBES
STEP 1: PREPARATION OF THE UNIT
Always put the unit on a flat, dry and uncluttered surface (leave a clearance of 15cm around your unit).
STEP 2: CLEANING OF THE TANK AND THE SYSTEM
The water tank and the system must be cleaned before use.
To clean the tank, fill it with water (see step 3) then program the unit and let the water flow (see step 4) for 1 minute. Stop the unit by pressing the On/Off button. Open the drain plug to remove the wastewater from the bottom of the unit (see step 8) and clean it with a most sponge. Throw this water out.
- Then plug in your unit and fill the tank with soft water (see step 3).
STEP 3: FILLING OF THE TANK
Fill the tank soft water, making sure that you do not exceed the maximum level indicated by the hole.
N.B. You can accelerate the ice cube making process by using very cold water.
Be sure to change the water once a day. If the unit is not used for a long period of time, you must replace the water.
The tank's capacity is 2.5L.
Close the cover.
STEP 4: PROGRAMMING
Press the On/Off button to start your unit.
Choose the ice cube size (small or large), by successively pressing the ice cube size selection button. The default size is the largest size. Select the smallest size when the ambient temperature is below 15^ and the largest size when the ambient temperature is higher than 30^ .
Press the Pause/Start button to start making ice cubes.
STEP 5: RECOVERY OF THE ICE CUBES
The sheet of ice cubes detaches from the ice cube making tray and slides into the bin. You can help the separation of the ice cubes by tapping with the scoop on the remaining blocks. Once the bin is full of ice cubes, the "bin full" indicator light will go on and the unit will stop making ice cubes. The ice cubes are kept cool in the unit but will nonetheless start to melt.
Empty the ice cube bin rapidly, either to use the ice cubes immediately or to keep them in the freezer for later use, then put the empty bin back in place.
STEP 6: LACK OF WATER IN THE TANK
When the unit has used up all of the water in the tank, the "lack of water" indicator light will go on because there is not enough water to start another cycle. If you want to obtain more ice cubes and continue to make ice cubes, put more water into the tank without going beyond the maximum level.
Press the on/off button. This will put the unit into standby mode and turn off the "lack of water" indicator light.
To restart the unit, press the On/Off button again then select the desired ice cube size. Press the Pause/Start button to restart the process.
STEP 7: STOPPING OF ICE CUBE MAKING
When the quantity of ice cubes obtained is sufficient, you can stop the ice cube making by simply pressing the on/off button. Remove ice cube bin to recover the last ice cubes made. Then unplug your unit.
STEP 8: DRAINING OF THE UNIT

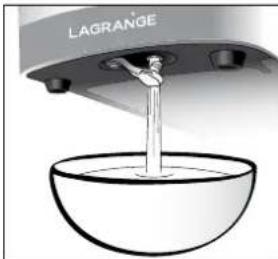
If water remains in the unit when the ice cube making is finished, you can drain it. To do this, move the unit to the edge of your table until the drain plug is accessible. Remove the plug and then place a recipient under the plug to receive the flow of water. When the water stops flowing, put the plug back in place and push your unit back on the work surface before storing it.

TROUBLESHOOTING GUIDE
Always strictly follow the preparation process described in these instructions. By doing so, you will avoid most problems.
In the event of a power cut due to the disconnection of the power cord or the turning off of the power button during an ice cube making cycle, it is possible that small fragments of ice will form and get stuck in the ice cube making tray, causing its obstruction. If this is the case, press and hold the "Ice cube size" button for 2 seconds. Wait until the ice falls before restarting the machine.
In the event of an interruption of the compressor due to an insufficient level of water, water overflow or a power cut, it will take three minutes for the unit to begin working when you restart it.
If you encounter difficulties, here is a table that will help you to understand why and how to solve the problem.
| Problem | Cause | Solution |
| The functioning of the compressor is abnormal and it makes a buzzing sound. | The voltage is lower that recommended. | Stop the ice cube machine and do not restart it until the normal voltage has been reached. |
| The "lack of water" indicator light is on. | 1. The water level in the tank is insufficient. 2. The ice cube bin is full, but the float switch is stuck. | 1. Add a sufficient quantity of water to the tank. 2. Remove the ice cubes. Gently move the float from up to down. |
| The indicator lights do not go on. | The unit is not correctly plugged in, or check your electrical system. | Make sure that the cord is correctly attached and that your electrical socket has no problems. Otherwise, contact the after-sale service department LAGRANGE. |
| The ice cubes produced are too large and they stick to each other. | 1. The water temperature is too low. 2. The ice from the preceding cycles stayed on the plaque. | 1. Select the small format. 2. Press and hold the "Ice cube size" button for 2 seconds. Wait until the ice falls before restarting the machine |
| The right program is selected for making ice cubes, but the ice is not coming out. | - | Contact the after-sale service department LAGRANGE. |
| The machine is on, but the water is hot. | - | Contact the after-sale service department LAGRANGE. |
| The level of the ice cubes has reached the ice-making plate, but the "Ice cube bin full" indicator light does not go on. | - | Contact the after-sale service department LAGRANGE. |
| The ice cubes become opaque. | Scale has accumulated in the unit. | Clean the tank and the system (see step 2 of making ice cubes). |
UPKEEP
CAUTION:
- Never put the unit or the plug into water and never put it in a dishwasher.
- Make sure that the unit is unplugged before cleaning it.
- CAUTION: Do not use devices mechanical or other means to accelerate the defrost process other than those recommended by LAGRANGE.
- Rinse thoroughly before turning on.
- Whether at the time of the initial installation or after a long period with no use, always use soft water before starting to make ice cubes.
- Body of the unit: Clean with a moist sponge.
Never spray the unit with chemical products or dilution agents such as acids, gasoline or oil.
- Plastic cover: Clean it with a moist sponge. Dry it thoroughly. Never use abrasive or aggressive cloths or products in order to protect the plastic and its shine.
- Water tank and interior walls: Drain, clean with a moist sponge and dry thoroughly. You can use a diluted solution of water and white vinegar. Rinse thoroughly and dry before reusing the unit.
- To ensure that the ice is clean, change the water in the tank at least once a day. In the event of a prolonged period without using the unit, empty the water tank and clean it thoroughly.
-
Ice cube bin and ice cube scoop: Clean them with a damp sponge and dishwashing liquid or use a diluted solution of white vinegar in water. Dry the ice cube bin thoroughly before putting it back in the unit.
-
Ice cube making system: Clean the ice cube making tray and the ice cube making plate frequently, using a diluted solution of water and white vinegar.
STORING OF THE UNIT
Remark: Always dry all of the elements thoroughly before repositioning them and storing them.
- Unplug the unit after use.
- Wait for it to cool down
- Empty the tank if you won't be making more ice cubes right away.
- Always wash and dry all of the parts before putting them back in place.
- Aerate the unit by opening the cover after use so that it dries on the inside.
- Store the unit with the cover closed on a flat and easily accessible surface.
- Do not put anything on top of your unit.

GUARANTEE TERMS
Guarantees for household appliances LAGRANGE.
Your unit is guaranteed for 2 years.
In order to receive an additional year of guarantee free of charge, register on the web site LAGRANGE (www.lagrange.fr).
The guarantee includes parts and labor and covers manufacturing defects. The guarantee does not cover deterioration due to poor use or non-observation of the instructions for use or breakage due to falling.
THIS GUARANTEE APPLIES TO HOUSEHOLD USES. IT CANNOT APPLY TO PROFESSIONAL OR SEMI-PROFESSIONAL USES.
The legal guarantee due from the seller does not in any way exclude the legal guarantee due from the Manufacturer for manufacturing flaws or defects according to articles 1641 to 1649 of the Civil Code. In the event of a breakdown or malfunction, contact your retailer. In the event of technical defects observed within one week of purchase, the units will be exchanged.
Beyond this period, they will be repaired by the LAGRANGE after-sale service.
To benefit from this guarantee, the user must present a copy of the invoice specifying the date of purchase of the unit.
Duration of availability of spare parts
In accordance with article L 111-2 of the consumer code, the availability of spare parts that we provide for a repairable product is 5 years as of its date of manufacturing.
However, this availability is only guaranteed in the country where the product was purchased.
Shipping costs for returns
After the first year which benefits from the dealer's guarantee, you will only have to pay the costs for returning the product to the factory. We will ship it back to you at our expense as quickly as possible.
If you have any other questions about our products, you can contact us at the following address: