
AI Ultra 2in1 RV2600WDEU - Robot vacuum SHARK - Free user manual and instructions
Find the device manual for free AI Ultra 2in1 RV2600WDEU SHARK in PDF.
| Product Type | Robot vacuum and mop 2-in-1 |
| Brand | Shark |
| Model | AI Ultra 2in1 RV2600WDEU |
| Power Supply | Rechargeable lithium-ion battery, charging dock XDKRV2600WFEU |
| Battery Life | Up to 6 hours full charge for sufficient runtime for surfaces up to 140 m² (with Recharge and Resume function) |
| Main Functions | Simultaneous vacuuming and mopping, laser navigation with mapping, obstacle detection, voice control (Alexa, Google Assistant), SharkClean app |
| Dustbin Capacity | Not specified (estimate: approx. 500 ml) |
| Water Tank Capacity | Up to MAX line (estimate: approx. 300 ml) |
| Main Brush | Self-cleaning rotating brush, replacement every 6 to 12 months |
| Side Brush | Yes, replaceable |
| Filter | Washable, air dry, replacement once a year |
| Maintenance | Regular cleaning of filter, rotating brush, sensors, wheels, and charging contacts |
| Safety | Class 1 laser safe, automatic stop if stuck, cliff sensors to avoid stairs, no-go zones via app |
| Connectivity | Wi-Fi 2.4 GHz, SharkClean app, compatible with Amazon Alexa and Google Assistant |
| Noise Level | Not specified (estimate: approx. 65 dB) |
| Weight | Not specified (estimate: approx. 4 kg) |
| Dimensions (L x W x H) | Not specified (estimate: 34 x 34 x 10 cm) |
| Spare Parts and Repairability | Parts available on sharkclean.fr: filter, rotating brush, side brush, dustbin, water tank, mop pad, battery, charging dock, receiving mat, brush door |
| Warranty | 2-year commercial warranty in addition to legal warranties |
Frequently Asked Questions - AI Ultra 2in1 RV2600WDEU SHARK
User questions about AI Ultra 2in1 RV2600WDEU SHARK
0 question about this device. Answer the ones you know or ask your own.
Ask a new question about this device
Download the instructions for your Robot vacuum in PDF format for free! Find your manual AI Ultra 2in1 RV2600WDEU - SHARK and take your electronic device back in hand. On this page are published all the documents necessary for the use of your device. AI Ultra 2in1 RV2600WDEU by SHARK.
USER MANUAL AI Ultra 2in1 RV2600WDEU SHARK
Robotic Vacuum Cleaner
RV2600WDEU
INSTRUKTIONER
GEBRAUCHSANWEISUNG
NOTICE D'UTILISATION
ET GARANTIE SHARK
INSTRUCCIONES
INSTRUCTIONS
ISTRUZIONI
INSTRUCTIES
INSTRUKSJONER
KÄYTTÖOHJEET
INSTRUKTIONER
INSTRUÇÕES
SHARKCLEAN APP


Download on the
App Store

GETT ON
Google Play

WORKS WITH
alexa

works with
Ok Google
VIGTIGE SIKKERHEDSANVISNINGER
LÆS OMHYGGELIGT INDEN IBRUGTAGNING • KUN BEREGNET TIL HUSHOLDNINGSBRUG
▲ADVARSEL
Reducer faren for brand, elektrisk stød, person- eller ejendomsskader:
B∅RN ELLER DYR B∅R IKKE EFTERLADES UDEN OPSYN I DE RUM,
SOM ROBOTST∅VSUGEREN HAR ADGANG TIL UNDER RENG∅RING.
ADVARSEL OM LASER
DETTE PRODUKT HAR EN LASER I KLASSE 1. SLUK ALTID FOR STRÖMMEN, F∅R ROBOTST∅VSUGEREN L∅FTES, ELLER DER FORETAGES VEDLIGEHOLDELSE PÅ DEN. SE IKKE DIREKTE IND I LASEREN.
HVIS IKKE OPLADNINGSKABLET PASSER ORDENTLIGT I KONTAKTEN, BEDES DU KONTAKTE EN KVALIFICERET ELEKTRIKER. TVING IKKE STIKKET IND I KONTAKTEN, OG FORSOG IKKE AT AENDRE DET, SÅ DET PASSER.
GENERELLE ADVARSLER
natural_image
Technical diagram of a mechanical component with internal parts and an arrow indicating a feature (no text or symbols present)natural_image
Line drawing of a robotic vacuum cleaner connected to a power outlet (no text or symbols)Ibrug


CLEAN-KNAP
MANUEL RENG∅RINGSTILSTAND
natural_image
Line drawing of a room with a rug, a potted plant, and a gray mat on a tiled floor (no text or symbols)natural_image
Line drawing of a room interior with TV, rug, and small objects (no text or symbols)natural_image
Line drawing of a robotic vacuum cleaner with a prohibition symbol overlay (no text or symbols present)natural_image
Line drawing of a mechanical component with a lid and internal holes, showing an arrow indicating direction (no text or symbols)natural_image
Technical line drawing of a mechanical component with a curved arrow indicating rotation (no text or symbols)natural_image
Line drawing of a mechanical component with a curved base and a raised handle (no text or symbols)natural_image
Technical line drawing of a circular mechanical component with a separate curved part, showing no text or symbols.natural_image
Technical line drawing of a robotic vacuum cleaner with mounting bracket (no text or symbols)natural_image
Technical line drawing of a mechanical component with no visible text or symbolsnatural_image
Line drawing of a robotic vacuum cleaner (no text or symbols)natural_image
Technical line drawing of a mechanical component with an open lid and internal holes, showing an upward arrow (no text or symbols)Download on the App Store

GETTTON Google Play
OPS/ETNING AF STEMMESTYRING MED GOOGLE ASSISTANT ELLER AMAZON ALEXA
T∅MNING AF ST∅VBEHOLDEREN

natural_image
Technical line drawing of a circular mechanical component with a central hub and mounting brackets (no text or symbols)natural_image
Technical line drawing of a mechanical component or tool assembly (no text or symbols visible)natural_image
Technical line drawing of a mechanical component with arrows indicating direction (no text or symbols)natural_image
Technical line drawing of a mechanical assembly with an arrow indicating a component (no text or symbols present)natural_image
Technical line drawing of a mechanical component or housing (no text or symbols)natural_image
Diagram showing a device component with arrows indicating assembly or insertion (no text or symbols present)natural_image
Hand holding a mechanical device with granular material, no visible text or symbolsnatural_image
Technical line drawing of a mechanical component with a base and internal structure (no text or symbols)natural_image
Cross-sectional diagram of a device casing with internal components and directional arrows indicating movement (no text or symbols)natural_image
Illustration of a hand using a caliper to adjust internal components (no text or symbols visible)natural_image
Top-down schematic of a mechanical device with internal components and mounting features (no text or labels)
natural_image
Diagram of a device with a switch connected to a power outlet, showing internal components and wiring (no text or symbols)natural_image
Line drawing of a hand inserting a small component into a device casing (no text or symbols)natural_image
Line drawing of a hand using a tool to clean or repair electronic components (no text or symbols visible)natural_image
Line drawing of a hand inserting a component into a device housing (no text or symbols)SharkNinja Europe Limited,
3150 Century Way,
Thorpe Park,
Leeds,
LS1582B
SharkNinja Germany GmbH
c/o Regus Management GmbH,
natural_image
Technical diagram of a mechanical component with internal parts and an arrow indicating a feature (no text or symbols present)natural_image
Line drawing of a robotic vacuum cleaner with attached electrical outlet (no text or symbols)In Verwen-
dung


CLEAN-TASTE
natural_image
Line drawing of a room with a mat, a potted plant, and a tiled floor (no text or symbols)natural_image
Line drawing of a room interior with TV, rug, and robotic arm (no text or symbols)natural_image
Line drawing of a circular device with a stopper and a prohibition symbol (no text or labels)natural_image
Line drawing of a mechanical component with a lid and internal holes, showing an arrow indicating direction (no text or symbols)natural_image
Technical line drawing of a mechanical component with circular holes and an arrow indicating rotation (no text or symbols)natural_image
Line drawing of a mechanical component with a curved handle and base (no text or symbols)natural_image
Line drawing of a robotic vacuum cleaner with a separate clamped component (no text or symbols)natural_image
Line drawing of a robotic vacuum cleaner with a circular base and handle, placed above a diagonal line (no text or symbols)natural_image
Technical line drawing of a mechanical component with no visible text or symbolsnatural_image
Line drawing of a robotic vacuum cleaner (no text or symbols)natural_image
Technical line drawing of a mechanical component with a lid and internal slots, showing an arrow indicating direction (no text or symbols)Download on the App Store

GETTTON Google Play
natural_image
Technical line drawing of a circular mechanical component with a central hub and side tabs, showing internal structure and an inset view (no text or symbols)natural_image
Diagram of a mechanical component with arrows indicating direction (no text or symbols)natural_image
Technical line drawing of a mechanical component or tool assembly (no text or symbols visible)natural_image
Technical line drawing of a mechanical assembly with an arrow indicating a process (no text or symbols present)natural_image
Technical line drawing of a mechanical component or housing (no text or symbols)natural_image
Diagram showing a device with a grid base and internal components, no text or symbols presentnatural_image
Hand holding a cleaning brush with a gridded brush, no text or symbols visiblenatural_image
Technical line drawing of a mechanical component with an inset showing internal structure (no text or symbols)natural_image
Cross-sectional diagram of a device casing with internal components and directional arrows indicating movement (no text or symbols)natural_image
Illustration of a hand using a caliper to adjust internal components (no text or symbols visible)natural_image
Top-down schematic of a mechanical device with internal components and mounting features (no text or labels)
natural_image
Diagram of a device with a plug inserted into a socket, connected to a wall and cable (no text or symbols present)natural_image
Line drawing of a hand inserting a small component into a device casing (no text or symbols)natural_image
Line drawing of a hand using a tool to clean or repair electronic components (no text or symbols visible)natural_image
Line drawing of a hand inserting a component into a device housing (no text or symbols)SharkNinja Europe Limited,
3150 Century Way,
Thorpe Park,
Leeds,
LS15 8ZB
SharkNinja Germany GmbH
c/o Regus Management GmbH,
Excellent Business Center 10.+11. Stock,
Westhafenplatz 1,
60327 Frankfurt am Main, Germany
sharkclean.eu
IMPORTANT SAFETY INSTRUCTIONS
PLEASE READ CAREFULLY BEFORE USE • FOR HOUSEHOLD USE ONLY
⚠ WARNING
To reduce the risk of fire, electric shock, injury, or property damage:
CHILDREN OR ANIMALS SHOULD NOT BE LEFT UNATTENDED IN ANY ROOMS
THAT THE ROBOTIC VACUUM HAS ACCESS TO DURING CLEANING.
LASER WARNING
THIS PRODUCT HAS A CLASS 1 LASER. ALWAYS TURN OFF THE POWER BEFORE LIFTING THE ROBOTIC VACUUM CLEANER OR PERFORMING ANY MAINTENANCE ON IT. DO NOT LOOK DIRECTLY INTO LASER.
IF THE CHARGING CABLE PLUG DOES NOT FIT FULLY INTO THE SOCKET, CONTACT A QUALIFIED ELECTRICIAN. DO NOT FORCE INTO SOCKET OR TRY TO MODIFY TO FIT.
GENERAL WARNINGS
When using an electrical appliance, basic precautions should always be followed, including the following:
- This appliance consists of a Wet/Dry Robot Floor Cleaner vacuum and charging dock with power supply. These components contain electrical connections, electrical wiring, and moving parts that potentially present risk to the user.
- Before each use, carefully inspect all parts for any damage. If a part is damaged, discontinue use.
- Use only identical replacement parts. See replacement accessories page of this booklet.
- This Wet/Dry Robot Floor Cleaner contains no serviceable parts.
- Use only as described in this manual. DO NOT use Wet/Dry Robot Floor Cleaner for any purpose other than those described in this manual.
- With exception of filters, dust cups and pads, DO NOT expose any parts of the Wet/ Dry Robot Floor Cleaner to water or other liquids.
- DO NOT put hands into any opening in the dock or robot.
USE WARNINGS
- This product has a Class 1 Laser. Always turn off the power before lifting the robotic vacuum cleaner or performing any maintenance on it.
- DO NOT look directly into laser.
- Always turn off the robotic vacuum cleaner before inserting or removing the filter, dustbin, or fluid reservoir.
- DO NOT handle plug, charging dock, charging cable, or Wet/Dry Robot Floor Cleaner with wet hands. Cleaning and user maintenance must not be done by children without supervision
- Children should NOT play with the appliance.
- This appliance can be used by children aged from 8 years and above and persons with reduced physical, sensory, or mental capabilities or lack of experience and knowledge if they
have been given supervision or instruction concerning use of the appliance in a safe way and understand the hazards involved.
- DO NOT use the robot without the dustbin, filter, and fluid reservoir in place.
- DO NOT damage the charging cord:
a) DO NOT pull or carry charging dock by the cord or use the cord as a handle.
b) DO NOT unplug by pulling on cord. Grasp the plug, not the cord.
c) DO NOT close a door on the cord, pull the cord around sharp corners, or leave the cord near heated surfaces.
d) The supply cord cannot be replaced. If the cord is damaged the appliance should be scrapped. - DO NOT put any objects into nozzle or accessory openings. DO NOT use with any opening blocked; keep free of dust, lint, hair, and anything that may reduce airflow.
- DO NOT use if Wet/Dry Robot Floor Cleaner airflow is restricted. If the air paths become blocked, turn the vacuum cleaner off and remove all obstructions before turning on the unit again.
- Keep nozzle and all vacuum openings away from hair, face, fingers, uncovered feet, or loose clothing.
- DO NOT use if Wet/Dry Robot Floor Cleaner is not working as it should, or has been dropped, damaged, left outdoors, or dropped into water.
- DO NOT place vacuum cleaner on unstable surfaces.
- DO NOT use to pick up:
a) Liquids.
b) Large objects.
c) Hard or sharp objects (glass, nails, screws, or coins).
d) Large quantities of dust (drywall dust, fireplace ash, or embers.)
e) DO NOT use as an attachment to power tools for dust collection.
f) Smoking or burning objects (hot coals, cigarette butts, or matches).
g) Flammable or combustible materials (lighter fluid, petrol, or kerosene).
h) Toxic materials (chlorine bleach, ammonia, or drain cleaner).
i) Toxic materials (high concentrations of chlorine bleach liquid, high concentrations of ammonia, or drain cleaning solution).
- DO NOT use in the following areas:
a) Outdoor areas near fireplaces with unobstructed entrances
b) Spaces that are enclosed and may contain explosive or toxic fumes or vapors (lighter fluid, petrol, kerosene, paint, paint thinners, mothproofing substances, or flammable dust
c) In an area with a space heater
d) Near fireplaces with unobstructed entrances.
-
Turn off the Wet/Dry Robot Floor Cleaner before any adjustment, cleaning, maintenance or troubleshooting. Note: in the OFF (O) position, the robot still uses a small amount of power.
-
Allow all filters to air-dry completely before reinstalling them to prevent liquid from being drawn into electric parts.
- DO NOT modify or attempt to repair the robotic vacuum cleaner or the battery yourself, except as indicated in this Owner's Guide. DO NOT use the vacuum if it has been modified or damaged.
- Remove all spilled or leaked liquid from the dock landing mat, base or floor, as it could lead to risk of electrical shock.
- When refilling the reservoir, check for leaks, as pooled liquids are a slipping hazard and may cause electrical shock. If the reservoir is damaged, it must be replaced.
- Use caution walking on mopped floors, as they may be slippery while damp.
- DO NOT use any household cleaners (all-purpose cleaners, glass cleaners, bleach) on any of the polished high gloss surfaces on the docking station or robot vacuum cleaner as they contain chemicals that may damage these surfaces. Instead use a cloth dampened with water to gently clean.
- To minimise the risk of the robot traveling beyond an unsafe boundary (stair or cliff edges, fireplaces, water hazards), establish these areas as no-go zones using the mapping feature in the SharkClean mobile app. Upon setting the boundary, run the vacuum and visually confirm that the settings effectively prevent the robot from passing beyond the set boundary. Adjust settings as necessary. For nonapp users, use a boundary to block off an unsafe boundary.
BATTERY USE
- The battery is the power source for the vacuum. Carefully read and follow all charging instructions.
- To prevent unintentional starting, ensure the vacuum is powered off before picking it up or carrying it. DO NOT carry the appliance with your finger on the power switch.
- Use ONLY the Shark ^7 charging dock XDKRV2600WFEU and use only battery RVBAT850A. Use of batteries or battery chargers other than those indicated may create a risk of fire.
- Keep the battery away from all metal objects such as paper clips, coins, keys, nails, or screws. Shorting the battery terminals together increases the risk of fire or burns.
- Under abusive conditions, liquids may be ejected from the battery. Avoid contact with this liquid, as it may cause irritation or burns. If contact occurs, flush with water. If liquid contacts eyes, seek medical help.
- Robotic vacuum cleaner should not be stored, charged, or used at temperatures below 50°F (10°C) or above 104°F (40°C). Ensure the battery and vacuum have reached room temperature before charging or use. Exposing the robot or battery to temperatures outside of this range may damage the battery and increase the risk of fire.
- DO NOT expose the Wet/Dry Robot Floor Cleaner or battery to fire or temperatures above 130°C (265°F) as it may cause explosion.
NO-GO ZONES AND BOTBOUNDARY STRIPS
38DO NOT put BotBoundary strips underneath carpet or rugs.
39. DO NOT place BotBoundary strips on top of one another.
40. Always use no-go zones or Bot-Boundary strips around reflective flooring and surfaces.
41. No-go zones or BotBoundary strips should always be used near carpeted stairs.
42. DO NOT use no-go zones or Bot-Boundary strips strips within 3 metres of the dock.
43. For your robot's cliff sensors to work properly, all runners, rugs, carpets, or small thresholds (like child gates) must be 20 centimetres from any stairs (or must be continuous and extend over the edge of the stairs). If a runner, rug, carpet, or small threshold that is less than 20 centimetres from the stairs cannot be moved, you must use a no-go zone or a BotBoundary strip to block off the stairs.
END-USER LICENSE AGREEMENT FOR SHARKNINJA SOFTWARE
SharkClean.co.uk/EULA
SAVE THESE INSTRUCTIONS
For the latest warnings and cautions, go to www.sharkclean.eu/robothelp
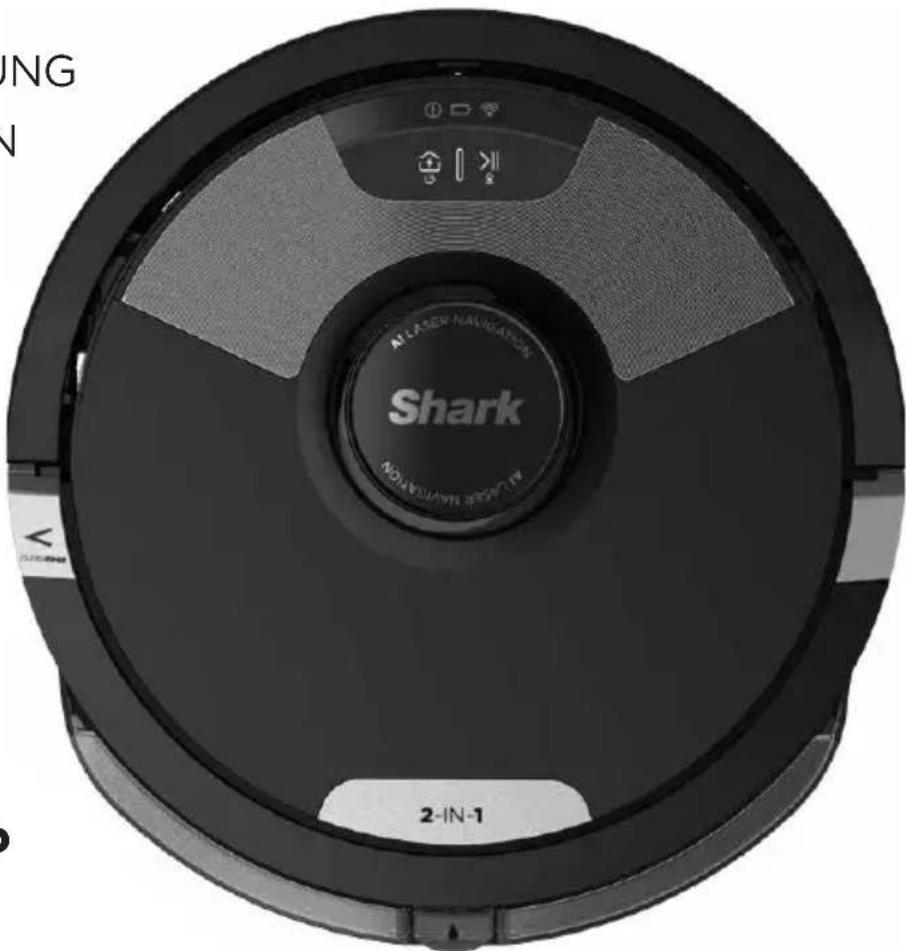
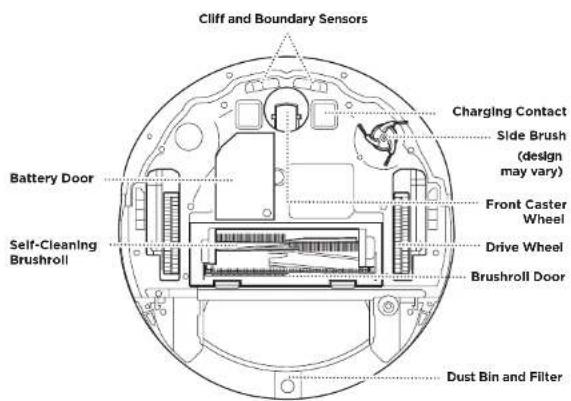
GETTING TO KNOW YOUR SHARK* AI ULTRA ROBOT
GETTING TO KNOW YOUR SHARK® AI ULTRA ROBOT
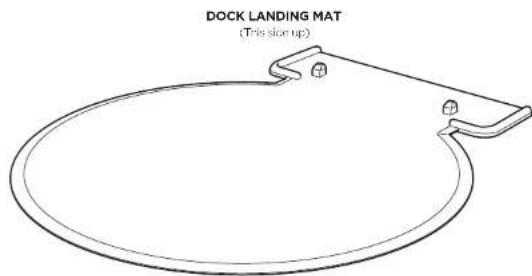
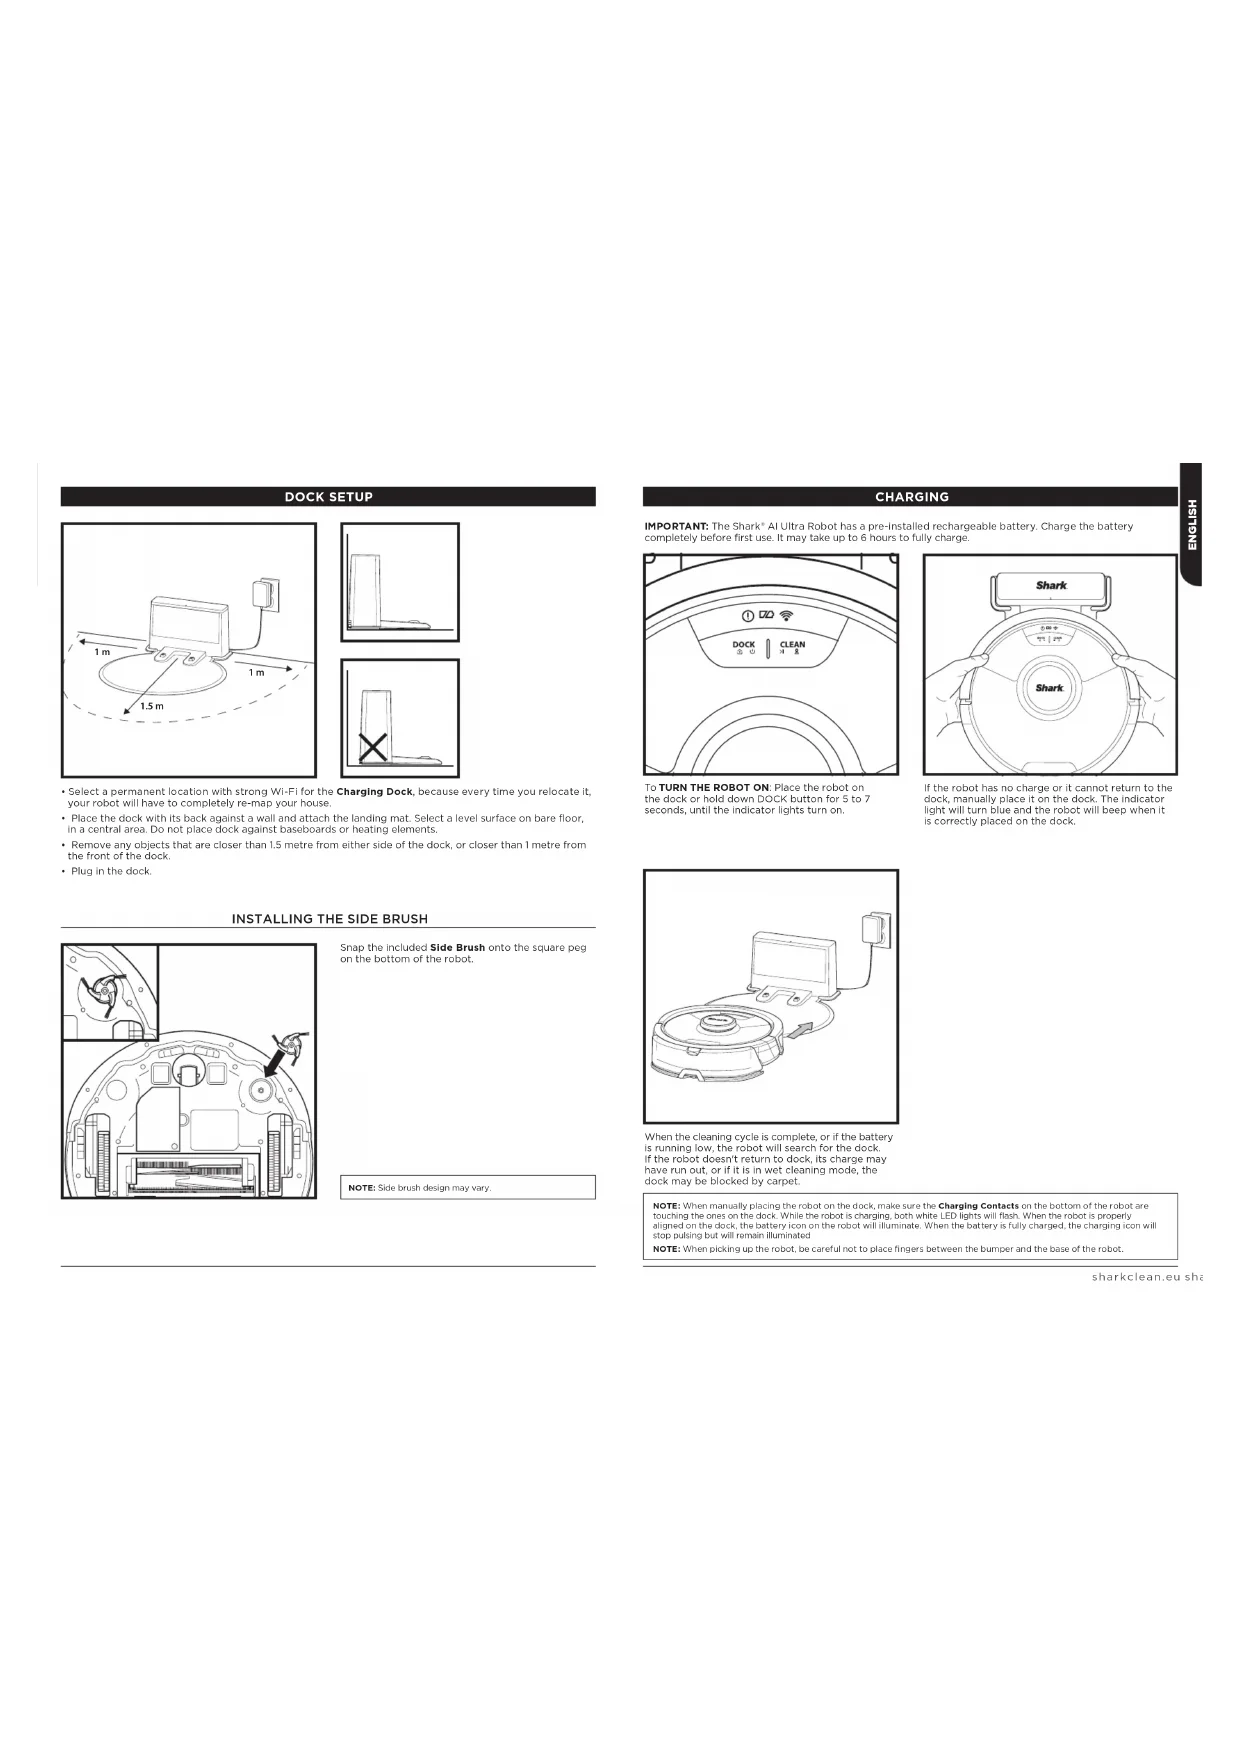
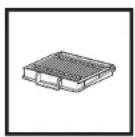
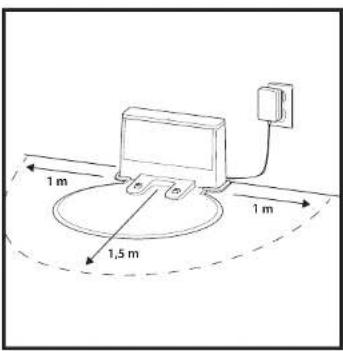
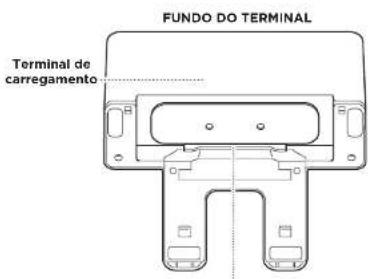
DOCK SETUP


- Select a permanent location with strong WI-FI for the Charging Dock, because every time you relocate it, your robot will have to completely re-map your house.
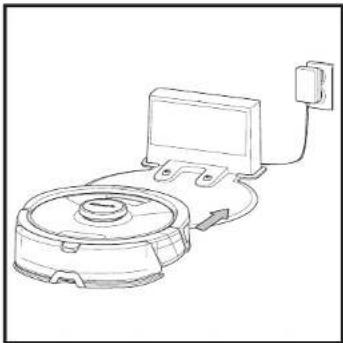
- Place the dock with its back against a wall and attach the landing mat. Select a level surface on bare floor, in a central area. Do not place dock against baseboards or heating elements.
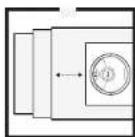
- Remove any objects that are closer than 1.5 metre from either side of the dock, or closer than 1 metre from the front of the dock.
- Plug in the clock.
natural_image
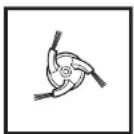
Technical line drawing of a mechanical component with internal parts and an arrow indicating direction (no text or symbols)Snap the included Slide Brush onto the square peg on the bottom of the robot.
NOTE: Side brush design may vary.
CHARGING
IMPORTANT: The Shark ^1 AI Ultra Robot has a pre-installed rechargeable battery. Charge the battery completely before first use. It may take up to 6 hours to fully charge.
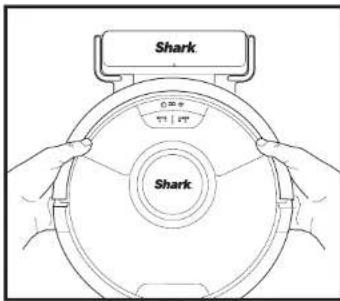
To TURN THE ROBOT ON: Place the robot on the dock or hold down DOCK button for 5 to 7 seconds, until the indicator lights turn on.
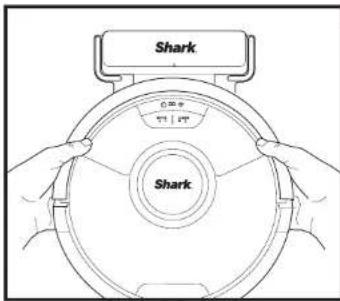
If the robot has no charge or it cannot return to the dock, manually place it on the dock. The indicator light will turn blue and the robot will beep when it is correctly placed on the dock.
natural_image
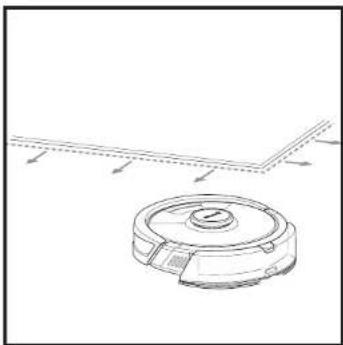
Line drawing of a robotic vacuum cleaner with attached power outlet (no text or symbols)When the cleaning cycle is complete, or if the battery is running low, the robot will search for the dock. If the robot doesn't return to dock, its charge may have run out, or if it is in wet cleaning mode, the dock may be blocked by carpet.
NOTE: When manually placing the robot on the dock, make sure the Charging Contacts on the bottom of the robot are touching the ones on the dock. While the robot is charging, both white LED lights will flash. When the robot is properly aligned on the dock, the battery icon on the robot will illuminate. When the battery is fully charged, the charging icon will stop pulsing but will remain illuminated. NOTE: When picking up the robot, be careful not to place fingers between the bumper and the base of the robot.
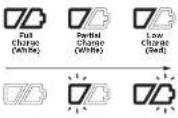
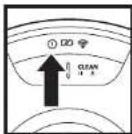
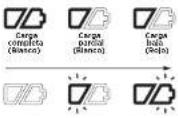
CHARGE INDICATOR LIGHTS
In Use
While Charging (White)
No Charge or Off
The white charge indicator lights show how much battery power is remaining.
While the robot is charging, both white LED lights will flash. When charging is complete, both white lights will illuminate steadily. It may take up to 6 hours to fully charge your robot.
If the robot is idle and away from the charging dock for 10 minutes, it will enter Sleep Mode. The indicator lights will turn off, but the battery and Wi-Fi lights will remain on in sleep mode. Wake up the robot by pressing any button.
NOTE: If the low charge light is blinking red, there is not enough battery power for the robot to return to the dock. Manually place the robot on the dock.
IMPORTANT: Before cleaning an entire room for the first time, we recommend that you first test your robot on a small section of the floor to ensure there is no scratching.
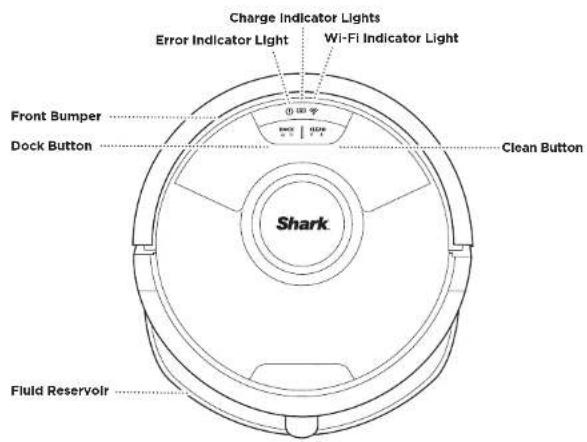
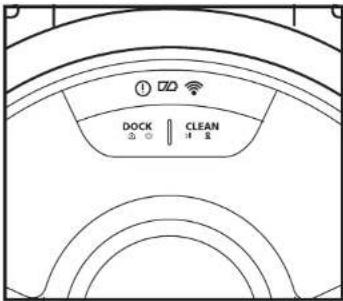
BUTTONS AND INDICATOR LIGHTS
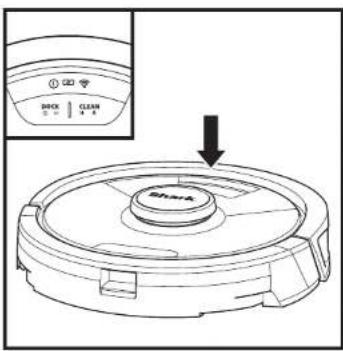

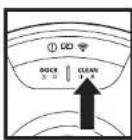
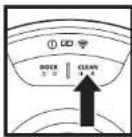
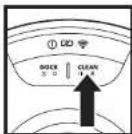
CLEAN BUTTON
Press to begin a cleaning session and press again to pause the cleaning session.
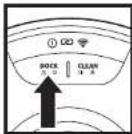
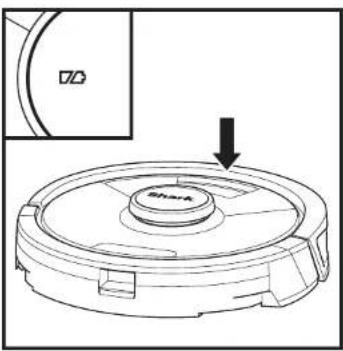
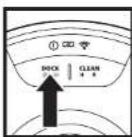
DOCK BUTTON
Hold down for 5 to 7 seconds to power on the robot. Press to stop cleaning and send robot back to the charging dock.
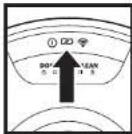
CHARGE INDICATOR LIGHTS Display the amount of charge remaining in the battery.

RECHARGE & RESUME
Press and hold the DOCK button for 15 seconds to turn Recharge & Resume ON or OFF.
The Recharge & Resume function is turned OFF by default. Turn ON Recharge & Resume for complete coverage if your home's floor plan is bigger than 140m ^2 . Your robot will return to the dock, recharge, and can pick up where it left off.
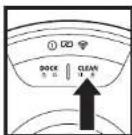
WET MOPPING
INDICATOR LIGHT
The CLEAN button will illuminate blue when the fluid reservoir is properly installed. The CLEAN button will illuminate yellow if the tank is empty and needs refilling.
"!" ERROR INDICATOR
See Troubleshooting section for full list of error codes.
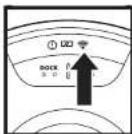
WI-FI INDICATOR
White light: connected to Wi-Fi.
Red light: not connected. Flashing White: setup mode. No light: not set up yet.
PREP YOUR HOME
Your robot uses an array of sensors to navigate around walls, furniture logs, and other obstacles while it cleans. To prevent the robot from entering areas you don't want it to, set up no-go zones in the app. For best results, prepare your home as indicated below, and schedule a daily cleaning to ensure all floor areas are regularly maintained.
NOTE: Scheduling is one of many features that can only be done in the app.
OBSTRUCTIONS
Clear cords and small objects less than 11.5 cm in height, and open interior doors to ensure a complete map of your home.
SCHEDULING
Schedule whole-home cleanings with the app. To schedule a mopping run with the app, the reservoir must be filled and installed in the robot with the pad attached.

THRESHOLDS
Your robot can climb over most thresholds to get from room to room, but if one is too high, set up a no-go zone in the app to block it off.
AVOID MOVING THE
ROBOT & DOCK
While your robot is cleaning, do not pick it up and move it, or move the charging dock—this will impact the robot's navigation and ability to return to clock when cleaning is complete.
STAIRS
For your robot's cliff sensors to work properly, all runners, rugs, carpets, or small thresholds (like child gates) must be 20.5 cm from any stairs (or must be continuous and extend over the edge of the stairs). If a runner, rug, carpet, or small threshold that is less than 20.5 cm from the stairs cannot be moved, you must use a no-go zone to block off the stairs.
REMOVE RUGS FROM
DOORWAYS WHEN
MOPPING
Before mopping, you must set up Carpet Zones in the app, and move any carpets or rugs that block access to floors that you want your robot to mop.
MANUAL CLEANING MODE
To manually start a cleaning cycle, press the CLEAN button on the robot or on the mobile app. To immediately send the robot back to the dock, press the DOCK button.
IMPORTANT: Before cleaning an entire room for the first time, we recommend that you first test your robot on a small section of the floor to ensure there is no scratching.
USING THE SHARK® AI ULTRA ROBOT
SHARK® AI ULTRA ROBOT
natural_image
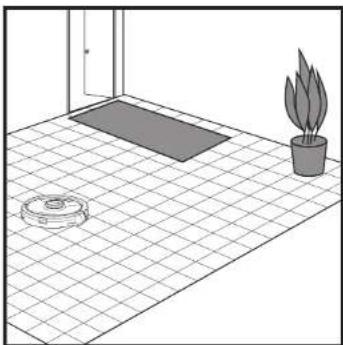
Line drawing of a room with a rug, a potted plant, and a gray mat on a tiled floor (no text or symbols)After setup is complete, follow instructions in the app to help your robot conduct an Explore Run to create an initial map of your home.
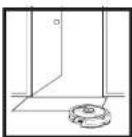
The robot will travel from room to room to identify walls, furniture, and other obstacles as it cleans. This run will take less time than a full cleaning, as it doesn't cover the entire floor.

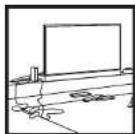
natural_image
Line drawing of a room interior with TV, rug, and small objects (no text or symbols)The robot's object detection technology helps it navigate around obstacles taller than 11.5 cm in height. Clear away small objects that may interfere with the cleaning path of your robot.
Create no-go zones in the app to block off areas you do not want the robot to enter. You can set up no-go zones around small objects, or use them to block off large areas.
VACUUM-ONLY INSTRUCTIONS
natural_image
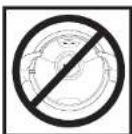
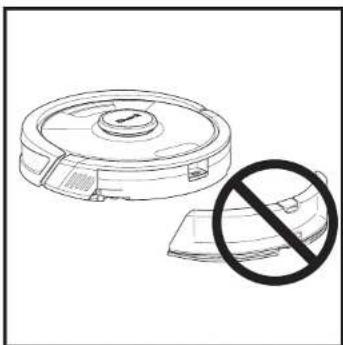
Line drawing of a robotic vacuum cleaner with a prohibition symbol overlay (no text or symbols present)To vacuum, the fluid reservoir must NOT be attached to the robot. Make sure the dust bin is properly installed.
NOTE: Be sure to charge the robot completely before its first cleaning so that it can explore, map, and clean as much of your home as possible. It may take up to 6 hours to fully charge your robot.
NOTE: Avoid moving the dock. If it is relocated, the robot may not be able to find its way back to the dock. If the robot is relocated while in use, it may not be able to follow its intelligent cleaning path, or find its way back to the dock.
USING THE SHARK® AI ULTRA ROBOT
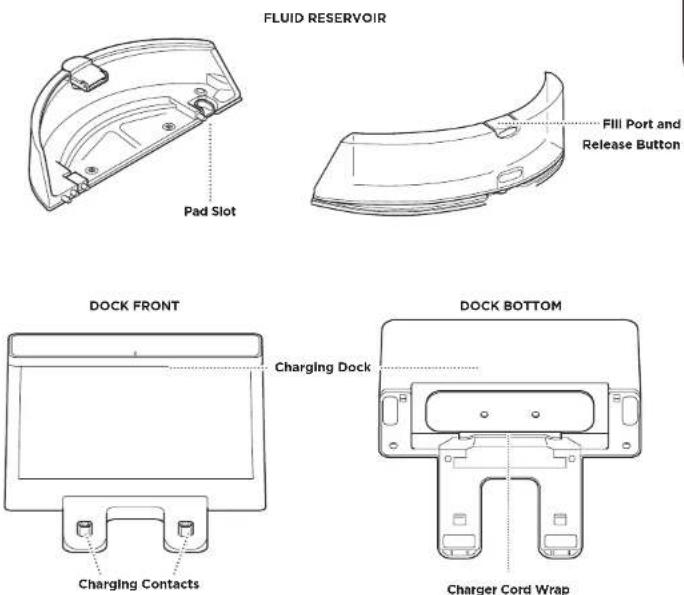
WET MOPPING SETUP
NOTE: Before it can mop, the robot MUST complete an Explore Run. After the Explore Run, you will have an option to set up Carpet Zones and verify those carpets in the app with a Carpet Verification Run. This ensures your robot will avoid carpets in mopping mode.
natural_image
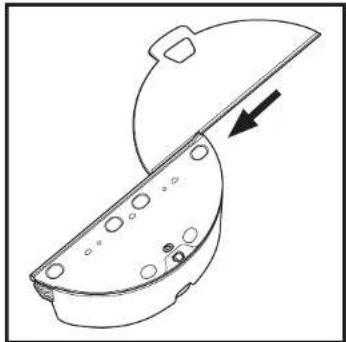
Line drawing of a mechanical component with a lid and internal holes, showing an arrow indicating direction (no text or symbols)Attach the mop pad by inserting the flat edge of the pad through the slot in the reservoir. Pull the mop pad all the way through the slot until it is securely inserted.
natural_image
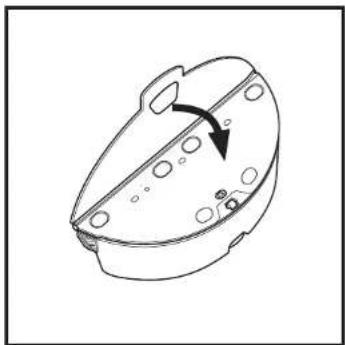
Technical line drawing of a mechanical component with no visible text or symbolsSecure the pad to the back of the reservoir.
natural_image
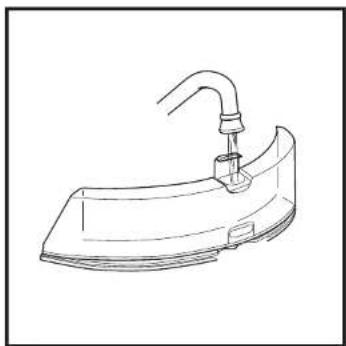
Line drawing of a mechanical component with a curved handle and attached bracket (no text or symbols)Lift open the fill cap on the top of the reservoir. Fill with water to the water line.

natural_image
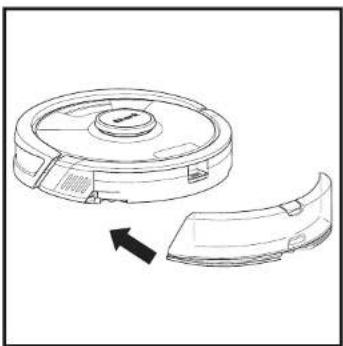
Technical line drawing of a circular mechanical component with a separate curved part, showing no text or symbols.Firmly push the reservoir into the back of the robot, behind the dust bin, and ensure the fluid reservoir clicks into place.
USING THE SHARK® AI ULTRA ROBOT
WET MOPPING SETUP
NOTE: When mopping, your robot may travel over floor mats or rugs. Before the next mopping run, move rugs or mats out of the robot's path, or use the app to enable Carpet Zones or to set up no-go zones.
natural_image
Technical line drawing of a robotic vacuum cleaner with mounting bracket (no text or symbols)Before your robot's first mopping run, set up Carpet Zones in the app to ensure your robot will avoid carpets and rugs when mopping. Follow instructions in the app to set up Carpet Zones and to start a Carpet Verification Run.
natural_image
Technical line drawing of a mechanical component with no visible text or symbolsWhen the reservoir has fluid and is properly installed, with the mop pad attached, the robot is ready to vacuum and mop simultaneously. Press the CLEAN button on the robot or in the app to start a vacuuming and mopping run. The robot will prime the mop pad for 30 seconds before starting its run.
natural_image
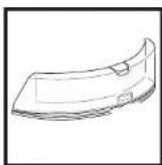
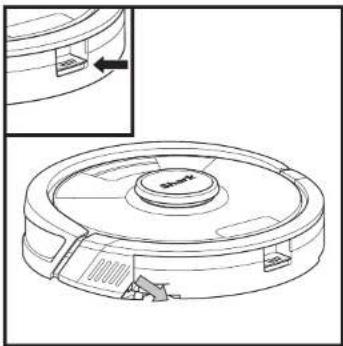
Technical line drawing of a mechanical component with a central hub and a directional arrow (no text or symbols)When mopping is complete, remove the reservoir by pressing the fill port button and sliding the reservoir out.
natural_image
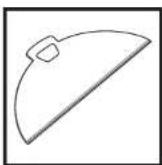
Diagram of a mechanical component with a lid and internal slots, showing an upward arrow (no text or symbols)To remove the mop pad from the reservoir, detach the pad from the back of the reservoir and slide the pad out of the slot.
CAUTION: Floors may be slippery after mopping.
USING THE SHARK® AI ULTRA ROBOT
Please visit sharkclean.com/app or visit SharkClean on YouTube for troubleshooting videos.
USING THE SHARKCLEAN' APP AND VOICE CONTROLS
Get the most out of your Shark' AI Ultra Robot with these app features:
Recharge & Resume Enable this feature to handle multi-room cleaning in larger homes. The robot will return to the dock, recharge, and can pick up where it left off. Carpet Zones Once the robot has mapped your home, set up Carpet Zones in the app to identify carpets and rugs for the robot to avoid when it mops.
•Scheduling
Set whole-home cleanings for any time, any day.
• Control From Anywhere Wherever you are, you're in control of your robot.
• Cleaning Reports Each time your robot cleans, your app will generate a cleaning report.
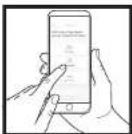
Search for SharkClean in the app store and download the app to your smartphone.

Downloaded on the App Store

COTTON Google Play
SETTING UP VOICE CONTROL WITH THE GOOGLE ASSISTANT OR AMAZON ALEXA
Visit sharkclean.com/app for setup instructions which include how to enable Shark Skill for Amazon Alexa and using with Google Assistant.
Google Assistant:
"OK Google, tell Shark to start cleaning." "OK Google, tell Shark to pause my robot." "OK Google, tell Shark to send my robot to the dock."
Amazon Alexa:
"Alexa, tell Shark to start cleaning." "Alexa, tell Shark to pause my robot." "Alexa, tell Shark to send my robot to the dock."
WI-FI TROUBLESHOOTING
• To use the app, your phone must be connected to a 2.4GHz network. The app will only work on a 2.4GHz network.
• Typical home Wi-Fi networks support both 2.4GHz and 5GHz.
- Do not use a VPN or a proxy server.
- Make sure Wi-Fi isolation is turned off on the router.
- Questions? Steps if You're Stuck: Having trouble connecting to your robot? For how-to videos, FAQs, troubleshooting, and tips & tricks visit: sharkclean.eu.
ERROR CODE PROBLEM
| 1 (RED) + Wi-Fi indicator (RED Flashing) Incorrect passwords for Wi-Fi | |
| 1 (RED flashing) + Wi-Fi (RED) SSID cannot be found, try connecting again | |
| Wi-Fi (RED Flashing) Cannot connect to Wi-Fi |
MAINTENANCE
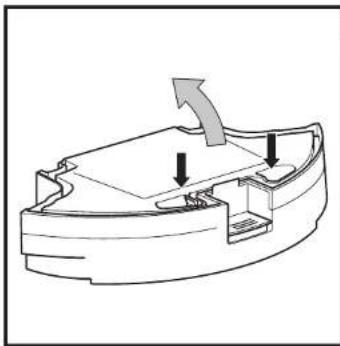
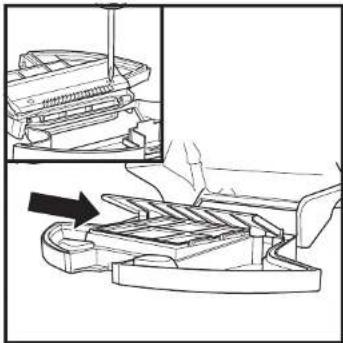
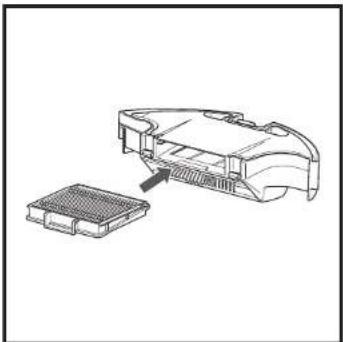
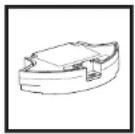
EMPTYING THE DUST BIN

natural_image
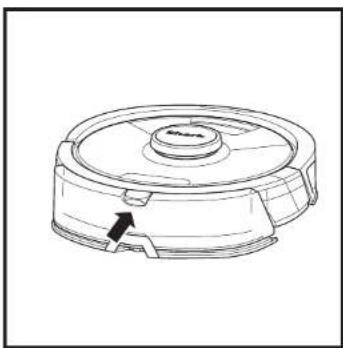
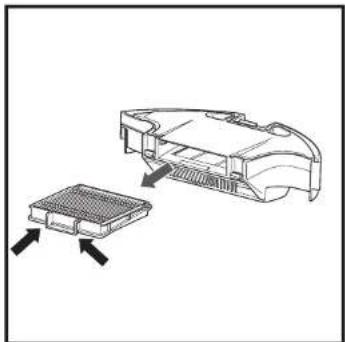
Technical line drawing of a circular mechanical component with mounting brackets and a central hub (no text or symbols)With the fluid reservoir removed, press the Dust Bin Release Button and slide out the dust bin.
natural_image
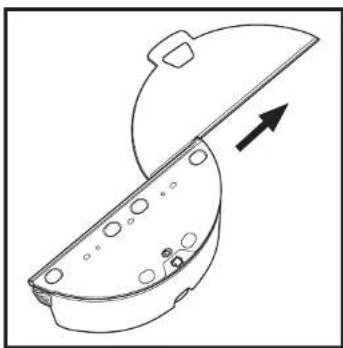
Diagram of a mechanical component with arrows indicating direction (no text or symbols)To open the dust bin lid, press and hold the button while lifting the lid, using the finger slots.
natural_image
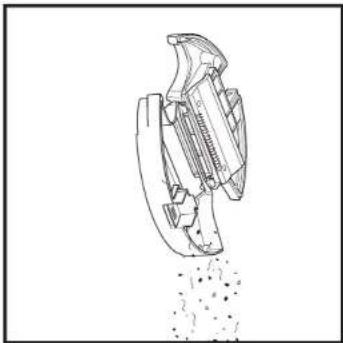
Technical line drawing of a mechanical component or assembly (no text or symbols visible)Empty debris and dust into rubbish bin. Wash dust bin if necessary, using water only.
natural_image
Technical line drawing of a mechanical assembly with an arrow indicating motion (no text or symbols present)To avoid mould, clean the area between the filter and the plastic shield after every mopping run, and periodically after vacuuming. Remove the shield and clear any debris buildup with a dry cloth or soft brush.
NOTE: Make sure to insert the dust bin completely, until it clicks into place.
MAINTENANCE
CLEANING AND REPLACING THE FILTER
For optimal suction power, after each use, clean and reinsert the filter inside the robot's dust bin. See sharkclean.eu for replacement filters.
natural_image
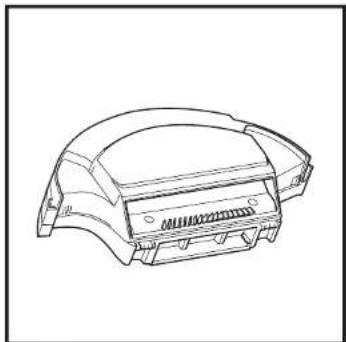
Technical line drawing of a mechanical component or housing (no text or symbols)Remove and empty the dust bin. Clean any hair or debris off the Anti-Tangle Comb on the back of the dust bin.
natural_image
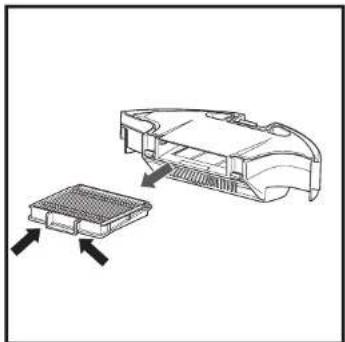
Diagram showing a device component with an inset view of its internal structure (no text or symbols)Pull filter out of the dust bin by the tabs.
natural_image
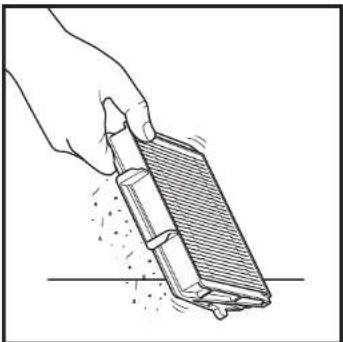
Hand holding a cleaning tool with a brush, spraying particles (no text or symbols visible)Lightly tap the filter to remove debris every time you empty the dust bin. For a deeper clean, rinse the filter with water once a month. Allow the filter to air-dry for up to 24 hours before reinstalling. Do not use soap or scrub the filter. This will damage the material.
natural_image
Technical line drawing of a mechanical component with a grid base and internal structure (no text or symbols)Reinsert the filter into the dust bin, then slide the dust bin back into the robot until it clicks into place.
NOTE: Replace the filter once a year for optimal performance.
MAINTENANCE
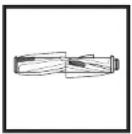
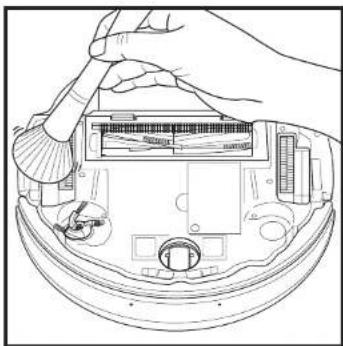
SELF-CLEANING BRUSHROLL
The Self-Cleaning Brushroll actively removes hair wrap while your robot cleans. If some debris remains wrapped around the brushroll, continue to run the robot to give the brushroll time to clean itself. If some hair wrap or debris remains after continued cleaning, carefully remove it from the brushroll.
natural_image
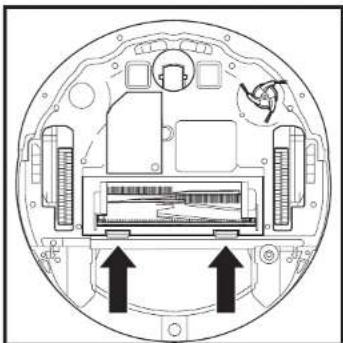
Cross-sectional diagram of a device casing with internal components and directional arrows indicating movement (no text or symbols)To access the brushroll, push up on the tabs on the brushroll door, then lift off the door.

natural_image
Illustration of a hand using a wrench to adjust internal components (no text or symbols visible)Lift out the brushroll and remove any debris. Reinstall the brushroll, inserting the flat end first. Close the brushroll door and press down until both sides click into place.
NOTE: Replace brushroll every 6 to 12 months, or when visibly worn. Some models come with one side brush. See sharkclean.eu for replacement parts.
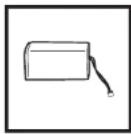
MAINTAINING THE RESERVOIR AND MOPPING PAD
To clean pads, machine wash warm with light colors. Use mild detergents and do not use bleach or fabric softeners. Air-dry, or tumble-dry on low with no dryer sheets.
Empty the reservoir after each use. Rinse the reservoir and let it air-dry. DO NOT put the reservoir in the dishwasher.
NOTE: Before storing, make sure the reservoir and pad are completely dry. Store the reservoir and pad in a dry place to prevent damage.
MAINTENANCE
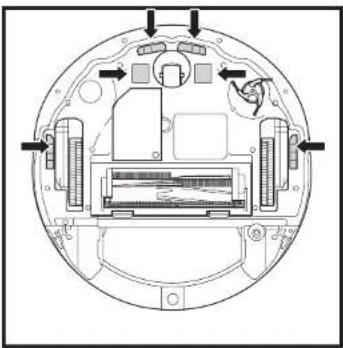
CLEANING SENSORS AND CHARGING CONTACTS
CLEAN SENSORS AND CHARGING CONTACTS AS NEEDED. With a dry cloth, gently dust off the sensors and contacts located on the bottom of the robot and on the dock.
natural_image
Top-down schematic of a mechanical device with internal components and mounting holes (no text or labels)
natural_image
Diagram of a device with a switch connected to a power outlet, showing internal components and wiring (no text or symbols)IMPORTANT: The robot uses cliff sensors to avoid stairs and other steep drops. Sensors may work less effectively when they are dirty. For best results, clean sensors regularly.
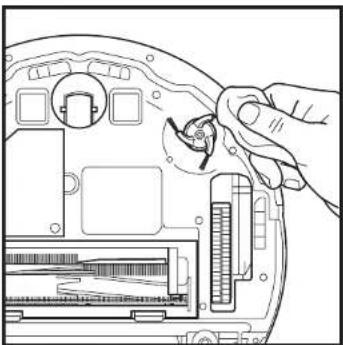
CLEANING SIDE BRUSH
CLEAN SIDE BRUSH AS NEEDED.
natural_image
Line drawing of a hand inserting a small component into a device casing (no text or symbols)Carefully unwind and remove any string or hair wrapped around the brush. Gently wipe the brush with a dry cloth. To reinstall, snap the brush over the peg. Spin the brush manually to make sure it is installed correctly.
NOTE: Side brush design may vary
NOTE: Remove and replace the side brush if it is bent or damaged. To remove the brush, lift it off its peg.
MAINTENANCE
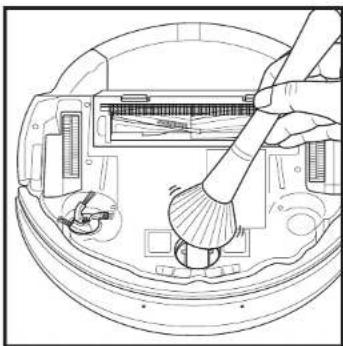
CLEANING THE WHEELS
CLEAN FRONT WHEEL PERIODICALLY. See sharkclean.eu for replacement parts.
natural_image
Technical line drawing of a mechanical component with a hand holding a brush (no text or symbols)Clean the wheel housing.
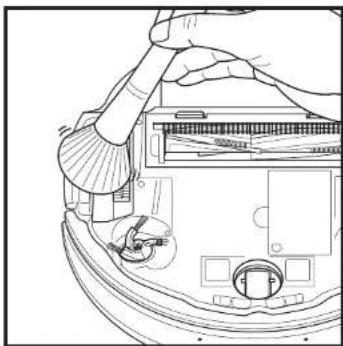
natural_image
Line drawing of a hand operating a computer with a scroll wheel (no text or symbols)Periodically clean the drive wheels and the housing around them. To clean, rotate each drive wheel while dusting.
NOTE: Brush not included.
REPLACEMENT PARTS
NOTE: To order replacement visit sharkclean.eu.
Filter Brushroll
Robot Dust Bin
[Non-Text]
Battery
Brushroll Door
Side Brush
NOTE: Side brush design may vary
Charging Dock
Dock Landing Mat
Mop Pad
Fluid Reservoir
ERROR # ERROR CODE SOLUTION
| 2 | DOCK (RED) + ! (RED) flashing | Side brush is stuck. Remove any debris from around the side brush so it moves freely. |
| 2 | CLEAN (RED) + DOCK (RED) + ! (RED) flashing | A drive wheel is stuck. Clean the wheels and remove any debris wrapped around the axes so they can move freely. |
| 2 | CLEAN (WHITE) + DOCK (RED) + ! (RED) flashing | Wheel motor encoder failure. Please visit sharkclean.eu. |
| 2 | CLEAN (WHITE) + ! (RED) flashing | Blockage in brushroll. Remove any debris from around and inside the brushroll so that it can spin freely. |
| 3 | CLEAN (GREEN) + DOCK (GREEN) + ! (RED) flashing together | Suction motor failure. Remove and empty the dust on, clean the filters, remove the brushroll and brushroll door, and remove blockages. |
| 6 | DOCK (RED) flashing | Front bumper may be jammed. Clean the bumper and make sure it moves in and out freely. |
| 7 | CLEAN (RED) + DOCK (WHITE) flashing | Cliff sensor error. Move your robot to a new location and clean its cliff sensors. |
| 9 | CLEAN (RED) + DOCK (RED) flashing | Robot clust bin needs to be reinstalled. Insert the clust bin until it clicks in place. |
| 10 | CLEAN (RED) flashing | Robot may be stuck on an obstacle. Move robot to a new location on a level surface. |
| 16 | CLEAN (RED) + DOCK (WHITE) alternating | Robot is stuck. Move your robot to a new location and make sure the front bumper moves in and out freely. |
| 21 | CLEAN (RED) + DOCK (WHITE) + ! (RED) flashing | Robot has encountered an error while booting. Please turn the power off and back on. |
| 24 | BATTERY ICON (RED) flashing | Battery is critically low and needs recharging. Please pick up your robot and place it on the base. Make sure the base indicator light turns blue to confirm your robot is placed on the base correctly. |
| 24 | DOCK (WHITE) + ! (RED) flashing | Robot has encountered an error while charging. Please make sure you are using the correct power cord for the base. |
| 25 | CLEAN (YELLOW) flashing | Fluid reservoir is empty. |
MAINTENANCE
TROUBLESHOOTING
If any error lights are illuminated or flashing on your Shark ^® AI Ultra Robot, see the error code chart below;
Shark | NINJA
TWO (2) YEAR LIMITED GUARANTEE
When a consumer buys a product in Europe, they get the benefit of legal rights relating to the quality of the product (your "statutory rights").
You can enforce these rights against your retailer. However, at Shark ^a we are so confident about the quality of our products that we give the product owner an additional manufacturer's guarantee of two years. These terms and conditions relate to our manufacturer's guarantee only - your statutory rights are unaffected.
The conditions below describe the prerequisites and scope of our guarantee. They do not affect your statutory rights or the obligations of your retailer and your contract with them.
Shark Guarantees
A household appliance like a Robot Vacuum constitutes a sizeable investment. Your new machine needs to work properly for as long as possible. The guarantee it comes with is an important consideration - and reflects how much confidence the manufacturer has in its product and manufacturing quality.
Every Shark® machine comes with a free parts and labour guarantee. Our customer service helpline (0800 862 0453) is open from 9.00am to 6.00pm Monday - Friday. It's free to call, and you'll be put straight through to a Shark® representative. You'll also find online support at www.sharkclean.eu.
How do I register my extended Shark guarantee?
You can register your guarantee online within 28 days of purchase. To save time, you'll need the following information about your machine:
- Date you purchased the machine (receipt or delivery note)
To register online, please visit www.Sharkclean.eu/uk/register-guarantee. Products purchased directly from Shark® are automatically registered.
What is covered by the free Shark® guarantee?
Repair or replacement (at Shark's discretion) of your Shark® machine, including all parts and labour. A Shark® guarantee is in addition to your legal rights as a consumer.
What are the benefits of registering my free Shark guarantee?
When you register your guarantee we'll have your details to hand if we ever need to get in touch. If you further agree to receive communications from us, you can also receive tips and advice on how to get the best out of your Shark ^1 Robot Vacuum and hear the latest news about new Shark ^2 technology and launches.
If you register your guarantee online, you'll get instant confirmation that we've received your details.
How long are new Shark® machines guaranteed for?
Our confidence in our design and quality control means that your new Shark® Robot Vacuum is guaranteed for two years.
Where can I buy genuine Shark ^® spares and accessories?
Shark® spares and accessories are developed by the same engineers who developed your Shark® Robot Vacuum. You'll find a full range of Shark® spares, replacement parts and accessories for all Shark® machines at www.sharkclean.eu.
Please remember that damage caused by use of non-Shark ^® spares is not covered under your guarantee.
What is not covered by the free Shark guarantee?
-
Normal wear and tear of wearable parts, which require regular maintenance and/or replacement to ensure the proper functioning of your unit, are not covered by this guarantee. Replacement parts are available for purchase at sharkclean.eu.
-
Any unit that has been tampered with or used for commercial purposes.
-
Accidental damage and faults caused by negligent use or care, misuse, neglect, carloss operation or handling of the Robot Vacuum which is not in accordance with this Shark Instruction booklet supplied with your machine.
- Use of parts not assembled or installed in accordance with these instructions.
- Faulty installation (except where installed by Shark).
- Repairs or alterations carried out by parties other than Shark ^® or its agents.
PLEASE READ CAREFULLY AND KEEP FOR FUTURE REFERENCE.
These instructions are designed to help you keep your Shark AI Robot running at peak performance.
SharkNinja Europe Limited,
3150 Century Way,
Thorpe Park
Loods,
LS15 82B
SharkNinja Germany GmbH
c/o Regus Management GmbH,
Excellent Business Center 10,+11, Stock,
Westhafonplatz 1,
60327 Frankfurt am Main, Germany
sharkclean.eu
Illustrations may differ from actual product. We are constantly striving to improve our products; therefore the specifications contained herein are subject to change without notice.
natural_image
Line drawing of a circular mechanical component with two mounting holes (no text or symbols)natural_image
Technical diagram of a mechanical component with internal parts and an arrow indicating a feature (no text or symbols present)natural_image
Line drawing of a robotic vacuum cleaner with attached power outlet (no text or symbols)natural_image
Technical line drawing of a mechanical component with a circular base and central hub, showing an arrow pointing to a specific feature (no text or symbols present)En uso
natural_image
Line drawing of a room with a rug, a potted plant, and a gray mat on a tiled floor (no text or symbols)natural_image
Line drawing of a room interior with TV, rug, and small objects (no text or symbols)natural_image
Line drawing of a robotic vacuum cleaner with a prohibition symbol overlay (no text or symbols present)natural_image
Line drawing of a mechanical component with a lid and internal holes, showing an arrow indicating direction (no text or symbols)natural_image
Technical line drawing of a mechanical component with a curved arrow indicating rotation (no text or symbols)natural_image
Line drawing of a mechanical component with a curved handle and central hub (no text or symbols)natural_image
Technical line drawing of a circular mechanical component with a separate curved part, showing no text or symbols.natural_image
Technical line drawing of a robotic vacuum cleaner with mounting bracket (no text or symbols)natural_image
Technical line drawing of a mechanical component with no visible text or symbolsnatural_image
Line drawing of a robotic vacuum cleaner (no text or symbols)natural_image
Technical line drawing of a mechanical component with an arrow indicating direction (no text or symbols)Download on the App Store

GETT ON Google Play
natural_image
Technical line drawing of a circular mechanical component with a central hub and mounting brackets (no text or symbols)natural_image
Diagram of a mechanical component with arrows indicating direction (no text or symbols)natural_image
Technical line drawing of a mechanical component or assembly (no text or symbols visible)natural_image
Technical line drawing of a mechanical assembly with an arrow indicating motion (no text or symbols present)natural_image
Technical line drawing of a mechanical component or housing (no text or symbols)natural_image
Diagram showing a device component with arrows indicating assembly or insertion (no text or symbols present)natural_image
Hand holding a cleaning tool with a brush, spraying particles (no text or symbols visible)natural_image
Technical line drawing of a mechanical component with a grid base and internal structure (no text or symbols)natural_image
Cross-sectional diagram of a device showing internal components and directional arrows (no text or symbols)natural_image
Illustration of a hand using a caliper to adjust internal components (no text or symbols visible)natural_image
Top-down schematic of a circular electronic device with internal components and mounting holes (no text or symbols)
natural_image
Diagram of a device with a plug inserted into a socket, connected to a power outlet (no text or symbols present)natural_image
Line drawing of a hand inserting a small component into a device casing (no text or symbols)natural_image
Line drawing of a hand using a tool to clean or repair electronic components (no text or symbols visible)natural_image
Line drawing of hands installing a component on a device (no text or symbols visible)SharkNinja Europe Limited,
3150 Century Way,
Thorpe Park,
Leeds
LS15 8ZB
SharkNinja Germany GmbH.
c/o Regus Management GmbH.
Excellent Business Center 10.+11. Stock,
Westhafenplatz
natural_image
Technical diagram of a mechanical component with internal parts and an arrow indicating a feature (no text or symbols present)natural_image
Line drawing of a robotic vacuum cleaner with attached power outlet (no text or symbols)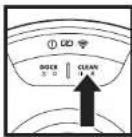
BOUTON CLEAN (NETTOYAGE)
natural_image
Line drawing of a room with a rug, a potted plant, and a tiled floor (no text or symbols)natural_image
Line drawing of a room interior with TV, rug, and objects (no text or symbols)natural_image
Line drawing of a circular object with a stopper and a rectangular base, accompanied by a prohibition symbol (no text or labels)natural_image
Line drawing of a mechanical component with a lid and internal holes, showing an arrow indicating direction (no text or symbols)natural_image
Technical line drawing of a mechanical component with no visible text or symbolsnatural_image
Line drawing of a mechanical component with a curved handle and base plate (no text or symbols)natural_image
Technical line drawing of a mechanical component with an arrow indicating rotation (no text or symbols)natural_image
Technical line drawing of a robotic vacuum cleaner with mounting bracket (no text or symbols)natural_image
Technical line drawing of a mechanical component with no visible text or symbolsnatural_image
Technical line drawing of a mechanical component with a central hub and mounting base (no text or symbols)natural_image
Line drawing of a mechanical component with a curved lid and an arrow indicating direction (no text or symbols)Download on the App Store

GETTTON Google Play
CONFIGURATION DE LA COMMANDE VOCALE AVEC L'ASSISTANT GOOGLE OU AMAZON ALEXA
natural_image
Technical line drawing of a circular mechanical component with a central hub and mounting brackets (no text or symbols)natural_image
Technical line drawing of a mechanical component or assembly (no text or symbols visible)natural_image
Diagram of a mechanical component with arrows indicating direction (no text or symbols)natural_image
Technical line drawing of a mechanical device with an inset showing a component being inserted (no text or symbols present)natural_image
Technical line drawing of a mechanical component or housing (no text or symbols)natural_image
Diagram showing a device with a grid base and internal components, no text or symbols presentnatural_image
Hand holding a gridded object with motion lines indicating movement (no text or symbols)natural_image
Technical line drawing of a mechanical component with a base and internal structure (no text or symbols)natural_image
Cross-sectional diagram of a device casing with internal components and directional arrows indicating movement (no text or symbols)natural_image
Illustration of a hand using a wrench to adjust internal components (no text or symbols visible)natural_image
Technical diagram of a circular mechanical or electronic component with internal components and directional arrows (no text or symbols)
natural_image
Diagram of a device with a plug inserted into a socket, connected to a power outlet (no text or symbols present)natural_image
Line drawing of a hand using a tool to adjust or install electronic components on a device (no text or symbols visible)natural_image
Line drawing of a hand using a tool to clean or repair electronic components (no text or symbols visible)natural_image
Line drawing of hands installing a component on a device (no text or symbols visible)Toll-free Customer Service Number: +33800908874
E-mail address: serviceclients.fr@sharkninja.com
IMPORTANTI ISTRUZIONI DI SICUREZZA
LEGGERE ATTENTAMENTE PRIMA DELL'UTILIZZO • SOLO PER IMPIEGO DOMESTICO
⚠AVVERTENZA
natural_image
Technical diagram of a mechanical component with internal parts and an arrow indicating a feature (no text or symbols present)natural_image
Line drawing of a robotic vacuum cleaner with attached power outlet (no text or symbols)In uso
Carica
PULSANTE CLEAN
natural_image
Simple line drawing of a room with a rug, a potted plant, and a tiled floor (no text or symbols)natural_image
Line drawing of a room interior with TV, rug, and small objects (no text or symbols)natural_image
Line drawing of a circular device with a stopper and a prohibition symbol (no text or labels)natural_image
Line drawing of a mechanical component with a lid and internal holes, showing an arrow indicating direction (no text or symbols)natural_image
Technical line drawing of a mechanical component with internal holes and a curved arrow indicating rotation (no text or symbols)natural_image
Line drawing of a faucet inserted into a curved container (no text or symbols)natural_image
Technical line drawing of a mechanical component with an arrow indicating rotation (no text or symbols)natural_image
Technical line drawing of a robotic vacuum cleaner with mounting bracket (no text or symbols)natural_image
Technical line drawing of a mechanical component with no visible text or symbolsnatural_image
Line drawing of a mechanical component with a central hub and a directional arrow (no text or symbols)natural_image
Line drawing of a mechanical component with a lid and arrow indicating direction (no text or symbols)Download on the App Store

GETTON Google Play
IMPOSTAZIONE DEL CONTROLLO VOCALE CON L'ASSISTENTE GOOGLE O CON AMAZON ALEXA
natural_image
Technical line drawing of a circular mechanical component with a central hub and mounting brackets (no text or symbols)natural_image
Technical line drawing of a mechanical component or assembly (no text or symbols visible)natural_image
Technical line drawing of a mechanical component with arrows indicating direction (no text or symbols)natural_image
Technical line drawing of a mechanical assembly with an arrow indicating direction (no text or symbols present)natural_image
Technical line drawing of a car body panel (no text or symbols)natural_image
Diagram showing a device with a grid base and an open panel, no text or symbols presentnatural_image
Line drawing of a hand holding a handheld device with granular material, no text or symbols presentnatural_image
Diagram of a device with a meshed base and internal components, no text or symbols presentnatural_image
Cross-sectional diagram of a device showing internal components and directional arrows (no text or symbols)natural_image
Illustration of a hand using a wrench to adjust internal components (no text or symbols visible)natural_image
Top-down schematic of a mechanical device with internal components and mounting features (no text or labels)
natural_image
Diagram of a device with a switch connected to a power outlet, showing internal components and wiring (no text or symbols)natural_image
Line drawing of a hand inserting a small component into a device casing (no text or symbols)natural_image
Line drawing of a hand using a tool to clean or repair electronic components (no text or symbols visible)natural_image
Line drawing of a hand inserting a component into a device housing (no text or symbols)SharkNinja Europe Limited.
3150 Century Way,
Thorpe Park
LS15 87B
SharkNinja Germany GmbH
c/o Regus Management GmbH,
Excellent Business Center 10.+II. Stock,
Westnarenplatz 1,
06.92.1: Anecorfoe Start Inc, Germany
sharkclean.eu
CONFIGURATIE STATION

natural_image
Technical diagram of a mechanical component with internal parts and an arrow indicating a feature (no text or symbols present)natural_image
Line drawing of a robotic vacuum cleaner with attached electrical outlet (no text or symbols)In Gebruik


KNOP CLEAN
natural_image
Line drawing of a room with a rug, a potted plant, and a gray tile on the floor (no text or symbols)natural_image
Line drawing of a room interior with TV, rug, and small objects (no text or symbols)natural_image
Line drawing of a robotic vacuum cleaner with a prohibition symbol overlay (no text or symbols present)natural_image
Line drawing of a mechanical component with a lid and internal holes, showing an arrow indicating direction (no text or symbols)natural_image
Technical line drawing of a mechanical component with an arrow indicating rotation (no text or symbols)natural_image
Line drawing of a mechanical component with a curved handle and base plate (no text or symbols)natural_image
Line drawing of a circular device with a separate curved component, showing no text or symbols.natural_image
Line drawing of a robotic vacuum cleaner with directional arrows indicating motion (no text or symbols)natural_image
Technical line drawing of a circular mechanical component with a central hub and side slots (no text or symbols)natural_image
Technical line drawing of a mechanical component with a central hub and an arrow indicating a specific feature (no text or symbols present)natural_image
Diagram of a mechanical component with a lid and internal holes, showing an upward arrow (no text or symbols)Download on the App Store

BITTOK Google Play
STEMBEDIENING INSTELLEN MET GOOGLE ASSISTANT OF AMAZON ALEXA
WIFI PROBLEEMOPLOSSING
natural_image
Technical line drawing of a circular mechanical component with a central hub and mounting brackets (no text or symbols)natural_image
Diagram of a mechanical component with arrows indicating direction (no text or symbols)natural_image
Technical line drawing of a mechanical component or assembly (no text or symbols visible)natural_image
Technical line drawing of a mechanical assembly with an arrow indicating motion (no text or symbols present)natural_image
Technical line drawing of a mechanical component or housing (no text or symbols)natural_image
Diagram showing a device component with an inset view of its internal structure (no text or symbols)natural_image
Hand holding a cleaning tool with a grater, spraying particles (no text or symbols visible)natural_image
Technical line drawing of a mechanical component with a grid base and internal structure (no text or symbols)natural_image
Cross-sectional diagram of a device casing with internal components and directional arrows indicating movement (no text or symbols)natural_image
Illustration of a hand using a tool to adjust or install electronic components inside a circular housing (no text or symbols visible)natural_image
Top-down schematic of a circular electronic device with internal components and mounting holes (no text or symbols)
natural_image
Diagram of a device with a switch connected to a power outlet, showing internal components and wiring (no text or symbols)natural_image
Line drawing of a hand inserting a spring into a device casing (no text or symbols)natural_image
Line drawing of a hand using a tool to clean or repair electronic components (no text or symbols visible)natural_image
Line drawing of a hand inserting a component into a device housing (no text or symbols)FOUT # FOUTCODE OPLOSSING
SharkNinja Europe Limited,
3150 Century Way,
Thorpe Park.
LCOCS, LS15 879
SharkNinja Germany GmbH
c/o Regus Management GmbH,
Excellent Business Center 10.+11. Stock
Westhafenplatz 1,
natural_image
Technical diagram of a mechanical component with internal parts and an arrow indicating a feature (no text or symbols present)Slik SLÅR DU PÅ ROBOTEN: Plasser roboten på ladestasjonen eller trykk og hold BASE-knappen i 5 til 7 sekunder inntil indikatorlysene slås på.
natural_image
Line drawing of a robotic vacuum cleaner connected to a power outlet (no text or symbols)natural_image
Technical line drawing of a mechanical component with a circular base and central hub, showing an arrow pointing to a specific feature (no text or symbols present)I bruk
Under lading (hvit)


CLEAN-KNAPP
(RENGJ∅RING-KNAPP)
natural_image
Line drawing of a room with a rug, a potted plant, and a gray tile on the floor (no text or symbols)natural_image
Line drawing of a room interior with TV, rug, and small objects (no text or symbols)natural_image
Line drawing of a robotic vacuum cleaner with a prohibition symbol overlay (no text or symbols present)natural_image
Line drawing of a mechanical component with a lid and internal holes, showing an arrow indicating direction (no text or symbols)natural_image
Technical line drawing of a mechanical component with a curved arrow indicating rotation (no text or symbols)natural_image
Line drawing of a faucet inserted into a curved plastic component (no text or symbols)Lølt påfyllingsdekselet på toppen av tanken. Fyll med romtemperert vann opp til påfyllingslinjen MAX. Lukk hetten og se til at den er godt forseglet.
natural_image
Line drawing of a circular device with a curved base and an arrow indicating rotation (no text or symbols)VÄTMOPPINGSOPPSETTVÄTMOPPINGSOPPSETT
natural_image
Technical line drawing of a robotic vacuum cleaner with mounting bracket (no text or symbols)natural_image
Technical line drawing of a mechanical component with no visible text or symbolsnatural_image
Technical line drawing of a mechanical component with a central hub and mounting bracket (no text or symbols)natural_image
Line drawing of a mechanical component with a lid and arrow indicating direction (no text or symbols)Download on the App Store

GETTTON Google Play
FOR A SETTE OPP TALESTYRING MED GOOGLE ASSISTENT ELLER AMAZON ALEXA,
T∅MMING AV ST∅VBEHOLDER
natural_image
Technical line drawing of a circular mechanical component with a central hub and mounting brackets (no text or symbols)natural_image
Diagram of a mechanical component with arrows indicating direction (no text or symbols)natural_image
Technical line drawing of a mechanical component or assembly (no text or symbols visible)natural_image
Technical line drawing of a mechanical assembly with an arrow indicating motion (no text or symbols present)natural_image
Technical line drawing of a mechanical component or housing (no text or symbols)Fjern og tøm støvbeholderen. Rens eventuelt hår eller rusk fra «Anti-Tangle»-kammen på baksiden av støvbeholderen.
natural_image
Diagram showing a device component with arrows indicating assembly or insertion (no text or symbols present)natural_image
Hand holding a cleaning tool with a grater, spraying particles (no text or symbols visible)natural_image
Technical line drawing of a mechanical component with a grid base and internal structure (no text or symbols)natural_image
Cross-sectional diagram of a device casing with internal components and directional arrows indicating movement (no text or symbols)natural_image
Illustration of a hand using a caliper to adjust internal components (no text or symbols visible)natural_image
Top-down schematic of a circular electronic device with internal components and mounting holes (no text or symbols)
natural_image
Diagram of a device with a switch connected to a power outlet, showing internal components and wiring (no text or symbols)natural_image
Line drawing of a hand inserting a small component into a device casing (no text or symbols)natural_image
Line drawing of a hand using a tool to clean or repair electronic components (no text or symbols visible)Rengjør hjulhuset.

natural_image
Line drawing of a hand inserting a component into a device housing (no text or symbols)3150 Century way. Thomas Park
Mortpe Park,
LS15 87B, Storbritannia
SharkNinja Germany GmbH
c/o Regus Management GmbH,
Excellent Business Center 10.+11. Stock,
Westhafenplatz 1,
60327 Frankfurt am Main,Tyskland
sharkclean.eu
natural_image
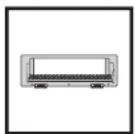
Simple line drawing of a rectangular device with two mounting feet (no text or symbols)Contactos de carregamento
natural_image
Technical diagram of a mechanical component with internal parts and an arrow indicating a feature (no text or symbols present)natural_image
Line drawing of a robotic vacuum cleaner with attached power outlet (no text or symbols)
BOTÃO CLEAN
RECARREGAR E RETOMAR
natural_image
Line drawing of a room with a rug, a potted plant, and a gray tile on the floor (no text or symbols)natural_image
Line drawing of a room interior with TV, rug, and objects (no text or symbols)natural_image
Line drawing of a robotic vacuum cleaner with a prohibition symbol overlay (no text or symbols present)natural_image
Line drawing of a mechanical component with a curved base and a lid, showing a black arrow pointing to a feature (no text or symbols)natural_image
Technical line drawing of a mechanical component with circular holes and an arrow indicating rotation (no text or symbols)natural_image
Line drawing of a mechanical component with a curved handle and a small inset component (no text or symbols)natural_image
Line drawing of a robotic vacuum cleaner with a separate clamped component (no text or symbols)natural_image
Diagram of a robotic vacuum cleaner with directional arrows indicating motion (no text or symbols)natural_image
Technical line drawing of a mechanical component with no visible text or symbolsnatural_image
Line drawing of a robotic vacuum cleaner (no text or symbols)natural_image
Technical line drawing of a mechanical component with an open lid and internal holes, showing an upward arrow (no text or symbols)natural_image
Technical line drawing of a circular mechanical component with a central hub and mounting brackets (no text or symbols)natural_image
Diagram of a mechanical component with arrows indicating direction (no text or symbols)natural_image
Technical line drawing of a mechanical component or assembly (no text or symbols visible)natural_image
Technical line drawing of a mechanical device with an arrow indicating motion (no text or symbols present)natural_image
Technical line drawing of a mechanical component or housing (no text or symbols)natural_image
Diagram showing a device component with arrows indicating assembly or transformation (no text or symbols present)natural_image
Hand holding a cleaning tool with a grater, spraying particles (no text or symbols visible)natural_image
Diagram of a device with a component inserted into a housing, showing internal structure and a separate storage unit (no text or symbols)natural_image
Cross-sectional diagram of a device showing internal components and two upward arrows indicating movement or force (no text or symbols present)natural_image
Illustration of a hand using a wrench to adjust internal components (no text or symbols visible)natural_image
Top-down schematic of a mechanical device with internal components and mounting features (no text or labels)
natural_image
Diagram of a device with a plug inserted into a socket, connected to a wall and cable (no text or symbols present)natural_image
Line drawing of a hand inserting a small mechanical component into a device casing (no text or symbols)natural_image
Line drawing of a hand using a tool to clean or repair electronic components (no text or symbols visible)natural_image
Line drawing of a hand inserting a component into a device housing (no text or symbols)SharkNinja Europe Limited.
3150 Century Way,
Thorpe Park,
Leeds, LS15 87B
SharkNinja Germany GmbH
c/o Regus Management GmbH,
Excellent Business Center 10.+11. Stock
Westhafenplatz 1,
60527 Frankfurt am Main, Alemannin
sharkclean.eu
natural_image
Technical diagram of a mechanical component with internal parts and an arrow indicating a feature (no text or symbols present)natural_image
Line drawing of a robotic vacuum cleaner with attached power outlet (no text or symbols)ERKKIV
Kāytōssā

TKpd
K002165350
[valkolen]

Gelttinen
(alkohen)

äihainen
(cuninen)

CLEAN-PAINIKE
(PUHDISTUS)
MANUAALINEN PUHDISTUSTILA
natural_image
Line drawing of a room with a rug, a potted plant, and a gray mat on a tiled floor (no text or symbols)natural_image
Line drawing of a room interior with TV, rug, and small objects (no text or symbols)natural_image
Line drawing of a robotic vacuum cleaner with a prohibition symbol overlay (no text or symbols present)natural_image
Line drawing of a mechanical component with a lid and internal holes, showing an arrow indicating direction (no text or symbols)natural_image
Technical line drawing of a mechanical component with no visible text or symbolsnatural_image
Line drawing of a mechanical component with a curved pipe inserted into a rectangular housing (no text or symbols)natural_image
Technical line drawing of a circular mechanical component with a separate curved part, showing no text or symbols.natural_image
Technical line drawing of a robotic vacuum cleaner with mounting bracket (no text or symbols)natural_image
Technical line drawing of a mechanical component with no visible text or symbolsnatural_image
Technical line drawing of a mechanical component with a central hub and mounting bracket (no text or symbols)natural_image
Diagram of a mechanical component with a curved housing and an arrow indicating direction (no text or symbols)Download on the App Store

Garron Google Play
PUHEOHJAUKSEN KÄYTTÖÖNOTTO GOOGLE ASSISTANT-TAI AMAZON ALEXA-SOVELLUKSESSA
WI-FI-YHTEYDEN VIANMÄÄRITYS
natural_image
Technical line drawing of a circular mechanical component with mounting brackets and a central hub (no text or symbols)natural_image
Diagram of a mechanical component with arrows indicating direction (no text or symbols)natural_image
Technical line drawing of a mechanical component or assembly (no text or symbols visible)natural_image
Technical line drawing of a mechanical assembly with an arrow indicating motion (no text or symbols present)natural_image
Technical line drawing of a mechanical component or housing (no text or symbols)natural_image
Diagram showing a device component with arrows indicating assembly or insertion (no text or symbols present)natural_image
Hand holding a cleaning tool with a grater, spraying particles (no text or symbols visible)natural_image
Technical line drawing of a mechanical component with a grid base and internal structure (no text or symbols)natural_image
Cross-sectional diagram of a device casing with internal components and two upward arrows indicating movement or force (no text or symbols present)natural_image
Illustration of a hand using a caliper to adjust internal components (no text or symbols visible)natural_image
Top-down schematic of a circular electronic device with internal components and mounting holes (no text or symbols)
natural_image
Diagram of a device with a plug and power outlet connected to a circular base, showing internal components (no text or symbols)natural_image
Line drawing of a hand inserting a small component into a device casing (no text or symbols)natural_image
Line drawing of a hand using a tool to clean or repair electronic components (no text or symbols visible)natural_image
Line drawing of hands installing a component on a device (no text or symbols visible)SharkNinja Europe Limited.
3150 Century Way,
Thorpe Park,
Leeds.
LS15 8ZB
SharkNinja Germany GmbH
c/o Regus Management GmbH,
Excellent Business Center 10.+11. Stock,
Westhafenplatz 1,
60327 Frankfurt am Main, Germany
sharkclean.eu
natural_image
Technical diagram of a mechanical component with internal parts and an arrow indicating a feature (no text or symbols present)natural_image
Line drawing of a robotic vacuum cleaner with attached power outlet (no text or symbols)
CLEAN-KNAPP (STÄDA)
natural_image
Line drawing of a room with a rug, a potted plant, and a gray tile on the floor (no text or symbols)natural_image
Line drawing of a room interior with TV, rug, and small objects (no text or symbols)natural_image
Line drawing of a circular device with a stopper and a prohibition symbol (no text or labels)natural_image
Line drawing of a mechanical component with a lid and internal holes, showing an arrow indicating direction (no text or symbols)natural_image
Line drawing of a mechanical component with an arrow indicating rotation (no text or symbols)natural_image
Line drawing of a medical or laboratory device with a curved handle and central component (no text or symbols)natural_image
Line drawing of a circular mechanical component with a separate curved part, showing no text or symbols.natural_image
Technical line drawing of a robotic vacuum cleaner with mounting bracket (no text or symbols)natural_image
Technical line drawing of a mechanical component with a central hub and side slots (no text or symbols)natural_image
Line drawing of a robotic vacuum cleaner (no text or symbols)natural_image
Line drawing of a mechanical component with a lid and internal holes, showing an arrow indicating direction (no text or symbols)Download on the App Store

• BETTON Google Play
INSTÄLLNING AV RÖSTKONTROLL MED GOOGLE ASSISTANT ELLER AMAZON ALEXA
natural_image
Technical line drawing of a circular mechanical component with a central hub and side tabs, shown with an inset view of a curved component (no text or symbols)natural_image
Technical line drawing of a mechanical component or assembly (no text or symbols visible)natural_image
Diagram of a mechanical component with arrows indicating direction (no text or symbols)natural_image
Technical line drawing of a mechanical assembly with an arrow indicating direction (no text or symbols present)natural_image
Technical line drawing of a mechanical component or housing (no text or symbols)natural_image
Diagram showing a device component with arrows indicating assembly or insertion (no text or symbols present)natural_image
Hand holding a cleaning tool with a grater, spraying particles (no text or symbols visible)natural_image
Technical line drawing of a mechanical component with a grid base and internal structure (no text or symbols)natural_image
Cross-sectional diagram of a device casing with internal components and two upward arrows indicating movement or force (no text or symbols present)natural_image
Illustration of a hand using a caliper to adjust internal components (no text or symbols visible)natural_image
Top-down schematic of a mechanical device with internal components and mounting features (no text or labels)
natural_image
Diagram of a device with a switch connected to a power outlet, showing internal components and wiring (no text or symbols)natural_image
Line drawing of a hand inserting a small component into a device casing (no text or symbols)natural_image
Line drawing of a hand using a tool to clean or repair electronic components (no text or symbols visible)Rengör hjulkåpan.
natural_image
Line drawing of a hand inserting a component into a device housing (no text or symbols)SharkNinja Europe Limited,
3150 Century way, Thems Park
Thorbe Park,
ENGLISH Illustrations may differ from actual product. We are constantly striving to improve our products; therefore the specifications contained here in are subject to change without notice.
© 2022 SharkNinja Operating LLC. SHARK is a registered trademark in the European Union of SharkNinja Operating LLC.
Apple App Store is a trademark of Apple Inc. Google, Android and Google Play are trademarks of Google LLC.