
Mini Nature Wild Cam TX117 - Camera TECHNAXX - Free user manual and instructions
Find the device manual for free Mini Nature Wild Cam TX117 TECHNAXX in PDF.
| Product type | Surveillance camera for indoor and outdoor |
| Brand | Technaxx |
| Model | Mini Nature Wild Cam TX117 |
| Image sensor | 1/4" CMOS 2MP |
| Maximum video resolution | Full HD 1080p (1920x1080) |
| Maximum photo resolution | 12 MP (interpolated) |
| Screen | 1.9" TFT LCD (384x160 pixels) |
| Lens | f=3.62 mm, F/NO2.2, field of view 62° |
| Infrared LED range | ~18 meters |
| PIR sensor range | ~15 meters |
| Trigger time | 0.6 second |
| Trigger interval | 5 seconds to 60 minutes (adjustable) |
| Video recording duration | 3 seconds to 10 minutes (adjustable) |
| File formats | JPEG (photo), AVI (video) |
| Power supply | 4 AA 1.5V batteries (included) or 6V AC adapter (not included) |
| Storage | MicroSD card up to 32 GB (class 10 recommended, not included) |
| Protection rating | IP56 (dust and water spray resistant) |
| Weight | 141 g (without batteries) |
| Dimensions (L x W x H) | 87 x 44 x 107 mm |
| Special features | Night mode, time-lapse, password protection, audio recording, photo series, timer, etc. |
| Warranty | 2 years |
| Package contents | Camera, Mini USB cable, mounting strap, 4 AA batteries, user manual |
Frequently Asked Questions - Mini Nature Wild Cam TX117 TECHNAXX
User questions about Mini Nature Wild Cam TX117 TECHNAXX
0 question about this device. Answer the ones you know or ask your own.
Ask a new question about this device
Download the instructions for your Camera in PDF format for free! Find your manual Mini Nature Wild Cam TX117 - TECHNAXX and take your electronic device back in hand. On this page are published all the documents necessary for the use of your device. Mini Nature Wild Cam TX117 by TECHNAXX.
USER MANUAL Mini Nature Wild Cam TX117 TECHNAXX
The Declaration of Conformity for this device is under the Internet link: www.technaxx.de/ (in bottom bar "Konformitätserklärung"). Before using the device the first time, read the user manual carefully.
Service phone No. for technical support: 01805 012643 (14 cent/minute from German fixed-line and 42 cent/minute from mobile networks). Free Email: support@technaxx.de
Keep this user manual for future reference or product sharing carefully. Do the same with the original accessories for this product. In case of warranty, please contact the dealer or the store where you bought this product. Warranty 2 years
Enjoy your product * Share your experience and opinion on one of the well-known internet portals
Contents
Features 1
Camera overview 2
Power supply 3
Inserting the memory card 3
Basic Operations 3
Download Files to a computer (2 ways) 9
Technical specifications 9
Features
- Security camera battery operated for indoor and outdoor use
- Ideal for recording and observing the wildlife and for monitoring houses
FullHD video resolution 1080p - 1.9" TFT LCD display (384x160)
- 1/4" CMOS sensor with 2MP
- Select functions: video, photo, video & photo
PIR sensor ( 15m) & IR range ( 18m) for night recordings - Triggering time 0.6 seconds
Built-in microphone & speaker - MicroSD card** up to 32GB (**not included in delivery)
- Camera protection class IP56 (dust proof & heavy splash water proof)
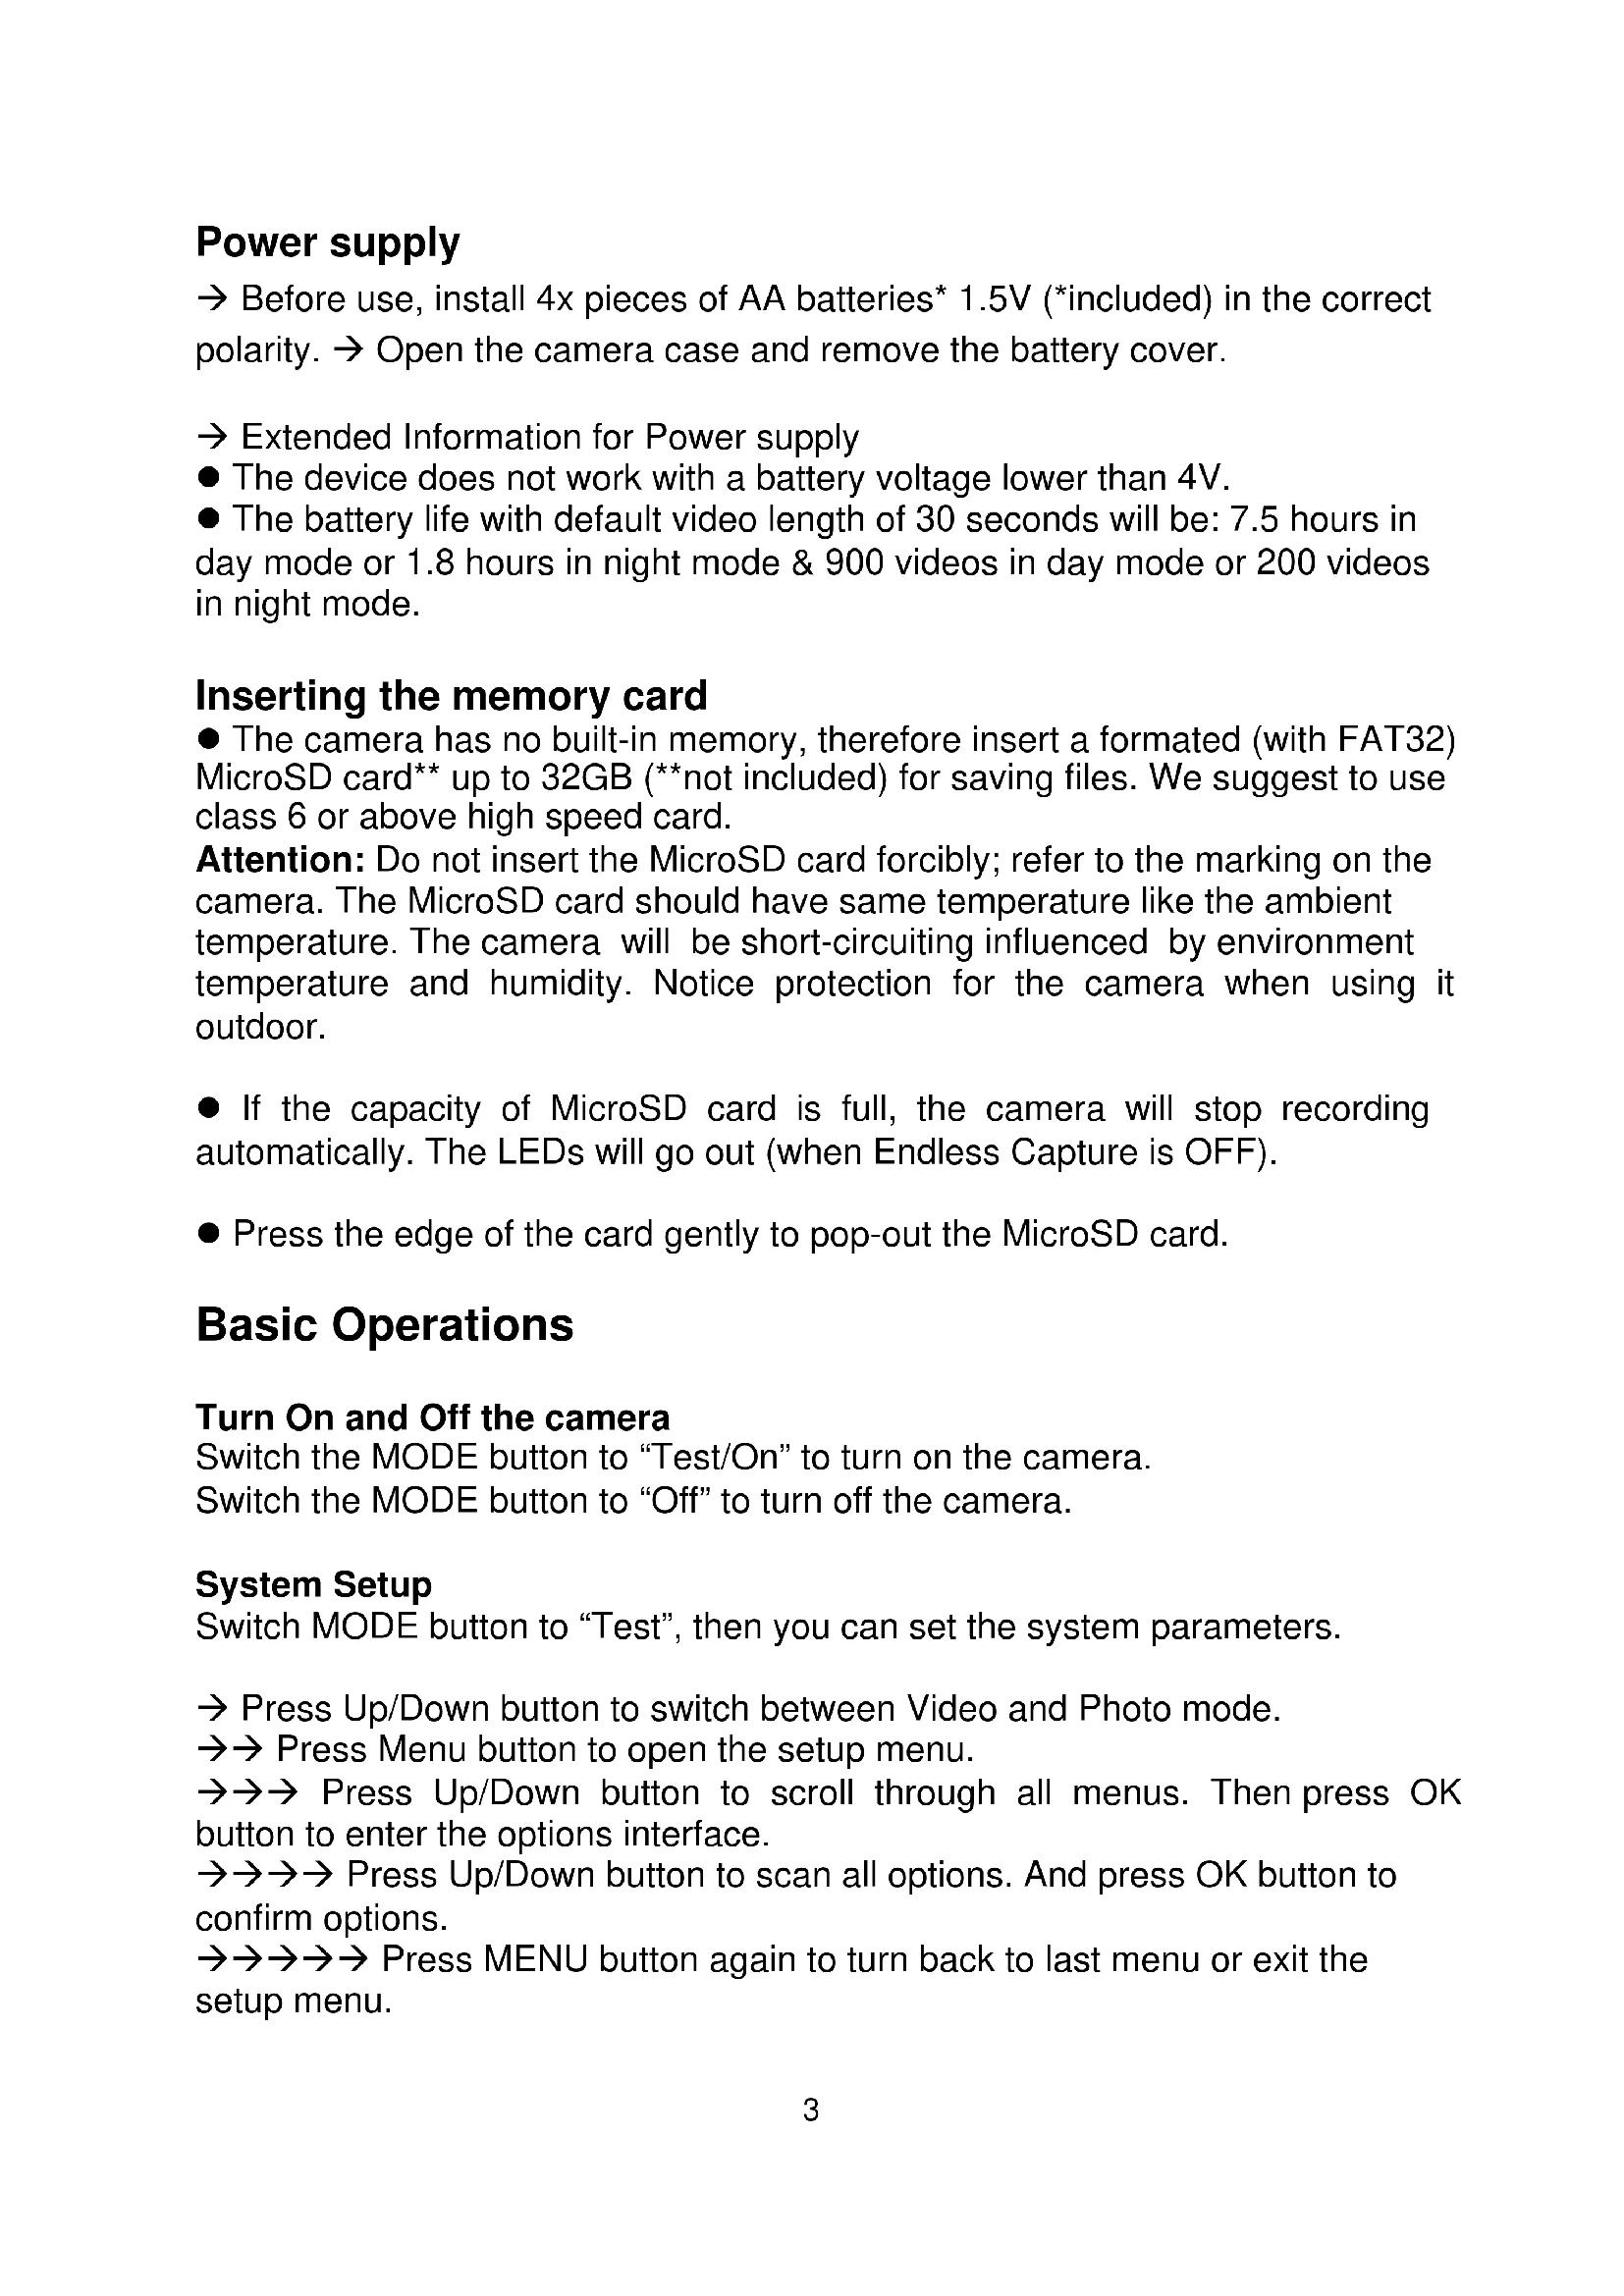
Camera overview
| Front view | Bottom view |
| 1 2 3 4 5 6 7 | 11 12 13 11 12 |
Rear view
| 1 Display screen 10 Playback button | ||
| 2 Infrared LEDs 11 DC adapter port | ||
| 3 Lens 12 Tripod Slot | ||
| 4 Up button / Video button 13 Microphone | ||
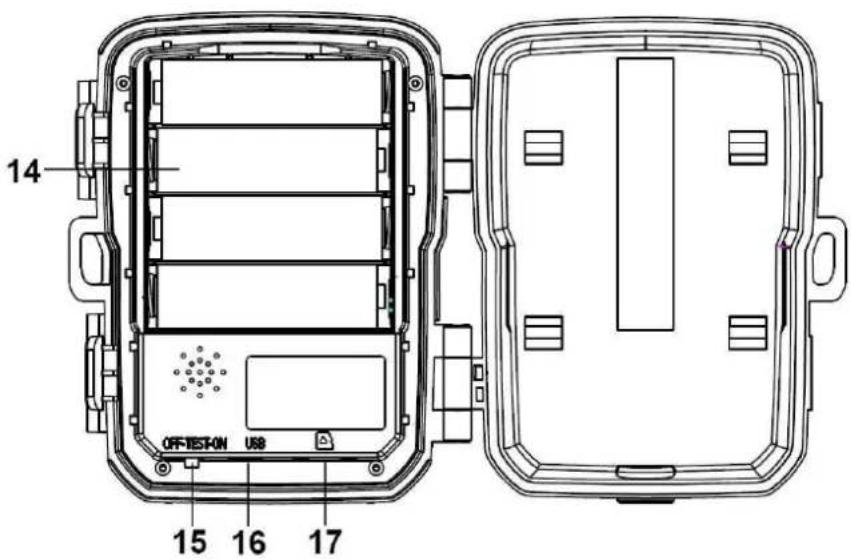
| 5 Down button / Capture button 14 Battery compartment | ||
| 6 PIR sensor (motion sensor) 15 On-TEST-OFF button | ||
| 7 OK / Record button 16 Mini USB connector | ||
| 8 Menu button 17 MicroSD card slot | ||
| 9 Right button | ||
Power supply
Before use, install 4x pieces of AA batteries 1.5V (included) in the correct polarity. Open the camera case and remove the battery cover.
Extended Information for Power supply
- The device does not work with a battery voltage lower than 4V .
- The battery life with default video length of 30 seconds will be: 7.5 hours in day mode or 1.8 hours in night mode & 900 videos in day mode or 200 videos in night mode.
Inserting the memory card
- The camera has no built-in memory, therefore insert a formatted (with FAT32) MicroSD card** up to 32GB (*not included) for saving files. We suggest to use class 6 or above high speed card.
Attention: Do not insert the MicroSD card forcibly; refer to the marking on the camera. The MicroSD card should have same temperature like the ambient temperature. The camera will be short-circuiting influenced by environment temperature and humidity. Notice protection for the camera when using it outdoor.
- If the capacity of MicroSD card is full, the camera will stop recording automatically. The LEDs will go out (when Endless Capture is OFF).
- Press the edge of the card gently to pop-out the MicroSD card.
Basic Operations
Turn On and Off the camera
Switch the MODE button to "Test/On" to turn on the camera.
Switch the MODE button to "Off" to turn off the camera.
System Setup
Switch MODE button to "Test", then you can set the system parameters.
Press Up/Down button to switch between Video and Photo mode.
Press Menu button to open the setup menu.
Press Up/Down button to scroll through all menus. Then press OK button to enter the options interface.
Press Up/Down button to scan all options. And press OK button to confirm options.
Press MENU button again to turn back to last menu or exit the setup menu.
Setup menu and function as below:
Mode: [Photo] / [Video] / [Photo & Video] (default). Select and press OK button to confirm.
| Set the working mode | Capture mode Camera only takes pictures. | |
| Video mode Camera only records video. | ||
| Capture & Video mode (default) | Camera will take a photo first, and then start to record video. | |
Photo Series:
| Set photo number of continuous shooting | Photo mode Camera will take photos continuously |
| Options: [1 photo] (default) / [2 photos in series] / [3 photos in series]. | |
| → Select and press OK button to confirm. |
Photo Resolution: Set the image resolution: the bigger the resolution the higher the sharpness! (It will take bigger space either.)
[12MP: 4608x2592] / [8M: 3840x2160] / [5M: 3072x1728] / [3M: 2304x1296]
(default) / [2M: 1920x1080] / [1M: 1280x720]
Select and press OK button to confirm.
Video Resolution: [1920x1080] / [1280x720] (default) / [720x480] / [640x480] / [320x240]. Select and press OK button to confirm. Set the video resolution: the bigger the resolution the shorter the recording time.
TL-Video Resolution: Set the resolution for the Time Lapse [3072x1728] / [2304x1296] and press OK button to confirm.
Video length / Audio recording
| Set the duration of recording a video clip → shortest time is 3 sec. / longest time is 10 min. Video length | |
| Options: 3 sec. – 10 min. (default is 20 sec.) | |
| → Select and press OK button to confirm. | |
| Audio recording | Open this function → camera will record audio when recording video. |
| Options: [On] (default) / [Off]. | |
| → Select and press OK button to confirm. | |
Shot Lag: 5 sec. -60 min. Select and press OK to confirm.
"Short Lag" is the time between the current video and the next video. Set the time of delay shooting when the camera detects the motion. Within the selected time, the camera will not record any image or video. It can avoid storing too much of the same event and saving more storage. (Default is 5 seconds.)
IR Distance: (set the distance of infrared induction): [Near] / [Middle] (default) / [Far]. Select and press OK button to confirm.
Note: Maybe you have to adjust the right option for your personal use.
Sensitivity Motion Sensors options: [Low] / [Middle] (default) / [High].
Select and press OK button to confirm.
Test the sensitivity and find the correct detection zone for your purpose. Set the sensitivity of the sensor. Note: The temperature can also influence the sensor sensitivity.
| Low | Set the sensitivity to low if you want to record indoors (small environment) or in cold environment. |
| Middle | Set the sensitivity to middle if you want to record outdoor (normal environment). |
| High | Set the sensitivity to high if you want to record outdoors (huge environment) or the temperature is mild. |
Target Recording Time
Set the target recording time of the day. With this option you can preselect when recordings should been taken.
As shown in right picture, you can set the start and stop time. The camera will work just in the set time slot. In other time, the camera will keep in standby state.
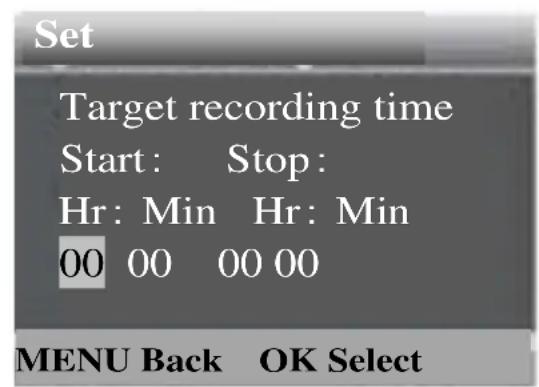
Options: [On] / [Off] (default).
Press OK to confirm.
Note: If start time and stop time are the same, the working time is 24 hours.
Time Lapse Recording
Set the interval time of taking pictures. The camera will take pictures automatically as per set time interval. For example, set the interval time to 1 hour, the camera will take a photo each hour. If you want to observe that a plant blooms, the camera will take 24 photos in 24 hours to record the whole process of blooming.
Options: [On] / [Off] (default).
Press OK to confirm.
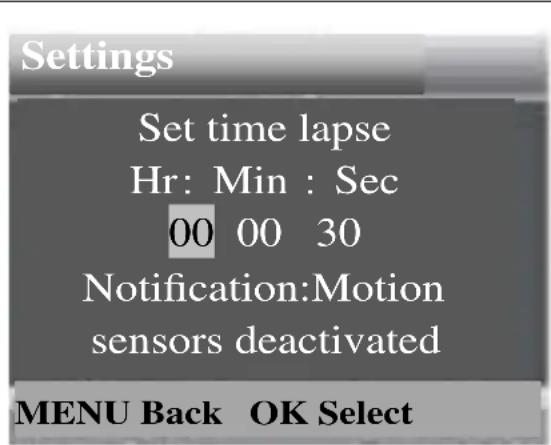
TL (Time Lapse) Video
You can set the interval time. The time range is from 3 second to 24 hours.
For example, set the interval to 1 hour, the camera will take a photo each hour. If the camera works for 24 hours, there will be 24 photos. These photos will be converted into a video.
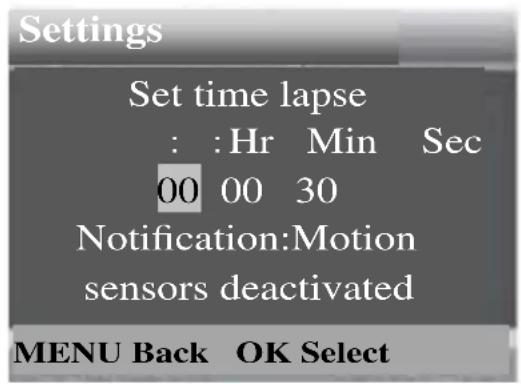
Options: [On] / [Off] (default). Press OK to confirm.
Language: (set the language display on screen): [English] / [German] (default) / [Danish] / [Finnish] / [Swedish] / [Dutch] / [Spanish] / [French] / [Italian] / [Portuguese].
Select and press OK button to confirm.
Endless Capture: [On] (default) / [Off]. Select and press OK button to confirm.
If you activate Endless Capture the device will capture photo or/and video, depending on the mode you choose, until the storage of the MicroSD card is reached.
When the storage is full the recording will move on what means that the oldest file (photo/video) will be deleted, every time a new motion is detected.
Time & Date: [Set time & date] / [Time format] / [Date format].
Select and press OK button to confirm.
| Set time & date | Press Up/Down button to adjust the values. → Select and press OK button to confirm. |
| Time format: selected between 24h (default) & 12h. | Press Up/Down button to adjust the values. → Select and press OK button to confirm. |
| Date format: select between [dd/mm/yyyy] (default) / [yyyy/mm/dd] / [mm/dd/yyyy]. | Press Up/Down button to adjust the values. → Select and press OK button to confirm. |
Photo Stamp: (stamp the date & time on the photos or not): [Time & date] (default) / [Date] / [Off]. Select and press OK button to confirm.
Password Protection: [On] / [Off] (default). Select and press OK button to confirm.
Set the power-on password of the camera. The password is four digits, each digit ranges from 0 to 9. Attention: If you set the password, write it down to make sure that you do not forget it!
Beep Sound: [On] / [Off] (default). Select and press OK button to confirm. Open den Beep sound menu to turn On or Off the confirmation sound of the buttons.
Format Memory Card: [Yes] / [No] (default). Select and press OK button to confirm.
Attention: Formatting the memory card (FAT 32) will delete all data permanently. Before using a new memory card or a card that has been used in another device previously, please format the memory card.
Serial No.: [On] / [Off] (default). Select and press OK button to confirm. Set the unique serial number for the camera. The number is four digits, each digit ranges from 0 to 9.
Reset Settings: [On] / [Off] (default). Select and press OK button to confirm.
Restore the camera to factory default settings including password, serial number and so on.
Version: Look up the Firmware information of the camera.
Take Photos, Record Video, Playback: Switch the Mode Button to "Test". In this mode, you can take photos, record video and playback files manually.
- Take Photos: Press Capture button to switch to photo mode. Press Shot button to take a picture.
- Record Video: Press Video button to switch to video mode. Press Shot button to start to record a video clip. Press Shot button again to stop recording.
- Playback: Press Playback button (10) to enter the playback interface. Press Up/Down button to scroll through photos or videos. When you want to playback video, press OK button to play the video. Press OK button again to have a pause. Press Menu button to stop playback. Press Playback button (10) again to exit the playback mode. Under "Playback" press the Menu button
Select from the following options:
| photo or video | Options: [Cancel] / [Delete] De→ Press OK to confirm | |
| Delete all files | Delete all photo and video files saved on the memory card. | Options: [Cancel] / [Delete]→ Press OK to confirm |
| Activate slide show | Playback the photos in slide way. | Each photo display 3 sec. |
| → Press OK button to stop playing. | ||
| Write protect | Lock the file. It can avoid accident deletion. | Options: [Write-protect current file] / [Write-protect all files] / [Unlock current file] / [Unlock all files]. |
| → Select and press OK button to confirm. | ||
Working Mode
- Switch the Mode Button to "On". After turn on the camera, the screen will display 15 seconds countdown. Then the LEDs and screen will go out. The camera begins to operate independently and enter standby mode.
- If the wild animals enter the detection range of the motion sensors, the camera will be activated and detect the motion trail. If the wild animals continue to move to the detection zone of the sensor, the camera will take photos or record video automatically.
- When the wild animals leave the detection zone of the sensors, the camera will be deactivated and turn back to standby mode.
Night Mode
- During the night, the infrared LEDs will turn on automatically, to provide necessary light for taking pictures/videos. This makes it is possible to taking picture at a distance about 3–18m without overexposing the night.
- However, reflective objects such as traffic signs can cause overexposure if they are located within the recording range. In night mode, the pictures just can display white and black. When record a video for long time in the evening the low voltage may have a great influence on the stability of the machine.
Attention: Do not record video with low battery voltage in the evening.
Download Files to a computer (2 ways)
- Inserting the MicroSD card into a card reader.
- Connecting the camera to a computer using the supplied USB cable.
Using a Card Reader
Pop-up the memory card from the camera and insert it into a card reader adapter. Then connect the card reader to a computer.
Open [My Computer] or [Windows Explorer] and double-click the removable disk icon that represents the memory card.
Copy image or video files from the memory card to your computer.
Connecting the camera to a PC by the USB Cable
Connect the camera to the computer via USB cable. Switch on the camera, the screen will display "MSDC".
Open [My Computer] or [Windows Explorer]. A removable disk appears in the drive list. Double-click the "Removable Disk" icon to view its contents. All files are stored in the folder named .DCIM".
Copy the photos or files to your computer.
Technical specifications
| Image sensor 1/4" CMOS 2MP | |
| Display 1.9" TFT LCD display (384x160) | |
| Video resolution | 1920x1080/25fps(interpolated),1280x720/30fps,720x480/30fps, 640x480/30fps, 320x240/30fps |
| Photo resolution | 12MP (4608x2592 interpolated), 8M (3840x2160 interpolated), 5M (3072x1728 interpolated), 3M (2304x1296 interpolated), 2M (1920x1080), 1M (1280x720) |
| Video length 3 sec.-1 | 0 min. programmable |
| File format JPEG/AVI | |
| Lens | f=3.62mm, F/NO2.2, FOV=62°, Auto IR filter |
| IR | 2x IR LEDs (high power/850nm), ~18m range |
| PIR | 40° viewing angle, ~15m |
| Triggering distance | ~15m (below 25°C at the Normal Level) |
| Triggering time | 0.6 seconds |
| Trigger interval | 5 sec.-60 min. programmable |
| Timer | On/Off, Time Lapse programmable |
| Shooting numbers | 1-3 |
| Effectiveness | Daytime: 1m up to infinitive, Night time: 3-18m |
| Periodic shot | Time Lapse 3 second up to 24 hours |
| Auto-distinguish images | Color images in daytime/black & white night images |
| PC interface | Mini USB2.0 |
| Memory | External: MicroSD** card (up to 32GB, Class10) [**not included in delivery] Internal memory: 8M x 16 SDRAM |
| Power supply | 4x AA batteries* (*included); external 6V power supply** at least 1,5A |
| Standby time | ~6 months, depending on settings and used battery quality |
| Lockable / Password protection Optional / 4-digit numbers | |
| Working temperature -7°C up to +40°C | |
| Weight & Dimensions | 141g (without batteries) / (L) 8.7 x (W) 4.4 x (H) 10.7cm |
| Package contents | Mini Nature Wild Cam TX-117, Mini USB cable, Mounting belt, 4x AA batteries, User Manual |
Warnings
- Do not attempt to disassemble the device, it may result in short-circuit or even damage.
- Do not drop or shake the device, it may break internal circuit boards or mechanics.
- Keep the device in dry and ventilated environment. Avoid high humidity and high temperature. Also batteries should not be exposed to excessive heat or direct sunlight.
- Keep the device away from little children.
- The device will be hot after using for too long time. This is normal.
- Please use the accessory provided by our factory.

Security and Disposal Hints for Batteries: Hold children off batteries. When a child swallowed a battery go to a doctors place or bring the child into a hospital promptly! Look for the right polarity (+) and (-) of batteries! Always change all batteries. Never use old and new batteries or batteries of different types together. Never short, open, deform or load up batteries! Risk of injury! Never throw batteies into fire! Risk of explosion!

Hints for Environment Protection: Packages materials are raw materials and can be recycled. Do not dispose old devices or batteries into the domestic waste. Cleaning: Protect the device from contamination and pollution (use a clean drapery). Avoid using rough, coarse-grained materials or solvents or aggressive cleaner. Wipe the cleaned device accurately. Important Notice: Should battery fluid leak from a battery, wipe the battery case with a soft cloth dry. Distributor: Technaxx Deutschland GmbH & Co.KG, Kruppstr. 105, 60388 Frankfurt a.M., Germany
Video length / Audio recording