
55001 - Generator HYUNDAI - Free user manual and instructions
Find the device manual for free 55001 HYUNDAI in PDF.
User questions about 55001 HYUNDAI
0 question about this device. Answer the ones you know or ask your own.
Ask a new question about this device
Download the instructions for your Generator in PDF format for free! Find your manual 55001 - HYUNDAI and take your electronic device back in hand. On this page are published all the documents necessary for the use of your device. 55001 by HYUNDAI.
USER MANUAL 55001 HYUNDAI
INVERTER BENZINE GENERATOR 55001/55002
NL Gebruiksaanwijzing
E Instruction manual
F Mode d'emploi
Gebrauchsanleitung
S Bruksanvisning
Brugsanvisning
HYUNDAI 2
Nederlands 4
English 8
Français 12
Deutsch 17
Svenska 22
Dansk 26
- Verklaring van overeenstemming - Declaration of conformity - Certificat de conformité - Konformitätserklärgung
Förklaring om överensstämmele - Overensstemmelseserklaering 31


A
HYUNDAI
4
INVERTER BENZINE GENERATOR 55001/55002
WAARSCHUWING

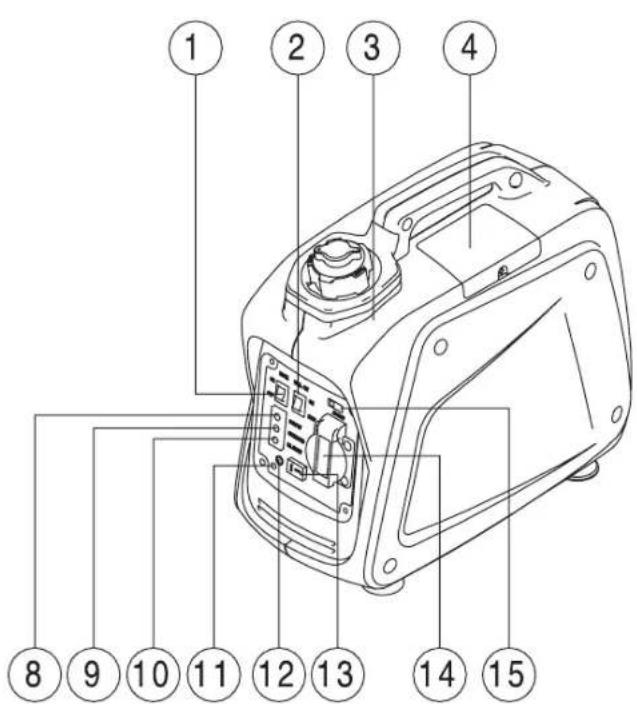
BESCHRIJVING (FIG. A)
Read all safety warnings and all instructions. Failure to follow the warnings and instructions may result in electric shock, fire and/or serious injury. Save all warnings and instructions for future reference.
SAFETYWARNINGS
When using the machine, always observe the enclosed safety warnings as well as the additional safety warnings.
The following symbols are used throughout this manual:

Denotes risk of personal injury or damage to the machine.
ADDITIONAL SAFETY WARNINGS FOR GENERATORS
Work area safety
- Place the machine on a solid surface. Do not place the machine on
- a metal surface.
- Do not store fuel near the machine.
Electrical safety
- Before use check whether the power input of the equipment to be connected is less than the maximum output of the generator.
- Only connect the equipment when the generator is running at full speed. Disconnect the equipment before switching off the generator.
Personal safety
- Avoid touching hot parts of the machine.
- Never add fuel when the machine is running. After use let the machine cool down for at least 15 minutes before refuelling.
Power tool use and care
- Do not use the machine for feeding electrical appliances (as an external power source).
- Do not place the machine in the blazing sun. Do not expose the machine to temperatures over 40^ . Do not store the machine in humid surroundings.
- Make sure that the generator has enough fuel when connected to the load.
- The sound absorber and the air filter function as flame catchers in case of after-burning. Therefore see to it that they are mounted properly and are in good technical condition.
-
Immediately switch off the generator in one of the following situations:
-
hitches or unstable running of the motor
- decrease of the electrical output
- overheating of the connected load
- excessive vibrating of the generator
- sparking
- presence of smoke or fire
The following pictograms are shown on the machine:

Wear hearing protection.

Only use the machine outside, in well-ventilated surroundings.

Do not use the machine in precipitation or in humid surroundings.

Do not use the machine in surroundings where sparks, flames or open fire can be present. Do not smoke near the machine.

use, always earth the machine!

Consult the manual.
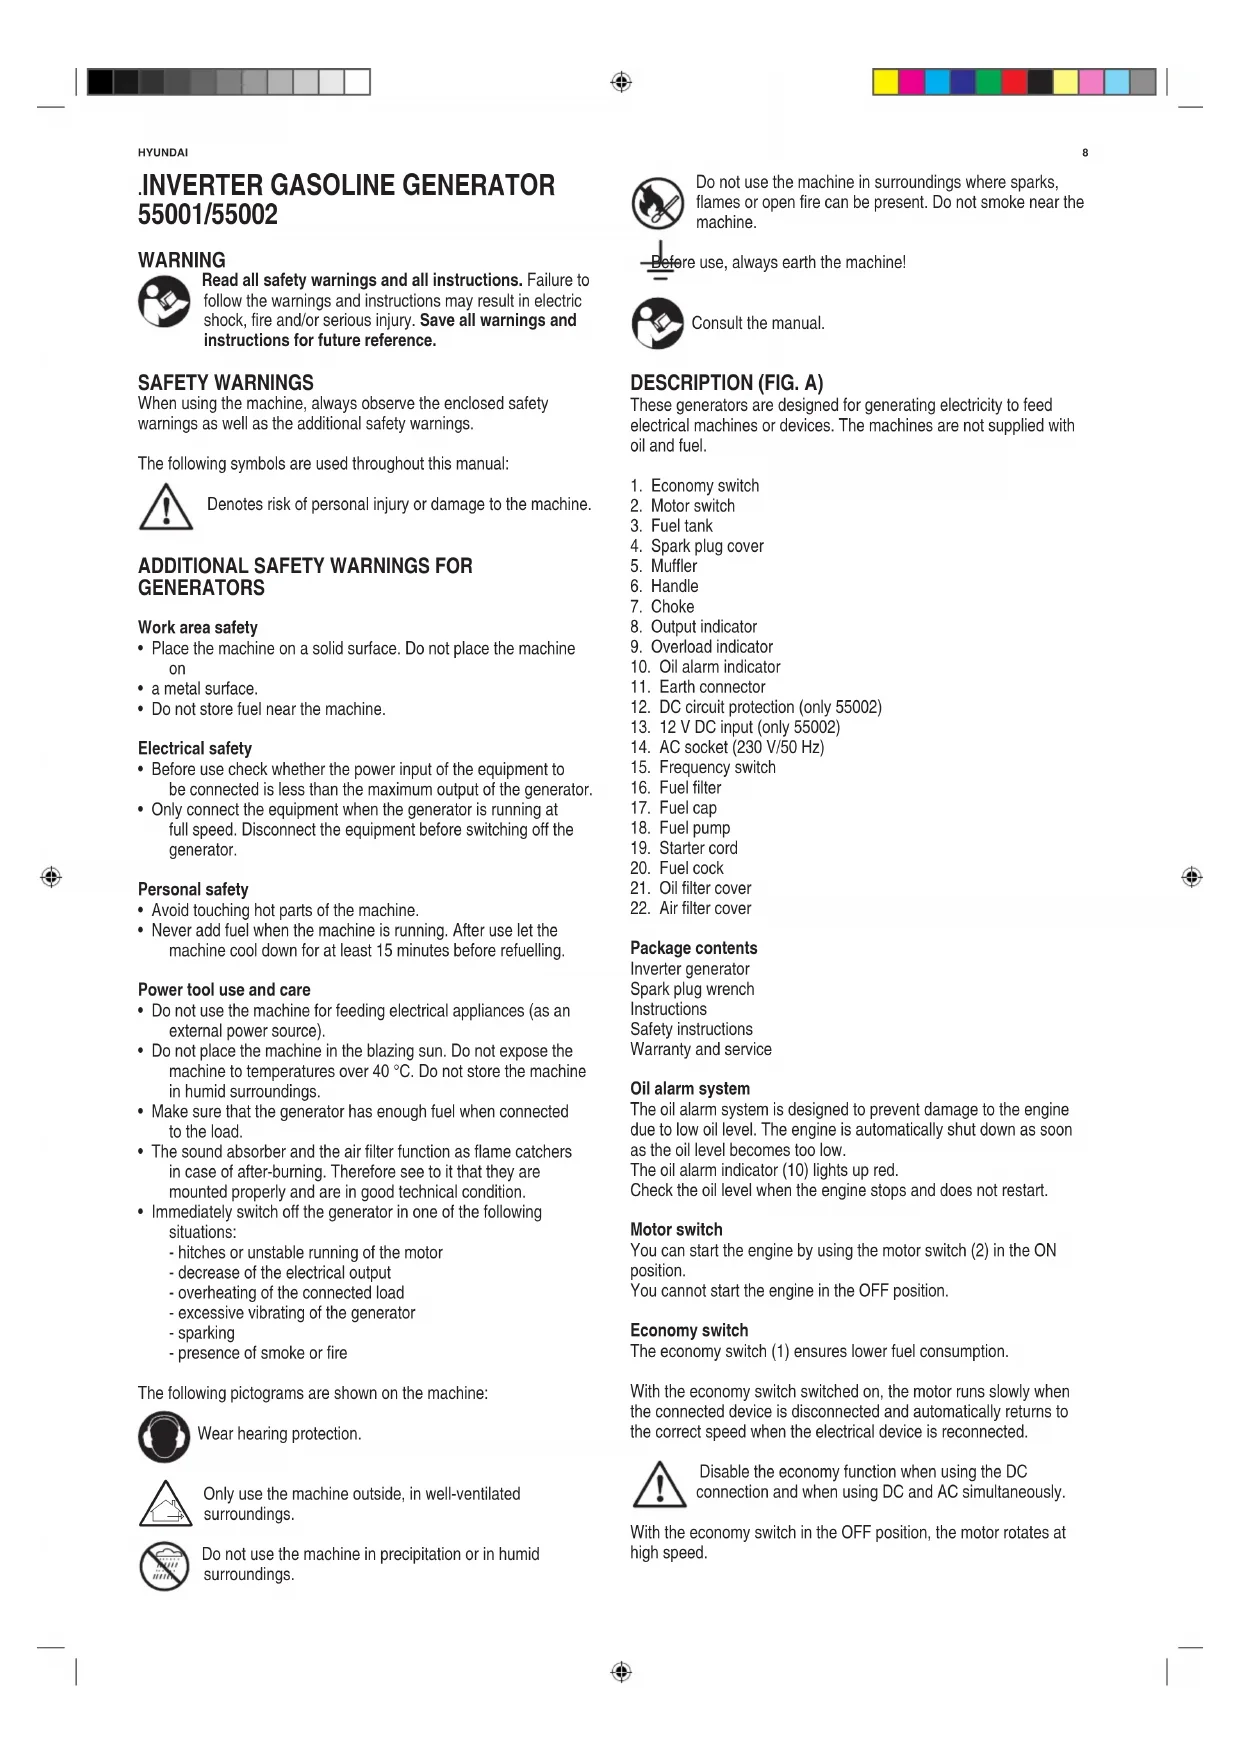
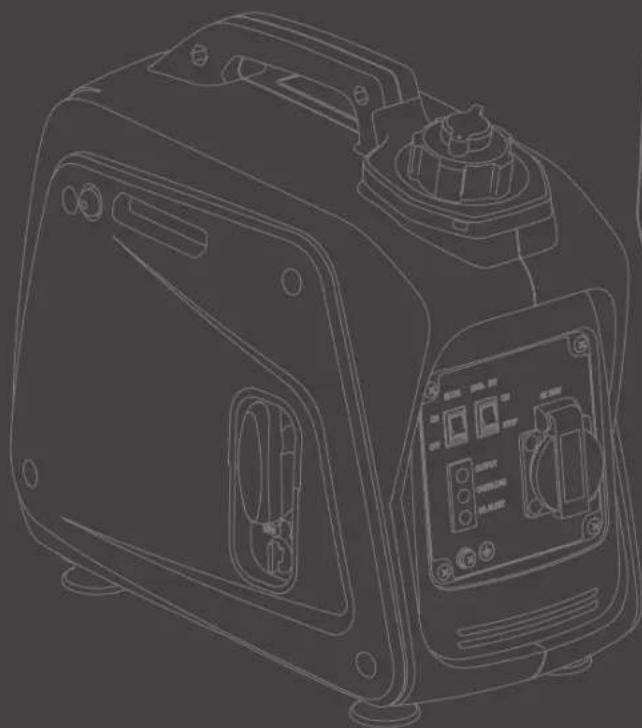
DESCRIPTION (FIG. A)
These generators are designed for generating electricity to feed electrical machines or devices. The machines are not supplied with oil and fuel.
- Economy switch
- Motor switch
- Fuel tank
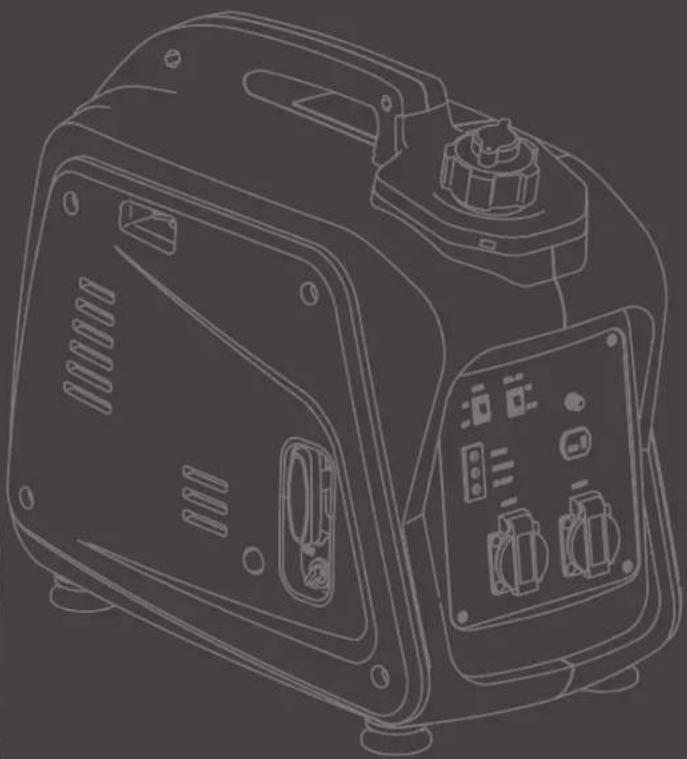
- Spark plug cover
- Muffler
- Handle
- Choke
- Output indicator
- Overload indicator
- Oil alarm indicator
- Earth connector
- DC circuit protection (only 55002)
- 12 V DC input (only 55002)
- AC socket (230 V/50 Hz)
- Frequency switch
- Fuel filter
- Fuel cap
- Fuel pump
- Starter cord
- Fuel cock
- Oil filter cover
- Air filter cover
Package contents
Inverter generator
Spark plug wrench
Instructions
Safety instructions
Warranty and service
Oil alarm system
The oil alarm system is designed to prevent damage to the engine due to low oil level. The engine is automatically shut down as soon as the oil level becomes too low.
The oil alarm indicator (10) lights up red.
Check the oil level when the engine stops and does not restart.
Motor switch
You can start the engine by using the motor switch (2) in the ON position.
You cannot start the engine in the OFF position.
Economy switch
The economy switch (1) ensures lower fuel consumption.
With the economy switch switched on, the motor runs slowly when the connected device is disconnected and automatically returns to the correct speed when the electrical device is reconnected.

Disable the economy function when using the DC connection and when using DC and AC simultaneously.
With the economy switch in the OFF position, the motor rotates at high speed.
9
ENGLISH
DC circuit protection (only 55002)
DC circuit protection (12) will automatically switched on when the load exceeds the rated output of the generator. Reduce the load to the rated output when the DC circuit protection is switched on.
Tank cover ventilation knob
The tank cover is provided with a ventilation knob in order to stop the fuel supply. The ventilation knob should be turned clockwise once from a closed position. As a result of that, the fuel can reach the carburettor and the engine can run. Turn the ventilation knob anti-clockwise in order to stop the fuel supply.

During transport of the machine, the ventilation knob must be in the OFF position.
Fuel cock
The fuel cock (20) is used to transport fuel from the tank to the carburettor.
BEFORE FIRST USE
Fill with oil
Use 4-stroke motor oil. SAE 10W30 is recommended for general, all-temperature use. Other viscosities may be used when the average temperature is within the indicated range.
- Remove the oil filter cover (21).
- Fill the oil sump with the required quantity of oil.
- Put the oil filter cover back in its place.
Fill with fuel
Always use fuel that fulfils the following specifications: unleaded petrol, octane content at least 87.

Never add fuel when the machine is on. After use let the machine cool down for at least 15 minutes before refuelling.

Never smoke near the machine or the fuel. Never add fuel in the vicinity of sparks, flames or open fire.
- Turn off the fuel cock (20).
- Remove the lid (17) from the filler opening.
- Pour the fuel carefully into the filler opening. Do not fill the tank beyond the marking.
- Place the lid back on the filler opening.
Earthing

The generator must be earthed before use. This prevents static charges that can lead to electric shock. Safety devices from the connected electrical appliances can also do their work (e.g. leakage current switches).
Connect a screened conductor (minimum cross-section 1.5mm^2 to the earth connector (6) and attach the other end to a ground point (e.g. radiator or water pipe).
USE
Starting the motor

Disconnect all connected devices before starting the engine.
- Loosen the tank cover ventilation knob (10).
- Turn on the fuel cock (20).
- Put the motor switch (2) in the ON position.
-
Slide the choke lever to the CHoke position. If the engine is warm, it will not be necessary to do so.
-
Slowly pull the starter handle until you notice resistance. Bring the handle back to its original position and pull fast. Do not fully pull the cord. After starting, let the starter handle return to its original position, while you are still holding the handle. Firmly hold the grip in order to prevent the generator from turning over when you pull the starter handle.
- Let the engine run warm.
- Slide the choke lever back to RUN position.
- Idle running of the engine is required for several minutes.
Switch off

Disconnect all connected devices.
- Put the motor switch (2) in the STOP position.
- Turn off the fuel cock (20).
- Tighten the tank cover ventilation knob (10).
Modification to the carburettor when used at high altitude
When used at high altitudes, the standard air-fuel mixture may be too rich. Performance will decrease and fuel consumption will increase. A very rich mixture will also pollute the spark plug and cause a hard start. If the generator is used at high altitudes, the main nozzle must be replaced or the idle screw must be adjusted.
If the generator is always used at high altitudes, the carburetor must be adjusted. Please contact your purchase address.

If the carburettor has been modified for high altitude use, the air-fuel mixture will be too low for use at low altitudes, causing the engine to overheat and become severely damaged. The carburettor must first be returned to its original state.
DIRECTIONS FOR USE
Alternating current (AC)
Start the engine as described above. Check that the output indicator (8) is green.
To connect an electrical device or machine, plug the mains plug into thean AC socket (14).
Overload protection
The indicator light for overload protection lights when an overload of a connected electrical appliance is detected, or when the generator is overheated or when the AC output voltage increases. The electronic circuit breaker will then be activated and the power supply will stop in order to protect the generator and all connected electrical appliances. The power indicator (green) flashes and the overload protection (red) comes on, after which the engine stops. In that case, follow the next steps:
- Switch off all connected electrical appliances and stop the engine.
- Reduce the total wattage of the connected electrical appliances by disconnecting one appliance.
- Check the vent slots for obstructions. Remove possible obstructions.
- Restart the engine.

The AC output of the generator will automatically reset when the engine stops and will then be started again.

The indicator light for over overload protection may light for a few seconds, if electrical appliances are used that require a high starting current, like a compressor or a submersible pump. This is not a case of malfunction.
HYUNDAI
10
Alternating current can be used simultaneously with direct current. If both are used at the same time, the total power for AC and DC must not be exceeded: AC: 0.7 kVA, DC: 4 A.
Most engines require more than their nominal power when starting.
Direct current (DC) (only 55002)

The DC input (13) may only be used to charge a 12V battery.
- Set the economy switch to the OFF position.
- Connect the charging cable to the battery and then to the DC input (13).

Risk of short circuit or sparks! Always connect the charging cable to the battery first. Always disconnect the cable from the generator.
If the cable is connected to a battery in a vehicle, the earth cable must first be disconnected from the battery to prevent short circuits.
Do not start the engine of the vehicle as long as the generator is connected to the battery. This causes damage to the generator.
- Connect the positive terminal to the positive pole of the battery. An incorrect connection can seriously damage the generator and battery.

If the battery liquid comes into contact with the skin, immediately rinse the skin with running water. Neutralize with a mild acid, e.g. lemon juice or vinegar. In case of contact with the eyes, rinse the eyes with clean running water for at least 10 minutes and consult a doctor.
DC circuit protection
Disconnect the battery when the DC circuit protection (18) is activated. Wait a few minutes, press the circuit protection again and reconnect the battery.
CLEANING AND MAINTENANCE
For good functioning and a long lifespan for the machine, regular cleaning and maintenance is essential.

Do not perform any cleaning or maintaining activities while the motor is running.

Do not smoke during the below work. Do no work in the vicinity of sparks, flames or open fire.
- Regularly clean the ventilation slots.
Changing the oil
The oil must be changed after the first 20 operating hours, and then after every 100 hours or 6 months.
- Place the machine on a stable and flat surface and allow the engine to run warm for a few minutes. Then switch off the engine and turn off the fuel cock. Turn the ventilation knob of the fuel tank cap clockwise.
- Loosen the screw at the side and remove the cap.
- Remove the oil filter cover (21).
- Place an oil collection tray under the engine. Turn over the generator in order to be able to fully drain off the oil.
-
Fill with oil.
-
Reinstall the oil filter.
- Place the side and tighten the screw.
Cleaning the air filter
It is very important to keep the air filter in good condition. Dirt caused by incorrect installation, incorrect maintenance or a damaged air filter, causes damage and wear to the engine. Regularly clean the air filter.
- Loosen the screw from the side and remove the cover.
- Remove the air filter cover (22) and the filter.
- Clean the filter with methylated spirits or ethanol.
- Squeeze the filter. Do not wring!
- Immerse the filter in clean engine oil.
- Squeeze the filter and mount it in place.
- Reinstall the air filter cover
- Place the side and tighten the screw.

The engine may never run without the filter; excessive wear of piston and/or cylinder could be the result.
Checking the spark plug
- Remove the spark plug cover (4).
- Remove the spark plug cable from the spark plug.
- Remove the spark plug with the spark plug wrench.
- Clean the electrode with a wire brush.
- Check the contact distance (correct value 0.6 - 0.7mm ), and adjust if necessary.
- Reinstall the spark plug and the spark plug cover.
Maintenance of the spark arrester
The spark arrester must be cleaned every 100 operating hours.
- Remove the screws, and remove the muffler guard (9).
- Remove the spark arrester (5).
- Clean the spark arrester with a brush.
- Replace the spark plug and mount the muffler guard.
TRANSPORT AND STORAGE
Long-term storage of your machine requires a number of preventive measures in order to prevent problems when the machine is restarted.
1. Empty the fuel tank.
- Remove the tank cap, drain all the fuel out of the fuel tank.
- Remove the cap, drain the fuel from the carburettor by loosening the drain screw.
2. Engine
- Remove the spark plug, pour about one spoonful of SAE 10W30 engine oil into the spark plug hole and reinstall the spark plug.
- Use the pull-starter in order to have the engine run several times (with switched-off motor switch).
- Pull the pull-starter until you notice resistance.
- Stop pulling.
- Clean the outside of the generator and apply a rust-prevention product.
- Store the generator, well-covered, in a dry, well ventilated place.
- The generator must remain in vertical position.

Never clean your generator with a bucket of water or a hose. Water can get inside the working pats of the generator and cause a short circuit or corrosion.
11
ENGLISH
TECHNICAL DATA
55001
Cylinder capacity cc 40 99.2
Bore mm
52.4
Stroke mm 33.546
Speed (idle) min
Output voltage AC V 100-240 100-240
Output frequency Hz 50 50
Output power kVA 0.7 1.7
Max output power kVA 0.8 1.8
Output voltage DC V - 12
Output current DC A - 5
Fuel consumption g/kW/h 550 550
Petrol engine air-cooled 4-stroke OHV 4-stroke OHV
Fuel tank capacity 12.1 3.8
Oil container volume 0.25 0.52
Fuel lead-freej Euro 95/98 (E5)Euro 95/98 (E5)
Oil SAE10W30 SAE10W
Continuous use h +/- 4.1 +/- 3.8
Start system recoil starter recoil starter
Spark plug type CMR6A A5RTC
LpA (sound pressure)* dB(A)/7m 73 73
db(A)/4m 58
Weight kg 8.5 18.5
53602ARANTEE
Refer to the enclosed guarantee conditions for the terms and
conditions of guarantee.
ENVIRONMENT
Disposal

Your product, accessories and packaging should be sorted for environmental-friendly recycling.
Only for EC countries
Do not dispose of power tools into domestic waste. According to the European Guideline 2002/96/EC for Waste Electrical and Electronic Equipment and its implementation into national right, power tools that are no longer usable must be collected separately and disposed of in an environmentally friendly way.
Subject to change; specifications can be changed without further
notice.
58
- Level of sound pressure at the workplace.
MAINTENANCE CHART
Regular maintenance is most important for the best performance and safe operation.

Never perform maintenance work while the generator is running.
| action | any use | every month or 10 hours | every 3 months or 50 hours | every 6 months or 100 hours | every 12 months or 300 hours | |
| spark plug | check distance of electrode and clean, replace if necessary | x | ||||
| engine oil | check level | x | ||||
| replace | x | |||||
| air filter | check | x | ||||
| clean, replace if necessary | x | |||||
| fuel filter | clean, replace if necessary | x | ||||
| fuel cock | clean and adjust when engine is cold | x | ||||
| fuel line | check fuel hose for crack or damage, replace if necessary | x | ||||
| exhaust system | check for leakage, retighten or replace gasket if necessary | x | ||||
| check muffler screen, clean / replace if necessary | x | |||||
| carburettor | check choke operation | x | ||||
| cooling system | check fan damage | x | ||||
| starting system | check recoil starter operation | x | ||||
| decarbonization | as often as necessary | x | ||||
| fittings/fasteners | check all fittings and fasteners | x |
HYUNDAI
GROUPE ÉLECTROGÉNÉ À ESSENCE 55001/55002
AVERTISSEMENT

DECLARATION OF CONFORMITY
CERTIFICAT DE CONFORMITE
Dvize by declares under its sole responsibility that this product is in conformity with the following standards or standardization documents
according to the provisions of the directives
Keeper of the technical documentation: