
YT32HTB1 - Television Yasin - Free user manual and instructions
Find the device manual for free YT32HTB1 Yasin in PDF.

| Product Type | LED TV |
| Brand | Yasin |
| Model | YT32HTB1 |
| Screen Size | 32 inches (approx 81 cm) |
| Power Supply | AC 100-240 V ~ 50/60 Hz |
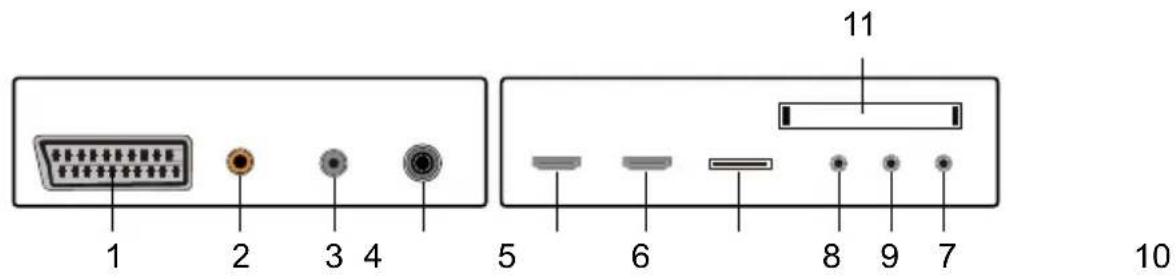
| Input Connectors | HDMI (x3), VGA, SCART, USB (x2), YPbPr, Mini AV, RF antenna, DVB-S2, PC audio input |
| Output Connectors | Coaxial output (SPDIF), headphones |
| Built-in Tuner | DVB-T/T2, DVB-C, DVB-S/S2 |
| Screen Resolution | HD 1366 x 768 pixels (estimated) |
| Picture Formats | 4:3, 16:9, Zoom, Smart Zoom |
| USB Multimedia Functions | Playback of photos, music, videos; FAT/FAT32 formats, disk up to 2 TB |
| Special Functions | CI+ (CAM module), EPG, teletext, parental lock, Hotel mode, Store mode |
| Audio | Built-in speakers (2x ?), sound modes: Standard, Music, Video, Sports, Personal |
| Remote Control | Yes, with numeric keys, menu, source, etc. |
| Security | System lock with password (default 0000), keyboard lock, parental control |
| Cleaning | Soft dry cloth, without volatile substances |
| Warranty | 2 years manufacturer (support and return) |
| Repairability | Do not open; contact customer service at www.yasin-eu.com |
| Operating Environment | Temperature 5-35 °C, humidity 10-75% |
| Weight | Not specified in the manual |
Frequently Asked Questions - YT32HTB1 Yasin
User questions about YT32HTB1 Yasin
0 question about this device. Answer the ones you know or ask your own.
Ask a new question about this device
Download the instructions for your Television in PDF format for free! Find your manual YT32HTB1 - Yasin and take your electronic device back in hand. On this page are published all the documents necessary for the use of your device. YT32HTB1 by Yasin.
USER MANUAL YT32HTB1 Yasin
natural_image
Illustration of a computer monitor with lightning bolts and a crossed-out airplane symbol (no text or labels)
Waarschuwing
natural_image
Simple line drawing of a computer monitor with a cross mark and a cloth, no text or symbols present.
Waarschuwing
natural_image
Illustration of a computer monitor with a 'X' symbol and sparkles above it, no text or symbols present.
Waarschuwing
natural_image
Simple line drawing of a house with steam rising, marked with an 'X' symbol (no text or labels)
Waarschuwing
natural_image
Cartoon illustration of a person holding a sign with an 'X' symbol, standing beside a computer monitor (no text or symbols on the sign)
Waarschuwing
natural_image
Simple line drawing of a computer monitor with an X mark and a battery on top, no text or symbols present.
Waarschuwing
natural_image
Illustration of a person standing next to a computer monitor and a clock with a small animal (no text or symbols)
Waarschuwing
natural_image
Simple line drawing of a hammer striking a surface with radiating lines (no text or symbols)
Waarschuwing
Control Panel Button Function
Power, Menu, Source, Volume up, Volume down, Channel up, Channel down
TV Aansluitingen
-
Scart
-
HDMI-1
-
Mini YPBPR
-
Coaxial
-
HDMI-2
-
Hoofdtelefoon
-
LNB in
-
USB
-
Cl-slot
-
RF antenne C/T2
-
Mini AV & AUDIO
natural_image
Hand inserting a small electronic device into a black TV case (no visible text or symbols)EPG (Electronic Programm Guide)
USB Features (USB-kenmerken)
natural_image
Close-up of green plant stalks in soil, captured via smartphone interface (no visible text or symbols on the plants themselves)Opmerking:
EC directives internet address:
https://eur-lex.europa.eu/browse/summaries.html?locale=en

First Time Installation 14
Menu Chanel 15
Channels.... 15
Auto tuning 15
Satellite 16
ATV Manual Tuning 16
DTV Manual Tuning 17
Channel edit.... 17
Delete channels.... 17
Skip channels.... 17
Move channels.... 17
LCN 18
CI card information 18
Picture settings 19
Sound settings 22
Time settings 24
Lock settings 26
Hotel Mode 28
Set-up 29
OSD-language 29
Teleteksttaal 30
Audio languages.... 30
Subtitle languages 30
Useful Information and Licences 40
Introduction
Thank you very much for purchasing your LED TV. To enjoy your set fully from the very beginning, read this manual carefully and keep it handy for future reference.
INSTALLATION
- Locate the TV in the room where direct light does not strike the screen. Total darkness or a reflection on the picture screen can cause eyestrain. Soft and indirect lighting is recommended for comfortable viewing.
- Allow enough space between the TV and the wall to permit ventilation.
- Avoid excessively warm locations to prevent possible damage to the TV or premature component failure.
- This TV can be connected to AC 100-240V\~ 50/60Hz.
- Do not install the TV in a location near heat sources such as radiators, air ducts, direct sunlight, or in closed compartments and closed areas. Do not cover the ventilation openings when using the TV.
- The indicator light will last for about 30 seconds after the power has been turned off. Wait until the indicator light goes out before repowering the TV.
SAFETY
- DO NOT expose the television to extremely high temperatures (below 5^ C and above 35^ C) or extreme humidity (less than 10% and more than 75%).
- DO NOT expose the television to direct sunlight.
- Prevent the television from coming into contact with liquids.
- Make sure that no objects get into the television and do not place vases of water on the television.
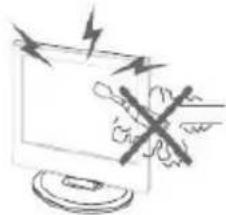
- Unplug the power cord and remove the antenna cable during a lightning storm (especially during lightning).
- Do not walk on the cable and ensure that the cable is fully unrolled.
- Do not overload outlets or extension cords, as this may result in the risk of fire or electric shock.
- Use a soft, dry cloth (without volatile substances) to clean the television.
- Do not attempt to repair the television yourself if it is defective. Contact us by sending an email to service@yasin-eu.com.
Warning

CAUTION RISK OF ELECTRIC SHOCK DO NOT OPEN

CAUTION: TO AVOID THE RISK OF ELECTRIC SHOCK. DO NOT REMOVE COVER (OR BACK).
NO USER- SERVICEABLE PARTS INSIDE.
REFER SERVICING TO QUALIFIED SERVICE PERSONNEL.
This symbol is intended to alert the user to avoid the risk of electric shock, do not disassemble this equipment by anyone except a qualified service personnel.

This symbol is intended to alert the user to the presence of important operating and maintenance instructions in the literature accompanying the equipment.

Class I Connect the plug to an earthed wall socket.
Caution
natural_image
Illustration of a computer monitor with a crossed-out hand and lightning bolts, symbolizing electrical hazard (no text or symbols present)
Caution
High voltages are used in the operation of this product.
Do not open the product's casing. Refer servicing to qualified service personnel.
natural_image
Simple line drawing of a computer monitor with a cross symbol on the screen, next to a rope tied to a chair (no text or symbols)
Caution
To prevent fire or electrical shock hazard, do not expose the main unit to moisture. Do not place objects filled with liquids, such as vases, on the TV.

natural_image
Illustration of a computer monitor with a 'X' symbol and a hand holding a flower above it (no text or symbols present)
Caution
Do not drop or push objects into the television cabinet slots or openings. Never spill any kind of liquid on the television receiver.

natural_image
Simple line drawing of a box with a cross mark and a small object on top (no text or symbols)
Caution
Avoid exposing the main unit to direct sunlight and other sources of heat. Do not stand the television receiver directly on other products which give off heat: e. g. video cassette players and audio amplifiers. Do not block the ventilation holes in the back cover. Ventilation is essential to prevent failure of electrical components. Do not squash power supply cord under the main unit or other heavy objects.
Caution

natural_image
Cartoon illustration of a person holding a large 'X' sign next to a computer monitor (no text or symbols on the sign)
Caution
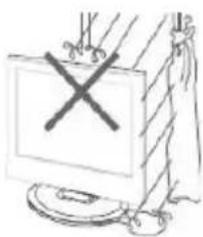
Never stand on, lean on or suddenly push the product or its stand. You should pay special attention to children.

natural_image
Simple line drawing of a computer monitor with an X mark and a battery on top, no text or symbols present.
Caution
Do not place the main unit on an unstable cart stand, shelf or table. Serious injury to an individual, and damage to the television, may result if it should fall.

natural_image
Illustration of a person standing next to a computer monitor and a clock with an insect (no text or symbols)
Caution
When the product is not used for an extended period of time, it is advisable to disconnect the AC power cord from the AC outlet.
natural_image
Simple line drawing of a hammer striking a surface with radiating lines (no text or symbols)
Caution
The LED panel used in this product is made of glass and is therefore breakable. This product must not be dropped or banged. If the LED Panel breaks be careful of being injured by broken glass.
Control Panel Button Function
Display\ hidden button menu: press the button in the pop-up menu, as shown below. The button menu will be closed automatically after the button is not operated for 5 seconds.

Button function selection: press the button shortly, move the focus to the right, and select the corresponding function, such as the short press on the button for 6 times the focus position as shown in the belowpicture. Press the button for a short time, and the focus is back to the position shown in the above picture.

Key function operation: longly press key can perform focus function, such as focus in the position shown above, will perform channel reduction.
Power, Menu, Source, Volume up, Volume down, Channel up, Channel down.
TV Connections

-
Scart
-
HDMI-1
-
Mini YPBPR
-
Coaxial
-
HDMI-2
-
Earphone
-
DVB-S2
-
USB
-
Cl-slot
-
RF antenne C/T2
-
Mini AV & AUDIO

NOTE
- It is only 500 mA MAX of DC current output when you connect with USB jack.
- To ensure the mobile HD works well, you should use other power supply for the mobile HD and don't use the USB jack in the same time.
- It supports mobile HD by connecting with USB jack (must be more than 2 Gb). The partitions of the mobile HD can't be more than 4 partitions. The max partition is 2 Tb. It supports FAT/FAT32 files. The max FAT file is 4Gb and the max FAT32 file is 2Tb.
Mounting
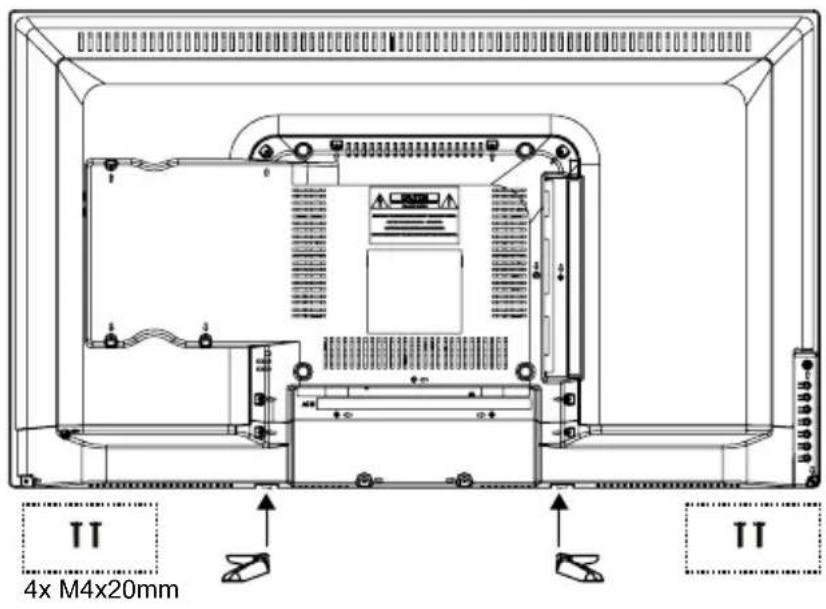
The TV on a surface
Attach the feet to the device as described in the illustration and screw them down with the supplied mounting screws.

Hang the TV on the wall
Attach your wall bracket to the appropriate threads on the back and pay attention to the distance between the holes with screws M7/M8.
Cl+ module

natural_image
Hand inserting a small electronic device into a black TV case (no visible text or symbols)This device is equipped with a CI + slot for using a smart card module that enables digital display without a decoder (provider box). We recommend the SMiT module for our TVs.
Installing a CI + module
-
Make sure the TV is in the factory settings. If the TV has not been used, it is automatically set to the correct setting. If you have been using the TV for some time, you must first reset it to the factory setting. Then turn your TV off again.
-
Connect your TV to the coaxial cable. This cable transmits the
digital channels.
- Turn the TV back on. Let him automatically search for the digital channels (see page 14). Don't forget to turn LCN on here. This may take a while.
- Check if channels have been found.
- Turn the TV off again.
- Now insert your smart card into the CI module. Now insert the module with smart card into the CI slot. Now turn on the TV again. The TV and CI module will now check each other. This can sometimes take more than 20 minutes.
- Your TV is now ready for use.
Removing the CI + module
- Turn off your TV.
- Carefully remove the module.
If a module is available, more options are available on the CI information page of the OSD.
- Press MENU to enter the system setting.
- Use ▲▼/ ◀▶ to select the CI information and press OK to enter the settings.
- Wait until the submenu is closed.
- Use ▲▼/ ◀▶ to select an option and press OK to edit or open the selected function.
- Press EXIT to save the changes and exit the menu.
Some menu options and settings depend on the corresponding CA module. We recommend the SMiT module.
The CA module (not included) is required when using a smart card (not included) to receive encrypted channels.
Ensure that the CA module and the smart card are compatible with each other. This device can read CI + compatible modules.
The available channels depend on the CA module used, the Smart Card and of course your provider.
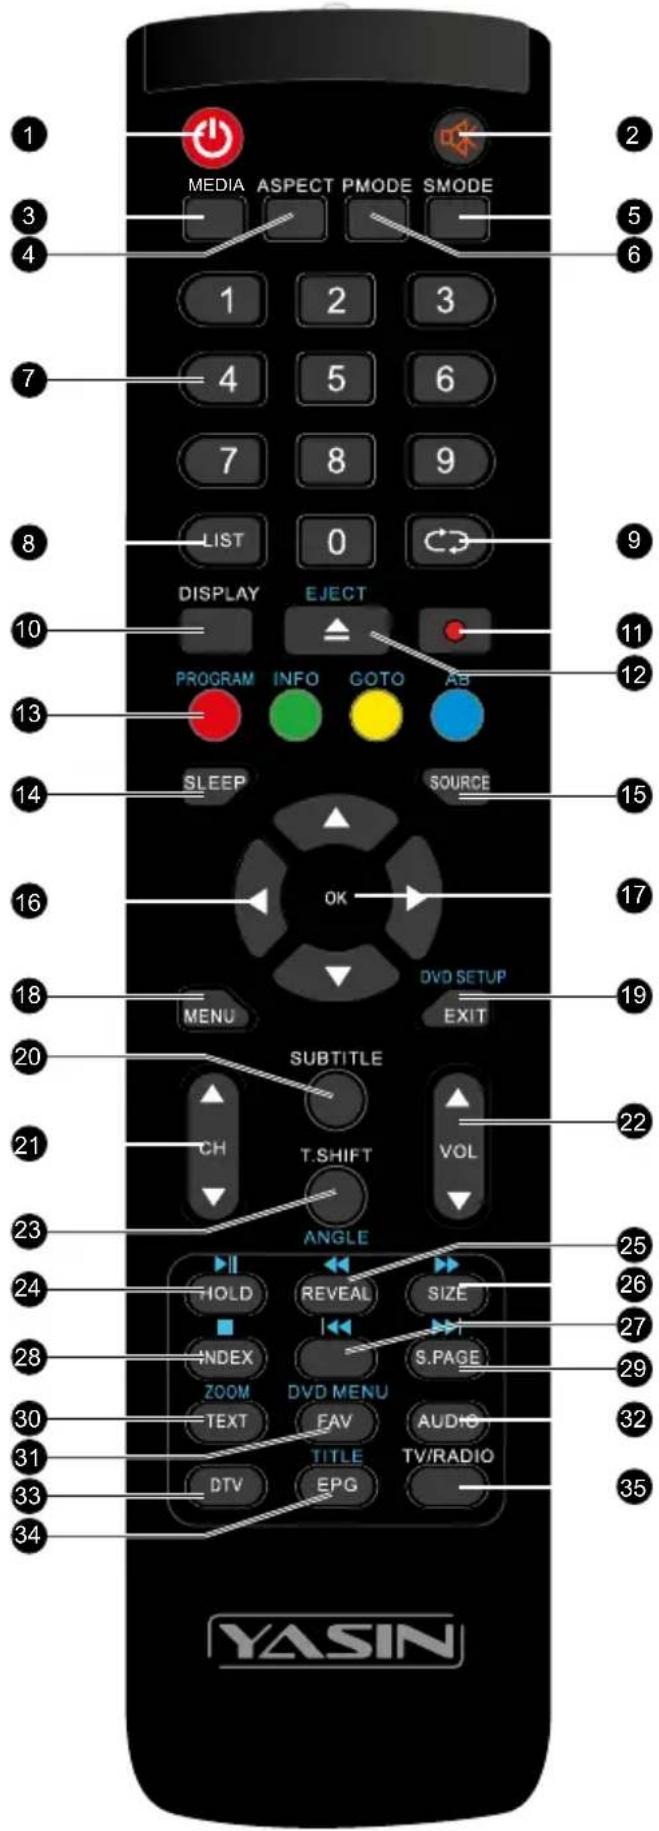
Remote Control

1 Switch the TV between on and standby mode.
2 MUTE: Mute and restore your TV sound.
3 MEDIA: USB media player, for playback from USB stick.
4 ASPECT: Watch the screen in various formats: Auto/4:3/16:9/Zoom/Subtitels/Smart-zoom.
5 SMODE.: Sound settings menu.
6 PMODE.: Picture settings menu.
7 0-9 numbers.
Press to select a programme.
8 List. Display the channel list (ATV/DTV mode).
9 Repeat. Return to the previous viewing channel (ATV/DTV mode)
10 DISPLAY: More information about the program (DTV mode).
11 No function.
12 No function.
13 Various functions in Teletext and program edit.
14 SLEEP: Set the time for the standby mode.
15 SOURCE: Select among the different input signal sources: DTV / ATV / AV / SCART / YPbPr / HDMI1 / HDMI2 / USB.
16 Allows you to navigate trough the OSD menus and adjust the system settings to your preference.
17 OK: confirm the selection in the OSD menus.
18 MENU: Displays the OSD menu (On Screen Display).
19 EXIT: Exit the OSD menu.
20 SUBTITLE: Display subtitles which are broadcast with the programme (DTV mode).
21 CH: Select a channel (up/down).
22 VOL: Adjust the volume (+ higher, - lower).
23 T.SHIFT: No function.
Remote Control
24 HOLD:
Freeze a multi-page passage on screen in Teletekst (TV teletekst mode).
▶II Start playing or pause (USB).
25 REVEAL:
Shows the top, bottom or entire page for easy reading in video text mode.
◀ Fast rewind (USB).
26 SIZE:
To enlarge the picture on the TV in teletext (TV teletex mode).
▶ Fast forward (USB).
27 No function.
To skip to the beginning of the previous chapter/track/photo (USB)
28 INDEX: To select the page number of the index in teletext (TV Teletex mode).
■ Stop the playback (USB)
29 S.PAGE:
To open a subpage if existing in teletext (TV teletext mode).
▶▶ Go to the beginning of the next chapter/track/photo (USB)
30 TEXT:
Turn on and off the teletext function (TV mode). ZOOM:
Zoom in on the displayed frame (USB).
31 FAV: Display the favourite channel list (ATV/DTV mode).
32 AUDIO: Turn on/off the Audio Description (AD) function (DTV mode). Select sterio/dual sound reception (ATV mode).
33 DTV: Enter DTV mode
34 EPG: Displays the EPG (Electronic Programme Guide) (DTV mode).
35 A short cut to switch input source tot TV/Digital radio channels.
Input source and channel reception
Use the TV
Make the connection with the desired receiving mode. The connection for DVB-C (cable / Coax) and DVB-T (antenna) can be found at the rear. For DVB-S reception (satellite), use the corresponding connection on the rear panel.
DVB-T (antenna)
Whether and how many DVB-T channels can be received by this device is highly dependent on the location and DVB-T signal strength in the area. DVB-T radio in particular is very limited and not available at most locations. Please note that if you use the TV in a different area than before, you must reset the channels. This is because the frequencies of the channels are very different from region to region. Channels marked with (internet) are linked to the internet and cannot be used.
DVB-C (cable / coax)
The programs can be received analogue or digital via DVB-C. If possible, prefer the digital receive mode. In this mode, more channels are available with better picture quality.
Coded channels (via provider or satellite)
You can also receive coded TV channels via satellite or DVB-C. That is why you need a box or Cam module and a SMART CARD from your service provider. Which programs can be used depends on the contract.
Module and smart card are not included in the delivery. Activating the card can take a few minutes when it is used for the first time. The device controls the module after each activation. Note the manual for Cl + module and smart card. Only Cl + modules and cards can be used. Other models are not supported.
Indication for Cl +
Please note that the recording and time shift function may be limited on some channels. Recorded files from channels encoded via CI + Card can only be played on this device. This is limited by the program and we as the manufacturer are not responsible for this.
Source
Select the correct input source on your TV (eg antenna, satellite cable, HDMI port) by pressing the SOURCE button on your remote control.
Confirm your choice with OK
Input source and channel reception
| Input Source | |
| Satellite |  |
| DVB-T/C |  |
| ATV |  |
| AV |  |
| SCART |  |
| YPbPR |  |
| HDMI1 |  |
| HDMI2 |  |
| USB |  |
 OK E Select OK E Select  ExitMove ExitMove | |
First time installation
Installation Guide
If this is the first time you are turning on the TV and there are no programs in the TV memory, the installation Guide menu will appear on the screen.
First Time Installation
OSD Language English
Country Netherlands
Environment
Home mode
OK
Auto Tuning
Note:
Searching for platform will take a long time, please be patient and don't turn off the TV.
OSD Menu CHANNEL
Channels
Press MENU to display the main menu. Press ◀▶ to select 'CHANNEL' in the main menu.
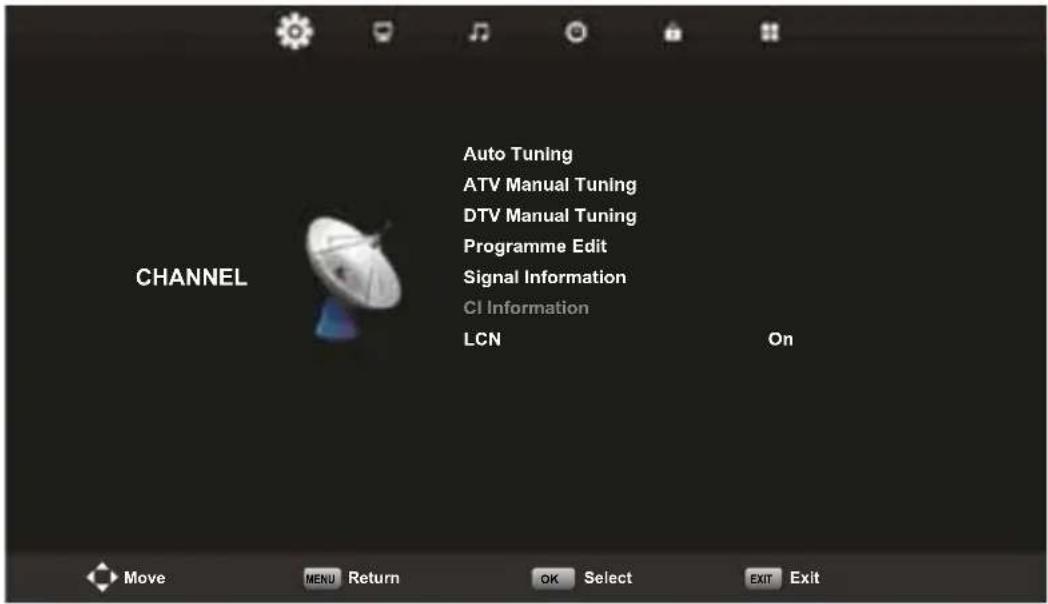
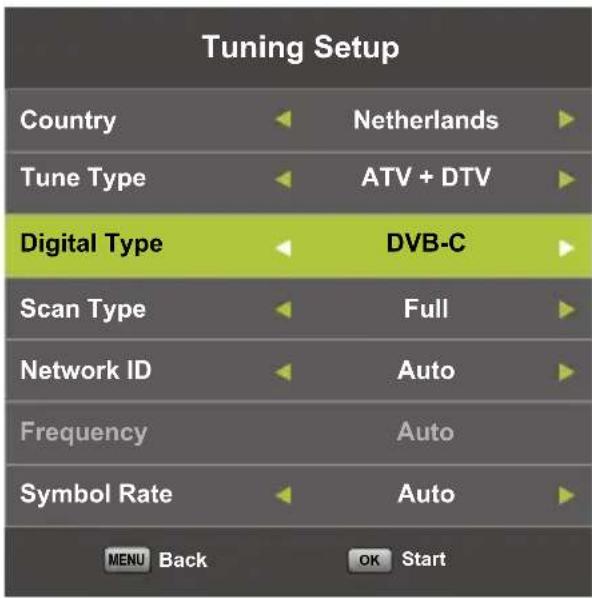
Auto Tuning
Press ▲▼ to select 'Auto Tuning'.
Press ▲▼ to select the country and use ▲▼ to select ‘Tune Type’ and ‘Digital Type’.
Put this on DTV + ATV. Select the type (DVB-T / S / C). Press OK to start the search.
Press MENU to skip EXIT to stop. Turn on “LCN” to put the channels in logical order (not possible with Satellite).
OSD Menu CHANNEL
| Channel Tuning | ||
| TV : | 0 | Programme |
| DTV : | 0 Programme | |
| Radio : | 0 | Programme |
| Data : | 0 | Programme |
| 0% | 46.25 MHz | TV |
| Please press MENU key to skip | ||
| Channel Tuning | ||
| TV : | 1 | Programme |
| DTV : | 4 Programme | |
| Radio : | 0 | Programme |
| Data : | 0 | Programme |
| 54% VHF CH 6 (DTV) Please press MENU key to exit | ||
Note:
Searching for platform will take a long time, please be patient and don't turn off the TV.
Satellite
If you are going to watch TV via your satellite, you must first search for the Satellite source input source (see page 13) before searching for channels. Then you can choose your satellite at Autotuning.

Press ▲▼ to select 'Manual scan' and press ▶ to 'ATV Manual Tuning'. Press OK to start with searching. Press MENU to return to the previous EXIT to exit the menu.
OSD Menu CHANNEL

Press ▲▼ to select 'Digital Manual
ok to start.
Press MENU to return to the previous
EXIT to exit the menu.
Channel Edit
Press ▲▼ to select 'Programme Edit' and pres OK to select.

Press ▲▼ to select the channel and channel.
Move channels
Press ▲▼ to select the channel and press the yellow button to move the channel. Press the yellow button again to confirm.
OSD Menu CHANNEL
The 3 colored buttons are shortcut keys.
Press▲▼ to select the channel to change, and then press the colored buttons to:
| Delete | Delete the selected channel |
| Move | Change the order of the selected channel |
| Skip | Skip the selected channel |
Press the FAV button to add or remove the channel from your favorite list. (Your TV connection will automatically skip the channel while CH +/- is used to watch the channels).
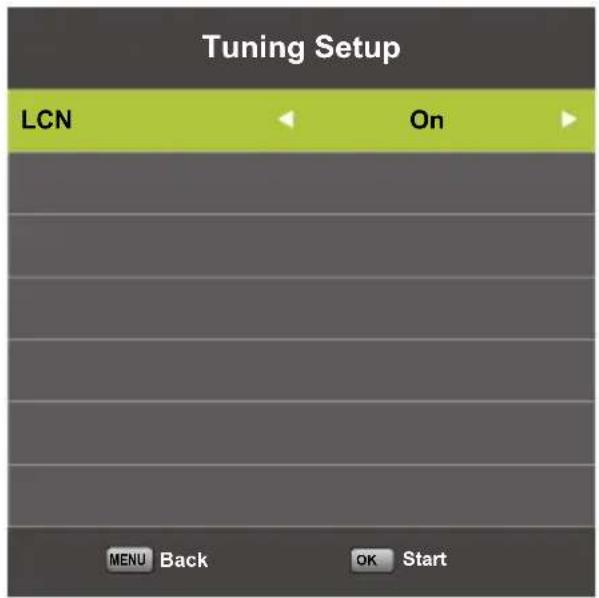
LCN (Logical channel number)
Turn on “LCN” to put the channels in logical order (not possible with Satellite).
CI information
Press ▲▼ to select 'CI info'. Presok to check CI card information.
OSD Menu PICTURE
The second item in the OSD menu is “PICTURE”. You can adjust the image effect here, such as contrast, brightness, etc.
Press MENU to enter the OSD menu. Than press ◀▶ to select the 'PICTURE' menu.
Press ▲▼ to select 'Picture Mode'. Presok to select.

Picture Mode
Press ▲▼ to select the picture mode and then pres OK to enter the submenu. You can change the contrast, brightness, color, sharpness and hue values when the image is in Personal mode.

Contrast/Helderheid/Kleur/Tint/Scherpte.
You select the item with the ▲▼ buttons that you want to change. By the ◀▶
OK to confirm.
OSD Menu PICTURE
| Contrast Adjust the light intensity of the image, but the shadow of the image is not variable. | |
| Brightness Adjusts the brightness of the image, making the dark area brighter | |
| Colour Adjusts the saturation of the color. | |
| Tint The use of color compensation has changed with the sending of the NTSC code. | |
| Sharpness Adjusts the level of the details in the image |

| Cold Increases the blue tone in the white. | |
| Normal Increases the average colors in white. | |
| Warm Increases the red color in the white. |
OSD Menu PICTURE
Noise Reduction
Filters and reduces image noise and improves image quality.
You select the desired quantity with the ▲▼ buttons. Then press OK to confirm.
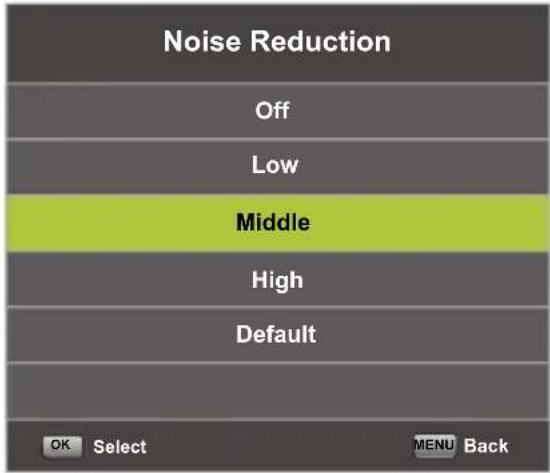
| Off Switch off noise reduction | |
| Low Detect and reduce low image noise | |
| Middle Detect and reduce moderate image noise | |
| High Detect and reduce increased image noise | |
| Default Set as Default |
OSD Menu SOUND
The third item in the OSD menu is "SOUND".
Press MENU to open the OSD menu.
Press ◀▶ o select the SOUND item in the OSD menu.
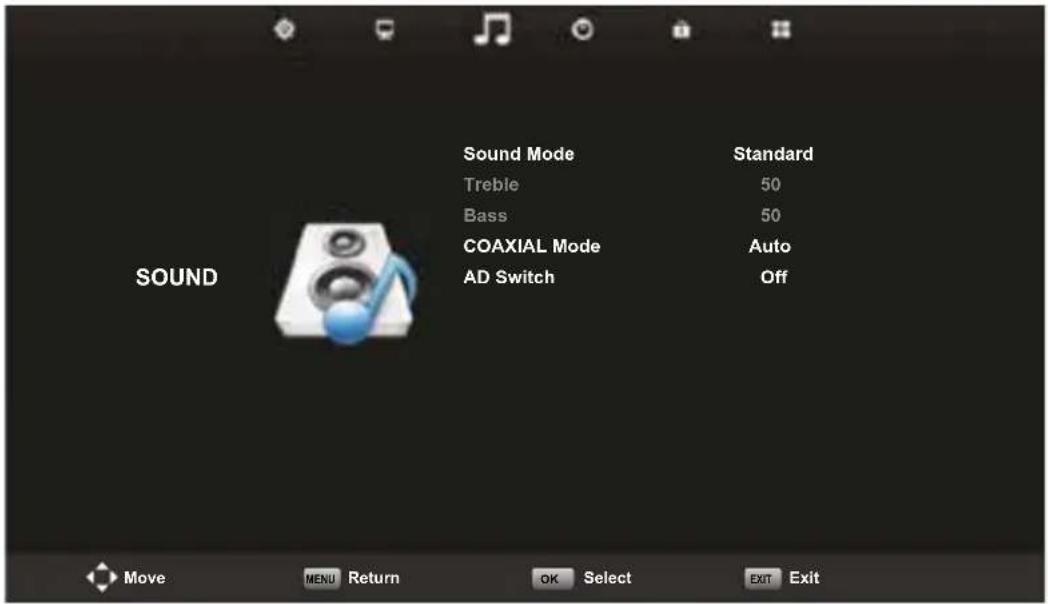
Press ▲▼ to select the option that you want to adjust in the SOUND menu. Press ok to adjust. After editing, press OK to confirm and return to the previous menu.
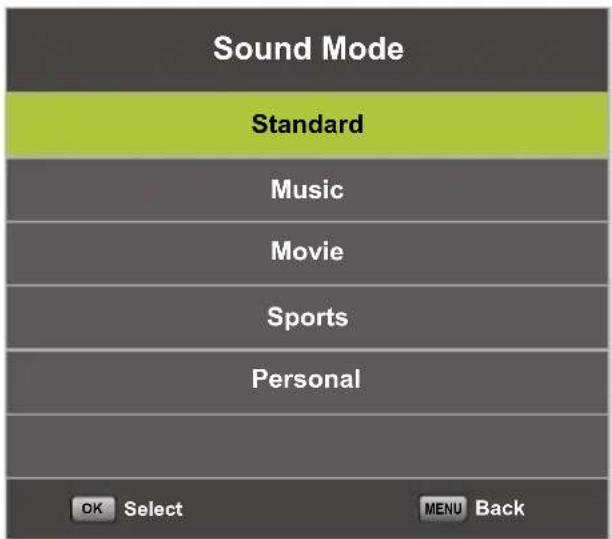
Sound Mode
Press ▲▼ to select the Sound mode and then presOK to enter the submenu. Press ▲▼ to select the item.
You can change the value of Treble and Bass when the sound is in Personal mode.
OSD Menu SOUND
| Standard Produces a balanced sound in all environments. | |
| Music Retains the original sound. Good for music programs. | |
| Movie Improve treble and bass for a rich sound experience. | |
| Sports Improves sound for sports broadcasts | |
| Personal The selection of personal sound settings |
Coaxial Mode
A PCM connection makes it possible to transfer two audio channels (ie stereo sound) in uncompressed digital form. Only intended for output. With digital transmission, the audio signal does not have to be converted from digital to analogue (and vice versa), so you do not have a loss of audio quality.
Press ▲▼ to select the Coaxial mode menu and then press ◀▶ to choose between PCM / Auto.
OSD Menu TIME
The fourth item in the OSD menu is the "TIME" menu.
Press MENU to open the OSD menu. Press ◀▶ to select the 'TIME' item in the OSD menu.

Press ▲▼ to select the option that you want to adjust in the TIME menu. Press OK to adjust. After adjusting, press OK to confirm the selection and return to the previous menu.

Press ▲▼ to select Time zone and then
press OK to enter the submenu. Press

ress

to confirm the selection.
OSD Menu TIME

this time)
Press ▲▼ to select Sleep Timer and then press OK to enter the submenu. Press ▲▼ to select the desired time. Press OK to confirm the selection.
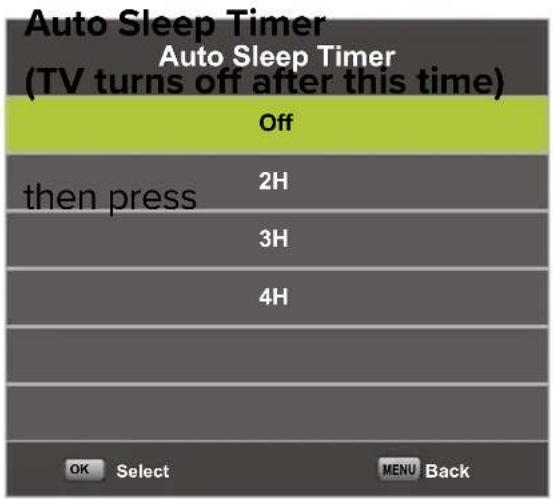
Press ▲▼ to select Auto Sleep Timer and OK to enter the submenu. Press ▲▼ to select the desired time. Press OK to confirm the selection.
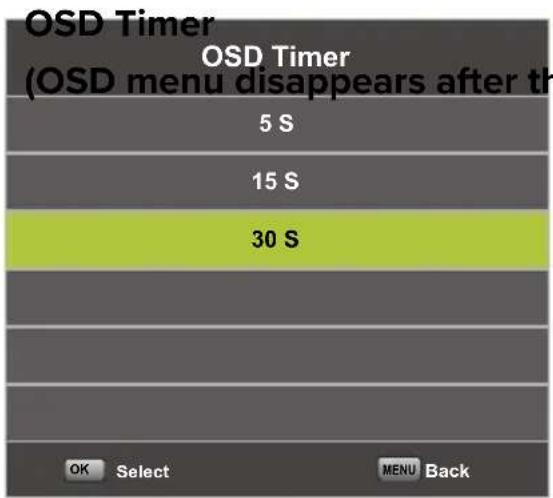
Press ▲▼ to select OSD Timer and then press OK to enter the submenu. Press ▲▼ to select the desired time. Press OK to confirm the selection.
OSD Menu LOCK
The fifth item in the OSD menu is the 'LOCK' menu.
Press MENU to open the OSD menu.
Press ◀▶ to select the LOCK item in the OSD menu.
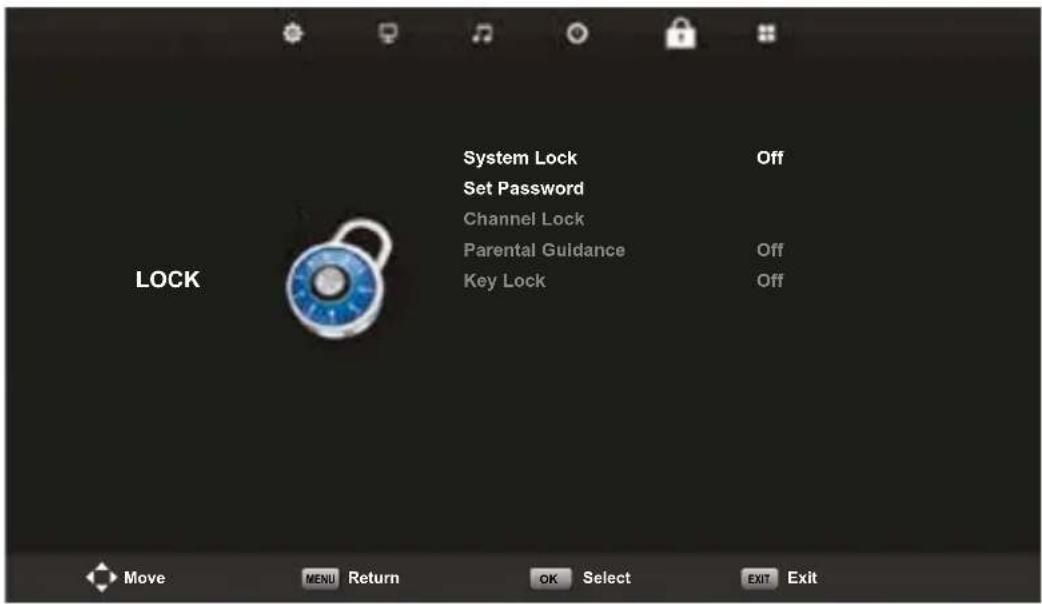
Press ▲▼ to select the option that you want to adjust in the LOCK menu. Press OK to adjust. After editing, press OK to save and return to the previous menu.
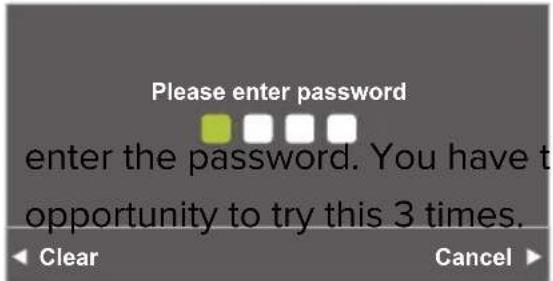
Password
Press ▲▼ to select System Lock. Then
The default code is 0000.
NOTE:
The administrator code is 8899. This is required to enable Parental Guidance or Channel Lock.
OSD Menu LOCK

Press ▲▼ to select set password and OK to enter the submenu.

Press ▲▼ to select Channel Lock and OK to enter the submenu.

Press ▲▼ to select Parent Guidance, and OK to enter the submenu. Press ▲▼ to select the channel number, and then press ◀▶ to turn it on or off.
HOTEL MODE
Hotel Mode
To open this option, first press MENU on the remote control and then the number buttons "8888".
The "HOTEL" menu will open.

Press ▲▼ to select the Hotel mode option that you want to adjust in the HOTEL menu. Press OK to adjust to enter the submenu. After editing, press OK to save and return to the previous menu.
Here you can set various settings by default that cannot be adjusted without a password. For example, maximum volume.
The sixth item in the OSD MENU is the "CONFIGURATION" menu.
Press MENU to open the OSD menu.
Press ◀▶ o select the CONFIGURATION item in the OSD menu.

Press ▲▼ to select an option that you want to adjust in the CONFIGURATION menu. Press OK to open the submenu. After editing, press OK to save and return to the previous menu.

OSD-Language
the default language. Press ▲▼/◀▶ to
ok to
confirm.

Press ▲▼ to select Teletext language and OK to enter the submenu. Press ▲▼/◀▶ to select the desired OK to confirm.
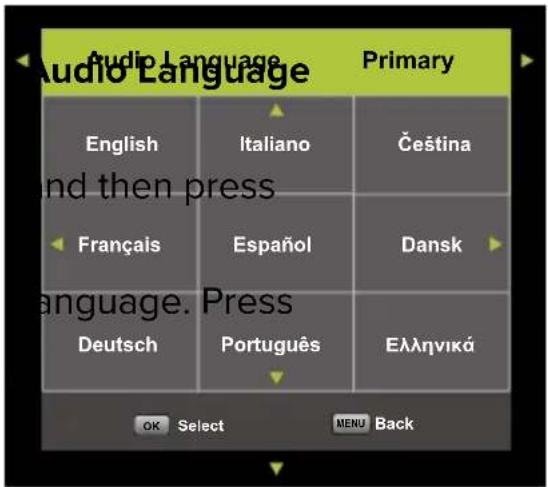
Press ▲▼ to select Audio Language OK to enter the submenu. Press ▲▼/◀▶ to select the desired OK to confirm.

Press ▲▼ to select Subtitle Language OK to enter the submenu. Press ▲▼/◀▶ to select the desired OK to confirm.
Hearing impaired
Press ▲▼ to select this menu and presOK to turn this function on or off. You can select the type of sound that best suits your personal preference.
Favourite List
When the source is selected as DTV, users can enter the favorite channel list by pressing the 'FAV' button. The "Favorite list" window looks like this:
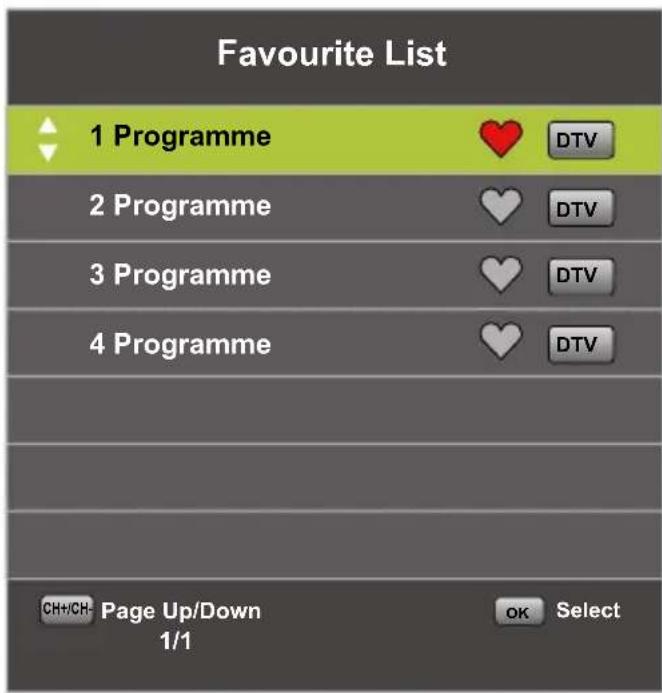
Press the ◀▶ buttons to select a list number.
Program information
If the source is selected as DTV, you can press the ‘DISPLAY’ button to display the channel information. The program information window looks like this:

Electronic Program Guide (EPG) contains program information that is broadcast now or in the future. The system will display the EPG window by pressing the “GUIDE” button. DATE and TIME information is displayed on the right side of the window. The left side shows all channels. The right side shows the programs in the channel. The selected program is also displayed at the top of the screen.

Press the YELLOW button to view the previous day. Press the BLUE button to view the next day.
Press ▲▼ to select a channel. Press the 'i' button on the remote control for more information about the program. Press EXIT to exit the guide.
USB Features
The TV is equipped with a USB port to upgrade software and play media files.
Pay attention:
- If possible, connect USB devices directly to a USB slot.
- If possible, do not use USB cables that are longer than 25 cm.
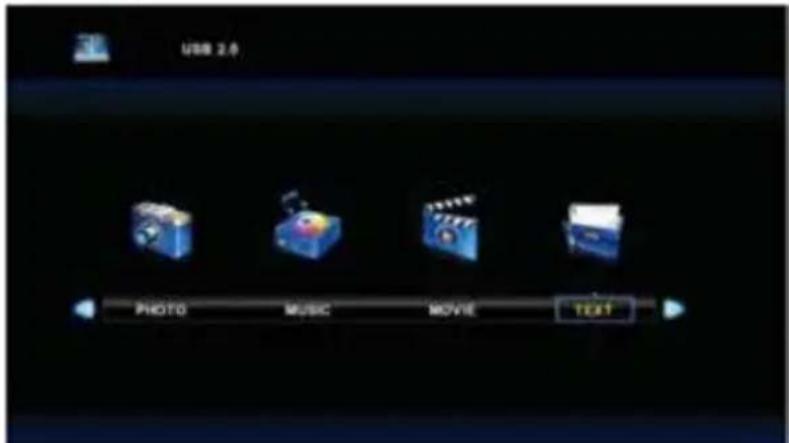
- Before using the Media menu, connect the USB device and then press the INPUT button to set the input source to the media.
Press the INPUT button on your remote control and select USB as the input source.
Use the ▲▼ keys to select your choice and confirm with OK.

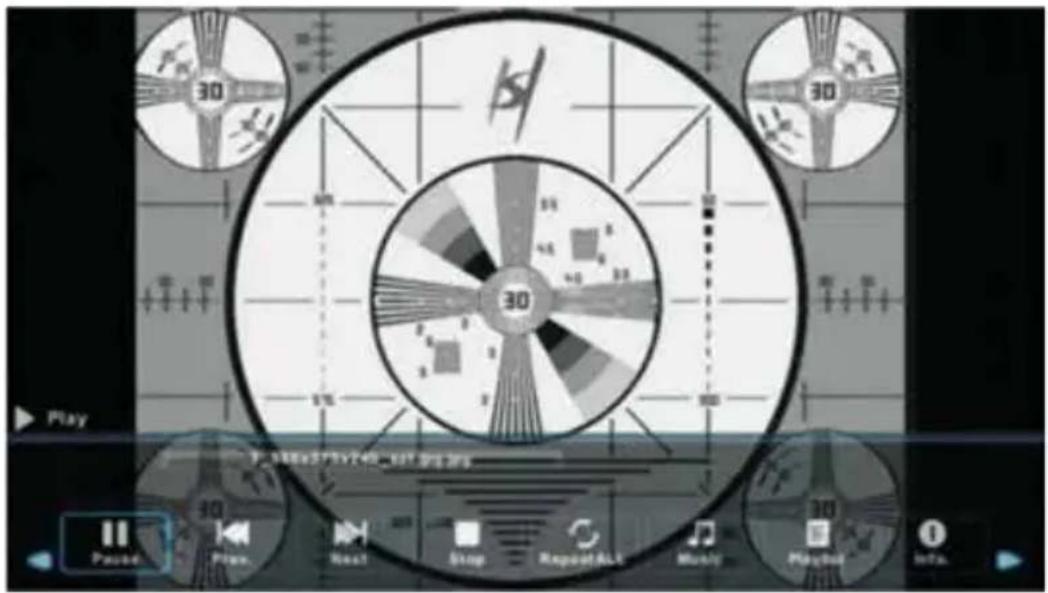
USB Features (Photo)
Use the ◀▶ buttons to select menu PHOTO and confirm with OK. Press MENU to return to the previous menu. Press EXIT to exit the menu.
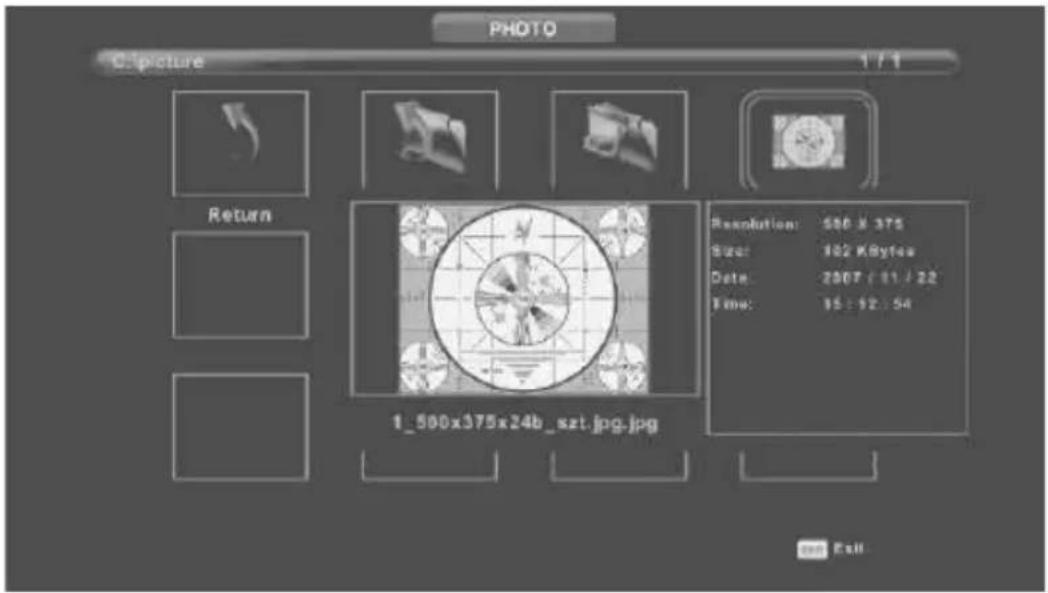
Press ◀▶ to select the file you want to view in the selection menu, and then press OK to display the image.
When you use the selected option, the file information appears on the right side of the image.
USB Features (Music)
Use the ◀▶ buttons to select menu MUSIC and confirm with OK. Press MENU to return to the previous menu. Press EXIT to exit the menu.

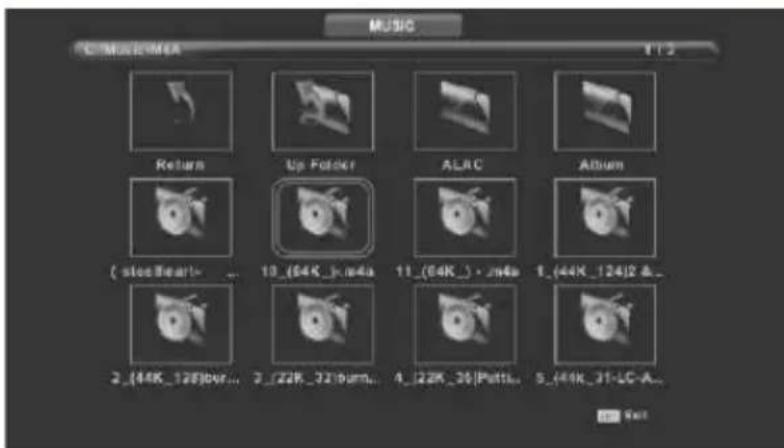
Press ◀▶ to select the hard drive you want to view, and then press OK to open. Press MENU to return to the previous menu.

USB Features (Movie)
Use the ◀▶ buttons to select menu MOVIE and confirm with OK. Press MENU to return to the previous menu. Press EXIT to exit the menu.
Press ◀▶ to select the hard drive you want to view, and then press OK to open. Press OK to select the movie that you want to see.
Press the DISPLAY button to select the menu that you want to run in the background, and then press OK to confirm the selection.
Press MENU to return to the previous menu. Press EXIT to exit the menu.
natural_image
Close-up of young green plant stalks in soil, no visible text or symbols on the plants themselvesNote:
The images related to the function are only for reference.
Specifications
HDMI-input
| Mode Resolution Horizontal Frequency (KHz) Vertical Frequency (KHz) | |||
| 480i 720 | x 480i 15.73 59.94/60 | ||
| 576i 720 | x 576i 15.63 50 | ||
| 480p 720 | x 480p 31.47 59.94/60 | ||
| 576p 720 | x 576p 31.26 50 | ||
| 720p 1.280 | x 720p | 37.50 | 50 |
| 44.96 | 59.94/60 | ||
| 1.080i | 1.920 x 1.080i | 28.13 | 50 |
| 33.75 | 59.94/60 | ||
| 1.080p | 1.920 x 1.080p | 56.25 | 50 |
| 67.5 | 59.94/60 | ||
Component video (YPbPr) input
| Mode Resolution Horizontal Frequency (KHz) Vertical Frequency (KHz) | |||
| 480i 720 | x 480i 15.73 | 59.94/60 | |
| 576i 720 | x 576i 15.63 50 | ||
| 480p 720 | x 480p 31.47 59.94/60 | ||
| 576p 720 | x 576p 31.26 50 | ||
| 720p 1.280 | x 720p | 37.50 | 50 |
| 44.96 | 59.94/60 | ||
| 1.080i | 1.920 x 1.080i | 28.13 | 50 |
| 33.75 | 59.94/60 | ||
| 1.080p | 1.920 x 1.080p | 56.25 | 50 |
| 67.5 | 59.94/60 | ||
Due to continuous product development, specifications are subject to change without prior notice.
Troubleshooting
Before contacting our service department you can go through the following for possible solutions.
| Problem Solution | |
| TV will not turn on • Make sure the power | cord is plugged in.• The batteries in the remote control may be drained; replace the batteries. |
| No picture, no sound • Check the cable | between TV and antenna/external AV device.• Press the power button on the remote.• Press the SOURCE button the remote, then press the ▼▲ button repeatedly to select the TV source. |
| Poor picture, sound OK • Check the cable | between TV and antenna/ external AV device.• Try another channel, the station may have broadcast difficulties.• Adjust the brightness/contrast in the Video menu.• Check that the unit is set to PAL |
| Audio noise • Check if the cables are connected properly.• Move any infrared equipment away from the TV. | |
| No audio • Make sure the volume is not turned off or set to minimum. | |
| Photos, videos and music from a USB device are not displayed | • Check if the USB storage device is capable of mass storage, as described in the documentation that came with the storage device.• Check if the USB storage device is compatible with the TV• Check if the audio and image file formats are supported by the TV. |
| USB files are played jerkily • The speed of the USB storage device can affect the speed of data transfer to the TV, preventing image and / or sound from being smoothly displayed. | |
Troubleshooting
The TFT LED panel uses a panel consisting of sub pixels which requires sophisticated technology to produce. However, there may be a small number of bright or dark pixels on the screen. These pixels will have no impact on the performance of the product.
Guarantee
We regret it when a product doesn't work as it should, despite our careful quality control. That is why we offer a 2-year manufacturer's warranty after the date of purchase on all our models. This guarantee is a pick-up and return guarantee. This means that we take care of the return of the product to our repair and service center. We will thoroughly check the product and solve the problem. We will send the product back to your home within 7 working days.
If the product can no longer be repaired, we will send you a new one.
Warranty conditions
- Factory warranty is only given if you can present the purchase invoice.
- This manufacturer's warranty applies to all Yasin products.
- Manufacturer's warranty applies only to material and manufacturing defects. Problems caused by improper use, incorrect installation, external factors and normal wear and tear are not covered by this manufacturer's warranty.
- The factory warranty expires as soon as changes or repair work on the product are carried out by yourself or third parties. The same applies if the serial number is changed or removed.
- The decision on repair or replacement of the product is exclusively reserved to Yasin. The warranty period is not extended due to repair or replacement.
Customer service
To use the Manufacturer's warranty or other questions, you can contact Yasin Customer Service via the customer service mail service@yasin-eu.com.
Due to the continuous product development, the manual can change without prior notice. Typing and printing errors reserved.

EC directives internet address:
https://eur-lex.europa.eu/browse/summaries.html?locale=en
The symbol on the product or its packaging indicates that this product must not be disposed of with your other household waste. Instead, it is your responsibility to dispose of your waste equipment by handing it over to a designated collection point for the recycling of waste electrical and electronic equipment. The separate collection and recycling of your waste equipment at the time of disposal will help conserve natural resources and ensure that it is recycled in a manner that protects human health and the environment.
For more information about where you can drop off your waste for recycling, please contact your local authority, or where you purchased your product.
Notes for Battery Disposal
The batteries used with this product contain chemicals that are harmful to the environment. To preserve our environment, dispose of used batteries according to your local laws or regulations. Do not dispose of batteries with normal household waste.
For more information, please contact the local authority or your retailer where you purchased the product.
MPEG-2 NOTICE
Any use of this product in any matter other than personal use that complies with the MPEG-2 standard for encoding video information for packaged media is expressly prohibited without a license under applicable patents in the MPEG-2 Patent Portfolio, which license is available from MPEG LA, LLC, 6312 S. Fiddlers Green Circle, Suite 400E, Greenwood Village, Colorado, 80111 U.S.A.
Inhaltsverzeichnis
Einleitung
Aufstellort 3
natural_image
Illustration of a computer monitor with a crossed-out hand and lightning bolts, symbolizing electrical hazard (no text or symbols present)
Warnung
natural_image
Simple line drawing of a computer monitor with a cross symbol on the screen, next to a rope tied to a chair (no text or symbols)
Warnung
natural_image
Illustration of a computer monitor with a 'X' symbol and a flower on top (no text or symbols present)
Warnung
natural_image
Simple line drawing of a box with a cross mark and a small object on top (no text or symbols)
Warnung
natural_image
Cartoon illustration of a person standing on a computer screen with a 'X' symbol, surrounded by floating bubbles (no text or symbols present)
Warnung
natural_image
Simple line drawing of a computer monitor with an X mark and a battery on top, no text or symbols present.
Warnung
natural_image
Illustration of a person standing next to a computer monitor and a clock with a timer (no text or symbols present)
Warnung
natural_image
Simple line drawing of a hammer striking a surface with radiating lines (no text or symbols)
Warnung
natural_image
Hand inserting a card into a black rectangular device (no visible text or symbols)The Ground Truth image displays a single, solid horizontal line. According to Rule 2 (UNDERSCORE & LINE RULES), this is a stylistic or background line, not a placeholder underscore. Therefore, the OCR result must ignore it and output nothing or only meaningful text. The provided OCR content is "____", which consists of four underscores. This is an incorrect interpretation of the line as a placeholder, violating the rule that stylistic lines must be ignored. The OCR has hallucinated placeholder underscores where none exist in the GT. Hence, the OCR result is inconsistent with the Ground Truth.
OK
natural_image
Close-up of young green plant stalks in a field, captured with no visible text or symbols.Hinweis:
EC directives internet address:
https://eur-lex.europa.eu/browse/summaries.html?locale=en

The symbol on the product or its packaging indicates that this product must not be disposed of with your other household waste. Instead, it is your responsibility to dispose of your waste equipment by handing it over to a designated collection point for the recycling of waste electrical and electronic equipment. The separate collection and recycling of your waste equipment at the time of disposal will help conserve natural resources and ensure that it is recycled in a manner that protects human health and the environment.
For more information about where you can drop off your waste for recycling, please contact your local authority, or where you purchased your product.
Notes for Battery Disposal
The batteries used with this product contain chemicals that are harmful to the environment. To preserve our environment, dispose of used batteries according to your local laws or regulations. Do not dispose of batteries with normal household waste.
For more information, please contact the local authority or your retailer where you purchased the product.
MPEG-2 NOTICE
Any use of this product in any matter other than personal use that complies with the MPEG-2 standard for encoding video information for packaged media is expressly prohibited without a license under applicable patents in the MPEG-2 Patent Portfolio, which license is available from MPEG LA, LLC, 6312 S. Fiddlers Green Circle, Suite 400E, Greenwood Village, Colorado, 80111 U.S.A.
Table des matières
Introduction
Installation 3
natural_image
Illustration of a computer monitor with a crossed-out hand and lightning bolts, symbolizing electrical hazard (no text or symbols present)
natural_image
Simple line drawing of a computer monitor with a cross symbol on the screen, next to a rope tied to a chair (no text or symbols)
natural_image
Illustration of a computer monitor with a 'X' symbol and a hand holding a flower above it (no text or symbols present)
natural_image
Simple line drawing of a box with a cross mark and a small object on top (no text or symbols)
natural_image
Cartoon illustration of a person standing next to a computer monitor with an 'X' symbol (no text or numbers present)
natural_image
Simple line drawing of a computer monitor with an X mark and a battery on top, no text or symbols present.
natural_image
Illustration of a computer monitor and a cartoon character with an insect, no text or symbols present
natural_image
Simple line drawing of a hammer striking a surface with radiating lines (no text or symbols)
natural_image
Hand inserting a small electronic device into a black TV case (no visible text or symbols)DVB-C (câble / coaxial)
natural_image
Close-up of young green plant stems in soil, no visible text or symbolsRemarque:
EC directives internet address:
https://eur-lex.europa.eu/browse/summaries.html?locale=en
Any use of this product in any matter other than personal use that complies with the MPEG-2 standard for encoding video information for packaged media is expressly prohibited without a license under applicable patents in the MPEG-2 Patent Portfolio, which license is available from MPEG LA, LLC, 6312 S. Fiddlers Green Circle, Suite 400E, Greenwood Village, Colorado, 80111 U.S.A.
About Yasin
Yasin has their sales office in Eindhoven and serve the European market from there.
The range consists of monitors an TVs.
So Yasin has the right screen for every user and every occasion.

natural_image
Abstract pattern of blue and white dots arranged in a fan-like structure against a dark background (no text or symbols)
Customer service
Send an email with your question:
service@yasin-eu.com
or phone +31 (0)24 - 34 34 230
(monday-friday 09.00 - 17.00 uur).
For product information: www.yasin-eu.com
- Waarschuwing
- Control Panel Button Function
- TV Aansluitingen
- EPG (Electronic Programm Guide)
- USB Features (USB-kenmerken)
- Introduction
- INSTALLATION
- SAFETY
- Warning
- CAUTION RISK OF ELECTRIC SHOCK DO NOT OPEN
- Caution
- TV Connections
- NOTE
- Mounting
- The TV on a surface
- Hang the TV on the wall
- Cl+ module
- Installing a CI + module
- Remote Control
- HOLD:
- REVEAL:
- SIZE:
- No function.
- INDEX: To select the page number of the index in teletext (TV Teletex mode).
- S.PAGE:
- TEXT:
- FAV: Display the favourite channel list (ATV/DTV mode).
- AUDIO: Turn on/off the Audio Description (AD) function (DTV mode). Select sterio/dual sound reception (ATV mode).
- DTV: Enter DTV mode
- EPG: Displays the EPG (Electronic Programme Guide) (DTV mode).
- A short cut to switch input source tot TV/Digital radio channels.
- Input source and channel reception
- Use the TV
- DVB-T (antenna)
- DVB-C (cable / coax)
- Coded channels (via provider or satellite)
- Source
- First time installation
- Installation Guide
- OSD Language English
- Note:
- OSD Menu CHANNEL
- Channels
- Auto Tuning
- Satellite
- Channel Edit
- Move channels
- LCN (Logical channel number)
- CI information
- OSD Menu PICTURE
- Picture Mode
- Noise Reduction
- OSD Menu SOUND
- Sound Mode
- Coaxial Mode
- OSD Menu TIME
- this time)
- OSD Menu LOCK
- Password
- HOTEL MODE
- OSD-Language
- Hearing impaired
- Favourite List
- Program information
- USB Features
- Pay attention:
- USB Features (Photo)
- USB Features (Music)
- USB Features (Movie)
- Specifications
- Troubleshooting
- Guarantee
- Warranty conditions
- Customer service
- Notes for Battery Disposal
- MPEG-2 NOTICE
- Inhaltsverzeichnis
- Einleitung
- Warnung
- Table des matières
- DVB-C (câble / coaxial)
- Remarque:
- About Yasin
Brand : Yasin
Model : YT32HTB1
Category : Television