
TBM8001W - Bread maker Tomado - Free user manual and instructions
Find the device manual for free TBM8001W Tomado in PDF.

| Product Type | Bread Machine |
| Brand | Tomado |
| Model | TBM8001W |
| Programs | 12 programs: Basic, French, Whole Wheat, Rapid, Sweet, Gluten Free, Ultra Fast, Dough, Jam, Cake, Sandwich, Bake Only |
| Bread Capacity | 650 g or 800 g |
| Adjustable Crust Color | Light (L), Medium (M), Dark (D) |
| Delay Timer | Up to 13 hours |
| Display | LED with program, weight, color and time indication |
| Baking Pan | Non-stick, removable |
| Kneading Hook | Yes, removable |
| Voltage | 220-240 V ~ 50 Hz |
| Power | 550-650 W (estimated) |
| Safety | Automatic shut-off, keep warm (60 min), overheat protection |
| Cleaning | Exterior: damp cloth; pan and hook: warm water, not dishwasher safe, do not immerse appliance |
| Spare Parts Available | Baking pan, kneading hook (www.tomado.com/support) |
| Warranty | 24 months |
| Usage | Household use only |
Frequently Asked Questions - TBM8001W Tomado
User questions about TBM8001W Tomado
0 question about this device. Answer the ones you know or ask your own.
Ask a new question about this device
Download the instructions for your Bread maker in PDF format for free! Find your manual TBM8001W - Tomado and take your electronic device back in hand. On this page are published all the documents necessary for the use of your device. TBM8001W by Tomado.
USER MANUAL TBM8001W Tomado
natural_image
White TOMADO rice cooker with digital display and control buttons (no visible text or symbols on body)natural_image
3D rendering of a square bucket with two labeled parts (1 and 2), no text or symbols present.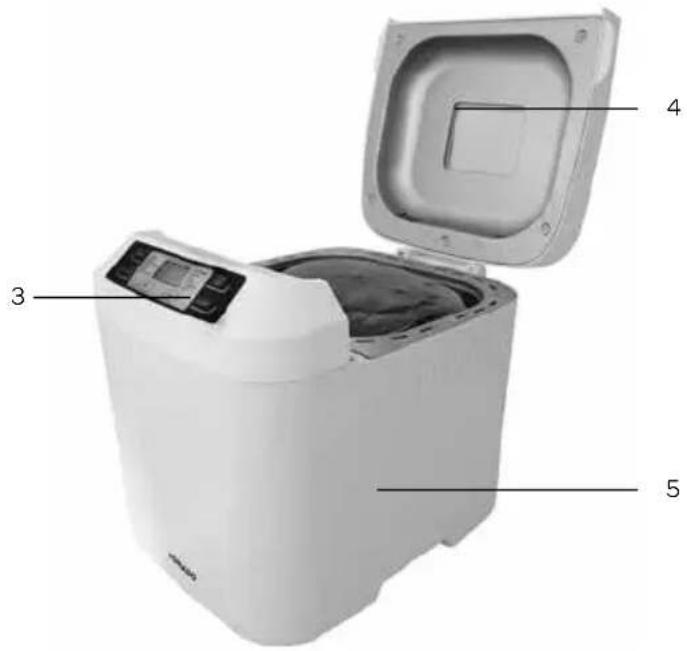

Programma: Basic, Quick of Sandwich
(Basis, Snel of Sandwich)
Volkorenbrood 650 gram 800 gram
Volkorenmeel 400 gr 500 gr
Water 275 ml 325 ml
Boter/ olie 7 gr 10 gr
Suiker 7 gr 10 gr
Zout 7 gr 10 gr
Gedroogde gist 5 gr 6 gr
Programma: French of Whole wheat (Frans of Volkoren)
Tarwebrood 650 gram 800 gram
Volkorenmeel 250 gr 300 gr
Witte bloem 150 gr 200 gr
Water 250 ml 300 ml
Boter/ olie 7 gr 10 gr
Suiker 7 gr 10 gr
Zout 7 gr 10 gr
Gedroogde gist 5 gr 6 gr
Programma: French of Whole wheat (Frans of Volkoren)
Aardbeienjam
Verse aardbeien 450 gram
Suiker 275 gram
Citroensap (vers) 3 eetlepels
- Carefully read the instruction manual in full prior to using the appliance and store the manual in a safe place for future reference.
-
Only use this appliance for the purposes described in the instruction manual.
• The outside can become very hot! -
The appliance must be connected to an alternating current supply, via an earthed wall socket, with a mains voltage that matches the information given on the information plate of the appliance.
- Never bend the power cord sharply or allow it to run across hot parts.
- Fully unwind the cord to prevent it from overheating.
- Never place the appliance near appliances that give off heat, such as ovens, gas cookers, hotplates, etc. Keep the appliance away from walls or other objects that may catch fire, such as curtains, towels (cotton or paper, etc.).
- Always make sure the appliance is on a sturdy, flat surface and only use it indoors.
- Do not leave the appliance unattended when it is in operation.
- If you want to move the appliance, make sure the appliance is switched off. Use both hands when moving the appliance.
- Do not use the appliance if the plug, cord or appliance are damaged, or if the appliance no longer functions properly or if it is damaged in any other way. If this is the case, consult the retailer or our maintenance service. Never replace the plug or cord yourself.
- Repairs to electrical appliances should only be performed by skilled persons. Incorrect repairs may expose the user to serious hazards.
- Never use the appliance with components that are not recommended or supplied by the manufacturer.
- Do not pull the cord and/or appliance to remove the plug from the wall socket. Never touch the appliance with wet or moist hands.
- Keep the appliance out of reach of children. Children do not see the dangers associated with handling electrical appliances. Therefore, never allow children to operate electrical appliances without supervision.
TOMADO®
- Keep the appliance and cord out of reach of children younger than 8 years of age.
- The appliance may be used by children of eight years and above and by persons with limited physical, sensory or mental capacities or a lack of experience and knowledge, provided they use the appliance under supervision or have been instructed about its safe use and understand the hazards involved.
• Children must not play with the appliance. - The appliance must not be cleaned or maintained by children, unless this is done under supervision.
- If the appliance is not being used or is being cleaned, switch off the appliance and remove the plug from the socket.
- Extension cords may only be used if the mains voltage (see the information plate) and capacity are identical to or higher than that of the appliance. Always use an approved earthed extension cord.
- If you decide to cease using the appliance due to a defect, we recommend cutting off the cord after removing the plug from the wall socket. Take the appliance to the waste processing department concerned of your municipality.
- If the appliance does not function after it has been switched on, it is possible that the fuse or earth leakage circuit breaker has been activated in the electrical distribution box. The group can be overloaded or an earth leakage current may have occurred.
- In case of a breakdown, never make repairs yourself; a tripped safety device in the appliance could indicate a defect that cannot be remedied by removing or replacing this safety device. Only original parts should be used.
- Never submerge the appliance, cord or plug in water.
- This appliance is only suitable for household use. If the appliance is not used as intended, no compensation can be claimed in case of defects or accidents and the warranty will be invalidated.
TOMADO®
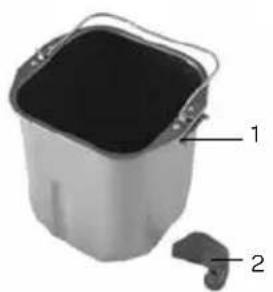
PRODUCT DESCRIPTION
- Baking tin
- Dough hook
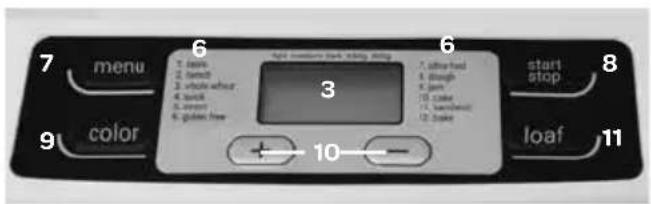
- Display
- Lid with inspection window
- Base unit
- Programmes
- Menu button
- Start and stop button
- Color button
- Time - & +
- Loaf button
natural_image
Close-up of a square bucket with two labeled parts (1 and 2), no visible text or symbols on the bucket itself.

PRIOR TO FIRST USE
Before using the appliance for the first time, proceed as follows: carefully unpack the bread maker and remove all packaging material. Keep the packaging (plastic bags and cardboard) out of reach of children. After unpacking the appliance, carefully check it for external damage that may have occurred during transport. In the packaging you will find the bread maker, baking tin, dough hook and instruction manual. Place the appliance on a sturdy, flat surface. Clean the bread maker, baking tin and dough hook with a damp cloth. On the inside, the baking tin and dough hook are covered with a non-stick coating, which is why you should never clean these items with cleaning agents, a dishwashing brush or a sponge. Always use a damp cloth for this. This is enough to keep it properly clean. When connecting the machine for the first time, a loud beep sounds and "03:00" appears on the display. The machine is now ready for use. When used for the first time, your bread maker could release some smoke. This is absolutely normal, does not do any harm and will disappear automatically.
THE ART OF BAKING
The quality of the bread that you bake in the bread maker depends on many factors. The more often you work with our bread maker, the quicker you get to understand these factors, which will be beneficial to the baking result. The bread maker is relatively simple to use, but does require a correct dosing of the ingredients. We therefore recommend using kitchen scales, preferably scales that weigh in grammes.
The machine allows you to choose between different programmes. Select the programme for the type of loaf you want, or as indicated in the recipe.
Make sure the yeast is the last ingredient you place in the tin, on top of the flour, so it does not come into contact with the salt, sugar and water and/or milk. Make sure your ingredients are fresh. You can establish the freshness of the yeast by dissolving 1 teaspoon of sugar in a beaker half filled with water and adding 1 teaspoon of yeast to this mixture. After a few minutes the mixture should start to buzz and bubble, only then you will know that the yeast is fresh.
Check the dough during the kneading process.
After 5 to 10 minutes, it should look like a smooth, elastic round ball. Add 1 tablespoon of water each time when the dough is too lumpy or add 1 tablespoon of flour when the dough is too wet.
Make sure you add the ingredients, water included, in the indicated order and that they are at room temperature. Therefore take butter and yeast out of the refrigerator in time. Sometimes the bread can rise too fast. This can be caused by a room temperature that is too high or ingredients that are too warm.
After baking a loaf, allow the bread maker to cool down for 15-20 minutes before baking another one.
THE INGREDIENTS
The most important factors for baking a successful loaf are the quality, freshness and correct weight of your ingredients.
Flour/ Meal
Flour or meal is the basic ingredient of bread.
The weight of the flour or meal differs per type. That is why it is absolutely necessary to measure the correct amount by means of scales. Advice: when buying meal, pay attention to the text on the packaging. It should state that the meal is also suitable for making bread (do not use patent flour).
Gluten
Gluten are natural components of flour/ meal and help the bread to rise.
Yeast
Yeast is a micro-organism that grows on various vegetable foods. Yeast has the capacity to convert sugars to alcohol and carbon dioxide, allowing it to multiply very quickly. Ideal therefore to make the dough rise and make it lighter and more digestible. We recommend using dry yeast in the bread maker. This (grain) yeast is easier to process and has a longer use-by date than fresh yeast, and it also yields a more constant baking result compared to fresh yeast.
Salt
Salt does not only ensure a particular taste of the bread, but also controls the activity of the yeast, making the dough firm and compact and preventing the bread from rising too fast.
Butter/oil
Butter or oil adds a better taste to the bread and makes the bread softer. The butter or oil should be at room temperature before adding it to the other ingredients.
Sugar
Sugar is the source of nutrition for the yeast and is a major part of the leavening process. You can use normal white sugar, brown sugar, syrup or honey. It adds some softness to the taste of the bread, increases the nutritional value and allows you to use the bread for a longer period of time. Caution: Do not use coarse sugar or sugar cubes, such as for sugar loafs, as this will damage the non-stick coating of the baking tin.
Water
When the flour/ meal is mixed with the water, the gluten are formed and the air is sealed in, allowing the loaf to rise. At a normal ambient temperature you use lukewarm water to make the bread: cold water does not activate the yeast and warm water activates the yeast too much.
Milk
Milk ensures a brown crust, improves the taste of the bread, increases the nutritional value and provides a beautiful creamy colour on the inside. When using fresh milk, you must of course reduce the amount of water to keep the liquid level in balance. Caution: Do not use fresh milk when programming the baking process with time delay. The milk could become sour.
Other ingredients
In cookery books you may find recipes that require herbs, nuts, currants, fruit or vegetables, etc. Always use fresh ingredients. When using nuts, sunflower seeds, dried fruit or anything similar, we recommend soaking them in water in advance, patting them dry properly and only then adding them to the dough. Do make sure these ingredients are not too large and not too sharp, due to possible damages to the non-stick coating.
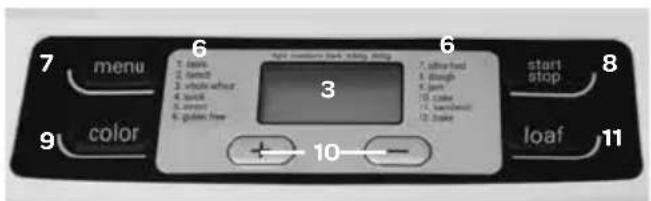
THE DISPLAY
Menu button
Use this button to select the correct baking programme. Each time you press this button you hear a beep sound and the programme number changes. The programme is stated on the display. This bread maker has 12 programmes to choose from (also see: Programmes).
Start and stop button
Use this button to start or stop the programme.
TIP: If you selected the wrong programme, you can change this by pressing the stop button for a number of seconds.
You can then set the machine again, with the correct programme.
START: to start a programme, press the button and you will hear a short beep sound. The colon between the time on the display starts to flash and the machine now sets the time and goes through the selected programme.
STOP: to end a programme, press down the button for a number of seconds until you hear a beep sound. The beep sound confirms that you have switched off the programme.
Color button
Use this button to indicate whether you want the crust to have a light, medium or dark colour.
TIP: When trying a recipe for the first time, we recommend using the medium crust colour.
Loaf button
Use this button to indicate the weight of the loaf that you want to make. You can choose between a loaf of 650 grammes and a loaf of 800 grammes.
TIP: The total weight of ingredients stated in the recipe is the weight of the loaf that you are going to make.
Time - / Time + buttons
By means of these buttons you can determine yourself when your loaf will be ready. By pressing the «+» button, the time is increased by 10 minutes each time. By pressing the «-» button, the time is decreased by 10 minutes each time. Also see: Using the time delay.
ON/OFF
| How can you see whether the machine is working and whether the programme is running? | When the colon flashes, the programme is running. |
| When the colon lights continuously, the programme has stopped. |
ERROR MESSAGES ON THE DISPLAY
If, after switching on the bread maker, "H:HH" appears on the display, this means that the temperature of the appliance is still too high. Lift the lid of the appliance and allow the appliance to cool down before you start baking a new loaf. When E:2-E:5 or E:8 appears on the display, switch off the appliance and remove the plug from the wall socket. In this case, contact our technical service department (see the last page for the address).
PROGRAMMES
1: Basic This is the most used programme for baking white, wheat or light whole wheat bread.
2: French In this programme, the baking time is longer than in the normal programme, giving the loaf a crust that is a little harder.
3: Whole wheat This programme is used for making loafs with heavier types of flour, such as whole wheat, wheat and multigrain bread. These types of flour require a longer kneading and leavening time. The loaf will usually be a little smaller than a white loaf, because the meal is more heavy.
4: Quick This is a programme for those occasions when you want a white bread within a short period of time. Due to the shorter time, you do have to take into account that these loafs are smaller than when you use the normal programme.
5: Sweet For making "sweet" loafs, such as currant and nut loafs.
6: Gluten free This programme allows you to make your own gluten free bread. The machine kneads the dough, allows it to rise and then bakes it.
7: Ultra fast By means of this programme you can make a tasty fresh white loaf of 650 grammes in 90 minutes and a white bread of 800 grammes in 100 minutes.
8: Dough By means of this programme you can make dough for rolls, pizza or any other recipes that require (bread) dough. The dough is not baked in the machine. A signal indicates when the dough is ready to be taken out of the baking tin.
TOMADO®
9: Jam For preparing delicious, fresh jam. Caution: Make sure the stones of the ingredients are removed
before you add them to the baking tin. Sharp stones could damage the non-stick coating. Working method: You add all ingredients to the baking tin and set the machine to the JAM programme. Then you press start and the machine first starts to pre-heat the ingredients. Then the machine starts to mix and eventually allows the jam to cool down. When the machine is ready, this is indicated by means of a beep signal. You can pour the jam in a jar or container and allow it to cool further. When cooled sufficiently, you can close the jar or container and store it in the fridge.
10: Cake By means of this programme you can make bread with baking powder, for instance, instead
of yeast. Loafs baked with this programme become less high and have a firmer structure. The timer cannot be used at this position, because the baking powder works immediately and eventually no longer provides good leavening. If you want to make cake with this programme, we recommend placing the ingredients in the baking tin. Then you enter the settings of the machine and before you press start you must mix the ingredients with a wooden spoon. This encourages the kneading process.
11: Sandwich Use this programme to make a very fluffy white loaf, for sandwiches for instance. Caution! When
using this programme, you cannot select a crust colour, the machine does this automatically.
12: Bake You can use this programme for ready-made dough, that you made earlier for example. You can
only bake the dough with this programme. The programme is pre-programmed at 60 minutes. In case of ready-made bread dough, observe the instructions from the manufacturer. It is also possible to reheat bread that has already been baked.
BAKING BREAD
Step 1: Remove the baking tin from the machine by turning it to the left by a quarter turn and pulling it straight out of the machine by the handle.
Step 2: Place the dough hook (included) on the shaft in the centre of the baking tin. Carefully and correctly place the dough hook, so that all ingredients are sufficiently mixed and kneaded. Always properly clean the shaft, so that any baking residues are completely removed.
Step 3: Add the ingredients to the baking tin as follows and in the following order:
-
Half the required flour/meal
-
Water/milk
-
Butter/oil
-
Eggs, if necessary
-
The rest of the required flour/meal
-
Sugar (add the sugar on one side)
-
Salt (add the salt on the other side)
-
Yeast (add yeast in a little hole created in the middle) Caution: The yeast should not come into contact with the water. It is possible that the water activates the yeast before the ingredients are sufficiently mixed and kneaded.
Step 4: Remove all residues of ingredients from the outside of the baking tin. Place the baking tin back in the machine and turn it to the right by a quarter turn, so that the baking tin is in a good firm position.
Step 5: Close the lid.
Step 6: Insert the plug into the socket. "3:00" appears on the display.
Step 7: Set the right programme by means of the Menu button.
Step 8: Use the COLOR button to set the colour of the crust. You can choose between light (L), medium (M) and dark (D). The chosen crust colour is shown at the top of the display by means of a “Δ”.
Step 9: By means of the Loaf button, select the correct size of the loaf that you want to make, 650 or 800 grammes. The chosen size is shown at the top of the display by means of a “Δ”.
Step 10: If necessary, set the time delay using the time delay buttons (+/-). Also see: "Using the time delay".
Step 11: Press the start button. The colon starts to flash, indicating that the machine is working.
* If you select one of these programmes, you cannot select a weight: Quick, Ultra fast, Dough, Jam, Cake and Bake. For this, also see section "Recipes".
An overview of the exact programme times can be found on the last page of the English instruction manual.
The time on the display is indicated in hours and minutes. Example: Programme 1, Normal, medium crust colour takes 3 hours.
During the kneading process a "beep signal" can be heard: after this "beep signal" you can add extra ingredients such as dry currants, nuts or other products. You open the lid, add the extra ingredients and then close the lid, after which the kneading process continues. Caution: Allow currants, raisins and nut to soak in advance, and dry them with a cloth or kitchen paper.
Make sure these ingredients are not too large or too sharp, or else the non-stick coating of the baking tin could get damaged.
Step 12: When the loaf is ready, you can hear a number of beep sounds. Hold down the stop button for a few seconds.
The machine will give another beep sound to confirm that the programme has been stopped. Remove the plug from the wall socket and open the lid of the machine. Remove the baking tin using oven gloves. Allow the loaf to cool down in the baking tin for about 10 to 15 minutes and turn the baking tin upside down above your worktop and carefully shake the loaf out of the tin.
Never place the loaf and baking tin on the outside of the machine or directly on a plastic tablecloth. Caution: the aluminium baking tin is not suitable for hitting against, being knocked against the worktop and/or pushed on the sides. After baking, the hot baking tin is soft and should not be burdened mechanically.
When the loaf is not immediately released, carefully turn the shaft on the bottom side of the baking tin until the loaf is released. When taking the loaf out of the machine and the dough hook remains stuck in the loaf, carefully remove it from the loaf. If necessary, allow the loaf to cool a little longer on a grille, so that you can later remove the dough hook with your hands. Do make sure the dough hook has cooled down enough. We recommend cutting the loaf only after 15-20 minutes. Extra: If, for instance, you are not going to be home in time, the bread maker continues to heat for another 60 minutes. This is not included in the time of the programme.
SETTING THE TIME DELAY
If you want to use the time delay, you must set this before pressing the Start button.
Important: do not use the time delay when using perishable ingredients.
First observe the first 9 steps described in section "Baking bread" and then – after setting the correct programme, crust colour and size – press the arrow keys to increase or decrease the time on the display. Also see section "The display".
+ = 10 minutes more
— = 10 minutes less
The time shown on the display is the total baking time required. The time delay can be programmed up to 13 hours.
Example: It is 9 am in the morning, and you want to have freshly baked bread at 5 pm in the afternoon.
Add all the ingredients to the baking tin. Place the baking tin in the bread maker. Close the lid and press the menu button to set the correct programme. Press the COLOR button to set the correct crust colour and set the correct weight using the Loaf button. Press “+” until 8:00 appears in the display. After all, 8 hours will pass from the moment you press the start button until the moment that the loaf should be ready (5 o'clock in the afternoon). Press the start button. The colon on the display starts to flash and the time counts down until the time is reached at which the bread maker should start kneading. The bread maker will now go through the entire set programme, until the loaf is ready at the time that you want.
A FEW TIPS
• Always carefully weigh the ingredients and make sure they are at room temperature.
- Add the ingredients in the correct order.
• Make sure the ingredients are fresh.
- Make sure you add the yeast to the baking tin as the last ingredient. Do this in a little hole in the meal. It should not come into contact with salt, sugar and water (milk).
- Tip: You can determine the freshness of the yeast by means of the following test: In half a cup of lukewarm water, dissolve 1 teaspoon of sugar and add 1 teaspoon of yeast to this mixture. After a few minutes, it should start to buzz and bubble, only then you will know that the yeast is fresh.
- Tip: 5 to 10 minutes after starting the bread maker, you can test if the dough ball is okay. The dough should look like a smooth, elastic, round ball. Open the lid and briefly touch the top of the dough ball with your fingers. Make sure the dough hook continues to rotate. If the dough lightly sticks to your finger, this is good. If the dough sticks to the baking tin, it is too wet. If the dough does not stick to your fingers, the dough ball is too dry.
- Tip: Salt slows the action of the yeast, while sugar accelerates it. If you cannot use one of these ingredients due to a diet, you must also leave out the other. In that case, you get a loaf without sugar and salt.
- If you immediately want to bake another loaf, you must allow the machine to cool down for 10 to 20 minutes before using it again.
- Different types of bread have different structures and sizes, because the ingredients used are different. Some loafs can also be much firmer and smaller than others. This is normal.
- It is possible that you must adapt the proportions of some recipes. By this we mean: the amount of yeast, or the amount of meal, or the amount of water. Never adapt everything at the same time. Because this will not have any effect. The adaptation can be necessary in connection with:
- quality and specific weight of the meal
- differences in ambient temperature
- freshness of the ingredients.
- The bread that you bake yourself does not contain preservatives, which means that it is also more perishable.
If you package the loaf air tight, after allowing it to cool down properly, you can eat the bread for a few days.
Of course, you can also freeze the bread, so you can consume it at a later date.
PROBLEMS AND SOLUTIONS
There are different factors that could lead to a poor result when baking bread. Below are a number of examples of poor results and how to solve this, if possible.
The loaf has collapsed
- If your loaf seems to have collapsed on all sides, this means that the dough was too wet. Try adding a little less water. When using conserved fruits or vegetables, first drain them well and properly wipe them dry before using them. They have been soaking for a longer period of time, as a result of which they contain excess liquid. You can also try to use a lighter type of flour.
- It can also be a case of excess leavening. The dough has risen so much, that the dough is no longer able to handle the rise. Try to add a little less yeast, 1 to 2 grammes less. In this case, it is also possible that the amount of liquid is to blame. It is possible that you use meal that needs less water than the standard recipes indicate. Try adding 10 to 20 ml less water the next time.
The loaf is not baked enough in the centre.
- If the inside of the loaf is not baked enough, this could be caused by the type of flour used. This usually happens when using heavier types of flour, such as rye flour or whole wheat flour. Try using one kneading process more when using these types of flour. When the bread maker has stopped the first kneading process, stop the appliance. Then set the appliance once more and press start: the appliance starts to knead again, now a larger volume of air has been absorbed in the dough.
- You can also set the crust colour to dark, as a result of which the baking temperature is increased.
The loaf has overspilled
- If your loaf rises higher than normally, this means that you used too much yeast. Check that you used the correct amount and type of yeast.
- Too much sugar could activate your yeast too much. Reduce the amount of sugar and also be careful when using fruits containing a lot of sugar or honey. Try to reduce the amount of water by 10 to 20 ml. Do remember that a lower moisture content prevents the yeast from being too active.
- When using a very finely ground flour, it is also sometimes possible that the loaf rises too much. Compared to heavier or more coarsely ground types of flour, these types of flour do not need a very active yeast to be able to rise.
The loaf is too dry
- Use a little less flour or add 1 tablespoon of liquid. When the bread maker is mixing heavier dough or when it uses longer kneading times, it is possible that the machine lightly vibrates on the worktop. Therefore, make sure the appliance is on a stable surface, not too close to another object and also not too close to the edge of the worktop.
Flat loafs
- When using flour ground by the miller or whole wheat flour, it is possible that the loaf is a little more flat (not a nice ball).
- If your loaf does not rise at all, you must check the yeast. Have you forgotten to add the yeast? If the loaf has risen only slightly, it is possible that the yeast was too old.
- Activation of the yeast is prevented if the water is too cold or too hot.
- Also check the amount of salt used. Make sure you have not used too much salt.
The appliance is not working
- Is it switched on?
The temperature of the bread maker is too high. Allow the bread maker to cool down before you start it again.
There is smoke coming from the aeration holes
- Perhaps ingredients have spilled onto the heating element.
The top of the loaf has cracked and looks brown.
- Too much flour, yeast or sugar.
Loaf is too small
- Not enough flour, yeast, sugar or water was used.
- Whole wheat flour was used, or flour containing artificial yeast.
- Poor type of yeast was used.
- Flour or yeast was used that was no longer fresh.
Loaf not baked enough
- Stop button was pressed after switching on.
- The lid was opened during the baking process.
Part of the loaf is still covered with flour.
- Not enough water was used.
TOMADO®
FREQUENTLY ASKED QUESTIONS
Question: Why is the shape and height of the loaf different each time?
Answer: The shape and height of the loaf depend on the ambient temperature and the quality and amount of ingredients.
Question: Why does the loaf not rise?
Answer: If you forget the yeast or use too little yeast or yeast that is too old, the loaf does not rise and stays "flat".
Question: How does the time delay work?
Answer: The time delay cannot be set under 1.50 hours and above 13 hours. The time delay requires a minimum of 1 hour and 50 minutes to go through all the necessary processes. The ingredients could spoil if they remain in the bread maker for more than 13 hours without being baked. For further explanation, see section "Using the time delay".
Question: Why is it not permitted to add extra ingredients to the basic ingredients?
Answer: In order to give the dough and/or loaf the correct shape and allow it to rise as it should, the dried currants, etc. should be added later. Moreover, it is possible that these ingredients are broken up during the kneading process. They could start to stick to one another, as a result of which they are not distributed evenly through the dough. You can add these ingredients only after the first “beep signal”. You cannot add ingredients when using one of the quick programmes.
Question: Is it possible to use fresh milk instead of water?
Answer: Yes this is possible, but do make sure you still have the same amount of liquid. For example: if a recipe asks for 210 ml of water, you can replace this by 210 ml of milk or 105 ml of water and 105 ml of milk. It is important that you use the total amount of liquid indicated.
Question: It is not possible or very difficult to get the loaf out of the baking tin, what can I do about that?
Answer: This could be caused by two things. The non-stick coating of your baking tin has worn, or the loaf has not yet cooled down. If the non-stick coating is worn, we recommend purchasing a new baking tin. To find out the exact cause, we recommend the following: when the bread maker is ready, remove the baking tin complete with loaf from the machine and allow everything to cool on the worktop for 15 to 20 minutes. Then hold the baking tin upside down and gently shake the loaf out of the baking tin. Allow the loaf to cool for another 15 minutes on a grille before slicing it.
Question: Play has developed on the dough hook. How did this happen and what can I do about it?
Answer: The non-stick coating on the inside of the dough hook is thick, soft and not fully hardened yet. This hardening process takes place when the machine is being used. Due to the pressure created on the dough hook during kneading, the non-stick coating on the inside becomes thinner and harder, thus creating more space. This takes place in the first weeks and is entirely normal. You could say that the dough hook wears out a little and this will not go any further than that.
Question: The dough hook remains stuck in the loaf, what can I do about this?
Answer: Nothing, because it is a good thing that the dough hook remains in the loaf. If this were not the case, it is possible that a large hole is created at the bottom of the loaf. Now, the loaf can cool down, before removing the dough hook. When the loaf cools down it becomes more firm and no hole will be created in the loaf. When used for the first time, it is possible that the dough hook remains in the baking tin. This has everything to do with the previous question.
Question: How can I clean the inside of my bread maker when the dough has overspilled?
Answer: The inside of the bread maker can be cleaned with an oven cleaner. Make sure the heating element is well protected. The heating element can be cleaned by having the machine go through a baking programme once or twice, without any contents. In that case, the heating element burns clean.
Question: Due to a diet, I am not allowed to eat bread with sugar. Is it possible to make sugar-free bread in the bread maker?
Answer: Yes, this is possible. You can leave the sugar out of the basic recipe. However, do take the following into account. If you do not use sugar, you should also not add salt. This is necessary for a good leavening process.
Question: Why is it that my loaf collapses at the moment when the machine goes from leavening to baking?
Answer: This could be caused by two things. It is possible that you used too much yeast or too much water. In most cases, this is caused by too much water. The recipes in the instruction manual are basic recipes. It is possible that you used meal that requires less liquid than indicated. We recommend reducing the amount of liquid by 10 to 20 ml. This should solve the problem.
Question: When making raisin bread, all the raisins are at the bottom of the loaf. What can I do about this?
Answer: The dough ball is probably too compact to be able to knead the raisins properly through the dough. Add 10 to 20 ml. of liquid to the basic recipe, so that the dough ball is more supple and it is easier to knead the raisins through the dough. You should make sure, however, that the raisins themselves are not too wet.
Question: Why is it that the crust is sometimes lighter and sometimes darker?
Answer: You can adjust this yourself by means of the "Color" button. For a light crust you set the appliance to light (L), for a dark crust you set the appliance to dark (D).
Question: What has happened when the loaf has reached as high as the lid?
Answer: You used too much yeast and/or sugar, as a result of which more gas bells were created inside the loaf, making it rise too much.
Question: Why is it not permitted to make bread based on fruit with the "quick" method?
Answer: The yeast time is reduced in this programme and when using more ingredients, the baking time is also affected, which means that you will not get a good result when using this programme with recipes like this.
Question: Why is it that the bread maker is kneading more slowly when making loafs that are more heavy?
Answer: This is normal when using these recipes. This is not a problem for the machine, but we do recommend adding a tablespoon of liquid.
CLEANING AND MAINTENANCE
Just before cleaning your bread maker, switch off the appliance, remove the plug from the wall socket and allow the appliance to cool down fully.
Exterior
Clean the exterior of the appliance and the inspection window with a damp cloth or sponge. Remove the baking tin before cleaning. If necessary, you can clean the exterior of the appliance by means of a mild washing-up liquid or SS cleaning agent. Do not use aggressive cleaning agents! Do not submerge the appliance, plug and cord in water or other liquids.
Interior
The interior of the appliance can be carefully cleaned with a lightly damp cloth. Be careful when cleaning the heating element.
Baking tin and dough hook
The baking tin and dough hook can be cleaned with warm water. Make sure you do not damage the non-stick coating if you are unable to remove the dough hook from the baking tin, you must allow the baking tin to cool down fully. Then pour a little bit of warm water in the baking tin, so that the dough hook is submerged. The water now ensures that the adhering particles dissolve, after which the dough hook can be removed. Never leave the baking tin to soak for more than 15 to 30 minutes. Do not use cleaning agents or dishwashing brushes, these could damage the non-stick coating of the baking tin and the dough hook. The baking tin and dough hook are not suitable for cleaning in the dishwasher.
RECIPES
Tip! When using a coarse type of meal, it is possible that you should use less water than indicated in the recipes. This is because a coarse type of meal absorbs less liquid.
White bread 650 grammes 800 grammes
White flour 400 gr 500 gr
Water 250 ml 300 ml
Butter/oil 7 gr 10 gr
Sugar 7 gr 10 gr
Salt 7 gr 10 gr
Dried yeast 5 gr 6 gr
Programme: Normal, Quick or Sandwich
Whole wheat bread 650 grammes 800 grammes
Whole wheat flour 400 gr 500 gr
Water 275 ml 325 ml
Butter/oil 7 gr 10 gr
Sugar 7 gr 10 gr
Salt 7 gr 10 gr
Dried yeast 5 gr 6 gr
Programme: French or Whole wheat
Wheat bread 650 grammes 800 grammes
Whole wheat flour 250 gr 300 gr
White flour 150 gr 200 gr
Water 250 ml 300 ml
Butter/oil 7 gr 10 gr
Sugar 7 gr 10 gr
Salt 7 gr 10 gr
Dried yeast 5 gr 6 gr
Programme: French or Whole wheat
Strawberry jam
Fresh strawberries 450 grammes
Sugar 275 grammes
Lemon juice (fresh) 3 tablespoons
or lemon juice (concentrated) 1 tablespoon
Programme: Jam
When using fruit containing stones, first remove these stones. When using other fruit, it is possible that the amount of sugar or lemon juice should also be adapted. Otherwise, you run the risk that it becomes too sweet.
Caution: Fruit contains fruit sugars. The amount of fruit sugars can differ per fruit. If there are a lot of fruit sugars in a fruit, it is possible that the jam boils over in combination with the added amount of sugar. Therefore, always stay near the machine when making jam. When the jam threatens to boil over, you can carefully open and close the lid for a short time, until the jam boils normally again. Caution: there is steam coming out of the machine.
TOMADO®
| Programme overview TBM8001W | ||||||||||
| Programme Time setting 1st kneading Resting | ||||||||||
| period | 2nd kneading Leavening period 1 | Leavening period 2 | Bake Keeping warm | Beep signal* | ||||||
| 1 | Basic - 800g | 13:00-3:00 | 12m | 20m | 18m | 25m | 40m | 65m | 60m | 2:20 |
| Basic - 650 g | 13:00-2:53 | 11m | 20m | 17m | 25m | 40m | 60m | 60m | 2:15 | |
| 2 | French - 800 g | 13:00-3:50 | 20m | 40m | 25m | 30m | 45m | 70m | 60m | 2:40 |
| French - 650 g | 13:00-3:40 | 18m | 40m | 22m | 30m | 45m | 65m | 60m | 2:35 | |
| 3 | Whole wheat - 800 g | 13:00-3:40 | 12m | 25m | 23m | 35m | 60m | 65m | 60m | 2:55 |
| Whole wheat - 650 g | 13:00-3:32 | 11m | 25m | 21m | 35m | 60m | 60m | 60m | 2:50 | |
| 4 | Quick | 2:10 | 12m | 10m | 13m | 0m | 25m | 70m | 60m | 1:45 |
| 5 | Sweet - 800 g | 13:00-2:55 | 12m | 5m | 23m | 30m | 40m | 65m | 60m | 2:30 |
| Sweet - 650 g | 13:00-2:50 | 12m | 5m | 23m | 30m | 40m | 60m | 60m | 2:25 | |
| 6 | Gluten free - 800 g | 13:00-2:55 | 12m | 10m | 13m | 30m | 40m | 70m | 60m | 2:25 |
| Gluten free - 650 g | 13:00-2:50 | 12m | 5m | 13m | 30m | 40m | 70m | 60m | 2:25 | |
| 7 | Ultra fast - 800 g | 1:38 | 13m | - | 5m | 30m | - | 50m | 60m | 1:28 |
| Ultra fast - 650 g | 1:28 | 13m | - | 5m | 25m | - | 45m | 60m | 1:18 | |
| 8 | Dough | 13:00-1:30 | 25m | - | - | 30m | 35m | - | - | - |
| 9 | Jam | 1:20 | 15m | - | - | - | 45m | 20m | - | - |
| 10 | Cake | 1:50 | 7m | 4m | 10m | 9m | - | 80m | 60m | 1:34 |
| 11 | Sandwich - 800 g | 13:00-3:00 | 17m | 40m | 8m | 25m | 35m | 55m | 60m | 2:04 |
| Sandwich - 650 g | 13:00-2:55 | 17m | 40m | 8m | 25m | 35m | 50m | 60m | 1:59 | |
| 12 | Only bake | 1:00 | - | - | - | - | - | 10-60m | 0-60m | - |
Time setting: 13:00 hours is the de maximum time delay that you can set and the time after that is the total programme time.
Resting period: the machine does nothing during this period and the dough starts to rise a little.
Keeping warm: the machine keeps the loaf warm for another 60 minutes. This extra function is for people who are not with the machine
in time, but still want to enjoy warm bread.
*The Beep Signal column indicates the time shown on the display for adding the extra ingredients.
(m = minutes)
RECYCLING

This symbol means that this product should not be disposed of with regular household waste (2012/19/EU). Observe the applicable rules in your country for the separated collection of electric and electronic products. By disposing of the product correctly, you prevent negative consequences for the environment and for public health. The packaging material of this product can be recycled 100%, return packaging material separately.
TOMADO®
natural_image
Illustration of a bucket with labeled parts (1 and 2), no text or symbols present.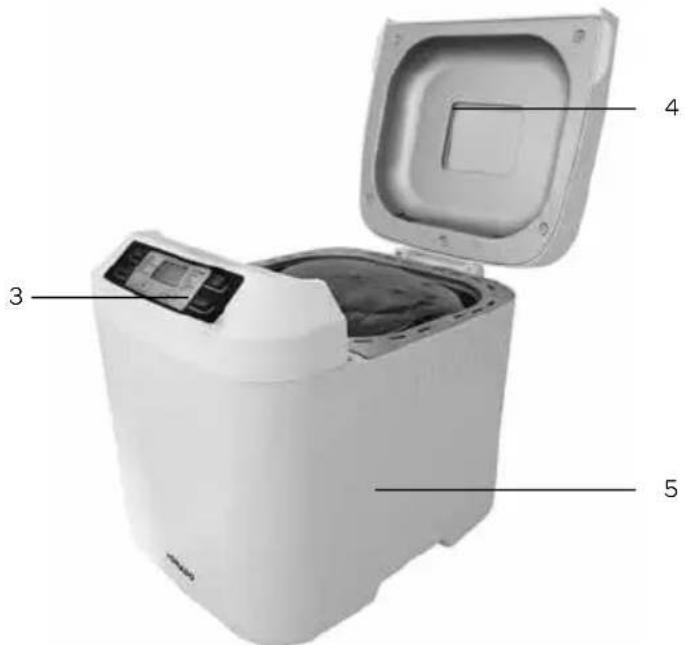

VOR DEM ERSTEN GEBRAUCH
natural_image
Illustration of a bucket with labeled parts (1 and 2), no text or symbols present.
AVANT LA TOUTE PREMIÈRE UTILISATION
Programme : Basic, Quick of Sandwich
(Base, Rapide ou Sandwich)
Pain complet 650 grammes 800 grammes
natural_image
3D rendering of a bucket with labeled parts (1 and 2), no text or symbols present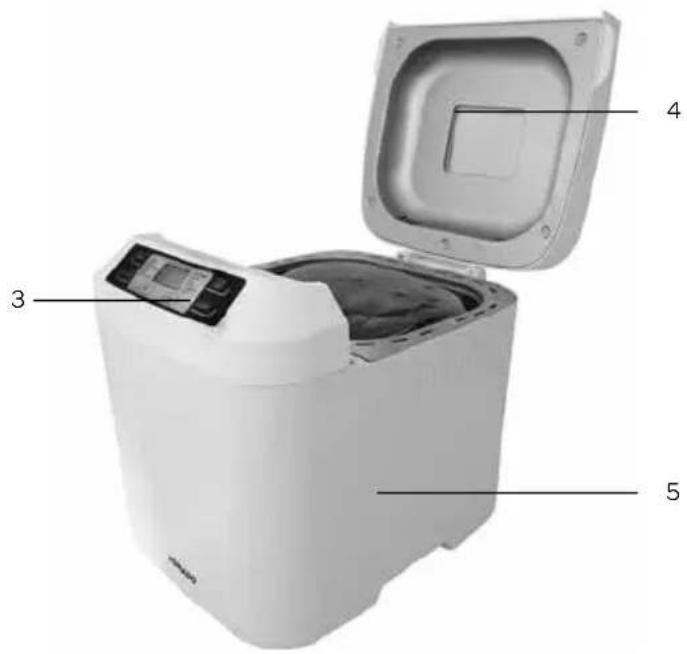
Go to www.tomado.com/support to purchase accessories or spare parts.
WARRANTY CONDITIONS
A 24 month warranty is provided for this product. Your warranty is valid if the product has been used in accordance with the instruction manual and for the purpose for which it was made. Also the original proof of purchase must be submitted, stating the date of purchase, the name of the retailer and the item number of the product. For extensive warranty information you are referred to our website: www.tomado.com/support
CONDITIONS DE LA GARANTIE


- TOMADO®
- PRODUCT DESCRIPTION
- PRIOR TO FIRST USE
- THE ART OF BAKING
- THE INGREDIENTS
- Flour/ Meal
- Gluten
- Yeast
- Salt
- Butter/oil
- Sugar
- Water
- Milk
- Other ingredients
- THE DISPLAY
- Menu button
- Start and stop button
- Color button
- Loaf button
- Time - / Time + buttons
- ERROR MESSAGES ON THE DISPLAY
- PROGRAMMES
- BAKING BREAD
- SETTING THE TIME DELAY
- A FEW TIPS
- PROBLEMS AND SOLUTIONS
- The loaf has collapsed
- The loaf is not baked enough in the centre.
- The loaf has overspilled
- The loaf is too dry
- Flat loafs
- The appliance is not working
- There is smoke coming from the aeration holes
- The top of the loaf has cracked and looks brown.
- Loaf is too small
- Loaf not baked enough
- Part of the loaf is still covered with flour.
- FREQUENTLY ASKED QUESTIONS
- CLEANING AND MAINTENANCE
- Exterior
- Interior
- Baking tin and dough hook
- RECIPES
- RECYCLING
- VOR DEM ERSTEN GEBRAUCH
- AVANT LA TOUTE PREMIÈRE UTILISATION
- WARRANTY CONDITIONS
- CONDITIONS DE LA GARANTIE
Brand : Tomado
Model : TBM8001W
Category : Bread maker