OLE 24750HVTB DVD - TV OK - Free user manual and instructions
Find the device manual for free OLE 24750HVTB DVD OK in PDF.
| Product type | Color TV with integrated DVD player |
| Brand | OK |
| Model | OLE 24750HVTB DVD |
| Screen size | 24 inches |
| Dimensions with stand (W x H x D) | 554.5 x 370 x 135 mm |
| Dimensions without stand (W x H x D) | 554.5 x 337 x 63 mm |
| Weight | Approximately 4.5 kg |
| Power supply | 100-240 V AC, 50/60 Hz, via supplied 12 V DC adapter |
| Power consumption | 47 W |
| Main functions | DVB-T2/C/S2 reception, HDMI, USB, DVD player, teletext, auto-programming, timer, auto standby, parental control, CEC |
| Connectivity | 1 x HDMI, 1 x USB, 1 x SCART, 1 x VGA input, 1 x YPbPr input, 1 x SPDIF coaxial output, headphone jack, antenna input, satellite input |
| Audio power | 2 x 2.5 W RMS |
| Supported USB file formats | Video: MPEG, AVI, MKV, MP4, H.265; Audio: MP3, AAC, AC3; Image: JPEG, BMP |
| Remote control batteries | 2 x AAA (included) |
| Maintenance and cleaning | Clean the screen and casing with a soft dry cloth. Do not use solvents or abrasive cleaners. |
| Safety | Do not open the casing, risk of electric shock. Avoid exposure to humidity and heat sources. Use only the supplied adapter. |
| Spare parts and repairability | Repairs must be carried out by a qualified professional. Spare parts available from after-sales service. |
| General information | User manual available for download. 24-month warranty. |
Frequently Asked Questions - OLE 24750HVTB DVD OK
User questions about OLE 24750HVTB DVD OK
0 question about this device. Answer the ones you know or ask your own.
Ask a new question about this device
Download the instructions for your TV in PDF format for free! Find your manual OLE 24750HVTB DVD - OK and take your electronic device back in hand. On this page are published all the documents necessary for the use of your device. OLE 24750HVTB DVD by OK.
USER MANUAL OLE 24750HVTB DVD OK
natural_image
Black flat-screen monitor with a CD on the right side (no visible text or symbols)Inhalt
text_image
Diagram showing a mechanical or electrical component with numbered parts and directional arrows indicating flow or movement.KLASSE 1 LASER-PRODUKT
STROMSCHLAGGEFAHR
natural_image
Illustration of a hand holding a circular object with a cross mark, next to a circular ring (no text or symbols)natural_image
Illustration of hands using a tool to cut a circular object with an arrow indicating rotation (no text or symbols)
natural_image
Illustration of a hand pressing down on a circular object with a cross mark, no text or symbols presentMarkings on the Product.... 2
Environmental Information.... 3
Features 4
Accessories Included.... 4
Standby Notifications....4
TV Control Switch & Operation.... 4
Using Main TV Menu .... 5
Inserting the Batteries into the Remote .... 5
Power Connection 6
Antenna Connection....6
License Notification 6
Disposal Information....7
Specification 7
Remote Control 8
Connections....9
Switching On/Off....10
First Time Installation.... 10
Using Satellite Channel Table Feature.... 11
Media Playback via USB Input 11
Media Browser.... 11
CEC....12
Settings Menu Contents ...... 13
General TV Operation 17
Using the Channel List.... 17
Configuring Parental Settings....17
Electronic Programme Guide 17
Teletext Services.... 18
Software Upgrade.... 18
Troubleshooting & Tips....18
AV and HDMI Signal Compatibility 19
Supported File Formats for USB Mode 20
Supported DVI Resolutions 21
DVD Mode....22
Safety Information 22
Notes on Discs 22
How to Watch a DVD....22
DVD Control Panel Buttons....22
General Playback 22
DVD Troubleshooting 23
Disc Types Compatible with This Unit 24
Specifications 24
Overview of the Remote Control 25
General DVD Operation 26
DVB functionality information 27
Mobil TV Instructions 28
Safety Information

CAUTION
RISK OF ELECTRIC SHOCK DO NOT OPEN

CAUTION: TO REDUCE THE RISK OF ELECTRIC SHOCK DO NOT REMOVE COVER (OR BACK). NO USER-SERVICEABLE PARTS INSIDE. REFER SERVICING TO QUALIFIED SERVICE PERSONNEL
In extreme weather (storms, lightning) and long inactivity periods (going on holiday) disconnect the TV set from the mains.
The mains plug is used to disconnect TV set from the mains and therefore it must remain readily operable. If the TV set is not disconnected electrically from the mains, the device will still draw power for all situations even if the TV is in standby mode or switched off.
Note: Follow the on screen instructions for operating the related features.
IMPORTANT - Please read these instructions fully before installing or operating
WARNING: This device is intended to be used by persons (including children) who are capable / experienced of operating such a device unsupervised, unless they have been given supervision or instruction concerning the use of the device by a person responsible for their safety.
- Use this TV set at an altitude of less than 2000 meters above the sea level, in dry locations and in regions with moderate or tropical climates.
- The TV set is intended for household and similar general use but may also be used in public places.
- For ventilation purposes, leave at least 5cm of free space around the TV.
- The ventilation should not be impeded by covering or blocking the ventilation openings with items, such as newspapers, table-cloths, curtains, etc.
- The power cord plug should be easily accessible. Do not place the TV, furniture, etc. on the power cord. A damaged power cord/plug can cause fire or give you an electric shock. Handle the power cord by the plug, do not unplug the TV by pulling the power cord. Never touch the power cord/plug with wet hands as this could cause a short circuit or electric shock. Never make a knot in the power cord or tie it with other cords. When damaged it must be replaced, this should only be done by qualified personnel.
- Do not expose the TV to dripping or splashing of liquids and do not place objects filled with liquids, such as vases, cups, etc. on or over the TV (e.g., on shelves above the unit).
-
Do not expose the TV to direct sunlight or do not place open flames such as lit candles on the top of or near the TV.
-
Do not place any heat sources such as electric heaters, radiators, etc. near the TV set.
- Do not place the TV on the floor and inclined surfaces.
- To avoid danger of suffocation, keep plastic bags out of the reach of the babies, children and domestic animals.
- Carefully attach the stand to the TV. If the stand is provided with screws, tighten the screws firmly to prevent the TV from tilting. Do not over-tighten the screws and mount the stand rubbers properly.
- Do not dispose of the batteries in fire or with hazardous or flammable materials.
- This TV is designed for mobile use in vehicles such as caravans, motorhomes, boats, etc. However, it should never be installed in any position where it may be visible to the driver or may interfere with the safe operating of the vehicle.
WARNING - Supplied AC Adapter is for use with the product only, do not use for any other purpose.
WARNING - Batteries must not be exposed to excessive heat such as sunshine, fire or the like.
WARNING - Excessive sound pressure from earphones or headphones can cause hearing loss.
ABOVE ALL - NEVER let anyone, especially children, push or hit the screen, push anything into holes, slots or any other openings in the case.
 | Caution | Serious injury or death risk |
 | Risk of electric shock | Dangerous voltage risk |
 | Maintenance | Important maintenance component |
Markings on the Product
The following symbols are used on the product as a marker for restrictions and precautions and safety instructions. Each explanation shall be considered where the product bears related marking only. Note such information for security reasons.

Class II Equipment: This appliance is designed in such a way that it does not require a safety connection to electrical earth.

Hazardous Live Terminal: The marked terminal(s) is/are hazardous live under normal operating conditions.

Caution, See Operating Instructions: The marked area(s) contain(s) user replaceable coin or button cell batteries.

text_image
CLASS 1 LASER PRODUCTClass 1 Laser Product: This product contains Class 1 laser source that is safe under reasonably foreseeable conditions of operation.
WARNING
Do not ingest the battery, Chemical Burn Hazard This product or the accessories supplied with the product may contain a coin/button cell battery. If the coin/button cell battery is swallowed, it can cause severe internal burns in just 2 hours and can lead to death.
Keep new and used batteries away from children. If the battery compartment does not close securely, stop using the product and keep it away from children.
If you think batteries might have been swallowed or placed inside any part of the body, seek immediate medical attention.
Never place a television set in unstable or inclined locations. A television set may fall, causing serious personal injury or death. Many injuries, particularly to children, can be avoided by taking simple precautions such as;
- Using cabinets or stands recommended by the manufacturer of the television set.
- Only using furniture that can safely support the television set.
- Ensuring the television set is not overhanging the edge of the supporting furniture.
- Not placing the television set on tall furniture (for example, cupboards or bookcases) without anchoring both the furniture and the television set to a suitable support.
- Not standing the television set on cloth or other materials placed between the television and supporting furniture.
- Educating children about the dangers of climbing on furniture to reach the television set or its controls. If your existing television set is being retained and relocated, the same considerations as above should be applied.
Apparatus connected to the protective earthing of the building installation through the MAINS connection or through other apparatus with a connection to protective earthing – and to a television distribution system using coaxial cable, may in some circumstances create a fire hazard. Connection to a television distribution system has therefore to be provided through a device providing electrical isolation below a certain frequency range (galvanic isolator)
WALL MOUNTING WARNINGS
- Read the instructions before mounting your TV on the wall.
- The wall mount kit is optional. You can obtain from your local dealer, if not supplied with your TV.
- Do not install the TV on a ceiling or on an inclined wall.
- Use the specified wall mounting screws and other accessories.
- Tighten the wall mounting screws firmly to prevent the TV from fall. Do not over-tighten the screws.
Environmental Information
This television is designed to be environment friendly. To reduce energy consumption, you can follow these steps:
If you set the Energy Saving to Minimum, Medium, Maximum or Auto the TV will reduce the energy consumption accordingly. If you like to set the Backlight to a fixed value set as Custom and adjust the Backlight (located under the Energy Saving setting) manually using Left or Right buttons on the remote. Set as Off to turn this setting off.
Note: Available Energy Saving options may differ depending on the selected Mode in the Settings>Picture menu.
The Energy Saving settings can be found in the Settings>Picture menu. Note that some picture settings will be unavailable to be changed.
If pressed Right button or Left button consecutively, "Screen will be off in 15 seconds." message will be displayed on the screen. Select Proceed and press OK to turn the screen off immediately. If you don't press any button, the screen will be off in 15 seconds. Press any button on the remote or on the TV to turn the screen on again.
Note: Screen Off option is not available if the Mode is set to Game.
When the TV is not in use, please switch off or disconnect the TV from the mains plug. This will also reduce energy consumption.
Features
- Remote controlled colour TV
- Fully integrated digital terrestrial/cable/satellite TV (DVB-T-T2/C/S-S2)
- HDMI inputs to connect other devices with HDMI sockets
- USB input
- OSD menu system
- Scart socket for external devices (such as DVD Players, PVR, video games, etc.)
- Stereo sound system
- Teletext
• Headphone connection
• Automatic programming system - Manual tuning
• Automatic power down after up to eight hours - Sleep timer
- Child lock
• Automatic sound mute when no transmission - NTSC playback
• AVL (Automatic Volume Limiting) - PLL (Frequency Search)
- PC input
• Game Mode (Optional) - Picture off function
Accessories Included
- Remote Control
- Batteries: 2 x AAA
- Instruction Book
• DC 12 V Input Power Adaptor - Car Plug
Standby Notifications
If the TV does not receive any input signal (e.g. from an aerial or HDMI source) for 3 minutes, it will go into standby. When you next switch-on, the following message will be displayed: "TV switched to stand-by mode automatically because there was no signal for a long time."
The Auto TV OFF option(in the Settings>System >More menu) could have been set to a value between 1 and 8 hours by default. If this setting is not set as Off and the TV has been left on and not been operated during the set time, it will switch into standby mode after the set time has expired. When you next switch-on the TV, the following message will be displayed. "TV switched to stand-by mode automatically because no operation was made for a long time." Before the TV switches into standby mode a dialogue window will be displayed. If you do not press any button the TV will switch into the standby mode after a waiting period of about 5 minutes. You can highlight Yes and press OK to switch the TV into standby mode immediately. If you highlight No and press OK, the TV will remain on. You can also choose to cancel the Auto TV OFF function from this dialogue. Highlight Disable and press OK, the TV will remain on and the function will be cancelled. You can enable this function again by changing the setting of the Auto TV OFF option from the Settings>System>More menu.
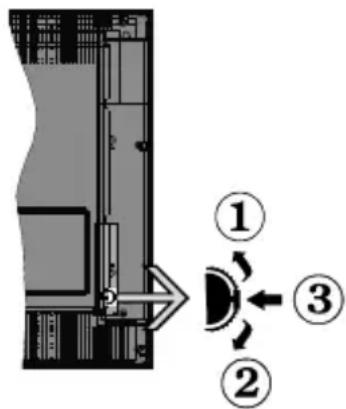
TV Control Switch & Operation
text_image
Diagram showing a mechanical or electrical component with numbered parts and directional arrows indicating motion or flow.- Up direction
- Down direction
- Volume / Info / Sources List selection and Standby-On switch
The Control button allows you to control the Volume / Programme / Source and Standby-On functions of the TV.
To change volume: Increase the volume by pushing the button up. Decrease the volume by pushing the button down.
To change channel: Press the middle of the button in, the information banner will appear on the screen. Scroll through the stored channels by pushing the button up or down.
To change source: Press the middle of the button in twice(for the second time in total), the source list will appear on the screen. Scroll through the available sources by pushing the button up or down.
To turn the TV off: Press the middle of the button in and hold it down for a few seconds, the TV will turn into standby mode.
To turn on the TV: Press the middle of the button in, the TV will turn on.
Notes:
If you turn the TV off, this cycle starts again beginning with the volume setting.
Main menu OSD cannot be displayed via control button.
Operation with the Remote Control
Press the Menu button on your remote control to display main menu. Use the directional buttons and
OK button to navigate and set. Press Return/Back or Menu button to quit a menu screen.
Input Selection
Once you have connected external systems to your TV, you can switch to different input sources. Press the Source button on your remote control consecutively to select the different sources.
Changing Channels and Volume
You can change the channel and adjust the volume by using the Programme +/- and Volume +/- buttons on the remote.
Using Main TV Menu
When the Menu button is pressed, the main TV menu will appear at the bottom of the screen. You can navigate through the menu items using the directional buttons on the remote. To select an item or see the sub-menu options of the highlighted menu press OK button. When you highlight a menu option some of the sub-menu items of this menu may appear on the upper side of the menu bar for quick access. To use a quick access item highlight it, press OK and set as desired using the Left/Right directional buttons. When finished press OK or Back/Return button to exit.
Press Exit button to close the main menu.
1. Home
When main menu is opened Home menu bar will be highlighted. The content of the Home menu can be customised by adding options from other menus. Just highlight an option and press the Down direction button on the remote. If you see Add to Home option you can add it to the Home menu. Same way you can delete or change the position of any item in the Home menu. Press the Down direction button and select Delete or Move option and press OK. In order to move a menu item use the Right and Left direction buttons to select the position that you want the item to move to and press OK.
2. TV
2.1. Guide
You can access the electronic programme guide menu using this option. Refer to Electronic Programme Guide section for more information.
2.2. Channels
You can access the Channels menu using this option. Refer to Using the Channel List section for more information.
2.3. Timers
You can set timers for future events using the options of this menu. You can also review the previously created timers under this menu.
To add a new timer select the Add Timer tab using the Left/Right buttons and press OK. Set the sub-menu
options as desired and when finished press OK. A new timer will be created.
To edit a previously created timer, highlight that timer, select the Edit Selected Timer tab and press OK. Change the sub-menu options as desired and press OK to save your settings.
To cancel an already set timer, highlight that timer, select Delete Selected Timer tab and press OK. A confirmation message will be displayed. Highlight Yes and press OK to proceed. The timer will be cancelled. It is not possible to set timers for two or more events that will broadcast in different channels at the same time interval. In this case you will be asked to choose one of these timers and cancel others. Highlight the timer you want to cancel and press OK, Options menu will be displayed. Then highlight Set/Cancel and press OK to cancel that timer. You will have to save changes after that. In order to do that press OK, highlight Save Changes and press OK again.
3. Settings
You can manage the settings of your TV using the options of this menu. Refer to Settings Menu Contents section for more information.
4. Sources
You can manage your input source references using the options of this menu. To change the current source highlight one of the options and press OK.
4.1. Source Settings
Edit the names, enable or disable selected source options.
Inserting the Batteries into the Remote
Remove the back cover to reveal the battery compartment. Insert two size AAA batteries. Make sure the (+) and (-) signs match (observe correct polarity). Do not mix old and new batteries. Replace only with same or equivalent type. Place the cover back on.
A message will be displayed on the screen when the batteries are low and must be replaced. Note that when the batteries are low, the performance of the remote control may be impaired.
Batteries should not be exposed to excessive heat such as sunshine, fire or the like.
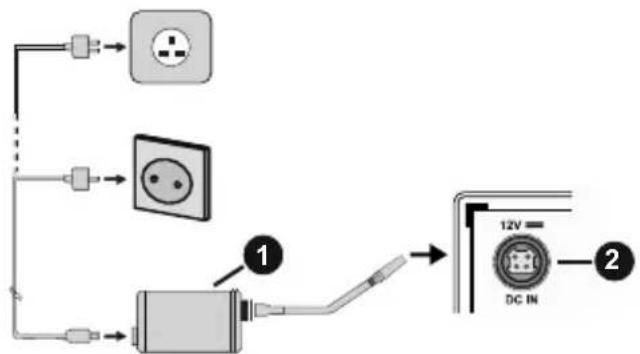
Power Connection
IMPORTANT: The TV set is designed to operate on a 12 V DC supply. For this, an adaptor is used which gives 12 V voltage. Connect this adaptor to a system that supplies 100-240V AC, 50/60Hz.
After unpacking, allow the TV set to reach the ambient room temperature before you connect the set to the mains.
flowchart
graph TD
    A["Switch"] --> B["Grid"]
    C["Switch"] --> D["Grid"]
    E["Switch"] --> F["Grid"]
    G["Switch"] --> H["Switch"]
    I["Switch"] --> J["Switch"]
    K["DC IN"] --> L["12V"]
    L --> M["DC IN"]
-
AC adaptor
-
Power Input, DC 12 V terminal
Important safety information
Be sure to ground the connection properly
Connect the ground terminal of the AC adaptor with the ground terminal provided at the power outlet using the enclosed power cord. If the provided plug does not fit your outlet, consult an electrician for replacement of the obsolete outlet.

Surely connect the ground wire.
Antenna Connection
Connect the aerial or cable TV plug to the AERIAL INPUT (ANT.) socket or satellite plug to the SATELLITE INPUT (LNB) socket located on the rear side of the TV.
Rear side of the TV

text_image
1 LNB ANT. 2-
Satellite
-
Aerial or cable

If you want to connect a device to the TV, make sure that both the TV and the device are turned off before making any connection. After the connection is done, you can turn on the units and use them.
License Notification
The terms HDMI and HDMI High-Definition Multimedia Interface, and the HDMI Logo are trademarks or registered trademarks of HDMI Licensing Administrator, Inc. in the United States and other countries.

Manufactured under license from Dolby Laboratories. Dolby, Dolby Audio and the double-D symbol are trademarks of Dolby Laboratories. Confidential unpublished works. Copyright ©1992-2019 Dolby Laboratories. All rights reserved.
The "CI Plus" Logo is a trademark of CI Plus LLP.
This product incorporates copyright protection technology that is protected by U.S. patents and other intellectual property rights. Use of this copyright protection technology must be authorized by Rovi Corporation, and is intended for home and other limited viewing uses only unless otherwise authorized by Rovi Corporation. Reverse engineering and disassembly are prohibited.
Disposal Information
[European Union]
These symbols indicate that the electrical and electronic equipment and the battery with this symbol should not be disposed of as general household waste at its end-of-life. Instead, the products should be handed over to the applicable collection points for the recycling of electrical and electronic equipment as well as batteries for proper treatment, recovery and recycling in accordance with your national legislation and the Directive 2012/19/EU and 2013/56/EU.
By disposing of these products correctly, you will help to conserve natural resources and will help to prevent potential negative effects on the environment and human health which could otherwise be caused by inappropriate waste handling of these products.
For more information about collection points and recycling of these products, please contact your local municipal office, your household waste disposal service or the shop where you purchased the product.
Penalties may be applicable for incorrect disposal of this waste, in accordance with national legislation.
[Business users]
If you wish to dispose of this product, please contact your supplier and check the terms and conditions of the purchase contract.
[Other Countries outside the European Union]
These symbols are only valid in the European Union.
Contact your local authority to learn about disposal and recycling.
The product and packaging should be taken to your local collection point for recycling.
Some collection points accept products free of charge.
Note: The sign Pb below the symbol for batteries indicates that this battery contains lead.
![OK OLE 24750HVTB DVD - [Other Countries outside the European Union] - 1](/content/2026/04/588470/images/9413a73e05ecd0012c5542a000a584ca593f95b2fad262772abc114c4d00dd87.jpg)
text_image
① ②- Products
- Battery
Specification
| TV Broadcasting | PAL BG/I/DKSECAM BG/DK |
| Receiving Channels | VHF (BAND I/III) - UHF(BAND U) - HYPERBAND |
| Digital Reception | Fully integrated digital terrestrial-cable-satellite TV(DVB-T-C-S)(DVB-T2, DVB-S2 compliant) |
| Number of Preset Channels | 8 000 |
| Channel Indicator On Screen Display | |
| RF Aerial Input 75 Ohm (unbalanced) | |
| Operating Voltage 100-240V AC, 50/60 Hz. | |
| Audio German+Nicam Stereo | |
| Audio Output Power (WRMS.) (10% THD) | 2 x 2,5 W |
| Power Consumption (W) 47 W | |
| TV Dimensions DxLxH(with stand) (mm) | 135 x 554,5 x 370 mm |
| TV Dimensions DxLxH(without stand) (mm) | 40/63 x 554,5 x 337 mm |
| Display 24" | |
| Operation temperature and operation humidity | 0°C up to 40°C, 85%humidity max |
![OK OLE 24750HVTB DVD - [Other Countries outside the European Union] - 2](/content/2026/04/588470/images/9f0fb33a3a944853a74f2bbea9071670548df5681ee4ceba7797b737d1dcfa83.jpg)
text_image
1 2 3 4 5 6 7 8 9 10 11 12 13 1 /ø 2 abc 3 def 4 ghl 5 kl 6 mno 7 pars 8 tuv 9 wxyz LANG. 0 _ 22 21 20 21 22 20 19 18 17 16 15 14 G i OK BACK EXIT- Standby: Switches On / Off the TV
- Numeric buttons: Switches the channel, enters a number or a letter in the text box on the screen.
- Language: Switches among sound modes (analogue TV), displays and changes audio/subtitle language and turns subtitles on or off (digital TV, where available)
- Menu: Displays TV menu
- Volume +/-
- Mute: Completely turns off the volume of the TV
- Guide: Displays the electronic programme guide
- Directional buttons: Helps navigate menus, content etc. and displays the subpages in TXT mode when pressed Right or Left
- OK: Confirms user selections, holds the page (in TXT mode), views Channels menu (DTV mode)
- Back/Return: Returns to previous screen, previous menu, opens index page (in TXT mode)
- Rewind: Moves frames backwards in media such as movies
- No function
- Coloured Buttons: Follow the on-screen instructions for coloured button functions
- Play: Starts to play selected media
- Stop: Stops the media being played
- Fast Forward: Moves frames forward in media such as movies
- Pause: Pauses the media being played
- Exit: Closes and exits from displayed menus or returns to previous screen
- Info: Displays information about on-screen content, shows hidden information (reveal - in TXT mode)
- Programme +/-
- Text: Displays teletext (where available), press again to superimpose the teletext over a normal broadcast picture (mix)
- Source: Shows available broadcast and content sources
Connections
| Connector Type Cables Device | |||
![OK OLE 24750HVTB DVD - [Other Countries outside the European Union] - 3](/content/2026/04/588470/images/0b317cf6fb9fc3f2d231ce22e67ea58a0fb08ada5675ac0fc6d03634b9df1a11.jpg) | VGA Connection (back) | ![OK OLE 24750HVTB DVD - [Other Countries outside the European Union] - 4](/content/2026/04/588470/images/99a1a3e2873f30e21d3382d9652ecf20c7ffb1f9af240a785c34827892d6c6ed.jpg) | ![OK OLE 24750HVTB DVD - [Other Countries outside the European Union] - 5](/content/2026/04/588470/images/5c1d9de639e6ef47c0f64e7a84d3ef276ca9e1267a4cc1b2163bd24fff4b6f23.jpg) |
AUDIO IN[SAWC]![OK OLE 24750HVTB DVD - [Other Countries outside the European Union] - 6](/content/2026/04/588470/images/1c8a18236287d20018039b7add045126cb338271d0193e184dbacce3a7a67449.jpg) | PC/YPbPr Audio Connection (side) | ![OK OLE 24750HVTB DVD - [Other Countries outside the European Union] - 7](/content/2026/04/588470/images/6889dca6bc26fd67beeb304b2aeda0aea81205009a66ed7adebb44e2456bb294.jpg) YPbPr/PC Audio Cable YPbPr/PC Audio Cable | |
| [XXX8] | HDMI Connection (back) | ![OK OLE 24750HVTB DVD - [Other Countries outside the European Union] - 8](/content/2026/04/588470/images/4b5614ac7734d92bafa4f522fd73e2677bba00f2433af324c0ea6c7cc9e77f0c.jpg) | ![OK OLE 24750HVTB DVD - [Other Countries outside the European Union] - 9](/content/2026/04/588470/images/56ce0004715f80e29e6569f33d155c02d8d2c8f105687dbb304924f0af5df8b2.jpg) |
![OK OLE 24750HVTB DVD - [Other Countries outside the European Union] - 10](/content/2026/04/588470/images/21dbce25d92bae806cb38f776b4e6c51647b074622c664966c44cd014c42b52f.jpg) | Scart Connection (back) | ![OK OLE 24750HVTB DVD - [Other Countries outside the European Union] - 11](/content/2026/04/588470/images/4a54b93fa56685d7f161062f6f9d7130c5708637a97b6b05a9d267e801ea8c9c.jpg) | |
YPBPR![OK OLE 24750HVTB DVD - [Other Countries outside the European Union] - 12](/content/2026/04/588470/images/69d2fa7cdb3c2385bccf52b906baab47a9663a986e9f9372685d8798487ef92f.jpg) | YPbPr Video Connection (back) | ![OK OLE 24750HVTB DVD - [Other Countries outside the European Union] - 13](/content/2026/04/588470/images/3dc04b0f93ac00fb86630062d9bbd5447fe9e621809e6437a3de6dc005cd8156.jpg) PC to YPbPr Connection Cable PC to YPbPr Connection Cable | |
| SIDE AV[DHZ][HC5] | Side AV (Audio/Video) Connection (side) | ![OK OLE 24750HVTB DVD - [Other Countries outside the European Union] - 14](/content/2026/04/588470/images/31554caab0e8905725c189186c1330633f11ecf477880c35a52929defc0a1f69.jpg) Audio/Video Cable Audio/Video Cable | ![OK OLE 24750HVTB DVD - [Other Countries outside the European Union] - 15](/content/2026/04/588470/images/555da10604a01ac9b1c2786506cb4bb32c9e3f198de19f2db74448db6b229b72.jpg) |
SPDIF![OK OLE 24750HVTB DVD - [Other Countries outside the European Union] - 16](/content/2026/04/588470/images/ffe765de6ff74bfacc2211bea904303a2b674d2747055d5157172513698e9962.jpg) | SPDIF (Coaxial Out) Connection (back) | ![OK OLE 24750HVTB DVD - [Other Countries outside the European Union] - 17](/content/2026/04/588470/images/90762fde24b3afca22eccbcb6c1e3dd0c222fbe6be9977ed852a4b5f9dc44f17.jpg) | ![OK OLE 24750HVTB DVD - [Other Countries outside the European Union] - 18](/content/2026/04/588470/images/5ecba0be9c2543c2453e4318c03a513c851d3ffc419eb685ad4604dd67187d85.jpg) |
HEADPHONE![OK OLE 24750HVTB DVD - [Other Countries outside the European Union] - 19](/content/2026/04/588470/images/c596932e60a7e53f448a127519b9c65485ee6956f7585f970ae582fd00db1c9b.jpg) | Headphone Connection (side) | ![OK OLE 24750HVTB DVD - [Other Countries outside the European Union] - 20](/content/2026/04/588470/images/53d0c754561c62a6e315e9cc0b46dd649f27187378f808431b018d7fbc85b293.jpg) | |
| [DSTS] | USB Connection (side) | [60SY] | ![OK OLE 24750HVTB DVD - [Other Countries outside the European Union] - 21](/content/2026/04/588470/images/97b7812458b3998bb7fda017892b1d4a499f4a388338a4ff5785969fa9ebff02.jpg) |
![OK OLE 24750HVTB DVD - [Other Countries outside the European Union] - 22](/content/2026/04/588470/images/72fe5687f4c2b1cdf8f769edaba4ca7cadd5aa78d63ad019857354a096abaf5a.jpg) | CI Connection (side) | ![OK OLE 24750HVTB DVD - [Other Countries outside the European Union] - 23](/content/2026/04/588470/images/fd7f6b93331b654219b7b255297b85832e9eca2555b4528cb111a0a718ff8de6.jpg) | ![OK OLE 24750HVTB DVD - [Other Countries outside the European Union] - 24](/content/2026/04/588470/images/40b8f00b70f74536bc99eace354861f3c589fece447057b551b587f44fb4c490.jpg) |
![OK OLE 24750HVTB DVD - [Other Countries outside the European Union] - 25](/content/2026/04/588470/images/cfd85b1fb974d8278cf2b852252a573feba2ee8a3b369ccf84422917ea228564.jpg) | 12V DC Connection (back) | DC 12V Input | ![OK OLE 24750HVTB DVD - [Other Countries outside the European Union] - 26](/content/2026/04/588470/images/bbc95c1ba00c0e546ccfe247a43ed82f91effc66ed225b8dcdb6fd9d3d784d04.jpg) |
![OK OLE 24750HVTB DVD - [Other Countries outside the European Union] - 27](/content/2026/04/588470/images/4b419dcc1a80062eec4004f4cc69f8f7b5db6aaf8a6dadc12b21f753fd1c69ff.jpg)
If you want to connect a device to the TV, make sure that both the TV and the device are turned off before making any connection. After the connection is done, you can turn on the units and use them.
Switching On/Off
To Switch the TV On
Connect the power cord to a power source such as a wall socket (100-240V AC, 50/60 Hz).
To switch on the TV from standby mode either:
- Press the Standby button, Programme +/- or a numeric button on the remote control.
- Press the middle of the side function switch on the TV in.
To Switch the TV Off
Press the Standby button on the remote control or press the middle of the side function switch on the TV in and hold it down for a few seconds, the TV will switch into standby mode.
To power down the TV completely, unplug the power cord from the mains socket.
Note: When the TV is switched into standby mode, the standby LED can blink to indicate that features such as Standby Search, Over Air Download or Timer is active. The LED can also blink when you switch on the TV from standby mode.
First Time Installation
When turned on for the first time, the language selection screen is displayed. Select the desired language and press OK. In the following steps of the installation guide, set your preferences using the directional buttons and OK button.
On the second screen set your country preference. Depending on the country selection you may be asked to set and confirm a PIN at this point. The selected PIN cannot be 0000. You have to enter it if you are asked to enter a PIN for any menu operation later.
Note: M7(*) operator type will be defined according to the Language and Country selections that you made in the First Time Installation.
(*) M7 is a digital satellite service provider.
You can activate Store Mode option in the next step. This option will configure your TV's settings for store environment and depending on the TV model being used, the supported features of it may be displayed on the side of the screen as an info banner. This option is intended only for store use. It is recommended to select Home Mode for home use. This option will be available in Settings>System>More menu and can be turned off/on later. Make your selection and press OK to continue.
On next screen you can set broadcast types to be searched, set your encrypted channel searching and time zone (depending on the country selection) preferences. Additionally you can set a broadcast type as your favourite one. Priority will be given to the selected broadcast type during the search process and the channels of it will be listed on the top of the channel list. When finished, highlight Next and press OK to continue.
About Selecting Broadcast Type
To turn a search option for a broadcast type highlight it and press OK. The checkbox next to the selected option will be checked. To turn the search option off clear the checkbox by pressing OK after moving the focus on the desired broadcast type option.
Digital Aerial: If D. Aerial broadcast search option is turned on, the TV will search for digital terrestrial broadcasts after other initial settings are completed.
Digital Cable: If D. Cable broadcast search option is turned on, the TV will search for digital cable broadcasts after other initial settings are completed. A message will be displayed before starting to search asking if you want to perform cable network search. If you select Yes and press OK you can select Network or set values such as Frequency, Network ID and Search Step on the next screen. If you select No and press OK you can set Start Frequency, Stop Frequency and Search Step on the next screen. When finished, highlight Next and press OK button to continue.
Note: Searching duration will change depending on the selected Search Step.
Satellite: If Satellite broadcast search option is turned on, the TV will search for digital satellite broadcasts after other initial settings are completed. Before satellite search is performed some settings should be made. A menu will be displayed where you can select to start an M7 operator installation or a standard installation. To start an M7 operator installation set the Install Type as Operator and the Satellite Operator as the related M7 operator. Then highlight Preferred Scan option and set as Automatic channel scan and press OK to start the automatic search. These options can be preselected depending on the Language and Country selections that you made in the earlier steps of the first time installation process. You may be asked to select HD/SD or country specific channel list according to your M7 operator type. Select one and press OK to proceed.
Wait till the scan is finished. Now the list has been installed.
While performing an M7 operator installation, if you want to use the satellite installation parameters that differ from the default settings select the Preferred Scan option as Manual channel scan and press the OK button to proceed. Antenna Type menu will be displayed next. After selecting the antenna type and the desired satellite in the following steps press OK in order to change the satellite installation parameters in the sub-menu.
In order to search for satellite channels other than M7 channels you should start a standard installation. Select the Install Type as Standard and press the
OK button to proceed. Antenna Type menu will be displayed next.
There are three options for antenna selection. You can select Antenna Type as Direct, Single Satellite Cable or DiSEqC switch by using Left or Right buttons. After selecting your antenna type press OK to see the options to proceed. Continue, Transponder list and Configure LNB options will be available. You can change the transponder and LNB settings using the related menu options.
- Direct: If you have a single receiver and a direct satellite dish, select this antenna type. Press OK to continue. Select an available satellite on the next screen and press OK to scan for services.
- Single Satellite Cable: If you have multiple receivers and a single satellite cable system, select this antenna type. Press OK to continue. Configure settings by following instructions on the next screen. Press OK to scan for services.
- DiSEqC switch: If you have multiple satellite dishes and a DiSEqC switch, select this antenna type. Then set the DiSEqC version and press OK to continue. You can set up to four satellites (if available) for version v1.0 and sixteen satellites for version v1.1 on the next screen. Press OK button to scan the first satellite in the list.
Analogue: If Analogue broadcast search option is turned on, the TV will search for analogue broadcasts after other initial settings are completed.
After the initial settings are completed TV will start to search for available broadcasts of the selected broadcast types.
While the search continues current scan results will be displayed at the bottom of the screen. After all the available stations are stored, Channels menu will be displayed. You can edit the channel list according to your preferences using the Edit tab options or press the Menu button to quit and watch TV.
While the search continues a message may appear, asking whether you want to sort channels according to the LCN(*). Select Yes and press OK to confirm.
(*) LCN is the Logical Channel Number system that organizes available broadcasts in accordance with a recognizable channel number sequence (if available).
Notes:
To search for M7 channels after the First Time Installation, you should perform the first time installation again. Or press the Menu button and enter the Settings>Installation>Automatic channel scan>Satellite menu. Then follow the same steps mentioned above in the satellite section.
Do not turn off the TV while initializing first time installation. Note that, some options may not be available depending on the country selection.
Using Satellite Channel Table Feature
You can perform these operations using the Settings>Installation>Satellite Settings>Satellite Channel Table menu. There are two options regarding to this feature.
You can download or upload satellite channel table data. In order to perform these functions a USB device must be connected to the TV.
You can upload current services and related satellites & transponders in TV, to a USB device.
Additionally you can download one of the satellite channel table files stored in USB device, to the TV.
When you select one of these files, all services and related satellites and transponders in the selected file will be stored in the TV. If there are any installed terrestrial, cable and/or analogue services, they will be kept and only satellite services will be removed.
Afterwards, check your antenna settings and make changes if necessary. An error message stating "No Signal" may be displayed if the antenna settings are not configured properly.
Media Playback via USB Input
You can connect 2.5" and 3.5" inch (HDD with external power supply) external hard disk drives or USB memory stick to your TV by using the USB inputs of the TV.
IMPORTANT! Back up the files on your storage devices before connecting them to the TV. Manufacturer will not be responsible for any file damage or data loss. Certain types of USB devices (e.g. MP3 Players) or USB hard disk drives/memory sticks may not be compatible with this TV. The TV supports FAT32 and NTFS disk formatting.
Wait a little while before each plugging and unplugging as the player may still be reading files. Failure to do so may cause physical damage to the USB player and the USB device itself. Do not pull out your drive while playing a file.
You can use USB hubs with your TV's USB inputs. External power supplied USB hubs are recommended in such a case.
It is recommended to use the TV's USB input(s) directly, if you are going to connect a USB hard disk.
Note: When viewing image files the Media Browser menu can only display 1000 image files stored on the connected USB device.
Media Browser
You can play back music and movie files and display photo files stored on a USB storage device by connecting it to your TV. Connect a USB storage device to one of the USB inputs located on the side of the TV.
After connecting a USB storage device to your TV Media Browser menu will be displayed on the screen.
You can access the content of the connected USB device any time later from the Sources menu. Select the related USB input option from this menu and press OK. Then select the file of your choice and press OK to display or play it back.
You can set your Media Browser preferences by using the Settings menu. Settings menu can be accessed via the information bar which is displayed on the bottom of the screen when pressed the Info button while playing back a video file or displaying a picture file. Press the Info button, highlight the gear wheel symbol positioned on the right side of the information bar and press OK. Picture Settings, Sound Settings, Media Browser Settings and Options menus will be available. The contents of these menus may change according to the type of the currently open media file. Only Sound Settings menu will be available while playing back audio files.
| Loop/Shuffle Mode Operation | |
Start playback and activate  | All files in the list will be continuously played in original order |
| Start playback and activate [23HC] | The same file will be played continuously (repeat) |
Start playback and activate  | All files in the list will be played once in random order |
Start playback and activate  | All files in the list will be continuously played in the same random order |
To use the functions on the information bar highlight the symbol of the function and press OK. To change the status of a function highlight the symbol of the function and press OK as much as needed. If the symbol is marked with a red cross, that means it is deactivated
CEC
This function allows to control the CEC-enabled devices, that are connected through HDMI ports by using the remote control of the TV.
The CEC option in the Settings>System>More menu should be set as Enabled at first. Press the Source button and select the HDMI input of the connected CEC device from the Sources List menu. When new CEC source device is connected, it will be listed in source menu with its own name instead of the connected HDMI ports name(such as DVD Player, Recorder 1 etc.).
The TV remote is automatically able to perform the main functions after the connected HDMI source has been selected. To terminate this operation and control the TV via the remote again, press and hold the "0-Zero" button on the remote control for 3 seconds.
You can disable the CEC functionality by setting the related option under the Settings>System>More menu accordingly.
The TV supports ARC (Audio Return Channel). This feature is an audio link meant to replace other cables between the TV and an audio system (A/V receiver or speaker system).
When ARC is active, the TV does not mute its other audio outputs automatically. You will need to decrease TV volume to zero manually if you wish to hear the ARC audio only (same as optical or co-axial digital audio outputs). If you want to change connected device's volume level, you should select that device from the source list. In that case volume control keys are directed to connected audio device.
Note: ARC is supported only via the HDMI1 input.
System Audio Control
Allows an Audio Amplifier/Receiver to be used with the TV. The volume can be controlled using the remote control of the TV. To activate this feature set the Speakers option in the Settings>System>More menu as Amplifier. The TV speakers will be muted and the sound of the watched source will be provided from the connected sound system.
Note: The audio device should support System Audio Control feature and CEC option should be set as Enabled.
Settings Menu Contents
| Picture Menu Contents | ||
| Mode | You can change the picture mode to suit your preference or requirements. Picture mode can be set to one of these options: Cinema, Game(optional), Sports, Dynamic and Natural. | |
| Contrast | Adjusts the light and dark values on the screen. | |
| Brightness | Adjusts the brightness values on the screen. | |
| Sharpness | Sets the sharpness value for the objects displayed on the screen. | |
| Colour | Sets the colour value, adjusting the colours. | |
| Energy Saving | For setting the Energy Saving to Custom, Minimum, Medium, Maximum, Auto, Screen Off or Off.Note: Available options may differ depending on the selected Mode. | |
| Backlight | This setting controls the backlight level. The backlight function will be inactive if the Energy Saving is set to an option other than Custom. | |
| Advanced Settings | ||
| Dynamic Contrast | You can change the dynamic contrast ratio to desired value. | |
| Noise Reduction | If the signal is weak and the picture is noisy, use the Noise Reduction setting to reduce the amount of noise. | |
| Colour Temp | Sets the desired colour temperature value. Cool, Normal, Warm and Custom options are available. | |
| White Point | If the Colour Temp option is set as Custom, this setting will be available. Increase the ‘warmth’ or ‘coolness’ of the picture by pressing Left or Right buttons. | |
| Picture Zoom | Sets the desired image size format. | |
| Picture Shift | This option may be available depending on the Picture Zoom setting. Highlight and press OK, then use directional buttons to shift the picture upwards or downwards. | |
| Film Mode | Films are recorded at a different number of frames per second to normal television programme. Turn this feature on when you are watching films to see the fast motion scenes clearly. | |
| Skin Tone | Skin tone can be changed between -5 and 5. | |
| Colour Shift | Adjust the desired colour tone. | |
| HDMI Full Range | While watching from a HDMI source, this feature will be visible. You can use this feature to enhance blackness in the picture. | |
| PC Position | Appears only when the input source is set to VGA/PC. | |
| Autoposition | If the image is not centered in VGA mode use this option to automatically adjust the position of the image. Press OK to start the auto adjustment. | |
| H Position | This item shifts the image horizontally to the right hand side or left hand side of the screen. | |
| V Position | This item shifts the image vertically towards the top or bottom of the screen. | |
| Dot Clock | Dot Clock adjustments correct the interference that appear as vertical banding in dot intensive presentations like spreadsheets or paragraphs or text in smaller fonts. | |
| Phase | Depending on the input source(computer etc.) you may see a hazy or noisy picture on the screen. You can use phase to get a clearer picture by trial and error. | |
| Reset | Resets the picture settings to factory default settings (except Game mode). | |
| While in VGA (PC) mode, some items in Picture menu will be unavailable. Instead, VGA mode settings will be added to the Picture menu while in PC mode. | ||
| Sound Menu Contents | ||
| Volume | Adjusts the volume level. | |
| Equalizer | Selects the equalizer mode. Custom settings can be made only when in User mode. | |
| Balance | Adjusts whether the sound comes from the left or right speaker. | |
| Headphone | Sets headphone volume.Please ensure before using headphones that the headphone volume is set to a low level, to prevent damage to your hearing. | |
| Sound Mode | You can select a sound mode (If the viewed channel supports). | |
| AVL (Automatic Volume Limiting) | Sets the sound to obtain fixed output level between programmes. | |
| Headphone/Lineout | When you connect an external amplifier to your TV using the headphone jack, you can select this option as Lineout. If you have connected headphones to the TV, set this option as Headphone.Please ensure before using headphones that this menu item is set to Headphone. If it is set to Lineout, the output from the headphone socket will be set to maximum which could damage your hearing. | |
| Dynamic Bass | Enables or disables the Dynamic Bass. | |
| Surround sound | Surround sound mode can be changed as On or Off. | |
| Digital Out | Sets digital out audio type. | |
| Installation Menu Contents | ||
| Automatic channel scan (Retune) | Displays automatic tuning options. D. Aerial: Searches and stores aerial DVB stations. D. Cable: Searches and stores cable DVB stations. Analogue: Searches and stores analogue stations. Satellite: Searches and stores satellite stations. | |
| Manual channel scan | This feature can be used for direct broadcast entry. | |
| Network channel scan | Searches for the linked channels in the broadcast system. D. Aerial: Searches for aerial network channels. D. Cable: Searches for cable network channels. Satellite: Searches for satellite network channels. | |
| Analogue fine tune | You can use this setting for fine tuning analogue channels. This feature is not available if no analogue channels are stored and if currently watched channel is not an analogue channel. | |
| Satellite Settings | Displays satellite settings. Satellite list: Displays available satellites. You can Add, Delete satellites or Edit satellite settings on the list. Antenna installation: You can change satellite antenna settings and/or start a satellite scan. Satellite Channel Table: You can upload or download satellite channel table data using the related options. | |
| Installation Settings (optional) | Displays installation settings menu. Standby Search (*): Your TV will search for new or missing channels while in standby. Any new found broadcasts will be shown. Dynamic Channel Update(*): If this option is set as Enabled, the changes on the broadcasts such as frequency, channel name, subtitle language etc., will be applied automatically while watching. (*) Availability depends on model. | |
| Setup Home Transponder (*) | Using this menu, you can edit the main and backup home transponder parameters, including the Pid of the related M7 operator, which are used to download the channel list. Set your preferences and press the Green button to save the settings. Then start an M7 operator installation using the Automatic channel scan>Satellite menu. (*) This menu option will only be available if an M7 operator installation is performed. | |
| Clear Service List | Use this setting to clear channels stored. This setting is visible only when the Country option is set to Denmark, Sweden, Norway or Finland. | |
| Select Active Network | This setting allows you to select only the broadcasts within the selected network to be listed in the channel list. This feature is available only for the country option of Norway. | |
| Signal Information | You can use this menu item to monitor signal related information such as signal level/ quality, network name etc for available frequencies. | |
| First time installation | Deletes all stored channels and settings, resets TV to factory settings. | |
| System Menu Contents | ||
| Conditional Access | Controls conditional access modules when available. | |
| Language | You may set a different language depending on the broadcaster and the country. | |
| Parental | Enter correct password to change parental settings. You can easily adjust Menu Lock, Maturity Lock, Child Lock or Guidance in this menu. You can also set a new PIN or change the Default CICAM PIN using the related options.Note: Some menu options may not be available depending on the country selection in the First Time Installation. Default PIN could have been set to 0000 or 1234. If you have defined the PIN(is requested depending on the country selection) during the First Time Installation use the PIN that you have defined. | |
| Date/Time | Sets date and time. | |
| Sources | Edit the names, enable or disable selected source options. | |
| Accessibility | Displays accessibility options of the TV. | |
| Hard of Hearing | Enables any special feature sent from the broadcaster. | |
| Audio Description | A narration track will be played for the blind or visually impaired audience. Press OK to see all available Audio Description menu options. This feature is available only if the broadcaster supports it. | |
| More | Displays other setting options of the TV. | |
| Menu Timeout | Changes timeout duration for menu screens. | |
| Standby LED | If set as Off the standby LED will not light up when the TV is in standby mode. | |
| Software Upgrade | Ensures that your TV has the latest firmware. Press OK to see the menu options. | |
| Application Version | Displays current software version. | |
| Subtitle Mode | This option is used to select which subtitle mode will be on the screen (DVB subtitle / Teletext subtitle) if both is available. Default value is DVB subtitle. This feature is available only for the country option of Norway. | |
| Auto TV OFF | Sets the desired time for the TV to automatically go into standby mode when not being operated. This option can be set from 1 to 8 hours in steps of 1 hour. You can also disable this option by setting as Off. | |
| Biss Key | Biss is a satellite signal scrambling system that is used for some broadcasts. If you need to enter Biss key on a broadcast, you can use this setting. Highlight Biss Key and press OK to enter keys on the desired broadcast. | |
| Store Mode | Select this mode for store display purposes. Whilst Store Mode is enabled, some items in the TV menu may not be available. | |
| Power Up Mode | This setting configures the power up mode preference. Last State and Standby options are available. | |
| CEC | With this setting you can enable and disable CEC functionality completely. Press Left or Right button to enable or disable the feature. | |
| CEC Auto Power On | This function allows the connected HDMI-CEC compatible device to turn on the TV and switch to its input source automatically. Press Left or Right button to enable or disable the feature. | |
| Speakers | To hear the TV audio from the connected compatible audio device set as Amplifier. You can use the remote control of the TV to control the volume of the audio device. | |
| OSS | Displays Open Source Software license information. | |
General TV Operation
Using the Channel List
The TV sorts all stored stations in the channel list. You can edit this channel list, set favourites or set active stations to be listed by using the Channels menu options. Press the OK button to open the channel list. You can filter the listed channels or make advanced changes in the current list using the Filter and Edit tab options. Highlight the tab you want and press OK to see available options.
Note: The commands Move, Delete and Edit name in the TV>Channels>Edit menu are not available for channels that are being broadcasted from an M7 operator.
Managing the Favourite Lists
You can create four different lists of your favourite channels. Enter the TV>Channels menu or press the OK button in order to open the Channels menu. Highlight the Edit tab and press OK to see the editing options and select the Tag/Untag channel option. Select the desired channel on the list by pressing the OK button while the channel is highlighted. You can make multiple choices. You can also use the Tag/Untag all option to select all channels on the list. Then press Back/Return button to return to the Edit menu options. Select Add/Remove Favourites option and press the OK button again. Favourite channel list options will be displayed. Set the desired list option to On. The selected channel/s will be added to the list. In order to remove a channel or channels from a favourite list follow the same steps and set the desired list option to Off.
You can use the filtering function in the Channels menu to filter the channels in the channel list permanently according to your preferences. For instance, using the options of the Filter tab, you can set one of your four favourite lists to be displayed every time the channel list is opened.
Configuring Parental Settings
The Parental menu options can be used to prohibit users from viewing of certain programmes, channels and using of menus. These settings are located in the Settings> System>Parental menu.
To display parental lock menu options, a PIN should be entered. After coding the correct PIN, Parental menu will be displayed.
Menu Lock: This setting enables or disables access to all menus or installation menus of the TV.
Maturity Lock: If this option is set, TV gets the maturity information from the broadcast and if this maturity level is disabled, prohibits access to the broadcast.
Note: If the country option in the First Time Installation is set as France, Italy or Austria, Maturity Lock's value will be set to 18 as default.
Child Lock: If this option is set to On, the TV can only be controlled by the remote control. In this case the control buttons on the TV will not work.
Set PIN: Defines a new PIN number.
Default CICAM PIN: This option will appear as greyed out if no CI module is inserted into the CI slot of the TV. You can change the default PIN of the CI CAM using this option.
TV PIN(*): By enabling or disabling this option you can allow or restrict some M7 operator channels to send PIN queries. These PIN queries provide an access control mechanism for related channels. If this option is set as On, the channels which send PIN queries cannot be accessed without entering the right PIN first.
(*) This menu option will only be available if an M7 operator installation is performed.
Note: Default PIN could have been set to 0000 or 1234. If you have defined the PIN(is requested depending on the country selection) during the First Time Installation use the PIN that you have defined.
Some options may not be available depending on the model and/or on the country selection in the First Time Installation.
Electronic Programme Guide
By means of electronic programme guide function of your TV you can browse the event schedule of the currently installed channels on your channel list. It depends on the related broadcast whether this feature is supported or not.
To access the programme guide, press the Guide button on your remote. You can also use the Guide option under TV menu.
There are 2 different types of schedule layouts available, Timeline Schedule and Now/Next. To switch between these layouts highlight the tab with the name of the alternative layout on the upper side of the screen and press OK.
Use the directional buttons to navigate through the programme guide. Use the Back/Return button to use the tab options on the upper side of the screen.
Timeline Schedule
In this layout option, all events of the listed channels will be displayed by timeline. You can use the directional buttons to scroll through the list of the events. Highlight an event and press OK to display event options menu.
Press Back/Return button to use available tab options. Highlight Filter tab and press OK to see the filtering options. To change the layout highlight Now/Next and press OK. You can use the Previous Day and Next Day options to display the events of the previous and next day.
Highlight Extras tab and press OK to access below options.
Highlight Genre: Displays Highlight Genre menu. Select a genre and press OK. The events in the
programme guide matching the selected genre will be highlighted.
Guide Search: Displays searching options. Using these options, you can search the programme guide database in accordance with the selected criteria. Matching results will be listed.
Now: Displays current event of the highlighted channel.
Zoom: Highlight and press OK to see events in a wider time interval.
Now/Next Schedule
In this layout option, only the current and next events of the listed channels will be displayed. You can use the directional buttons to scroll through the list of the events.
Press Back/Return button to use available tab options. Highlight Filter tab and press OK to see the filtering options. To change the layout highlight Timeline Schedule and press OK.
Event Options
Use the directional buttons to highlight an event and press OK button to display Options menu. The following options are available.
Select Channel: Using this option, you can switch to the selected channel in order to watch it. The programme guide will be closed.
More Info: Display detailed information on the selected event. Use up and down directional buttons to scroll through the text.
Set Timer on Event / Delete Timer on Event: Select Set Timer on Event option and press OK. You can set timers for future events. To cancel an already set timer, highlight that event and press the OK button. Then select Delete Timer on Event option. The timer will be cancelled.
Notes: You cannot switch to any other channel while there is an active timer on the current channel.
It is not possible to set timer for two or more individual events at the same time interval.
Teletext Services
Press the Text button to enter. Press again to activate mix mode, which allows you to see the teletext page and the TV broadcast at the same time. Press once more to exit. If available, sections in the teletext pages will become colour-coded and can be selected by pressing the coloured buttons. Follow the instructions displayed on the screen.
Digital Teletext
Press the Text button to view digital teletext information. Operate it with the coloured buttons, cursor buttons and the OK button. The operation method may differ depending on the contents of the digital teletext. Follow the instructions displayed on the digital teletext screen. When the Text button is pressed again, the TV returns to television broadcast.
Software Upgrade
Your TV is capable of finding and updating the firmware automatically via the broadcast signal.
Software upgrade search via user interface
On the main menu select Settings>System and then More. Navigate to Software upgrade and press the OK button. Then select Scan for upgrade and press OK button to check for a new software upgrade.
If a new upgrade is found, it starts to download the upgrade. After the download is completed, a warning will be displayed, press OK button to complete software upgrade process and restart TV.
3 AM search and upgrade mode
Your TV will search for new upgrades at 3:00 o'clock if Automatic scanning option is set to Enabled and if the TV is connected to an aerial signal. If a new software is found and downloaded successfully, it will be installed at the next power on.
Note: Do not unplug the power cord while led is blinking during the reboot process. If the TV fails to come on after the upgrade, unplug, wait for two minutes then plug it back in.
All updates are automatically controlled. If a manual search is carried out and no software is found then this is the current version.
Troubleshooting & Tips
TV will not turn on
Make sure the power cord is plugged in securely to a wall outlet. Press the Power button on the TV.
Poor picture
- Check if you have correctly tuned the TV.
- Low signal level can cause picture distortion. Please check antenna connections.
- Check if you have entered the correct channel frequency if you have performed manual tuning.
No picture
- TV is not receiving any signal. Make sure the correct source has been selected.
• Is the antenna connected properly?
• Is the antenna cable damaged? - Are suitable plugs used to connect the antenna?
- If you are in doubt, consult your dealer.
No sound
- Check if the TV sound is muted. Press the Mute button or increase the volume to check.
- Sound may be coming from only one speaker. Check the balance settings from Sound menu.
Remote control - no operation
- The batteries may be exhausted. Replace the batteries.
- The batteries maybe inserted incorrectly. Refer to the section "Inserting the Batteries into the Remote".
No signal on an input source
- It is possible that no device is connected.
- Check the AV cables and connections from your device.
- Check the device is switched on.
The Image is not centered in VGA source
To have your TV automatically center the image, enter the PC Position menu in Picture menu, highlight Autoposition and press OK. Wait for it to finish. In order to set the position of the image manually you can use H Position and V Position options. Select the desired option and use Left and Right directional buttons on the remote to set.PC Input Typical Display Modes
The following table is an illustration of some of the typical video display modes. Your TV may not support all resolutions.
| Index Resolution Frequency | ||
| 1 | 480 60 Hz | |
| 2 | 600 56 Hz | |
| 3 | 800x600 60 Hz | |
| 4 | 4x768 60 Hz | |
| 5 | 24x768 66 Hz | |
| 6 | 30x768 60 Hz | |
| 7 | 4x960 60 Hz | |
| 8 | 4x1024 60 Hz | |
| 9 | 4x768 60 Hz | |
| 10 | 0x1050 60 Hz | |
| 11 | 0x1200 60 Hz | |
| 12 | 0x1080 60 Hz | |
AV and HDMI Signal Compatibility
| Source Supported Signals Available | |||
| EXT(SCART) | PAL 50/60 | O | |
| NTSC 60 | O | ||
| RGB 50 | O | ||
| RGB 60 | O | ||
| Side AV | PAL 50/60 | O | |
| NTSC 60 | O | ||
| PC/YPbPr | 480I, 480P | 60Hz | O |
| 576I, 576P | 50Hz | O | |
| 720P | 50Hz,60Hz | O | |
| 1080I | 50Hz,60Hz | O | |
| 1080P | 50Hz,60Hz | O | |
| HDMI | 480I 60Hz | O | |
| 480P | 60Hz | O | |
| 576I, 576P | 50Hz | O | |
| 720P | 50Hz,60Hz | O | |
| 1080I | 50Hz,60Hz | O | |
| 1080P | 24Hz, 25Hz30Hz, 50Hz,60Hz | O | |
(X: Not Available, O: Available)
In some cases a signal on the TV may not be displayed properly. The problem may be an inconsistency with standards from the source equipment (DVD, Set-top box, etc.). If you do experience such a problem please contact your dealer and also the manufacturer of the source equipment.
Supported File Formats for USB Mode
| Media Extension Format Notes | |||
| Video | g,.mpeg | MPEG1-2 MPEG1: | 768x576 @ 30P, MPEG2:1920x1080 @ 30P |
| .vob MPEG2 | 1920x1080 @ 30P | ||
| .mp4 MPEG4, Xvid, H.264 | |||
| .mkv H.264, | MPEG4,VC-1 | ||
| .avi MPEG2 | MPEG4, Xvid, H.264 | ||
| .flv H.264/V | VP6/Sorenson | H.264/VP6: 1920x1080 @ 30PSorenson: 352x288 @ 30P | |
| .mp4, .mov, .3gpp, .3gp, MPEG transport stream, .ts, .trp, .tp, .mkv | HEVC/H.265 1080P | @60fps - 50Mbps | |
| .3gp MPEG4, H.264 1920x1080 @ 30P | |||
| Audio | 3 MPEG1 Layer | 2/3 | Layer2: 32Kbps ~ 448Kbps (Bit rate) / 32kHz, 44.1kHz, 48kHz, 16kHz, 22.05kHz, 24kHz (Sampling rate)Layer3: 32Kbps ~ 320Kbps (Bit rate) / 32kHz, 44.1kHz, 48kHz, 16kHz, 22.05kHz, 24kHz, 8kHz, 11.025kHz, 12kHz (Sampling rate) |
| (worksonly with video files) | AC3 32Kbps ~ 640 | Kbps (Bit rate) / 32kHz, 44.1kHz, 48kHz (Sampling rate) | |
| AAC | 16Kbps ~ 576Kbps (Bit rate) / 48kHz, 44.1kHz, 32kHz, 24kHz, 22.05kHz, 16kHz, 12kHz, 11.025kHz, 8kHz (Sampling rate) | ||
| EAC3 | 32Kbps ~ 6Kbps (Bit rate) / 32kHz, 44.1kHz, 48kHz (Sampling rate) | ||
| LPCM | Unsigned 8bit PCM, Signed/Unsigned 16bit PCM (big / little endian), 24bit PCM (big endian), DVD LPCM 16/20/24bit (Bit rate)/ 6kHz, 8kHz, 11.025kHz, 12kHz, 16kHz, 22.05kHz, 24kHz, 32kHz, 44.1kHz, 48kHz , 88.2kHz, 96kHz, 176.4kHz, 192kHz (Sampling rate) | ||
| IMA-ADPCM/MS-ADPCM | 384Kbps (Bit rate) / 8KHz ~ 48Khz (Sampling rate) | ||
| LBR 32Kbps ~ 96K | Kbps (Bit rate) / 32kHz, 44.1kHz, 48kHz (Sampling rate) | ||
| Picture | .jpeg | Baseline | Resolution(WxH): 17000x10000 |
| Progressive | Resolution(WxH): 4000x4000 | ||
| .bmp | - | Resolution(WxH): 5760x4096 | |
| Subtitle | .sub, .srt | - | - |
Supported DVI Resolutions
When connecting devices to your TV's connectors by using DVI converter cable(DVI to HDMI cable - not supplied), you can refer to the following resolution information.
| 56Hz 60Hz 66Hz 70Hz 72Hz 75Hz | ||||||
| 640x400 | ||||||
| 640x480 | x | |||||
| 800x600 | x x | |||||
| 832x624 | ||||||
| 1024x768 | x x x | |||||
| 1152x864 | ||||||
| 1152x870 | ||||||
| 1280x768 | ||||||
| 1360x768 | ||||||
| 1280x960 | ||||||
| 1280x1024 | ||||||
| 1400x1050 | ||||||
| 1440x900 | ||||||
| 1600x1200 | ||||||
| 1680x1050 | ||||||
| 1920x1080 | ||||||
DVD Mode
Safety Information
CAUTION
DVD Player is a class 1 laser product. However this product uses a visible laser beam which could cause hazardous radiation exposure. Be sure to operate the player correctly as instructed.
CLASS 1 LASER PRODUCT
RISK OF ELECTRIC SHOCK
The lightning flash with arrowhead symbol, within an equilateral triangle, is intended to alert the user to the presence of uninsulated “dangerous voltage” within the product’s enclosure that may be of sufficient magnitude to constitute a risk of electric shock of persons.
The exclamation point within an equilateral triangle is intended to alert the user to the presence of important operating and maintenance (servicing) instructions in the literature accompanying the appliance.
Notes on Discs
On handling discs
- To keep the disc clean, handle the disc by its edge. Do not touch the surface.
- Do not stick paper or tape on the disc.
- If the disc is contaminated with any substance like glue remove before using it.

natural_image
Illustration of a hand holding a circular object with a cross mark, next to a circular ring (no text or symbols)- Do not expose the disc to direct sunlight or heat sources such as hot air ducts, or leave it in a car parked in direct sunlight as the temperature can rise quickly and damage the disc.
• After playing, store the disc in its case.
On cleaning
- Before playing, clean the disc with a cleaning cloth. Wipe the disc from the centre out.
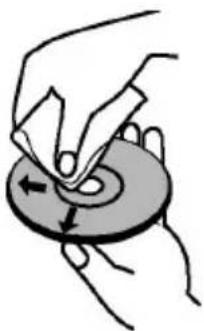
natural_image
Illustration of hands using a tool to cut a circular object with an arrow indicating rotation (no text or symbols)
natural_image
Illustration of a hand placing a small object on a circular object with an arrow indicating rotation (no text or symbols)- Do not use solvents such as benzine, thinner, commercially available cleaners or anti-static spray intended for vinyl LPs.
How to Watch a DVD
When placing a disc into the loader, labelled side of the disc should be on the front.
When TV set is turned on, first switch to DVD source by using the Source button on the remote control. Press play on the remote control, or directly press play button on the side panel. If there is no disc inside the loader, place a DVD first and press play.
Note: If you switch to another source by pressing Source or Programme +/- buttons on the remote control, DVD playback will be paused automatically. You should press Play button and resume the playback manually when you switch to DVD mode.
DVD Control Panel Buttons
▶ / Play / Pause)
Plays/pauses the disc. When DVD menu (root menu) is active, this button functions as "button select" (selects the highlighted item in menu) if this is not prohibited by the disc.
/ ▲Stop / Eject)
Stop playing disc / Eject or Load the disc.
Note:
You cannot eject the disc via the remote control.
While playing a file, you should press Stop button three times to eject.
General Playback
Basic Play
- Press the Standby button
- Insert a disc into the loader.
The disc will be automatically loaded and play will commence if the disc does not have any menus recorded on it.
A menu may appear on the TV screen after a few moments or the film may start immediately. This behaviour depends on the disc content and may change.
Note: Step 3 and 4 are available only when a menu is recorded on the disc.
- Press Down / Up / Left / Right or the numeric button (s) to select the preferred title.
- Press OK to confirm the selected item.
The played item may be a motion picture, a still picture or another submenu depending on the disc content.
For your reference
If an action corresponding to a button is prohibited the "☐" symbol appears.
Notes on Playback
- No sound will be heard during fast forward or rewind.
- No sound will be heard during slow motion play.
- Reverse slow motion play may not be available depending on the DVD content.
- In some cases, the subtitle language is not changed immediately to the selected one.
- When the preferred language is not selected even after pressing the button several times, it means that the language is not available on the disc.
- When the player is restarted or the disc is changed, the subtitle selection is automatically changed back to the initial settings.
- If a language is selected, not supported by the disc, the subtitle language will automatically be set to the disc's priority language.
- Usually a circulation will happen while switching to another subtitle, that is you can cancel the subtitle by pressing the Text button a number of times until "Subtitles Off" appears on the screen.
- When the power is turned on or the disc is removed, the language heard is the one selected at the initial settings. If this language is not recorded on the disc, only the available language on the disc will be heard.
- Some DVDs may not contain root and/or title menus.
- Reverse stepping is not available.
- For your convenience: If you attempt to enter a number greater than the total time of the current title, the time search box disappears and “Input Invalid” message appears on upper-left corner of screen.
- Slide Show is disabled when the ZOOM mode is on.
DVD Troubleshooting
Poor picture quality (DVD)
- Make sure the DVD disc surface is not damaged. (Scratch, fingerprint etc.)
- Clean the DVD disc and try again.
See instructions described in "Notes on Discs" to clean your disc properly.
- Ensure that the DVD disc is in the tray with the label facing forward.
- A damp DVD disc or condensation may affect the equipment. Wait for 1 to 2 hours in Stand-by to dry the equipment.
Disc does not play
- No disc in the machine. Place a disc into the loader.
• Disc incorrectly loaded.
Note: Ensure that the DVD disc is in the tray with the label facing forward.
- Wrong type of disc. The machine cannot play CD-ROMS etc. The region code of the DVD must match the player.
Wrong OSD language
- Select the language in the set-up menu.
- The language for the sound or subtitles on a DVD cannot be changed.
- Multilingual sound and/or subtitles not recorded on the DVD.
- Try to change the sound or subtitles using DVD's title menu. Some DVD's do not allow the user to change these settings without using the disc's menu
• These functions are not available on the DVD.
No picture
- Make sure you have pressed the correct buttons on the remote control. Try once more.
No sound
- Check if volume is set to an audible level.
- Make sure the sound isn't turned off by mistake.
Distorted sound
- Check that the appropriate listening mode setting is correct.
If nothing works
If you have tried the above solutions and none seem to work, try switching your TV-DVD off and on again. If this does not work, contact your supplier or TV-DVD repair technician. Never attempt to repair a defective TV-DVD yourself.
Disc Types Compatible with This Unit
| Disc Types (Logos) | Recording Types | Disc Size | Max. Playing Time | Characteristics |
DVD VIDEO VIDEO | Audio+Video | 12 cm | Single-sided; 240 min.Double-sided; 480 min. | · DVD contains excellent sound and video due to Dolby Digital and MPEG-2 System.· Various screen and audio functions can be easily selected through the on screen menu. |
AUDIO-CD DIGITAL AUDIO DIGITAL AUDIO | Audio 12 cm | 74 min. | · An LP is recorded as an analog signal with more distortion. CD is recorded as a digital signal with better audio quality, less distortion and less deterioration of audio quality over time. | |
MP3-CD | Audio(xxxx.mp3) | 12 cm | It depends on MP3 quality. | · MP3 is recorded as a digital signal with better audio quality, less distortion and less deterioration of audio quality over time. |
| PICTURE-CDJPEGREADABLE | Video(still picture) | 12 cm | It depends on JPEG quality. | · JPEG is recorded as a digital signal with better picture quality over time. |
For proper operation, only 12 cm discs must be used.
Specifications
| Types of Discs Supported | DVD: SS/SL 4.7" (DVD-5)SS/DL 4.7" (DVD-9)DS/SL 4.7" (DVD-10)DS/DL 4.7" (DVD-18) | CD-DACD-RCD-RWMP-3/JPEG |
| Video Type | MPEG-2 Video Standard Decoding (MPEG-1 supported)Full-Screen Video Display of 720 x 576 (PAL) & 720 x 480 (NTSC) pixels50 and 60 Hz frame refresh rates (PAL & NTSC)Digital bit-stream processing rate up to 108Mbits/secLine resolution more than 500 lines | |
| Audio Type | MPEG Multichannel DecodingLPCM | |
| Audio Output | Analog Outputs:24 bit /48, 44.1kHz down-sampling DAC | |
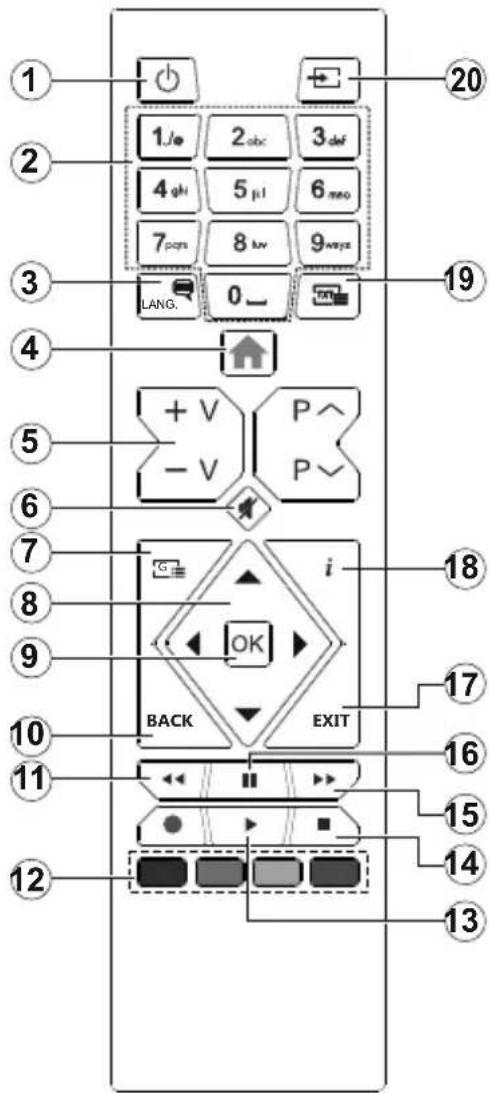
text_image
1 2 3 4 5 6 7 8 9 10 11 12 13 14 15 16 17 18 19 20 1.Je 2.abc 3.def 4.ghi 5.ji 6.meo 7.pqs 8.kw 9.ways LANG. 0_ + V P^- - V P~ BACK EXIT- Standby
- Numeric buttons
- Audio language selection
- TV Menu
- Volume Up / Down
- Mute
- DVD menu
- Navigation buttons
- OK / Select
- Back / Previous menu
- Rewind
- Coloured buttons; Red button - Zoom Green button - Repeat Yellow button - Root Blue button - Title
- Play
- Stop
- Fast forward
- Pause
- Exit
- Time
- Subtitle language selection
- Source selection
General DVD Operation
You can operate DVD, movie CD, music or picture CD's content by using the proper buttons on your remote control. Below are main functions of commonly used remote control buttons.
| Buttons | DVD Playback | Movie Playback | Picture Playback | Music Playback |
| ▶ | Play Play Play Play | |||
| || | Pause Pause | Pause Pause | ||
| ■ | Stop Stop Stop Stop | |||
| ◀/▶ | Skip backward/forward | Skip backward/forward | Rotate Skip backward/forward | |
| ▼/▲ | Highlights a menu item / Shifts the zoomed picture up or down (if available). | |||
| ◀◀/▶▶ | Rapid advance / Rapid reverse | |||
| GUIDE Displays time / Views main setup menu | ||||
| INFO | Time counter mode selection (during playback). Press repeatedly to switch between modes. | |||
| LANGUAGE | Press Language button to change the audio language. | X | X | |
| MENU | Displays TV menu. | |||
| OK | Enter / View / Play | |||
| GREEN BUTTON | Displays repeat options. | |||
| RETURN/BACK | Returns back to the previous menu (if available). | |||
| YELLOW BUTTON | Goes back to the root folder (if available). | |||
| TEXT | Press Text button to change the subtitle language or turn off the subtitles. | X | X | |
| BLUE BUTTON | Displays disc menu (if available). | Displays disc menu (if available). | X | X |
| RED BUTTON | Zooms picture. Press repeatedly to switch between zoom options. | |||
| Other Functions – Button Combinations (During playback) | |
| ||+▶▶ | Slow forward |
| (||+▶▶)+◀◀▶▶ | Sets slow forward speed |
| ▶▶+▶▶ | Sets rapid advance speed |
| ◀◀+◀◀ | Sets rapid reverse speed |
| ■+■ | Confirms stop command |
(*) You can switch to title by pressing numeric keys directly. You need to press 0 and then digit key to switch one digit titles (example: to select 5, press 0 and 5).
DVB functionality information
This DVB receiver is only suitable for use in the country which it was designed to be used in.
Although this DVB receiver conforms to the latest DVB specifications at the time of manufacture, we cannot guarantee compatibility with future DVB transmissions due to changes that may be implemented in broadcast signals and technologies.
Some digital television functions may not be available in all countries.
We continually strive to improve our products; therefore, specifications may change without prior notice.
For advice on where to purchase accessories, please contact the store where you purchased your equipment.
Mobil TV Instructions
Switching the TV On Using 12 Volt
- Connect the cigarette lighter plug cable into the cigarette lighter socket of your car.
- Plug the other side of 12 volt cable into DC 12 socket on the back side of the TV. Then the standby LED will light up.
- Press the Standby button, Programme +/- buttons or a numeric button on the remote control or press the middle of the side function switch on the TV in. The TV will then switch on.
- Adjust the antenna position for better reception or reinstall TV channels if necessary.
Switching the TV Off
- Press the Standby button on the remote control or press the middle of the side function switch on the TV in and hold it down for a few seconds, so the TV will switch into standby mode.
- Unplug cable connectors and power plugs.
ATTENTION: 12 V Input :
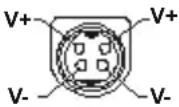
Table des matières
text_image
CLASS 1 LASER PRODUCTtext_image
Diagram showing a device with labeled components and directional arrows, including numbered parts ①, ②, and ③.PRODUIT LASER DE CLASSE 1
RISQUE DE CHOC ÉLECTRIQUE
natural_image
Illustration of a hand holding a circular object and a cross symbol on a ring (no text or symbols present)natural_image
Illustration of hands using a tool to cut a circular object with an arrow indicating rotation (no text or symbols)
natural_image
Illustration of a hand placing a circular object with a cross mark, no text or symbols presenttext_image
CLASS 1 LASER PRODUCTtext_image
Diagram showing a device layout with numbered components and directional arrows indicating flow or movement.natural_image
Illustration showing a hand holding a circular object and a cross symbol on a ring (no text or symbols present)natural_image
Illustration of hands using a tool to cut a circular object with an arrow indicating rotation (no text or symbols)
natural_image
Illustration of a hand placing a circular object with a cross mark, no text or symbols present| A | Product Fiche | ||
| B | Commercial Brand:ok. | ||
| C | Manufacturer No. | 10124084 | |
| D | Model Name | OLE 24750HV-TB DVD | |
| E | Energy efficiency class | A+ | |
| F | Visible screen size (diagonal,approx.) (inch/cm) | 24 inches | 60 cm |
| G | On mode average power consumption (Watt) | 19,0 | |
| H | Annual energy consumption (kWh/annum) (*) | 27 | |
| I | Standby power consumption (Watt) | 0,50 | |
| J | Off mode power consumption (Watt) | N/A | |
| K | Display resolution (px) | 1366x768 | |
| A | B | C | D | E | F | ||
| English Product Fiche Commercial Brand Product No. Model No. Energy efficiency class Visible screen size(diagonal, approx.) (inch/cm) | |||||||
| Deutsch | Produkt-Datenblatt Markenzeichen | Herstellernummer | Modellkennung Energieeffizienzklasse Sichtbare Bildse | shirmgrößediagonalca.) (Zoll /cm ) | |||
| عربية | الbelOmega التجارية: تليفرنكن | رقم الم子弹 | قُمْتَعَلِيَةِ الطَّانَة | الحجم الشائّة المرباح (فطري) (وَصْتَبَّم) | |||
| Български | Справочен лист с техническите пании | Търговска марка | Продукт No | Модел No | Клас на енергийна ефективност | Видим размер на екрана пиганал прибл.) (инча /см) | |
| čeština | Produktovy list | Značka výrobce | Číslo produktu | Model č. | Energetická třída | Viditelná velikost obrazovky (uhlop fička.pribl).(p alcù /cm) | |
| Dansk | Produktoplysningskema | Varemærke | Produktnr. | Model nr. | Energieffektivitetsklasse | Synlig skærmstørrelse (diagonalt,ca.) (HK/cm) | |
| Suomi | Tuote fiche | Kaupallinen merkki | Tuote nro. | Malli nro. | Virran tehokkuusluokka | Nakyvan kuvaruudun koko dia gonaalinepn. ( tuumaa/cm) | |
| Français | Fiche du produit | Marque commerciale | Produit N° | Modèle N° | Classe d'efficacité énergétique | Taille d'écran visible (diagonale,approx.) pouces/cm) | |
| Hrvatski | SAZETAK PROIZVODA | Trgovačka marka | Br. proizvoda | Br. modela | Klasa energetske učinkovitosti | Vidljiva veličina ekrana (diagonalna,ribilžno) (inča/cm) | |
| Nederlands | Productfiche | Commercieel merk. | Productnr. | Modelnr. | Energie efficientie klasse | Zichtbare schermgrootle dia gonaal ca.) (inches/cm) | |
| Español | Ficha del Producto | Marca Comercial | N° de Producto | N° de Modelo | Clasificación Energética | Tamaño de pantalla visible (dia gonała prox.) (puładas/cm) | |
| Svenska | Produktspecifikation | Varumärke | Produktnr. | Modellnr. | Energiklass | Synlig skármstorlek dia gonalun gefärlig) (tum/cm) | |
| Italiano | Scheda prodotto | Marchio commerciale | Numero prodotto | Numero modello | Classe di efficienza energetica | Dimensioni visibili dello schermo dia gonałe circą(p ollici/cm) | |
| Polski | KARTA PRODUKTU | Marka produktu | Nr produktu | Nr modelu | Klasa efektywności energetycznej | Widoczny obraz ekranu orzekatna okolol/cali/cm) | |
| Magyar | Termékismerteto adatlap | Kereskedelmi marka | Termékszám | Modellszám | Energiahatékonysági osztály | Latható keptartomány (diagonális,kb.) (inches/cm) | |
| Norsk | Produktinformasjon | Kommersiell merkevare | Produkt nr. | Modell nr. | Energieffektivitet klasse | Synlig skjermstørrelse (diagonal,ca.) tommer/cm) | |
| Português | Ficha do produto | Marca Comercial | Produto N° | Modelo N° | Classificação eficiência energetica | Tamanho ecrà visivel (diagonal,aprox.) polegadas/cm) | |
| Română | Fişă produs | Marcă comercială | Nr. Produs | Nr. Model | Clasa de eficiență energetică | Dimensiunea ecranului vizibil dia gonałă ə rox) (inch/cm) | |
| Русский | Справочный листок технических данных изделия | Торовая марка | Номер изделия | Номер модели | Класс энергопотребления | Видимый размер экрана (по диагонали,Около) (дюймов/см) | |
| беларуская | Справочный листок технических данных изделия | Торовая марка | Номер изделия | Номер модели | Класс энергопотребления | Видимый размер экрана (по диагонали,Около)(дюймов/см) | |
| македонски | Технички податоци | Комерцијална марка | Производ бр. | Модел бр. | Класа на енергетска ефикасност | ГОлемина на видлив екран диј агонала,околу) (инчи/cm) | |
| український | Техичні дані | Кормеціина марка | Артикул | Модель | Клас енергоспоживання | Видимий розмір екрана (диагональ,Гр иблизно) (дюймів/см) | |
| Srpski | Tehnicke odlike | Komercijalna marka | Proizvod br. | Model br. | Klasa energetske efikasnosti | Veličina vidljivog ekrana (dijagonala, tokom) (inča/cm) | |
| Slovenčina | Produktovy list | Znacka vyrobcu | Číslo produktu | Model č. | Energeticka trieda | Viditelna velikost obrazovsky (uhlop riečka,zhruba) (palcov/cm) | |
| Slovenščina | Opis izdelka | Komercialna znamka | St. Izdelka | St. Modela | Razred energetske učinkovitosti | Vidna velikost zaslona (diagonala,ribl.) (palcev/cm) | |
| Еллянікі | Деллю проилотоç | Емпоріко опіра | Ар. Проилотоç | Ар. Мовіталоу | Катніоріа еверүекіакніς атообооңс | Ордато ріжевіços одовңс (діяшвиоç, тірр) (виос/см) | |
| Bosanski | Те́ннікі podасі | Komercijalna marka | Produkt br. | Model br. | Klasa energetske efikasnosti | Vidljiva velicina ekrana (diagonala,ribilžno. x inča/cm) | |
| لاوي | لاوي عَلَدُ | لاوي عَلَدُ | لاوي عَلَدُ | لاوي عَلَدُ | لاوي عَلَدُ | لاوي عَلَدُ | لاوي عَلَدُ |
| Turkçe | Urûn fisi | Ticari Marka | Urûn No. | Model No. | Enerji verimilliği sinifi | Görülen ekran boyutu (çapraz, yakışk.) (inç /cm) | |
| Shqip | Ie dhenat e produktit | Marka tregtare | Nr. i produktit. | Nr. i modelit. | Klasa e eficiences se energjise | Madhesia e ekranit te dukshem (diag onal, afërsisht) (inç/cm) | |
| Lietuvių | Gaminio etiketė | Gamintojas | Gaminio Nr. | Modello Nr. | Energetinio efektyvumo klase | Matomas ekrano dydis (jstrižainė,approx.) (colq /cm) | |
| Latviešu | Produkta apraksts | Marka | Produkta nr. | Modeja nr. | Energoelektivitates klase | Ekran a izmers (pa diognali, apmçram) (collas/cm) | |
| Eesti | TOOTEKIRJELDUS | Tootja firma | Toote nr. | Mudeli nr. | Energiaklass | Vaadatava ekrani suurus (diagonaal, umbes) (tolli/cm) | |
| تارسي | مشخصات محصول | مارک تجاري | شماره محصول | شماره منل | کروه کرايی اترزی | الذازه صفحه قابل مشاهده (غندسی،کتریب) (ایب) / ملنتی متر) | |
| G | H | I | J | K | |||
| English On mode average power consumption (Watt) | Annual energy consumption (kWh/annum) | Standby power consumption (Watt) | Off mode power consumption (Watf) | Display resolution (px) | |||
| Deutsch | Durchschnittlicher Stromverbrauch im eingeschalletem Zustand (Watt) | Jährlicher Energieverbrauch (kWh/Jahr) | Standby-Stromverbrauch (Watt) Stromverbrauch im ausgeschalletem Zustand (Watt) | Standby-Euflösung (px) | Display-Auflösung (px) | ||
| عربية | متوسط استهلاك الطاقة عن تبمنيل (وولط) | (الاستهلاك Linkوي Link playing) | (الاستهلاك طاقة في وضج الاستهلاك (وولط) | (الاستهلاك طاقة في وضج الاستهلاك (وولط) | (الاستهلاك طاقة في وضج الاستهلاك (وولط) | ||
| Български | Средна консумация на електроенергия във включено състояние (Watt ) | одишка консумация на електроенергия (kWh/Годиша) | консумация на електроенергия в режим на готовност (Watt) | консумация на електроенергия в изключено състояние (Watt) | Разделителна способност на дисплея (пиксела) | ||
| čeština | Prümérnä spotreba elektrické energie v zap nutém režimu (Wattü) | Roční spotreba energie (kWh/Roční) | Spotreba elektrické energie v poholovoslim režimu (Wattü) | Spotreba elektrické energie ve vyputém režimu (Wattü) | Rozlišení displeje (px) | ||
| Dansk | Gennemsnilligt stromforbrug i laedt tilstand (Watt) | Arligl energiforbrug (kWh/Arligl) | Stromforbrug (slandby)(Watt) | Stromforbrug i slukkel lilsland (Watt) | Skærmopplösning (px) | ||
| Suomi | Päälla-tilan keskimääränen virrankulutus (Wattia) | Vuosittainen sähkönkulutu (kWh/Vuosittainen) | Vakiovirran kulutus (Wattia) Pols-tilan virkankulutus (Wattia) Nayton erottelukyky | virkankulutus (Wattia) Nayton erottelukyky | (pikselia) | ||
| Français | Consommation énergétique moyenne en mode "marche"(Watt) | Consommation énergétique annuelle (kWh/annuel ) | Consommation d'énergie en veille (Watt) | Consommation d'énergie en mode "arrêt" (Watt) | Resolution de l'écran (px) | ||
| Hrvatski | Prosječna potrošnja el. energije kada je proizvod ukučen (Watta) | Godišnja potrošnja el. Energije (kWh/Godišnja ) | Potrošnja el. energije u modu prigravnosti (Watta ) | Potrošnja el. energije kada je proizvod isključen (Watta ) | Rezolucija zaslona (piksela) | ||
| Nederlands | Aan-modus gemiddeld stroomverbruik (Watt ) | Jaarlijks energieverbruik (kWh/Jaarli ks ) | Stand-by stroomverbruik (Watt) Ult-modus stroomverbruik (Watt) Schermresolutte (px) | ||||
| Espanol | Consumo eléctrico medio, en funcionamiento(Vatio ) | Consumo eléctrico anual (kWh/anual ) | Consumo en modo en espera (Vatio) Consumo eléctrico modo apagado (Vatio) | Resolución de pantalla (px) | |||
| Svenska | Stromkonsumtion i PA-lage (Watt) Energism | konsumtion per ár (kWh/Arlig) | Stromkonsumtion i viloläge (Watt) Stromkonsumtion i AV-lage (Watt) Skarmupplösning (pixlar) | ||||
| Italiano | Consumo di corrente medio da acceso (Watt ) | Consumo annuale di energia (kWh/annuc) | Consumo di corrente in modalità standby (Watt) | Consumo di corrente da spenta (Watt) Risoluzione del display (px) | |||
| Polski | Średnie zużycie energii w trybie wączony m(Wałów ) | Roczne zużycie energii (kWh/Roczne) | Średnie zużycie energii w trybie pczekiwania Wałów ) | Zużycie energii w trybie wyłączonym (Wałów ) | Rozdzielczość obrazu (pikseli) | ||
| Magyar | Energiafogyasztás bekapcsolva hagyott üzemmódban (Watt) | Eves energiatogyasztás (kWh/Eves) | Energiafogyasztás standby üzemmódban (Watt) | Energiafogyasztás kikapcsolt üzemmódban (Watt) | Kepernyofelbontas (px) | ||
| Norsk | Pāmodus gjennomsnittlig stromforbruk (Watt ) | Arlig stromforbruk (kWh/Arlig) | Hvillemodus stromforbruk (Watt) | Av-modus stromforbruk (Watt) | Skjermopplösning (piksel) | ||
| Português | Consumo energia em modo medio (Watt ) | Consumo annual energia (kWh/anual ) | Consumo energia em stand-by (Watt) Consumo energia em modo alimentação (Watt) | Resolução do visor (pixel) | |||
| Română | Consum electric mediu în modul pornit (Watt ) | Consum anual de energie (kWh/anual ) | Consum electric în stare de repaus (Watt) | Consum electric în modul oprit (Watt) | Rezolutja ecranului (pixel) | ||
| Русский | Средний расход энергии в режиме работы Вт) | Ежегодный расход энергии (кВт/Год) | Расход энергии в режиме ржидания (Вт ) | Расход энергии в выключенном режиме (Вт) | Разрешение экрана (пикселей) | ||
| беларуская | Средний расход энергии в режиме включенияvat ) | Ежегодный расход энергии (kWh/рад авое) | Расход энергии в режиме ржидания (ватт) | Расход энергии в режиме выключения (ватт) | Разрешение экрана (пикселей) | ||
| македонски | Просечна потрошувачка кога е вкучен | Годишна потрошувачка на энергия и (kWh/Го длина) | Тотрошувачка во мирување (вати) | Тотрошувачка кога е ислучен (вати) | Резолуција на екран (пикселей) | ||
| український | Середня сложивана потужність у робочому режимі (Вт) | Середньорична сложивана потужність (kWh/Pičне) | Споживана потужність у режимі рчікування (Вт) | Споживана потужність у вимкненому стані (Вт) | Роздільна здатність екрана (пикселів) | ||
| Srpski | Prosečna potrošnja kada je uključení (Vati) | Godišnja potrošnja energije (kWh/Godišnja ) | Potrošnja tokom mirovanja (Vati) | Potrošnja kada je isključení (Vati) | Rezolucija displeja (piks.) | ||
| Slovencina | Priemema spotreba elektrickej energie v zapnutom ražime(Wattov) | Ročná spotreba energie (kWh/Ročná ) | Spotreba elektrickej energie v pohotovostnom režime (Wattov ) | Spotreba elektrickej energie vo vyrputom režime (Wattov) | Rozlíšenie displeja (pixl.) | ||
| Slovenščina | Poraba elektricne energije v povrečnem načinu (Wattov) | Letna poraba energije (kWh/Letna) | Poraba energije v stanju prigravljenosti (Wattov) | Poraba energije nacinu izklopa (Wattov) | Resolucija zaslona (piks.) | ||
| Елляникá | Месян катавálωση ερύματος λειτοφγ ισ (Watt) | Ετήσια κατανάλωση ενέργειας (kWh/Ετή στο) | Κατανάλωση ερύματος στην αναμονή (Watt) | Κατανάλωση ερύματος σε απτενεργοποίηση η Watf) | Ανάλυση οδόνης (ΠΙξελ) | ||
| Bosanski | Prosječna potrošnja kada je uključení (Watt ) | Godišnja potrošnja energije (kWh/Godišnja ) | Potrošnja tokom mirovanja (Watt) Potrošnja kada je isključení (Watt) Rezolucija ekrana (piks.) | ||||
| Түркçe | (оки)(зыки түрк и түрк и түрк и түрк и түрк и түрк и түрк и түрк и түрк и түрк и түрк и түрк и түрк и түрк и түрк и түрк и түрк и түрк и түрк и түрк и түрк 1024 | (напади/пропи) | (оки)(зыки түрк и түрк и түрк и түрк и түрк и түрк и түрк и түрк и түрк и түрк и түрк и түрк и түрк и түрк и түрк и түрк и түрк и түрк и тэрын и тэрын и тэрын и тэрын и тэрын и тэрын и тэрын и тэрын и тэрын и тэрын и тэрын и тэрын и тэрын и тэрын и тэрын и тэрын и тэрын и тэрын и тэрын и тэрын и тэрыи и тэрын и тэрын и тэрын и тэрын и тэрын и тэрын и тэрын и тэрын и тэрын и тэрын и тэрын и тэрын и тэрын и тэрын и тэрын и тэрын и тэрын и тэрын и тэрын и тэрып и тэрын и тэрын и тэрын и тэрын и тэрын и тэрын и тэрын и тэрын и тэрын и тэрын и тэрын и тэрын и тэрын и тэрын и тэрын и тэрын и тэрын и тэрын и тэрын и тэрыن и тэрын и тэрын и тэрын и тэрын и тэрын и тэрын и тэрын и тэрын и тэрын и тэрын и тэрын и тэрын и тэрын и тэрын и тэрын и тэрын и тэрын и тэрын и тэрын и тэрык и тэрын и тэрын и тэрын и тэрын и тэрын и тэрын и тэрын и тэрын и тэрын и тэрын и тэрын и тэрын и тэрын и тэрын и тэрын и тэрын и тэрын и тэрын и тэрын и тэраи и тэрын и тэрын и тэрын и тэрын и тэрын и тэрын и тэрын и тэрын и тэрын и тэрын и тэрын и тэрын и тэрын и тэрын и тэрын и тэрын и тэрын и тэрын и тэрын и тэраін и тэрын и тэрын и тэрын и тэрын и тэрын и тэрын и тэрын и тэрын и тэрын и тэрын и тэрын и тэрын и тэрын и тэрын и тэрын и тэрын и тэрын и тэрын и тэрын и тэраин и тэрын и тэрын и тэрын и тэрын и тэрын и тэрын и тэрын и тэрын и тэрын и тэрын и тэрын и тэрын и тэрын и тэрын и тэрын и тэрын и тэрын и тэрын и тэрын и тэры, атахан на Energy I am amin (Watt) | (Имлян атахан на Energy I am amin (Watt) | (Имлян атахан на Energy I am amin (Watt) | (Имлян атахан на Energy I am amin (Watt) | (Имлян атахан на Energy I am amin (Watt) |
(*) English
(*) Deutsch
(*) عرای
(*) Български
(*) čeština
. .
(*) Dansk
(*) Suomi
(*) Francais
( ) Prangan
(*) Hrvatsk
(*) Nederlands
The Ground Truth image displays a single, solid horizontal line. According to Rule 2 (UNDERSCORE & LINE RULES), this is a stylistic or background line, not a placeholder underscore. Therefore, the OCR result must ignore it and output nothing or only meaningful text. The provided OCR content is "____", which consists of four underscores. This is an incorrect interpretation of the line as a placeholder, violating the rule that stylistic lines must be ignored. The OCR has hallucinated underscores where none should exist based on the GT's visual context. Hence, the OCR result is inconsistent with the Ground Truth.
(*) Español
(*) Svenska
、
(*) Italiano
(*) Polski
(*) Magya
(*) Norsk
(*) Português
(1)
(*) Românã
(*) Русский
( ) Русский
(*) беларуская
( ) 2014, 2015
(*) македонски
√ 2021年1月23日
(*) український
(7)4 2013.2.2013
(*) Smski
(*) Slovenčina
(*) Slovenščina
(1) Stevensma
(*) Ελληνικά
(1) = 0.1
(*) Bosanski
(*) כב
(*) Türkçe
(*) Shqip
(*) Lietuvių
The Ground Truth image displays a single, solid horizontal line. According to Rule 2 (UNDERSCORE & LINE RULES), this is a stylistic or background line, not a placeholder underscore. Therefore, the OCR result must ignore it. The provided OCR content is "____", which consists of four underscores. This is an incorrect interpretation of the line as a placeholder, violating the rule that stylistic lines must be ignored. The OCR has hallucinated text (underscores) where none should exist. Hence, the result is inconsistent with the Ground Truth.
(*) Latviešu
(*) Eesti
(*) قارسى
Energy consumption kWh per year, based on the power consumption of the television operating 4 hours per day for 365 days. The actual energy consumption will depend on how the television is used.
Energieverbrauch kWh/Jahr, auf der Grundlage eines täglich vierstündigen Betriebs des Fernsehgerätes an 365 Taqen. Der tatsächliche Energieverbrauch hängt von der Art der Nutzung des Fernsehgerätes ab.
استبلاك الطاقة كيلو واهذ سنوبيا kWh، بناء على استبلاك طلقة تلوزيع بعمل 4 ساحات ومسا لنده: 365 يوم، بعندد الاستبلاك القلي، للملكة على طر ingة استخدام الحيلان.
ри 365 дни. Действително консумираната енергия ще зависи от начина на употреба на телевизора.
Sontřeba elektrická anemia kWh za mů uvoházelní za erotřehu elektrická anemia televistního nělimaža, kter ú je u ovunzu á hodinu denná na dohu 365 dní. Skutěná erotřeba elektrická anemia závisi na zlněchnu
Opovora vilačnava energio krtin za tor, čymlačojni zo opovora, oločnava energio biotnizniho prijimavu, not je je provoči triviny, dožiný po vanu over ahr. Oločnava opovora oblačnava energio zateln na Čravodou maji telaužnih, nálimača
Energiforbrug: kWh om året, beregnet som fjernsynets effektforbrug, hvis det er taendt 4 timer om dagen i 365 dage. Det faktiske energiforbrug vil bero på, hvordan fjernsynet bruges.
Energiankulutus kWh:a vuodessa, kun oletetaan, että televisiota käytetään 4 tuntia päivässä 365 päivän ajan. Todellinen energiankulutus riippuu television käyttötavasta.
Consommation d'énergie de kWh par an, sur la base de la consommation électrique d'un téléviseur fonctionnant quatre heures par jour pendant trois cent soixante-cinq jours. La consommation réelle dépend des
conditions d'utilisation du téléviseur.
Utrošak energije iznosi kWh godišnje na temelju utroška energije televizora koji radi četiri sata dnevno 365 dana u godini. Stvarni utrošak energije ovisit će o tome kako se upotrebljava televizor.
Energieverbruik kWh per jaar, gebaseerd op het elektriciteitsverbruik van de televisie wanneer deze gedurende 365 dagen 4 uur per dag aanstaat. Het feitelijke energieverbruik is afhankelijk van de manier waarop
de televisie wordt gebruikt
Consumo de energía: kWh al año, suponiendo cuatro horas de funcionamiento diario durante 365 días. El consumo efectivo dependerá de las condiciones reales de uso de la televisión.
Energiförbrukning kWh per år, beräknad utifrån effektförbrukningen för en tv-mottagare som används fyra timmar per dygn under 365 dygn. Den faktiska energiförbrukningen kommer att bero på hur tv-mottagaren
används.
Consumo di energia kWh'anno calcolato sulla base del consumo di un televisore in funzione per 4 ore al giorno per 365 giorni. Il consumo effettivo di energia dipende dall'utilizzo reale del televisore.
Zużycie energii kWh/rok na podstawie zużycia energii przez telewizor działający 4 godziny dziennie przez 365 dni. Rzeczywiste zużycie energii zależy od sposobu użytkowania telewizora
A televizikészülék napi 4 órás üzem mellett az év 365 napjára vetítve évente kWh mennyiség ü energiát fogyaszt. A tényleges energiafogyasztás a készülék üzemeltetési módjától függ
Energiforbruk kWh per år, strømforbruket er basert på bruk av TV-en for 4 timer per dag for 365 dager. Det faktiske energiforbruket vil være avhengig av hvordan TV-en brukes.
Consumo de energia de kWh por ano. baseado no consumo. em termos de potência. do televisor a funcionar 4 horas por dia durante 365 dias. O consumo de energia real dependerá do modo como o televisor é
utilizado.
Consumul de energie de kWh pe an. pe baza putenii consumate de aparatul TV atunci c ând este în funciune 4 ore pe zi timp de 365 de zile : consumul real de energie depinde de conditile de utilizare a aparatului
Энергопотребление кВт-ч в год приводится из расчета потребления энергии телевизором при работе 4 часа в день на протяжении 365 дней. Фактическое потребление электроэнергии будет зависеть
от того, как используется телевизор.
Энергаспажыванне квт-г у год приводзіцца з разлику спажывання знерпі тэлевізарам пры працы 4 галзіны ў дзень на працягу 365 дз ён. Фактычнає спажыванне электраэнерпі будзе запежаць ад таго, я
выкастыювваеша тэпевізар.
Единогетечата потопликаша а кИм галишно для оценка на потопликашата на теплесински инал щто работи 4 часа пневно. 365 линами. Реалната енергетева потопликаша – їе зависи от та тако се
Користи телевизискиот уред.
Значення енергоспоживання кВт-год на рік базується на потужності. споживаної телевізором, що працює протягом 4 годин на день впродовж 365 днів. Фактичне споживання електроенергії запежить від
способу використання телевізора.
Potrašnia struie od kWh na oodišniem nivou zasnovana ie na potrošnii televizora koji ie ukliučen 4 sata dnevno 365 dana oodišnie. Stvarna potrošnia struie zavisiće o načina korišćenia televizora
Spotreba energie kWh za rok na základe spotreby elektrickei energie televizora, ktor v je v činnosti 4 hodiny denne počas 365 dní. Skutočná spotreba energie závisí od toho, ako sa televizor použiva.
Poraba anemiia ia kWh na leto, nlerde na nanaialno anemiia televizoria, ki deluia 4 ure na dan v vsah 385 dnah. Deianska noraba anemiia ia odrvisna od načina unoraba televizoria.
Kasakut, as anionous LAM and iota, as a bina and aminib, as a niai and aaii, as a kaii, as a kaii, as a kaii, as a kaii, as a kaii, as a kaii, as a kaii, as a kaii, as a kaii, as a kaii, as a kaii, as a kaii, as a kaii, as a kaii, as a kaii, as a kaii, as a kaii,
Κατυναλωση ένεργιας κανή ονά έτος, με. προση την κατυναλωση ιχους στό την πημεροση για τετρωση κατυναργια ονά ημερο επί δου ημερες. Π προγρατική κατυναλωση ενεργιας εζαρτισται από του τροση υπόσης την προγριας.
Energetaka potrešnja i
ENERGYEŠKA POJUSNIJA JE ATZ KIVIHA YOJUSHJEMI NIVOU, NA OSHOVU POJUSNIJE I YRA KOJI TAVI 4 II UNEVNO, ODO GANA. OVIATNA ENERGELSKA POJUSNIJA ZAVISI OU IUGA KOJIKU E I V KOJISU.
תְרָה בַרִי אַלְרָה בַרִי אַלְרָה בַרִי אַלְרָה בַרִי אַלְרָה בַרִי אַלְרָה בַרִי אַלְרָה בַרִי א'
365 gün boyunca günde 4 saat çalı şan televizyonun tüketliği güç referans alınarak yılda kWh enerji tüketimi. Güncel enerji tüketimi televizyonun nasıl kullanıldığına bağlı olacaktır.
Konsumi i energjisë kWh në vit, bazuar në konsumin e energjisë së televizorit kur punon për 4 orë në dite për 365 dite. Konsumi aktual i energjisë varet nga mënyra e përdorimit të televizorit.
kWh energijos sunaudojimas per metus nurodomas atsizvelqus i tai, kiek energijos sunaudojama televizonui veikiant 4 valandas per dieną 365 dienas iš eilės. Faktinį energijos sunaudojima lems tai, kiek laiko bus
naudojamas televizonius.
Energijas patērinš kWh gadā, nemot vērā televizora elektroenergijas patērinu, darbojoties 365 dienas, četras stundas dienā. Faktiskais energijas patērinš būs atkarīgs no tā, kā televizors tiks izmantots.
Energiatarbimine kWh aastas, eeldusel et televiisor töötab neli tundi päevas ja 365 päeva aastas. Tegelik energiatarbimine oleneb televiisori kasutusvilisist.
ميزان مصرف الرژی به ميزان 4 ساعت در روز برای 365 روز سل. موزان لصلی مصرف اترژی به ميزان استفاده از تلوبیزون بستگی دارن. هر سال بر اسلا س Mozان مصرف تلوبیزون به ميزان 1 kWh در 4 هر سال بر اسلا س Mozان مصرف 4 روز سل.
text_image
OK. OLE 24750HV-TB DVD A++ A+ A B C D E ENERGIA · ENERGIA ENEPEIA · ENERGIJA ENERGY · ENERGIE ENERGI 19 Watt 27 kWh/annum 6024 cm 24 inch 2010/1062 - 2017 50502155| A | VESA WALL MOUNT MEASUREMENTS | ||
| B | Hole Pattern Sizes (mm) | W | H |
| 75 | 75 | ||
| C | Screw Sizes | ||
| D | Length (X) | min. (mm) | 5 |
| max. (mm) | 8 | ||
| E | Thread (Y) | M4 | |
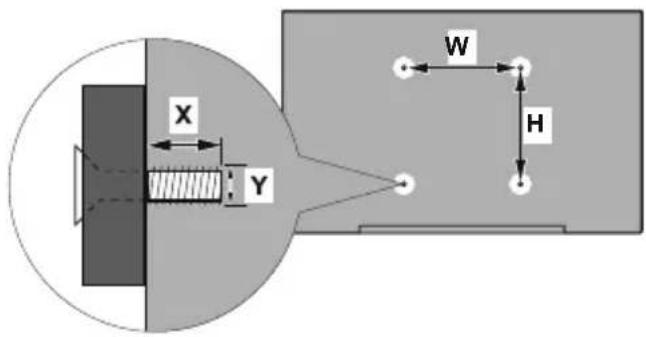
text_image
X Y W H| A B C D E | |||||
| English | VESA WALL MOUNT MEASUREMENTS | Hole Pattern Sizes (mm) Screw Sizes Length (X) Thread (Y) | |||
| Deutsch | MASSANGABEN FÜR VESA-WANDMONTAGE | Lochmustergrößen (mm) | Schraubengrößen | Länge (X) | Gewinde (Y) |
| Français | DIMENSIONS DU SUPPORT DE FIXATION MURALE VESA | Dimensions des modèles de trous de montage (mm) | Dimensions des vis | Longueur (X) | Filetage (Y) |
| Italiano | Misurazioni installazione a parete VESA | Dimensioni schema foro (mm) | Dimensioni vite | Lunghezza (X) | Filettatura (Y) |
| Português | MEDIÇÕES DE MONTAGEM MURAL VESA | Dimensões do molde de furação (mm) | Tamanhos do parafuso | Comprimento (X) | Rosca (Y) |
| Español | MEDIDAS DEL MONTAJE DE PARED VESA | Tamaños de patrón para agujero (mm) | Tamaños de tornillo | Longitud (X) | Rosca (Y) |
| Türkçe | VESA DUVARA MONTAJ APARATI ÖLÇÜLERİ | Açılacak Delik Ölçüleri (mm) | Vida Ölçüleri | Uzunluk (X) | Rüzey (Y) |
| Еллэнvik | ΔΙΑΣΤΑΣΕΙΣ ΒΑΣΗΣ ΤΟΙΧΟΥ VESA | Μενέθη συήματος συών (mm) | Μενέθη βιδών | Μήκος (X) | Элеίρωμα (Y) |
| Polski | WYMIARY DO MONTAZU NAŚCIENNEGO VESA | Rozmiary szablonu otworów (mm) | Rozmiary wkrętów | Długość (X) | Gwint (Y) |
| čeština | ROZMĚRY DRŽÁKU NA ZEŐ VESA | Rozměry velikosti děr (mm) | Rozměry śroubú | Délka (X) | Závit (Y) |
| Magyar | VESA FALI TARTÓ MÉRETEK | Lyukak méretének nagysága(mm) | Csavar méret | Hossz (X) | Menet (Y) |
| Română | MĂSURĂTORI SUPORT PERETE VESA | Dimensiuni tipar gaură (mm) | Dimensiuni şuruburi | Lungime (X) | Filet (Y) |
| Svenska | VESA VÄGGMONTERINGSMÄTT | Hålmönsterstorlear (mm) | Skruvstorlekar | Längd (X) | Träd (Y) |
| Nederlands | VESA WANDMONTAGE METINGEN | Grootte booropening (mm) | Schroefgroote | Lengte (X) | Draad (Y) |
| Suomi | VESA-SEINÄASENNUKSEN MITAT | Reikäkuvion koot (mm) | Ruuvinkoot | Pituus (x) | Kierre (Y) |
| Norsk | VESA VEGGMONTERINGSMÄL | Hullmønster størrelser (mm) | Skruestørrelser | Lengde (x) | Träd (Y) |
| Dansk | VESA VÄGGMONTERINGS-MÄL | Hulmønster-størrelser (mm) | Skruestørrelser | Længde(X) | Träd (Y) |
| Русский | РАЗМЕРЫ НАСТЕННОГО КРЕПЛЕНИЯ VESA | Размеры системы отверстий | Размеры винтов | Длина(X) | Резьба (Y) |
| беларуская | ПАМЕРЫ НАСЦЕННАГА МАЦАВАННЯ VESA | Памеры сістэмы адтулін | Памеры вінтоў | Даўжыня (X) | Разьба (Y) |
| македонски | МЕРКИ ЗА МОНТИРАЊЕ НА СИД ЗА „BECA“ | Шема на големини на дупката (мм) | Големина на шрафот | Должина (X) | Навој (Y) |
| українська | РОЗМИРИ НАСТИННОГО КРИПЛЕННЯ VESA | Відстань між кріпильними отворами, мм | Розміри гвинтів | Довжина (X) | Діаметр різьби (Y) |
| Srpski | DIMENZIJE VESA ZIDNOG NOSAČA | Dimenzije šablona za bušenje | Dimenzije zavrtnjeva | Dužina (X) | Navoj (Y) |
| Slovenčina | ROZMERY DRŽIAKA NA STENU VESA | Rozmery velkosti dier (mm) | Rozmery skrutiek | Dĺžka (X) | Závit (Y) |
| Slovenščina | MERE STENSKEGA NOSILCA VESA | Velikosti vzorca lukenj (mm) | Velikosti vijakov | Dolžina (X) | Navoj (Y) |
| Hrvatski | VESA MJERE ZIDNOG DRŽAČA | Veličine uzorka otvora (mm) | Veličine vijka | Dužina (X) | Navoji (Y) |
| Bosanski | DIMENZIJE VESA ZIDNOG NOSAČA | Dimenzije šablona za bušenje | Dimenzije vijaka | Dužina (X) | Navoj (Y) |
| Български | РАЗМЕРИ ЗА КОМПЛЕКТ ЗА МОНТАЖ НА СТЕНА VESA | Размери на отвора (mm) | Размер на болта | Дължинат (X) | Резба (Y) |
| Lietuvių | VESA TVIRTINIMO PRIE SIENOS MATAVIMAI | Angos šablono dydis (mm) | Varžtu dydis | Igis (X) | Sriegis (Y) |
| Latviešu | VESA SIENAS STIPRINĀJUMA IZMĚRI | Caurumu šablona izměrs (mm) | Skrūvju izmēri | Garums (X) | Vitne (Y) |
| Eesti | VESA SEINALE KINNITAMISE MÕÕDUD | Kruvi suuruse mõõt (mm) | Kruvi suurus | Kõrgus(x) | Keere (Y) |
| Shqip | PŘRMASAT E NJĘSISĘ SĘ MONTIMIT NĘ MUR VESA | Madhësitę modele të vrimave (mm) | Madhësitę e vidhave | Giatësia (X) | Filetimi (Y) |
| عربي | مQLAIΨS للتشیت على الجدار VESA | (م) أ '+حام التقوب (م) | (م) أ '+حام البرای (م) | (Х) ا CPLOL (У) | (У) ا CPLOL (У) |
| لاوي | VESA λισόν πιν τιν τιν τιν τιν τιν τιν τιν τιν τιν τιν τιν τιν τιν τιν τιν τιν τιν τιν τιν τιν τιν τιν τιν τιν τιν τιν τιν τιν τιν τιν τιν τιν τιν τиν τιν τιν τιν τιν τιν τιν τιν τιν τιν τιν τιν τιν τιν τιν τιν τιν τιν τιν τιν τιν τιν τιν τιν τιν τιν τιν τιν τιν τιν τιν τιν τιν τι ν | (م) α "б" (م) α "д" (م) α "д" (م) α "д" (م) α "д" (م) α "д" (م) α "д" (م) α "д" (م) α "д" (م) α "д" (م) α "д" (م) α "д" (م) α "д" (م) α "д" (م) α "д" (م) α "д" | (م) α "б" (م) α "д" (م) α "д" (م) α "д" (م) α "д" (م) α "д" (م) α "д" (م) α "д" (م) α "д" (م) α "д" (م) α "д" (م) α "д" (م) α "д" (م) α "д" | (Х) α "б" (م) α "д" (م) α "д" (م) α "д" (م) α "д" (م) α "д" (م) α "д" (م) α "д" (م) α "д" (م) α "д" (م) α "д" (م) α "д" (م) α "д" (م) α "д" (م)α "д" (م) α "д" (م) α "д" (م) α "д" (م) α "д" (م) α "д" (م) α "д" (م) α "д" (م) α "д" (م) α "д" (م) α "д" (م) α "д" (م) α "д" (م) α "д" (م) α "d" (م) α "д" (م) α "д" (م) α "д" (م) α "д" (م) α "д" (م) α "д" (م) α "д" (م) α "д" (م) α "д" (م) α "д" (م) α "д" (م) α "д" (م) α "д" (م) α "д" |
EN: Hereby, Imtron GmbH, declares that the radio equipment type TFT IDTV is in compliance with Directive 2014/53/EU. The full text of the EU declaration of conformity is available at the following internet address:
http://de.ok-online.com/nc/de/service/downloads.html
DE: Hiermit erklärt Imtron GmbH, dass der Funkanlagentyp TFT IDTV der Richtlinie 2014/53/EU entspricht. Der vollständige Text der EU-Konformitätserklärung ist unter der folgenden Internetadresse verfügbar:
http://de.ok-online.com/nc/de/service/downloads.html
FR: Le soussigné, Imtron GmbH, déclare que l'équipement radioélectrique du type TFT IDTV est conforme à la directive 2014/53/UE. Le texte complet de la déclaration UE de conformité est disponible à l'adresse internet suivante:
http://de.ok-online.com/nc/de/service/downloads.html
IT: Il fabbricante, Imtron GmbH, dichiara che il tipo di apparecchiatura radio TFT IDTV è conforme alla direttiva 2014/53/UE. Il testo completo della dichiarazione di conformità UE è disponibile al seguente indirizzo Internet: http://de.ok-online.com/nc/de/service/downloads.html
ok.
Warranty Card
ok. Products
We provide a warranty for this device in according to the following conditions:
-
In acc ordance with the conditions below (points 2-7) we will remove defects of the device free of charge, it they are evidently due to material and/or production errors, and if they are reported to us immediately after detection and within 24 months of delivery to the first end user.
-
The warranty does not cover easily breakable parts such as glass, plastic or light bulbs. A warranty obligation is not triggered by minor deviations from the target conditions, which are not significant to the value and usability of the device, by damages due to chemical and electro-chemical effects of water, in general by abnormal environmental conditions or improper operating conditions, or if the device otherwise comes into contact with unsuitable substances. A warranty can also not be assumed if the defects on the device are due to transport damage which is not caused by us, improper installation and assembly, incorrect operation, non-household usage, a lack of maintenance or the non-observance of the operating or assembly instructions. Warranty claims are void if repairs or interventions are carried out by people who are not authorised by us to do so, or if our devices have been equipped with spare parts, supplements or accessories, which are not original parts and therefore cause a defect.
-
The warranty service is performed by either repairing the defect parts or replacing them with non-defect parts, at our discretion. Devices which can be transported (e.g. in a car) and on which a warranty service is claimed within the scope of this warranty, are to be handed over or sent to our closest customer service office or our contracted customer service office. Repairs at the place of installation
can only be requested for devices which are operated on site (stationary devices). The respective sales receipt stating the purchase and /or delivery date is to be submitted. Replaced parts become our property.
-
If the rectification of the defect device is rejected by us or fails, we will provide a replacement of equal value and at no charge within the above-mentioned warranty period, at the request of the end user.
-
Warranty services neither invoke an extension of the warranty period, nor start a new warranty period. The warranty period for built-in replacement parts ends with the warranty period for the whole device.
-
Smart Devices: If your device is able to connect to the internet (so called smart device) security updates are not part of the scope of this warranty. For a certain period of time security updates for your smart device will be done automatically. If this period ends you will be informed by a general note. Afterwards security updates can be performed manually.
-
This warranty extends to every country where this device is supplied by an authorised distributor.
-
Any other or further claims, in particular those regarding compensation for damage caused outside of the device are ruled out -provided liability is not obligatory by law.
-
We are furthermore liable without restrictions in accordance to legal requirements for damage covered by the liability scope of the Product Liability Act, as well as for damage caused by intentional and gross negligent contract violations plus fraudulent intent by us, our legal representatives or vicarious agents.
-
This warranty bond does not affect your legal warranty claims.
Español
Garantía
CUSTOMER SERVICE HOTLINES:
België / Belgique - Ligne d'assistance client: 022008804 (lokaal tarief)