09997 - Air purifier Maxxmee - Free user manual and instructions
Find the device manual for free 09997 Maxxmee in PDF.
| Product type | Air purifier |
| Brand | Maxxmee |
| Model | 09997 |
| Model number | URHAF-06 |
| Power supply | 220 – 240 V ~ 50 / 60 Hz |
| Power consumption | max. 85 W |
| Max. air flow | 420 m³/h |
| Application area | 50 to 70 m² |
| Noise level | 50 to 60 dB |
| Protection class | Class I |
| Main functions | 6-stage purification (pre-filter, combined HEPA 14 filter, UV-C lamp, photocatalyst, ionization), air quality LED indicator, 8h timer, auto mode, night mode, child lock |
| Number of speeds | 3 levels |
| Fine particle sensor | Yes, regular cleaning recommended |
| Filters | 1 x combined filter (HEPA 14 + activated carbon), 1 x aluminum pre-filter (washable) |
| Filter lifespan | Indicated by reminder on screen, varies by usage |
| Maintenance and cleaning | Clean device with dry cloth, clean sensor every 2 months, clean UV-C lamp after cooling |
| Safety | Automatic shutdown if front cover removed, child lock, safety switch |
| Spare parts and repairability | Spare parts available at www.dspro.de/kundenservice |
| Remote control | Yes, with 2 AAA batteries (not included) |
| Weight | Not specified, estimated 8-10 kg |
Frequently Asked Questions - 09997 Maxxmee
User questions about 09997 Maxxmee
0 question about this device. Answer the ones you know or ask your own.
Ask a new question about this device
Download the instructions for your Air purifier in PDF format for free! Find your manual 09997 - Maxxmee and take your electronic device back in hand. On this page are published all the documents necessary for the use of your device. 09997 by Maxxmee.
USER MANUAL 09997 Maxxmee
Fan speed (22) / Circulate
Functional Overview and Operating Elements 17
Before Initial Use 18
Inserting / Replacing Batteries 19
Use 19
Cleaning and Storage 19
Maintenance 20
Troubleshooting 21
Disposal 21
Technical Data 22
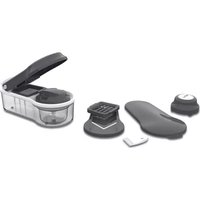
ITEMS SUPPLIED
• Air purifi er 1 x
• Combination filter 1 x
• Aluminium pre-fi lter 1 x
- Remote control 1 x
- Operating instructions 1 x
Check the items supplied for completeness and the components for transport damage. If you find any damage, do not use the device but contact our customer service department.

To use the remote control, you also require two 1.5 V batteries, AAA. These are not supplied with the device.
AT A GLANCE
Device (Picture A)
1 Air vents
2 Touch display
3 LED indicator
4 Front cover with magnets
5 Aluminium pre-fi lter
6 Combination fi lter
7 UV-C lamp (in the main unit)
8 Fan (in the main unit)
9 Main unit
10 Ventilation slots
11 Protective cover of the particulate sensor
12 Carrying handle
Touch Display (Picture B)
13 Temperature display – current temperature
14 Replace filters display – Replace filters reminder
15 Particulate display
16 g / m^3 display - Particulate value
17 Fan speed display
18 Fan activity display
19 Display area
20 Control panel
21 Field On/Off - On/Off
22 Field Fan speed – Fan speed
23 Field Timer - Timer
24 Field Auto mode – Automatic mode
25 Field Sleep mode – Sleep mode
26 Field Anion – Ionisation
27 Field UV lamp - UV-C light
28 Field Child lock – Child lock
29 Field Replace filters – Reset replace fil tters reminder
30 Child lock □ □ display – Child lock active/deactivated
31 Humidity display – Humidity
Main Unit (Picture D)
32 Safety switch
Main Unit – Side (Picture E)
33 Air inlet of the sensor
34 Air outlet of the sensor
35 Particulate sensor
Control panels are shown as follows: Child lock
Displays are shown as follows: Temperature
Key numbers are shown as follows: (1)
Picture references are shown as follows: (Picture A)

IMPORTANT NOTICES! PLEASE KEEP FOR REFERENCE!
Dear Customer,
We are delighted that you have chosen the MAXXMEE High Performance Air Purifier.
The highly efficient 6-level system uses an integrated HEPA 14 fi Iter, combination fi Iter, disinfecting UV-C light and a photocatalyst and ionising function to free the air of harmful or polluting components such as particulate matter, pollen, allergens etc.
Thanks to the LED strip which shows 4 levels, you can see the particulate concentration for yourself directly.
If you have any questions about the device and about spare parts / accessories, contact the customer service department via our website: www.dspro.de/kundenservice
We hope you have a lot of fun with your MAXXMEE High Performance Air Purifi er.
Information About the Operating Instructions
Before using the device for the first time, please read through these operating instructions carefully and keep them for future reference and other users. They form an integral part of the device. The manufacturer and importer do not accept any liability if the information in these operating instructions is not complied with.
SYMBOLS

Danger symbols: These symbols indicate possible dangers. Read the associated safety notices carefully and follow them.


Supplementary information

Warning: UV-C radiation

Read the operating instructions before use!

Symbol for direct current
SIGNAL WORDS
Signal words indicate hazards if the associated notices are not followed.
DANGER – high risk, results in serious injury or death
WARNING – medium risk, may result in serious injury or death
NOTICE – may result in risk of damage to material
INTENDED USE
■ This device is intended for purifying and ionising the ambient air.
■ The device is not a substitute for adequate ventilation.
■ The device is not suitable for use as a (fume) extractor hood.
- Do not use the device indoors where smoky or gaseous insect repellents have been used, or in places with oily residues, incinerators or chemical vapours.
■ The device is not designed to filter carbon monoxide (CO) or radon (Rn) gases from the air. It is not suitable as a safety device for accidents involving combustion and hazardous chemicals.
■ The device is suitable for a surface area of no more than 70 m^2 . It is not a substitute for an air-conditioning system.
■ The device is for personal use only and is not intended for commercial applications.
■ Use the device only for the specified purpose and as described in the operating instructions. Any other use is deemed to be improper.
■ The warranty does not cover faults caused by incorrect handling, damage or attempted repairs. The same applies to normal wear and tear.
SAFETY NOTICES

WARNING: Read all safety notices, instructions, illustrations and technical data provided with this device. Failure to follow the safety notices and instructions may result in electric shock, fire and/or injuries.
This device may be used by children aged 8 and over and by people with reduced physical, sensory or mental abilities or a lack of experience and / or knowledge if they are supervised or have received instruction on how to use the device safely and have understood the dangers resulting from failure to comply with the relevant safety precautions.
■ Children must not play with the device.
■ Cleaning and user maintenance must not be carried out by children, unless they are supervised.
■ Children younger than 8 years of age and animals must be kept away from the device and the connecting cable.
■ The device must always be switched off and disconnected from the mains power when left unattended and before cleaning it and changing the filters.
- Do not make any modifications to the device. If the device or the connecting cable are damaged, they must be replaced by the manufacturer, customer service department or a similarly qualified person (e.g. specialist workshop) in order to avoid any hazards.

DANGER – Danger of Electric Shock
■ Use and store the device only in closed rooms.
■ Do not use the device in rooms with high humidity.
■ Never immerse the device and the connecting cable in water or other liquids and ensure that they cannot fall into water or become wet.
If the device does fall into water, pull the mains plug out of the plug socket immediately. Only after this should
you retrieve the device from the water. Never attempt to pull it out of the water while it is connected to the mains power!
■ Never touch the device and the connecting cable with wet hands when the device is connected to the mains power.
- Do not use the device if it has malfunctioned, fallen or been dropped into water. Have it checked in a specialist workshop before using it again.

WARNING – Risk of Damage to the Eyes and Skin!
■ Germicidal ultraviolet rays are harmful to the eyes and skin. Never expose yourself or other people and animals to direct or reflected rays! If you come into contact with the rays, consult a doctor immediately.
■ Make sure that the safety switch is not blocked!

WARNING – Danger of Fire
- Do not use the device in the vicinity of highly fl ammable materials (curtains, textiles, etc.). Do not place any combustible materials (e. g. cardboard, paper, plastic) on the device.
■ Do not use fl ammable substances such as air fresheners or similar products in the immediate vicinity of the device.
■ Do not insert anything into the openings of the device and make sure that they do not become clogged. The device must not be used with blocked openings.

WARNING – Danger of Injury
- Keep children and animals away from the packaging material. There is a danger of suffocation.
■ Make sure that the connecting cable does not present a trip hazard. There is a danger of tripping over it.
■ The magnetic fi elds of the magnets may interfere with sensitive electronic devices. You should therefore keep electronic devices and magnetic data storage media away from it. If in any doubt, people with electronic medical implants (e. g. pacemakers) should consult their doctor before using the device.
■ Batteries can be deadly if swallowed. The battery and the remote control should be kept out of the reach of small children and animals. If a battery is swallowed, immediate medical attention must be sought. There is a danger of burns from battery acid.
If a battery leaks, avoid physical contact with the battery acid, and wear protective gloves if necessary. If you do touch battery acid, rinse the affected areas with abundant clear water straight away and seek medical assistance immediately. There is a danger of burns from battery acid.
NOTICE – Risk of Damage to Material and Property
■ Lay the connecting cable in such a way that it does not become squashed or bent and does not come into contact with hot surfaces.
■ Switch off the device and pull the mains plug out of the socket if an error occurs during operation or before a thunderstorm.
■ Always switch off the device fi rst be- fore the mains plug is pulled out of the plug socket. When you pull the mains plug out of the plug socket, always pull on the mains plug and never the mains cable!
■ Never pull or carry the device by the connecting cable.
■ Do not use the device in the immediate vicinity of devices which operate using short waves or microwaves. Maintain a minimum gap of 2 metres.
■ Protect the device from other heat sources, naked flames, sub-zero temperatures, persistent moisture and impacts.
■ Do not lay or place any heavy objects on the device.
■ The LEDs of the LED indicator cannot be replaced.
■ Use only original accessories from the manufacturer in order to guarantee that there is no interference that may prevent the device from working and to avoid possible damage.
NOTICE – Risk of Damage to Material and Property from Batteries
■ Use only the battery type specified in the technical data.
■ Take batteries out of the remote control when they are dead or if you will not be using the remote control for a prolonged period. This will prevent any damage caused by leaks.
■ Do not use the remote control if a battery has leaked. Remove dead batteries from the battery compartment immediately.
FUNCTIONAL OVERVIEW AND OPERATING ELEMENTS
Safety Device
The device has a safety switch (32) in the main unit (9) (Picture D). The device can only be switched on if the front cover (4) is fitted correctly and the safety switch is depressed as a result (automatic switch-off function deactivated). If the front cover is removed during operation, the automatic switch-off function is activated and the device switches off.
Remote Control
The device can be controlled both via the control panel (20) and via the remote control (Picture C):
$$ \text { Timer } = \text { Timer } (2 3) $$
$$ \text { On / Off } = \text { On / Off } (2 1) $$
$$ I / I I / I I I = \text { Speed level } I / I I / I I I $$
$$ \text { Child Lock } = \text { Child Lock (28) } $$
$$ \text { Circulate } = \text { Fan Speed (22) } $$
$$ \text { S t e r i l i z e } = \mathrm{UVlamp} (2 7) $$
$$ \text { Auto } = \text { Auto mode } (2 4) $$
$$ \text { Ionizer } = \text { Anion (26) } $$
$$ \text { Sleep } = \text { Sleep mode } (2 5) $$
The replace reminder cannot be reset via the remote control.
Control Panel
Touch the relevant fi eld to activate or deactivate the individual function.
When the operating fi elds fl ash, this indicates which functions are activated.
On/Off (21)
Switch the device on / off
Fan speed (22) / Circulate
Set the speed level
The fan of the device has three speed levels. They can be set by touching the Fan Speed fi eld several times. The level is indicated by the various fan symbols on the fan speed display (17).
Timer (23)
Activate / set / deactivate timer
The device has an 8-hour timer. You can set it by touching the Timer fi eld several times (01H to 08H – Off). While setting, the possible options are shown on the g/m^3 display (16) of the particulate value.
Auto mode (24) / Auto
Activate / deactivate AUTO mode
When this function is active, the device measures the particulate concentration via the sensor (11) and automatically selects a suitable speed. In AUTO mode, the speed level accordingly cannot be adjusted manually.
EN
Sleep mode (25) / Sleep
Activate / deactivate night mode
When this function is active, the display area (19) and the control panel (20) switches off apart from the Sleep mode fi eld. The fan runs at the lowest speed level. To deactivate the night mode, the fi eld must be touched twice: once to activate the touch display (2) and once more to deactivate the function.
Anion (26) / Ionizer
Activate / deactivate ionizer
If this function is active, negatively charged ions which bind dirt particles from the air are released.
UV lamp (27) / Sterilize
Activate / deactivate UV-C lamp
When this function is active, the UV-C lamp (7) in the device is activated and the air is also disinfected by the light.
Child lock (28)
Activate / deactivate child lock
When this function is active, all operating elements are locked. As well as the fi eld fl ashing, the Child Lock display (30) appears.
To deactivate the function, touch the field for around 5 seconds. The Child Lock display appears.
Replace Filter (29)
Reset replace fi lter reminder
As soon as the fi Iters reach the end of their useful life, the Replace fi Iters reminder (14) appears in the display area (19). Once the fi Iters have been changed, touch the fi eld for around 5 seconds to reset the replace fi Iter reminder. The Replace Filters display goes out.
Particulate Display and LED Indicator
The particulate display (15) presents the particulate concentration in the form of four bars in different colours:
green: very low
yellow: low
orange: average
red: high
The LED indicator (3) lights up in the corresponding colour so that the result is immediately apparent.
BEFORE INITIAL USE
- Remove any possible fi lms, stickers or transport protection from the device. Never remove the rating plate and any possible warnings!
- Unpack the fi Iters :
- Grasp the top end on both sides between the main unit (9) and the front cover (4).
- Press against the housing with your thumbs, then detach and remove the front cover from the main unit.
- Remove the aluminium pre-filter (5) and the combination filter (6) from the main unit.
- Unpack the fi Iters and insert them back into the device. When you do this, ensure the correct sequence and correct fi t (fi rst the combination fi Iter, then the aluminium pre-fi Iter; loops must be facing forwards).
- First insert the front cover with the locking lugs at the bottom into the recesses on the main unit, and then press it against the main unit at the top. You must hear and feel it engage.
- Insert batteries into the remote control (see the "Inserting / Replacing Batteries" chapter).
INSERTING / REPLACING BATTERIES
Before inserting the batteries, check whether the contacts in the remote control and on the batteries are clean, and clean them if necessary.
- Slide the battery compartment cover in the direction of the arrow and take it off.
- Take out used batteries and insert two new ones (1.5 V; AAA). Pay attention to the correct polarity (+ / -).
- Insert the battery compartment cover in the remote control and slide it shut. You must hear and feel it engage.
Replace the batteries if the power of the remote control starts to wane.
USE
Please Note!
■ The device must have clearance of at least 30 cm above it and to all sides and be placed on a dry, even, solid and moisture-resistant surface.
■ Before use, ensure that the filters are correctly fitted.
■ Only connect the device to a plug socket that is properly installed and matches the technical data of the device. The plug socket must also be readily accessible after connection so that the connection to the mains can quickly be isolated.
- Do not operate the device unsupervised so that you can intervene immediately if there are any faults.
- Position the device at the required location.

For effi cient operation we recommend closing the windows and doors of the room.
- Fully unwind the connecting cable and connect it to an easily accessible plug socket. You will hear a beep. All elements on the touch display (2) light up and go out, with the exception of the On/Off field (21) on the control panel (20). The device is in standby mode.
- Touch the On/Off field to switch on the device. The touch display lights up permanently and the device starts to operate.
The function Auto mode (24) and the ionising function Anion (26) are preset.
- Adjust the settings of the device to suit your individual needs (see the "Functional Overview and Operating Elements" chapter).
- If the device is no longer going to be used, switch off the device via the On/Off fi eld and pull the mains plug out of the plug socket.
CLEANING AND STORAGE
Please Note!
■ The filters cannot and must not be cleaned.
- Do not use any sharp or abrasive cleaning agents or cleaning pads to clean the device. They may damage the surfaces.
- Make sure that the device is not connected to the mains power.
- Wipe down the device with a soft, damp cloth.
- Store the device in a clean, dry place so that it is protected and is out of the reach of children and animals when it is not in use.
EN
Cleaning the Particulate Sensor
The particulate sensor should be cleaned regularly (roughly every two months) in order to ensure that the device works in the optimum way.
- Press the locking lug towards the protective cover (11) of the sensor and take off the protective cover.
- Clean the sensor (35) and the air inlet (33) and outlet (34) of the sensor with a damp cloth or cotton bud (Picture E).
- Then dry everything with a dry cloth or cotton bud.
- Insert the protective cover into the main unit (9). You must hear and feel it engage.
Cleaning the UV-C Lamp
Please Note!
■ The UV-C lamp will become hot during use. Allow the UV-C lamp to cool sufficiently after using the device. There is a danger of burns!
- Take the front cover (4) off the main unit (9).
- Remove the filters from the main unit.
- Wipe down the UV-C lamp (7) with a dry duster.
NOTICE: Make sure that you do not touch the UV-C lamp with your fingers! - Reassemble the device. When you do this, ensure the correct sequence of the combination filter (6) and aluminium pre-filter (5) (see the "Before Initial Use" chapter).
MAINTENANCE
The device must be kept operationally ready. It indicates via the Replace Filters display (14) if the fi Iters need to be replaced. The intervals at which the fi Iters need to be replaced depend on the air quality and the frequency of use of the device.

More replacement parts can be purchased via the following website: www.dspro.de/kundenservice
- Grasp the top end on both sides between the main unit (9) and the front cover (4).
- Press against the housing with your thumbs, then detach and remove the front cover from the main unit.
- First pull the aluminium pre-fi Iter (5) and then the combination filter (6) out of the main unit by the loop.
- Insert a new combination fi lter into the main unit. When you do this, make sure that the loop and thus the blue side is pointing forwards.
- Insert a new aluminium pre-fi lter into the main unit. When you do this, make sure that the side with the loop is pointing forwards.
- First insert the front cover with the locking lugs at the bottom into the recesses on the main unit, and then press it against the main unit at the top. You must hear and feel it engage.
- Switch on the device and reset the replace filter reminder by touching the Replace filters field (29).
TROUBLESHOOTING
If the device does not work properly, check whether you are able to rectify the problem yourself. If the problem cannot be solved with the steps below, contact the customer service department.

Do not attempt to repair an electrical device yourself!
The device does not work.
The mains plug is not inserted in the plug socket correctly.
▶ Correct the fit of the mains plug.
The plug socket is defective.
▶ Try another plug socket.
There is no mains voltage.
▶ Check the fuse of the mains connection.
The front cover (4) is not fitted correctly in the main unit (9). / The safety switch (32) is not depressed.
▶ Correct the fit of the front cover.
The device has not been switched on via the On/Off field (21).
▶ Press the On/Off field.
The fuse in the fuse box is triggered.
Too many devices connected to the same circuit.
▶ Reduce the number of devices in the circuit.
The remote control does not work.
The batteries are empty.
▶ Replace the batteries.
There are obstacles between the remote control and the infrared sensor in the device.
▶ Remove possible obstacles or aim the remote control at the sensor in the device from a different position.
The distance between the remote control and the device is too great.
▶ Reduce the distance.
DISPOSAL

Dispose of the packaging material in an environmentally friendly manner so that it can be recycled.

The batteries should be removed before disposing of the remote control and disposed of separately from it at suitable collection points.
This device is governed by the European Directive 2012/19/EU on waste electrical and electronic equipment (WEEE). Do not dispose of this device as normal domestic waste, but rather in an environmentally friendly manner via an offi cially approved waste disposal company.
EN
TECHNICAL DATA
Article number: 09997
ID of operating instructions: Z 09997 M DS V2 0221 dk
Device
Model number: URHAF-06
Power supply: 220 - 240 V \~ 50 / 60 Hz
Power: max. 85 W
Max. air throughput: 420 m³/h
Area of application: 50 – 70 m ^2
Noise level: 50 - 60 dB
Protection class: I
Remote control
Power supply: 3 V (2 x 1.5 V battery; AAA)

All rights reserved.
SOMMAIRE
Composition 23
Aperçu général 23
Symboles 25
Appareil (illustration A)
MISE EN PLACE / REEMPLACEMENT DES PILES
WAARSCHUWING – Brand- gevaar
WAARSCHUWING – Verwon- dingsgevaar
UV-C-lamp activeren/deactiveren
Kinderslot activeren/deactiveren
De contactdoos is defect.