
08374 - Radio EasyMaxx - Free user manual and instructions
Find the device manual for free 08374 EasyMaxx in PDF.
| Product type | Design radio |
| Brand | EasyMaxx |
| Model | 08374 |
| Power supply | 6 V DC via USB mains adapter (not included) or 4 C batteries (1.5 V) |
| Speaker | 4 Ω, 2 W |
| Supported audio formats | MP3, WAV |
| Radio bands | FM 87.5 – 108 MHz, AM 520 – 1620 kHz |
| Connections | AUX IN (3.5 mm jack), headphone output (3.5 mm jack), USB port, SD card reader |
| Wireless connectivity | Bluetooth |
| Main functions | FM/AM radio, USB/SD/AUX playback, Bluetooth, headphone listening |
| Controls | On/off, functions (FUNC), navigation (PREV/NEXT), play/pause, stop, volume, tuning |
| Antenna | Adjustable telescopic antenna |
| Operating temperature | 5°C to 35°C |
| Care and cleaning | Wipe with a clean, slightly damp cloth; do not immerse in water |
| Safety | Use by children aged 8 and over under supervision; risk of electric shock; do not cover the device |
| Package contents | Radio, USB cable (USB plug to female connector), instruction manual |
| Spare parts and repairability | Use only original accessories; repairs by the manufacturer or a specialized workshop |
| General information | Non-professional domestic use; warranty excludes normal wear and improper use |
Frequently Asked Questions - 08374 EasyMaxx
User questions about 08374 EasyMaxx
0 question about this device. Answer the ones you know or ask your own.
Ask a new question about this device
Download the instructions for your Radio in PDF format for free! Find your manual 08374 - EasyMaxx and take your electronic device back in hand. On this page are published all the documents necessary for the use of your device. 08374 by EasyMaxx.
USER MANUAL 08374 EasyMaxx
natural_image
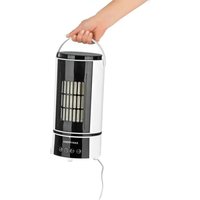
White vintage portable radio with a metal handle and antenna, no visible text or symbols on the device itself.08374 / 06842
DE EN FR NL
Gebrauchsanleitung
ab Seite 3
Operating Instructions
starting on page 13
Mode d'emploi
Safety Instructions 14
Items Supplied 16
Device Overview 16
Power Supply 17
Use 18
Cleaning and Storage 20
Troubleshooting 21
Technical Data 22
Disposal 22
Dear Customer,
We are delighted that you have chosen this designer radio.
Before using the device for the first time, please read through these operating instructions carefully and keep them for future reference and other users. They form an integral part of the device.
The manufacturer and importer do not accept any liability if the information in these operating instructions is not complied with.
If you have any questions about the device and about spare parts/accessories, please contact the customer service department via our website: www.service-shopping.de
Explanation of the Symbols


Danger symbols: These symbols indicate risks of injury (e.g. from electricity or fire). Read through the associated safety instructions carefully and follow them.
Supplementary information
Read operating instructions before use.
Circuit symbol for direct current
Protection class II
Only use indoors.
Explanation of the Signal Words
DANGER warns of serious injuries and danger to life
WARNING warns of possible serious injuries and danger to life
CAUTION warns of slight to moderate injuries
NOTICE warns of damage to property
Intended Use
- The device is intended to be used for receiving analogue radio stations and for playing audio fi les (mp3, WAV).
- The device is for personal domestic use only and is not intended for commercial applications.
- The device should only be used as described in these instructions. Any other use is deemed to be improper.
- The following are excluded from the warranty: all defects caused by improper handling, damage or unauthorised attempts at repair. This also applies to normal wear and tear.
Safety Instructions
This device may be used by children aged 8 and over and by people with reduced physical, sensory or mental abilities or a lack of experience and knowledge if they are supervised or have received instruction on how to use the device safely and have understood the dangers resulting from this.
■ Children must not play with the device.
- Cleaning, user maintenance and the insertion / changing of batteries may not be performed by children, unless they are older than 8 years of age and are supervised.
■ Children younger than 8 years of age and animals must be kept away from the device!

WARNING – Danger of Injury
- Danger of burns from battery acid! Batteries can be deadly if swallowed. Keep batteries and the device out of the reach of children and animals. If a battery is swallowed, seek medical assistance immediately.
- Danger of burns from battery acid! If a battery has leaked, do not allow your skin, eyes and mucous membranes to come into contact with the battery acid. If you touch battery acid, rinse the affected area with abundant fresh water immediately and contact a doctor as soon as possible.
- Danger of hearing damage! The volume of the music should never be too loud. This can cause lasting hearing damage. Even only a short period of loud noise can cause hearing damage. The volume should always be kept at a pleasant level.

DANGER – Danger of Electric Shock
- Do not immerse the device or the connecting cable in water or other liquids. If the device falls into water while it is connected to the mains power, switch off the power supply immediately. Do not attempt to pull the device out of the water while it is still connected to the mains power!
- Never touch the device and the connecting cable with wet hands when these components are connected to the mains power.

WARNING – Danger of Fire
- Do not use the device in rooms containing easily ignitable or explosive substances. Never operate the device in the vicinity of a gas source.
- Do not cover the device during operation and make sure there is sufficient air circulation.
NOTE – Risk of Damage to Material and Property
- Use and store the device only in dry indoor rooms. Do not use the device in rooms with high humidity.
- Wait before starting up or connecting the device to a mains power network if the device is brought from a cold environment into a warm one. The condensation which is produced may possibly destroy the device. Once the device has reached room temperature, you can start operating it.
- Do not immerse the device in water or other liquids and make sure that it cannot fall into water. Do not place any containers filled with liquid, for example vases, on or directly next to the device.
- Place the device on a dry surface, a sufficient distance away from heat sources (for example ovens and heating systems).
- Protect the device from: impacts, heat, direct sunlight, frost, moisture and wet conditions.
- Keep the device away from magnetic data storage devices in order to avoid any loss of data caused by the magnetic fi eld of the device!
- Do not place any heavy objects on the device.
- Lay the connecting cable in such a way that it does not become squashed or bent and does not come into contact with hot surfaces.
In the event of damage/faults, switch the device off / disconnect it from the mains power immediately. Do not start using the device if there are visible signs of damage or liquid has penetrated into the device.
■ Remove the mains adapter from the plug socket before a thunderstorm.
- Do not make any modifications to the device. If the device is damaged, it must be replaced by the manufacturer, customer service department or a similarly qualified person (e.g. specialist workshop).
■ Use only original spare parts from the manufacturer. If accessory parts which are not authorised by the manufacturer are used, all warranty and guarantee claims are void.
NOTICE – The Proper Handling of Batteries
Take the batteries out of the device when they are dead or if you will not be using the device for a prolonged period to prevent damage caused by leaking.
■ Remove batteries which have leaked from the battery compartment immediately and clean the contacts.
■ Non-rechargeable batteries must not be charged or reactivated by other means.
- Batteries must not be taken apart, thrown into a fire, immersed in liquid or short-circuited.
Items Supplied

PLEASE NOTE!
■ WARNING – Danger of Suffocation! Keep children and animals away from plastic bags and fi lms.
1 x radio
1 x cable (USB connector to barrel connector)
1 x operating instructions
Check the items supplied for completeness and transport damage. If you find any damage, do not use the device (!), but rather contact the customer service department.
Device Overview
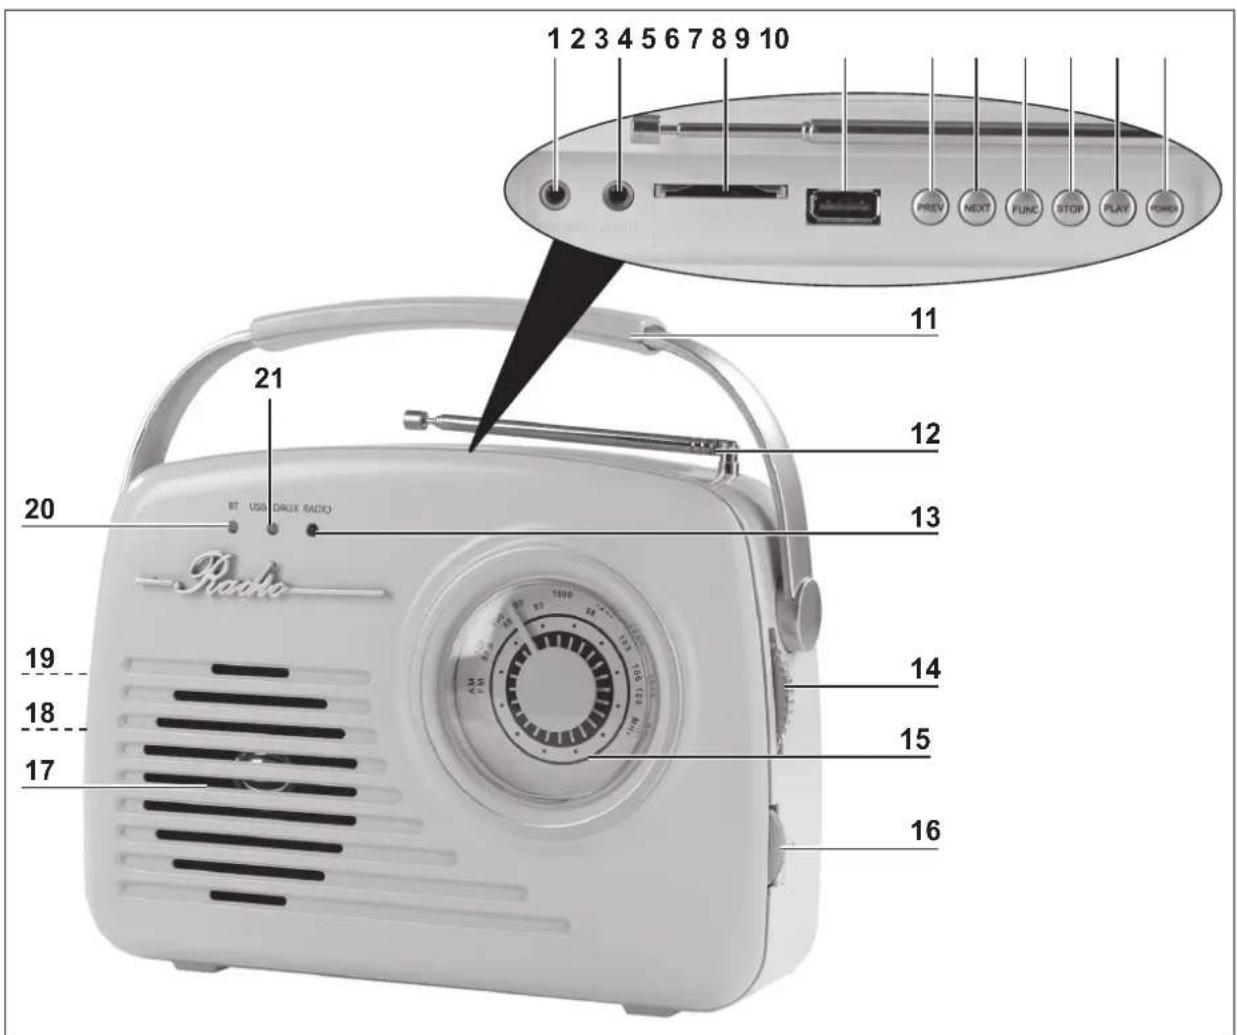
1 PHONES Headphones output: 3.5 mm jack
2 AUX IN Audio input: 3.5 mm jack
3 SD CARD Slot for SD cards
4 USB USB socket
5 PREV Press briefly: go to previous track; hold down: rewind
6 NEXT Press briefly: go to next track; hold down: fast-forward
7 FUNC Press repeatedly to switch between: Bluetooth ^ connection, USB medium, SD card, external device (AUX), radio; in radio mode: switch from FM to AM
8 STOP In USB/SD mode: stop playback
9 PLAY Start / pause playback; in BT mode: stop
10 POWER On/Off
11 Handle
12 Telescopic aerial that can be rotated / pulled out
13 RADIO Operating lamp: lights up when the radio is switched on
14 TUNING Turn to set the frequency
15 Frequency display
16 VOLUME Volume control
17 Speaker
18 IN DC 6V On the back: socket for connecting a mains adapter
19 On the back: battery compartment
20 BT Operating lamp: flashes while searching for a Bluetooth®-enabled device, lights up constantly when a connection has been made to a Bluetooth®-enabled device
21 USB/SD/AUX Lit up blue: USB is activated; lit up red: SD card is activated: lit up violet: AUX is activated
Power Supply
The device can both be operated with batteries and be connected to the mains power supply.
Inserting / Changing Batteries

PLEASE NOTE!
■ Always replace all batteries together. Do not use batteries of different types or brands, or batteries with different capacities. When replacing batteries, ensure the correct polarity (+ / −).
Before inserting the batteries, check whether the contacts in the battery compartment and on the batteries are clean, and clean them if necessary.
■ Use only the battery type specified in the technical data, preferably powerful alkaline batteries.
You require 4 Baby C batteries (1.5 V).
- Remove the battery compartment cover: Press the catch above the battery compartment (19) towards the battery compartment and flip it open.
- Insert four Baby C batteries (1.5 V) into the battery compartment, or replace old batteries with new ones. Pay attention to the correct polarity (+ / -).
- Insert the battery compartment cover into the battery compartment and flip it shut.
Replace the batteries when the power of the device starts to wane.
Mains Power Mode

PLEASE NOTE!
- Only plug the mains adapter into a plug socket once the cable has been connected to the device.
- Do not supply power to the device via a computer because the high currents that may exist could damage the computer.
For mains power mode, the items supplied with the device include a cable (USB connector to barrel connector). A USB mains adapter is also required.
- Plug the barrel connector of the cable which is supplied into the IN DC 6V socket (18) on the device.
- Plug the USB connector of the cable into the USB mains adapter.
- Connect the USB mains adapter to an easily accessible plug socket whose voltage corresponds to the specification on the rating plate of the USB mains adapter. The plug socket must also be readily accessible after connection.

The device can alternatively be operated with a standard mains adapter (6 V DC, max. 1 A) and a cable with a barrel connector ( ⊙—⊕—⊕ ) (not supplied with the device). This is plugged into the IN DC 6V socket (18) of the device.
Use
The device can be used as a
• conventional radio;
- playback device for SD cards and storage media with a USB connector;
- speaker for external players (e.g. MP3 players) which are connected via Bluetooth or a jack plug.
The device also has a socket for headphones.
Radio
- To obtain the best possible radio reception, extend the telescopic aerial (12).
- Switch on the device by pressing the POWER button (10).
- Keep pressing the FUNC button (7) until the RADIO operating lamp (13) lights up. The FM radio reception (VHF) is switched on.
- To switch to AM reception (long, medium and short waves), press the FUNC button again.
- Select a radio station by turning the TUNING dial (14). Tilt and rotate the telescopic aerial to improve the reception if necessary.
- Adjust the volume with the VOLUME control (16).
Playback via Bluetooth®
NOTICE: Read the operating instructions for the Bluetooth®-enabled device.
- Switch on the device by pressing the POWER button (10).
- Keep pressing the FUNC button (7) until the BT operating lamp (20) lights up. The radio can now be found by the Bluetooth®-enabled device.
- Switch on Bluetooth® on the Bluetooth®-enabled device and start searching for available devices.
- Select "Design Radio" and connect. As soon as both devices are connected to one another, the BT operating lamp is lit constantly.
- The playback can be controlled both via the Bluetooth®-enabled device and via the PREV (5), NEXT (6), PLAY (9) buttons and the volume control (16) of the radio.
USB
- Make sure that the device is switched off. Press the POWER button (10) to switch off the device.
- Plug the USB connector of a storage medium into the USB socket (4).
- Switch on the device by pressing the POWER button.
- Keep pressing the FUNC button (7) until the USB/SD/AUX operating lamp (21) lights up blue.
- Control the playback via the PREV (5), NEXT (6), STOP (8), PLAY (9) buttons and the volume control (16).
- Switch off the device before the USB connector is pulled out.
SD Card
- Make sure that the device is switched off. Press the POWER button (10) to switch off the device.
- Insert an SD card into the SD CARD slot (3).
- Switch on the device by pressing the POWER button.
- Keep pressing the FUNC button (7) until the USB/SD/AUX operating lamp (21) lights up red.
- Control the playback via the PREV (5), NEXT (6), STOP (8), PLAY (9) buttons and the volume control (16).
- Switch off the device before the SD card is pulled out.
Connecting External Devices with Jack Plug (AUX IN)

PLEASE NOTE!
- The radio and the external playback device must be switched off before they are connected to or disconnected from one another. Read the operating instructions for the playback device.
- Make sure that the playback device and the radio are switched off. Press the POWER button (10) to switch off the radio.
- Plug the 3.5mm jack plug of the playback device into the AUX IN socket (2) of the radio.
- Switch on the designer radio by pressing the POWER button (10).
- Keep pressing the FUNC button (7) until the USB/SD/AUX operating lamp (21) lights up violet.
- Switch on the playback device and control the playback via this device. The volume can be set via the VOLUME control (16) of the radio.
Connecting Headphones

WARNING!
- Danger of damage to hearing! A high volume which impinges on your ears for a lengthy period of time can cause permanent hearing damage. You should therefore avoid constant listening at a high volume via headphones or earphones!
- Use the volume control (16) to set the lowest volume.
- Plug the jack plug of the headphones or earphones into the PHONES headphones output (1) on the device.
- Set the volume you want.
Cleaning and Storage

PLEASE NOTE!
■ Make sure before any cleaning that the device is switched off and not connected to the mains power.
No liquid must be allowed to enter the device during cleaning. Never immerse the device in water!
- Do not use any corrosive or abrasive cleaning agents!
Wipe down the device with a clean, slightly damp cloth. Use mild cleaning agent if necessary.
If the device is not going to be used for a prolonged period, take out the batteries and disconnect the device from the mains power.
Store the device in a dry, clean, frost-free place that is protected from direct sunlight and cannot be accessed by children or animals.
Troubleshooting
If the device does not work properly, first check whether you are able to rectify the problem yourself. If the problem cannot be solved with the following steps, contact the customer service department.

Do not attempt to repair an electrical device yourself!
| Problem Possible cause Fix | ||
| No function. In mains power mode: The connecting cable is not connected correctly. | Correct the connection. | |
| In mains power mode: The plug socket is defective. | ||
| In mains power mode: No mains voltage is present. | ||
| In battery mode: The batteries are too weak or inserted incorrectly. | ||
| No sound can be heard. | The volume is set to a minimum level. | Check the volume setting. |
| If an external device is connected: The devices are not connected to one another correctly. The external device is not switched on or its volume is too low. The battery output of the external device is too weak. | Check the connection of both devices and correct it if necessary. Switch on the external device and check its volume setting. Insert new batteries. | |
| Poor sound quality/interference | Interference from electronic devices such as televisions, stereo systems, mobile phones, computers etc. | Keep the device away from electronic devices. |
| Radio operation: Steel or reinforced concrete in multi-storey buildings may block the radio signal. | Place the radio near a window. | |
| Radio operation: Interference may be caused by a nearby radio mast. | It may be helpful to use the extendable aerial. Try varying the length and angle of the aerial. | |
Technical Data
Article numbers: 06842 (mint); 08374 (vanilla)
Model number: SP-11
Voltage supply: • 6 V DC;
- 4 x Baby C batteries (1.5 V);
- Mains power connection via USB mains plug or mains adapter (6 V DC, max. 1 A) with jack/barrel connector—⊕—⊕
Speaker: 4 ohm; 2 W
Supported fi le formats: mp3, WAV
FM (VHF): 87.5 – 108 MHz
AM (LW, MW, SW): 520 – 1620 KHz
Connections: Sound: AUX IN jack ∅ 3.5 mm
Earphones: jack ∅ 3.5 mm
Mains adapter: jack / barrel connector⊖—●—⊕
SD Card
USB connector (A)
Operating temperature: 5°C – 35°C
Manual ID: Z 08374_06842 M DS V1 0618

DS Produkte GmbH hereby declares that the radio equipment type with the model number SP-11 complies with Directive 2014/53/EU. The complete text of the EU declaration of conformity is available at the following internet address:
Designated for sale in the following member states of the European Union:
| AT | √ | CZ | √ | ES | √ | GR | √ | IT | √ | MT | √ | RO | √ |
| BE | √ | DE | √ | FI | √ | HU | √ | LT | √ | NL | √ | SE | √ |
| BG | √ | DK | √ | FR | √ | HR | √ | LU | √ | PL | √ | SI | √ |
| CY | √ | EE | √ | GB | √ | IE | √ | LV | √ | PT | √ | SK | √ |
Disposal

Dispose of the packaging material in an environmentally friendly manner and take it to a recycling centre.

Dispose of the device in an environmentally friendly manner at a recycling centre for used electrical and electronic devices.

Batteries should be removed prior to disposal of the device and disposed of separately. To protect the environment, non-rechargeable and rechargeable batteries must not be disposed of with normal household waste, but must be taken to suitable collection points.
Customer Service / Importer
DS Produkte GmbH
Am Heisterbusch 1 • 19258 Gallin • Germany
Tel.: +49 38851 314650
(Calls to German landlines are subject to charges. The cost varies depending on the service provider.)
All rights reserved.
Contenu
www.service-shopping.de
WAARSCHUWING – Brandgevaar
- Gebrauchsanleitung
- Operating Instructions
- Mode d'emploi
- Explanation of the Symbols
- Explanation of the Signal Words
- Intended Use
- Safety Instructions
- WARNING – Danger of Injury
- DANGER – Danger of Electric Shock
- WARNING – Danger of Fire
- NOTE – Risk of Damage to Material and Property
- NOTICE – The Proper Handling of Batteries
- Items Supplied
- PLEASE NOTE!
- Device Overview
- Power Supply
- Inserting / Changing Batteries
- You require 4 Baby C batteries (1.5 V).
- Mains Power Mode
- Use
- Radio
- Playback via Bluetooth®
- USB
- SD Card
- Connecting External Devices with Jack Plug (AUX IN)
- Connecting Headphones
- WARNING!
- Cleaning and Storage
- Troubleshooting
- Do not attempt to repair an electrical device yourself!
- Technical Data
- Disposal
- Customer Service / Importer
- Contenu
- WAARSCHUWING – Brandgevaar
Brand : EasyMaxx
Model : 08374
Category : Radio