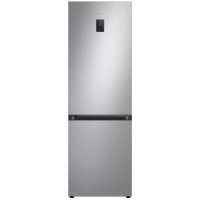
SAMSUNG RB34T671DSA - Refrigerator

RB34T671DSA - Refrigerator SAMSUNG - Free user manual and instructions

Find the device manual for free RB34T671DSA SAMSUNG in PDF.

📄 208 pages English EN Download 💬 AI Question 11 questions ⚙️ Specs
Notice SAMSUNG RB34T671DSA - page 3
Pick your language and provide your email: we'll send you a specifically translated version.
Product type Fridge-freezer
Brand Samsung
Model RB34T671DSA
Dimensions (H x W x D) 1750 x 595 x 650 mm
Net weight 70 kg
Total capacity 340 L
Energy class E
Annual consumption 200 kWh/year
Noise level 40 dB(A)
Power supply 220-240 V, 50 Hz
Voltage 220-240 V
Frequency 50 Hz
Main functions No Frost, rapid cooling, holiday mode, door alarm
Cooling type No Frost
Defrost Automatic
Interior lighting LED
Shelf material Tempered glass
Number of shelves 4 in the fridge
Number of vegetable drawers 2
Freezer type Bottom drawer compartment
Maintenance and cleaning Clean with a soft cloth and warm water. Automatic defrost.
Safety Open door alarm, child lock (depending on model)
Available spare parts Handles, gaskets, drawers, hinges
User repairability Handles, gaskets, drawers, hinges (replacement possible)
Warranty 2 years (parts and labor), 10 years on compressor

Frequently Asked Questions - RB34T671DSA SAMSUNG

How to reverse the refrigerator door?
Door reversal requires at least two people. Unplug the appliance, remove the top cover, disconnect the cables, then remove the top, middle, and bottom hinges. Reassemble in reverse order. Refer to the "Hinge Replacement" section of the manual for more details. Wear safety gloves and use a Phillips screwdriver and a socket wrench.
How to replace the door handle?
Remove the screw covers with a flathead screwdriver, then unscrew the screws with a Phillips screwdriver. Remove the old handle and install the new one, tightening the screws securely. Be careful not to scratch the door and ensure there is no gap between the handle and the door.
How to replace the door gasket?
Open the door and remove the old gasket by pulling it. Attach the new gasket by pressing firmly to ensure it adheres perfectly. Make sure there is no gap to prevent cold air leaks.
How to remove and reinstall the freezer drawers?
Gently lift the front of the drawer and slide it out to remove it. To reinstall, insert it into the rails and push it all the way in. Check that it is properly aligned on the rails.
Where can I find spare parts for my Samsung refrigerator?
Go to the official Samsung website (samsung.com) and enter the model code RB34T671DSA. You will find available parts such as handles, gaskets, drawers, and hinges. The model code is on the barcode label at the bottom left of the appliance. Check the exact name of the part before ordering.
What to do if my refrigerator stops cooling?
First check that the appliance is plugged in and the thermostat is set correctly. Ensure the door closes properly and the gasket is in good condition. If the problem persists, clean the ventilation grilles at the back. If nothing works, contact an authorized Samsung service center.
How to clean the interior of the refrigerator?
Unplug the appliance. Remove all food and shelves. Clean the interior with a soft cloth dampened with warm water and a little mild detergent. Rinse with a damp cloth and dry. Do not use abrasive products.
Can I repair some parts myself?
Yes, you can replace handles, gaskets, drawers, and hinges yourself. For hinge replacement, extreme caution is required as the doors are heavy. Any other repair should be done by a certified professional to avoid voiding the warranty.
What is the warranty on this refrigerator?
The standard warranty is 2 years on parts and labor, and 10 years on the compressor. Any unauthorized repair voids the warranty. Keep your purchase receipt as proof.
How to adjust the refrigerator and freezer temperature?
Use the control panel (often touch or button) located on the front. The recommended temperature is 3 to 5°C for the refrigerator and -18°C for the freezer. Refer to the manual for specific settings for your model.

User questions about RB34T671DSA SAMSUNG

1 question about this device. Answer the ones you know or ask your own.

Ask a new question about this device

Your email remains private: it is only used to notify you if someone answers your question.

The freezer constantly displays an open door alert even though the door is closed
Frequently Asked Questions - 8 d
Response Notice-Facile

The door sensor of the RB34T671DSA freezer triggers a false alert (the model has a built-in open door alarm). Here’s how to diagnose and resolve this issue:

Checks to perform

  • Check the door seal - The seal of the freezer (lower compartment, drawer) may be damaged, worn, or misaligned. The RB34T671DSA manual emphasizes this point: check for any gaps that would prevent a proper closure. A defective seal prevents the sensor from detecting the closure.
  • Close the door completely - Push the freezer drawer until it clicks into place. Sometimes, a slight vibration or misalignment of the drawer (buildup of frost or dirt on the slides) simulates a semi-open door.
  • Clean the slides and hinges - Frost or dust buildup around the lower freezer can prevent an airtight closure.

Replacing the seal (as a preventive measure)

According to the RB34T671DSA manual, the door seal is among the parts you can replace yourself. If the diagnosis shows that it is damaged or worn, replacement is often the simplest and most economical solution before contacting customer service.

If after these checks the alarm persists, the door sensor itself may be defective - a customer service intervention will then be necessary (the model comes with a 2-year parts and labor warranty).

Respond (be the first)

Download the instructions for your Refrigerator in PDF format for free! Find your manual RB34T671DSA - SAMSUNG and take your electronic device back in hand. On this page are published all the documents necessary for the use of your device. RB34T671DSA by SAMSUNG.

USER MANUAL RB34T671DSA SAMSUNG

User servicing manual

  1. You can check where to buy replacement parts at http://samsung.com
  2. Visit the part purchase site and enter the model code of your product to check the parts available for purchase. The model code is labelled on the outer side of your product.
  3. You can check the model code and version on the barcode label at the bottom left of the product.
  4. For replacement parts, make sure the part name matches that of the illustration in this manual.
  5. User-serviceable parts are limited to handles (some models only), gaskets, drawers, and hinges.

NOTE

Following the repair by a non-authorised service provider, self-repair or non-professional repair of the product, Samsung is not liable for any damage to the product, any injury or any other product safety issue caused by any attempt to repair the product which does not carefully follow these repair and maintenance instructions. Any damage to the product caused by an attempt to repair the product by any person other than a Samsung certified service provider will not be covered by the warranty.

CAUTION

  • The part name listed on the site may differ from that in this manual. Please make sure you choose the right part name.
  • Replacing hinges requires extreme caution because it involves detaching the door.
  • Be sure to wear safety gloves while making repairs.

English

The actual image and provided parts of the refrigerator may differ, depending on the model and the country.

Diagram of a refrigerator interior with numbered labels pointing to different compartments

01 Top hinge 02 Gasket
03 Drawer 04 Handles (Applicable models only)
05 Middle hinge 06 Barcode label
07 Bottom hinge

English

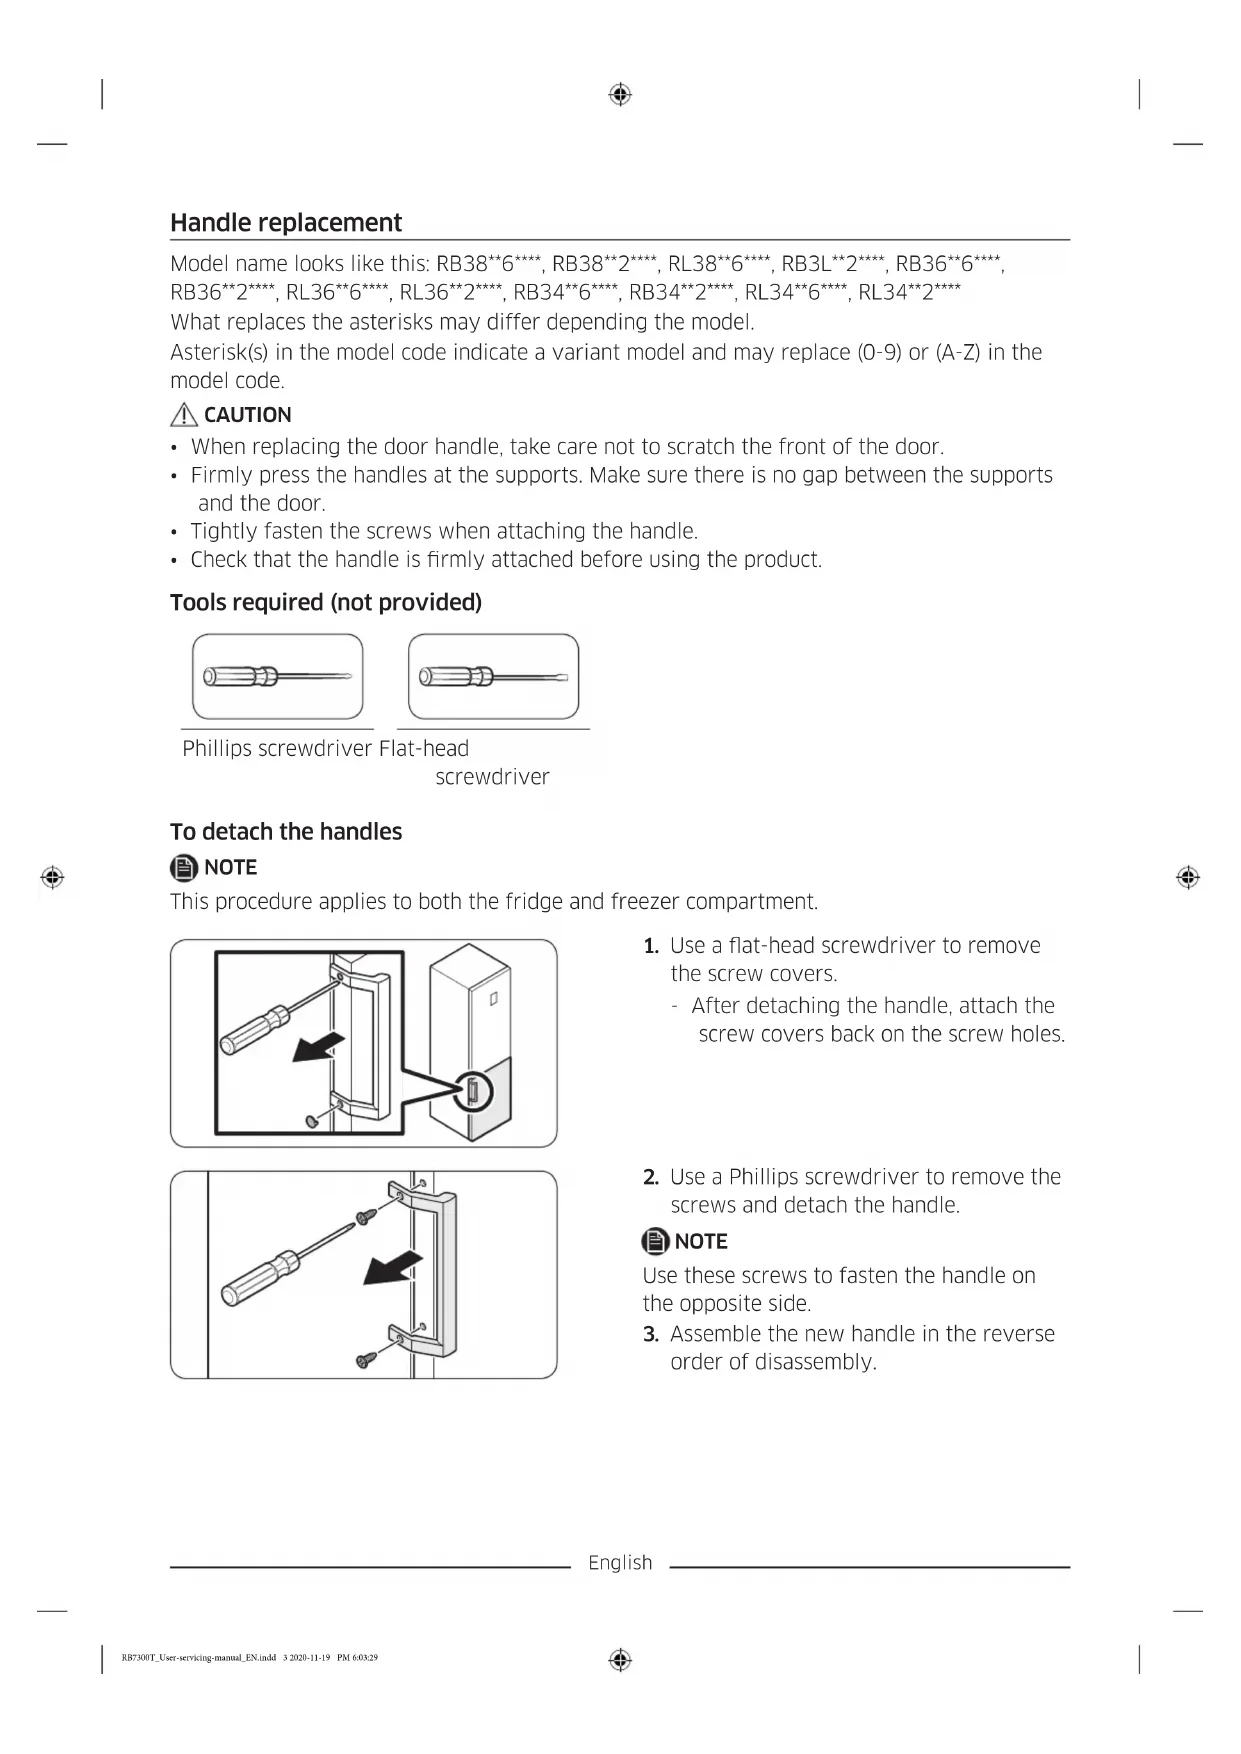
Handle replacement

Model name looks like this: RB38**6****, RB38**2****, RL38**6****, RB3L**2****, RB36**6****, RB36**2****, RL36**6****, RL36**2****, RB34**6****, RB34**2****, RL34**6****, RL34**2****

What replaces the asterisks may differ depending the model.

Asterisk(s) in the model code indicate a variant model and may replace (0-9) or (A-Z) in the model code.

SAMSUNG RB34T671DSA - Handle replacement - 1

CAUTION

  • When replacing the door handle, take care not to scratch the front of the door.
  • Firmly press the handles at the supports. Make sure there is no gap between the supports and the door.
  • Tightly fasten the screws when attaching the handle.
  • Check that the handle is firmly attached before using the product.

Tools required (not provided)

Two identical illustrations of a screwdriver with a flat blade, shown in two different angles (no text or symbols)

Phillips screwdriver Flat-head
screwdriver

To detach the handles

SAMSUNG RB34T671DSA - To detach the handles - 1

NOTE

This procedure applies to both the fridge and freezer compartment.

Diagram showing a screwdriver inserted into a door panel, with an arrow indicating the direction of movement.

Diagram showing a screwdriver inserted into a mechanical bracket with a black arrow indicating direction (no text or symbols present)

  1. Use a flat-head screwdriver to remove the screw covers.
  2. After detaching the handle, attach the screw covers back on the screw holes.
  3. Use a Phillips screwdriver to remove the screws and detach the handle.

SAMSUNG RB34T671DSA - NOTE - 3

NOTE

Use these screws to fasten the handle on the opposite side.

  1. Assemble the new handle in the reverse order of disassembly.

English

Gasket replacement

SAMSUNG RB34T671DSA - Gasket replacement - 1

CAUTION

Make sure you firmly attach the gasket. Otherwise, cold air from the refrigerator may leak.

To remove the gasket

Diagram of a door frame with an arrow indicating direction (no text or symbols)

Open the door and remove the gasket from the door.

To replace the gasket

Diagram of a door frame with an arrow pointing to the front panel (no text or symbols)

Attach a new gasket to the refrigerator door. Make sure there is no gap between the new gasket and the door.

Drawer replacement

SAMSUNG RB34T671DSA - Drawer replacement - 1

CAUTION

Check that the drawer is inserted properly into the rail during assembly.

To remove the drawer

Diagram of a plastic drawer with a black arrow pointing to it, no text or symbols present

Gently lift up the front of the drawer and slide it out.

To reattach the drawers

Reattaching the drawers follows the reverse order of their respective removal steps.

English

Hinge replacement

To replace the hinges, you must remove the doors first.

SAMSUNG RB34T671DSA - Hinge replacement - 1

CAUTION

- When removing the doors, take extreme caution because the doors are heavy. - Before replacing the hinges, put a soft pad such as cardboard on the floor to prevent scratches on the door when you place the doors down. - As the hinges must be handled carefully and replaced by two or more persons, we recommend you to call for professional technical service.

- If you remove the hinge without holding the door, the door may fall and cause injury. - Ensure that the shaft is firmly tightened on the hinge. - Check that the hinge is firmly attached to the cabinet. - Make sure the wire connectors are connected properly. - Be careful not to damage the wires when fastening the top cover.

SAMSUNG RB34T671DSA - CAUTION - 1

WARNING

- Tilting/laying the refrigerator requires a minimum of 2 people. - Disconnect the power cord before reversing the doors.

Tools required (not provided)

SAMSUNG RB34T671DSA - Tools required (not provided) - 1

SAMSUNG RB34T671DSA - Tools required (not provided) - 2

SAMSUNG RB34T671DSA - Tools required (not provided) - 3

Phillips screwdriver Flat-head screwdriver 11 mm spanner

SAMSUNG RB34T671DSA - Tools required (not provided) - 4

SAMSUNG RB34T671DSA - Tools required (not provided) - 5

SAMSUNG RB34T671DSA - Tools required (not provided) - 6

10 mm socket wrench 8 mm socket wrench 10 mm spanner

English

Reversing the door

SAMSUNG RB34T671DSA - Reversing the door - 1

NOTE

For the models with handles, reverse the handles first. (For detailed information, see the "Handle replacement (For models with bar handles)" section.)

Diagram of a battery or switch assembly with screw holes and a labeled component (no text or symbols present)

Diagram showing a device with labeled component A and an upward arrow indicating motion or force direction

Technical diagram of an electronic device showing internal components and wiring (no text or labels)

Technical diagram of a mechanical assembly with labeled components and directional arrows (no text or symbols)

  1. With the fridge door closed, use a Phillips screwdriver to remove the screws fastening the top cover (A).

  2. Gently lift the top cover (A) and place it on top of the refrigerator.

- Be careful when you lift the top cover (A). There is a wire connected underneath it.

  1. Remove the wire and the wire connector placed on the holder underneath the top cover.

- This step may not apply to some models.

SAMSUNG RB34T671DSA - NOTE - 5

CAUTION

Do not pull the connectors too hard.

  1. Disconnect the wire connector (A).
  2. This step may not apply to some models.

English

Technical diagram showing mechanical assembly with labeled components and directional arrow

Diagram of a refrigerator interior showing the door and shelf arrangement (no text or symbols)

A

  1. Use a socket wrench (8 mm) to remove the screws fastening the top hinge (A).

CAUTION

To prevent the fridge door from falling, make sure to hold it tight while removing the screws.

  1. Open the fridge door, and then lift the door to remove it from the middle hinge. Keep the door in a safe place.

CAUTION

The door is heavy. To prevent damage or injury, use caution while removing the door.

  1. Open the freezer door, and then use a socket wrench (8 mm) to remove the screws fastening the bottom hinge (A).

English

Diagram showing a door opening with labeled components A and B, including an inset view of a clip mechanism.

Technical diagram showing a mechanical clamp or bracket with screws and a directional arrow (no text or symbols)

  1. With the freezer door sitting on the bottom hinge (A), slowly pull the bottom hinge (A) to remove it from the holder on the bottom of the refrigerator. Once the bottom hinge (A) is removed from the holder, remove it from the freezer door, and then pull the freezer door down to remove it from the middle hinge (B).

CAUTION

To prevent the freezer door from falling, make sure to hold the freezer door tight until it is safely removed from the middle hinge (B).

  1. Use a Phillips screwdriver and socket wrench (10 mm) to remove the screws fastening the middle hinge (A).

  2. Reassemble in the opposite order of disassembly after replacing the top, middle, and/or bottom hinge.

CAUTION

• Make sure the wire connectors are connected properly.

- Be careful not to damage the wires when fastening the top cover

English

Guide de réparation

Diagram of a screwdriver inserted into a mechanical clamp or bracket, with a black arrow indicating direction (no text or symbols present)

Diagram showing a device with labeled component A and an upward arrow indicating motion or force direction

Technical diagram of an electrical connector with visible wiring and components (no text or symbols)

Technical diagram of a mechanical assembly with arrows indicating direction, no text or symbols present

Diagram of a refrigerator interior showing the door, rack, and storage panel with an upward arrow indicating direction (no text or symbols present)

A

Technical diagram showing a mechanical clamp or bracket with screws and a directional arrow (no text or symbols)

Diagram showing a screwdriver inserted into a mechanical bracket with a black arrow indicating direction (no text or symbols present)

Diagram showing a device with labeled component A and an upward arrow indicating motion or force direction

Technical diagram of an electrical connector with visible wiring and components (no text or symbols)

Technical diagram of a mechanical assembly with arrows indicating direction (no text or symbols present)

Diagram of a refrigerator interior showing the door and shelf, with an arrow indicating upward movement (no text or symbols present)

A

Technical diagram showing a mechanical clamp or bracket with screws and a directional arrow (no text or symbols)

Diagram of a screwdriver inserted into a mechanical clamp or bracket, with a black arrow indicating direction (no text or symbols present)

Diagram showing a device with labeled component A and an upward arrow indicating motion or force direction

Technical diagram of an electronic device showing internal components and wiring (no text or labels)

Technical diagram of a mechanical assembly with labeled components and directional arrows (no text or symbols)

Diagram of a refrigerator interior showing the door and shelf arrangement (no text or symbols)

A

Technical diagram showing a mechanical clamp or bracket with pins and a directional arrow (no text or symbols)

Diagram of a screwdriver inserted into a mechanical clamp or bracket, with a black arrow indicating direction (no text or symbols present)

Diagram showing a device with labeled component A and an upward arrow indicating motion or force direction

Technical diagram of an electrical connector with visible wiring and components (no text or symbols)

Technical diagram of a mechanical assembly with arrows indicating direction (no text or symbols present)

Diagram of a refrigerator interior showing the door and shelf arrangement (no text or symbols)

A

Technical diagram showing a mechanical clamp or bracket with screws and a directional arrow (no text or symbols)

Destornillador Phillips Destornillador de punta plana

Diagram of a screwdriver inserted into a mechanical bracket with a black arrow indicating direction (no text or symbols)

Diagram showing a device with labeled component A and an upward arrow indicating motion or force direction

Technical diagram of an electrical connector with visible wiring and components (no text or symbols)

Technical diagram of a mechanical assembly with arrows indicating direction (no text or symbols present)

Diagram of a refrigerator interior showing the door, rack, and storage panel with an upward arrow indicating direction (no text or symbols present)

A

A

Chave Phillips Chave de fendas

Remoção das pegas

SAMSUNG RB34T671DSA - Remoção das pegas - 1

NOTA

Diagram showing a screwdriver inserted into a mechanical clamp or bracket with a black arrow indicating direction (no text or symbols present)

Diagram showing a device with labeled component A and an upward arrow indicating motion or force direction

Technical diagram of an electrical connector with visible wiring and components (no text or symbols)

Technical diagram of a mechanical assembly with arrows indicating direction, no text or symbols present

Diagram of a refrigerator interior showing the door and shelf arrangement (no text or symbols)

A

Technical diagram showing a mechanical clamp or bracket with screws and a directional arrow (no text or symbols)

Mechanical assembly diagram showing a screwdriver inserted into a bracket with a black arrow indicating direction (no text or symbols)

A

Technical diagram of an electrical enclosure with visible wiring and components (no text or labels)

Technical diagram of a mechanical assembly with directional arrows indicating movement or force (no text or symbols present)

Diagram of a refrigerator interior showing the door and drawer with an arrow indicating upward motion (no text or symbols present)

A

Technical diagram showing a mechanical clamp or bracket with screws and a directional arrow (no text or symbols)

Mechanical assembly diagram showing a screwdriver inserted into a bracket with a black arrow indicating direction (no text or symbols)

Diagram showing a device with labeled component A and an upward arrow indicating motion or force direction

Technical diagram of an electrical connector with visible wiring and components (no text or symbols)

Technical diagram of a mechanical assembly with arrows indicating direction, no text or symbols present

Diagram of a refrigerator interior showing the door and shelf arrangement (no text or symbols)

A

Technical diagram showing a mechanical clamp or bracket with screws and a directional arrow (no text or symbols)

Diagram showing a screwdriver inserted into a mechanical bracket with a black arrow indicating direction (no text or symbols present)

Diagram showing a device with labeled component A and an upward arrow indicating motion or force direction

Technical diagram of an electrical connector with visible wiring and components (no text or symbols)

Technical diagram of a mechanical assembly with arrows indicating direction (no text or symbols present)

Diagram of a refrigerator interior showing the door and shelf arrangement (no text or symbols)

A

Technical diagram showing a mechanical clamp or bracket with screws and a directional arrow (no text or symbols)

Stjerneskrutrekker En flat skrutrekker

Diagram of a screwdriver inserted into a mechanical clamp or bracket, with a black arrow indicating direction (no text or symbols present)

Diagram showing a device with labeled component A and an upward arrow indicating motion or force direction

Technical diagram of an electrical connector with visible wiring and components (no text or symbols)

Technical diagram of a mechanical assembly with arrows indicating direction (no text or symbols present)

Diagram of a refrigerator interior showing the door, rack, and storage panel with an upward arrow indicating direction (no text or symbols present)

A

Technical diagram showing a mechanical clamp or bracket with screws and a directional arrow (no text or symbols)

Diagram showing a screwdriver inserted into a mechanical bracket with a black arrow indicating direction (no text or symbols present)

Diagram showing a device with labeled component A and an upward arrow indicating motion or direction

Technical diagram of an electrical connector with visible wiring and components (no text or symbols)

Technical diagram of a mechanical assembly with arrows indicating direction, no text or symbols present

Diagram of a refrigerator interior showing the door and shelf arrangement (no text or symbols)

A

Technical diagram showing a mechanical clamp or bracket with pins and a directional arrow (no text or symbols)

Diagram showing a screwdriver inserted into a mechanical clamp or bracket with a black arrow indicating direction (no text or symbols present)

Diagram showing a device with labeled component A and an upward arrow indicating motion or force direction

Technical diagram of an electrical connector with visible wiring and components (no text or symbols)

Technical diagram of a mechanical assembly with arrows indicating direction, no text or symbols present

Diagram of a refrigerator interior showing the door and shelf arrangement (no text or symbols)

A

Technical diagram showing a mechanical clamp or bracket with pins and a directional arrow (no text or symbols)

Diagram showing a screwdriver inserted into a mechanical clamp or bracket with a black arrow indicating direction (no text or symbols present)

Diagram showing a device with labeled component A and an upward arrow indicating motion or force direction

Technical diagram of an electrical connector with visible wiring and components (no text or symbols)

Technical diagram of a mechanical assembly with arrows indicating direction (no text or symbols present)

Diagram of a refrigerator interior showing the door and shelf arrangement (no text or symbols)

A

Technical diagram showing a mechanical clamp or bracket with screws and a directional arrow (no text or symbols)

Diagram showing a screwdriver inserted into a mechanical clamp or bracket with a black arrow indicating direction (no text or symbols present)

Otvorte dvierka a zložte z nich tesnenie.

Osadenie tesnenia

Diagram of a door frame with an arrow pointing to the front panel (no text or symbols)

Diagram showing a device with labeled component A and an upward arrow indicating motion or force direction

Technical diagram of an electrical connector with visible wiring and components (no text or symbols)

Technical diagram of a mechanical assembly with arrows indicating direction, no text or symbols present

Diagram of a refrigerator interior showing the door and shelf arrangement (no text or symbols)

A

Technical diagram showing a mechanical clamp or bracket with screws and a directional arrow (no text or symbols)

Diagram showing a screwdriver inserted into a mechanical bracket with a black arrow indicating direction (no text or symbols present)

Diagram showing a device with labeled component A and an upward arrow indicating motion or force direction

Technical diagram of an electrical connector with visible wiring and components (no text or symbols)

Technical diagram of a mechanical assembly with arrows indicating direction (no text or symbols present)

Diagram of a refrigerator interior showing the door, rack, and storage panel with an upward arrow indicating direction (no text or symbols present)

A

Technical diagram showing a mechanical clamp or bracket with screws and a directional arrow (no text or symbols)

Diagram showing a screwdriver inserted into a mechanical bracket with a black arrow indicating direction (no text or symbols present)

A

Technical diagram of a mechanical or electrical component with internal wiring and mounting brackets (no text or symbols)

Technical diagram of a mechanical assembly with labeled components and directional arrows (no text or symbols)

Diagram of a refrigerator interior showing the door and drawer with an arrow indicating upward motion (no text or symbols present)

A

Technical diagram showing a mechanical clamp or bracket with pins and a directional arrow (no text or symbols)

Mechanical assembly diagram showing a screwdriver inserted into a bracket with a black arrow indicating direction (no text or symbols)

Diagram showing a device with labeled component A and an upward arrow indicating motion or force direction

Technical diagram of an electrical connector with visible wiring and components (no text or symbols)

Technical diagram of a mechanical assembly with arrows indicating direction, no text or symbols present

Diagram of a refrigerator interior showing the door and shelf arrangement (no text or symbols)

A

Technical diagram showing a mechanical clamp or bracket with screws and a directional arrow (no text or symbols)

01 Gornja šarka 02 Zaptivna guma
03 Fioka 04 Ručke (samo odredeni modeli)
05 Srednja šarka 06 Oznaka sa bar-kodom
07 Donja šarka

Srpski

Zamena ručke

Naziv modela izgleda ovako: RB38**6****, RB38**2****, RL38**6****, RB3L**2****, RB36**6****, RB36**2****, RL36**6****, RL36**2****, RB34**6****, RB34**2****, RL34**6****, RL34**2****

Sadržaj koji zamenjuje zvezdice može se razlikovati u zavisnosti od modela.

Zvezdice u šifri modela ukazuju na varijantu modela i mogu biti zamenjene ciframa (0–9) ili slovima (A–Z).

SAMSUNG RB34T671DSA - Zamena ručke - 1

OPREZ

  • Prilikom zamene ručke na vratima, pazite da ne napravite ogrebotine na prednjoj strani vrata.
  • Čvrsto pritisnite ručke na potpore. Uverite se da između potpora i vrata nema razmaka.
  • Čvrsto pritegnite zavrtnje kada postavljate ručku.
  • Pre korišćenja proizvoda poverite da li je ručka dobro pričvršćena.

Potrebne alatke (nisu obezbedene)

Two identical illustrations of a screwdriver with a flat blade, shown in two different angles (no text or symbols)

Diagram showing a screwdriver inserted into a mechanical bracket with a black arrow indicating direction (no text or symbols present)

Otvorite vrata i sa njih skinite zaptivnu gumu.

Da biste zamenili zaptivnu gumu

Diagram of a door frame with an arrow pointing to the front panel (no text or symbols)

Postavite novu zaptivnu gumu na vrata frižidera. Uverite se da između nove zaptivne gume i vrata nema razmaka.

Zamena fioke

SAMSUNG RB34T671DSA - Zamena fioke - 1

OPREZ

Tokom postavljanja, proverite da li je fioka pravilno umetnuta u vodice.

Da biste skinuli fioku

Diagram of a plastic drawer with a black arrow pointing to it, no text or symbols present

Lagano podignite naviše prednju stranu fioke i izvucite je.

Da biste vratili fioke

Diagram showing a device with labeled component A and an upward arrow indicating motion or force direction

Technical diagram of an electrical connector with visible wiring and components (no text or symbols)

Technical diagram of a mechanical assembly with arrows indicating direction, no text or symbols present

  1. Dok su vrata frižidera zatvorena, pomoću krstastog odvijača uklonite zavrtnje kojima je pričvršćen gornji poklopac (A).

  2. Oprezno podignite gornji poklopac (A) i stavite ga na gornju stranu frižidera.

- Budite pažljivi dok podižete gornji poklopac (A). Ispod njega se nalaze povezani kablovi.

  1. Uklonite kabl i konektor kabla sa držača postavljenog ispod gornjeg poklopca.

- Ovaj korak se ne odnosi na sve modele.

SAMSUNG RB34T671DSA - Da biste vratili fioke - 4

OPREZ

Diagram of a refrigerator interior showing the door and shelf, with an arrow indicating upward movement (no text or symbols present)

A

Technical diagram showing a mechanical clamp or bracket with pins and a directional arrow (no text or symbols)

  1. Dok vrata zamrzivača leže na donjoj šarci (A), polako povucite donju šarku (A) da biste je izvukli iz držača na donjoj strani frižidera. Kada uklonite donju šarku (A) iz držača, uklonite je iz vrata zamrzivača, a zatim povucite vrata zamrzivača nadole da biste ih skinuli sa srednje šarke (B).

! OPREZ

01 Gornja šarka 02 Brtva
03 Ladica 04 Ručke (samo kod određenih modela)
05 Srednja šarka 06 Naljepnica s crtičnim kodom
07 Donja šarka

Hrvatski

Zamjena ručki

Naziv modela izgleda ovako: RB38**6****, RB38**2****, RL38**6****, RB3L**2****, RB36**6****, RB36**2****, RL36**6****, RL36**2****, RB34**6****, RB34**2****, RL34**6****, RL34**2****

Diagram showing a screwdriver inserted into a mechanical bracket with a black arrow indicating direction (no text or symbols present)

  1. Upotrijebite odvijač s ravnom glavom za uklanjanje poklopaca vijaka.
  2. Nakon odvajanja ručke, pričvrstite poklopce vijaka natrag na otvore za vijke.

  3. Križnim odvijačem uklonite vijke i odvojite ručku.

NAPOMENA

Upotrijebite navedene vijke za pričvršćivanje ručke na suprotnu stranu.

  1. Sastavite novu ručku obrnutim redoslijedom od odvajanja.

Hrvatski

Zamjena brtve

OPREZ

Pobrinite se da čvrsto pričvrstite brtvu. U suprotnome bi hladan zrak iz hladnjaka mogao izlaziti van.

Za uklanjanje brtve

Diagram of a door frame with an arrow indicating direction (no text or symbols)

Otvorite vrata i uklonite brtvu s vrata.

Za zamjenu brtve

Diagram of a door frame with an arrow pointing to the front panel (no text or symbols)

Pažljivo podignite prednji dio ladice i izvucite je.

Ponovno postavljanje ladica

Diagram showing a device with labeled component A and an upward arrow indicating motion or force direction

Technical diagram of an electrical connector with visible wiring and components (no text or symbols)

Technical diagram of a mechanical assembly with arrows indicating direction and labeled component A (no text or symbols present)

Diagram of a refrigerator interior showing the door and shelf arrangement (no text or symbols)

A

  1. Ključem s čegrtaljkom (8 mm) uklonite vijke koji učvršćuju gornju šarku (A).

OPREZ

Kako biste spriječili pad vrata, čvrsto ih držite dok uklanjate vijke.

Technical diagram showing a bracket with screws and a directional arrow, no text or symbols present

01 Mentesha e sipërme 02 Guarnicioni
03 Sirtari 04 Dorezat (vetëm modelet që e kanë)
05 Mentesha e mesit 06 Etiketa e barkodit
07 Mentesha e poshtme

Shqip

Diagram of a screwdriver inserted into a mechanical clamp or bracket, with a black arrow indicating direction (no text or symbols present)

Diagram showing a device with labeled component A and an upward arrow indicating motion or force direction

Technical diagram of an electrical connector with visible wiring and components (no text or symbols)

Technical diagram of a mechanical assembly with arrows indicating direction, no text or symbols present

Diagram of a refrigerator interior showing the door and shelf arrangement (no text or symbols)

A

Technical diagram showing a mechanical clamp or bracket with screws and a directional arrow (no text or symbols)

Крстач Плоснат шрафцигер

Diagram showing a screwdriver inserted into a mechanical bracket with a black arrow indicating direction (no text or symbols present)

A

Technical diagram of a mechanical assembly with visible wiring and components (no text or symbols)

Technical diagram showing mechanical assembly with arrows indicating direction (no text or symbols)

Diagram of a refrigerator interior showing the door and shelf arrangement (no text or symbols)

A

Technical diagram showing a mechanical clamp or bracket with screws and a directional arrow (no text or symbols)

Ristpeakruvikeeraja Lamepeakruvikeeraja

Diagram showing a screwdriver inserted into a mechanical clamp or bracket with a black arrow indicating direction (no text or symbols present)

Diagram showing a device with labeled component A and an upward arrow indicating motion or force direction

Technical diagram of an electrical connector with visible wiring and components (no text or symbols)

Technical diagram of a mechanical assembly with arrows indicating direction, no text or symbols present

Diagram of a refrigerator interior showing the door and shelf, with an arrow indicating upward movement (no text or symbols present)

A

Technical diagram showing a mechanical clamp or bracket with screws and a directional arrow (no text or symbols)

Diagram of a screwdriver inserted into a mechanical clamp or bracket, with a black arrow indicating direction (no text or symbols present)

Diagram showing a device with labeled component A and an upward arrow indicating motion or force direction

Technical diagram of an electrical connector with visible wiring and components (no text or symbols)

Technical diagram of a mechanical assembly with arrows indicating direction (no text or symbols present)

Diagram of a refrigerator interior showing the door and shelf, with an arrow indicating upward movement (no text or symbols present)

A

Technical diagram showing a mechanical clamp or bracket with pins and a directional arrow (no text or symbols)

Diagram of a screwdriver inserted into a mechanical clamp or bracket, with a black arrow indicating direction (no text or symbols present)

Atveriet durvis un iznemiet blivi no durvim.

Lai nomainītu blīvi

Diagram of a door frame with an arrow pointing to the front panel (no text or symbols)

Diagram showing a device with labeled component A and an upward arrow indicating motion or force direction

Technical diagram of an electrical connector with visible wiring and components (no text or symbols)

Technical diagram of a mechanical assembly with arrows indicating direction and labeled component A (no text or symbols present)

Diagram of a refrigerator interior showing the door and shelf arrangement (no text or symbols)

A

Technical diagram showing a mechanical clamp or bracket with pins and a directional arrow (no text or symbols)

Diagram showing a screwdriver inserted into a mechanical bracket with a black arrow indicating direction (no text or symbols present)

Odprite vrata in z vrat odstranite tesnilo.

Zamenjava tesnila

Diagram of a door frame with an arrow pointing to the front panel (no text or symbols)

Na vrata hladilnika pritrdite novo tesnilo. Prepričajte se, da med novim tesnilom in vrati ni vrzeli.

Zamenjava predala

SAMSUNG RB34T671DSA - Zamenjava predala - 1

PREVIDNO

Previdno dvignite sprednji del predala in ga izvlecite.

Ponovna namestitev predala

Diagram showing a device with labeled component A and an upward arrow indicating motion or force direction

Technical diagram of an electrical connector with visible wiring and components (no text or symbols)

Technical diagram of a mechanical assembly with arrows indicating direction, no text or symbols present

  1. Vrata hladilnika naj bodo zaprta, nato pa s Phillipsovim izvijačem odstranite vijake, s katerimi je pritrjen zgornji pokrov (A).

  2. Previdno dvignite zgornji pokrov (A) in ga položite na zgornjo stran hladilnika.

Diagram of a refrigerator interior showing the door and shelf, with an arrow indicating upward movement (no text or symbols present)

A

Technical diagram showing a mechanical clamp or bracket with screws and a directional arrow (no text or symbols)

Manual assistant
Powered by Anthropic
Waiting for your message
Product information

Brand : SAMSUNG

Model : RB34T671DSA

Category : Refrigerator