01017 - Mop Maxxmee - Free user manual and instructions
Find the device manual for free 01017 Maxxmee in PDF.

| Product type | Rechargeable rotating mop with spray function |
| Brand | Maxxmee |
| Model | 01017 |
| Power supply | Li-Ion battery 11.1 V, 2000 mAh |
| Power adapter input voltage | 100-240 V ~ 50/60 Hz, 0.5 A |
| Power adapter output voltage | 13.2 V DC, 0.5 A |
| Charging time | Approximately 4 hours |
| Runtime | Approximately 40 to 50 minutes (fully charged battery) |
| Water tank capacity | 200 ml max. |
| Bucket capacity | 5 liters max. |
| Measuring cup capacity | 150 ml |
| Protection class | II |
| Main functions | Dry or wet cleaning, water spray, automatic pad cleaning and spin-drying |
| Washing pad care | Machine wash at 60 °C, low temperature drying, no dry cleaning, no bleaching, no ironing, no fabric softener |
| Appliance cleaning | With a soft, damp cloth; do not immerse the body or handle |
| Safety | Indoor use only; do not expose to rain; stop and unplug before cleaning; keep out of reach of children |
| Included spare parts | Power adapter, body with battery, measuring cup, extraction tool, 2 washing pads, handle, 2-part pole, bucket with handle, cleaning/spin-drying unit |
| Repairability | Repairs must be carried out by the manufacturer, customer service, or a qualified workshop |
Frequently Asked Questions - 01017 Maxxmee
User questions about 01017 Maxxmee
0 question about this device. Answer the ones you know or ask your own.
Ask a new question about this device
Download the instructions for your Mop in PDF format for free! Find your manual 01017 - Maxxmee and take your electronic device back in hand. On this page are published all the documents necessary for the use of your device. 01017 by Maxxmee.
USER MANUAL 01017 Maxxmee
Before Initial Use 15
Assembling the Device 15
Charging Up the Battery 16
Preparing the Device 16
Use 17
Cleaning and Storage 18
Troubleshooting 18
Disposal 19
Technical Data 19
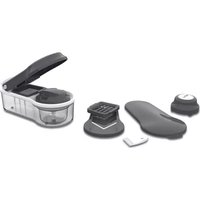
ITEMS SUPPLIED
(Picture A)
A Mains adapter 1 x
B Main unit with built-in battery 1 x
C Measuring cup 1 x
D Removal tool 1 x
E Mop pad 2 x
F Handle with operating buttons 1 x
G Stem, 2-part 1 x
H Bucket with carrying handle 1 x I Insert for cleaning and wringing out
- Operating instructions 1 x
Check the items supplied for completeness and the components for transport damage. If you find any damage, do not use the device but contact our customer service department.
Remove any possible fi Ims, stickers or transport protection from the device.
Never remove the rating plate and any possible warnings!
AT A GLANCE
(Picture B)
1 Spray button
2 On/Off button
3 Cleaning button
4 Stem mount with release mechanism (activate/deactivate device)
5 Charging socket (on the back)
6 LED display
7 Ball joint
8 Water tank cap
9 Cleaning feet
10 Spray nozzle
11 Water tank (in the main unit)
Key numbers are shown as follows: (1)
Picture references are shown as follows: (Picture A)
Dear Customer,
We are delighted that you have chosen the MAXXMEE cordless rotary mop. Thanks to the spray function, the water is sparingly applied so that you can also keep delicate floors clean. You can then conveniently clean and wring out the microfi bre pads in the bucket with the special insert. If you have any questions about the device and about spare parts / accessories, contact the customer service department via our website: www.dspro.de/kundenservice
We hope you have a lot of fun with your MAXXMEE cordless rotary mop.
Information About the Operating Instructions
Before using the device for the first time, please read through these operating instructions carefully and keep them for future reference and other users. They form an integral part of the device. The manufacturer and importer do not accept any liability if the information in these operating instructions is not complied with.
SYMBOLS
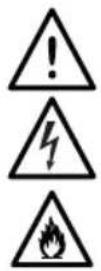
Danger symbols: These symbols indicate possible dangers. Read the associated safety notices carefully and follow them.
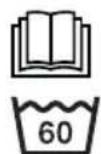
Read the operating instructions before use!
60^ normal wash cycle
Tumble dry at a low temperature

Supplementary information

Do not dry-clean
Do not bleach

Protection class II

Do not iron

Only use indoors!
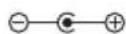
Polarity of the barrel connector (mains adapter)

Symbol for direct current

Energy efficiency class VI
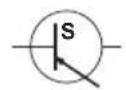
Switching power supply
Safe electrical isolation (transformer)
SIGNAL WORDS
Signal words indicate hazards if the associated notices are not followed.
DANGER - high risk, results in serious injury or death
WARNING - medium risk, may result in serious injury or death
NOTICE - may result in risk of damage to material
INTENDED USE
This device is suitable for dry and damp cleaning of different types of surfaces (floors, stairs etc.).
It can be used both indoors and outdoors.
This device is not suitable for mopping up:
highly fl ammable or combustible liquids,
glowing or burning ash.
The device is intended for personal domestic use only and is not intended for commercial applications.
The device should only be used as described in the operating instructions. Any other use is deemed to be improper.
The warranty does not cover faults caused by incorrect handling, damage or attempted repairs. The same applies to normal wear and tear.
SAFETYNOTICES
This device may be used by children aged 8 and over and by people with reduced physical, sensory or mental abilities or a lack of experience and / or knowledge if they are supervised or have received instruction on how to use the device safely and have understood the dangers resulting from failure to comply with the relevant safety precautions.
Children must not play with the device.
- Cleaning and user maintenance must not be carried out by children without supervision.
- Never exceed the maximum fill level of the water tank (max. 200 ml). It is essential to follow the instructions in the "Preparing the Device" - "Filling the Water Tank" chapter.
-
The device must always be switched off and disconnected from the mains power before it is cleaned.
-
Only ever charge up the rechargeable battery using the mains adapter supplied with the device. Do not charge any other devices with the mains adapter.
- Do not make any modifications to the device! If the device, the connecting cable or the battery are damaged, they must be replaced or repaired by the manufacturer, customer service department or a similarly qualified person (e. g. specialist workshop) in order to avoid any hazards.

DANGER - Danger of Electric Shock
Charge and store the device only in closed rooms.
- Never immerse the device and the connecting cable in water or other liquids and ensure that they cannot fall into water or become wet.
If the device falls into water while it is connected to the mains power, switch off the power supply immediately. Only after this should you pull the device out of the water and dispose of it.
- Never touch the device and the connecting cable with wet hands when the device is connected to the mains power.
If the device is used outdoors, make sure that it is not exposed to any rain or moisture.

WARNING - Danger of Injury!
- Keep children and animals away from the packaging material. There is a danger of suffocation.
Make sure that the connecting cable is always kept out of the reach of small children and animals. There is a danger of strangulation.
If the battery leaks, avoid physical contact with the battery acid. There is a danger of burns from battery acid. Wear protective gloves if necessary. If you touch battery acid, rinse the affected areas with abundant clear water straight away and seek medical assistance immediately.
Make sure that the connecting cable does not present a trip hazard. There is a danger of falling over it.
Do not use the device if it is damaged.

WARNING - Danger from Rechargeable Batteries!
The main unit with a built-in battery must not be taken apart, thrown into a fire or exposed to high temperatures of over +40^ . The battery could ignite or explode.
Make sure that the handle and the main unit (apart from the water tank) cannot get wet. Do not use the device if liquid has got inside it. The battery in the main unit could ignite or explode.
Do not cover the device and the mains adapter during charging to prevent overheating.
NOTICE - Risk of Damage to Material and Property
Make sure that the connecting cable is not squashed, bent or laid over sharp edges and does not come into contact with hot surfaces.
Do not wind the mains cable around the mains adapter.
The device should only be used if it has been fully and correctly assembled!
Pull the mains adapter out of the plug socket if an error occurs during charging or before a thunderstorm.
The device must be switched off when the mains adapter is pulled out or inserted into the plug socket. Always pull the mains adapter and never the mains cable to disconnect the device from the mains power.
Do not use the device when it is still connected to the mains adapter.
- Protect the device from: heat, naked fl ames, sub-zero temperatures, direct sunlight and impacts.
Do not leave the insert in the water for a prolonged period to prevent any deformation.
Use only original accessories from the manufacturer in order to guarantee that there is no interference that may prevent the device from working and to avoid possible damage.
NOTICE - Risk of Damage to Material and Property from Batteries
Remove the battery from the handle when it is used up. This will prevent any damage caused by leaks.
Use only the battery type specified in the technical data. Pay attention to the correct polarity (+ / -) when replacing batteries.
Non-rechargeable batteries must not be recharged or reactivated by other means, dismantled, thrown into a fire, immersed in fluids, or short-circuited.
BEFORE INITIAL USE
- Assemble the device (see the "Assembling the Device" chapter).
- Charge up the battery (see the "Charging Up the Battery" chapter).
ASSEMBLING THE DEVICE
PLEASE NOTE: Tilt the stem mount (4) on the main unit (B) forwards until it engages. It must be upright so that the device is deactivated and cannot be switched on accidentally. The LED display (6) must have gone out.
- Plug the stem parts (G) into each other as follows. They must lock into each other.
- Plug the handle (F) into the top of the stem. It must engage audibly.
- Plug the stem with the handle into the stem mount on the main unit. It must engage audibly.
To detach the stem, the handle or take the stem apart, the removal tool (D) is required. Plug it in each case into the small opening on the stem parts and pull out the top part at the same time.
Attaching / Detaching Mop Pads
Please Note!
The mop pads must not be attached to the cleaning feet when they are wet.
- Attaching: Attach one mop pad (E) in each case to a cleaning foot (9) using the hook and loop fastener.
- Detaching: Pull the mop pads off the cleaning feet.
Folding the Carrying Handle of the Bucket In / Out
- Folding out: Flip up the carrying handle and pull it up into the vertical position to fix it in place.
- Folding in: Push down the carrying handle and fold it down (Picture C).
CHARGING UP THE BATTERY
Please Note!
Risk of a short circuit! Do not stick any conducting objects (e.g. a screwdriver or similar implement) into the charging socket.
Make sure that the charging socket is dry.
Only connect the mains adapter to a plug socket that is properly installed and matches the technical data of the device. The plug socket must also be readily accessible after connection so that the connection to the mains can quickly be isolated.
Pull the mains adapter out of the plug socket if it is not going to be used for a lengthy period of time.
It is essential that you charge up the battery fully before you first use the device in order to achieve the maximum charging capacity.
- Tilt the stem mount (4) on the main unit (B) forwards until it engages. It must be upright so that the device is deactivated and cannot be switched on accidentally. The LED display (6) must have gone out.
- Connect the barrel connector of the mains adapter (A) to the charging socket (5).
- Connect the mains adapter to a properly installed plug socket that is easily accessible. The LED display fl ashes red during the charging process. The battery is fully charged up when the LED display is lit constantly blue.
- Disconnect the mains adapter from the mains power and then from the main unit.
PREPARING THE DEVICE
Before the device can be used, the following steps must be followed:
Charge up the battery (see the "Charging Up the Battery" chapter)
- Fill the water tank (see the "Filling the Water Tank" section)
- Fill the bucket (see the "Filling the Bucket" section)
Filling the Water Tank
Please Note!
When the water tank is filled, the main unit must not be tilted, turned upside down or laid or placed on its side. Water could leak out!
Pour water that is no hotter than 50^ into the water tank.
1. Tilt the stem mount (4) on the main unit (B) forwards until it engages. It must be upright so that the device is deactivated and cannot be switched on accidentally. The LED display (6) must have gone out.
2. Open the water tank cap (8) on the main unit.
3. Fill the water tank (11) with water (max. 200 ml) using the measuring cup (C) (Picture D).
4. Close the water tank cap.
Filling the Bucket
Please Note!
Note the maximum fi ll level of the bucket. If the bucket is overfi lled, there is the risk that water will get into the main unit when the mop pads are cleaned.
- Remove the insert (I) from the bucket (H).
- Fill the bucket with water. IMPORTANT! It is essential to note the MIN and MAX markings in the bucket.
- Place the insert back into the bucket.

The water must not cover the insert once it has been inserted.
USE

Switch off the device after you fi nish cleaning each surface so that the operating time on each battery charge is increased significantly.
- Tilt the stem mount (4) on the main unit (B) back a little using the handle (F) in order to trigger the release mechanism and activate the device. It is in stand-by mode. The LED display (6) lights up blue.
- Press the On / Off button (2) on the handle to switch on the device. The two cleaning feet (9) start to rotate.
- Guide the device over the surface to be cleaned or polished.
- If necessary, press the spray button (1) on the handle to add extra moisture to the floor with the aid of the spray nozzle (10).
-
To switch off the device, press the On/Off button again. The cleaning feet stop rotating.
-
Tilt the stem mount on the main unit forwards using the handle in order to trigger the release mechanism and deactivate the device. You must feel the stem engage. The LED display goes out.
Wetting / Cleaning Mop Pads
To achieve an optimum mopping result, the mop pads (E) can easily be wetted and cleaned during use.
- Tilt the stem mount (4) on the main unit (B) forwards until it engages. It must be upright so that the device is deactivated and cannot be switched on accidentally. The LED display (6) must have gone out.
- Place the main unit on the insert (I) in the water-filled bucket (H) (Picture E). When you do this, make sure that the recesses of the cleaning feet (9) fit on the corresponding bulges of the insert.
- Hold the mop securely - do NOT press down - and press the cleaning button (3). The LED display lights up blue. The cleaning feet rotate inwards for approx. 10 seconds. The rollers rotate and the mop pads are wetted and cleaned. The cleaning feet then rotate outwards for approx. 20 seconds. The rollers stop and the excess water is removed from the mop pads. When the LED display goes out., the process is complete.
- Continue cleaning the floor.

For heavier soiling and resilient floors, the mop pads can be wetted without wringing them out. To do this, place the main unit in the bucket, tilt the stem backwards to activate the device, and press the On/Off button (2). Once the mop pads have been suffi cientsly moistened, press the On / Off button again.
CLEANING AND STORAGE
Please Note!
During cleaning make sure that no liquid gets into the main unit (apart from the water tank) or the handle.
- Do not use any sharp or abrasive cleaning agents to clean the housing. They may damage the surfaces.

The mop pads may lose some of their colour over time. This is normal and does not have any adverse effect on function. However, if one of the mop pads is damaged or worn, it must be replaced.
- If there is still water in the water tank (11), empty it by pressing the spray button (1). This is necessary to avoid any calcifi cation of the device and the spray nozzle (10).
- Remove the insert (I) from the bucket (H) and empty the bucket (Picture F).
- Clean the bucket and insert with warm water and a little detergent.
- Clean the device with a damp, soft cloth if necessary. Then dry with a soft cloth.
Pull the mop pads (E) off the cleaning feet (9) and clean them. Note the washing label when you do this! Please Note: Wash separately or with similar colours. Do not use fabric softener. - Charge up the battery after every use (see the "Charging Up the Battery" chapter).
- Store the device and the accessories in a dry place which is protected from sunlight and is out of the reach of children and animals.
TROUBLESHOOTING
If the device does not work properly, check whether you are able to rectify the problem yourself. If the problem cannot be solved with the steps listed, contact the customer service department.

Do not attempt to repair an electrical device yourself!
The battery is not charging. The LED display (6) does not flash when the device is connected to the mains power.
The mains adapter (A) is not inserted in the plug socket correctly.
Correct the fit of the mains adapter.
The barrel connector is not plugged in the charging socket (5) of the device correctly.
- Correct the connection between the charging socket and barrel connector.
The plug socket is defective.
Try another plug socket.
There is no mains voltage.
Check the fuse of the electrical distributor (fuse box).
The device cannot be started.
The battery of the device is too weak.
Charge up the battery.
The release mechanism in the stem mount (4) has been triggered.
Activate the device by tilting the stem or the stem mount backwards.
The device is not working correctly.
The floor is unsuitable for the device.
The device only works on smooth floors such as parquet, laminate, tiles etc.
The cleaning process for the mop pads (E) is aborted. / The cleaning feet (9) stop rotating.
Too much pressure is being exerted.
- When the main unit (B) is in the bucket (H), hold the mop securely to stabilise it, but do not press it onto the insert (I).
DISPOSAL

Dispose of the packaging material in an environmentally friendly manner so that it can be recycled.
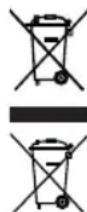
This device is governed by the European Directive 2012/19/EU on waste electrical and electronic equipment (WEEE). Do not dispose of this device with a built-in battery as normal domestic waste, but rather in an environmentally friendly manner via an offi cially approved waste disposal company.
TECHNICAL DATA
ID of the operating instructions: Z 01017 M DS V1 1020 dk
Device
Article number: 01017
Model number: JCC001
Voltage supply: 11.1 V (Li-ion battery, 2000mAh)
Capacity of bucket: max. 5 litres
Capacity of water tank: max. 200 ml
Capacity of measuring cup: max. 150 ml
Battery
Charge time: approx. 4 hours
Operating time: approx. 40 - 50 minutes (with fully charged battery)
Mains adapter
efficiency in operation: 82.30%
Efficiency on low load (10%): 65.39%
Power consumption on no-load: 0.078 W


All rights reserved.
SOMMAIRE
Composition 20
Apercu general 20
Symboles 21
Chere cliente, cher client,
WAARSCHUWING - Verwondingsgevaar!
WAARSCHUWING - Gevaardoor accu's!
APPPARAAT IN ELKAAR ZETTEN
De contactdoos is defect.