HBRUP 160 NKN - Fridge HOOVER - Free user manual and instructions
Find the device manual for free HBRUP 160 NKN HOOVER in PDF.

User questions about HBRUP 160 NKN HOOVER
0 question about this device. Answer the ones you know or ask your own.
Ask a new question about this device
Download the instructions for your Fridge in PDF format for free! Find your manual HBRUP 160 NKN - HOOVER and take your electronic device back in hand. On this page are published all the documents necessary for the use of your device. HBRUP 160 NKN by HOOVER.
USER MANUAL HBRUP 160 NKN HOOVER
PTThank you for purchasing this product. Before using your refrigerator, please carefully read this instruction manual in order to maximize its performance. Store all documentation for subsequent usage or other owners. This product is intended solely for household use or similar applications such as: - the kitchen area for personnel in shops, of fices and other working environments
on farms, by clientele of hotels, m otels and other environments of a residential type
at bed and breakfasts (B & B)
or retail sale. This appliance must be used only for purposes of storage of food, any other use is considered dangerous and the manufacturer will not be responsible for any omissions. Also, it is recommended that you take note of the warranty conditions. The refrigerator contains a refrigerant gas (R600a: isobutene) and insulating gas (cyclopentane), with high compatibility with the environment, that are, however, inflammable. We recommend that you follow the following regulations so as to avoid situations dangerous to you: Before performing any operation, unplug the power cord from the power socket.
The refri geration s
stem positioned behind and inside the applia nce c ontains refri gerant. There fore, a void dama ging the tubes.
If in the refrigeration system a leak is noted, do not touch the wall outlet and do not use open flames. Open the w indow and let air into the room. Then call a service center to ask for repair.
Do not scrape with a knife or sharp object to remove frost or ice that occurs. With these, the refrigerant circuit can be damaged, the spill from which can cause a fire or damage your eyes.
Do not install the appliance in humid, oily or dusty places, nor expose it to direct sunlight and to water.
Do not install the appliance near heaters or inflammable materials.
Do not use extension cords or adapters.
er cord or touch the plug with wet hands.
Do not damage the plug and/or the power cord; this could cause electrical shocks or fires. x It is recommended to keep the plug clean, any excessi ve dust SAFETY INFORMATION ENGLISHENGLISH 1residues on the plug can be the cause fire.
Do not use mechanical devices or other equipment to hasten the defrosting process.
Absolutely avoid the use of open flame or electrical equipment, such as heaters, steam cleaners, candles, oil lamps and the like in order to speed up the defrosting phase.
Do not use or store inflammable sprays, such as spray paint, near the appliance, it could cause an explosion or fire.
tor age compartments, unless they are of the type recommended by the manufacturer.
Do not place or store inflammable and highly volatile materials such as ether, petrol, LPG, propane gas, aerosol spray cans, adhesives, pure alcohol, etc. These materials may cause an explosion.
tore medici ne or re search material s in the appliance. When the material that requires a strict control of storage temperatures is to be stored, it is possible that it will deteriorate or an uncontrolled reaction may occur that can cause risks.
gs in the appliance enclosure or in the built-in structure, free of obstruction.
Do not place objects and/or containers filled with water on the top of the appliance.
Do not perform repairs on this appliance. All interventions must
performed solely by qualified personnel.
This appliance can be used by children aged from 8 years and above and b y persons with reduced physical, sensory or mental capabilities or with a lack of experience and knowledge; provided that they have been given adequate supervision or instruction concerning how to use the appliance in a safe way and understand the hazards involved.
Childre n s hould not play
ith the appliance. Clea ning and user maintena nce should not be made by children without supervision
“FOR appliances without a 4-star compartment: this refrigerating appliance is not suitable for freezing foodstuffs” “FOR a free standing appliance: this refrigerating appliance is not intended to be used as a built-in appliance”3Evaporator
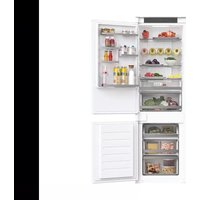
The most energy-saving configuration requires drawers, food box and shelves to be positioned in the product, please refer to the above pictures. Overview5 Correct positioning•It’s suggested to set the temperature at 4°C in the fridge compartment, and, whether possible, at -18°C in the freezer compartment.
- For most food categories, the longest storage time in the fridge compartment is achieved with colder temperatures. Since some particular products (as fresh fruits and vegetables) may be damaged with colder temperatures, it is suggested to keep them in the crisper drawers, whenever present. If not present, maintain an average setting of the thermostat.
- For frozen food, refer to the storage time written on the food packaging. This storage time is achieved whenever the setting respects the reference temperatures of the compartment (one-star -6°C, two stars -12°C, three stars -18°C)
POSITIONING Install the appliance at a location where the ambient temperature c orresponds to the climate class indicated on the rating plate of the appli ance: - - Extended temperate (SN): ‘this refrigerating appliance is i ntended to be used at ambient temperatures ranging from 10 °C to 32 °C’ - - Temperate (N): ‘this refrigerating appliance is intended t o be used at ambient temperatures ranging from 16 °C to 32 °C’ - - Subtropical (ST): ‘this refrigerating appliance is intended to be used at ambient temperatures ranging from 16 °C to 38 °C’ - - Tropical (T): ‘this refrigerating appliance is intended to be used at ambient temperatures ranging from 16 °C to 43 °C’
- Information above give users recommendation of temperature setting.
7HPSHUDWXUH6HWWLQJ5HFRPPHQGDWLRQ
Correct positioningReversing the Door Swing Tools required: Phillips style screwdriver / Flat bladed screwdriver / Hexagonal spanner
1. Tilt the unit slightly towards the rear and
prop it securely. Two people are required to tilt the unit during the door reversal process.
2. Remove the top right hinge cover.
Ensure the unit is unplugged and empty. Adjust the two levelling feet to their highest position. To take the door off it is necessary to tilt the unit backwards. You should rest the unit on something solid so that it will not slip during the door reversing process. All parts removed must be saved to do the reinstallation of the door. Do not lay the unit flat as this may damage the coolant system. We recommend that 2 people handle the unit during assembly.
4. Remove the top left screw cover.
5. Move the core cover from left side to
right side. And then lift the door and place it on a padded surface to prevent it from scratching.
6. Remove the screws and bottom hinge.
Then remove the adjustable feet from both side.
Reversing the door swing7. Unscrew and remove the bottom hinge pin, turn the bracket over and replace it.
8. Refit the bracket fitting the bottom hinge
pin. Replace both adjustable feet.
9. Place the door back on. Ensure the door
is aligned horizontally and vertically so that the seals are closed on all sides before finally tightening the top hinge.
10. Insert the hinge bracket and screw it to
Reversing the door swing12. Put the hinge cover and the screw cover back.
13. With the door closed, check that the
door is aligned horizontally and verti- cally and that the seals are closed on all sides before finally tightening the bottom hinge. Re-adjust the level- ling feet as needed.
Reversing the door swing12 Defrosting on evaporator is operated manually. When the biggest thickness of the frostDefrosting on evaporator is operated manually. When the biggest thickness of the frost layer on the evaporator increase to 4mm, it must be turn off the power supply to defrost.layer on the evaporator increase to 4mm, it must be turn off the power supply to defrost. Cautions MaintenanceWhether the thickness of the frost layer was thicker than 4mm when you make the refrigerator defrost.
Troubleshooting14 GUARANTEE Minimum guarantee is: 2 years for EU Countries, 3 years for Turkey, 1 year for UK, 1 year for Russia, 3 years for Sweden, 2 years for Serbia, 5 years for Norway, 1 year for Morocco, 6 months for Algeria, Tunisia no legal warranty required.
AVAILABILITY OF SPARE PARTS
“Thermostats, temperature sensors, printed circuit boards and light sources are available for a minimum period of seven years after placing the last unit of the model on the market. Door handles, door hinges, trays and baskets for a minimum period of seven years and door gaskets for a minimum period of 10 year, after placing the last unit of the model on the market”. For further information about the product, please consult https:// eprel.ec.europa.eu/ or scan the QR on the energy label supplied with the appliance To contact the technical assistance, visit our website: https://corporate.haier- europe.com/en/ Under the section “website”, choose the brand of your product and your country. You will be redirected to the specific website where you can find the telephone number and form to contact the technical assistance. Technical specificationsColdest Area Than The Refrigerator This symbol below indicates the location of the coldest area of the refrigerator. This area is bounded near the fan and above it by the icon or shelf positioned at the same level. To maintain temperatures in this area, be careful not to move this shelf.
INSTALLING THE TEMPERATURE GAUGE
To help you set up your fridge correctly, it features a temperature gauge that allows you to monitor the average temperature in the coldest area.WARNING: This ad is only intended for use with the refrigerator. Be careful not to use it in another refrigerator (in fact the coldest area is not the same) or for another use. Temperature control in the coldest area Once the installation of the temperature gauge is complete, it is possible You can periodically check that the temperature of the coldest zone is correct. If necessary, adjust the thermostat accordingly. The internal temperature of the refrigerator is influenced by several factors such as: B. the ambient temperature in the room, the amount of food stored and the frequency with which the door is opened. Consider these factors when setting the temperature. Be careful to properly store food in the refrigerator and especially in the coldest area. Make sure the temperature display indicates "OK". If “OK” does not appear, the temperature of the zone is too high. Set the thermostat to a higher position. Wait at least 12 hours before resetting the thermostat. After loading fresh food into the appliance or opening the door again (or for a long time), it is normal for the "OK" indicator not to appear on the temperature display. 15Vi ringraziamo per aver scelto questo nostro prodotto. Prima di u tilizzare il frigorifero, leggere il presente manuale di istruzioni per massimizzare le prestazioni del prodotto. Riporre tutta la documentazione per utilizzo futuro o per i successivi proprietari. Questo apparecchio è destinato unicamente in ambiente domestico o per applicazioni simili quali: