
896020 - Vacuum Cleaner MILWAUKEE - Free user manual and instructions
Find the device manual for free 896020 MILWAUKEE in PDF.

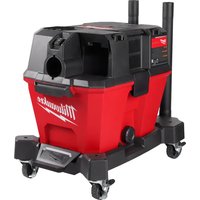
| Product Type | Industrial vacuum cleaner / dust extractor |
| Brand | Milwaukee |
| Model | 8960-20 |
| Supply Voltage | 120 V AC |
| Input Current | 12 A |
| Input Power | 1440 W |
| Suction Power | 890 W / 7.4 A |
| Protection | IPX4 |
| Tank Capacity | 8 gallons (30.3 L) |
| Weight | 16.3 kg (36 lb) |
| Airflow | 148 ft³/min (4.2 m³/min) |
| Hose Diameter | 36 mm |
| Main Filter | Part Number 49-90-1953 |
| HEPA Filter | Part Number 49-90-1952, efficiency 99.998% at 0.3 micron |
| Dust Bag | Plastic (49-90-1954) or fleece (49-90-1955) |
| Automatic Filter Cleaning | Yes, automatic main filter cleaning system |
| Power Tool Outlet | Yes, with automatic start (max 4.6 A / 550 W) |
| Speed Adjustment | Yes, variable airflow control |
| Wet/Dry Use | Yes (with bag removal and float valve) |
| Warranty | 5 years (USA and Canada), 3 years for this model |
Frequently Asked Questions - 896020 MILWAUKEE
User questions about 896020 MILWAUKEE
0 question about this device. Answer the ones you know or ask your own.
Ask a new question about this device
Download the instructions for your Vacuum Cleaner in PDF format for free! Find your manual 896020 - MILWAUKEE and take your electronic device back in hand. On this page are published all the documents necessary for the use of your device. 896020 by MILWAUKEE.
USER MANUAL 896020 MILWAUKEE
Cat. No./No de cat. 8960-20
8 GALLON DUST EXTRACTOR DéPOUSSIÈREUR DE 8 GALLONS EXTRACTOR DE POLVO DE 8 GALONES

WARNING To reduce the risk of injury, user must read and understand operator's manual.
AVERTISSEMENT Afin de réduire le risque de blessures, l'utilisateur doit dire et bien comprendre le manuel.
ADVERTENCIA Para reducir el riesgo de lesiones, el usuario debeleer y,&ender elmanual.
IMPORTANT SAFETY INSTRUCTIONS
WARNING
Failure to follow the warnings and instructions may result in electric shock, fire and/or serious injury. When using an electric
appliance, basic precautions should always be followed, including the following:
READ ALL INSTRUCTIONS BEFORE USING THIS APPLIANCE.
WARNING
TO REDUCE THE RISK
OF FIRE, ELECTRIC SHOCK OR INJURY:
- Do not leave appliance when plugged in. Unplug from outlet when not in use and before servicing. Connect to a properly grounded outlet only. See Grounding Instructions.
- Do not expose to rain - store indoors.
- Do not allow to be used as a toy. Close attention is necessary when used by or near children.
- Not intended for use by persons (including children) with reduced physical, sensory or mental capabilities, or lack of experience and knowledge. For use only by persons who have been instructed in its correct usage. Supervision is required.
- Use only as described in this manual. Use only manufacturer's recommended attachments.
- Do not use with damaged cord or plug. If appliance is not working as it should, has been dropped, damaged, left outdoors, or dropped into water, return it to a service center.
- Do not pull or carry by cord, use cord as handle, close a door on cord, or pull cord around sharp edges or corners. Do not run appliance over cord.
- Keep cord away from heated surfaces.
- Do not unplug by pulling on cord. To unplug, grasp the plug not the cord.
- Do not handle plug or appliance with wet hands.
- Do not wrap cord around hand or fingers.
- Do not put any object into openings. Do not use with any opening blocked; keep free of dust, lint, hair, and anything else that may reduce air flow.
- Keep hair, loose clothing, fingers, and all parts of body away from openings and moving parts.
- Do not pick up anything that is burning or smoking such as cigarettes, matches, or hot ashes.
- Do not use without filters in place.
- Turn off all controls before plugging in or unplugging tool.
- Ensure all latches are secured before transporting. Do not transport with liquid in the tank.
- Use extra care when cleaning on stairs.
- Do not use tool as a step or ladder.
- Do not use to pick up flammable or combustible liquids such as gasoline or use in areas where they may be present.
- Dust extractors have motors and other parts that can produce arcs or sparks during normal use. Do not use within 20 feet of areas where explosive gases may be present (such as gasoline pumps and places where liquids like paint thinners, cleaners, solvents, etc. are stored).
- Do not use as a water pump. Dust extractor is intended to vacuum water/air mixture.
- Unplug power cord whenever motor head is removed from tank.
-
Do not use in the presence of explosive liquids or vapors.
-
This product is suitable for collection of silica dust when used in accordance with these instructions.
- To reduce the risk of health hazards from other vapors or dust, do not vacuum carcinogenic, toxic or hazardous materials such as asbestos, arsenic, barium, beryllium, pesticides or other health endangered materials.
- Do not use where oxygen or anesthetics are used.
- Wear electrically insulated footwear, such as rubber boots, when vacuuming wet material.
- Maintain labels and nameplates. These carry important information. If unreadable or missing, contact a MILWAUKEE service facility for a free replacement.
-WARNING! Do NOT use this dust extractor to vacuum lead paint debris unless properly certified for lead paint material cleanup. This product is suitable for collection of lead paint debris under the United States Environmental Protection Agency's (EPA) Renovation, Repair, and Painting (RRP) Rule (40 CFR Part 745) when used by certified technician in accordance with these instructions and when the Fleece Bag Model number, 49-90-1955, Main Filter Model number 49-90-1953, and HEPA Filter Model number 49-90-1952 are installed.
-WARNING! Some dust created by power sanding, sawing, grinding, drilling, and other construction activities contains chemicals known to cause cancer, birth defects or other reproductive harm. Some examples of these chemicals are: - lead from lead-based paint
- crystalline silica from bricks and cement and other masonry products, and
- arsenic and chromium from chemically-treated lumber.
Your risk from these exposures varies, depending on how often you do this type of work. To reduce your exposure to these chemicals: work in a well ventilated area, and work with approved safety equipment, such as those dust masks that are specially designed to filter out microscopic particles.
Before using the dust extractor, read this operator's manual, your tool's manual, and all labels on the dust extractor and tool. This tool is for commercial use.
The dust extractor is compliant with Table 1 of OSHA Standard 29CRF 1926.1153 assuming it is used in accordance with MILWAUKEE instructions. Please reference https://www.osha.gov for further details on compliance methods.
MILWAUKEE Cat. No. 8960-20 has an efficiency of 99.998% in the < 0.3 micron particle size range and larger which qualifies as a HEPA system.
READ AND SAVE ALL INSTRUCTIONS FOR FUTURE USE
SYMBOLOLOGY


Volts
Alternating Current
Warning - Consult the operator's manual for additional safety information.


Canadian Standards Association
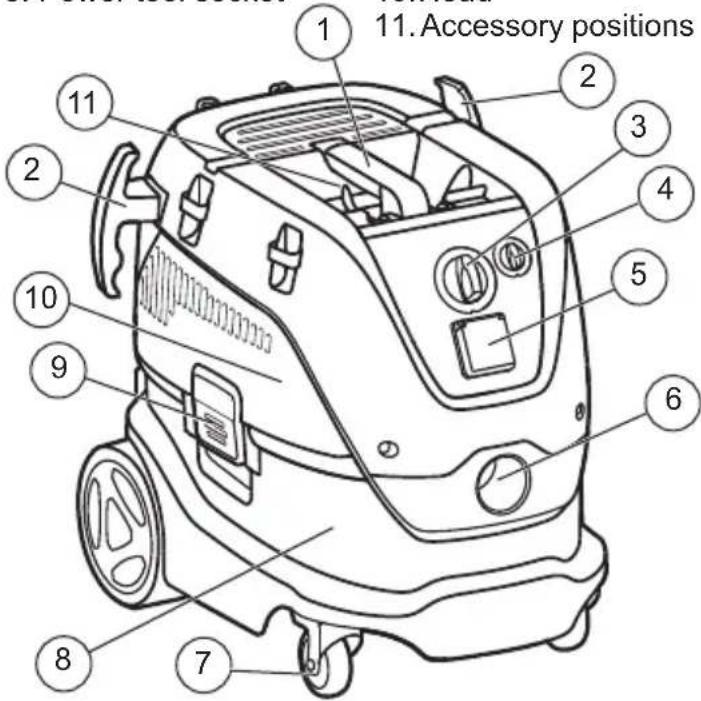
FUNCTIONAL DESCRIPTION
- Handle 6. Inlet fitting
2.Hose hook 7.Castors - Power switch
- Speed control
-
Power tool socket
-
Accessory positions
SPECIFICATIONS
Cat. No. 8960-20
Input Volts. 120 AC
InputAmps. 12
Input Hertz 50/60
Input Watts 1440
Vacuum Power 890 W/7.4 A
Ingress Protection.. IPX4
Max Output Watts. 550
Max Output Ams. 4.6
Tank Capacity gallons. 8
Weight 36 lb (16.3 kg)
Air Flow cubic feet per minute 148
Hose Diameter. 36 mm
HEPA Filter 49-90-1952
Main Filter. 49-90-1953
Plastic Dust Bag - 5PK 49-90-1954
Fleece Dust Bag - 5PK 49-90-1955
Power Tool Adapter 49-90-1957
Hose Sleeve 49-90-1958
Hose Clip Adapter. 49-90-1959
Dust Extractor Adapter 49-90-1960
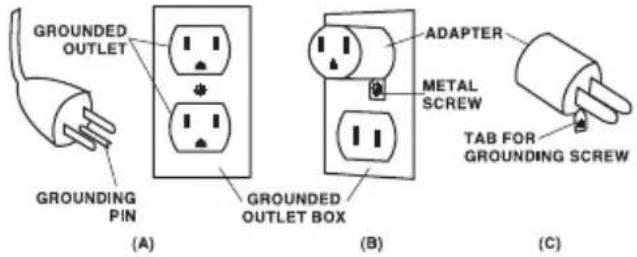
This appliance must be grounded. If it should malfunction or breakdown, grounding provides a path of least resistance for electric current to reduce the risk of electric shock. This appliance is equipped with a cord having an equipment-grounding conductor and grounding plug. The plug must be inserted into an appropriate outlet that is properly installed and grounded in accordance with all local codes and ordinances.
GROUNDING INSTRUCTIONS
WARNING Improper connection of the equipment-grounding conductor can result in a risk of electric shock. Check with a qualified electrician or service person if you are in doubt as to whether the outlet is properly grounded. Do not modify the plug provided with the appliance - If it will not fit the outlet, have a proper outlet installed by a qualified electrician.
This appliance is for use on a nominal 120-volt circuit, and has a grounded plug that looks like the plug illustrated in sketch A. A temporary adapter that looks like the adapter illustrated in sketches B and C may be used to connect this plug to a 2-pole receptacle as shown in sketch B if a properly grounded outlet is not available. The temporary adapter should be used only until a properly grounded outlet (sketch A) can be installed by a qualified electrician. The green colored rigid ear, lug or the like extending from the adapter must be connected to a permanent ground such as a properly grounded outlet box cover. Whenever the adapter is used, it must be held in place by a metal screw.
GROUNDING METHODS
IN CANADA, THE USE OF A TEMPORARY ADAPTERIS NOT PERMITTED BY THE CANADIAN ELECTRICAL CODE. Make sure that the appliance is connected to an outlet having the same configuration as the plug. No adapter should be used with this appliance.
EXTENSION CORDS
Grounded tools require a three wire extension cord. As the distance from the supply outlet increases, you must use a heavier gauge extension cord. Using extension cords with inadequately sized wire causes a serious drop in voltage, resulting in loss of power and possible tool damage. Refer to the table shown to determine the required minimum wire size. The smaller the gauge number of the wire, the greater the capacity of the cord. For example, a 14 gauge cord can carry a higher current than a 16 gauge cord. When using more than one extension cord to make up the total length, be sure each cord contains at least the minimum wire size required. If you are using one extension cord for more than one tool, add the nameplate amperes and use the sum to determine the required minimum wire size.
Guidelines for Using Extension Cords
- If you are using an extension cord outdoors, be sure it is marked with the suffix "W-A" ("W" in Canada) to indicate that it is acceptable for outdoor use.
- Be sure your extension cord is properly wired and in good electrical condition. Always replace a damaged extension cord or have it repaired by a qualified person before using it.
- Protect your extension cords from sharp objects, excessive heat and damp or wet areas.
| Recommended Minimum Wire Gauge For Extension Cords* | |||||
| NameplateAmps | Extension Cord Length | ||||
| 25' 50' 75' 100' 150' | |||||
| 0 - 2.0 | 18 | 18 | 18 | 18 | 16 |
| 2.1 - 3.4 | 18 | 18 | 18 | 16 | 14 |
| 3.5 - 5.0 | 18 | 18 | 16 | 14 | 12 |
| 5.1 - 7.0 | 18 | 16 | 14 | 12 | 12 |
| 7.1 - 12.0 | 16 | 14 | 12 | 10 | -- |
| 12.1 - 16.0 | 14 | 12 | 10 | -- | -- |
| 16.1 - 20.0 | 12 | 10 | -- | -- | -- |
- Based on limiting the line voltage drop to five volts at 150% of the rated amperes.
ASSEMBLY
Unpack accessories and parts from the tank by unlatching the head and pulling it up and off the base.
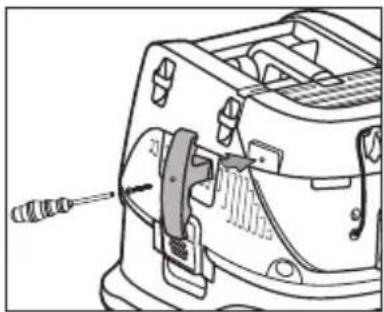
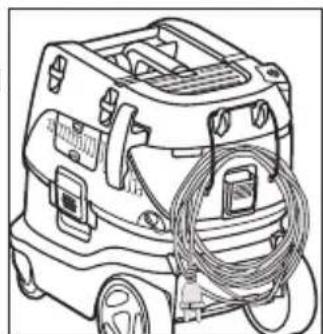
Installing the Hose Hooks
- Remove the screws from the hose hook locations.
- Fit hose hooks to the brackets.
- Insert screws and tighten securely.
- Wrap hose around head, looping above and below the hose hooks to secure.
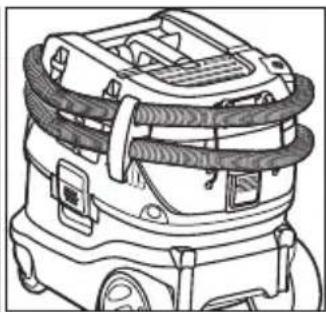
Securing the Power Cord
- Loop the power cord and secure in the rear bungee, as shown.
Filters can become clogged during heavy use. To maintain the efficiency of the dust extractor, empty/change the filter bag and clean all of the filters periodically. Milwaukee suggests cleaning the filters after 200 holes (at 5/8'' diameter, 4'' deep) or an equivalent amount of produced dust.
Installing/Changing the Plastic Dust Bag
- Unplug tool.
- Unlatch and remove head.
- Remove old bag and discard according to regulations.
- Open the bag fully and fit the cardboard inlet over the inlet tube.
- Pull the bag over the edges of the tank. Ensure the small holes around are pulled to the outside
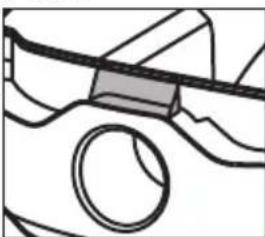
- Tuck the bag inside the black tab over the hose inlet. This ensures the bag does not come between the head and tank connection, allowing the antistatic system to discharge properly during use.
- Replace the head and latch it in place.
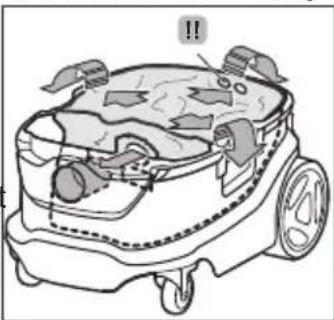
and the edge of the bag of the tank.
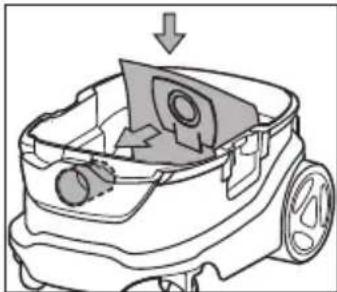
Installing/Changing the Fleece Dust Bag
- Unplug tool.
- Unlatch and remove head.
- Remove old bag and discard.
- Fit the cardboard inlet over the inlet tube.
- Ensure the bag is contained fully in the tank.
- Replace the head and latch it in place.
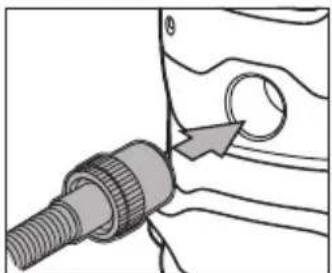
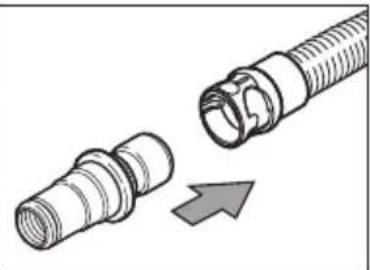
Installing the Hose and Accessories
Refer to "Accessories" for a list of adapters and dust collection attachments.
- Fit the hose into the inlet and twist to secure.
- Choose the appropriate accessory and insert it onto the hose. Twist to secure.
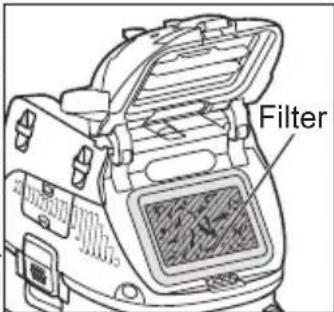
Cleaning/Changing the Main Filter
The dust extractor has an automatic filter cleaning system. During extremely heavy or long uses, manual cleaning may be necessary. If manual cleaning does not restore full suction, replace the filter. See "Specifications" for replacement part number.
- Turn on dust extractor.
- To manually clean the filter, place palm of you hand over the nozzle for 10 seconds.
- Turn off the dust extractor.
- Unplug tool.
- Unlatch and open the filter compartment.
- Remove the filter and shake or tap the edge over trash can.
- Replace the clean filter. If filter does not clean with tapping, replace with a new filter.
- Close and latch filter compartment.
Cleaning the Motor Intake Filter
- Unplug tool.
- Press in the lock tabs and pull the cover away from the head.
- Pull out the sponge filter
- Clean the filter and replace.
- Insert the cover into the head until the lock tabs
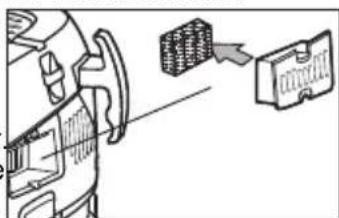
After particularly dusty applications, the motor intake filter may become clogged and cause the tool overload. If overload occurs, unplug the tool for 5 minutes and clean the filters.
Changing the HEPA Filter
Periodically inspect the HEPA filter and replace if necessary. See "Specifications" for replacement part number.
- Unplug tool.
- Unlatch and remove head.
- Place the head upside down on a level surface.
- Remove the 4 screws holding the orange cover in place.
- Carefully remove the HEPA filter. Note, there filter - do not discard the
- Inspect and replace the filter and ring.
- Replace the cover and tighten the 4 screws securely.
OPERATION
WARNING
To reduce the risk of injury, always unplug tool before changing or re
moving accessories. Only use accessories specifically recommended for this tool. Others may be hazardous.
Always wear proper eye protection marked to comply with ANSI Z87.1.
Selecting Air Speed
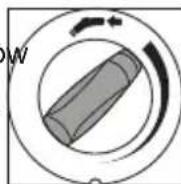
To increase or decrease the air flow speed, use the speed control dial. Turn the dial clockwise to decrease the air flow speed, and counter clockwise to increase the airflow speed.
Filters can become clogged during heavy use. To maintain the efficiency of the dust extractor, empty/change the filter bag and clean all of the filters periodically. Milwaukee suggests cleaning the filters after 200 holes (at 5/8'' diameter, 4'' deep) or an equivalent amount of produced dust.
Starting and Stopping Dust Extractor
To turn on the dust extractor, set the power switch to the ON position (I). To turn off the dust extractor, set the power switch to the OFF position (O). To automatically start the dust extractor using a power tool's switch, set the power switch to the TOOL position.
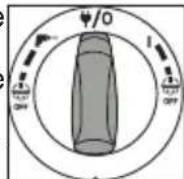
To use the tool without the automatic filter cleaning function, set the power switch to the filter cleaning OFF symbol below the TOOL or ON positions. It is recommended to turn off the automatic filter cleaning when using the dust extractor for wet pickup.
Picking Up Dry Materials
Make sure that the tank is dry before using the dust extractor to pick up dry materials. If the extractor tank is wet, run the dust extractor for about 5 minutes (without picking up anything) to dry the inside of the tank.
Using the Dust Extractor with a Power Tool
WARNING
To reduce the risk of fire, electric shock, injury, and damage to the tool:
Do not plug any tool or appliance rated over 4.6 A / 550 W into the outlet on the dust extractor. Check nameplate on the tool for the amp rating. Many tools (such as sanders) are designed to be used with dust extractors. The dust extractors collect the dust that these tools create before it gets into the air or onto the floor. Dust extractors with the AUTO setting are ideal for collecting dust because they can be set up to turn on and off automatically using the tool's AUTO/ON/OFF switch
- Connect hose to the tool.
- Plug the tool into the outlet on the dust extractor's head.
- Set the AUTO/ON/OFF switch to the AUTO position.
- Turnon the tool and the dust extractor few seconds.
- When done, turn off the tool and the dust extractor will stop automatically.
- Unplug the tool and turn the dust extractor OFF (O) when the job is complete.
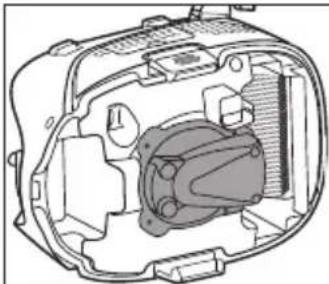
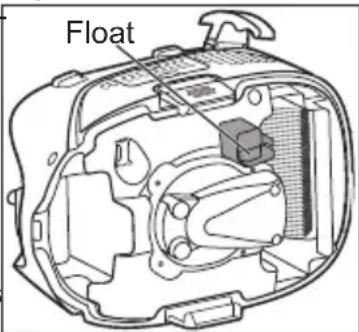
Picking Up Wet Materials
WARNING
To reduce the risk of electric shock, DO NOT pick up wet materials
unless tank has been cleaned of dust and the filter bag has been removed. Turn off and unplug tool if foam or liquid escapes from the tool.
A float valve shuts off suction when the tank is full. Be sure the float is clean and moves freely before use.
- Unplug tool and remove head.
- Remove filter bags and clean tank.
- Ensure the float moves freely.
- Replace head and latch in place.
- Turn the power switch to ON (I) and filter cleaning OFF on the dust extractor.
- Suction wet materials.
- When finished, turn the power switch to OFF (O).
- Unplug tool and remove head.
- To drain liquid, block wheels and carefully dump contents. Do not store dust extractor with liquid in tank.
- Rinse and dry tank. Run dust extractor for 5 minutes to ensure tank is thoroughly dry before picking up dry materials.
MAINTENANCE
WARNING
To reduce the risk of injury, always unplug the tool before performing
any maintenance. Never disassemble the tool. Contact a MILWAUKEE service facility for ALL repairs.
Maintaining Tools
Keep your tool in good repair by adopting a regular maintenance program. Inspect your tool for issues such as undue noise, misalignment or binding of moving parts, breakage of parts, or any other condition that may affect the tool operation. Return the tool to a MILWAUKEE service facility for repair. After six months to one year, depending on use, return the tool to a MILWAUKEE service facility for inspection.
WARNING
To reduce the risk of personal injury, electric shock and damage, nev
er immerse your tool in liquid or allow a liquid to flow inside it.
Cleaning
Clean dust and debris from vents. Keep handles clean, dry and free of oil or grease. Use only mild soap and a damp cloth to clean, since certain cleaning agents and solvents are harmful to plastics and other insulated parts. Some of these include gasoline, turpentine, lacquer thinner, paint thinner, chlorinated cleaning solvents, ammonia and household detergents containing ammonia. Never use flammable or combustible solvents around tools.
Storage
Before storing the dust extractor, always empty and clean the tank. Never allow debris to sit in the tank for any extended period of time. The dust extractor should be stored indoors.
Repairs
For repairs, return the tool to the nearest authorized service center.
ACCESSIONS
WARNING
To reduce the risk of injury, always unplug the tool before attaching or
removing accessories. Use only specifically recommended accessories. Others may be hazardous.
| Adapter Connection Chart | |
| For Dust Extraction Attachment: Use Hose Adapter: | |
| 49-40-6101 49-90-1959 & | 49-90-1960 |
| SDS Plus and SDS Max Vacuum Bits | 49-90-1957 |
| 49-40-6105 49-90-1958 | |
| 5261-DE 49-90-1958 | |
| 49-40-6110 | 49-90-1959 |
| 5317-DE 49-90-1959 | |
| 5318-DE 49-90-1959 | |
For a complete listing of accessories, go online to www.milwaukeeetool.com or contact a distributor.
1-800-SAWDUST (1.800.729.3878)
Monday-Friday, 7:00 AM - 6:30 PM CST
or visit www.milwaukeetool.com
Contact Corporate After Sales Service Technical Support with technical, service/repair, or warranty questions.
Email: metproductsupport@milwaukeetool.com
Become a Heavy Duty Club Member at www.milwaukeetool.com to receive important notifications regarding your tool purchases.
SERVICE - CANADA
Milwaukee Tool (Canada) Ltd
1.800.268.4015
Monday-Friday, 7:00 AM - 4:30 PM CST
or visit www.milwaukeetool.ca
LIMITED WARRANTY USA & CANADA
Every MILWAUKEE power tool (see exceptions below) is warranted to the original purchaser only to be free from defects in material and workmanship. Subject to certain exceptions, MILWAUKEE will repair or replace any part on an electric power tool which, after examination, is determined by MILWAUKEE to be defective in material or workmanship for a period of five (5) years* after the date of purchase unless otherwise noted. Return of the power tool to a MILWAUKEE factory Service Center location or MILWAUKEE Authorized Service Station, freight prepaid and insured, is required. A copy of the proof of purchase should be included with the return product. This warranty does not apply to damage that MILWAUKEE determines to be from repairs made or attempted by anyone other than MILWAUKEE authorized personnel, misuse, alterations, abuse, normal wear and tear, lack of maintenance, or accidents.
Normal Wear: Many power tools need periodic parts replacement and service to achieve best performance. This warranty does not cover repair when normal use has exhausted the life of a part including, but not limited to, chucks, brushes, cords, saw shoes, blade clamps, o-rings, seals, bumpers, driver blades, pistons, strikers, lifters, and bumper cover washers.
*This warranty does not cover Air Nails & Staplers; Airless Paint Sprayer; Cordless Battery Packs; Gasoline Driven Portable Power Generators; Hand Tools; Hoist - Electric, Lever & Hand Chain; M12™ Heated Gear; Reconditioned Product; and Test & Measurement Products. There are separate and distinct warranties available for these products.
**The warranty period for Job Site Radios, M12™ Power Port, M18™ Power Source, Jobsite Fan and Trade Titan™ Industrial Work Carts is one (1) year from the date of purchase. The warranty period for the Drain Cleaning Cables and AIRSNAKE™ Drain Cleaning Air Gun Accessories is two (2) years from the date of purchase. The warranty period for the M18™ Compact Heat Gun, 8 Gallon Dust Extractor, M18™ Framing Nailers, M18 FUEL™ 1/2" Ext. Anvil Controlled Torque Impact Wrench w/ ONE-KEY™, and the M18 FUEL™ 1" High Torque Impact Wrench w/ ONE-KEY™ is three (3) years from the date of purchase. The warranty period for the LED in the LED Work Light and the LED Upgrade Bulb for the Work Light is the lifetime of the product subject to the limitations above. If during normal use the LED or LED Bulb fails, the part will be replaced free of charge.
Warranty Registration is not necessary to obtain the applicable warranty on a MILWAUKEE power tool product. The manufacturing date of the product will be used to determine the warranty period if no proof of purchase is provided at the time warranty service is requested.
ACCEPTANCE OF THE EXCLUSIVE REPAIR AND REPLACEMENT REMEDIES DESCRIBED HEREIN IS A CONDITION OF THE CONTRACT FOR THE PURCHASE OF EVERY MILWAUKEE PRODUCT. IF YOU DO NOT AGREE TO THIS CONDITION, YOU SHOULD NOT PURCHASE THE PRODUCT. IN NO EVENT SHALL MILWAUKEE BE LIABLE FOR ANY INCIDENTAL, SPECIAL, CONSEQUENTIAL OR PUNITIVE DAMAGES, OR FOR ANY COSTS, ATTORNEY FEES, EXPENSES, LOSSES OR DELAYS ALGEGED TO BE AS A CONSEQUENCE OF ANY DAMAGE TO, FAILURE OF, OR DEFECT IN ANY PRODUCT INCLUDING, BUT NOT LIMITED TO, ANY CLAIMS FOR LOSS OF PROFITS. SOME STATES DO NOT ALLOW THE EXCLUSION OR LIMITATION OF INCIDENTAL OR CONSEQUENTIAL DAMAGES, SO THE ABOVE LIMITATION OR EXCLUSION MAY NOT APPLY TO YOU. THIS WARRANTY IS EXCLUSIVE AND IN LIEU OF ALL OTHER EXPRESS WARRANTYES, WRITTEN OR ORAL. TO THE EXTENT PERMITTED BY LAW, MILWAUKEE DISCLAIMS ANY IMPLIED WARRANTYES, INCLUDING WITHOUT LIMITATION ANY IMPLIED WARRANTY OF MERCHANTABILITY OR FITNESS FOR A PARTICULAR USE OR PURPOSE; TO THE EXTENT SUCH WARRANTYER IS NOT PERMITTED BY LAW, SUCH IMPLIED WARRANTYES ARE LIMITED TO THE DURATION OF THE APPLICABLE EXPRESS WARRANTY AS DESCRIBED ABOVE. SOME STATES DO NOT ALLOW LIMITATIONS ON HOW LONG AN IMPLIED WARRANTY LASTS, SO THE ABOVE LIMITATION MAY NOT APPLY TO YOU, THIS WARRANTYY GIVES YOU SPECIFIC LEGAL RIGHTS, AND YOU MAY ALSO HAVE OTHER RIGHTS WHICH VARY FROM STATE TO STATE.
This warranty applies to product sold in the U.S.A. and Canada only. Please consult the 'Service Center Search' in the Parts & Service section of MILWAUKEE's website www.milwaukeetool.com or call 1.800. SAWDUST (1,800.729.3878) to locate your nearest service facility for warranty and non-warranty service on a Milwaukee electric power tool.
LIMITED WARRANTY - MEXICO, CENTRAL AMERICA & CARIBBEAN
TECHTRONIC INDUSTRIES' warranty is for 5 years since the original purchase date.
This warranty card covers any defect in material and workmanship on this Product.
To make this warranty valid, present this warranty card, sealed/ stamped by the distributor or store where you purchased the product, to the Authorized Service Center (ASC). Or, if this card has not been sealed/stamped, present the original proof of purchase to the ASC.
Call 55 4160-3547 to find the nearest ASC, for service, parts, accessories or components.
Procedure to make this warranty valid
Take the product to the ASC, along with the warranty card sealed/ stamped by the distributor or store where you purchased the product, and any faulty piece or component will be replaced without cost for you. We will cover all freight costs relative with this warranty process. Exceptions
This warranty is not valid in the following situations
a) When the product is used in a different manner from the end-user guide or instruction manual.
b) When the conditions of use are not normal.
c) When the product was modified or repaired by people not authorized by TECHTRONIC INDUSTRIES.
Note: If cord set is damaged, it should be replaced by an Authorized Service Center to avoid electric risks.
SERVICE AND ATTENTION CENTER
Call to 554160-3547
IMPORTED AND COMMERCIALIZED BY
TECHTRONIC INDUSTRIES MEXICO, S.A. DE C.V.
Miguel de Cervantes Saavedra No.301 Piso 5, Torre Norte
Milwaukee Tool (Canada) Ltd 1.800.268.4015
Monday-Friday, 7:00 AM - 4:30 PM CST
www.milwaukeeetoole.ca
GARANTIE LIMITEE - AUX ETATS-UNIS ET AU CANADA
Los filtrosSEOSEOSEOSEOSEOSEOSEOSEOSEOSEOSEOSEOSEOSEOSEOSEOSEOSEOSEOSEOSEOSEOSEOSEOSEOSEOSEOSEOSEOSEOSEOSEOSEOSEOSEOSEOSEOSEOSEOSEOSEOSEOSEOSEOSEOSEOSEOSEOSEOSEOSEOSEOSEOSEOSEOSEOSEOSEOSEOSEOSEOSEOSEOSEOSEOSEOSEOSEOSEOSEOSEOSEOSEOSEOSEOSEOSEOSEOSEOSEOSEOSEOSEOSEOSEOSEOSEOSEOSEOSEOSEOSEOSEOSEOSEOSEOSEOSEOSEOSEO SEOEO SEOEO SEOEO SEOEO SEOEO SEOEO SEOEO SEOEO SEOEO SEOEO SEOEO SEOEO SEOEO SEOEO SEOEO SEOEO SEOEO SEOEO SEOEO SEOEO SEOEO SEOEO SEOEO SEOEO SEOEO SEOEO SEOEO SEOEO SEOEO SEOEO SEOEO SEOEO SEOEO SEOEO SEOEO SEOEO SEOEO SEOEO SEOEO SEOEO SEOEO SEOEO SEOEO SEOEO SEOEO SEOEO SEOEO SEOEO SEOEO SEOEO SEOEQ
Lunes a Viernes (9am a 6pm)
O contactanos en www.milwaukeetool.com.mx
GARANTÍA LIMITADA -E.U.A. YCANADA
13135 West Lisbon Road
Brookfield, WI 53005 USA
58140084d6
4/20 Printed in Hungary

- GALLON DUST EXTRACTOR DéPOUSSIÈREUR DE 8 GALLONS EXTRACTOR DE POLVO DE 8 GALONES
- IMPORTANT SAFETY INSTRUCTIONS
- WARNING
- OF FIRE, ELECTRIC SHOCK OR INJURY:
- READ AND SAVE ALL INSTRUCTIONS FOR FUTURE USE
- SYMBOLOLOGY
- FUNCTIONAL DESCRIPTION
- SPECIFICATIONS
- GROUNDING INSTRUCTIONS
- EXTENSION CORDS
- Guidelines for Using Extension Cords
- ASSEMBLY
- Installing the Hose Hooks
- Securing the Power Cord
- Installing/Changing the Plastic Dust Bag
- Installing/Changing the Fleece Dust Bag
- Installing the Hose and Accessories
- Cleaning/Changing the Main Filter
- Cleaning the Motor Intake Filter
- Changing the HEPA Filter
- OPERATION
- Selecting Air Speed
- Starting and Stopping Dust Extractor
- Picking Up Dry Materials
- Picking Up Wet Materials
- MAINTENANCE
- Maintaining Tools
- Cleaning
- Storage
- Repairs
- ACCESSIONS
- 1-800-SAWDUST (1.800.729.3878)
- SERVICE - CANADA
- Milwaukee Tool (Canada) Ltd
- 1.800.268.4015
- LIMITED WARRANTY USA & CANADA
- LIMITED WARRANTY - MEXICO, CENTRAL AMERICA & CARIBBEAN
- Procedure to make this warranty valid
- Milwaukee Tool (Canada) Ltd 1.800.268.4015
- GARANTIE LIMITEE - AUX ETATS-UNIS ET AU CANADA
- GARANTÍA LIMITADA -E.U.A. YCANADA
Brand : MILWAUKEE
Model : 896020
Category : Vacuum Cleaner