SRCOOLNET2LX - Network accessory Tripp Lite - Free user manual and instructions
Find the device manual for free SRCOOLNET2LX Tripp Lite in PDF.

| Product Type | SNMP/Web Management Auxiliary Card |
| Brand | Tripp Lite |
| Model | SRCOOLNET2LX |
| Compatibility | Localized coolers SRCOOL2KWM, SRCOOL7KRM, SRCOOL18K, SRCOOL24K and row cooler SRCOOL33K |
| Interfaces | 1 Ethernet RJ45 port, 1 Micro-USB port, 1 USB Type-A port |
| Network Protocols | IPv4, IPv6, DHCP, HTTP/HTTPS, Telnet, SSH, SNMP |
| Power | Via host device (non-PoE) |
| Included Sensor | EnviroSense2 E2MT module (temperature probe) |
| Main Functions | Remote management via web browser, SNMP, Telnet, SSH; remote temperature setpoint control; ambient temperature monitoring |
| LED Indicators | Ethernet link (blinking green), activity, speed (yellow), status (green/orange) |
| Reset Button | Yes, recessed (3 s for restart, 20 s for factory reset) |
| Management Software | PowerAlert Device Manager (web interface) |
| Security | Username and password authentication (localadmin/localadmin by default) |
| Warranty | 2 years limited |
| Package Contents | Micro-USB cable (3.7 m), E2MT module, E2MT user manual, installation guide |
Frequently Asked Questions - SRCOOLNET2LX Tripp Lite
User questions about SRCOOLNET2LX Tripp Lite
0 question about this device. Answer the ones you know or ask your own.
Ask a new question about this device
Download the instructions for your Network accessory in PDF format for free! Find your manual SRCOOLNET2LX - Tripp Lite and take your electronic device back in hand. On this page are published all the documents necessary for the use of your device. SRCOOLNET2LX by Tripp Lite.
USER MANUAL SRCOOLNET2LX Tripp Lite
Installation and Quick Start Guide
SNMP/Web Management Accessory
Model: SRCOOLNET2LX
Installation 2
Features 10
Tech Support 12
Warranty 12
Product Registration and 13
Regulatory Compliance
Espanol
14
Français 27

Read this guide carefully before installation. A separate downloadable User's Guide can be found by going to www.triplite.com/support and typing SRCOOLNET2LX in the search field. Refer to the User's Guide for additional information about configuration and operation.
PROTECT YOUR INVESTMENT!
Register your product for quicker service and ultimate peace of mind. You could also win an ISOBAR6ULTRA surge protector—a $100 value!
www.triplite.com/warranty


1111 W. 35th Street, Chicago, IL 60609 USA • www.triplite.com/support
Copyright © 2018 Tripp Lite. All rights reserved.
Installation
The SRCOOLNET2LX allows a user to communicate with and control Tripp Lite's SRCOOL2KWM, SRCOOL7KRM, SRCOOL18K, SRCOOL24K (pre-installed in unit) spot coolers, and compatible SRCOOL33K row-based cooler as manageable devices on a network accessible via Web browser, network management station, telnet, SSH or command line.
1 - Preparation
1-1 Confirm Package Contents: In addition to this manual, your package should include the following:
- Micro-USB cable for remote temperature sensing and configuration (part number: 73176E), 12 ft.
- EnviroSense2 E2MT Sensor Module
E2MT User Manual
1-2 Locate MAC Address: The 12-digit MAC address (000667xxxxx) is located on the SRCOOLNET2LX.
2 - Installation
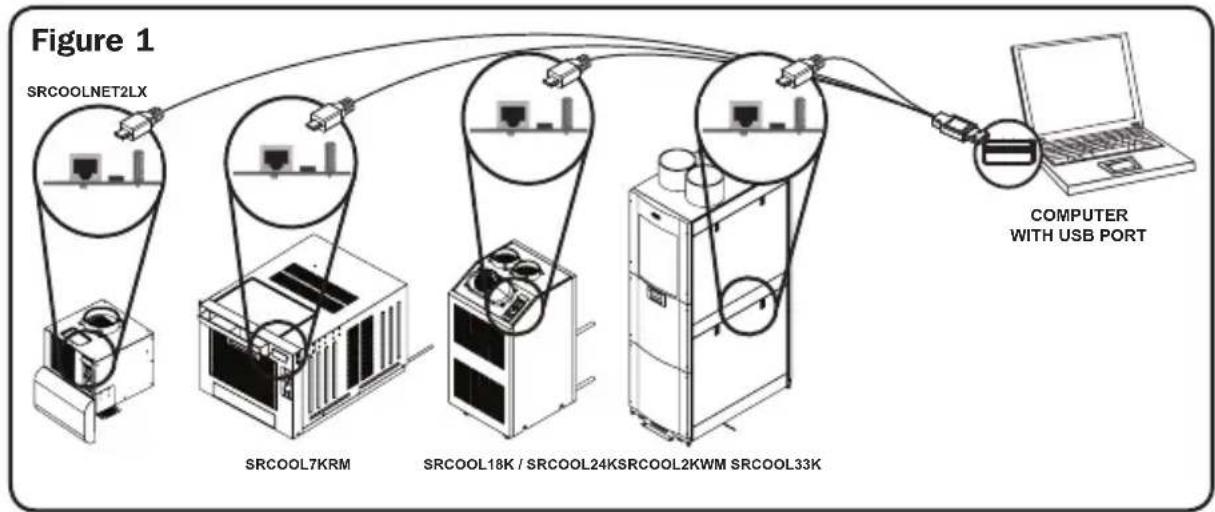
2-1 Insert the SRCOOLNET2LX into the front SNMP accessory slot on the SRCOOL2KWM/7KWM/18K/24K spot coolers or compatible SRCOOL33K row-based cooler (Figure 1 in section 4-2).
2-2 Connect SRCOOLNET2LX to Network: Connect a standard Ethernet patch cable to the RJ45 Ethernet port on the SRCOOLNET2LX.
Note: This port does not support PoE (Power over Ethernet) applications.
2-3 Determine Network Installation Method: If your network's DHCP server will assign a dynamic IP address to the SRCOOLNET2LX automatically, proceed to 3 - Dynamic IP Address Assignment. If you will assign a static IP address to the SRCOOLNET2LX manually, proceed to 4 - Static IP Address Assignment. If you are uncertain which method to use, contact your network administrator for assistance before continuing the installation process.
Installation
3 - Dynamic IP Address Assignment
3-1 Connect SRCOOLNET2LX to Network: By default, the SRCOOLNET2LX will attempt to obtain an IP address via DHCP. This may take as long as several minutes, depending on your network environment.
3-2 Discover IP Address: To identify the IP address assigned to the SRCOOLNET2LX, contact your network administrator and provide the MAC address of the SRCOOLNET2LX. You can also determine the IP address locally at the card. If you do not already have the serial over USB driver installed on your PC, you can download it from www.triplite.com/support by typing SRCOOLNET2LX in the search field. Select the driver named "TL-cdc". To install, follow the instructions provided with the driver.
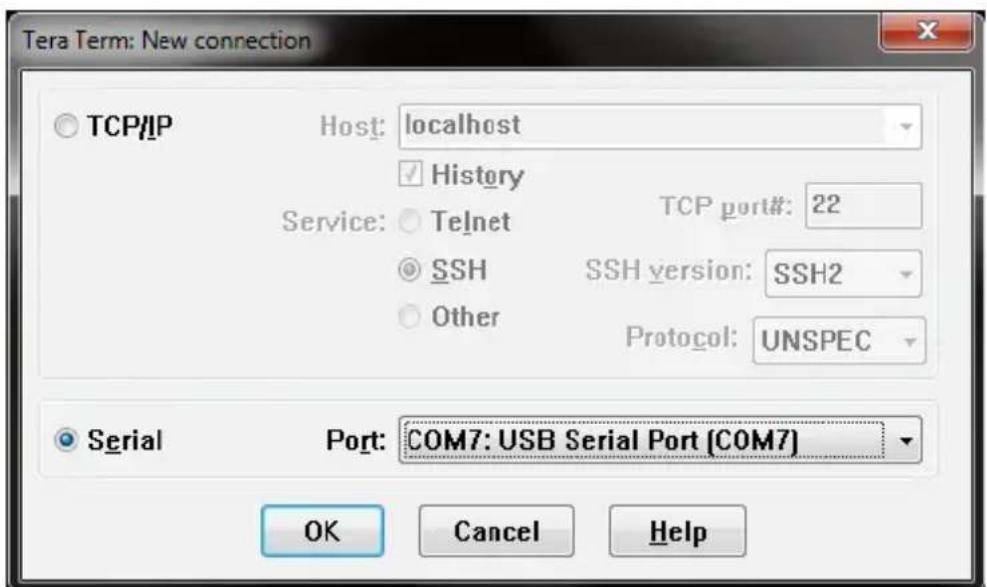
Once the driver is installed and the COM port has been assigned, start a terminal emulation program, such as Tera Term Pro. Configure it to use the assigned COM port and use the following serial port settings: 115.2Kbps, 8, NONE, 1. Connect the USB cable to the PC and the Micro-USB end to the Micro-USB port on the SRCOOLNET2LX. When the login prompt appears, login as localadmin / localadmin. When the Menu appears, navigate to "3- Network Configuration", then to "1- IP Configuration". The assigned IP address will be displayed. After you have determined the IP address, proceed to section 5 - Test and Configure.
Notes:
- usernames and passwords are case sensitive.
- You may wish to request a long-term lease period for the IP address, depending on your application.
- PowerAlert® Device Manager and the WEBCARDLX support both IPv4 and IPv6. The card is set up by default to receive a DHCP address for IPv4, IPv6 or both. Receiving both addresses allows connection to the card via either the IPv4 or IPv6 address.
Installation
4 - Static IP Address Assignment/Terminal Menu Configuration Settings
4-1 Determine IP Information: The SRCOOLNET2LX can support a single static IPv4 address (requires setting the IP address, subnet mask and gateway) and/or a single static IPv6 address. In addition, the SRCOOLNET2LX can support a single static IPv4 or an IPv6 DNS address that is required to be entered.
4-2 Configure Terminal Emulation Program: If you have not already done so, download the serial over USB driver (TL-cdc) from the Tripp Lite website. The driver can be found by going to www.triplite.com/support and typing SRCOOLNET2LX in the search field. To install the driver, follow the instructions provided. Once the driver is installed and a COM port has been assigned, set your terminal emulation program to use the COM port that corresponds to the USB port.
4-3 Connect SRCOOLNET2LX to Computer: Using the provided cable, connect your PC to the Micro-USB port on the SRCOOLNET2LX.
Installation
4-4 The card will display a Linux-style login after boot up. Login as localadmin / localadmin to access the standard menu.
Note: usernames and passwords are case sensitive.
4-5 From the Main Menu:
a. Select Option 3: Network Configuration
b. Select Option 1: IP Configuration
c. Select Option 3: IPv4 setting on Option 4: IPv6 settings
d. Select Option 1: Method
e. Select Option 2: Static
Assign the address, subnet mask, gateway, etc. Save your settings by selecting "A" (apply). Choose "y" to restart PowerAlert now. Close your terminal session.
4-6 Remove Configuration Cable: Remove the configuration cable that connects the SRCOOLNET2LX to the computer.
Installation
5 - Test and Configure

Test Network Connection: After an IP address has been assigned to the card, try to access it with a Web browser. Open Firefox or Chrome on a computer connected to the network and enter http:// or https:// followed by the IP address. The login screen for the PowerAlert Device Manager will display. The default username is localadmin and the password is localadmin. After you enter the username and password, the PowerAlert Status page will appear in the browser window. For more information about configuration and operation of the managed device, refer to the User's Guide located in the support section of the SRCOOLNET2LX product web page.
Note: usernames and passwords are case sensitive.
Installation
6 - Using E2MT as Remote Set Temperature Sensor
SRCOOLNET2LX supports the use of one E2MT environmental sensor (included) to control the temperature, rather than the AC unit's default internal temperature sensor in the return airstream. The E2MT sensor can be located in the area you wish to control to the specific set point.
6-1 Configuring SRCOOLNET2LX for Remote Set-Point Usage
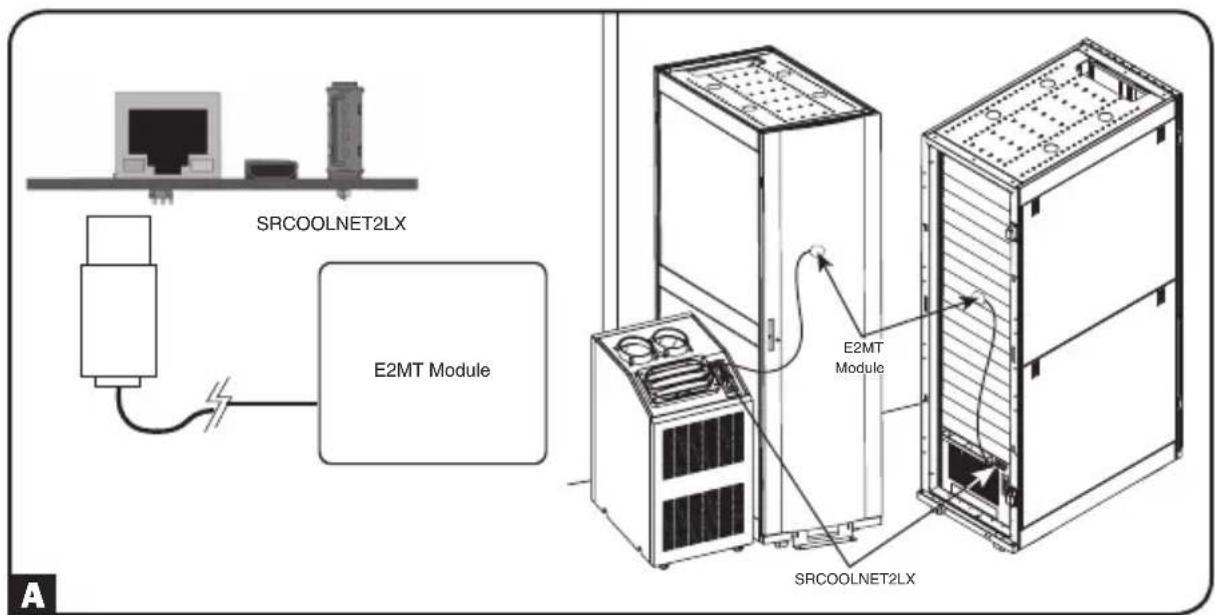
To use the Remote Temperature Set-Point feature, ensure the E2MT device is installed in the desired location for monitoring and also connected to the SRCOOLNET2LX A.
Installation
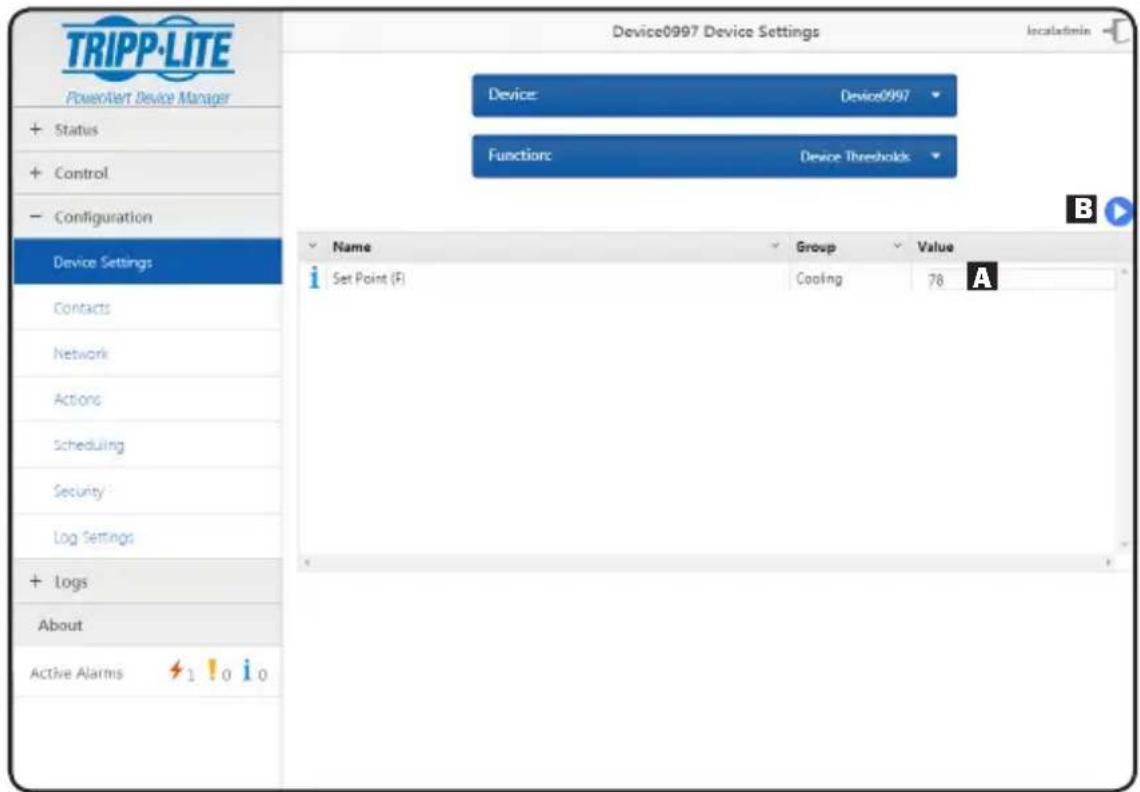
From the PowerAlert Device Manager Interface, turn ON the cooling unit by selecting the Control menu. Under the Control menu, check the "Turn On Device" option and click the activation button to the right. Next, navigate to the Configuration menu> Device Settings to ensure the E2MT sensor is selected. Under the Function: Device Thresholds drop-down menu in the box labeled "Value", type in the temperature set-point you wish the SRCOOLNET2LX to target A and press activation button to the right B. The set point control on the device display panel will be overridden.
Installation
The cooling unit will now begin cooling when the temperature reading at E2MT equals or exceeds the set point value you entered. When the temperature falls below this set-point, the unit will stop cooling. If the "Always On" checkbox is checked, the fans will remain running when the unit stops cooling. If the "Always On" checkbox is unchecked, the fans will shut off and the unit will shut down. Once the temperature reaches the set point again, the unit will restart and begin cooling until the temperature reported by E2MT returns below the set point.
Note: This cycle will continue indefinitely until you select "Shutdown Cooler" from the SRCOOLNET2LX user interface or turn the cooling unit off via the device display panel.
6-2
Important Considerations When Using Remote Temperature Setpoint Mode
It is important to keep the following considerations in mind when using the Remote Temperature Set-Point feature of SRCOOLNET2LX:
1 The temperature being used for controlling the attached cooling device is the E2MT sensor, NOT the return air temperature. The return air temperature may be higher or lower than the temperature E2MT is reporting.
2 The set point displayed on the attached cooling unit's display panel should be ignored when the SRCOOLNET2LX is set to Remote Temperature Set-Point mode in the PowerAlert Device Manager. The set point displayed on the device display panel will be the minimum (when cooling) or maximum (when not cooling) set point permissible by the cooling unit.
*The SRCOOL2KWM and compatible SRCOOL33K will display the correct set point on the cooling unit's display.
Note: When the Remote Set-Point Temperature feature is enabled, the unit will show as "EXTERNAL" on the SRCOOL33K's LCD display. If there is no setting of external temperature set-point within 60 seconds, the unit will measure the value internally and the icon "EXTERNAL" will be off.
3 If the power button on the cooling unit display panel is pressed while in Remote Temperature Set-Point mode, the mode will be canceled.
Features
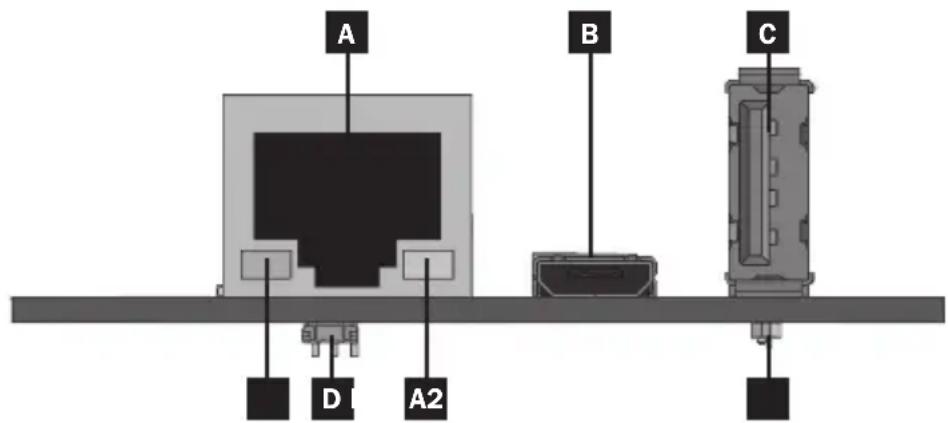
A Ethernet Port: RJ45 jack connects the SRCOOLNET2LX to the network using a standard Ethernet patch cable. The Link LED A1 and Status LED A2 indicate the operating conditions. See the LED Function Table for a description of LED behavior.
B Micro-USB Port: Use this port to directly connect with a computer running a terminal emulation program. A cable (part number: 73176E) is included with the SRCOOLNET2LX. If you need to order a replacement cable, contact Tripp Lite Customer Support at 773.869.1234.
Type-A USB Port: Use this port to connect the included E2MT module for monitoring ambient temperature conditions.
Note: Do not connect a keyboard or mouse to this port.
D Reset Button: The reset button is recessed, accessible through a small hole under the RJ45 network port. Use a paper clip or other suitable object to press the reset button for 3 seconds to reboot the network interface. Rebooting the network interface will not erase network settings or interrupt AC power. Press and hold the reset button for 20 seconds to restore the network interface to its factory default settings. Restoring to the factory default will erase all previously saved data—including network settings—without interrupting AC power.
E Status LED: Shows SRCOOLNET2LX status. See the LED Function Table for a description of LED behavior.
10
Features
LED Function Table
| Identifier | LED Function LED | Color Status Description | |
| A1 | Ethernet Link/Activity Indicator | Green Flashing | There is network activityon the port |
| Off There isno networkactivity on the port | |||
| Off Performreset viainterface or resetbutton | |||
| A2 | EthernetNetwork SpeedIndicator | Yellow On steady | 100 Mbpsnetworkspeed |
| Off10 Mbps speed if A1is flashing | |||
| Off No network activity ifA1is also off | |||
| Off Performreset viainterface or resetbutton | |||
| E | SRCOOLNET2LXStatus | Green On steady | Normal operation |
| Green Single flash | Power upindicator | ||
| Green/Orange | Off No power or card isinitializing | ||
| Green/Orange | Alternating(~1/sec.) | ||
| Green/Orange | Alternating(~2/sec.) |
Technical Support
Technical Support can be found at: www.triplite.com/support
Warranty
LIMITED WARRANTY
Seller warrants this product, if used in accordance with all applicable instructions, to be free from original defects in material and workmanship for a period of 2 years from the date of initial purchase. If the product should prove defective in material or workmanship within that period, Seller will repair or replace the product, in its sole discretion. Service under this Warranty can only be obtained by delivering or shipping the product (with all shipping or delivery charges prepaid) to: Tripp Lite, 1111 W. 35th Street, Chicago, IL 60609, USA. Seller will pay return shipping charges. Visit www.triplite.com/support before sending any equipment back for repair.
THIS WARRANTY DOES NOT APPLY TO NORMAL WEAR OR TO DAMAGE RESULTING FROM ACCIDENT, MISUSE, ABUSE OR NEGLECT. SELLER MAKES NO EXPRESS WARRANTY OTHER THAN THE WARRANTY EXPRESSLY SET FORTH HEREIN. EXCEPT TO THE EXTENT PROHIBITED BY APPLICABLE LAW, ALL IMPLIED WARRANTY, INCLUDING ALL WARRANTY OF MERCHANTABILITY OR FITNESS, ARE LIMITED IN DURATION TO THE WARRANTY PERIOD SET FORTH ABOVE; AND THIS WARRANTY EXPRESSLY EXCUSES ALL INCIDENTAL AND CONSEQUENTIAL DAMAGES. (Some states do not allow limitations on how long an implied warranty lasts, and some states do not allow the exclusion or limitation of incidental or consequential damages, so the above limitations or exclusions may not apply to you. This Warranty gives you specific legal rights, and you may have other rights which vary from jurisdiction to jurisdiction).
WARNING: The individual user should take care to determine prior to use whether this device is suitable, adequate or safe for the use intended. Since individual applications are subject to great variation, the manufacturer makes no representation or warranty as to the suitability or fitness of these devices for any specific application.
Not compatible with PoE (Power over Ethernet) applications.
Product Registration and Regulatory Compliance
PRODUCT REGISTRATION
Visit www.triplite.com/warranty today to register your new Tripp Lite product. You'll be automatically entered into a drawing for a chance to win a FREE Tripp Lite product!*
- No purchase necessary. Void where prohibited. Some restrictions apply. See website for details.
CAUTION: Use of this equipment in life support applications where failure of this equipment can reasonably be expected to cause the failure of the life support equipment or to significantly affect its safety or effectiveness is not recommended. Do not use this equipment in the presence of a flammable anesthetic mixture with air, oxygen or nitrous oxide.
WEEE Compliance Information for Tripp Lite Customers and Recyclers (European Union)

Under the Waste Electrical and Electronic Equipment (WEEE) Directive and implementing regulations, when customers buy new electrical and electronic equipment from Tripp Lite they are entitled to:
- Send old equipment for recycling on a one-for-one, like-for-like basis (this varies depending on the country)
- Send the new equipment back for recycling when this ultimately becomes waste
Regulatory Compliance Identification Numbers
For the purpose of regulatory compliance certifications and identification, your Tripp Lite product has been assigned a unique series number. The series number can be found on the product nameplate label, along with all required approval markings and information. When requesting compliance information for this product, always refer to the series number. The series number should not be confused with the marketing name or model number of the product.
Tripp Lite has a policy of continuous improvement. Specifications are subject to change without notice.


Manufacturing Excellence.
1111 W. 35th Street, Chicago, IL 60609 USA • www.triplite.com/support
1111 W. 35th Street, Chicago, IL 60609 USA • www.triplite.com/support
1111 W. 35th Street, Chicago, IL 60609 USA • www.triplite.com/support
18-06-379 93-387E_revA