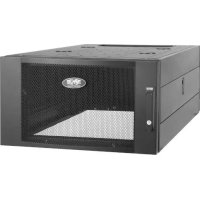
SmartRack SR24UB - Wardrobe Tripp Lite - Free user manual and instructions
Find the device manual for free SmartRack SR24UB Tripp Lite in PDF.

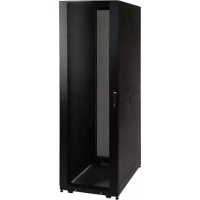
| Product Type | 19" Rack Enclosure |
| Brand | Tripp Lite |
| Model | SmartRack SR24UB |
| Number of Rack Units (U) | 24U |
| Dimensions (H x W x D) | 1169 x 600 x 850 mm |
| Weight | 56 kg |
| Maximum Load Capacity | 453 kg |
| Adjustable Mounting Depth | 76 to 826 mm |
| Material | Steel |
| Color | Black |
| Doors | Front and rear, lockable and reversible |
| Side Panels | Removable and lockable |
| Castors Included | Yes (4) |
| Leveling Feet | Yes (4) |
| Mounting Rails | 4 vertical, depth-adjustable |
| Grounding | Yes, with grounding lugs at all four corners |
| Warranty | 5-year limited |
| Usage Conditions | Controlled indoor, away from moisture and extreme temperatures |
| Maintenance | Clean with a dry cloth; avoid moisture and dust |
Frequently Asked Questions - SmartRack SR24UB Tripp Lite
User questions about SmartRack SR24UB Tripp Lite
0 question about this device. Answer the ones you know or ask your own.
Ask a new question about this device
Download the instructions for your Wardrobe in PDF format for free! Find your manual SmartRack SR24UB - Tripp Lite and take your electronic device back in hand. On this page are published all the documents necessary for the use of your device. SmartRack SR24UB by Tripp Lite.
USER MANUAL SmartRack SR24UB Tripp Lite
- Important Safety Instructions 2
- Overview 2
- Feature Identification 3
-
Enclosure Installation 4
4.1 Preparation 4
4.2 Unpacking 4
4.3 Installing Casters and Levelers 4
4.4 Placement 4
4.5 Leveling the Enclosure 5
4.6 Ground Connection 5 -
Enclosure Configuration 6
5.1 Door Locks 6
5.2 Reversing the Doors 6
5.3 Mounting Rails 6
5.4 Adjusting Mounting Rail Depth 6 - Equipment Installation 7
6.1 Installing or Removing Cage Nuts 7 - Specifications 7
8.Storage and Service 8 - Warranty & Product Registration 8
Espanol 9
Français 17
Pycckn 25
WARRANTY REGISTRATION
Register your product today and be automatically entered to win an ISOBAR® surge protector in our monthly drawing!

tripplite.com/warranty


Manufacturing Excellence.
1111 W. 35th Street, Chicago, IL 60609 USA · triplite.com/support
Copyright © 2022 Tripp Lite. All trademarks are the sole property of their respective owners.
1. Important Safety Instructions
SAVE THESE INSTRUCTIONS
All sections of this manual contain instructions and warnings that should be followed during the installation and use of the Enclosures described in this manual. Read all instructions and warnings thoroughly before attempting to move, install or use the Enclosures described in this manual. Failure to comply will create a risk of personal injury and property damage and may invalidate the warranty.
- Keep the enclosure in a controlled indoor environment, away from moisture, temperature extremes, flammable liquids and gasses, conductive contaminants, dust and direct sunlight.
- Leave adequate space at the front and rear of the enclosure for proper ventilation. Do not block, cover or insert objects into the external ventilation openings of the enclosure.
The enclosure is extremely heavy. Use caution when handling the enclosure. Do not attempt to unpack, move or install it unassisted. Use a mechanical device such as a forklift or pallet jack to move the enclosure in the shipping container. - Do not place any object on the enclosure, especially containers of liquid, and do not attempt to stack the enclosures.
- Inspect the shipping container and the enclosure for shipping damage. Do not use the enclosure if it is damaged.
- Leave the enclosure in the shipping container until it has been moved as close to the final installation location as possible. The casters are designed for minor position adjustments within the final installation area only. The casters are not designed for moving the enclosure over longer distances.
The casters are not designed to provide long-term support for the enclosure after final installation. Use the levelers to provide long-term support.
Install the enclosure in a structurally sound area with a level floor that is able to bear the weight of the enclosure, all equipment that will be installed in the enclosure and any other enclosures and/or equipment that will be installed nearby. - Install the cabinet securely to the building structure, using the hold down brackets as illustrated in the Enclosure Installation section of this manual.
- Do not push the enclosure from the side panels to move it. Pushing from the side panels will cause a tipping hazard.
- When rolling the enclosure on its casters, always push it from behind, never pull it toward you.
- A rolling enclosure can cause personal injury and property damage if not properly supervised. If rolling the enclosure down a ramp is required, use extreme caution. Do not attempt to use ramps that have a slope steeper than 1:12.
- Use caution when cutting packing materials. The enclosure could be scratched, causing damage not covered by the warranty.
- Save all packing materials for later use. Repacking and shipping the enclosure without the original packing materials may cause product damage that will void the warranty.
- Do not re-ship the enclosure with additional equipment unless the enclosure was shipped with a special shock pallet ("SP1" models only). The combined weight of the enclosure and installed equipment must not exceed the load capacity of the pallet. Tripp Lite is not responsible for any damage that occurs during re-shipment.
DANGER: STABILITY HAZARD, RACKS ARE TO BE INSTALLED BY QUALIFIED SERVICE PERSONNEL ONLY. - Use of this equipment in life support applications where failure of this equipment can reasonably be expected to cause the failure of the life support equipment or to significantly affect its safety or effectiveness is not recommended.
2. Overview
SmartRack Enclosures accommodate all standard 19-inch rackmount equipment, regardless of vendor, and ship fully assembled for quick and easy deployment.
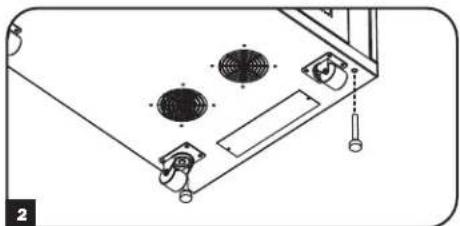
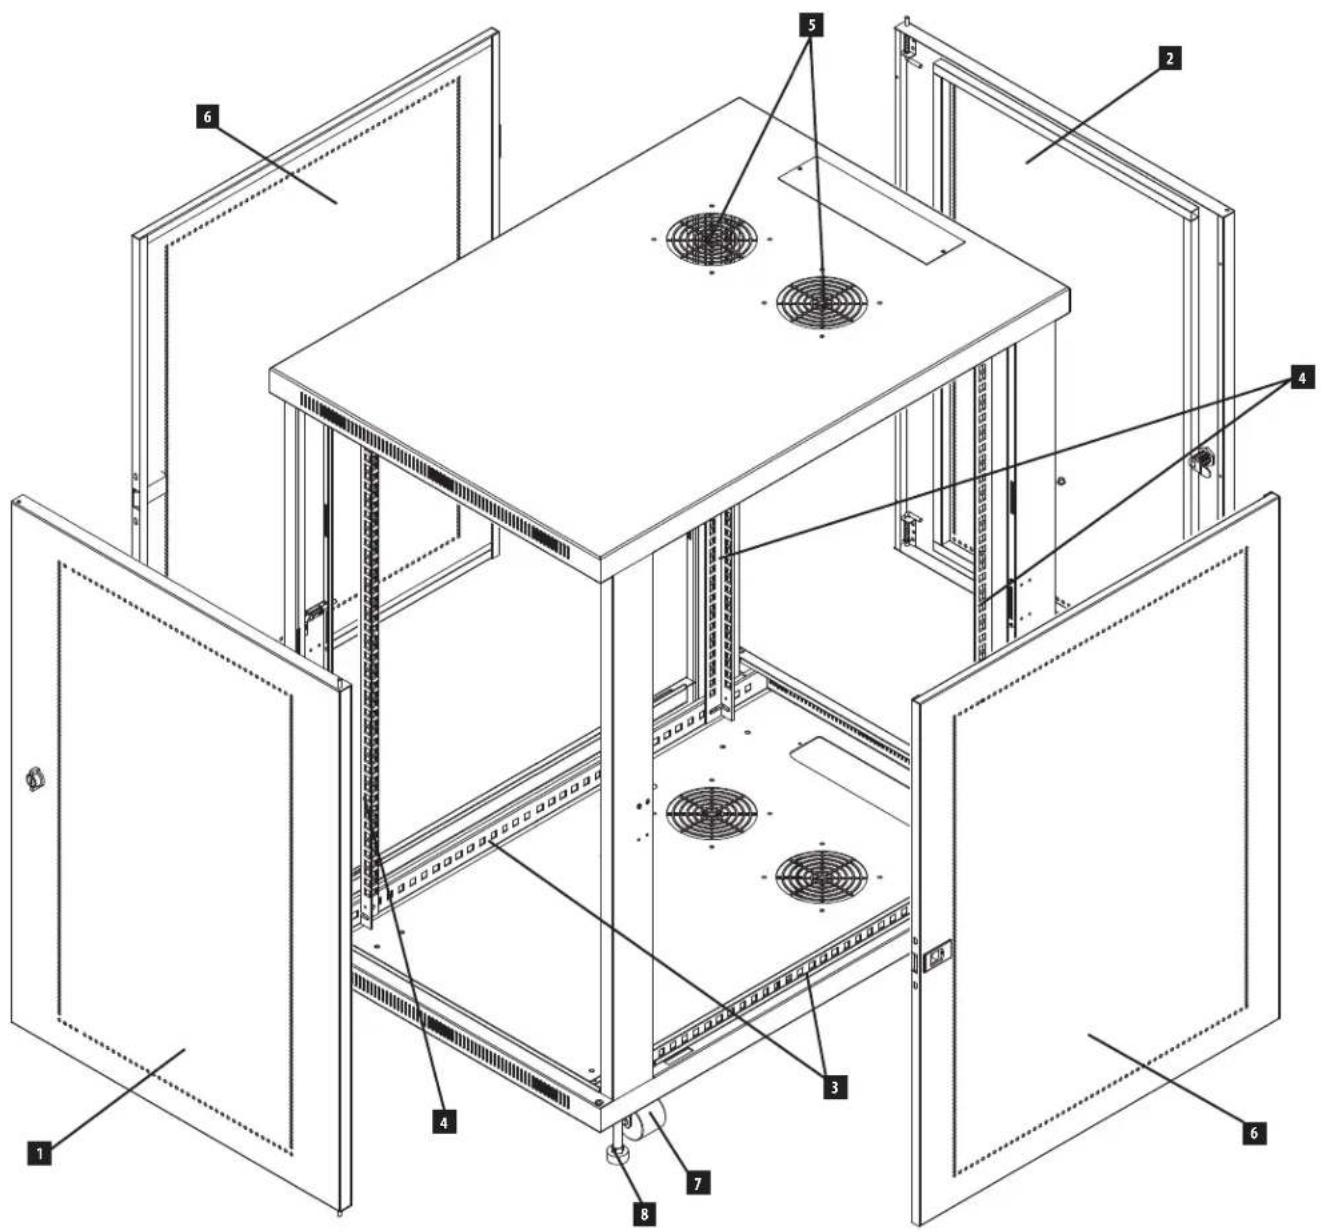
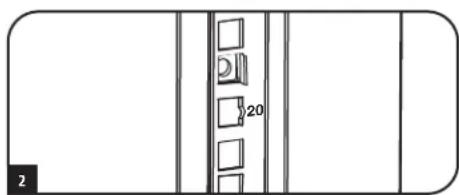
3. Feature Identification
Locking/Reversible Front Door
2 Locking/Reversible Back Door
3 Horizontal Rails
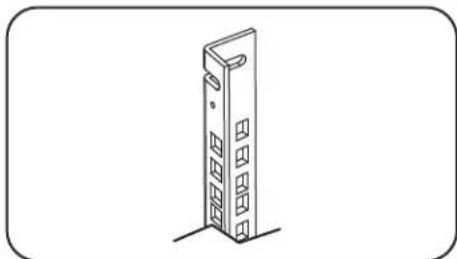
4 Vertical Mounting Rails
5 Vents
6 Locking/Removable Side Panels
7 Casters
8 Leveling Feet

4. Enclosure Installation

Caution! Read All Instructions andWarnings Before Installation!

WARNING: The rack enclosure is extremely heavy. Do not attempt to unpack, move or install the enclosure without assistance. Until it has been properly installed and stabilized, the enclosure is prone to tipping and could cause property damage and/or personal injury. Use extreme caution when handling the enclosure and be sure to follow all handling and installation instructions. Do not attempt to install equipment without first stabilizing the enclosure.
4.1 Preparation
The enclosure must be installed in a structurally sound area that is able to bear the weight of the enclosure, all the equipment that will be installed in the enclosure and any other enclosures and/or equipment that will be installed nearby. Before unpacking the enclosure, you should transport the shipping container closer to the final installation location to minimize the distance you will need to move the unit after the protective packaging has been removed. If you plan to store the enclosure for an extended period before installation, follow the instructions in the Storage and Service section.
You need several tools:
Level
14 mm Open-End or Combination Wrench
10 mm Open-End or Combination Wrench (2)
- Phillips-Head Screwdriver
4.2 Unpacking

Use at least two people to unpack the enclosure.

1 Move shipping pallet to a firm, level surface.
2 Save all packing materials for later use unless you are certain they will not be required. Packing materials are recyclable.
3 With one person on each side, carefully lift the enclosure off of the pallet and place on a firm, level surface.
Examine the enclosure for any damage or loose parts. Confirm all parts are present. If anything is missing or damaged, contact Tripp Lite for assistance. Do not attempt to use the enclosure if it has been damaged.
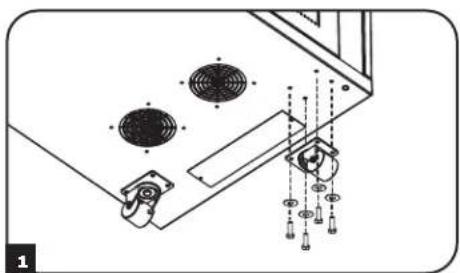
4.3 Installing Casters and Levelers
1 Installing Casters
Tripp Lite's accessory SRCASTER kit is included with your rack enclosure. This kit consists of 4 casters with required locknuts, washers and bolts for installation. Using two 10mm open-end or combination wrenches, install the casters to the base of the unit using the pre-drilled holes near each corner of the enclosure.
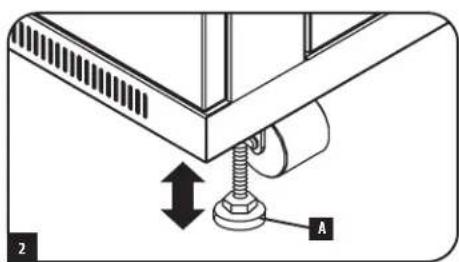
2 Installing Levelers
There are 4 levelers included with your rack enclosure, 2 for the front and 2 for the rear. Using a 14mm open-end wrench, install the levelers at the base of the unit using the threaded holes near each corner of the enclosure by turning the leveler in counter-clockwise. When the rack enclosure is moved to its installation location, use a 14mm open-end wrench to level the rack.
4.4 Placement
You can use the casters to move the enclosure for a short distance over a level, smooth, stable surface by pushing it from the front or rear (not the side panels). Do not attempt to roll the enclosure over long distances. The enclosure should be moved close to its installation location inside its shipping container before it is unpacked. Warning: Use appropriate equipment and follow all applicable safety procedures and regulations.

Warning: Never attempt to lift or install without adequate help. Do not try lifting the enclosure alone.
4. Enclosure Installation (continued)
4.5 Leveling

WARNING: Level the enclosure before attempting to install equipment. The casters are not designed to provide long-term support for the enclosure. Use the levelers to provide long-term support. Install the enclosure in a structurally sound area with a level floor that is able to bear the weight of the enclosure, all equipment that will be installed in the enclosure and any other enclosures and/or equipment that will be installed nearby.
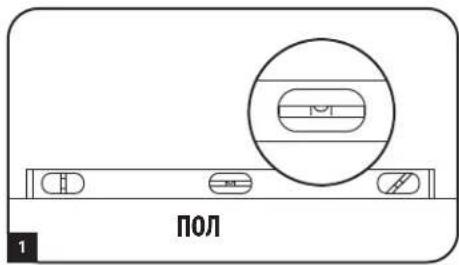
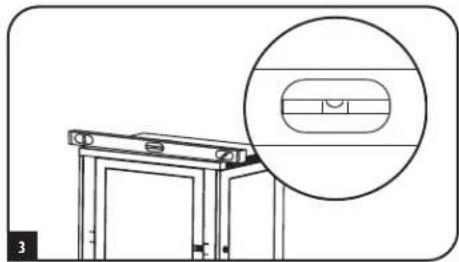
1 After the enclosure has been moved to the installation location, use a carpenter's level to check the slope of the floor. If the floor slopes more than 1% , choose an alternate installation site.
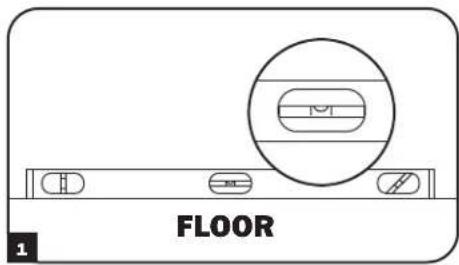
Use a 14 mm open-end wrench to lower each leveler until it reaches the floor. (There are 4 levelers, 2 at the front and 2 at the rear.) Make sure each leveler contacts the floor solidly. Note: Lower a leveler by turning it clockwise; raise a leveler by turning it counterclockwise.

After lowering each leveler, use the carpenter's level to confirm that the enclosure is level in all directions. Adjust the levelers as required until the enclosure is level.
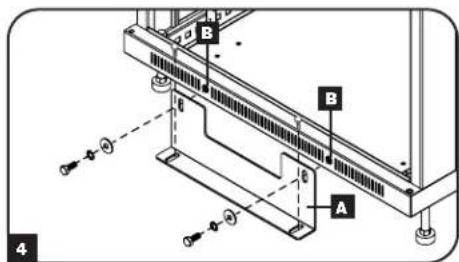
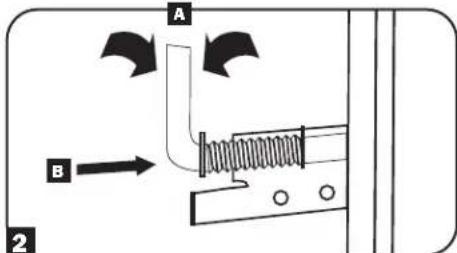
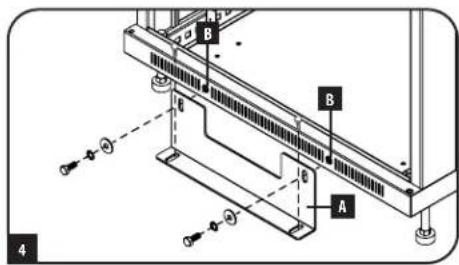
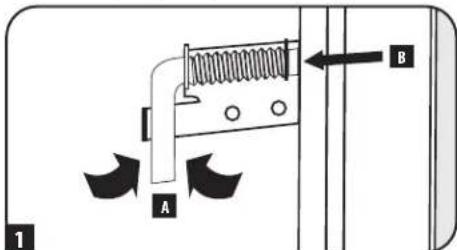
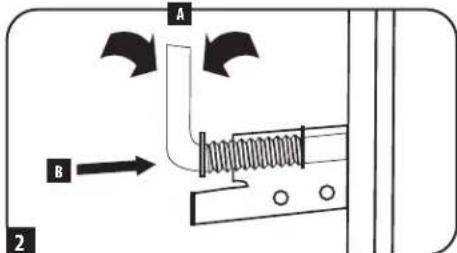
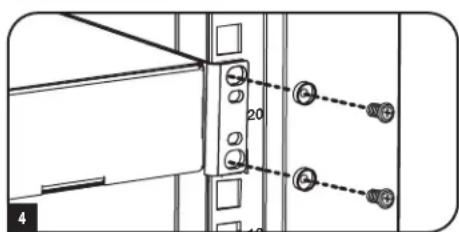
4 In order to secure the cabinet to the building structure for stability, attach the 2 hold down brackets using the hardware provided with the brackets. Use a 13mm open-end wrench to connect the brackets A to the outer bracket mounting points of the enclosure B. Attach the brackets secure mounting points in the floor using user-supplied hardware or Tripp Lite's SmartRack Bolt-Down Kit (Part # SRBOLTDOWN).
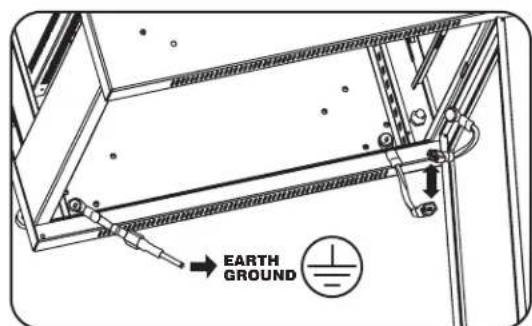
4.6 Ground Connection
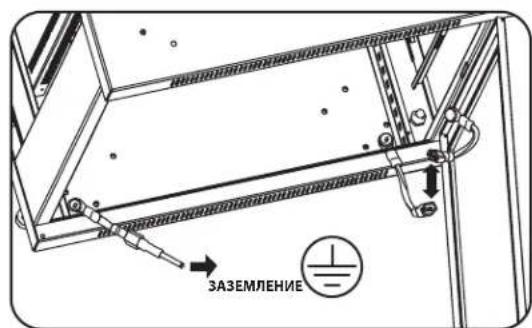
- All parts of the enclosure are grounded to the frame of the enclosure.
- Grounding studs have been provided in all four corners of the enclosure to allow for grounding in any configuration (including front or back door reversals).
- Grounding holes are also provided on top and bottom corners of both front and back doors to accommodate any configuration.
- To ground the enclosure simply connect the two quick-disconnect grounding wires, one to the hole provided on the inside of either the front or back door and the other to the stud provided in any corner of the enclosure. Connect your facility's earth ground connection to the grounding stud not used by door connections, using an 8 AWG (3.264 mm) wire.
Warning: Attach each enclosure to earth ground separately. Do not use the enclosure without an earth ground connection.
5. Enclosure Configuration
5.1 Door Locks
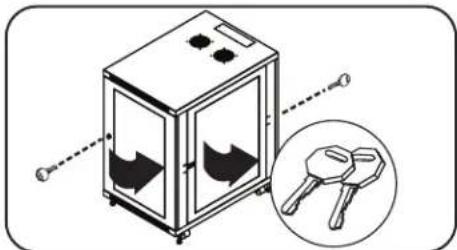
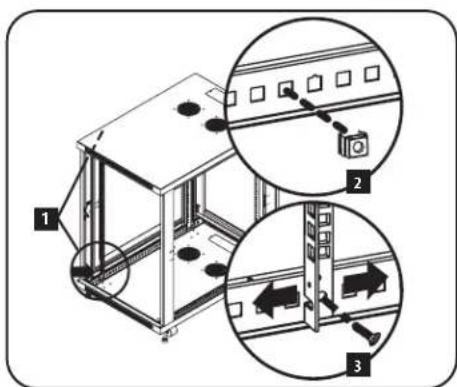
The front and back doors have locks that are accessible by the included keys. Each side panel locks using an L-shaped lever on the inside of the enclosure.
To unlock and remove the side panels, lift the shorter leg of the "L" up and pull it away from the side panel. Pull the tab on the side panel and remove it from the enclosure.
To re-lock the side panels, secure it in the proper position, lift the shorter leg of the "L" up and push it toward the side panel, back into the hole that it was in initially. Once it is in place, push the shorter leg of the "L" down to lock it. Note: To lock and unlock the side panels, you will need to have access to the interior of the enclosure.
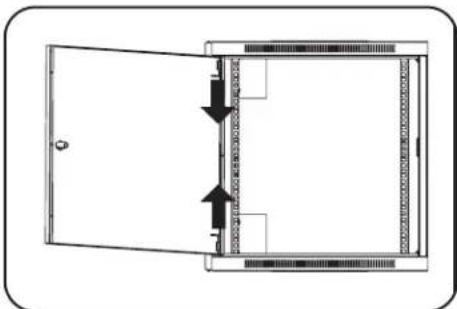
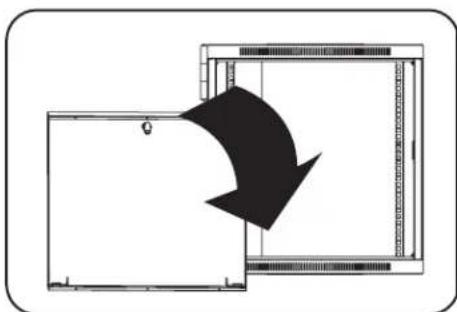
5.2 Reversing the Doors
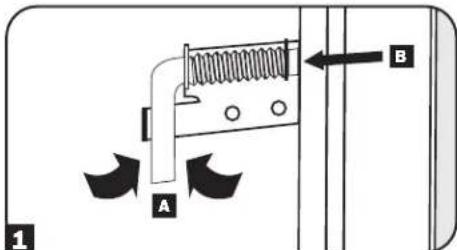
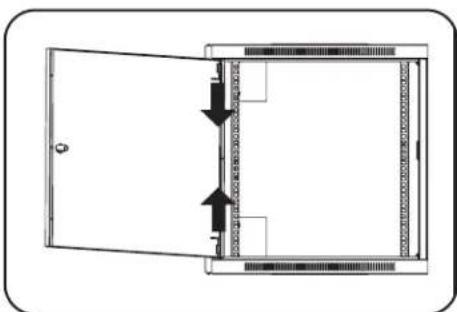
The doors of the enclosure are held in position on the enclosure's frame with two spring-loaded pins. To reverse the door's swing direction, simply release the pins by pulling them up (lower pin) or down (upper pin) and remove them from the mounting holes on the frame of the enclosure.
Flip the door in the opposite direction and replace the pins in the identical mounting holes on the other side of the enclosure's frame by lining them up with the mounting holes and engaging them again.

5.3 Mounting Rails
The enclosure comes with mounting rails that have square holes for mounting rack equipment. To install equipment, use the included cage nuts and other hardware. (See page 7 for installation of cage nuts.) Warning: Be sure to have the enclosure in its final position on the floor before mounting any equipment inside. Also be sure to have all the right adjustments on your rails before mounting equipment. (See below for Adjusting Mounting Rail Depth.)
5.4 Adjusting Mounting Rail Depth
Warning: Do not attempt to adjust rails while equipment is installed in the enclosure. Do not attempt to use rails without screws installed. (2 per rail.)
The 4 mounting rails are pre-installed to accommodate equipment with a mounting depth of 20.5 inches (521 mm). Do not adjust the mounting rails unless your equipment requires a different mounting depth. The front and rear sets of rails can be adjusted independently for mounting of equipment with depths between 3 inches (76 mm) and 32.5 inches (826 mm).
Each rail is connected to the enclosure with 2 screws and 2 cage nuts: 1 set in the upper corner and another in the lower corner. Using a Phillips-head screwdriver, remove the screws that fasten the rails to the enclosure.
2 Move cage nuts to desired depth and reinstall.
3 Slide the mounting rails to the desired depth and reattach them using the screws you removed in Step 1.

6. Equipment Installation
Warning: Do not install equipment until you have stabilized the enclosure. Install heavier equipment first and install it towards the bottom of the enclosure. Install equipment starting from the bottom of the enclosure and proceeding toward the top of the enclosure - never the reverse. If using sliding equipment rails, be careful when extending the rails. Do not extend more than one set of sliding equipment rails at one time. Avoid extending sliding equipment rails near the top of the enclosure.
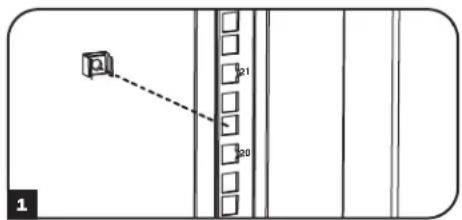
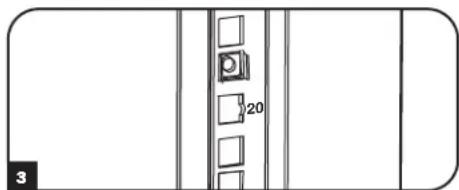
Note: The square holes in the middle of each rack unit are numbered and also include a small notch to aid identification. A single rack unit includes the space occupied by the numbered hole and the holes directly above and below.

6.1 Installing or Removing Cage Nuts
WARNING: The flanges of the cage nuts should engage the sides of the square opening in the rail, not the top and bottom. Follow the instructions in your equipment documentation to ensure proper installation of your equipment.
1 Locate the numbered square openings in the mounting rails where you plan to install your equipment. You will install cage nuts (included) into the square openings in order to provide an attachment point for the mounting screws (included).
Note: Consult your equipment documentation to determine how many cage nuts will be required and where they will need to be installed.
2 From the inside of the mounting rail, insert one of the flanges of the cage nut through the square opening. Press it against the side of the square opening. Each flange should engage one side of the square opening, not the top or bottom.
3 Compress the cage nut at the sides slightly to allow the remaining flange to fit through the square opening. When the cage nut is properly installed, both flanges will protrude through the square opening and will be visible on the outer surface of the mounting rail. Repeat steps 1-3 until all required cage nuts are installed.
4 After installing the required cage nuts, use the included mounting screws and cup washers to secure your equipment to the rack rail. Place the cup washers between the screws and the equipment mounting brackets.
Note: Your equipment may also include mounting hardware. Read the mounting instructions that came with your equipment before installing your equipment.
To Remove Cage Nuts, Reverse Steps 1-3
Note: You may wish to use a cage nut tool (user-supplied) to aid cage nut installation and removal.


7. Specifications
| Model SR24UB | |
| Dimensions (H x W x D) 46.03 x 23.63 x 33.5" (1169 x 600 x 850 mm) | |
| Unit Weight 123 lb (56 kg) | |
| Load Capacity 1000 lb (453 kg) Stationary or Rolling | |
| Mounting Depth (Adjustable) 3" to 32.5" (76 to 826 mm) | |
8. Storage and Service
Storage
The enclosure should be stored in a controlled indoor environment, away from moisture, temperature extremes, flammable liquids and gasses, conductive contaminants, dust and direct sunlight. Store the enclosure in its original shipping container if possible.
Service
Your Tripp Lite product is covered by the warranty described in this manual. A variety of Extended Warranty and On-Site Service Programs are also available from Tripp Lite. For more information on service, visit triplite.com/support. Before returning your product for service, follow these steps:
- Review the installation and operation procedures in this manual to insure that the service problem does not originate from a misreading of the instructions.
- If the problem continues, do not contact or return the product to the dealer. Instead, visit triplite.com/support.
- If the problem requires service, visit triplite.com/support and click the Product Returns link. From here you can request a Returned Material Authorization (RMA) number, which is required for service. This simple on-line form will ask for your unit's model and serial numbers, along with other general purchaser information. The RMA number, along with shipping instructions will be emailed to you. Any damages (direct, indirect, special or consequential) to the product incurred during shipment to Tripp Lite or an authorized Tripp Lite service center is not covered under warranty. Products shipped to Tripp Lite or an authorized Tripp Lite service center must have transportation charges prepaid. Mark the RMA number on the outside of the package. If the product is within its warranty period, enclose a copy of your sales receipt. Return the product for service using an insured carrier to the address given to you when you request the RMA.
9. Warranty and Product Registration
5-Year Limited Warranty
Seller warrants this product, if used in accordance with all applicable instructions, to be free from original defects in material and workmanship for a period of 5 years from the date of initial purchase. If the product should prove defective in material or workmanship within that period, Seller will repair or replace the product, at its sole discretion.
THIS WARRANTY DOES NOT APPLY TO NORMAL WEAR OR TO DAMAGE RESULTING FROM ACCIDENT, MISUSE, ABUSE OR NEGLECT. SELLER MAKES NO EXPRESS WARRANTIES OTHER THAN THE WARRANTY EXPRESSLY SET FORTH HEREIN. EXCEPT TO THE EXTENT PROHIBITED BY APPLICABLE LAW, ALL IMPLIED WARRANTYES, INCLUDING ALL WARRANTYES OF MERCHANTABILITY OR FITNESS, ARE LIMITED IN DURATION TO THE WARRANTY PERIOD SET FORTH ABOVE; AND THIS WARRANTY EXPRESSLY EXCULES ALL INCIDENTAL AND CONSEQUENTIAL DAMAGES. (Some states do not allow limitations on how long an implied warranty lasts, and some states do not allow the exclusion or limitation of incidental or consequential damages, so the above limitations or exclusions may not apply to you. This warranty gives you specific legal rights, and you may have other rights which vary from jurisdiction to jurisdiction).
WARNING: The individual user should take care to determine prior to use whether this device is suitable, adequate or safe for the use intended. Since individual applications are subject to great variation, the manufacturer makes no representation or warranty as to the suitability or fitness of these devices for any specific application.
Product Registration
Visit www.triplite.com/warranty today to register your new Tripp Lite product. You'll be automatically entered into a drawing for a chance to win a FREE Tripp Lite product!*
- No purchase necessary. Void where prohibited. Some restrictions apply. See website for details.
Tripp Lite has a policy of continuous improvement. Specifications are subject to change without notice. Photos and illustrations may differ slightly from actual products.


1111 W. 35th Street, Chicago, IL 60609 USA · triplite.com/support
1111 W. 35th Street, Chicago, IL 60609 USA • triplite.com/support
PykoBODCTBO N0Ib30BaTeJia
UkaΦ cepu SmartRack BbICOTo 24U
Modèle: SR24UB
(homep cepnu: AG-039A)
CopepkaHne
- Baxhble yka3aHnno no TexHnke 6e3onachoctn 26
-
KpaTkoe onncahne 26
3.Cxema paononoKeHHyHKUHOHaJIbHbIX 3neMeHTOB 27
4.Порядok установкишkaф28
4.1 IoprotoBka 28
4.2 Pacnakobka 28
4.3 YctaHObKa poNkOB n perynnpoBoHbIX HOKe 28
4.4 Pa3MeueHne 28
4.5 BbipabHbHaHe uKaΦa 29
4.63a3eMJIeHne 29 -
KomnohoBka wka 30
5.1Дверныезамки 30
5.2 IpepcTaHOBKa IBepeu 30
5.3 MoTtAxHbIe HnpaBnaIOuNe 30
5.4 Perynnpobka rny6bHb MOHTaXhbix HnpaBraIoUx 30
6.YctanOBka 6obopydOBaHn3
6.1 yctahOBka/chTne 3aknaHbIX raek 31 - TexHHueckne xapaKTepeHCTnKn 31
8.XpaHHeHnTexHnueckoe 6cbnyKbHaHne 32 - FapantnHbIe 06aTeJbCTBa 32
English 1
Espanol 9
Français 17
EAC


1111 W. 35th Street, Chicago, IL 60609 USA - triplite.com/support
OxpaHReTcA aTbOPcknmpaBOM 2022 Tripp Lite. Bce TOproBbe 3aKaN ABAHOTcA MCKNCHHTeBHON COCTBEHHOTCb CBOX COOTBeTcByuHx BnaJeIbueB.
1. Baxhble yka3aHnno TeXnke 6e30nacHOCTM
COXPAHNTHE HACTOUIE YKA3AHNA
Bo Cex paoen hactoepy kyoobqcba coepkata yka3aHn npdynpckdHn, KOTOpbIe Heo6xOIMO c06hAoTaB b Pooce cye taHOBKn HcKcNpyataum omCaHbX b Hem uKaObo. Bmmatelbno 03aKoMbteCb co BcEMn yka3aHnMn npeDnypckDeHnMn nepe BblonHHeHm NIO6b X dEChTbn, CBzAHHbc cpeMeueHHeM, yctahOBKn mHKcNpyataum uKaObo, OINCAHbX b HactoJeM pykoBodtbe. Hec6nOdenme daHoro Tpe6oBaHn Co3dct oanchoTb noyuHn TpaBM nMn BO3HNKOBHeHm MUYueCTBeHHOr yuapeb a MoKet pnmBctm K anHympoBaHNO raptAHtnm.
KdJHnHxOHTBcBnOMeEHmC KOnHPOINpEmbM MHKPOKIMATOM BdaIh OT HCTOHNKOB BnaI, 3KCTpeMaIbHbIX TeMpeaTp, BocNlAmeHIOUHXc JIKKOCTe Ira3OB, 3NEKTpnpoBOHbIX 3aTpaHNTenE, nbIIN N pRMAOTCOJIHeHOrO CBeta.
- Penei shkafo m no3aHr Heo 06xOIMO o6ceuMb oocneuMb doctatoHc Cb6oDHorpo npoCTpaHCTBa Ira ero HauNeKaUero npOBETPnBAHn. He 3aropaxBaTe n He hakpbBaiTe BHeunme BeHTmuaOHhie OTBepCTMa KaF a, a TAKGE He BCTabIe T BHX KaKHe-NbO ppeMteB.
- Ⅲkaфянгскраимпгхлбесьм. Рппретeшенийshkaфсбддгпсгггггггггггггггггггg He nbtaitecpaacakobbaba,петeшаынуctahabnBaTb erO bDINHOTy.Дипетeшени
甲kaфы BNYTPn TpAChnpTIpOBOHORO KONTeHepa HcNtOJIb3yTe MExaHNeCKeO yCTpoIcTB Otna BInIOUHOrO norgpy3uHaKn HINBINOCHN TmApabNueckO TeLEKKN.
He KnaIHTe Ha kaKaKaeHn6o npEMeTb, OcoBEnHO EMcOCTmA TaKHe He yCtAHNBAHTe KaKbI DpyHa Dpyra.
Ocmotptte tpaHcnpTPOBOUHb KOHTeHep Ha npEpmet HauuHnOBpeKdHn, nOnyueHHbX npTpaHcnpTIpOBke. He noB3yTeCb uKafoB eero NobpeKdHnA
He 3BneKeIe 7kaΦ n3 TpaHcnpTPOBOUHO KOnTeHepa d0 ero nepMeueHnHa MaKcMaJIbHo 6N3Koe paccToHHe K MeCt yOKOHATeJIbHO YCTAHOBKn. PONIK npEHa3NaeHb ToJbKO dIe H3NaHTeJIbHX KoppeKTPOBok NonoJXeHnHa Ha MeCe OKOHATeJIbHO YCTAHOBKn. PONIK He paccHTaHb Ha nepMeueHne 7kaΦ a HoBJLmepacToHnA.
PONK TAKKE He paccnntahbHa dolropeMeHHoe HcnoIb30aHHe B KaueCTBe onopbl Dna 1kaKa a nocne ero okoHataeBHO yctAHOBKn. B KaueCTBe dolropeMeHHo onopbl HCnOByte npncocobHnry Dnla BbPaBHbAHnra.
KoHOBHeBHTOHOHIOHOIOHOHOHOHOHOHOHOHOHOHOHOHOHOHOHOHOHOHOHOHOHOHOHOHOHOHOHOHOHOHOHOHOHOHOHOHOHOHOHOHOHOHOHOHOHOHOHOHOHOHOHOHOHOHOHOHOHOHOHOHOHOHOHOHOHOHOHOHOHOHOHOHOHOHOHOHOHOHOHOHOHOHOHOHOHOHOHOHOHOHOHOHOHOHOHOHOHOHOHOHO HO HO HO HO HO HO HO HO HO HO HO HO HO HO HO HO HO HO HO HO HO HO HO HO HO HO HO HO HO HO HO HO HO HO HO HO HO HO HO HO HO HO HO HO HO HO HO HO HO HO HO HO HO HO HO HO HO HO HO HO HO HO HO HO HO HO HO HO HO HO HO HO HO HO HO HO HO HO HO HO HO HO HO HO HO HO HO HO HO HO HO HO HO HO HO HO HO HO HO HO OH BO HOB HOB HOB HOB HOB HOB HOB HOB HOB HOB HOB HOB HOB HOB HOB HOB HOB HOB HOB HOB HOB HOB HOB HOB HOB HOB HOB HOB HOB HOB HOB HOB HOB HOB HOB HOB HOB HOB HOB HOB HOB HOB HOB HOB HOB HOB HOB HOB HOB HOB H OB HOB HOB HOB HOB HOB HOB HOB HOB HOB HOB HOB HOB HOB HOB HOB HOB HOB HOB HOB HOB HOB HOB HOB HOB HOB HOB HOB HOB HOB HOB HOB HOB HOB HOB HOB HOB HOB HOB HOB HOB HOB HOB HOB HOB HOB HOB HOB HOB HOB HCBBOHBOHBOHBOHBOHBOHBOHBOHBOHBOHBOHBOHBOHBOHBOHBOHBOHBOHBOHBOHBOHBOHBOHBOHBOHBOHBOHBOHBOHBOHBOHBOHBOHBOHBOHBOHBOHBOHBOHBOHBOHBOHBOHBOHBOHBOHBOHBOHBOHBOHBO
- PiooHNO yctAHOBHTe WkaHa CTPOHTeBHyO KOCTpyKUHO C nIOMOuIbTOyEpeJHXBaUHX KPOHTeHOB, KaK nOKa3aHO Ha pMCYKe B pa3dene IpopJokUcTahOBKn WkaKa daHHOrO pykoBODCTBA.
Pn npnepeeennn nn aen eeyet oonkab ero ctoponb bokobix nanei. Pn tonkannn kopnyca co stpohbl bokobix nanei cyecbyet onachoctber eo onpokmbibanm.
Pn nepeKaTbIaHmUkaHa npOuKax 683aTeBHO TOnKaIte erO cAun H N B KOem Cnyae HE TAnHe Ha ce6h.
- IpekaTbIaHmE uKaFa 6e3 HndIeXaUero KOHTPOMoKET PnBECTN K PnUHEnHIO TpABM NIM MMyUeCTBEHHORO yUepe6a. Pn He06xOIMOCTH cKaTbIBAHNr UkaFa BnH3 nO HAKIOHNO INOCKOT co6nOaIte npdeIbHyO octopokHOCTb. He nONb3yIte HAKIOHbIE NPOCKOTc yKLOHOM 6one 12%.
Ipnpa3pezAHm ynakOBuHbIX MaTePnaIOB co6JHOaIe octopoxHoCTb. 3To MoKet PnBeCTN K HaeceHIO ZaapanH Ha nobepxHocTb IkaΦa, 4To npEcdTabIeT c6oB yuep6, He nokpbBaembIeJeCTByOooI rapaHTme.
Bce ynaKOBouHbIe MaTePnAbIb cIeDyet coXpaHnIT IINocEduOJeero HcNtloh3oBaHnHa. NObTOpHra yNaKOBka HtpaHcnpTnPoBkA WkaFa 6e3 HcNtlo3oBaHnHa OPMtnHbHbIX yNaKOBouHbIX MaTePnAnOB MoKeT pInBeCTM K NpOBeJxHeHIO H3dEnH, KOTope ONoBueET 3a cOob AnHynnpoBaHnE DeIcTBkyuien rapAHTHN.
He npcykaetcnoeinyoata TpaHcnopTnpOBKa WkAca c noonohntbHbM oobpyoBaHMe 3a NckNooyehMe cyueae nepBOHaaybHn NOCTABKn WkAco CneuaNBHM ydp03auueneHHbM NoDIOHom (ToIbKO dna Moen SP1).CymMaphB Bec WkAca H uYctAOBHeHrO B HEm oobpyoBaHn He oJxhen PpeBbUaT b rpyzOnobEMHOCTb NOdHO. KomnaHm Tripp Lite he Hecet OTBeTcBEHNOCT3a Kaokn-Pl6o, pnuHHeHHB n Bpocece noeJeooie TpaHcnopTnpOBKn.
- OINACHOCTb: BO IN36EJAHNE IOTEPN YCTOHNUBOCTN YCTAHOBKA UIKAFIOB DIONKHA IPOIN3BOIDTBcT TOIbKO KBAJIINΦUPOBAHHBIM CEPBCHbIM IPEPCOHAIOM.
He peKoMeHdyETcN cNoIb3OBAHnne daHHoro 6OpbyOBaHnB B CHTeMaX KJ3He06ecneHn, Tge erO BBxOJ N3 CTPOR npEiIOIOXHTeBO HO MOKeT pINBecTu K nepe6oAM B pa6ote obopyoBaHnna J3He06ecneHn nn B 3aHuNTeBHO Mepe CH3HTB erO 6e3oNaCHOTB nN 3ΦeKTbHOCtB.
2. Kpatkoe onncanhe
Ukafo bceMeBcTaBc68 Cte TaHapThoe 19-IOMOoe O60pyOBaHne He3ABnHMo OT erO npOn3BOuTeN HocTbAHTC NOHOCTbB C6ope Iy o6ecneHn 6bIcTpoBt NerKoCTB BBOA B KcPnayatauio.
3.Cxema pacnooXeHnA yHKuOHaJIbHbIX 3JeMeHTOB
3aHpaMa/nepeTbHaMa nepeHnaDbepua
2 3aHpaemay/nepectabmey3aDnBepua
3Topn3oHTaJIbHbIe HappaBIAIOUe
4BepTKaJIbHbIe MoHTaXHbIe WnHbI
5 BeHTnAunOHhbeOTBepCTH
6 3aHpaemble/cbemhbie60Kobbe naHenn
7 POnuKu
3 Perynnipoboohbte HOXKn
He nbitaTecb noDHMaTb WkaB OOnHouKy.

4.YctahOBka shkaΦa (npoDJIkeHne)
4.5 BbipabHbBaHne

BHIMAHHE! BbipOBHnE t WkaF neped yctahOBkOB H eror o6OpDobAHn. POnNK TaKxHe paccHTaHbHa noRtBpeMeHHoe nCNoB3oBAHne B KaecTbe onopbl dIe WkaFa. B KauCTBe DoNtOpeMeHHo onOpby hncnoB3yTe npCnOc6NeHHra DnBa IbpaBnBnAHn. WkaF doJKeH 6bBy t cTahOBnBn B KOHCTpykuHO npouHOM MeCe CPOBhM OCHOBHnEM, CNOcOBHM BbIepXMBaTB Bec Camoro WkaF, Bcero o6OpDobAHn, KOTOpoe bytet YCTaHOBNEHO BHTPN Hero, a TAKKHe IIObIx dpynx WkaFbHn/nn O6OpDobAHn, KoTopbIe bdyr YctaHOBNeHb B6n3n Hero.
1 Nocne nepemeeHHa Ka MeCTy yTaHOBKn npOBePbTe yKIOH nona c NOMOUsbO cTPOHTbHO rpoBHa. Ecnu yKIOH nona npEbbIaet 19%, BbIepeHTe Iya YcTAHOBKn dpyoe MeTo.
2Pn nnono pOkoBoro KIOUHa 14 MM BBBepHne KaKdyo perynpoBOHy IOKky A Do ee cOpNHKOHOBeHH C NOOM (IkaΦ HmeeT 4 npncoc6NeHH Ia IBaBPABHBHmH -no 2 CpeEHN C3aH).Y6eHNTecb B ToM, YTO KaKdoe H3 Hux NIOHTO conpHKacaetcC NOON.
PnmeHne. JnBbEptbBAHn (onyckAHn) perynpOBOHn HOKKn ee cIeYET BpaaTb NO yacOBn CTpeKne, a n3abeptbBAHn (noHHMaHn) - npTMB YACOBn CTpeKN.
Pocne BbEpBtBnHnKaKdoIpyrnpoBOHnHOxKn npOBepTe c NMOuBcTO CPOnteBHorO ypOBn, 4ro6bl uKaF pacnonaranc poBHO BO BCEx HApBaBHeHX. Perynnpyte BbCOTy perynpoBOHbIX HOKeK No Mepe He06XoHMoCTn DoTex nop, NOka KHe 6yDen YcTAHOBnEOBHO.
4ДЯКрENHЯшкФСТРHTeHNoKCHTPyCmN CcIbNoOeCneHnY cTOnHBOCTNpHKpeNTe 2JepKBAUHxK pONHTeHa C NOMOuBKOPEKENHIXN NOCTABNMeBbX B KOMPLeKeTc KPOHHTeHAMn. C NOMOuBPOKKOBORKHOa Ha 13 MM 3aKpeNTe KPOHHTeHbA BO BHEuHNx ToQkX KpENHeHn KPOHHTeHOB K WkaFy B 3aKpeNTe KPOHHTeHbB ToqKaX MoTHaKHO K PKNEHHN K NOy npN NOMOuOcHAcTK (B KOMPLeKt H BxoDIT) nN npeJaeraemOro KOMNaHne Tripp Lite KOMPNeKTa DЯ KpENHeHn WkaΦoB SmartRack K NOy (Kat. No SRBOLTDOWN).
4.63a3emJIeHne
Bce Detanu ukaa 3a3eMnroTcpe3 ero Kapac.
3a3eMnHouuie KOHTAOKTbI IMEOTcBO BcEx qTeBipEx yTnx IkaQa,TOO6ecneHBAET BO3MOXHOCT bero 3a3EmHeHn npm JIO6oB KOMnoHOBKe (B TOM cNcpe npn nepctahOBKe nepdne Hnn 3aehn Dbepu).
KpOmeToro,BBepxHIN HnHnHnx yIax nepeDneHn 3aJHe n Dbeepu MmEOTc npoyuHbI dna 3a3emHn, oecneWBAoUe BO3MOXHOCTb IIO60I KOMNHOBOHKn.
ДлгзаэмлелншkaфдостаточинолсоeннltбдбсрOTоeннeхьз3aemnKoHxnpOBda:OHH K npoyuHHe HBytpneHHe CTOpOE npeHNe HIN 3aHHe DBePbI,dpYrO -K 3a3eMnKoHMe KYKTAY, paONIOJKeHNOMy B IIObOM IVrNOB shka. CoedHInTe 3aemnHOUI KHTAKT, He NcOnb3yEmbl dNlnoCoEHNHEHn DBepen, cshHoi3aemlnHc CBOero o6bKa T cNoMOsBu npOBda KaHbpm 8 AWG (3,264 MM).
BHHMaHHe!KaJbI WkaΦ DoJIKeH NoIOCoEIMHTbC K WnHe 3a3EmHe Hn OToIeNbHOCTn. NOnb3OBaHHe He3a3EmHeHbIM WkaΦom He Donyckaetc.
5. KomnohoBka ukaΦa
5.1Доверныезамки
IpeHnH H 3aHnH BdePbI OcHsEhbl 3aMKaMn,OTNpaEmBmIM C NOMOuBbXoDyIMX B KOMIIeK TKnOeH. KaJzHnI 63 KObObIx NaHeJIe 3aNpAeTc PnPi NOMUgI T-06pa3HOrO PbYaKa C BHTpyHeH CTOpOHb IkaHa.
I 10nTINPAAHn HCHTHB6OKOBxh PAnHeJe CNeyET NOHHTB BBeXP KOpTOe NpOeY F-6pa3HO pBuaXkna OTOCTPAHbE rO TO6KOBOH naHEIn. BByHt b6OKoBYu NaHEIn h3 uKafo,notAHyB e3a3blyOk.
2IINIOBTOPOHoi qHKCAUIM 60KOBHOI HAIeHn HA CBOE MecTe cIeYET UCTAHOBHTte B HUHXHe NIOXeHne, NOHHTB BBEX KOPOTKO pIEO I-6pa3HOro pbuaKkHa HADABHTb Ha Hrero B CTOPOHy 60KOBHOI HAIeHn CcIeHNO NOMECTtB erO bpaTHo B TO OTBepCTHe, rE OH HAXOUNC nepBOHauhAoHNo. IocNE TORO KAK KOPOTKO pIEO I-6pa3HOro pbuaKkO kAoketra Ha CBOE MecTe, cIeYET 3aHiknpoBaTb ERO HAKATHE BHN3.
PmmeHne. 3aHpaHn HOTPAHn60KobXnAHeNe Heo6xOmmn HMeTb DoTyB HByTp bka.

5.2 IpepectahOBka dBepeu
Bepu bkaopa yepkbaotc b hyxohm nooxehn ha ero knpnyc c nomooibb Dbyx npnpkhenbix uttoob. 06bH3mEHt happanhe OTKpbBaHn DBepu,doctatoHO BIBECTH 3TH uTmphi H3 3aenneHn BBHYb tN N3MOHTaxhBx OTbeptnB Koppyce uKaopa,nothyb 3a Hnx BBeP (HHKHN WTH) NIN BHN (BepxHN WTH).
IpeBepHnTe IebpUy uYctaHOBtIe UHTObIe HcBOmecTa B TaKHe Jx MoTAtXHbIe OTBepTMA Ha DpyToI CTopoHE KOpNya 1ka0ha, CoMBeCTM N C MOHTaXHbIMN OTBepTMA M N CHOB BBeJe B3auenneHne.


5.3 MoTAtXHbIe HnPaBIAIOUne
IkaΦ noctabnetaTc moTaXhblm HapabnloUHMM, KOtOpbIe MHeOT KBaApaThbte OBepeTHraJaMOtaXa CToeHOrO obOpdyoabaHn. IyCTAHOBKn 6obopyoabaHn cIeyET nONb3oBaTb NOCTABnEMbE B KOMPKeTE 3aknaHbIe raKIN npOuyIO OChAcTKy.(Nopdok yCTAHOBKn 3aknaHbIX Raek CM.Ha CTp 7).BHNMaHne! Npeep YCTAHOBKO KaKoro-Ni6o 6OpbyoBaHn BHytpb XkaΦa Heo6xOIMO y6eHTbcra B TOM, TTO OH HaxoHITcB CBOeM KOHeHOM NOnKeHH. KpOme TOrO, Npeep MoTaXOM o6OpdyoBaHn Heo6xOIMO DoJKNbIM Opa30m OTperynpoBaTb BCE HapablaIOUHe. (CM.npeCtAbNeHHbI HnHex pa3dE9 "PerynpoBaTKny6HbI MOHaTKBIX HapablaIOUxN".
5.4 PerynupobKa rny6HbMoHTaXhblx HappaBlaioxN
BHHMaHHe HbTaTcB perynpoBaH hAnpaBnOuIe npy ctaHOBneHOM B Wka6o6pyoBaHN. He bTaTaeC hnoB3ObaT hAnpaBnOuIe 6e3 yctAHOBKn BHTOB (no 2 Ha KaKdyu HappaBnOuIyU).
4 MONTAXHbHe HnapabnlouJe yCTaHabnlaBoAtcHa 3aBObe-H3rOToBtene n paaccTahbHa pa3MeueHe OobpyoBaHnC MoTaNJHO rnybHn521 MM. He perynpuyte MOHTXhBe HnapabnlouJe 3a NCKIOUeHMe TEx CNYaEB, KOrDa Iyra YCTaHabnBaEMo RAMn oobpyoBaHnI Tpe6yETc dpyra MoTaNKHaR rnybHa.IpeDnHra N3dNn rpynnb HnapabnlouixMoryr perynpobatcRe HeabncMoDPyr ot Dpyra IMy MoTaNka OOBpyoBaHnI rnybHoHOn ot 76 do 826 MM.
KanJa HapnabHoua npKnpenHa K Kopnyc ukaopa npn NmoOn 2 BHTOB 2 3aknabXraek: Onda napa TaKHX Detane paonlaeraTcBepxHem yIy, apyra-B HIXHE. C NOMOIO Kpctoo6paHO OTBePTK BbIEbpHNTe BNHTb, KOtOpbe Kpenr HapnabHouie K Kopnyc ukaopa.
2 Iepemecntte 3aknaHbte raikn Ha keaemyu rny6hny uYcTaHOBNTe BHTbHa MeCTO.
3 CBNbHeMoHTaxHbHe HAnpaBnIooHe Ha KenaemyI rHy6BHy H ChOba 3akpenite Ix C NOMouB BnHTOB, BBeBpHyTbIX Ha Ware 1.

6. YctaHOBka o6OpydoBaHnIa
BHHMaHHe yctahabnBaIte obopydOBaHne Do o6ceueheny yToMwBOcTH uKaFa. Chayana yCTAHoBHe obopydOBaHne, KOtOpoe cNeyTe pa3MeTb B HxKHe qAChn uKaFa. YctahabnBaIte obopydOBaHne HauHna CnHa 3u KaFa no HapPabLeHIO BBePx — Hn B Kcem cyae He HAObOPe. Pnp HcNoB3OBaHm HapPabLnOux Dn pyCTAHOBKn 6010aIte octopoxhoctb pN N BblkHe H. He bDlnaTe 6oone OHOH rpynnbI HapPabLHOUX OHOBpeMeHHo. CtapaiTe b He bDlnrTaB HapPabLnOune dny tCtAHOBKn 6010aIte octopoxhoctb pN N BblkHe B BeXHe qAChn uKaFa.
PnmeHne. KbaepbHe B cepHHe Kaqdo Hkaqpa npohymepoabHa H MeHOT He6oBHyO HaCceky dny yDObCTBa paon3HaBaHna. B Kaqdom OTeNbHom 6kaFy MMeTc MeTo, rde pacnonararet HmepoBaHHoe OTBpCTHe O TBpeTnHaxoJaHecn HncpeCDtBeHHo HAD nnoHM.

6.1 YctaHOBka/chTne 3aKnlaHbIX raeK
BHIMAHWE!OTRw6bI KpOMOK3aKnAdhBxaekdoJNkHb3aueenTbca3a6okOBbe,aeBepxHmHNKmKpaKaDpaTHoOBePCTNa HnpanBaJIoue.ДЯ o6ecneuHn npabunhoCTN yCTahOBKn 60OpDobHn 60OpDobHn CNeUyTe Yka3aHnM, M3IOKeHHbM B COpBOdntbHOJ DOKyMeHTauu K Hemy.
1 Haimite HymepoBaHbIe KBApaTHbIe OTBepCTMa B MOthaXbIX HAnpabJIHOux, KOtOpbe IInaHpyETc INCnlo3OBaTdIy cYtaHOBKn o6OpyOBOAHN. BCTABTe 3akJaHbIe raiKu (M3 KomNeKeTa) B KBaPaTHbIe OTBepCTNa C ceIbIO o6ceNeEHn ToKu KpeIIeHn Da MoTHaXbIX BHTOB (NoCTabJIReMbIX B KOMNeKeTe).
PnmeaHne. IOnpeEnenHeo6xoMIMO KOINcETBa 3aknaDbIx raeK MeCT Hx yCTaHOBKn O3HaKOBKn C0npOBOuNTbHON DOkymeTaunE K CBOemy O6OpyDObAHIO.
2IpoJeHbTe OJIN H3 OTN6OB KpOMK3aKJaNDHOraKMYepe3 KBaPaTHOEOTBepCTME C BHYTpHeH CTOpHOblMOHTaHHOH NaPabJIHOuEe. BdABte ee no HapabNEHHo K6OkoBOMy KpaIO KBaPaTHORo OTBepCTn. OTn6b KlPOmOK 3aKJaNDbIX Raek DOnKHB3auePJIbC3a6OkoBIE,a He BepXHH MHNKHH KpaARKaBpaTHORo OTBepCTn.
3 CnEka HauabHe Ha 3aKnaIHyu raiky no 60kAM, YTO No3BONHT dpyrOmy OTN6y KpOMKn PnoTnepe3 KBaPaTHoe OTBePCTHe. IpH npAubHbNo yCTAHOBKe 3aknHOi raiKn 6o aTIN6e KPOMK BbIAOTc o6pHoi CTOpOH b KaDpaTHo 0TBepCTMa N BuHbHa BHeUHe NOBepxHocTH MoTHaKHOi HapBaJIaIOeI. NobToprIte 1-3 do tex nop, noka He 6yUT yCTahOBHe b BCE Heo6xoDMble 3aKnaIDbie raiKn.
4 Nocye UCTAHOBKHeo6xOaHbIX 3aKaIaNbIX Taek npKpeNtE CBOe O6OpyDobAHne K CToeHoi HapabnHcE C NOMuBHO MOHTaKbIX BNTHO u aWeo6pa3bIX Waih6 n3 KOmNkTe. IomeCTHe aWeo6pa3bIe Waih6bl MEXdy BNHTAMN MoHTaKbHM KPOHtEHaMn dJa KpennHeH o6OpyDobAHn.
PnmeaHne.B KOMNNT NOCTABKMOBOPyOBAHIN MORYTAKKBEXOHTMBOTMTOHXTKHEI pNcNObHNEH. Ipepe yCTaHOBKO CBOEObOpYOBAHN 03HAKOmbTeCb cKa3AHMNIO MONTAKy, NOCTABNEMBMHN B KOMNNTKe CHMM.
IaN3BnueHnna 3aknaHbIXraek nobToPHTe WAn 1-3 B o6paTHOM npAKe
PnmeHne. PnKcnaHmYcTaHOBky N3BLeueHne 3aKlaadbIX raeK MoKHO pOIM3BOdntb CnOMoubIO cNeuaHbHO INCTpyMeHTA (B KOMNIeKT NOCTABKN HE BXoDNT).


7. TexHnueckne xapaKTePncTnKn

1111 W. 35th Street, Chicago, IL 60609 USA - triplite.com/support