SmartRack SRWO8U22MD - Server Tripp Lite - Free user manual and instructions
Find the device manual for free SmartRack SRWO8U22MD Tripp Lite in PDF.

User questions about SmartRack SRWO8U22MD Tripp Lite
0 question about this device. Answer the ones you know or ask your own.
Ask a new question about this device
Download the instructions for your Server in PDF format for free! Find your manual SmartRack SRWO8U22MD - Tripp Lite and take your electronic device back in hand. On this page are published all the documents necessary for the use of your device. SmartRack SRWO8U22MD by Tripp Lite.
USER MANUAL SmartRack SRWO8U22MD Tripp Lite
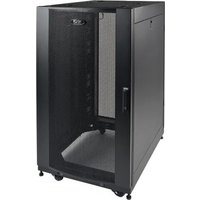
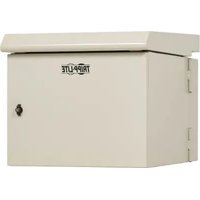
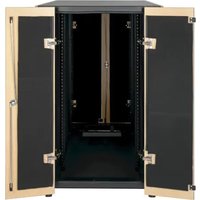
8U/12U/22U Configurable Wall-Mounted 2-Post Open Frame Rack
Model: SRW08U22
Introduction 2
Important Safety Instructions 2
Parts List 2
Installation/Wall-Mounting 3
8U Configuration 3
12U Configuration 4
22U Configuration 5
Equipment Installation 6
Storage & Service 6
Warranty & Product Registration 6
Espanol 7
Français 13
PROTECT YOUR INVESTMENT!
Register your product for quicker service and ultimate peace of mind.
You could also win an ISOBAR6ULTRA surge protector—a $100 value!
www.triplite.com/warranty


Manufacturing Excellence.
1111 W. 35th Street, Chicago, IL 60609 USA · www.triplite.com/support
Copyright © 2017 Tripp Lite. All rights reserved.
Introduction
Tripp Lite's SRw08U22 is the perfect multi-option 2-post open frame rack solution for applications where space is limited. 8U, 12U or 22U rack space options allow configuration flexibility without having to buy separate rack fixtures, all in an out-of-the-way wall-mount form factor. The SRw08U22 accommodates all standard 19-inch rackmount equipment compatible with 2-post mounting.
Important Safety Instructions

SAVE THESE INSTRUCTIONS
This Manual contains instructions and warnings that must be followed during the installation and operation of the product described in this manual. Failure to comply may invalidate the warranty and cause property damage or personal injury.
- Keep the rack in a controlled indoor environment, away from moisture, temperature extremes, flammable liquids and gasses, conductive contaminants and dust.
- Leave adequate space at the front of the rack for proper ventilation.
- Inspect the shipping container and the rack for shipping damage. Do not use the rack if it is damaged.
- Leave the rack in the shipping container until it has been moved as close to the final installation location as possible.
- Install the rack in a structurally sound area capable of handling the load, the weight of the rack, all equipment that will be installed in the rack and any other equipment that will be installed nearby.
- Save all packing materials for later use. Repacking and shipping the enclosure without the original packing materials may cause product damage that may affect the warranty.
- Do not attempt to install the rack unassisted.
- Do not attempt to install equipment without first wall mounting and stabilizing the rack.
- Use of this equipment in life support applications where failure of this equipment can reasonably be expected to cause the failure of the life support equipment or to significantly affect its safety or effectiveness is not recommended.
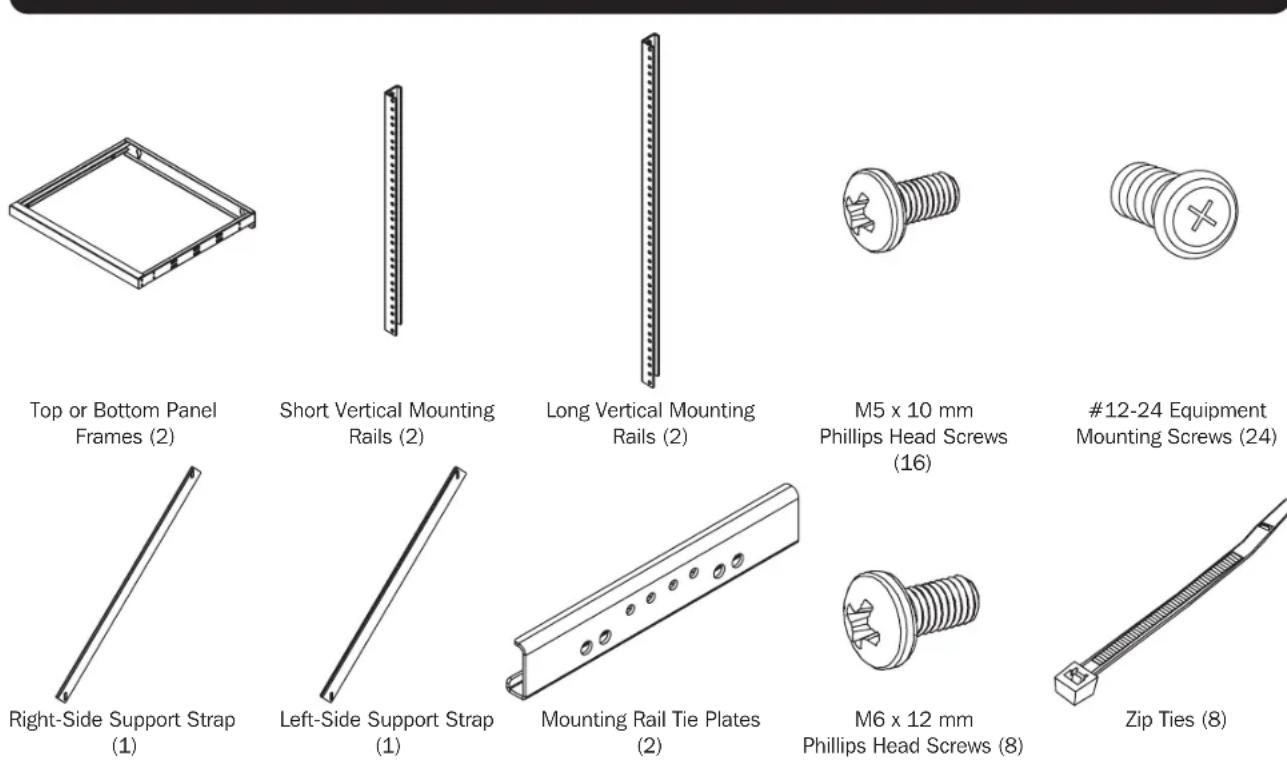
Parts List
Installation/Wall-Mounting

WARNING: Do not attempt to mount the rack to the wall with equipment mounted to the rack.
WARNING: The wall surface, the wall studs and all user-supplied mounting hardware must be able to support the combined weight of the rack and all equipment that will be installed in the rack. The rack can support an equipment load up to 150 lb. maximum, evenly distributed.
Note: Recommended torque for tightening all M5 screws is 35 in·lbf or 3.9 N·m.
8U Configuration
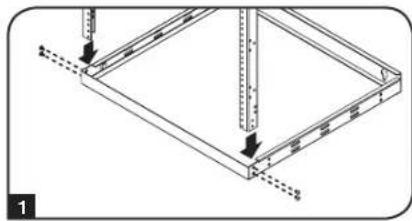
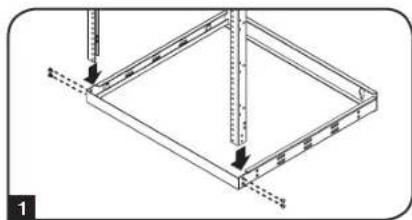
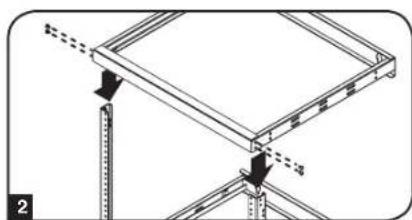
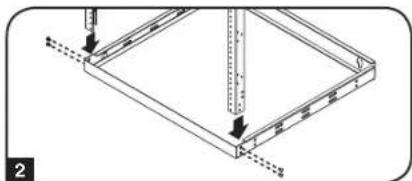
Step 1 Insert one end of the shorter vertical mounting rails into the corners of the bottom panel frame (both panel frames can be used as a top or a bottom) opposite the mounting side and secure them with 2 of the M5 x 10 mm Phillips head screws on each side.
Step 2 Insert the other end of the shorter vertical mounting rails into the corners of the top panel frame opposite the mounting side and secure them with 2 of the M5 x 10 mm Phillips head screws on each side.
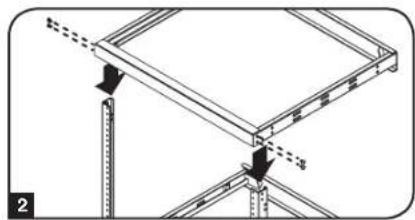
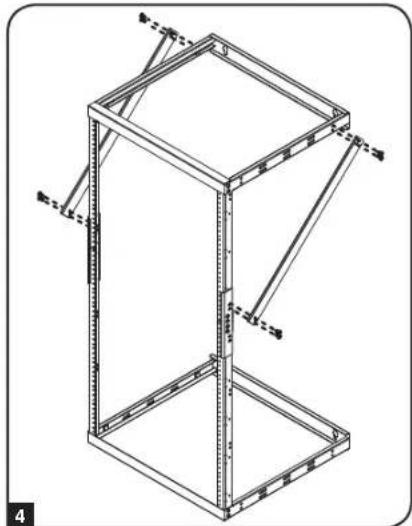
Step 3 Attach the right-side and left-side support straps by securing 8 of the M6 x 12 mm Phillips head screws to the sides of the top panel frame and vertical mounting rails.
Step 4 Before mounting the rack, find the studs in your wall/mounting surface and make all measurements, and or guide marks in accordance with the configuration you have chosen (8U).
Step 5 Using user-supplied hardware, mount the top and bottom panel frames to the wall. Both mounting frames can accommodate 5 / 16 lag bolts.
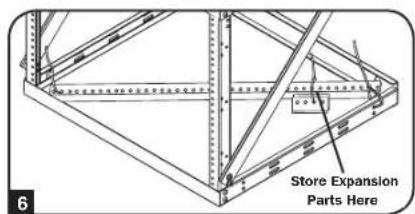
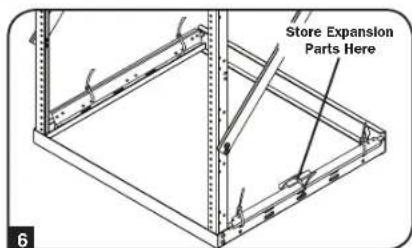
Step 6 Using the supplied zip ties included in the expansion hardware bag, you can store the extra 12U (long) mounting rails, plus the remaining expansion hardware contents (Mounting Rail Tie Plates, 8 M5 Phillips Screws and Zip Ties) inside the bag that the expansion hardware was packaged in. It is important to save all unused hardware in the event that you want to expand your configuration at a later date.
Installation/Wall-Mounting continued
12U Configuration
Step 1 Insert one end of the longer vertical mounting rails into the corners of the bottom panel frame (both panel frames can be used as a top or a bottom) opposite the mounting side and secure them with 2 of the M5 x 10 mm Phillips head screws on each side.
Step 2 Insert the other end of the longer vertical mounting rails into the corners of the top panel frame opposite the mounting side and secure them with 2 of the M5 x 10 mm Phillips head screws on each side.
Step 3 Attach the right-side and left-side support straps by securing 8 of the M6 x 12 mm Phillips head screws to the sides of the top panel frame and vertical mounting rails.
Step 4 Before mounting the rack, find the studs in your wall/mounting surface and make all measurements, and or guide marks in accordance with the configuration you have chosen (12U).
Step 5 Using user-supplied hardware, mount the top and bottom panel frames to the wall. Both mounting frames can accommodate 5 / 16 lag bolts.
Step 6 Using the supplied zip ties included in the expansion hardware bag, you can store the extra 8U (short) mounting rails, plus the remaining expansion hardware contents (Mounting Rail Tie Plates, 8 M5 Phillips Screws and Zip Ties) inside the bag that the expansion hardware was packaged in. It is important to save all unused hardware in the event that you want to expand your configuration at a later date.

Installation/Wall-Mounting continued
22U Configuration
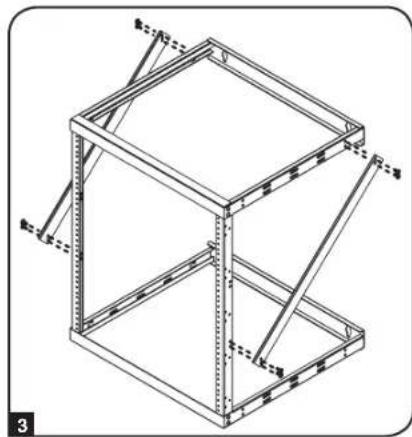
Step 1 Using one of the mounting rail tie plates and four of the M5 x 10 mm Phillips head screws, connect one set of shorter and longer vertical mounting rails. Repeat this step for the other set of rails.
Step 2 Insert one end of the combined vertical mounting rails into the corners of the bottom panel frame (both panel frames can be used as a top or a bottom) opposite the mounting side and secure them with 2 of the M5 x 10 mm Phillips head screws on each side.
Step 3 Insert the other end of the combined vertical mounting rails into the corners of the top panel frame opposite the mounting side and secure them with 2 of the M5 x 10 mm Phillips head screws on each side.
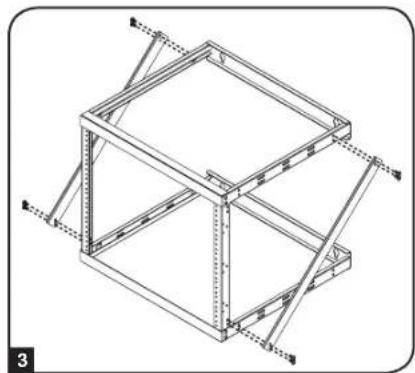
Step 4 Attach the right-side and left-side support straps by securing 8 of the M6 x 12 mm Phillips head screws to the sides of the top panel frame and vertical mounting rails.
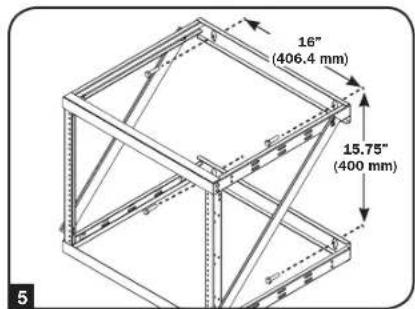
Step 5 Before mounting the rack, find the studs in your wall/mounting surface and make all measurements, and or guide marks in accordance with the configuration you have chosen (22U).
Step 6 Using user-supplied hardware, mount the top and bottom panel frames to the wall. Both mounting frames can accommodate 5 / 16 lag bolts.
Note: Mount this configuration with the longer rails towards the bottom.


Equipment Installation
It should be noted that the SRWO8U22 can support an equipment load up to 150 lb. maximum.
For all other equipment mounting, please refer to the intended equipment's Owner's Manual's for equipment installation instructions. Typically, this information can be found in the "Mounting" or "Rackmounting" sections of the manual. Tripp Lite has provided you with
24 Equipment Mounting Screws, included in this package.
Storage and Service
Storage
The enclosure should be stored in a controlled indoor environment, away from moisture, temperature extremes, flammable liquids and gasses, conductive contaminants, dust and direct sunlight. Store the enclosure in its original shipping container if possible.
Service
Your Tripp Lite product is covered by the warranty described in this manual. A variety of Extended Warranty and On-Site Service Programs are also available from Tripp Lite. For more information on service, visit www.triplite.com/support. Before returning your product for service, follow these steps:
- Review the installation and operation procedures in this manual to insure that the service problem does not originate from a misreading of the instructions.
2.If the problem continues, do not contact or return the product to the dealer. Instead, visit www.triplite.com/support. - If the problem requires service, visit www.triplite.com/support and click the Product Returns link. From here you can request a Returned Material Authorization (RMA) number, which is required for service. This simple on-line form will ask for your unit's model and serial numbers, along with other general purchaser information. The RMA number, along with shipping instructions will be emailed to you. Any damages (direct, indirect, special or consequential) to the product incurred during shipment to Tripp Lite or an authorized Tripp Lite service center is not covered under warranty. Products shipped to Tripp Lite or an authorized Tripp Lite service center must have transportation charges prepaid. Mark the RMA number on the outside of the package. If the product is within its warranty period, enclose a copy of your sales receipt. Return the product for service using an insured carrier to the address given to you when you request the RMA.
Warranty & Product Registration
5-Year Limited Warranty
Sellerr wth i t of initial purchase. If the product should prove defective in material or workmanship within that period, Seller will repair or replace the product, at its sole discretion.
THIS WARRANTY DOES NOT APPLY TO NORMAL WEAR OR TO DAMAGE RESULTING FROM ACCIDENT, MISUSE, ABUSE OR NEGLECT. SELLER MAKES NO EXPRESS WARRANTY ISSERS. OTHER THAN THE WARRANTY EXPRESSLY SET FORTH HEREIN. EXCEPT TO THE EXTENT PROHIBITED BY APPLICABLE LAW, ALL IMPLIED WARRANTYES, INCLUDING ALL WARRANTYES OF MERCHANTABILITY OR FITNESS, ARE LIMITED IN DURATION TO THE WARRANTY PERIOD SET FORTH ABOVE; AND THIS WARRANTY EXPRESSLY EXCUSES ALL INCIDENTAL AND CONSEQUENTIAL DAMAGES. (Some states do not allow limitations on how long an implied warranty lasts, and some states do not allow the exclusion or limitation of incidental or consequential damages, so the above limitations or exclusions may not apply to you. This warranty gives you specific legal rights, and you may have other rights which vary from jurisdiction to jurisdiction).
WARNING: The individual user should take care to determine prior to use whether this device is suitable, adequate or safe for the use intended. Since individual applications are subject to great variation, the manufacturer makes no representation or warranty as to the suitability or fitness of these devices for any specific application.
Product Reglstration
Visit www.triplite.com/warranty today to register your new Tripp Lite product. You'll be automatically entered into a drawing for a chance to win a FREE Tripp Lite product!*
- No purchase necessary. Void where prohibited. Some restrictions apply. See website for details.
Tripp Lite has a policy of continuous improvement. Specifications are subject to change without notice.


Manufacturing Excellence
1111 W. 35th Street, Chicago, IL 60609 USA · www.triplite.com/support
Installation/ Montage mural 15
Configuration 8U 15
Configuration 12U 16
Configuration 22U 17
Manufacturing Excellence.
1111 W. 35th Street, Chicago, IL 60609 USA · www.triplite.com/support
Installation/Montage mural

Installation/Montage mural (suite)
Configuration 12U
Installation/Montage mural (suite)
Configuration 22U
Manufacturing Excellence.
1111 W. 35th Street, Chicago, IL 60609 USA · www.triplite.com/support