SmartRack SR45UBDPWD - Electrical cabinet Tripp Lite - Free user manual and instructions
Find the device manual for free SmartRack SR45UBDPWD Tripp Lite in PDF.

| Product Type | 19" Server Rack Enclosure |
| Brand | Tripp Lite |
| Model | SmartRack SR45UBDPWD |
| Rack Height | 45U (84 in / 2133.6 mm) |
| Dimensions (H × W × D) | 2133.6 × 750 × 1200 mm (84 × 29.53 × 47.3 in) |
| Net Weight | ≈ 164 kg (361 lb) |
| Maximum Static Load Capacity | 1363 kg (3000 lb) |
| Maximum Rolling Load Capacity | 1022 kg (2250 lb) |
| Material | Steel with powder coating |
| Front Door | Lockable, reversible, with handle and window |
| Rear Doors | Two lockable doors |
| Side Panels | 4 lockable panels (removable) |
| Top Panel | Removable with pins |
| Mounting Points | Front and rear profiles adjustable in depth (101.6 mm to 1066.8 mm) |
| Cable Management Channels | 2 adjustable profiles at rear |
| Cage Nuts Supplied | 60 M6 cage nuts |
| Casters | 4 casters (short distance only) |
| Leveling Feet | 4 leveling feet for leveling and permanent support |
| Grounding | Front/rear grounding point, M6 screw included |
| Keys Supplied | 2 keys (doors and side panels) |
| Rack Assembly Possible | Yes, with provided joining brackets |
| Warranty | 5-year limited |
| Maintenance | Clean with a dry cloth; store in controlled indoor environment |
Frequently Asked Questions - SmartRack SR45UBDPWD Tripp Lite
User questions about SmartRack SR45UBDPWD Tripp Lite
0 question about this device. Answer the ones you know or ask your own.
Ask a new question about this device
Download the instructions for your Electrical cabinet in PDF format for free! Find your manual SmartRack SR45UBDPWD - Tripp Lite and take your electronic device back in hand. On this page are published all the documents necessary for the use of your device. SmartRack SR45UBDPWD by Tripp Lite.
USER MANUAL SmartRack SR45UBDPWD Tripp Lite
SmartRack® Enclosures
Important Safety Instructions 2
Overview 2
Feature Identification 3
Enclosure Installation 4
Preparation 4
Unpacking 4
Placement 5
Leveling 6
Ground Connection 6
Enclosure Configuration 7
Adding or Removing Front and Rear Doors 7
Reversing Front Door 7
Adding or Removing Roof Panel 9
Adding or Removing Side Panels 9
Adjusting Mounting Rails and Cable Management Rails 10
Combining (Baying) Enclosures 11
Equipment Installation 11
Installing or Removing Cage Nuts 12
Specifications 12
Storage and Service 14
Warranty and Product Registration 14
Espanol 15
Français 29
Pycckn 43
PROTECT YOUR INVESTMENT!
Register your product for quicker service and ultimate peace of mind.
You could also win an ISOBAR6ULTRA surge protector—a $100 value!
www.triplite.com/warranty


Manufacturing
Excellence
当 m = 32 时方程有两个实数根;
SAVE THESE INSTRUCTIONS
All sections of this manual contain instructions and warnings that should be followed during the installation and use of the SmartRack Enclosures described in this manual. Read all instructions and warnings thoroughly before attempting to move, install or use the SmartRack Enclosures described in this manual. Failure to comply will create a risk of personal injury and property damage and may invalidate the warranty.
- Keep the enclosure in a controlled indoor environment, away from moisture, temperature extremes, flammable liquids and gasses, conductive contaminants, dust and direct sunlight.
- Leave adequate space at the front and rear of the enclosure for proper ventilation. Do not block, cover or insert objects into the external ventilation openings of the enclosure.
The enclosure is extremely heavy. Use caution when handling the enclosure. Do not attempt to unpack, move or install it unassisted. Use a mechanical device such as a forklift or pallet jack to move the enclosure in the shipping container. - Do not place any object on the enclosure, especially containers of liquid, and do not attempt to stack the enclosures.
- Inspect the shipping container and the enclosure for shipping damage. Do not use the enclosure if it is damaged.
- Leave the enclosure in the shipping container until it has been moved as close to the final installation location as possible. The casters are designed for minor position adjustments within the final installation area only. The casters are not designed for moving the enclosure over longer distances.
The casters are not designed to provide long-term support for the enclosure after final installation. Use the levelers to provide long-term support. - Install the enclosure in a structurally sound area with a level floor that is able to bear the weight of the enclosure, all equipment that will be installed in the enclosure and any other enclosures and/or equipment that will be installed nearby.
- Do not push the enclosure from the side panels to move it. Pushing from the side panels will cause a tipping hazard.
- When rolling the enclosure on its casters, always push it from behind, never pull it toward you.
- A rolling enclosure can cause personal injury and property damage if not properly supervised. If rolling the enclosure down a ramp is required, use extreme caution. Do not attempt to use ramps that have a slope steeper than 1:12.
Use caution when cutting packing materials. The enclosure could be scratched, causing damage not covered by the warranty. - Save all packing materials for later use. Repacking and shipping the enclosure without the original packing materials may cause product damage that will void the warranty.
- Do not re-ship the enclosure with additional equipment unless the enclosure was shipped with a special shock pallet ("SP1" models only). The combined weight of the enclosure and installed equipment must not exceed the load capacity of the pallet. Tripp Lite is not responsible for any damage that occurs during re-shipment.
- Use of this equipment in life support applications where failure of this equipment can reasonably be expected to cause the failure of the life support equipment or to significantly affect its safety or effectiveness is not recommended.
Overview
SmartRack Enclosures accommodate all standard 19-inch rackmount equipment, regardless of vendor, and ship fully assembled for quick and easy deployment. They feature adaptable, heavy-duty cabinets in 24U, 42U, 45U, 47U and 48U heights, with or without side panels. Several models are available with an integrated shock pallet that allows resellers, integrators and enterprise customers to pre-configure equipment and re-ship the enclosures to the final installation site.
SmartRack Enclosures have variable mounting depths, ideal for servers. Integrated baying hardware enables cost-effective, orderly and efficient expansion. The cabinets include quick-release doors and side panels for convenient maintenance and split rear doors for improved access and reduced clearance requirements. Front access doors are reversible for installation flexibility. Front and rear doors and side panels are lockable.
Available SmartRack Enclosures
| Model # Rack Height Side Panels Shock Pallet | |||
| SR24UB 24U Yes No | |||
| SR24UBEXP 24U No No | |||
| SR24UBEXPSP1 24U No Yes | |||
| SR24UBSP1 24U Yes Yes | |||
| SR42UB 42U Yes No | |||
| SRX42UB* | 42U Yes No | ||
| SR42UBCL | 42U Yes No | ||
| SR42UBDP | 42U Yes No | ||
| SRX42UBDP* | 42U Yes No | ||
| SRX42UBDPEXP* | 42U No No | ||
| SRX42UBDPWDEXP* | 42U No No | ||
| SRX42UBEXP 42U No | No | ||
| SRX42UBEXP* | 42U No | No | |
| SR42UBEXPND | 42U No | No | |
| SR42UBEXPSP1 42U No Yes | |||
| SR42UBSP1 42U Yes Yes | |||
| SR42UBWD | 42U Yes No | ||
| Model # Rack Height Side Panels Shock Pallet | |||
| SRX42UBWD* | 42U Yes No | ||
| SRX42UBWDEXP* | 42U No | No | |
| SR42UBWDCL | 42U Yes No | ||
| SR45UB 45U Yes No | |||
| SRX47UB* | 47U Yes No | ||
| SRX47UBEXP* | 47U No | No | |
| SRX47UBDP* | 47U Yes No | ||
| SRX47UBDPEXP* | 47U No | No | |
| SRX47UBWD* | 47U Yes No | ||
| SRX47UBWDEXP* | 47U No | No | |
| SRX47UBDPWD* | 47U Yes No | ||
| SRX47UBDPWDEXP* | 47U No | No | |
| SR48UB 48U Yes No | |||
| SR48UBCL | 48U Yes No | ||
| SR48UBDP | 48U Yes No | ||
| SR48UBDPWD | 48U Yes No | ||
| SR48UBEXP 48U No | No | ||
| SR48UBEXPSP1 48U No Yes | |||
| SR48UBSP1 48U Yes Yes | |||
*SRX-Series SmartRack Enclosure
See the Specifications section for more information.
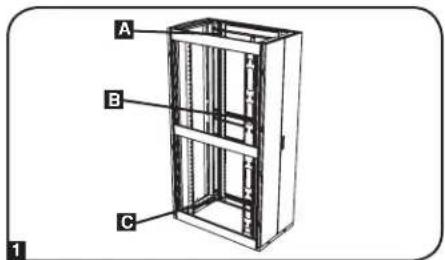
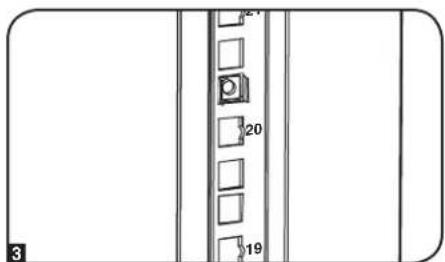
Feature Identification
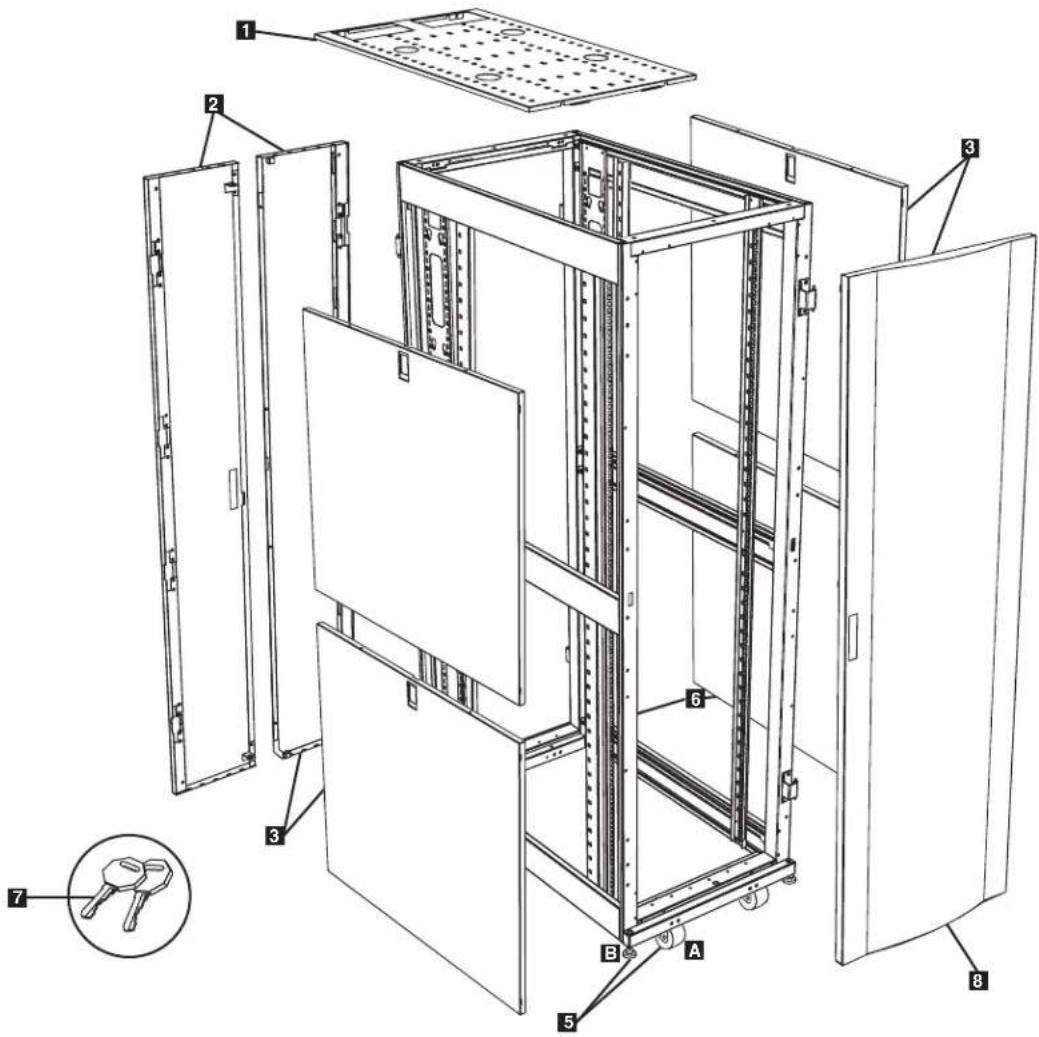
Model SR42UB is shown. The other models have similar features, with the differences noted.
1 Roof Panel
Locking Split Rear Doors
Locking Side Panels (24U enclosures use 2 side panels instead of 4. Side panels are not included with "EXP" models.)
4 Cable Management Rails
5 Casters A and Levelers B
6 Mounting Rails (Provide horizontal and vertical mounting points for equipment.)
7 Keys (One for the doors and one for the side panels.)
Locking Reversible Front Door
Not Shown: Mounting hardware, documentation, shipping brackets and other shipping materials.
Enclosure Installation

Caution! Read All Instructions andWarnings Before Installation!

WARNING: The rack enclosure is extremely heavy. Do not attempt to unpack, move or install the enclosure without assistance. Until it has been properly installed and stabilized, the enclosure is prone to tipping and could cause property damage and/or personal injury. Use extreme caution when handling the enclosure and be sure to follow all handling and installation instructions. Do not attempt to install equipment without first stabilizing the enclosure.
Preparation
The enclosure must be installed in a structurally sound area with a level floor that is able to bear the weight of the enclosure, all the equipment that will be installed in the enclosure and any other enclosures and/or equipment that will be installed nearby. Before unpacking the enclosure, you should transport the shipping container closer to the final installation location to minimize the distance you will need to move the unit after the protective packaging has been removed. If you plan to store the enclosure for an extended period before installation, follow the instructions in the Storage and Service section.
You need several tools (user-supplied):
13 mm Open-end Wrench
18 mm Open-end Wrench
Utility Blade
Carpenter's Level
Phillips-head Screwdriver
5/32" Allen Wrench
You also need the following hardware (included):
(60) Phillips-head Mounting Screws (M6 x 5/8")
(60) Cage Nuts (M6)
(60) Nylon Cup Washers
Unpacking
NOTE: If the enclosure is an "SP1" model with a shock pallet, follow the special unpacking instructions attached to the shipping container instead of the unpacking instructions in this section. All warnings still apply.
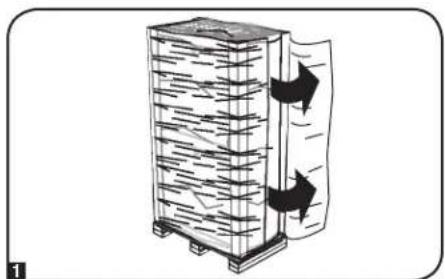
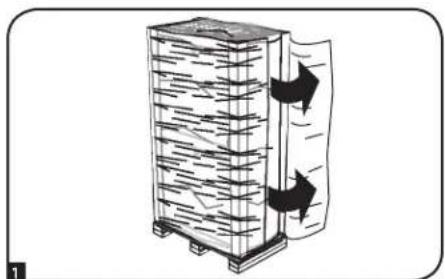
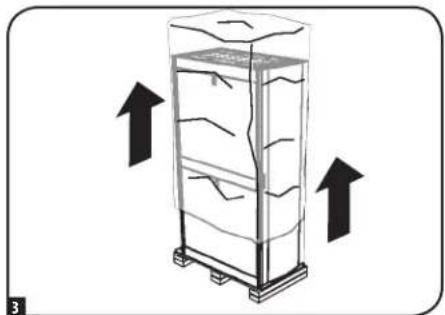
1 Confirm that the shipping container is upright and stable, then use a utility blade to cut the shrinkwrap securing the corner protectors. Apply the utility blade directly over the corner protectors to prevent the utility blade from scratching the enclosure or cutting the heavy protective plastic bag beneath the shrink-wrap. WARNING: Do not scratch the enclosure or cut the heavy plastic bag beneath the shrink-wrap. Do not push or pull the enclosure while unpacking.
2 Remove the corner protectors. Save all packing materials (including the pallet) for later use unless you are certain they will not be required. The packing materials are recyclable.

3 Remove the heavy plastic bag surrounding the enclosure. Examine the enclosure for any damage or loose parts. Confirm that all parts are present. If anything is missing or damaged, contact Tripp Lite for assistance. Do not attempt to use the enclosure if it has been damaged.

Enclosure Installation
Unpacking (continued)
Use the key to open the enclosure's doors and locate the 2 shipping brackets that attach the enclosure to the shipping pallet. The brackets are located inside the enclosure.
Note: The keys are attached to the front of the enclosure.
Use a 13 mm open-end wrench to remove the shipping brackets. Be extremely careful, as the enclosure could shift unexpectedly after bracket removal. Save the brackets and bracket hardware for later use.
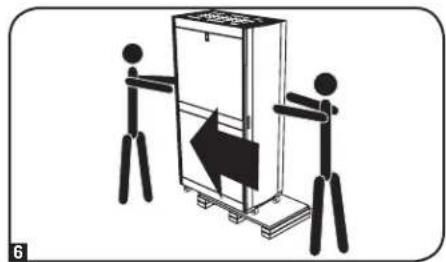
6 Position at least one person at the front of the enclosure and one person at the rear of the enclosure. Slowly push the enclosure toward the back of the shipping pallet until all four casters go over the edge of the pallet and touch the floor. WARNING: Use at least one assistant when removing the enclosure from the pallet. Be extremely careful when moving the enclosure.
Placement
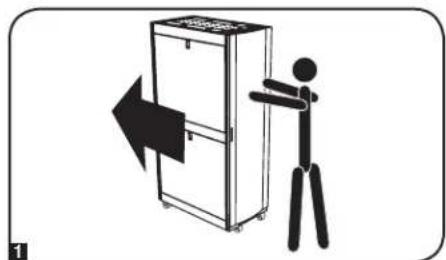
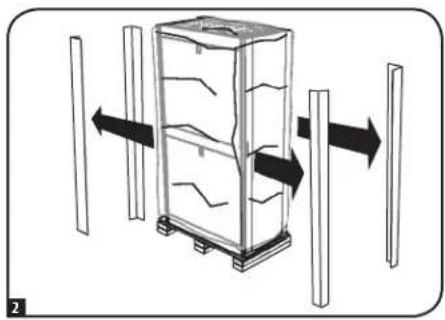
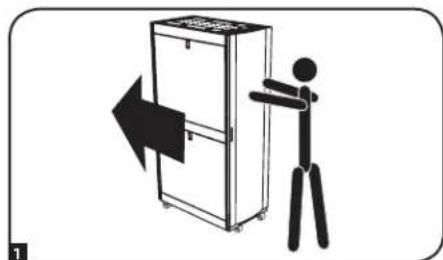
1 Use the casters to move the enclosure for a short distance over a level, smooth, stable surface by pushing it from the front or rear (not the side panels). Do not attempt to roll the enclosure over long distances. The enclosure should be moved close to its installation location inside its shipping container before it is unpacked. (Use a forklift or pallet jack to move the shipping container.)
WARNING: Do not push or pull the enclosure at the side panels or pull the enclosure toward you.
If required, the enclosure can be lifted by attaching 4 user-supplied M8 diameter eye bolts to the threaded holes near the upper corners of the enclosure frame. Use steel bolts with an ISO strength rating of 8.8 or higher. The 4 bolts can support the weight of the enclosure and up to 1000 lb (450 kg) of installed equipment. WARNING: Only experienced equipment operators should attempt to lift the enclosure. Use appropriate equipment and follow all applicable safety procedures and regulations.
Enclosure Installation
Leveling
WARNING: Level the enclosure before attempting to install equipment. The casters are not designed to provide long-term support for the enclosure. Use the levelers to provide long-term support. Install the enclosure in a structurally sound area with a level floor that is able to bear the weight of the enclosure, all equipment that will be installed in the enclosure and any other enclosures and/or equipment that will be installed nearby.
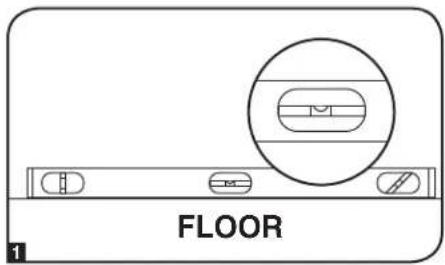
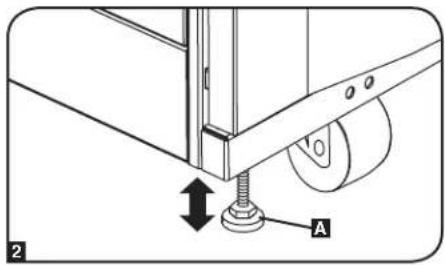
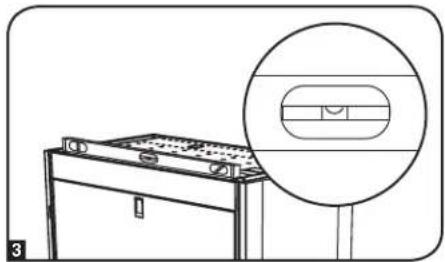
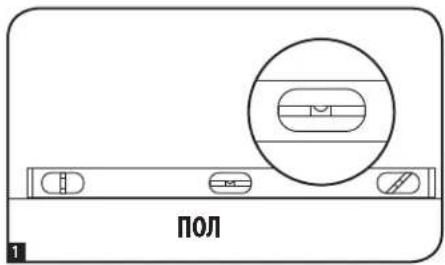
1 After the enclosure has been moved to the installation location, use a carpenter's level to check the slope of the floor. If the floor slopes more than 1% , choose an alternate installation site.
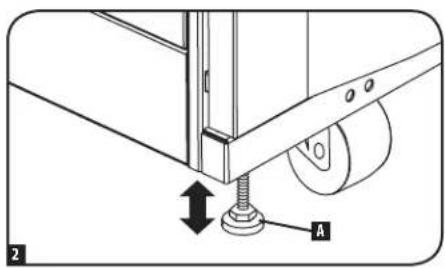
Use an 18 mm open-end wrench to lower each leveler until it reaches the floor. (There are 4 levelers, 2 at the front and 2 at the rear.) Make sure each leveler contacts the floor solidly. Note: Lower a leveler by turning it clockwise; raise a leveler by turning it counter-clockwise.
After lowering each leveler, use the carpenter's level to confirm that the enclosure is level in all directions. Adjust the levelers as required until the enclosure is level.
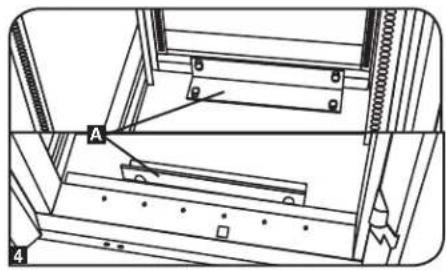
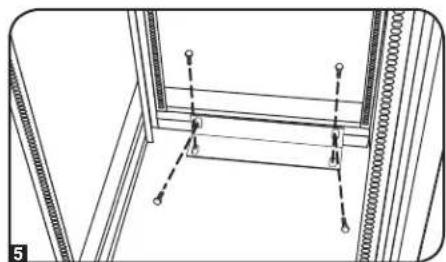
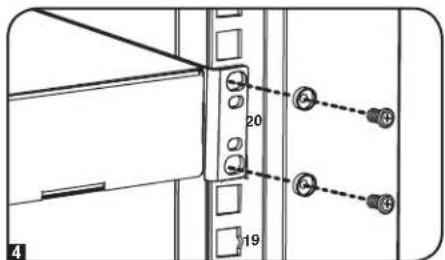
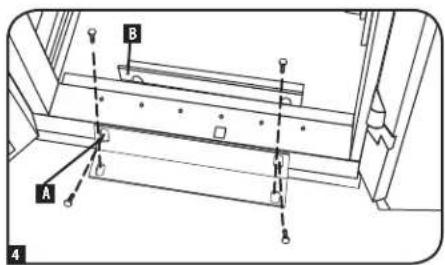
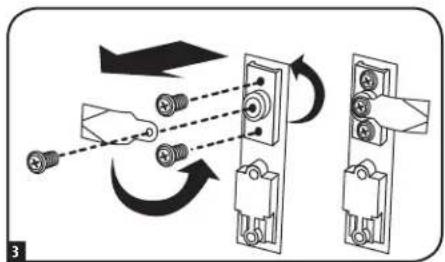
4 (Optional) If you wish to provide an additional measure of stability, you can attach the 2 shipping brackets, using the hardware that attached the enclosure to the shipping pallet. Use a 13mm open-end wrench to connect the brackets to the outer A or inner B bracket mounting points of the enclosure. Attach the brackets to secure mounting points in the floor using user-supplied hardware or Tripp Lite's SmartRack Bolt-Down Kit (Model: SRBOLTDOWN).
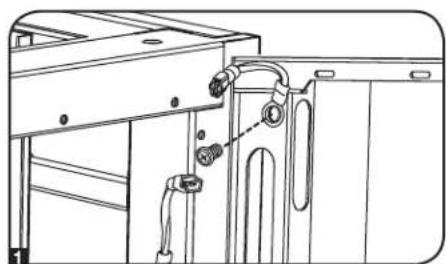
Ground Connection
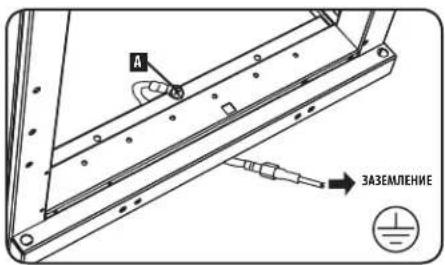
All the parts of the enclosure are grounded to the frame of the enclosure. Use the enclosure's front or rear threaded grounding point A and an M6 screw (included) to connect the frame of the enclosure directly to your facility's earth ground connection with an 8 AWG (3.264 mm) wire. Route the ground wire under the enclosure's frame to ensure unhindered door operation. WARNING: Attach each enclosure to earth ground separately. Do not use the enclosure without an earth ground connection.

Enclosure Configuration
Adding or Removing Front and Rear Doors
WARNING: Do not attempt to add or remove doors without assistance.
Removing Door
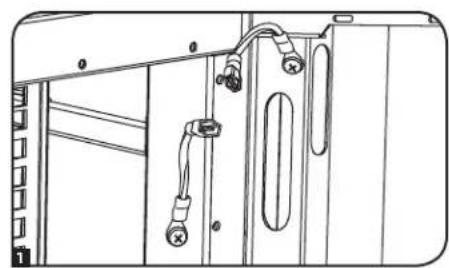
1 Disconnect the door's ground wire.
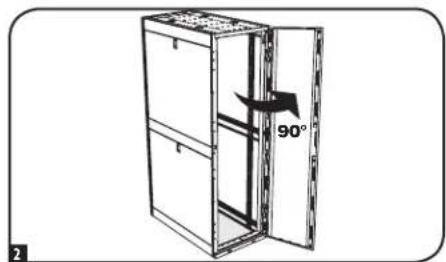
2 Open the door until it is perpendicular (90 degrees) to the front of the enclosure.
3 Lift the door from the hinges and remove it from the enclosure.
To Reinstall Door, Reverse Steps 1-3
(Optional) If the enclosure is joined to another enclosure, turn the door back toward the enclosure as you lift it from the hinges.
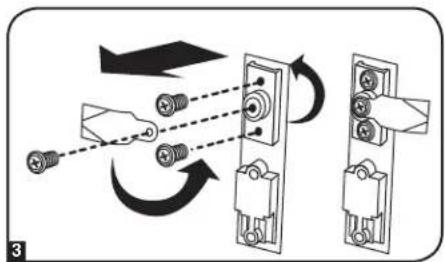
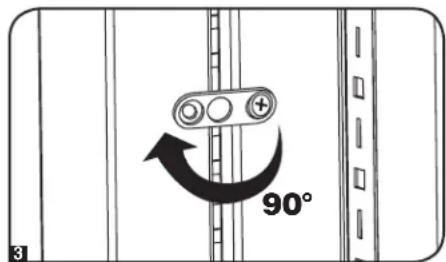
Reversing Front Door
WARNING: Do not attempt to reverse the front door without assistance.
1 Remove the screw connecting the ground wire to the inside of the door.
2 Remove the 2 screws connecting the door handle to the door. Remove the door handle.


Enclosure Configuration
Reversing Front Door (continued)
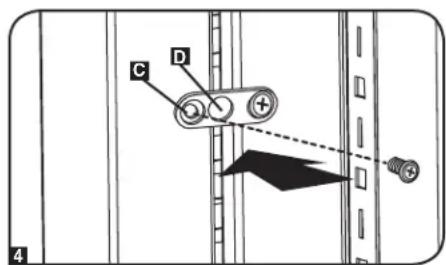
Remove the screw and washer from the rear of the door handle and remove the latching mechanism. Rotate the latch washer counter-clockwise 90 degrees and reverse the latch so it points in the opposite direction, then use the screw and washer to re-attach the latch to the rear of the door handle.
4 Remove the door by following the steps in the previous section.
Remove the door hinges from the enclosure, rotate them 180 degrees and attach them on the opposite side of the enclosure.
Note: The alternate door hinge attachment points have plastic plugs in the screw holes. Remove the plugs and insert them in the original door hinge attachment points.
Unscrew the 2 hinge mechanisms from the hinge openings inside the door, then reattach each of them using the set of screw holes immediately opposite their original position.
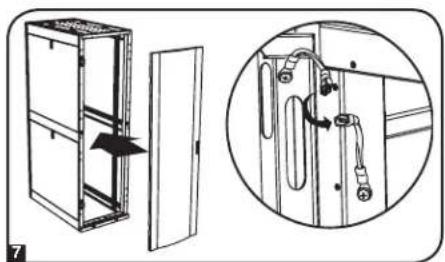
7 Rotate the door 180 degrees and reinstall it on the enclosure. Remember to connect the ground wire to the inside of the door, using the attachment point nearest the hinge at the top of the door. The attachment point is marked with the ground connection symbol:
Reinstall the door handle.


Enclosure Configuration
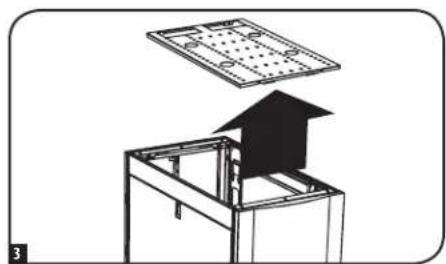
Adding or Removing Roof Panel
WARNING: Do not attempt to use the roof panel for weight-bearing purposes other than those explicitly described and approved by Tripp Lite. Do not attempt to add or remove the roof panel without assistance.
Removing Roof Panel
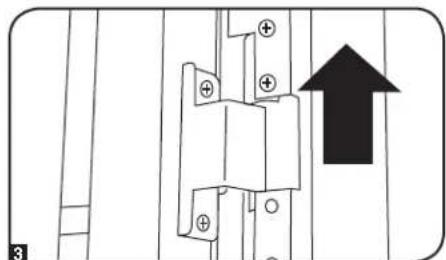
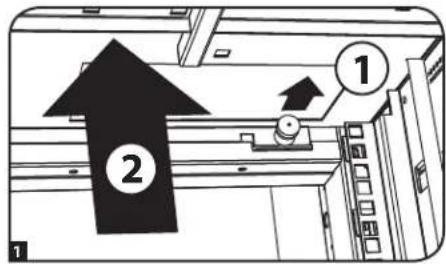
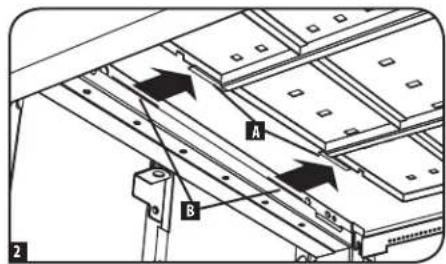
Pull the 2 pins near the rear of the roof panel. While holding the pins, push the roof panel upward.

2 Remove the roof panel tabs A from the roof panel attachment slots B in the enclosure frame.

3 Lift the roof panel from the enclosure.
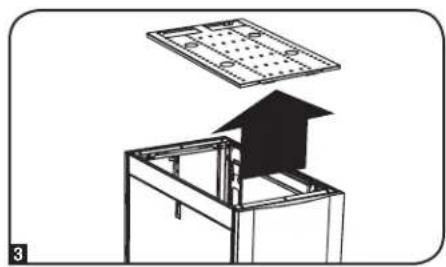
To Reinstall Roof Panel, Reverse Steps 1-3
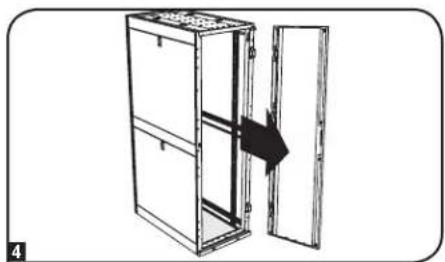
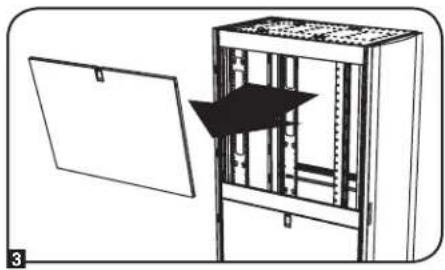
Adding or Removing Side Panels Removing Side Panel
1 Open the latch by sliding it downward.
2 Tilt the top of the panel away from the enclosure.

Enclosure Configuration
Adding or Removing Side Panels (continued)
3 Lift the panel away from the brace that supports it.
To Reinstall Side Panel, Reverse Steps 1-3
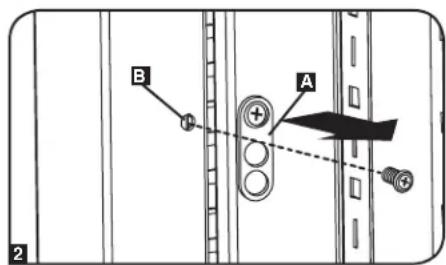
Adjusting Mounting Rails and Cable Management Rails
WARNING: Do not attempt to adjust rails without assistance. Do not attempt to adjust rails while equipment is installed in the enclosure. Do not attempt to use rails without screws installed (6 per rail).
The 4 mounting rails are pre-installed to accommodate equipment with a mounting depth of 30 inches (762 mm). Do not adjust the mounting rails unless your equipment requires a different mounting depth. The front and rear sets of rails can be adjusted independently in 12 -inch (6 mm) increments for mounting depths between 4 inches (101.6 mm) and 42 inches (1066.8 mm).
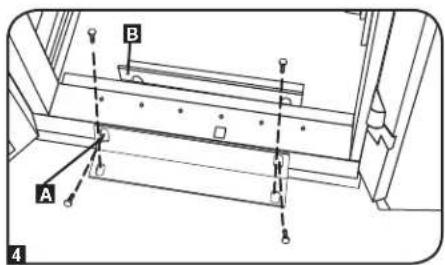
1 Each rail is connected to the enclosure with 6 screws - 1 pair at the upper beam A, 1 pair at the middle beam B and 1 pair at the lower beam C.
2 Remove the screws fastening each of the rear mounting rails to the enclosure. (If adjustment of the front rails is required, you can also remove the screws from the front rails.)
3 Slide the mounting rails to the desired depth and reattach them using the screws you removed in Step 2. The rail attachment points are numbered A to help you align each pair of rails at the same depth.
The depth of the 2 cable management rails can be adjusted using the same method.
Enclosure Configuration
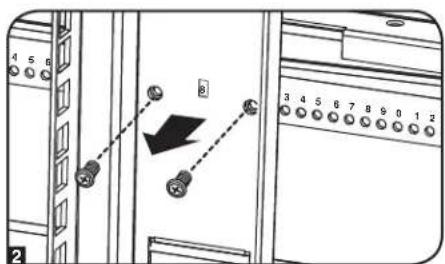
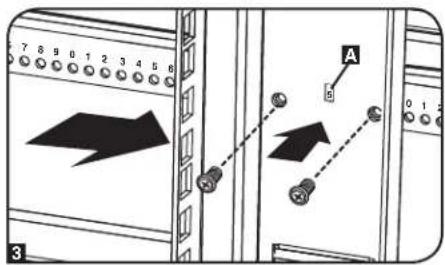
Combining (Baying) Enclosures
WARNING: Combining enclosures is not a substitute for stabilizing the enclosures. Each enclosure in a bay of combined enclosures requires the same stabilizing measures as a standalone enclosure.
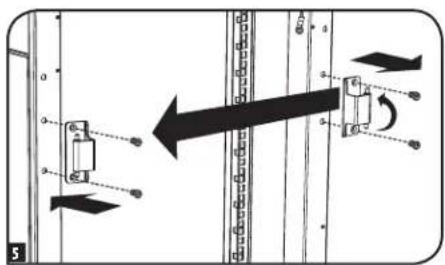
1 Arrange the enclosures in the correct position for baying.
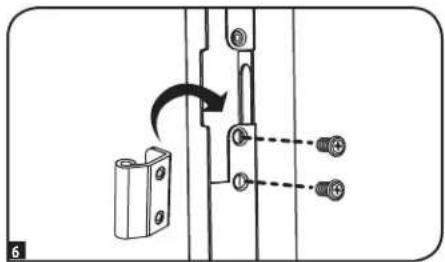
2 Each enclosure includes 4 baying brackets A that correspond to baying connection points B on the adjoining enclosure. The baying connection points already contain screws. Remove the screw from each baying connection point in the adjoining enclosure.
3 Loosen the screw in each baying bracket and turn each bracket 90 degrees toward the adjoining enclosure, aligning each bracket with the corresponding baying connection point on the adjoining enclosure.
4 Connect each bracket to the adjoining enclosure using the screws you removed in step 2, but do not tighten the screws completely. Adjust the position of the enclosures as needed. If you want the centers of the enclosures to be 24 inches (61 cm) apart/29.9 inches (76 cm) for the SR42UBWD, use the outside hole of the bracket C. If you want the centers to be 60 cm (23.6 inches) apart/75 cm (29.5 inches) for the SR42UBWD, use the middle hole of the bracket D. After connecting all brackets and confirming that the enclosures do not need further adjustment, tighten all screws.
Note: You may wish to remove the doors from the enclosures before combining them. Reinstalling the doors afterward is optional. Remove the interior side panels before baying enclosures if you wish to enable access between enclosures.

Equipment Installation
WARNING: Do not install equipment until you have stabilized the enclosure. Install heavier equipment first and install it toward the bottom of the enclosure. Install equipment starting from the bottom of the enclosure and proceeding toward the top of the enclosure - never the reverse. If using sliding equipment rails, be careful when extending the rails. Do not extend more than one set of sliding equipment rails at one time. Avoid extending sliding equipment rails near the top of the enclosure.
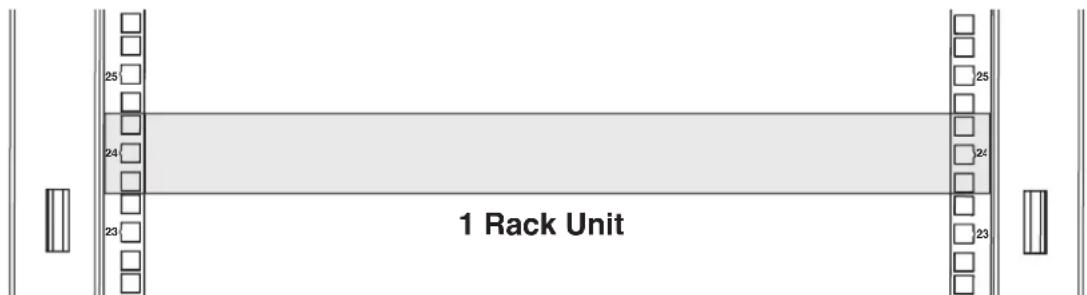
Note: The square holes at the middle of each rack unit are numbered and also include a small notch to aid identification. A single rack unit includes the space occupied by the numbered hole and the holes directly above and below.
Equipment Installation
Installing or Removing Cage Nuts
WARNING: The flanges of the cage nuts should engage the sides of the square opening in the rail, not the top and bottom. Follow the instructions in your equipment documentation to ensure proper installation of your equipment.
Installing Cage Nuts
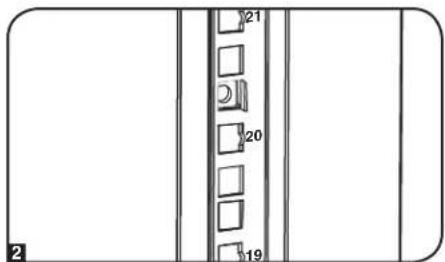
1 Locate the numbered square openings in the mounting rails where you plan to install your equipment. You will install cage nuts (included) into the square openings in order to provide an attachment point for the mounting screws (included).
Note: Consult your equipment documentation to determine how many cage nuts will be required and where they will need to be installed.
2 From the inside of the mounting rail, insert one of the flanges of the cage nut through the square opening. Press it against the side of the square opening. Each flange should engage one side of the square opening, not the top or bottom.
3 Compress the cage nut at the sides slightly to allow the remaining flange to fit through the square opening. When the cage nut is properly installed, both flanges will protrude through the square opening and will be visible on the outer surface of the mounting rail. Repeat steps 1-3 until all required cage nuts are installed.
4 After installing the required cage nuts, use the included mounting screws and cup washers to secure your equipment to the rack rail. Place the cup washers between the screws and the equipment mounting brackets.
Note: Your equipment may also include mounting hardware. Read the mounting instructions that came with your equipment before installing your equipment.
To Remove Cage Nuts, Reverse Steps 1-3
Note: You may wish to use a cage nut tool (user-supplied) to aid cage nut installation and removal.

Specifications
| Model Static Roll | Load Capacity* Unit Dimensions Shipping Dimensions | |||||||||
| ing Height Width Depth Weight | ||||||||||
| SR24UB 3000 lb. | (1363 kg) | 2250 lb. (1022 kg) | 47.25 in. (1200 mm) | 23.63 in. (600 mm) | 43 in. (1092 mm) | 190 lb. (86 kg) | 51.4 in. (1306 mm) | 26 in. (650 mm) | 45 in. (1140 mm) | 232 lb. (105 kg) |
| SR24UBEXP 3000 lb. | (1363 kg) | 2250 lb. (1022 kg) | 47.25 in. (1200 mm) | 23.63 in. (600 mm) | 43 in. (1092 mm) | 145 lb. (66 kg) | 51.4 in. (1306 mm) | 26 in. (650 mm) | 45 in. (1140 mm) | 187 lb. (85 kg) |
| SR24UBSP1 3000 lb. | (1363 kg) | 2250 lb. (1022 kg) | 47.25 in. (1200 mm) | 23.63 in. (600 mm) | 43 in. (1092 mm) | 190 lb. (86 kg) | 51.4 in. (1306 mm) | 28 in. (705 mm) | 47 in. (1194 mm) | 240 lb. (109 kg) |
| SR24UBEXPSP1 3000 lb. | (1363 kg) | 2250 lb. (1022 kg) | 47.25 in. (1200 mm) | 23.63 in. (600 mm) | 43 in. (1092 mm) | 145 lb. (66 kg) | 51.4 in. (1306 mm) | 28 in. (705 mm) | 47 in. (1194 mm) | 195 lb. (88 kg) |
| SR42UB 3000 lb. | (1363 kg) | 2250 lb. (1022 kg) | 78.5 in. (1994 mm) | 23.63 in. (600 mm) | 43 in. (1092 mm) | 286 lb. (130 kg) | 85 in. (2149 mm) | 26 in. (650 mm) | 45 in. (1140 mm) | 328 lb. (149 kg) |
| SRX42UB** 3000 lb. | (1363 kg) | 2250 lb. (1022 kg) | 78.5 in. (1994 mm) | 23.63 in. (600 mm) | 41.25 in. (1048 mm) | 298.98 lb. (135.62 kg) | 83.43 in. (2118 mm) | 25.75 in. (654 mm) | 42.85 in. (1088.4 mm) | 331.06 lb. (150.17 kg) |
Specifications
Load Capacity* Unit Dimensions Shipping Dimensions
| Model Static Rolling Height Width Depth Weight Height Width Depth Weight | ||||||||||
| SR42UBCL 3000 | lb. (1363 kg) | 2250 lb. (1022 kg) | 78.5 in. (1994 mm) | 23.63 in. (600 mm) | 43 in. (1092 mm) | 305 lb. (138 kg) | 85 in. (2149 mm) | 26 in. (650 mm) | 45 in. (1140 mm) | 347 lb. (157 kg) |
| SR42UBDP 3000 | lb. (1363 kg) | 2250 lb. (1022 kg) | 78.5 in. (1994 mm) | 23.63 in. (600 mm) | 47.3 in. (1200 mm) | 315 lb. (143 kg) | 85 in. (2149 mm) | 26 in. (650 mm) | 45 in. (1143 mm) | 367 lb. (167 kg) |
| SRX42UBDP** 3000 | lb. (1363 kg) | 2250 lb. (1022 kg) | 78.5 in. (1994 mm) | 23.63 in. (600 mm) | 49 in. (1246 mm) | 323.20 lb. (146.60 kg) | 83.43 in. (2118 mm) | 25.75 in. (654 mm) | 50.72 in. (1288.4 mm) | 358.74 lb. (162.72 kg) |
| SRX42UBDPEXP** | 3000 lb. (1363 kg) | 2250 lb. (1022 kg) | 78.5 in. (1994 mm) | 23.63 in. (600 mm) | 49 in. (1246 mm) | 234.51 lb. (106.37 kg) | 83.43 in. (2118 mm) | 25.75 in. (654 mm) | 50.72 in. (1288.4 mm) | 270.05 lb. (122.49 kg) |
| SR42UBDPWD 3000 | lb. (1363 kg) | 2250 lb. (1022 kg) | 78.5 in. (1994 mm) | 29.53 in. (750 mm) | 47.3 in. (1200 mm) | 342 lb. (155 kg) | 85 in. (2149 mm) | 26 in. (660 mm) | 45 in. (1143 mm) | 404 lb. (183 kg) |
| SRX42UBDPWD** | 3000 lb. (1363 kg) | 2250 lb. (1022 kg) | 78.5 in. (1994 mm) | 31.5 in. (800 mm) | 49 in. (1246 mm) | 374.58 lb. (169.91 kg) | 83.43 in. (2118 mm) | 33.46 in. (850 mm) | 50.72 in. (1288.4 mm) | 422.55 lb. (191.65 kg) |
| SRX42UBDPWEXP** | 3000 lb. (1363 kg) | 2250 lb. (1022 kg) | 78.5 in. (1994 mm) | 31.5 in. (800 mm) | 49 in. (1246 mm) | 285.27 lb. (129.39 kg) | 83.43 in. (2118 mm) | 33.46 in. (850 mm) | 50.72 in. (1288.4 mm) | 333.23 lb. (151.15 kg) |
| SR42UBEXP 3000 | lb. (1363 kg) | 2250 lb. (1022 kg) | 78.5 in. (1994 mm) | 23.63 in. (600 mm) | 43 in. (1092 mm) | 209 lb. (95 kg) | 85 in. (2149 mm) | 26 in. (650 mm) | 45 in. (1140 mm) | 251 lb. (114 kg) |
| SRX42UBEXP** | 3000 lb. (1363 kg) | 2250 lb. (1022 kg) | 78.5 in. (1994 mm) | 23.63 in. (600 mm) | 41.25 in. (1048 mm) | 224.75 lb. (101.94 kg) | 83.43 in. (2118 mm) | 25.75 in. (654 mm) | 42.85 in. (1088.4 mm) | 256.82 lb. (116.50 kg) |
| SR42UBEXPND 3000 | lb. (1363 kg) | 2250 lb. (1022 kg) | 78.5 in. (2261 mm) | 23.63 in. (600 mm) | 43 in. (1092 mm) | 161 lb. (73.03 kg) | 84 in. (2133.6 mm) | 28 in. (711.2 mm) | 47 in. (1193.8 mm) | 211 lb. (95.7 kg) |
| SR42UBEXPSP1 | 3000 lb. (1363 kg) | 2250 lb. (1022 kg) | 78.5 in. (1994 mm) | 23.63 in. (600 mm) | 43 in. (1092 mm) | 203 lb. (92 kg) | 84 in. (2146 mm) | 28 in. (705 mm) | 47 in. (1194 mm) | 253 lb. (115 kg) |
| SR42UBSP1 3000 | lb. (1363 kg) | 2250 lb. (1022 kg) | 78.5 in. (1994 mm) | 23.63 in. (600 mm) | 43 in. (1092 mm) | 286 lb. (130 kg) | 84 in. (2146 mm) | 28 in. (705 mm) | 47 in. (1194 mm) | 336 lb. (152 kg) |
| SR42UBWD 3000 | lb. (1363 kg) | 2250 lb. (1022 kg) | 78.5 in. (1994 mm) | 29.53 in. (750 mm) | 43 in. (1092 mm) | 313 lb. (142 kg) | 85 in. (2149 mm) | 26 in. (660 mm) | 45 in. (1140 mm) | 365 lb. (166 kg) |
| SRX42UBWD** | 3000 lb. (1363 kg) | 2250 lb. (1022 kg) | 78.5 in. (1994 mm) | 31.5 in. (800 mm) | 41.25 in. (1048 mm) | 349.53 lb. (158.55 kg) | 83.43 in. (2118 mm) | 33.46 in. (850 mm) | 42.85 in. (1088.4 mm) | 392.72 lb. (178.14 kg) |
| SRX42UBWDEXP** | 3000 lb. (1363 kg) | 2250 lb. (1022 kg) | 78.5 in. (1994 mm) | 31.5 in. (800 mm) | 41.25 in. (1048 mm) | 275.30 lb. (124.87 kg) | 83.43 in. (2118 mm) | 33.46 in. (850 mm) | 42.85 in. (1088.4 mm) | 318.49 lb. (144.46 kg) |
| SR42UBWDCL | 3000 lb. (1363 kg) | 2250 lb. (1022 kg) | 78.5 in. (1994 mm) | 29.53 in. (750 mm) | 43 in. (1092 mm) | 304 lb. (138 kg) | 85 in. (2149 mm) | 26 in. (660 mm) | 45 in. (1140 mm) | 346 lb. (157 kg) |
| SR45UB | 3000 lb. (1363 kg) | 2250 lb. (1022 kg) | 84 in. (2133.6 mm) | 23.63 in. (600 mm) | 43 in. (1092 mm) | 305 lb. (138 kg) | 92.5 in. (2298.7 mm) | 26 in. (650 mm) | 45 in. (1140 mm) | 347 lb. (157 kg) |
| SRX47UB** 3000 | lb. (1363 kg) | 2250 lb. (1022 kg) | 87.2 in. (2215 mm) | 23.63 in. (600 mm) | 41.25 in. (1048 mm) | 326.23 lb. (147.98 kg) | 87.2 in. (2215 mm) | 25.75 in. (654 mm) | 42.85 in. (1088.4 mm) | 358.31 lb. (162.53 kg) |
| SRX47UBEXP** 3000 | lb. (1363 kg) | 2250 lb. (1022 kg) | 87.2 in. (2215 mm) | 23.63 in. (600 mm) | 41.25 in. (1048 mm) | 326.23 lb. (147.98 kg) | 87.2 in. (1215 mm) | 25.75 in. (654 mm) | 42.85 in. (1088.4 mm) | 358.31 lb. (162.53 kg) |
| SRX47UBDPEXP** 3000 | lb. (1363 kg) | 2250 lb. (1022 kg) | 87.2 in. (2215 mm) | 23.63 in. (600 mm) | 41.25 in. (1048 mm) | 242.90 lb. (110.18 kg) | 87.2 in. (2215 mm) | 25.75 in. (654 mm) | 42.85 in. (1088.4 mm) | 274.98 lb. (124.73 kg) |
| SRX47UBDPEXP** 3000 | lb. (1363 kg) | 2250 lb. (1022 kg) | 87.2 in. (2215 mm) | 23.63 in. (600 mm) | 49 in. (1246 mm) | 352.29 lb. (159.80 kg) | 87.2 in. (2215 mm) | 25.75 in. (654 mm) | 50.72 in. (1288.4 mm) | 387.83 lb. (175.92 kg) |
| SRX47UBWDEXP** 3000 | lb. (1363 kg) | 2250 lb. (1022 kg) | 87.2 in. (2215 mm) | 23.63 in. (600 mm) | 49 in. (1246 mm) | 252.04 lb. (114.33 kg) | 87.2 in. (2215 mm) | 25.75 in. (654 mm) | 50.72 in. (1288.4 mm) | 287.58 lb. (130.45 kg) |
| SRX47UBWDEXP** 3000 | lb. (1363 kg) | 2250 lb. (1022 kg) | 87.2 in. (2215 mm) | 31.5 in. (800 mm) | 41.25 in. (1048 mm) | 381.42 lb. (173.01 kg) | 87.2 in. (2215 mm) | 33.46 in. (850 mm) | 42.85 in. (1088.4 mm) | 424.60 lb. (192.60 kg) |
| SRX47UBDPWD** | 3000 lb. (1363 kg) | 2250 lb. (1022 kg) | 87.2 in. (2215 mm) | 31.5 in. (800 mm) | 41.25 in. (1048 mm) | 298.09 lb. (135.21 kg) | 87.2 in. (2215 mm) | 33.46 in. (850 mm) | 42.85 in. (1088.4 mm) | 341.27 lb. (154.80 kg) |
| SRX47UBDPWEXP** | 3000 lb. (1363 kg) | 2250 lb. (1022 kg) | 87.2 in. (2215 mm) | 31.5 in. (800 mm) | 49 in. (1246 mm) | 408.30 lb. (185.20 kg) | 87.2 in. (2215 mm) | 33.46 in. (850 mm) | 50.72 in. (1288.4 mm) | 456.27 lb. (206.96 kg) |
| SR48UB | 3000 lb. (1363 kg) | 2250 lb. (1022 kg) | 89 in. (2261 mm) | 23.63 in. (600 mm) | 43 in. (1092 mm) | 315 lb. (143 kg) | 95 in. (2416 mm) | 26 in. (650 mm) | 45 in. (1140 mm) | 357 lb. (162 kg) |
| SR48UBCL 3000 | lb. (1363 kg) | 2250 lb. (1022 kg) | 89 in. (2261 mm) | 23.63 in. (600 mm) | 43 in. (1092 mm) | 334 lb. (151 kg) | 95 in. (2416 mm) | 26 in. (650 mm) | 45 in. (1140 mm) | 376 lb. (171 kg) |
| SR48UBDPWD 3000 | lb. (1363 kg) | 2250 lb. (1022 kg) | 89 in. (2261 mm) | 29.53 in. (750 mm) | 47.3 in. (1200 mm) | 378 lb. (171.5 kg) | 26 in. (660 mm) | 45 in. (1143 mm) | 53 in. (1340 mm) | 440 lb. (200 kg) |
| SR48UBEXP 3000 | lb. (1363 kg) | 2250 lb. (1022 kg) | 89 in. (2261 mm) | 23.63 in. (600 mm) | 43 in. (1092 mm) | 225 lb. (102 kg) | 95 in. (2416 mm) | 26 in. (650 mm) | 45 in. (1140 mm) | 267 lb. (121 kg) |
| SR48UBEXPSP1 3000 | lb. (1363 kg) | 2250 lb. (1022 kg) | 89 in. (2261 mm) | 23.63 in. (600 mm) | 43 in. (1092 mm) | 225 lb. (102 kg) | 95 in. (2416 mm) | 26 in. (705 mm) | 47 in. (1194 mm) | 213 lb. (96.6 kg) |
| SR48UBSP1 3000 | lb. (1363 kg) | 2250 lb. (1022 kg) | 89 in. (2261 mm) | 23.63 in. (600 mm) | 43 in. (1092 mm) | 315 lb. (143 kg) | 95 in. (2416 mm) | 26 in. (660 mm) | 45 in. (1143 mm) | 365 lb. (166 kg) |
| SR48UBWD 3000 | lb. (1363 kg) | 2250 lb. (1022 kg) | 89 in. (2261 mm) | 29.53 in. (750 mm) | 43 in. (1092 mm) | 343 lb. (156 kg) | 95 in. (2416 mm) | 26 in. (660 mm) | 45 in. (1140 mm) | 395 lb. (179 kg) |
**SP1" models include a shock pallet that allows the enclosure to be shipped with pre-installed equipment. The maximum shipping capacity is 1250 lb (568 kg), including the weight of the enclosure and the pre-installed equipment. **SRX-Series SmartRack Enclosure
Storage and Service
Storage
The enclosure should be stored in a controlled indoor environment, away from moisture, temperature extremes, flammable liquids and gasses, conductive contaminants, dust and direct sunlight. Store the enclosure in its original shipping container if possible.
Service
Your Tripp Lite product is covered by the warranty described in this manual. A variety of Extended Warranty and On-Site Service Programs are also available from Tripp Lite. For more information on service, visit www.triplite.com/support. Before returning your product for service, follow these steps:
- Review the installation and operation procedures in this manual to insure that the service problem does not originate from a misreading of the instructions.
- If the problem continues, do not contact or return the product to the dealer. Instead, visit www.triplite.com/support.
- If the problem requires service, visit www.triplite.com/support and click the Product Returns link. From here you can request a Returned Material Authorization (RMA) number, which is required for service. This simple on-line form will ask for your unit's model and serial numbers, along with other general purchaser information. The RMA number, along with shipping instructions will be emailed to you. Any damages (direct, indirect, special or consequential) to the product incurred during shipment to Tripp Lite or an authorized Tripp Lite service center is not covered under warranty. Products shipped to Tripp Lite or an authorized Tripp Lite service center must have transportation charges prepaid. Mark the RMA number on the outside of the package. If the product is within its warranty period, enclose a copy of your sales receipt. Return the product for service using an insured carrier to the address given to you when you request the RMA.
Warranty and Product Registration
5-Year Limited Warranty
Sell warrants this product, if used in accordance with all applicable instructions, to be free from original defects in material and workmanship for a period of 5 years from the date of initial purchase. If the product should prove defective in material or workmanship within that period, Seller will repair or replace the product, in its sole discretion.
THIS WARRANTY DOES NOT APPLY TO NORMAL WEAR OR TO DAMAGE RESULTING FROM ACCIDENT, MISUSE, ABUSE OR NEGLECT. SELLER MAKES NO EXPRESS WARRANTY OTHER THAN THE WARRANTY EXPRESSLY SET FORTH HEREIN. EXCEPT TO THE EXTENT PROHIBITED BY APPLICABLE LAW, ALL IMPLIED WARRANTY, INCLUDING ALL WARRANTY OF MERCHANTABILITY OR FITNESS, ARE LIMITED IN DURATION TO THE WARRANTY PERIOD SET FORTH ABOVE; AND THIS WARRANTY EXPRESSLY EXCUSES ALL INCIDENTAL AND CONSEQUENTIAL DAMAGES. (Some states do not allow limitations on how long an implied warranty lasts, and some states do not allow the exclusion or limitation of incidental or consequential damages, so the above limitations or exclusions may not apply to you. This warranty gives you specific legal rights, and you may have other rights which vary from jurisdiction to jurisdiction).
WARNING: The individual user should take care to determine prior to use whether this device is suitable, adequate or safe for the use intended. Since individual applications are subject to great variation, the manufacturer makes no representation or warranty as to the suitability or fitness of these devices for any specific application.
Product Registration
Visit www.triplite.com/warranty today to register your new Tripp Lite product. You'll be automatically entered into a drawing for a chance to win a FREE Tripp Lite product!
- No purchase necessary. Void where prohibited. Some restrictions apply. See Web site for details.
Tripp Lite follows a policy of continuous improvement. Product specifications are subject to change without notice.
Note on Labeling
This symbol is used on the product: Ground Connection


1111 W. 35th Street, Chicago, IL 60609 USA • www.triplite.com/support
1111 W. 35th Street, Chicago, IL 60609 USA www.triplite.com/support
1111 W. 35th Street, Chicago, IL 60609 USA • www.triplite.com/support
1111 W. 35th Street, Chicago, IL 60609 USA www.triplite.com/support
Entreposage et service.
PykoBODCTBO N0Ib30BaTeJia
Ukaфы cepи SmartRack
BaXhIbe yka3aHnNo ToTexHnke 6e3oNaChOCTn 44
KpaTkoe onncahne 44
Cxema paonoloxhenyHKnOHaBbIX 3eMeHToB 45
Topaok yctahOBkn uka46
IoproToBka 46
PacnaKOBka 46
Pazmeuen 47
BbipabHnBaHne 48
3a3eMJIeHne 48
KomnohOBka uKaΦa 49
Uctanobka/chTne npeedneu 3aDneu Dbeepu 49
IpeceTaHOBka nepeDnei DBepu 49
UcTaHOBka/ChTne BepXHei NaHei 51
UcTaHOBKa/CHrTHe 60KOBbIX naHEne 51
Perynpobka MOHTaXhbIX Ka6eIbHbIX HappaBriaOuix 52
CobmeeHne uKaΦOB (yCTaHOBKa BpaI) 53
UcTaHOBka 60bpyoBaHHa53
YCTAHOBKa HnH ChTne 3aKnadhbix raeK 54
Texnueckne xapaKtepncn 55
XpaHHeHnTexHnueckoe 6cbnyKbAHne 56
TapaHTnI nprrntpaunu n3denn 56
English 1
Espanol 15
Français 29
COXPAHNTE HACTOUIUE YKA3AHNA
Bo cex pa3enax hactoienpo kyo0dcbTa codepjatc yka3aHm H npdynpdeHn KOTpbe Heooxmo co6hOaDab Tb npoece CytahOBKn EKcNpyataun onncAhhBv H em kkaob cepinn SmartRack. Bnmatbno 03nakomtecb CoBemu yka3aHmnn npdynpdeHnpeep BblnoHememkbx dctbn, CBA3Hbix C npemeueHem, yctahOBKn nKcNpyataun wkaob cepinn SmartRack, oncaHHbx H aactoien pkyo0dctBe. Hco6nOeHme daHnro Tpe6oBaHm CO3daT onHocTb noyHema TpaBM NIN BO3HKHOBEHMA MmyeCTBHeHoro yuepeba Moke tnpBeCTK aHHynpoBaHNO rapaHTM.
KaФДОПЕКН HAKOДТСВВ B NOmeUeHIM C KOHTPOnIpyeMbIM MKNPOKINMaTOM BdAIn OT MCTOCHNKOB BnAIn, 3KCTpeMaJIbHbIX TeMnepaTp, BocNJaMeHaIOUHXK XWDKOCTe N Ra3OB, 3NeKTpOpPoBODhix 3aPra3HITenei, PbIn IN pPMArO CONHeHOrO CBeta.
Ipeepuikkaqom Hno3auiHrno Heo6xduMmo 6oeTneHTb DocTaouHO Cbo60dHoro PnOCTpaHcTBa dna erO HndEkaUero npOBetPmbAHn. He 3aropaxmbaiTe n He hakpbbaTe BHeHHMe BHTHnauHnHbte OBePctTHn IkuKa, a TAKKe HE BCTaBnAeTBE HHX KAAKNe-1m6pEIMTe.
K 10000000000000000000000000000000000000000000000000000000000000
- He KnaadHe Ha KaKa KaKne-Jn6o PnpMeTb, OOCbeHHo EMcKocTc CxMdkOCTaM, a TaKke He yCtHaBmBaIte WkaΦbl Dpyr Ha Dpyra.
OcmotpTe TpaHcnpTPOBOUHbKoHTeHep HuaPpeMeT HauHHaNOBpeKdEHH, NOnyueHHbXnPnTpaHcnpTbpOKHe He nob3yIteB kkaqom B cnyae ernoPBpeKdEHH.
He 38nekae Tkaa H TpaHnTOpTnpBOoTHO KOHTeHepa do erpeMeueHna MaKumalbHo 6n3Keoe pactOnHHe K MeCTy oKHaTeBHO yTaHOBKn. POnk npEHa3HaehbI ToBko DnH He3HaHTebHIX KoppeKTIOPOBOK OIOJoxEHMa Ha Mce To OKHATeBHO yCTaHOBKn. PoNk He paCCuTahbI Ha nepeMeueHne IkaFa h BoIbUhe paccToHHra.
Ponikn TaKke He paccuHbHa IOnOBpeMeHHoe HcNob3oBaHMe B KaueCTBe onopbl dIa WkaΦa nocne erO OKOHateBHO uCTaHOBKn. B KaueCTBe DOnIOBpeMeHHo Onopbl MOnob3yHTe PnHCnoc6bHmDnBbPaBHVAHIM.
Ikafo 1000000000000000000000000000000000000000000000000000000000000000000000000000
Pn nppeMeueHH WkaH e He cneIyTe TOnKaTb ero co tOPOHb 60KOBx naHenei. Pn pToKHaHH KOpTyCa CO tOPOHb 60KOBx naHenei cyuEcTBeyr ONaCHObEr oipokMbBAHm.
- PnpeKaTbAHnn KkaHa npOlnkax 63aTeJbHToNkaiTe erO c3aH N H M B KOEM Cnyae HE TAnHe Ha ce6h.
IpeKabHmE 63e3nHexaueero KHTPOna MoKet PnBcTn K PnMHeHHIO TpaBM Nm MMyuCtBeHHOrO yieep6a. Pn He6xOIMoCTN cKaTBaHn HAH3No HAKHOHNIPOCKOCTM CObHIOaTe npedbHyO octopokHOCTb. He NoJIyIteB HaKIOHbIMn IIOKoCTMa CykHOHm Kpye 1:12.
Pn pa3pezamm ynaokobuybIX Maepnaboeoctoeocpoknoctb. 30 To MoKet npmbecTN K HaeceHNu capannn Ha nobepxnoctb ukafoa, OTO npckTabreTcboy eouepb, He nokpbblBaembl DeeyCTbnuoien rapaHTmE.
CoxpaHnTE BcE ynaKOBHbIe MATEpHbIbIy nocNcIeYIOJIe IIOIIOB3OBAHmI. IOBTOHg YNAKOBKa I TpaHCnOpTHPobKBa IkaΦa 6e3 NcIONb3OBAHMr opMHINbHbIX yNaKOBouHbIX MATEpHaONB MoKeT pIMBeCTN K NOBpeXJdHMIO H3dHMN, KOToPOe NobNeueT 3a COBOH ANHyHNPoBaHMe DeIcTBouJeIraPAHTM.
He nyckaaetc nocehyouaep Tnncnoptnpbka uoka c JonoHIntenbHbM o6pOyobAHmE 3a NCKnoHemC npueBepoHaahbNoctabKu Ka a co CneuaHbM yapao3auuHmN MIOdoHM (Tolkbno I moenep SP). Cymmaphn Bc E K a U cytaoh HbHn H eonopk HnpeBbHt bpyzoOnbEmHOCT noD0ha. Komna Htrpp Lite He Hecet OTBETCBHooT 3a Kaokn-Ho 8uep, pnnHHHb H bpocce nocehyoue TnpchtnpOBin.
HepeKoHmDyETcNcNoB3OBAHnE DaHnHO OobpyoBaHnB B CHTeMax Xnn3Heo6ecneeyHn, Tne ero BbIXoI N3 CTPOr npdePNOXHTeBHO MOKeT pNBecTH K nepe6oM B paOte OobpyoBaHn Xnn3Heo6ecneeyHn MIM B 3HaHTeBHO Mepe CHNtB er o6e30aHCHOTb HIN 3f@ekTHBHOCTb.
KpaTkoe onncahne
KbBcB 1000000000000000000000000000000000000000000000000000000000000000000000000000000
I 10000000000000000000000000000000000000000000000000000000000000000000000000000000000000000000
Bbinyckaemble moen ukafoB cepnn SmartRack
| Моequal NBысotaшkaфа БokовBLEпаели | Празноюдарный поюн |
| SR24UB 24U ДaНeT | |
| SR24UBEXP 24UНeTНeT | |
| SR24UBEXPSP1 24UНeTДa | |
| SR24UBSP1 24UДaДa | |
| SR42UB 42UДaНeT | |
| SRX42UB* 42UДaНeT | |
| SR42UBCL 42UДaНeT | |
| SR42UBDP 42UДaНeT | |
| SRX42UBDP* | 42UДaНeT |
| SRX42UBDPEXP* | 42UНeTНeT |
| SR42UBDPWD | 42UДaНeT |
| SRX42UBDPWD* | 42UДaНeT |
| SRX42UBDPWDEXP* | 42UНeTНeT |
| SR42UBEXP 42UНeTНeT | |
| SRX42UBEXP* | 42UНeTНeT |
| SR42UBEXPND | 42UНeTНeT |
| SR42UBEXPSP1 42UНeTДa | |
| SR42UBSP1 42UДaДa | |
| SR42UBWD | 42UДaНeT |
BHHMAHMEI KpaehraeKpae Hn taeknoebchim. He nbaTaeCb paacakobbaba, nepemaahtnn yctahabmbatka b Ondnochy. MoMeHa HndexaeeytaHO Bn nppeMne HIOO 1000000000000000000000000000000000000000000000000000000000
IoproToBka
IIkaqdoJnKHeBbIyUcTahOBHeB KOKHTpyKluHNOIpoTHOM MeCe CPOBbIM OCHOBaHE, CNOcObHM BbIeDPKBaBtB Bec CamrO uKafoA, Bcero O6bOpDobAHM, KOtOpoe 6yTeYCTAHOBHeBOHyrHr, a TAKKe IIOb6xI pyTHN XkDaOH bN/INnOoOpyOBaHN, KOtOpBE yDyt UCTAHOBHeB NOnHr Hero. Nepd PaNakOBKn Oka KaCJeT DcTABTb TpAnCIPTPbOoBHyck KOHeHep KAc MOKHO BnIKe K McTeY OKOHATEnBHO YCTAHOBK cIeNoB MInHm3Aun paCToHaN, Hb Noote POTnepeTcyTeN peMeHeMaB MoNDy NocE ChraTb 3auHTHOuPAKOBKn. Ecm Bbl PnAnHPyeXpaHHeMe IteHHe dIITBeHOrO nepHOa BpEmEH Do HnN nocE yCTAHOBKn, CneJeDy Yk3AaHNR, INIOKeONHBM Bpa3JeE XpaHHeMe N TeHXueCKe o6CyKbHae.
Bam Notpebyotca Heckonbko HHTCPyMeHToB (B KOMPIeK TocTaBHe BXOJIT)
KnouraeHbpoxKOBbHa13MM
KnIouraeHbpoxxkoBbHa18MM
YHMBepcAnbHbHHOX
CtpounenbHbIypoBHe
Kpeo06pa3HaonOTBeptKa
Topueboi knou 5/32
Kpome toro, noptepbyetc cnedyoua ochactka (noctabnetaB Kommneke):
BnHTbKpEnKHeBc KpeCTo06pa3HbIM WnHcEm (Mx 5/8")-60 wT.
Tain3aKJaadHbIe(M6)-60Wt.
-ⅢaⅡbⅠyaaoeo6pa3hbe HeHNOHOBbE-60wt.
Pacnakokka
Ia 100 Hn 13 Moen eep SP1 cyapaoaunneHbIM noDIOHOM cyeHte CnuaHBm yka3AHMn IO paacakOBKe, npnaaraeMbIM K TpaHcnpTOPOBOHMOy KOHTHepy, Bmcto ananorHbix yka3AHN, HIOKeHHbIX B hactoHem pa3dene. PpH 30m BCE ppeynpeKdHn octaOTCB DECTBHN.
1Y6eHNTcB TOM, YTO TpAHCNOPTIPBOOHyB KOHTHeHep HAXoDITCB YCToTHyOB BEPTKaBbHM NOJoxEHM, Nocne Yero C nMOOsbHO YNHBPcAHLHOrO HOKA pa3peKBe TYCAOHyIO NNEHy, FHKnpyUOy yrNOBb AMOTNtATOpB. BO KsEkaHne HAECEHnI aPAnHHn Ha NOBEXHOCTb IkaΦa MM pAe3zAHnI NIOIHTHO 3auTHORO NNIETMNEHOBOro MEuKa NOD yCaJOHOI NNEKoi NPOBdTe JEBHE MOKa HENOCPeCTBEHNO NOBEXHOCTb YrNOBbX AOpMTNtAtOpB.BHMAHVE! He HANOHTE UAPANHH NaOBEPXHOCTb IkaΦa H NoPAe3paERIO NIOHTb NIOINMTNHOBB MeWko, paONNoXeHHIO NOD yCaJOHOI NNEKoi. He TOnKaJIte WkaΦH e TAHNIE ORe HA Ce6Ba B IpOceCE PaACNAKBKn.
2 CHIMMTE yrrnoBle amOpTH3atopb. CoxpaHnTE Bce ynakobOuyhHe MaTePnAnbI (BkNouy noDOn) nnaocneyuioero nncnbsOBAHua, cBN bH Ye bexdcbHBTOM, YTO OHn 00e He NoTpeSyOTc. YnakOBuHyBe MaTePnAnbI noDnKeAT BTOpHNO nepepa6oTke.
3 CHMMTE co IkaFpaIIOHb noNHTmNEHOBMyEIOK.OCMOTPHe IkaFHa npEIMe HAIINa KAKHX-NIO NOBpeKdHn Hn H3aKpENHbIX dTeanei.Y6eIITcB b HANuHm BcEx dTaei.B Cnyae OTCYTBn Hn NOBpeKdHn KAKX-NIO Detanei ObaTHe 3a NOMOIBB KOMNAHIO TrippLite.He nONb3yITcB IkaFom B cIyue ero nobpeKdHn.
Iopraok yctahOBkn ukaΦa
Pacnakobka (npodokjeHne)
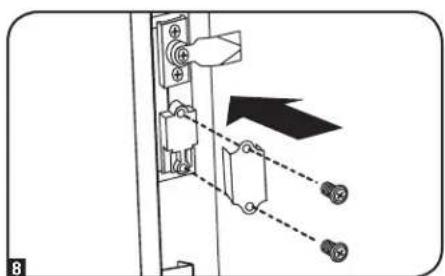
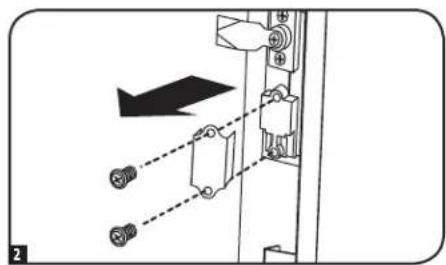
40TKPOIe KIOVOM DBePbHsKaFa HnHnTe 2 TpAHCNoptHPoOBHyBx KPOHHTeHa A, c nOMOuBo KOtOpbIX OH pNkpenneK TpaHcNoptHPoOBOHMy NoDHOy. YKa3AHbIe KPOHHTeHb paONaIarOTCB BYTPn sKaF.
PnmeHne. Knou npukpenenb n nepehdne noepexnoeepxnoo
C HMMTepaHcnpTnpoBOnHbE KPOHHTeHbC NOMOuBIOPOKBOBOI RAeHOrO KIOUHa 13 MM. Co6IOJaTe npedeBHyO octopoxHOCTb, NOckOBky NoOE CHrTHM KPOHHTeHb BO3MOxHO HenpeBaJeHHoe nepMeueHHe IkaFa. CoXpaHITe KPOHHTeHb IM DeTANII dN IN KpENNEHc C eBbNo NOcNeDyOoEro HcNtBbOBAHN.
6 PmEhBwmepeOHN YeOBek DQNKeH HAXoDttcbrapeepWkaFOM NOOH YeOBek -no3aHr Her. MeJeHHeToTOKaiTe WkaBCTOPHY 3aHneYacTHn TpAChNtOpNtPOBOHOHoro NDOJHO DaTex np, NOKA Bce YeTbIpe pOnHa He BbIyT 3a KpaI NoDHOHa H He KOCHyTCa nona.BHUMAHNE!ДЯ ChTnA WkaFa c NODOA Tpe6yTaC He MeHec DByx YenOBek. PIn nepeMeennn WkaCaobIOdAte npeJeBHyO octPokHoCTb.
Pazmeuenie
PONNNn npnaaHaaneHb nnapeMeueHHa Kafoa H a KOpOTKe paccToHHe no pOBH, rnaKo h yctOHNBO nobepxHcT nyTe mtonKaHHa NocneHrero cnepeHn Hn C3dAn (He co ctoPOBb6 HOKBXn PAHNEe). He nepeKtaBaIte kka H a nnHbIbe paCToHnH. Kka cneyET DOCTABt b Ka MOKHO bHKKe K MeTc Ery tAOBKH BHYTptn TPAHCNpTOPOBVOHOr KOHTeHepa BnyAKoBAHOM BnEe. (JnpepeMeueHH TpAChNPTOPOBHO KOTeHepa HNOB3yTe BNOnuHbN porpy3UKN HINBOHUYrnpaBnueckky TeENKcy). BHIMAHNE! He tonKaTHe He TaTHe Kco CTOpOHb6 KOKBbXn HaneJe, a TAKe He TANthe IRe Hae 68
Pn Heo6xOIMOCTH WkA MOHNO pnpnoiABT pyTeEM BBePTbAHn 4pbM-60NTOB DnAMetpOM 8 (B KOMNNEK TocABKn HE BXOJAT) B pe36b06Bte OBpctn H6m3n BepHXN yTNOB KApKa Cwka, IaIeTOn cienn CneyET nCnONBtOBaTB CTaNbHe 60NTb C NACCOM npOHCTn no 150 He HnKe 8.4.4 TaXn 60n ta CnOc6Hb BbDpeKBaTB Bec wka a n 450 kYCTaHOBENHO B hem 6OpdyOBaHn. BHMAHNE! POnbEm WkA daonkeh ocyeCTBaTc tonko onbITbHMn CneuaHnCTAMn no 6cnyXHBaHn 6OpdyOBaHn
Cnedyte BcM npmHmblM K daHHmy cnyao yka3aHmno To texHnke 6e3oNaChOCTn H HopMaTHBbIM npedncaHnM, HcNoIb3yI IraT0cooCBTeCTByooie o6OpoyobHaHe N OchAcKy.


Nopraok yctaHOBKu wkka
BbipabHbBaHme
BHHMAHNE! BbipOBHnIe WkaΦ npepy yctahOBKoB H Ero o6OpDobAHn. PoNk TaKHe He paccuTaHb Ha noTROpeMeHoe NcNoB3OBAHne B KaueCTBe OnpbI nkaΦa.
B KaueCTBe DOnIOBpeMeHHo ONpbl KcnoIb3yIte PnCtncO6ObEHn Ira BbipABHBnA.H. WkaΦ DoJKeH 6b1b YCTaHOBnE B KOHCTpyKcHNOH NoPouHOM MeCe CPOBbIM OCHOBAHm,
ChocOBHM BbIepKHNBaTB Bec camoro WkaΦa, Bcero o6OpDobAHn, KoTope 6yET YCTaHOBHe BHTPhr Ho, a TAKK He L6bIX dpyRnx WkaΦoB H/nn O6OpDyOBAHn, KOTOpble 6ydyT
yctahOBHeB b6n3n Hero.
10nce npememmna hka K MeCy yCTAHOBKn npOBepBte yKNOH nona C nOMOuBIO cTPOHTenbHoro yPOBHa. EcmN yKNOH nona npEBbIaet 1%, BbEpeNTe IyCTAHOBKn dpyTO meTo.
2Pn nomou poKOBORO KIOHua Ha 18 MM BbIEBHPHTe KaJDOe npNCIO6OBHHe DnB BbApHBNAHn A Doero cnpHKOCHOHn C nonOM. (Ukaq Hmeet 4 npNCIO6OBHn DnB BpABHBNAHn - no 2 CpepeHn C3aH).Y6eHNTecb B TOM, QTO KaKDOe N3 HMX IIOTHo conPKkacaTcC nONOM.
PnmeHneIyBbepmbaHua (onycaHua) npucncobhenu dna Bbpaebubauu e2o cnoeyem bpaumb no yacobou cmpke, a n 3abeepmbaHua (nodHumua) -npomue yacobou cmpku.
3Iocne BbIeBtBbAHnKaKkDOro npCIOcOBeHnHa DnBaBpAHBaHnMa npoBepMe C NoMOnuBc TPOHTeNBO rPOBnA, YTO6b Ika paacnoIaranc poBHO BO BCEx HapabEnHax. PerynHyPeTbeBCOTy npCIOcOBeHn Da BbAPaBHnBaHnNo Mepe Heo6xOdMMoCTn DoTex nop, noKa uKaΦ he 6yTeTahOBHeh poBHO.
4 (Onuohhbo) IIOI OeCneHHe HIOJONHHTBHOY UcOTHUOBCTMOKHO pNkPKPnHb K WkaFy 2 TPAHCNPtPOBOHybXk POKHTHeHa C NOMOIO BpNCOCOEnHH, KOPTbHM OH bH BYTNKPNENK H TPAHCNPtPOBOHYOM NoDHOy. C NOMOIO BOKKOBOR KNOHA Ha 13 MM 3AKpenITE KPOHTHEB BO BHOHNHX A HIN BYTPNEHIX B TOKAX K POKHNTHE KPOHTHEHOB K WkaFy. 3AkpenITE KPOHTHEB BTOKHX MONTAKHO HKNKPNENH K NOI npN MOOH OCHACTM (B KOMNKEH BTBXOHT) NIN ppeNaerMOFO KOMNAHHe Tripp Lite KomnkeTA DRA KPNENH Hs KaFOB SmartRack K NOI (MoEbn: SRBOLTDOWN)
3a3eMJIeHne
Bcetannska3a3emHOTCpeep3eroKapKa.1nnpmoro coeHHNEHAPKACAa 4uHIO3a3emHnBAWero o6bekTa c nOMOH npoBaOa KANbPOM8 AWG(3,264MM) CnEpyETNcNOB3OBaTbepeDIOIO HIA3HIO TOUY 3a3EMHIN H IN BHTM6 (noCTABNNbEM b KomnneKeI).DnOceCNHEnb6ecpnnATCBHeHO TOKpbBaHn 3AkpBbAHn IBepbIPOBEHNTe 3a3EMNHO pnoBd NO pKACOM SKaKaBHMAHNE! KaKnDyKsKaONJEN NOcoEDHNbTaC KWNHE 3a3emHnno NO tDeBbHOCTN. PboB3oBaHHe He3a3emHnBBIM WkaFOM HeOnyckaTeC.

KomnohoBka ukaq
YcTaHOBKa/CHTne NpeDHeu 3aAHeu DBepeu
BHIMAHME! He nbitaiTecb HabewinBab N CHMaTaB DBepcbl 1kaaBaOdnoHouky
ChnTne DBepubl
1 OToeDMHHTe npBOoD 3a3eMnEHn DbePbU.
0TkoTe DBepu DO TORO NonoXeHnA, B KOTOPOM OHa OKaXeTc nepEnHdUkyapHnO (noD yrnom 90 rpayncoB) nepeHne IIOCKoCTM kkaΦa.
1IIOHMME TBepuHmCHMMTEe cneTeb WkaΦa.
IyctaHOBKn DBepuHa MeTo CneDyeT NOBtOpuTb WArn 1-3 B o6paTHOM npAKe
(OnuHnAbHo) EChm 3OT WkKa coeDHH cdpyHM Wkaqom, NOBepHnTe dBepuy o6paTHo B CTOPOH y Ka pnp ee CHaTm C nTeJIb.
IpeceTaHOBKa nepeDnei Dbepebl
BHIMAHME! He nbitaiTecb nepeBewbnBatnb pepeHIO BOEPUY Ha Dpyryo CTOpOHy B ODMHOy.
1BbIeBNHTe BnHT,coeHHHIOoH m npOBOd 3a3eMEnH C BHYtpeHNE HOBepxHOCTbO Dcpe.
2BbBepHHTe 2 BnHTa, oecneueHbAioiue KpenneHne DbePnoypuKdEpe. CmmHte Dbepyo pyky.


KomnohOBka ukafoa
IpectaHOBka nepeDnei DBepu (npoJOnJeHne)
BbEPHTe BnHT H CnHMTe 7aHbC TbIbHO CTOpBOH DBePHTO pyKu, NOcYe Yero BbHtE 3anOpHb MEXAHM. IOBEPHTe 7aHbBy 3anOpHOro MEXAHm3Ma Ha 90 rpaucob npOTHB qacOB CTpeKN uPaBepHTe 3auenky TaKIM o6pa3OM, Yo6bl Oha 6bln 6baeHa B npOTBnONooXHyTO CTOpOy, A 3aTe CM NOnoou BO BNTA H aai6bl pNpKpENrT 3auenky 6paTHO K TbIbHO CTOpOHe DBePHTO pyKn.
C HmInTe DBepyu B npAke, I3nOKeHHOM B npdeBnyeepa3ene.
5 CHMMITE DBeBHeNIE netnH co IkaKa,pa3BeBHeHte Hx Ha 180 rpaDycoB M3akpeHte Ha npotIMBOIIOKHO CTOpOHe IkaKa.
PmmeHne. B moKx Kpennn HdebpHbX nemn h na pnoBnONoNHO CT opone HaxOaMnCR nnaCIMACOBBE 3a2nyu, bcmabnnHbE P36b0be omBepcmu. BbHbme 3a2nyu u cmaBme ux B omBepcmu, nepBOHaayalho ucnlon3obawuee da Kpennn HdebpHbX nemn.
BbEpHnTe 2 neteBEx MEXAHM3Ma H3 neteBEx NAOB C BHTpeHH ETOPOH bEepuH 3AKePNITE KAKD HN,HCIOB3yI Dn A T0H cnnpy P360BEx OTBepCTnPACNOJcEHNY HnOePCEDTBEHHO HanpOTMB TEX, KOtOpbe MCNOB3BOANCBNEBOHAAhBO.
7 Pa3BepHNTe DBepy Ha 180 rpaDycOB uYCTaHOBITE ee 6bPHTHO HA KkaΦ. He 3a6yIbe TIOcEOHNITb npoBD 3a3EMLNEH N BHYTPENHE NOBEPXHOCTn DEpBt B TOHKe KPNENHRA, paONIOKHeHHO 6Nkke BCEx K NeTIE B EbpXHe HAcTH I BepeBt. Ta TOKa KPNENHRA O603HaHcHc CMBOIOM 3a3EMNOUcTO cOeINHHeHNA:
YCTAHOBHTe Ha MeToDBePHyO pyHcy.


KomnohoBka ukaq
YcTahOBKa/ChrTne BepXHe nAHeHn
BHUMAHNE! He nbTaeTeBnONb3oBaT BepxHIO naneB ukaFa dIra paaMeueHnRA TaeBix npedMetob 3a HckHouHHeM cIyAeB, ABhIM o6pa30m oncaHbIX Odo6peHHbx KOMNAHMe TrippLite. He nbTaeTeB yctahabNBA t ChmMaTb BepxHIO naneB ukaFa bOduHocKy.
ChaTne BepxHe nahenn
1 NotHHTe Ha ce68 2 uTnOHTa, paCnoNooKHeHbIe B 3aDHeu Cactn BepxHenn NaHen. YdePXMBAa TnTOBtB, BbyTONKHITe BepxHOIO naHEnb No HappaBHeHMo BBcpx.
2 BbHbTe 3bUcKb BepXHei NaHeII A 13 ee MOtAaXbHbX na0B 8 KApKace Wka.
3 CHIMMITE BepxHIO npaHEb co WkaFa.
1111 W. 35th Street, Chicago, IL 60609 USA - www.triplite.com/support
18-04-161 93-2723