
SmartRack SRWX12USNEMA - Electrical cabinet Tripp Lite - Free user manual and instructions
Find the device manual for free SmartRack SRWX12USNEMA Tripp Lite in PDF.

| Product Type | Electrical cabinet (patch panel) |
| Brand | Tripp Lite |
| Model | SmartRack SRWX12USNEMA |
| Dimensions (H x W x D) | 635 x 600 x 549 mm |
| Net weight | 27 kg |
| Static load capacity | 90 kg |
| Adjustable mounting depth | 76 to 521 mm |
| Material | Steel with powder coated finish |
| Color | Black |
| Fan power supply | NEMA 5-15 to C13 cord, 120V, 60Hz |
| Doors | Front and rear, lockable with keys |
| Side panels | Removable and lockable (L-handle) |
| Mounting rails | 4 vertical rails with square and threaded holes |
| Cage nuts included | Yes, for mounting 19" equipment |
| Air filters | 20 x 24 inches (508 x 610 mm), replaceable |
| Ventilation | 4 fans mounted on front door |
| Cable management | Cable routing slots |
| Grounding | Front/rear grounding terminals (M6 screw included) |
| Wall mounting | Yes, via 16 keyhole slots (M10 or 3/8" bolts) |
| Intended use | Indoor, controlled environment, protected from moisture and dust |
| Warranty | 5 years limited |
| Optional accessories | Caster kit SRCASTER |
Frequently Asked Questions - SmartRack SRWX12USNEMA Tripp Lite
User questions about SmartRack SRWX12USNEMA Tripp Lite
0 question about this device. Answer the ones you know or ask your own.
Ask a new question about this device
Download the instructions for your Electrical cabinet in PDF format for free! Find your manual SmartRack SRWX12USNEMA - Tripp Lite and take your electronic device back in hand. On this page are published all the documents necessary for the use of your device. SmartRack SRWX12USNEMA by Tripp Lite.
USER MANUAL SmartRack SRWX12USNEMA Tripp Lite
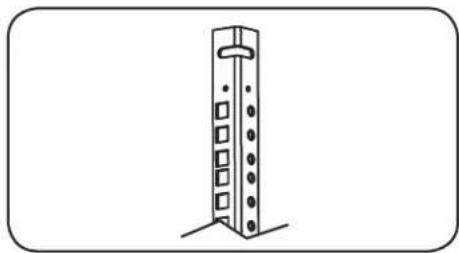
12U Wall-Mounted SmartRack™ NEMA12 Enclosure
Model: SRW12USNEMA
Table of Contents
- Important Safety Instructions 2
- Overview 2
- Feature Identification 3
-
Enclosure Installation 4
4.1 Preparation 4
4.2 Unpacking 4
4.3 Placement 4
4.4 Ground Connection 4
4.5 AC Power Connection 5 -
Enclosure Configuration 5
5.1 Door Locks 5
5.2 Reversing the Enclosure Door 6
5.3 Reversing the Enclosure 6
5.4 Mounting Rails 7
5.5 Adjusting Mounting Rail Depth 7
5.6 Cleaning/Replacing Air Filters 7
- Wall Mounting the Enclosure 7
6.1 Mounting 7 - Equipment Installation 8
7.1 Installing or Removing Cage Nuts 8
7.2 Alternate Mounting: 9 Tapped Hole Mounting Rail - Specifications 10
- Storage and Service 10
- Warranty & Warranty Registration 10
Espanol 11
Francais 21
Pycckn 31
1. Important Safety Instructions
SAVE THESE INSTRUCTIONS
This Manual contains instructions and warnings that must be followed during the installation and operation of the product described in this manual. Failure to comply may invalidate the warranty and cause property damage or personal injury.
- Keep the enclosure in a controlled indoor environment, away from moisture, temperature extremes, flammable liquids and gasses, conductive contaminants, dust and direct sunlight.
- Leave adequate space at the front and rear of the enclosure for proper ventilation. Do not block, cover or insert objects into the external ventilation openings of the enclosure.
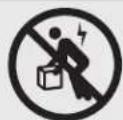
- The enclosure is extremely heavy. Use caution when handling the enclosure. Do not attempt to unpack, move or install it unassisted. Use a mechanical device such as a forklift or pallet jack to move the enclosure in the shipping container.
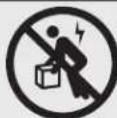
- Do not place any object on the enclosure, especially containers of liquid, and do not attempt to stack the enclosures.
- Inspect the shipping container and the enclosure for shipping damage. Do not use the enclosure if it is damaged.
- Leave the enclosure in the shipping container until it has been moved as close to the final installation location as possible.
- Install the enclosure in a structurally sound area capable of handling the load, or on a level floor that is able to bear the weight of the enclosure, all equipment that will be installed in the enclosure and any other enclosures and/or equipment that will be installed nearby.
- Use caution when cutting packing materials. The enclosure could be scratched, causing damage not covered by the warranty.
- Save all packing materials for later use. Repacking and shipping the enclosure without the original packing materials may cause product damage that will void the warranty.
- Do not reship the enclosure with additional equipment unless the enclosure was shipped with a special shock pallet ("SP1" models only). The combined weight of the enclosure and installed equipment must not exceed the load capacity of the pallet. Tripp Lite is not responsible for any damage that occurs during reshipment.
- Use of this equipment in life support applications where failure of this equipment can reasonably be expected to cause the failure of the life support equipment or to significantly affect its safety or effectiveness is not recommended. Do not use this equipment in the presence of a flammable anesthetic mixture with air, oxygen or nitrous oxide.
2. Overview
SmartRack Enclosures accommodate all standard 19-inch rackmount equipment, regardless of vendor, and ship fully assembled for quick and easy deployment.
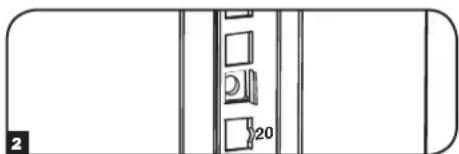
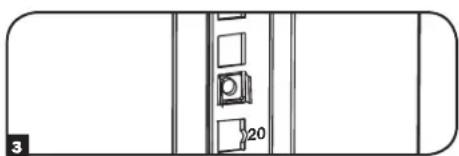
3. Feature Identification

4. Enclosure Installation

Caution! Read All Instructions andWarnings Before Installation!

Warning: Rack enclosures can be extremely heavy. Do not attempt to unpack, move or install the enclosure without assistance. Use extreme caution when handling the enclosure and be sure to follow all handling and installation instructions. Do not attempt to install equipment without first stabilizing the enclosure.
4.1 Preparation
The enclosure must be installed in a structurally sound area that is able to bear the weight of the enclosure, all the equipment that will be installed in the enclosure and any other enclosures and/or equipment that will be installed nearby. Before unpacking the enclosure, you should transport the shipping container closer to the final installation location to minimize the distance you will need to move the unit after the protective packaging has been removed. If you plan to store the enclosure for an extended period before installation, follow the instructions in the Storage and Service section.
You need several tools:
You also need the following hardware:
Level
- Appropriate hardware for wall mounting (not included)
Phillips-head Screwdriver
- Appropriate tools for wall mounting
4.2 Unpacking

Use at least two people to unpack the enclosure.

1 Move shipping pallet to a firm, level surface.
Open box and remove the four foam corner protectors. Save all packing materials for later use unless you are certain they will not be required. Packing materials are recyclable.
With one person on each side, carefully lift the enclosure out of the box and place on a firm, level surface.
Examine the enclosure for any damage or loose parts. Confirm all parts are present. If anything is missing or damaged, contact Tripp Lite for assistance. Do not attempt to use the enclosure if it has been damaged.

Never extend more than one component from the enclosure at a time.

4.3 Placement
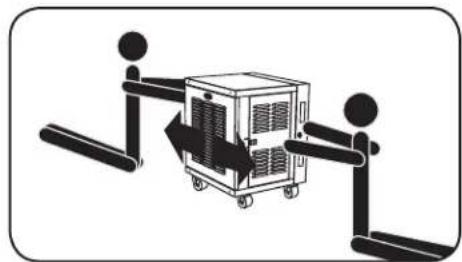
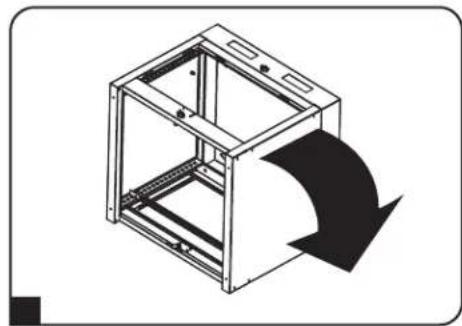
The enclosure should be moved close to its installation location inside its shipping container before it is unpacked. Warning: Do not push or pull the enclosure at the side panels or pull the enclosure toward you. Only experienced equipment operators should attempt to lift the enclosure. Use appropriate equipment and follow all applicable safety procedures and regulations.
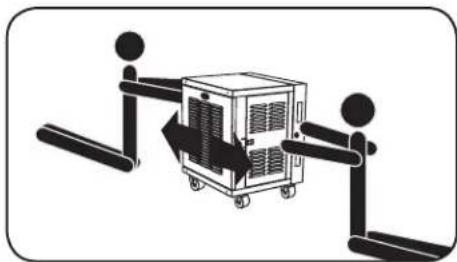

Warning: Never attempt to lift or install without adequate help. Do not try lifting the enclosure alone.
4.4 Ground Connection
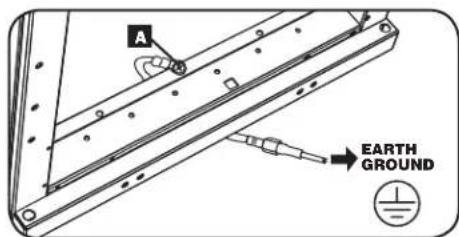
All parts of the enclosure are grounded to the frame of the enclosure. Use the enclosure's front or rear threaded grounding point A and an M6 screw (included) to connect the frame of the enclosure directly to your facility's earth ground connection with an 8 AWG (3.264 mm) wire. Route the ground wire under the enclosure's frame to ensure unhindered door operation. Warning: Attach each enclosure to earth ground separately. Do not use the enclosure without an earth ground connection.
4. Enclosure Installation (continued)
4.5 AC Power Connection
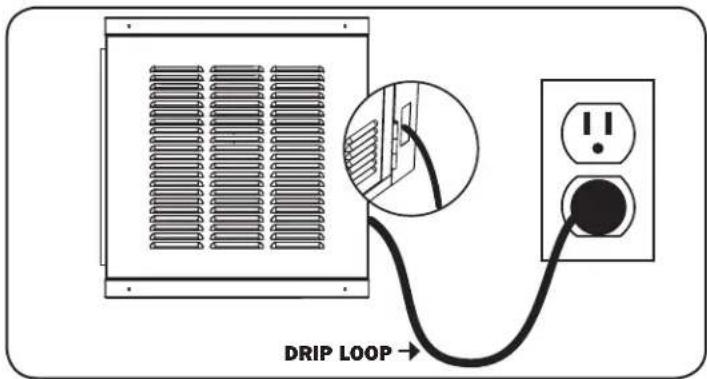
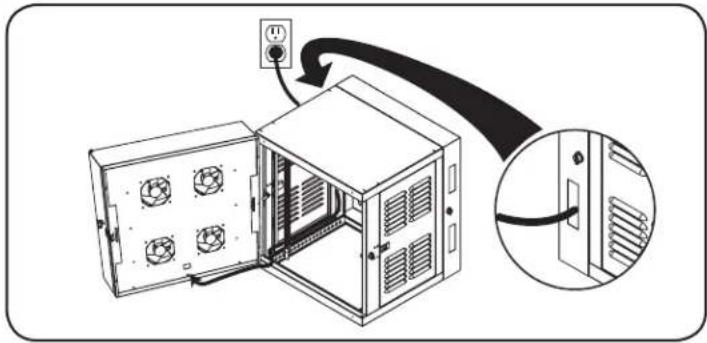
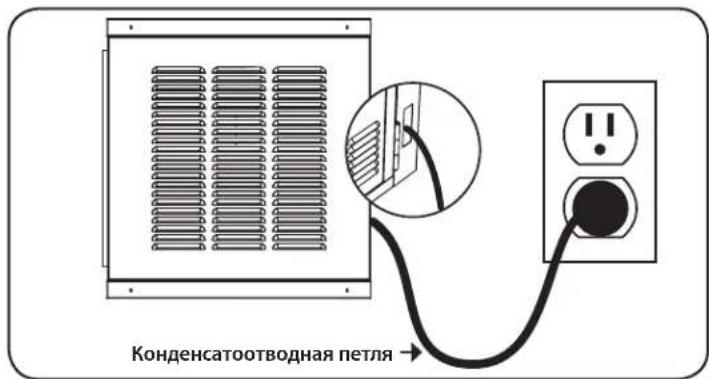
The SRW12USNEMA comes with a panel of 4 fans mounted in the front door. The fans receive power via the included NEMA 5-15 to C13 power cord plugged into the C14 inlet on the bottom of the door. The cord must be properly routed and installed before the unit will be fully functional.
Power Cord Routing
To allow the door to swing fully open and for maximum cord length, connect the power cord to the C14 inlet and route along the bottom of the unit on the hinged side of the door. The cord must emerge from the bottom cable routing slot on the side to which the door is hinged.

Creating a Drip Loop
For added safety, a drip loop must be implemented in the power cord for proper installation of the SRW12USNEMA. To create a drip loop, make sure that the power cord is routed down from the unit and must rise back up again to the power outlet, forming a loop in the cord that will guide any moisture away from both the outlet and the unit.
5. Enclosure Configuration
Before installation, be sure to plan the location and arrangement of components within the enclosure. Be sure all mounting rails are reversed or adjusted for depth, depending on your equipment configuration. Note: Always disconnect power input and remove equipment before attempting to reconfigure the enclosure.
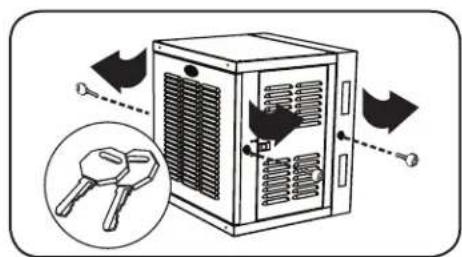
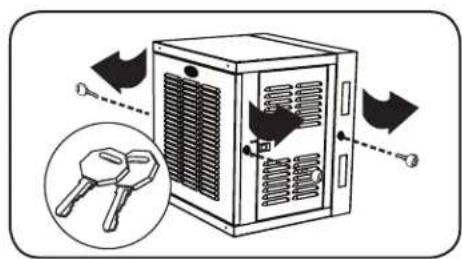
5.1 Door Locks
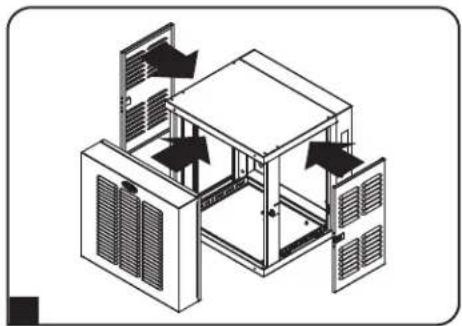
The front and back doors have locks that are accessible by the included keys. Each side panel locks using an L-shaped lever on the inside of the enclosure.
To unlock and remove the side panels, lift the shorter leg of the "L" up (labeled A) and pull it away from the side panel (labeled B). Pull the tab on the side panel and remove it from the enclosure.
To re-lock the side panels, secure it in the proper position, lift the shorter leg of the "L" up (labeled A) and push it toward the side panel, back into the hole that it was in initially (labeled B). Once it is in place, push the shorter leg of the "L" down to lock it. Note: To lock and unlock the side panels, you will need to have access to the interior of the enclosure.
5. Enclosure Configuration (continued)
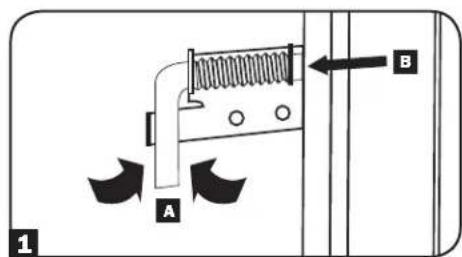
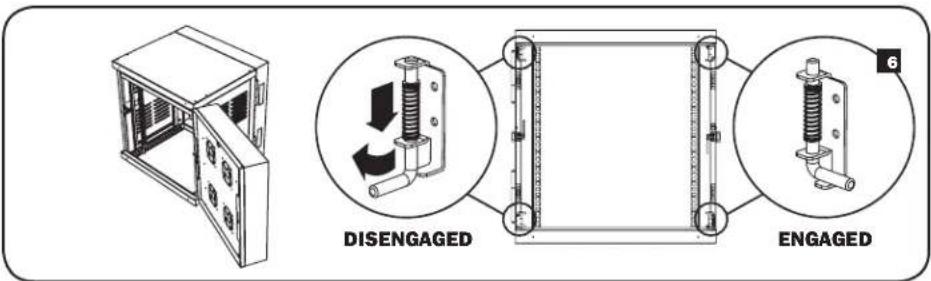
5.2 Reversing the Enclosure Door
In order to accommodate various rack configurations, the enclosure door can be reversed. The direction in which the door opens is controlled by four L-shaped levers on the inside of the enclosure.
To access these levers, you must first remove the side panels following the procedures outlined in section 5.1.
The levers (both top and bottom) on the side from which the door opens must be "DISENGAGED," while the levers (both top and bottom) on the opposite side, the side from which the door swings, must be "ENGAGED."
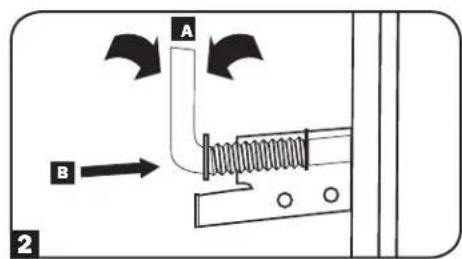
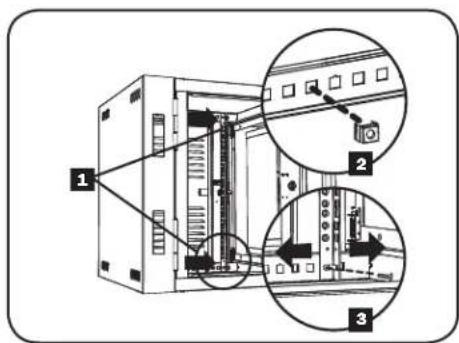
3 Disengage the levers. Levers are "DISENGAGED" when the short side of the "L" lever is removed from its bracket cradle. To remove short side of "L" lever from the bracket cradle, push away from the bracket cradle (either up or down) and rotate (either towards or away from the door) so that the short side of the "L" exits the cradle.
4 Remove the door. A metal bushing is located on the bottom lip of the frame, on the side from which the door was swinging.
Move the bushing from the side on which the door was swinging to the opposite side of the frame and line it up with the hole.
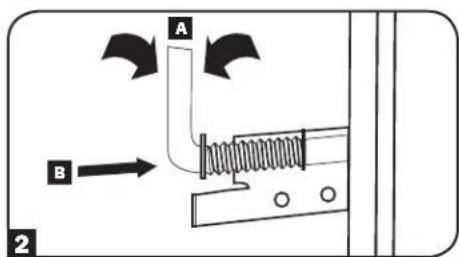
6 Line up the door on the opposite side and engage the levers. Levers are "ENGAGED" when the short side of the "L" rests in the bracket cradle. To "ENGAGE", push lever to compress the spring and rotate into the bracket cradle. When engaging the bottom lever, make sure it goes through the bushing.
7 Make sure that both top and bottom levers on the side from which you want the door to open are "DISENGAGED" and that both levers on the side from which you want the door to swing are "ENGAGED." Otherwise, door may not function properly and damage may result.

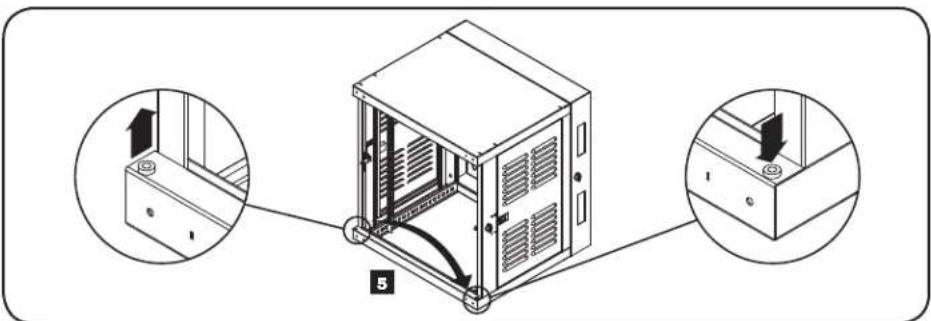
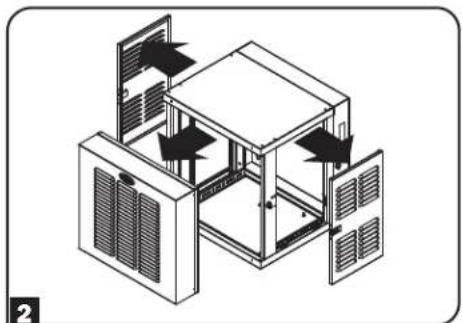
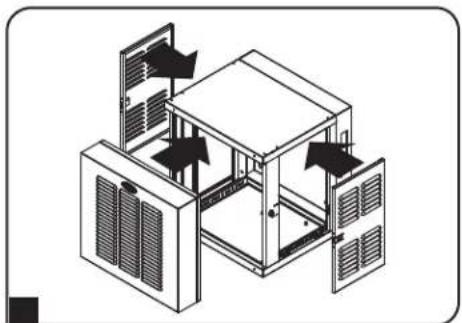
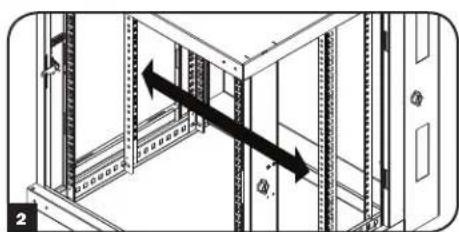
5.3 Reversing the Enclosure
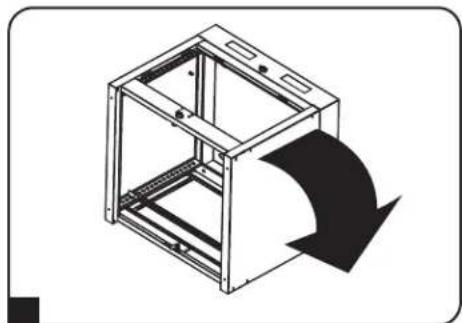
In order to accommodate various rack configurations, the entire enclosure can be reversed.
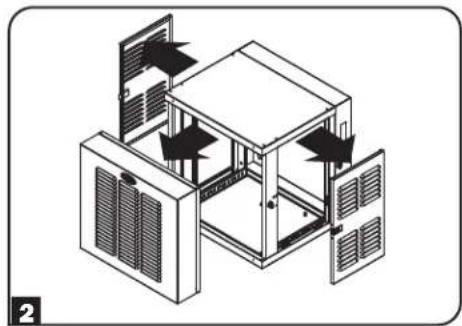
1 Remove side panels by following the procedure in section 5.1.
2 Remove front door by placing all four "L" levers in "DISENGAGED" positions and pulling it away from the enclosure.
3 Remove the metal bushing described in section 5.2.
4 Flip the enclosure.
5 Replace the metal bushing as explained in section 5.2.
6 Reattach front door and side panels.
5. Enclosure Configuration (continued)
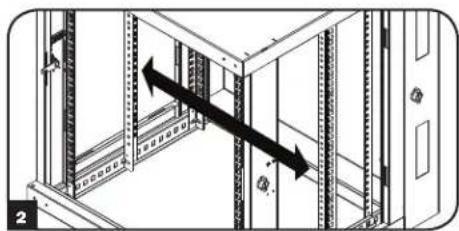
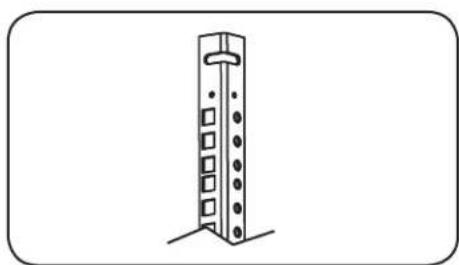
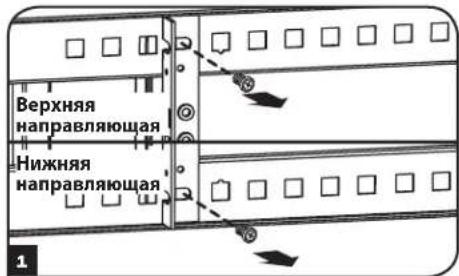
5.4 Mounting Rails
The enclosure comes with mounting rails that have both square and tapped holes for mounting rack equipment. To install equipment, use the included cage nuts and other hardware. (See page 7 for installation of cage nuts.) Warning: Be sure to have the enclosure securely mounted to the wall, or in its final position on the floor before mounting any equipment inside. Also be sure to have all the right adjustments on your rails before mounting equipment. (See below for Adjusting Mounting Rail Depth.)
5.5 Adjusting Mounting Rail Depth
Warning: Do not attempt to adjust rails while equipment is installed in the enclosure. Do not attempt to use rails without screws installed. (2 per rail.)
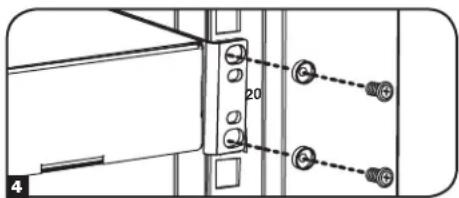
The 4 mounting rails are pre-installed to accommodate equipment with a mounting depth of 20.5 inches (521 mm). Do not adjust the mounting rails unless your equipment requires a different mounting depth. The front and rear sets of rails can be adjusted independently in 1/4-inch (6mm) increments for mounting depths between 3 inches (76 mm) and 20.5 inches (521 mm).
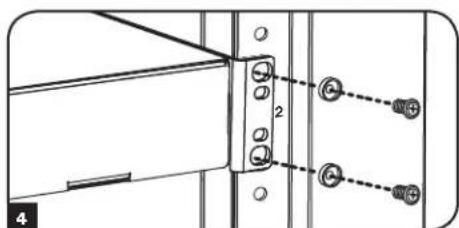
Each rail is connected to the enclosure with 2 screws and 2 cage nuts: 1 set in the upper corner and another in the lower corner. Using a Phillips-head screwdriver, remove the screws that fasten the rails to the enclosure.
2 Move cage nuts to desired depth and reinstall.
3 Slide the mounting rails to the desired depth and reattach them using the screws you removed in Step 1.
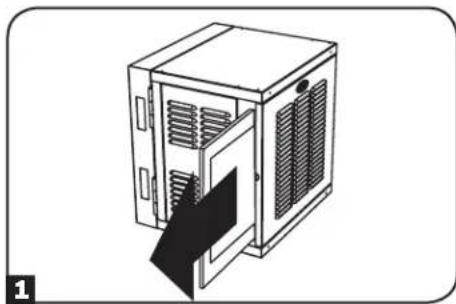
5.6 Cleaning/Replacing Air Filters
The SRW12USNEMA comes with pre-installed dust filters in the front door. It uses standard 20'' × 24'' filters that can be found at most home improvement stores. To remove filters for cleaning or replacement:
1 Locate filter on left side of the door and gently slide it out away from the unit.
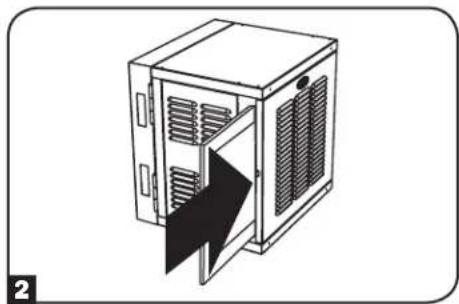
To replace filter:
Align filter with slot in door and slide in until it reaches the end of its enclosure and you feel resistance.
Note: Part of the filter remains outside of the door for easy removal.
6. Wall Mounting the Enclosure
Warning: Do not attempt to mount the enclosure to the wall with equipment mounted in the enclosure.
6.1 Mounting
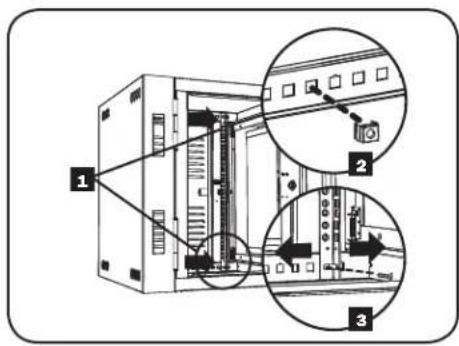
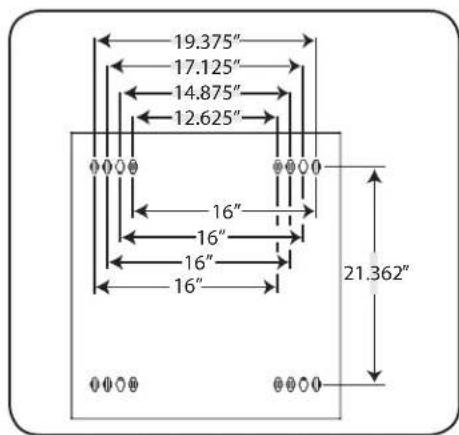
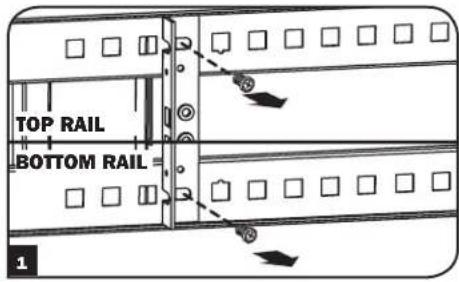
There are 16 keyhole cutouts on the back door of the enclosure. Each keyhole can accommodate an M10 or 3/8 bolt. The holes are on centers and beginning with the two innermost holes, the centers are 12.625" , 14.875" , 17.125" and 19.375" apart, respectively moving outward and horizontally. Holes are then 21.362" apart vertically, as shown in the diagram.
Using a level, measure to position your mounting areas precisely. Use appropriate fasteners (not included) to secure the enclosure to the wall. Warning: The area you plan to mount the enclosure to must be able to withstand the weight of the enclosure and all mounted equipment. For the weight of the enclosure and its capacity, see the specifications on page 8.
7. Equipment Installation
Warning: Do not install equipment until you have stabilized the enclosure. Install heavier equipment first and install it towards the bottom of the enclosure. Install equipment starting from the bottom of the enclosure and proceeding toward the top of the enclosure - never the reverse. If using sliding equipment rails, be careful when extending the rails. Do not extend more than one set of sliding equipment rails at one time. Avoid extending sliding equipment rails near the top of the enclosure.
Note: The unit comes with two different kinds of screws for equipment installation, black and silver. Use the black mounting screws if you are securing your equipment to the square hole side of the mounting rail. Use the silver screws if you are securing your equipment to the tapped hole side of the mounting rail.
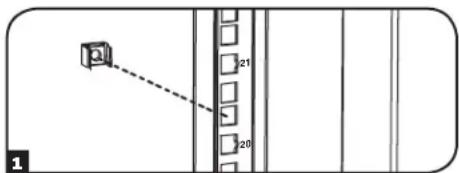
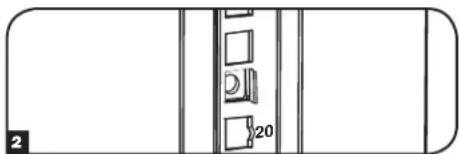
Note: The square holes in the middle of each rack unit are numbered and also include a small notch to aid identification. A single rack unit includes the space occupied by the numbered hole and the holes directly above and below.

7.1 Installing or Removing Cage Nuts
WARNING: The flanges of the cage nuts should engage the sides of the square opening in the rail, not the top and bottom. Follow the instructions in your equipment documentation to ensure proper installation of your equipment.
1 Locate the numbered square openings in the mounting rails where you plan to install your equipment. You will install cage nuts (included) into the square openings in order to provide an attachment point for the mounting screws (included). Note: Consult your equipment documentation to determine how many cage nuts will be required and where they will need to be installed.
2 From the inside of the mounting rail, insert one of the flanges of the cage nut through the square opening. Press it against the side of the square opening. Each flange should engage one side of the square opening, not the top or bottom.
3 Compress the cage nut at the sides slightly to allow the remaining flange to fit through the square opening. When the cage nut is properly installed, both flanges will protrude through the square opening and will be visible on the outer surface of the mounting rail. Repeat steps 1-3 until all required cage nuts are installed.
4 After installing the required cage nuts, use the included black mounting screws and cup washers to secure your equipment to the rack rail. Place the cup washers between the screws and the equipment mounting brackets.
Note: Your equipment may also include mounting hardware. Read the mounting instructions that came with your equipment before installing your equipment.
To Remove Cage Nuts, Reverse Steps 1-3
Note: You may wish to use a cage nut tool (user-supplied) to aid cage nut installation and removal.
7. Equipment Installation (continued)
7.2 Alternate Mounting: Tapped Hole Mounting Rail
Warning: Do not attempt to adjust rails while equipment is installed in the enclosure. Do not attempt to use rails without screws installed. (2 per rail.)
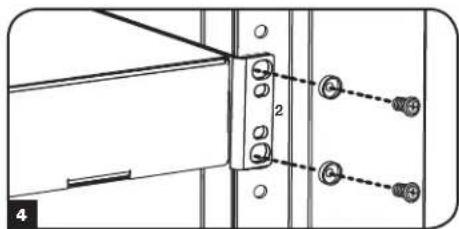
The mounting rails are pre-installed for securing equipment using the square hole side of the mounting rail. To switch to the tapped hole side of the mounting rail, follow the steps below:
Each rail is connected to the enclosure with 2 screws: 1 in the upper corner and another in the lower corner. Using a Phillips-head screwdriver, remove the screws that fasten the rails to the enclosure.
2 Switch the rail locations. Ensure the tapped hole side of each rail is facing the front door.
3 Reattach the mounting rails.

Use the included silver mounting screws to secure your equipment to the rack rail. Place the cup washers between the screws and the equipment mounting brackets.
Note: Your equipment may also include mounting hardware. Read the mounting instructions that came with your equipment before installing your equipment.
8. Specifications
| Model SRW12USNEMA | |
| Dimensions (H x W x D) 25 x 23.63 x 21.6" (635 x 600 x 549 mm) | |
| Unit Weight 60 lb (27 kg) | |
| Load Capacity* 200 lb (90 kg) Stationary | |
| Mounting Depth (Adjustable) 3" to 20.5" (76 to 521 mm) |
- Full wall-mount load capacity requires a mounting surface capable of bearing the full load. Rolling applications require optional SRCASTER accessory kit.
9. Storage and Service
Storage
The enclosure should be stored in a controlled indoor environment, away from moisture, temperature extremes, flammable liquids and gasses, conductive contaminants, dust and direct sunlight. Store the enclosure in its original shipping container if possible.
Service
Your Tripp Lite product is covered by the warranty described in this manual. A variety of Extended Warranty and On-Site Service Programs are also available from Tripp Lite. For more information on service, visit www.triplite.com/support. Before returning your product for service, follow these steps:
- Review the installation and operation procedures in this manual to insure that the service problem does not originate from a misreading of the instructions.
- If the problem continues, do not contact or return the product to the dealer. Instead, visit www.triplite.com/support.
- If the problem requires service, visit www.triplite.com/support and click the Product Returns link. From here you can request a Returned Material Authorization (RMA) number, which is required for service. This simple on-line form will ask for your unit's model and serial numbers, along with other general purchaser information. The RMA number, along with shipping instructions will be emailed to you. Any damages (direct, indirect, special or consequential) to the product incurred during shipment to Tripp Lite or an authorized Tripp Lite service center is not covered under warranty. Products shipped to Tripp Lite or an authorized Tripp Lite service center must have transportation charges prepaid. Mark the RMA number on the outside of the package. If the product is within its warranty period, enclose a copy of your sales receipt. Return the product for service using an insured carrier to the address given to you when you request the RMA.
10. Warranty and Warranty Registration
5-Year Limited Warranty
Sell wth t i r t t t t t t t t t t t t t t t t t t t t t t t t t t t t t t t t t t t t t t t t t t t t t t t t t t 0
THIS WARRANTY DOES NOT APPLY TO NORMAL WEAR OR TO DAMAGE RESULTING FROM ACCIDENT, MISUSE, ABUSE OR NEGLECT. SELLER MAKES NO EXPRESS WARRANTY OTHER THAN THE WARRANTY EXPRESSLY SET FORTH HEREIN. EXCEPT TO THE EXTENT PROHIBITED BY APPLICABLE LAW, ALL IMPLIED WARRANTYES, INCLUDING ALL WARRANTYES OF MERCHANTABILITY OR FITNESS, ARE LIMITED IN DURATION TO THE WARRANTY PERIOD SET FORTH ABOVE; AND THIS WARRANTY EXPRESSLY EXCUSES ALL INCIDENTAL AND CONSEQUENTIAL DAMAGES. (Some states do not allow limitations on how long an implied warranty lasts, and some states do not allow the exclusion or limitation of incidental or consequential damages, so the above limitations or exclusions may not apply to you. This warranty gives you specific legal rights, and you may have other rights which vary from jurisdiction to jurisdiction).
WARNING: The individual user should take care to determine prior to use whether this device is suitable, adequate or safe for the use intended. Since individual applications are subject to great variation, the manufacturer makes no representation or warranty as to the suitability or fitness of these devices for any specific application.
Warranty Registration
Visit www.triplite.com/warranty today to register the warranty for your new Tripp Lite product.You'll be automatically entered into a drawing for a chance to win a FREE Tripp Lite product!* No purchase necessary. Void where prohibited. Some restrictions apply. See website for details.
Tripp Lite has a policy of continuous improvement. Specifications are subject to change without notice.


Manufacturing Excellence.
1111 W. 35th Street, Chicago, IL 60609 USA • www.triplite.com/support
Armoire murale 12U SmartRack, NEMA 12

Manufacturing
Excellence.
1111 W. 35th Street, Chicago, IL 60609 USA • www.triplite.com/support
PYKOBODCTBO NOJIb3OBATEJI
Manufacturing Excellence.
1. Baxkhble npabnla texhkn6e3onacnoctn
COXPAHNTE 3TN INPABUNIA
DaHHeO pyKoBOcTBO coepKIT npaBnla 6e30NaChocTn IN ppeynpeKdEHHN KOtOpbIe HkyKHO CO6JIIOaTb BO BpEmr MOHTaKa IN KcNpyaTuIN DaHOrO npOyKTa. Heco6JIIOeHne 3TNx Tpe6OBaHN MoKeT bblBaTb NToepIO rapaHTmN IN PnPBecTn K NOpeKdEHHN MMyueCTBa IN TpaBMe.
- ⅢkaФdonxeH haxoDbcB B nomeeHn C perynpemybIM npaMeTpamM MkPOKImaT. He onyckaetcnoBleHnaBnaJHoCTb, npepaTe TMnepaTp, HauNue ropoux XmKocte N ra3OB, TOKOpOBoaXuX BeueCTB, nbnn noNaDAHne npraBx coNHehbx lyue.
Huyxho o6ecneuHTb doCTaTOHoe npocTpaHCTBO c nepeDHeN 3aHHe CTOPOHbI WkaFa dna HADNeJaae BcHTnlaa. He 6loKpObaTb, He 3aKpbBaTb HcBCTaBnTb NOCTOPOHHe PpeDMtB B BEHTnlaIOHHbI OTBepCTNa HA KOpNyce WkaFa. - ⅢkaΦ ΜmeeT 60JIbIyH Maccy. Пип epemeueHn IkaФа сеуeT co6IIOaTb octopoxHocTb. PaCnaKOBbIaTb, nepeMeuaTb IIN yCTaHaBnBaTb erO HJxHO BdBOeM C nOMOuHnKOM.ДЯп epemeueHn IkaФaВ yNAKOBOUH Tape ICNoIb3yIOTc MexaHnueckne yCTpoIcTBa, TaKne KAK BInOuHbI NOrpy3uK IIN WtAbeneYkNaDnK.
He cTaBnTb Ha WkaΦ HnKaKnx NpeMeTOB, OcOeHNO EMKOCTe C XnKIOCTbIO, IN He CTaBnTb WkaΦbl Dpyr Ha dpyra.
IpoBepnTb ynaKOBouHyo Tapu n ukaΦ ha OTCyTCTBne NOpeXdHm npn TpaHCnpTIpOBKe. He mCnoNb3ObaTb kα,ecn OH noBpeXdeH. - ⅢkaФdoJKeHocBaTbCByyNaKOBouHOnTape, noka OH He 6ydtnepeMeueH KaK MoXHo 6JIxke K MeCTy OKOHaTeNbHO yCTaHOBKn.
- ⅢkaΦ yctaHabnBaetcB KOHCTpyKTHBNO npOHT Ho, cnoocbHn HeCTn Harpzky, nIHa NpOy, cnOC6bHm BbIepKaTb Bec 3kaΦa, BCero o6OpdyoBaHn, KToOpoe 6ydt YcTaHOBneHo B 3kaΦ, nIpynx KopnycoB n/Inn O6OpdyoBaHn, KToPbIe 6ydt YcTaHOBneHb prAOM.
- Pn pe3ke ynaKOBouHbIX MaTePnaNoB cIeIyET co6IIOaTb ocTOPOXHOCTb. IkaΦ MoKeT 6bITb IOUpaNaH, a npuHHHeHbIe NOBpeXdHnH He NOKpbBaIOCTra pArHTne.
Bce ynaKOBouHbIe MaTePnAblc coXpaHryOTc dIra Bo3MOxHOrO IcNoB3oBaHnB B 6yUysem. NIOBTOpHaY yNaKOBKa n TpaHCnpTIpOBKa WkaΦa 6e3OpINHbHOyNAKOBNMOKeT pNBeCTN K NOBpeJdeHnIO HdJIeN, YTO npNBedET K yTpate rapaHTIn.
He cneyet TpaHcnopTnpoBaTb kkaC dONOHNHTeBbHM O6OpDObaHmE, cNn OH He 6bn OcHaJeH CNEuaNBbHM yApO3aUuHbIM NOdoHom (ToIbKO MoJEn "SP1"). O6uH Bec uKaFa a NytAHOBNeHHOrO O6OpDObaHm He DoJIKeH npeBbTaT b rpy3oOnDbemHoCTb NoDoHa. Tripp Lite He Hecet OTBeTCTBeHHocTH 3a Yueep6, KOtOpBn npuHHeH BO BpEm NaBtphoTpaHcnopTnpoBKn.
He peKomeHdyetc HcnoIb3ObaT bTo o6OpyOBaHne B npInIOKeHnx NCKycCTBeHHoro NOpeJxHaH JxN3HeJeTeBHOCTn, Ige OTka3 HaCToJIero 6OpUOBaHm MoKeT Bbl3BaT ocTaHOBky o6OpyOBaHn IOdepJxHaH JxN3HeJeTeBHOCTn ININ 3HaHTeBHo NOBnAry He erO 6e3OnaCHOCtB ININ 3ΦΦeKTHBHOCTb. He nCNoIb3ObaT bTo o6OpyOBaHne B cpeax, KOtOpBle coepXaT JeRKO BocPiameHemBie CMeCN Obe360JIuBAIOUX CoCTABO B03DyXOM, KNCLOpOdom ININ 3aKNCsbO a3Ota.
2.0630p
KiaKaBbSmartRack npdHa3NaHcHbI pa3MeueHH cTaNapTHoro 19-IOMOBOrO cToeHORo 6OpyDobAHn, HeaBNCmO OT npOn3BODnten, nocTabJIOTc nnHOCTbIO cO6paHbIMn I46bICpTO r IpocTO rpaBepTbBAHn.
3.ОпиcaHne BO3MOxHOCTei
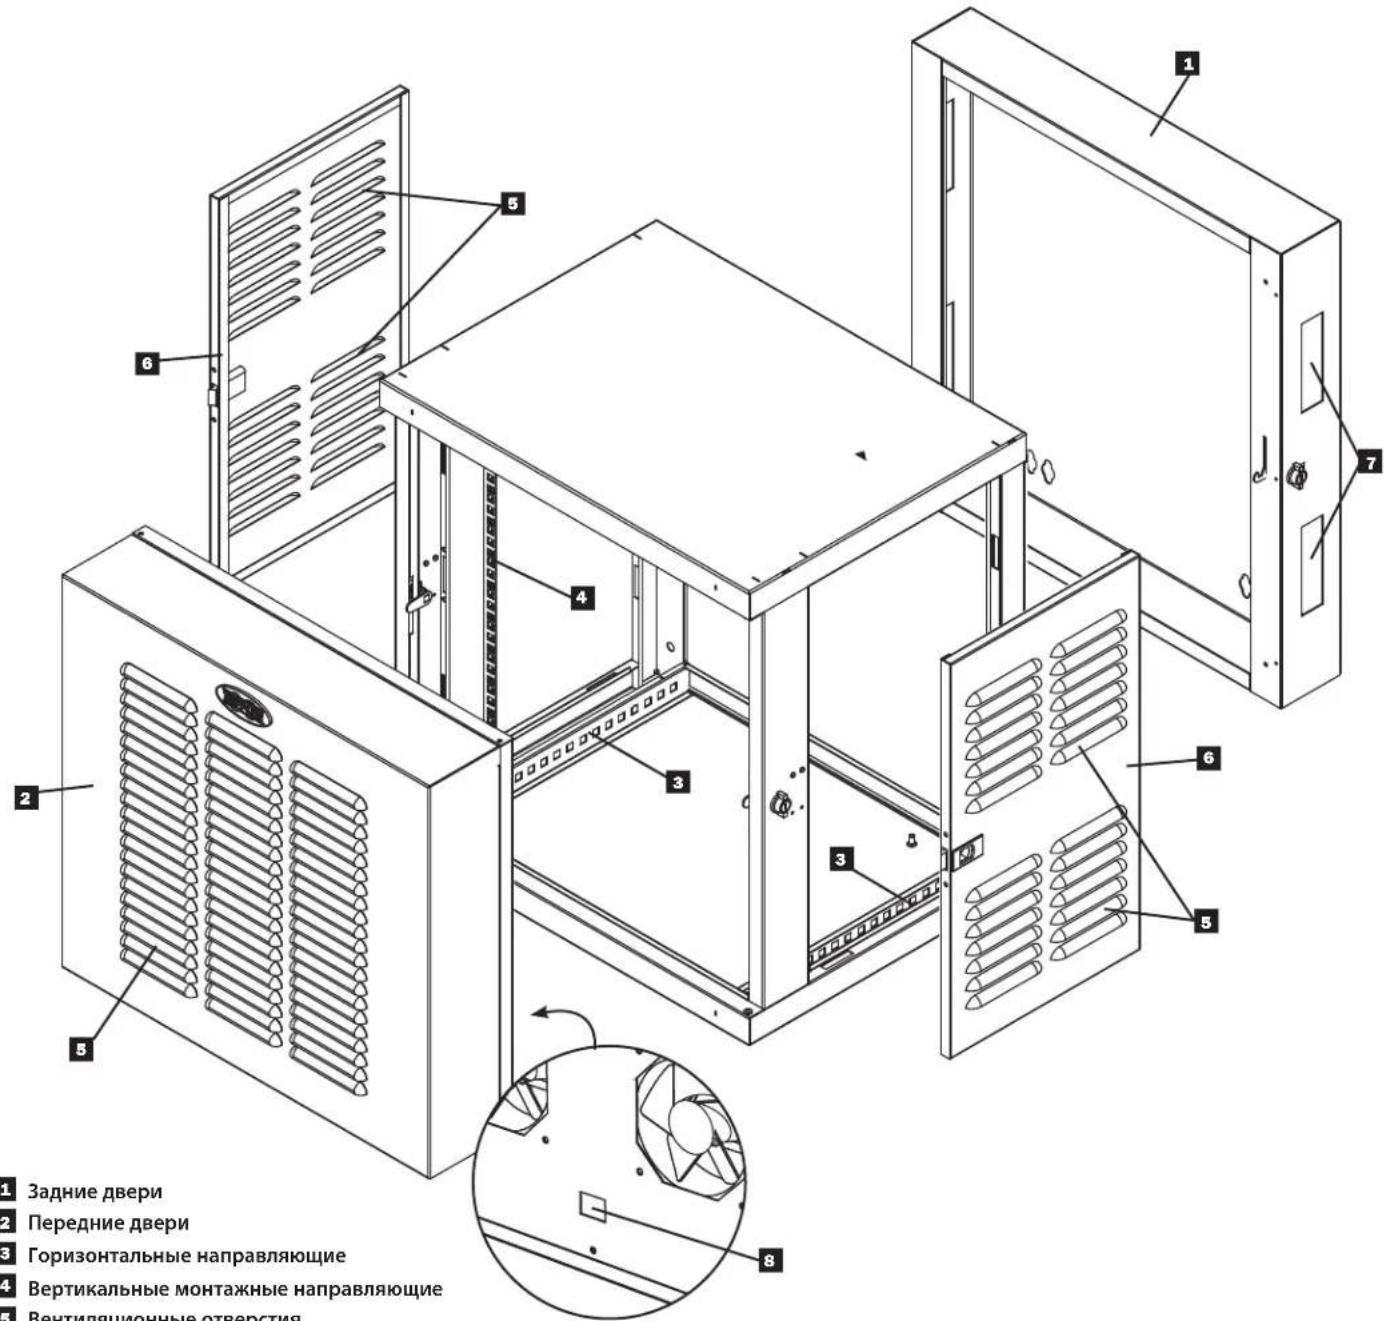
3aDnne DBepu
2 IpepeHne DBeprn
3 Topn3oHTaIbHbIe HappaBnaKUne
4BepTnKaJIbHbIe MOHTaXHbIe HAppaBnaIOUne
5 BeHTnlaIOHOHbIe OTBepCTNIA
6 3aHpaembe,cbemhble6okobblnnaHnn
7 Pnpoe3n dny npoknaKKa6eN
8 Bxod nHTaHn nepeMeHHoro TOKa
4.YctahOBkaWkaΦa

BHMaHne!pepeyctahOBko npoHTaTe Bce nHcTpyKuIM npedynpeJxdeHna!

PepynpekdeHHe: 1kafo bmyt 6bIb ouh TjXeblm. Paacakobibatb, npeMeaTb uyn yctahabnBaT hkaf Hxho BBOEM C NOMOHNKOM. Cneyet co6noaTb oc6yo octopoxhoct bp no opaueHH CO kkaFOM n O63aTeNbHO cNoDBaB BCem IHCTpyKmM NO yCTAHOBKe I KcNpnyataun. Dohauana yctahOBKn o6opyoBaHn Hxho PpeBaHTbeHo o6ceuHT b ytoHBOCTb kkaFa.
4.1 NpOroTOBka
UkaqdoJxHcHbMaTbcB KOHCTpyKTHBO HPOOH 3OHe, cnooc6HO HeCtH Harpzky, nHa NoIy, cnooc6Hom BbldePxAbBec Ukaqba, Bcero
obopyoBaHn, KOTOpoe 6ydt EYCAHO B uKa, n pyuHX KOPyncoB n/nn O6OpyoBaHn, KOtOpbe 6ydt YCTAHOBHe bpaOM. Pepe PaNakOBkou
Ukaq aOH DoJIKe HbTepeMeueh BO3MOXHO 6nke K MeCTy OKOHATeBHOn yCTaHOBKn, TTObMIHNIMINpOBaTb paCToHne, Ha KOTOpoe erO HyXHO
6ydt nepeMeCTNTb NocE CHrTHAunTHO yNAKOKn. Ecnn PAnHpyETc XpaHHTb KaB TeEHNE dInTeBHoro nepNoDa do YCTAHOBKn, CneDynte
HCTpyKmM B pa3dene XpaHeHne n o6cbNyKBaHnE.
IOTpe6yOTcHEckoNkoHHTpyMeHToB:
Kpome Toro, Heo6xoDmO cIeMyOuEe o6OpyDobAHne:
- YpOBeHb
-CoOTBeTCTByUOuN KpeIeK DnH HAcTeHHOrO MOHTaKa (B KOMIIeKT He BXoDIT)
OTBeptKa c KpeTo06pa3HOn rOIOBko
HCTpyMeHTbI DnA MOHTaKa Ha CTeHy
4.2 PacnaKOBka

Ipa pacnakOBkn kkaaHa HyxHbI KaK MmHmym DaYeJIOBeKa.
1 TomecTb NOdoH Ha npOHO, POBHO NOBepxHOCTN.
OTKpbTb yuDnBtyeIyBx3aunThbX 3neMeHTn3 neHONlaCTa.CoxpaNtB BCE yNAKOBOUHbme MaTePnAnI Dn daNBHeWero nOIOJIb3OBAHnI, NOKA HE CTAHET TOHNOIBeCTHO, OTO OHN 6oJIbHEe HNOADoRcYNAKOBOUHbme MaTePnANI NOJNeKAT NepepA60TKe.
B3aBwncb no Ondomy cienobekc kKaJdoCtOPOhbl, octopoxHb BItaunTb KkaΦnA uNkA n NoCTaBnTb Ha npouhyo, pOBHyIO NOBepxHOCTb.
4 NpOBePnTb KOpNc Ha OTCyTCTBnE NobpeXeHn Hn He3akpenneHbIX DeTanei. NqTBepnTb NnonOTy KomnKeTaun. EcnKacKe-TO qactn OTCYCTBYIOT Unn NobpeXeHb, 6paTnTbca 3a NooMooB b KomnaHIO Tripp Lite. He nCnoB30BaT bKaΦ, eCm OH 6bl NobpeXeH.

Hnkorda He BbIDBnraTb n3 ukafo 6one oDHoro KomnoHeHTa 3a OmH pa3.

4.3 Pa3MeueHne
IpeepacnakOBKo WkaΦ OJIOKeH 6bITb NpeMeueH MaKcIMaJIbHO 6N3KO K MeCTy yCTaHOBKn B CBOe TpaHCnpTHoTape. IpeynpeXeHHe: He ToKaTb H He TaHyTb WkaΦ B 6OKOBm HapabHeHn, a TAKHe TEHYb WkaΦ Ha ce6. POnHMAtb WkaΦ MOrY ToJIbKO ONItbHe MOtAXHKnO6OpdyOBAHn. UcNoJIb3OBAt b COOTBeCTByUOSe e6OpdyOBAHne c Co6NIoDeHnEM BCex HEo6xOdBmBIX npabIN HOpMaTUBOB NO TEXnke 6eONaCHOCTn.

PpeynpeKdHne: Henb3n noHNMaTb nIn yCTaHaBnBaTb 6e3 COOTBeTCTByOuSei NOMou.
HnB Koem cnyae Hnbl3a NODHMMaTb 1kaΦ B OndHOyK.

4.43a3emJIeHne
Bce yactn 3a3emnehha erpamy. nnoNkHoueHnna KaKa a K3a3emHeHIO o6bekTa nCNoIb3OBAt b Touky 3a3emHnra A cpe3b6oH u BNHTOM M6 (B KOMnEKeT). nna noKKnOyeHnK 3a3eMHeHIO nCNOb3OBaTB Ka6e1b 8 AWG (3,264 MM). IpPobO 3a3eMHeHn npOKnAdbBaTec noD paMOI WkaHa, YTO6bI o6ecNeuHb 6ecnpenATCTBeHHy0 pa6Oy Dbepei. PpeynpeJxHeHne: Kaxbln WkaΦ NOKNIOAeTcK 3a3eMHeHIO OTdEBHO. HEnb3a NcNOb3OBaTB WkaΦ 6e3 3a3eMHeHn.

4. YctahOBka wKaΦa (npodonxehue)
4.5 NpoknoueHne K ceTn nepemehoro ToKa
B KOMPNEKT WkaF a-CTOaK SNRW12USNEMA BxOJNT naHeIb c 4 BeHTnTIpaMn, BMOHTnpoBaHHaB N nepeHIO duBepCu. 3eKtpoITaHne BeHTnIaTOpOB OcyUeCTBnaETcyepe3 noCTabIeMbI B KOMPNEKTe uHyp nTuHaH NEMA 5-15 TnA C13, noCoedHReMbI KO BXoHOMy pa3bemy TnA C14, pacnoLooXeHHOMY B HIXHNe Yactn DBePcbl. IJa obecneueHn POJIHO FyHKUOHaJIbHOCTn DaHHoro yCTpoIcTB aHyp doJXeH 6bIb HaJIeKaIIM o6pa3om npoloxen h zakpenIIeH.
Ppokka Hpya nTuHa
IJIIO6eCneueHnB03MOXHOCTN OTKpbIBaHnna DBePcbl Ha NOnHb yrOIN MAKCMmaHBo DNHHb IuHyp PNOKIIIOHTe WHyp NITAHn K BXODHomy pa3bemy C14 nIpOTAHnTe erO BDOJI DNHIua WKaFa c nTeTbeo CBTOPOh bDBePcbl. UHy pONKeH BByXoIDNb H3 NHXHe npopez nIpy nPOKlaKn Ka6eJI c ToI CTOpOHb, rDe DBepca HabeWnBaTcHa nETNI.
Co3dHHe KOHcHcTaTOoTbOHOHneTn
B cenax doonHntbHoro oecneueHn 6e3onacHocTn, nna
HaJnxaIero MoTaXa IkaFa-CTOkN SRW12USNEMA aactb hHpya
nTuHn Hno6xOIMNO nONb3OBaT bnn BbINOnHeHn HcnpadAoUeH
KOHdHcatoOTBOHDHO KaebhHO NtTN. Dnco3dHn
KOHdHCatoOTBOHDHO KaebhHO NtTN CnEyET oecneuHTb
PPOXOXHe NHypa nTuHn BHn OYCTPOHCTBa C o63aTeNbHBIM
pa3BPOTOm O6pATHO HABPx K ceTeBO p03ETke, B pe3ynbTaTe Yero Whyp
6yDet O6pa3OBbBaTb neTIO, OTbDOAUYBO BcN BAnrKa OK p03eTK, TAK n OYCTPOHCTBA.
5.KonФиграцmaшkaфa
Iohayana yctahOBKn HxKHO cHnAHpOaBt paONoXeHne n nopAOK KOMnoHETOB BHTpn KOpnyca. Bce MoTAXhble HanpaBnHOune DOnKhb6bITb npabInbHO pa3meuhenb IOTpeynPOBaHbI NO rHybHe, B 3aBNCmOCTN OT KOHpyauun O6OpdyobAHn. Ipumeyanue. Neped Hauanom NIO6ou nepekomnoHOku ukaFa HeoXoDUMo omKnIOUmb e2o om 3NeKpmponumaHua U bHiymb ece pa3Meuenhoe B hem o6OpdyobAHue.
5.1ДверньеЗamkn
IpeepnHn 3aHnBnEepn HMeOT 3AMKn, KOtOpbte 3anpaTcKIOUamN 3 KOMPNeKta NocTabKn. KaJdA 6OKOBa NaHEnb 3anpaeTcF-06pa3HbIM pyurom n3Hytpn uKaΦa.
1 TTO6bI OTNEpTB n CHrTb 6OKOByHO naHEnb, HJXHO NOdHrTB BBepx KOPOTKoe IneO y-6o3HaHO A) n BtTaunB erO n3 6OKOBn naHeN (603NaeHo B). NToTHyTB 3a BbICTyN Ha 6OKOBn naHeN n ChrTb ee co Wkafoa.
2 106bI CHOBA yCTAHOBHT b6OKOBtB NaHEn, HxKHO yCTAHOBHT bX B npabunbHom nOLOKeHN, NOHrTaB BBepx KOpOTKe Ineo F-6pa3HOrO pbuHa (0603aueho A, HauBaBnE rO B CTOPHy NaHEn, BCTABUTb 6paTHo B OTBepCTne, B KOTOpOM OH 6bl N3HaayAbHo (0603aueho B). KaT TOnbko pbyar 3aimet CBOe MeTo, Haxatb KOpOTKe Ineo F-6pa3HOrO pbuHa BAHn, YTO6bI 3aFnkupobAt er. Note: To lock and unlock the side panels, you will need to have access to the interior of the enclosure.

5. KOnΦnrgypauny shkaΦa (npodonxene)
5.2 NpebeBnBaHne DBepuI Wkafo
3aHnIy DBeP bKaFa IMeET KBaIpaTHoe OTBepCTne IIN npoxoJa KaBee Hx OprAHn3aUN. DOnONHInTeNbHbI npoem HaxOIMTCB B BepXHe Yactn 1kkaF. KaJdbI npoem dI npoxoJa KaBee MoKeT 6bIT 3akpIt CbeMHbIM NaHeJIaM, KOtOpBE KpeRrTCB BNHTAMN.
1ДяdoctynaKуka3aHHbIMpbiaJxKaM chayana CHIMITE60KOBbe naHEnB NopraKe, n3IOnKeHHOM Bpa3Dele 5.1.
2 PbyaXkn (kak BepxHn, TaK n HnKnHn), pacnoIoxKeHHbIe Ha ToT CTopoHE, C KOtOpO OTKpbIbAeTcBdEpua, DOnJbHb HaxoDnTBcB NIOJoxHeN "OTCOEINHEO", a pbyaXkn (kak BepxHn, TaK n HnKnHn), HaxoDnueceHa InpOBONIOJHO CTopoHE - T.e. ToI CTopoHE, C KOTopoO hA NobOPaYNBaeTcB, - DOnJbHb HaxoDnTBcB B NOJoxHeN "IPNCOEINHEO".
OTcoeHNHTpeBpuaXKn.PbuaXkn HaxoJATcB NOIOKeHm «OTCOEINHEHO》,KordaKopoTkoe nIeO T-6pa3Horo pbyaXkaBbHyTO n3 CBOeONOPHOH HappaBnlouei.ДЯ TOrO YTO6bl BbHyTB KopoTkoe NIIeO T-6pa3Horo pbyaXka n3 ONOPHOH HAppaBnlouei, OToXMtme erO tHappaBnlouei(BBePx nnBn3) nNOBepHnTE (B CTOPOHy DBePbU nnOT Hee) TaK, TTO6bl KopoTkoe NIIeO T-6pa3Horo pbyaXka BBIIINO HappaBnlouei.
4 CHMNTe DBepy. MetaJIHueckra DetIb npedCTabIeT co6o Btynky, paCNOJKeHHyHa HIXHem yOpHom BbICTpe pAmb Ha ToI CTopoHe, rIe nobopauBaJalacBdEpua.
5 IpectabbTe Btynky CToI CTOpHbI, rIe IOBopauBaIacb DBepu, Ha npOTnBOJIOJXHyTOCTOpOHy paMbI n COBmecTlTe ee C OTBepCTmE.
6 BbipOBHnTe DBepy C npOTBONOJNOHc HcOpHOI nPnCOeHNHTe pbHaxKn. PbuaKn HaxoJrTcB NIOJoxHeHH NIPUCOEINHEHO, KOrda KopoTKe pJeO O-6pa3HOro pbuaKxO npHaETcHa NoBepXHoCTb ONOPHOH HapBaJIIOUeE. JnN NIPUCOEINHEHn HAadBnte Ha pbuar dJa CkATn PnyKnHb I N BEpHnE erO B onOpHyo HapBaJIIOUyIO. IpNcoeINHn HnKnn PbuaKOK, y6eINTEcB TOM, YTO OH npOXoIT Hepe3 BTynKy.
7 YeIeTcB ToM, YTO KAK BepxHn, TAK HINXHn pbHaHn Ha ToT cToPoHe, C KOToPoN DBePca DOJnxHa OTKpbBaTbCra, "OTCOEINHEHbl", a 06a pbHaHa ToT cToPoHe, C KOToPoN OHa DOJnxHa NOBopauHBaTbCra, "IPNCOEDINHEHbl". B npotNBHom Cnyae DBepca MoKeT He pa6oTaB HaJIeKaumm O6pa3OM, YTO B CBOIO OuepeB MoKeT Bbl3BaTb ee NobpeKdHeHne.
5. KoHΦnrgypauny shkaΦa (npodonjxehue)
5.3 NImeHHe HnPaBJIeHn OTKpbIbAHn DBepe
C cIeIbIpeaIIN3aIIN pa3IINHbIX BapnaHTOB CToeHOro MOHTaxa IpeyCMATPNBaETCB 03MOXHOCTb NepeBepTbAHnB BCero WkaΦa CEJIINKOM.
1 CHIMITE 6OKOBIE naHEn B nopJKe, n3IOXeHHOM B pa3Je 5.1.
2 CHINMITE nepeHIO DBeepu, NomeCTN Bce CteBipe F-06pa3HbIX pbuaKkBA NOJIOKeHne "OTCOEINHEO" nOTCTpAHnB ee ot kka.
3 CHINMITE MetaJIHueCKyIO BTVIky,ONICAHHyIO BA3Dene 5.2.
4песернITEшкф.
5 IpepecTaBbTe MetaJIInueckyIO BtUky B nopAKe, yka3aHHOM B pa3deJe 5.2.
6 UcTaHOBInTe nepeHIOU DBepyu 6OKOBbIe naHEnn O6paTHO Ha CBOm MecTa.
5.4 MoThaXHbIe HnpaBnaIOuJe
IkaΦ noCTaBnEraTc MOnTaXHbIMn HApBaNlHOUmm, KOToPbIe NMeIOT KAK KbAdpaThbIe, TAK IN pe36obBble OTBepCTn DnA MOtXaK cToeHOrO o6OpyDobAHn. IIn yCTaHOBKn 6OpdyoBaHn IcNoB3yIOUc 3aKJIaHbIe raiKn IpyrVe kpeKeXHbIe 3JeMehbI. (YCTaHOBKa 3aKNaIbHbIX raek onicaHa Ha CTp.7). IpeDynpexkHe: Pepe yCTaHOBKn IIO6Oro o6OpyDobAHn B WkaΦ HxHoo y6eHTbcra, tO OH nHaexHo 3akpenHe Ha cTeHe nHa HA nOBy BMeTe CBOe OKOHaTeNbHO yCTaHOBKn. KpOME TORO, nepe yCTaHOBKn o6OpyDobAHn HxHko BBInONHITb BCE Heo6xOIMMbIe peryIpOBKn MoTaxkhbIX HAnpaBnaIoUxu. (PerynipOBKa rny6HbIb MoTaxkhbIX HAnpaBnaIoUxu onicaHa Hxke).
5.5 PerynnpobKa rny6uHbMoHTaXHbIX HanpaBnaIOxuX
Ppeynpexdne: EcnB ukafoy yctahOBneno 06OpyoBaHne, perynnpobky HappaBnOux BbIOnHbTb HeIb3a. Heb3a nCnonb3oBaTb HappaBnIOuue 6e3 yCTaHOBnEHbIX BHTOB. (no 2 Ha KaKdyu HappaBnIOuio.)
4MOHTaKbHHe HappaBnIOuIpeDbapntelbHO yCTaHOBeHb IpyaMaeeHnO6OpyOBaHnC MoTAtXHo rnybHOB 20,5IOUma (521 MM). He Hyxho perynipobAte HappaBnIOuIe,ecnI dIa O6OpyOBaHnE He Tpe6bycra pyra MOnTaXHaNr rnybHnA. PpeDnne n3adHnne Ha6OpbHaPpabNIOuIX MOHO perynipobAte He3aBncMo dpyr ot dpya c warom B 1/4 IOHMa (6MM),TO PO3BOJAE TBy6paTb rnybHbI dna MOtXaOT 3IOHMoB (76 MM)do 20,5IOHMa (521 MM).
1 KaKaJaI N3 HApBaBnIoUx npKpEnNeHa K KopnyC c NOMOu2 BHTOB n 2 3aKnlaHbX raeK - NO ODHomy KOMNKeTy B BePxHE M HnKHeM yrJax. C NOMOuKpeCTOBo OTBePTKn BbIEbpHTe BnHTb, o6ecneuBaOuue KpenneHne HApBaBnIoUx K KopnyC.
2 IepemecntTe 3aKaIbHbIe raiKn Ha HyKHyIOIy6HyN IOBTOPO yCTaHOBNTe HApabLIOJIe.
3IpeMeCTbMOHTaXHbIe HApBaJIIOUme Ha HyxHyO rJy6BHy N CHOba 3aKpeNTb INC NOMObB BnHTOB,INBLeueHHbIX B Ware 1.
5.6 OuNTka/3aMeHa BO3dUHbIx ΦnbltpOB
SkaSRW12USNEMA NOCTABnREcB KOMIIeKTe C bIyEnaJIbNAIbOuIMN fHbTpAMN, YCTaHOJIeHHbIMN B nepeHHe DBepe.ДЯ Heo npedyCMOTpeHbCTAHApTHbIE ΦHbTpbl pa3MePOM 20" x 24",npOdaUmecR B 6OnbHnHCTBe Mara3INHOB 6bITOBbIX TOBapOB.DnA CHATNIA FIObTPOB C cJeIbO ONUCTKN NIM 3aMeHbI:
1 HaHnITe fHbTp, paCnoJoxeHHb H na neBcI CTOpOHe DBePbI, n OCTOpOxHO BbITaHInTe erO hapyKy.
ДЯЗAMeHbIФИЛТра:
2 CoBmecTne fHnIbTp c npope3bK B DBepe n 3aDbnraTe erO BHytpkapMaHa Do ynpa.
Ipumeyane.Yacmb fuibmpa omaemc chapyu deepu dno obneuehna nocnedyioe bviEMku.
6. MoHTaX WkaΦa Ha cTeHy
PepypeKHeH: Hb3a BbINHbMoTAtX KkaHa CteHy Bmte CytaHOBnEHbIM B HeM o6OpyOBAHnEM.
6.1 MoHTaX
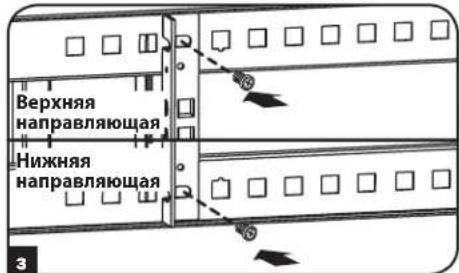
Ha 3aDHeI DBeRn WkaFa hmeIOCTc 16 MoTaNKbHbIX npoeMOB. KaKdI npoeIpneHa3HaueHn IKnpeHHN6 BoNTAMn M10 nn 3/8". PaCtOHHm MeJy ueTpAmn IpoeMOB NaHauHaOTc C dByx BHTpeHHX OTBepTn IN CoCTABJIHO TOoBTcTBeHHO 12,625" (320 MM), 14,875"(378 MM), 17,125"(435 MM) n 19,375"(492 MM) npr O T npya CooTBeTCTBeHHO, DnIRaCb HApxNy No rOpu3oHTaII. Np BePTkAII paCtOHHN MeJy ceHTpAMn IpoeMOB coCTABJIOT 21,362"(543 MM), KaK poka3aHo Ha PncyHke.
C nOMOJIbU yPOBnI N3MEpNTb TOnHoe NIOJoxHe IToeK KpeJIeHnI. JIa KpeJIeHnI WkaFa K CTHe NCNOL3OBaTb COOTBeCTByIOUm KpeEnX (B KOMNJIeKT He BXoIT). PpeDynpExdHne: O6NaCTb, KOtOpA rIIaHNPyeTcI dI MaTxAkaKaDa, DOnJHa 6bITb B CoCTOHN M BblEepKaTb Bec WkaFa u BCero CMOHTIpOBaHOrO B Hem O6OpdyobAHn. Macca WkaFa n ero Harpy3OuHnar CnOCo6HOctb npVBeHe b TeXhuecknx XapaKTePncTkax Ha cTp. 32.
7.YctaHOBkaO6OpydoBaHnIa
IpeynpekdeHHe: YcTaHbNtB o6OpDobAHne Heh3a, nKa He oecneueHo yctoMHBoe noOnKeHne Kopnyca Kka. TaKeoe o6OpDobAHne ycTaHabMbAetc npBbIM n Ha HxHHe N03nUu Wka. YcTaHabNtBaT b6OpDobAHne HyKHO HauHHa C HxKHe qactn Wka a npOonKaTb HAnpAbNeHH K BepxHe uactn - HNKOrHa He hao6OpOT. EcnncnoJb3yIOrCa nAazn DnA o6OpDobAHn, cJeYET co6nOdaTb octopoxHOCTb npn Hpa3DbirAHm. He cJeYET BblBnArTb OndOBpeMeHH 6oone OndHO rOMnEKA Tn HapabnnIOux dR o6OpDobAHn. CJeYET n36erTb BblnKeHH O6OpDobAHn B BepxHe qactn Wka.
Ppumeyaue: daHbMoynocmabnemcB Komnlekmc B uHmamu dbx paunhbx munoe (eepno zu cepepcmozo ueo) dmo Mohmaja obopyoohua. MoMaXhne buHmbu eepno zema cneyem uonnb0amb 8 mom cnyae, eIu bI kpenume cfoe obopydoahue K moi cmopohe MoHaXho Hapabnoue, komopar cna6zeta KaadpaHbIMU omepcmmu. MoHaXhne buHmbu cpepcmozo ueema cneyem uonnb0abmb mom cnyae, eIu bI kpenume cfoe obopydoahue K moI cmopohe MoHaXho Hapabnoue, komopar cna6zeta pe3b6obmu omepcmmu.
PpumueaHue: Kbadpamhhe omepcmu 6 cepedune kao do cmoku npohmepoabnbl, a mkae umeom hebnouho hape3 uenx uehmuauu. Odo MOhmaHoe MeCmO zAHMaem B CMOKe npocmpaHcMBO MEXdy npohmepoahHHbIMU omepcmu m c ocehdHMU homepaMu.

7.1 YctaHOBka nn ydaJIeHne 3aKlaIbIx RaEK
BHIMAHHE: ΦaHbI 3aKnaHbIX raeK dOJIxHbI HaxoITbcI NO 6OKam KBaIpaTHbIX OTBepCTN B HApBaIIIOueI, a He BBepx y Bn3y. IIN oEcecneueHH npabInbHO yCTaHOBKn O6OpYOBaHn O6OpYOBaHn.
1 HauTn Homep KbaIpaTHoro OTBepCTNBA MOHTaXHOH HAnpaBIAUOeien, Kyua PIIaHnpyeTcayctAHOBtB o6OpyDoBaHne.3aKlaIbHbe raIKN (B KOMJIKeTBe) 6yDy UcTaHaBINBaTbcA B KBaIpaTHbe OTBepCTN, uTO6bI o6ecNeuHTb TouKN KpeJIeHna IJn BNTOB (B KOMJIKeTBe).IpnMeaHHe: NcNoJIb3y JOKyMeHTaUIO K o6OpyDoBaHIO, ONpeJeINb Heo6xOIMoe KOJIueCTBO IMcTa yCTaHOBKn raeK.
2 BctaBtB oIN H3 ΦIaHueB 3aKlaHHO rAIKN B KBaIpaTHoe OTBepCTne C BHYtpHHeC TOpObH MoTAtXHoH HanpAIBnIOUeH. HaxaTB Ha Hee, YTO6bI BbIPOBHrB C KpaEM KBaIpaTHoro OTBepCTNk. KaJbI ΦIaHeuDOnJKeH HAXoINbCra C 60koBcI CTOpObH KBaIpaTHoro OTBepCTnA, a He BBepxu IIN BHN3y.
3 CnErKa CxKbTa 3aKnadHyu RaKy No 6oKaM, YTo6bI OCTaBsaJcAChTb PhaHua PpoWHa B KBaDpaTHoe OTBepCTne. Korda 3aKnadHraJa Ka yCTaHOBeHa npabunbHo, oba PhaHau6yDyT npoxOHTb HACKB03b Yepe3 KbAdpaTHoe OTBepCTne 6yDyT BnDbHb Ha BHeUHei CTopoHE MOHTaXHOH HApBaJIouSeI. NOBTopNTb 7arn 1-3 dny aTahOBKn BCex Heo6XoIMbIX 3aKnadHbIX raek.
7. YctaHOBka 06OpyIOBaHn (npoOJIxHue)
4 NocIe yCTaHOBKn Heo6xOINMbIX 3aKnaIaNbIX Taek npnKpeNITe CBoE o6OpyOBAHn K CToeuHO HAnpaBraIOUe C NOMOsbIO NOCTABINREMbIX B KOMNIKeTc MOHTaXbIX BInTOB UEPHOUBeTa N HaSeO6pa3HbIX 7aIb6. NmecTtne TaSeO6pa3HbIX 7aIb6bl MeJy BNHTAMM N MOHTaXbIMN KPOHSTeHaMn Dn KpeJIeHnO6OpyOBAHn.
IpuemueaHue:B kOmnnneKm noCMABku obOpdyobAHua maKke moKem bXoDumkpenek dna MOHmaKa.Ipeed ycmaHOBkoIobOpdyobAHua HxNHO npOummb uHcmpkyuU noMOHmaKy, noCMABnREbE BEmcme c oOpdyobAHueM.

Yro6by ydaanb3aKaNaHbte raKn, BblonHnTb DeIcTBn 1-3B O6paTHOM noprKe
IpuemueaHue: Ira oBneueHua ycmahOBku U ydaenHua 3aknaDbhe 2aek moKHO maKHe ucnonb3oabmb cenuaHbU hcmpymEm (npuobpemaemnonb3oamemcamocmernbHo).
7.2 AJIbTePHaTnBhIe BO3MOXHOCTN MOHTaXa: MOHTaXHJa HAnpaBnaOua c pe3b6oBbIMN OTBepCTnA M
BHHMaHHe NbTaIeTcB perynIpOaTb HappaBnaIOuNne npy cTaHOBHeHHOM B uKaΦ o6OpdyoBaHm. He nbTaIeTcB nCnoB3OBaTb HappaBnaIOuNne 6e3 yCTaHOBKn BHTOB (no 2 Ha KaKdyu HappaBnaIOUyU).
Ha 3aBoTe-3rTOBnTeMe MOHTaxHbIe HAnpabNIOUne yCTaHOBHeI NOd KpeNIIeHne O6OpyOBAHnC IcNtOB3oBaHnEM ToT CToPOHbI HApabNIOUe, KOtopar Ch6KeHa KBaPaTHbIMN OTBepCTnM.Дla NepexOda Ha NCIOB3oBAHn ToT CToPOHbI MOnTaXHON HApabNIOUe, KToPpar Ch6KeHa pe3b6OBbIMN OTBepCTnM, Heo6xOIMO BblINOHITb CNeDyIOUne DeECTBnA:
1 KaKaJaHaNpaBnaHoua NapKpePnHea K Kopny Cy KaFa npn NmOoIy BByx BNHTOB, OINH n3 KOToBix paCnOlaeraTc B BepxHem yrny, a Dpyro-B HnKHeM. C NmOuSy KpeToobp3HOOTBePKNbBepHNTe BnHTbl, KOToBle KpeTnHaNpaBnaHouie K Kopny Cy KaFa.
2 PomeHnTe pacnoJoxHe HappaBnIOxN. Y6eNTecb TOM, YTO KaJda N3 HAppaBnaOx npacnonaraTcTaKIM O6pa3OM, YTO ee cToPOHa C pe3b6OBbIMN OTBepCTnMa M O6paIeHa K nepeDne NDBepue.
3 NOBTOPOHO 3aKpeNITMe MOHTaXHbIe HnPaBIAOJIe.
4 PnKpEnTe O6OpD0BaHne K CToeHbIM HapBaJrOuIMC NcNoB3OBAHmE BxOJaux B KOMNJIeKT MOHTaXHbIX BNHTOB CEpe6Picto rBeta. IomeCTte YaWeO6pa3HbIe Wai6bl Mejdy BNHTAMN MONTaXHbIM KPOHtTeHaMn DnI KpENHeHnO6OpD0BaHnR.
Ipuemueaue:Baue oobpyoabuaue macke moxem nocmaanbcb8 KOMnneKme c MOHmaxhbmu npucno6neHuAMU.
Ipeod ycmaHOkou c0e2o oobpyoabaun 03hakombmeb cyka3aHuraMu no MoHmaxy, nocmaanreMbmu B KOMnneKme C HUM.
8. TexnueckneXapaKtepncnkn

Manufacturing Excellence.
1111 3anaad. 35-ya nua, ukaro, nnnooc 60609, CwA. www.tripplite.com/support

- 12U Wall-Mounted SmartRack™ NEMA12 Enclosure
- Table of Contents
- Important Safety Instructions
- SAVE THESE INSTRUCTIONS
- Overview
- Feature Identification
- Enclosure Installation
- Caution! Read All Instructions andWarnings Before Installation!
- Preparation
- Unpacking
- Use at least two people to unpack the enclosure.
- Never extend more than one component from the enclosure at a time.
- Placement
- Warning: Never attempt to lift or install without adequate help. Do not try lifting the enclosure alone.
- Ground Connection
- Enclosure Installation (continued)
- AC Power Connection
- Power Cord Routing
- Creating a Drip Loop
- Enclosure Configuration
- Door Locks
- Enclosure Configuration (continued)
- Reversing the Enclosure Door
- Reversing the Enclosure
- Mounting Rails
- Adjusting Mounting Rail Depth
- Cleaning/Replacing Air Filters
- Wall Mounting the Enclosure
- Mounting
- Equipment Installation
- Installing or Removing Cage Nuts
- To Remove Cage Nuts, Reverse Steps 1-3
- Equipment Installation (continued)
- Alternate Mounting: Tapped Hole Mounting Rail
- Specifications
- Storage and Service
- Storage
- Service
- Warranty and Warranty Registration
- 5-Year Limited Warranty
- Warranty Registration
- Armoire murale 12U SmartRack, NEMA 12
- PYKOBODCTBO NOJIb3OBATEJI
- Baxkhble npabnla texhkn6e3onacnoctn
- COXPAHNTE 3TN INPABUNIA
- 2.0630p
- 3.ОпиcaHne BO3MOxHOCTei
- 4.YctahOBkaWkaΦa
- BHMaHne!pepeyctahOBko npoHTaTe Bce nHcTpyKuIM npedynpeJxdeHna!
- NpOroTOBka
- PacnaKOBka
- Ipa pacnakOBkn kkaaHa HyxHbI KaK MmHmym DaYeJIOBeKa.
- Hnkorda He BbIDBnraTb n3 ukafo 6one oDHoro KomnoHeHTa 3a OmH pa3.
- Pa3MeueHne
- PpeynpeKdHne: Henb3n noHNMaTb nIn yCTaHaBnBaTb 6e3 COOTBeTCTByOuSei NOMou.
- 4.43a3emJIeHne
- YctahOBka wKaΦa (npodonxehue)
- NpoknoueHne K ceTn nepemehoro ToKa
- Ppokka Hpya nTuHa
- Co3dHHe KOHcHcTaTOoTbOHOHneTn
- 5.KonФиграцmaшkaфa
- 5.1ДверньеЗamkn
- KOnΦnrgypauny shkaΦa (npodonxene)
- NpebeBnBaHne DBepuI Wkafo
- KoHΦnrgypauny shkaΦa (npodonjxehue)
- NImeHHe HnPaBJIeHn OTKpbIbAHn DBepe
- MoThaXHbIe HnpaBnaIOuJe
- PerynnpobKa rny6uHbMoHTaXHbIX HanpaBnaIOxuX
- OuNTka/3aMeHa BO3dUHbIx ΦnbltpOB
- MoHTaX WkaΦa Ha cTeHy
- MoHTaX
- 7.YctaHOBkaO6OpydoBaHnIa
- YctaHOBka nn ydaJIeHne 3aKlaIbIx RaEK
- YctaHOBka 06OpyIOBaHn (npoOJIxHue)
- AJIbTePHaTnBhIe BO3MOXHOCTN MOHTaXa: MOHTaXHJa HAnpaBnaOua c pe3b6oBbIMN OTBepCTnA M
- TexnueckneXapaKtepncnkn
Brand : Tripp Lite
Model : SmartRack SRWX12USNEMA
Category : Electrical cabinet