
IAN 404410 - Inflatable paddleboard CRIVIT - Free user manual and instructions
Find the device manual for free IAN 404410 CRIVIT in PDF.
| Product type | Inflatable Stand Up Paddle board |
| Brand | Crivit |
| Model | IAN 404410 |
| Dimensions (inflated) | 300 × 80 × 15 cm (L × l × H) |
| Weight (deflated) | Approximately 9.4 kg |
| Maximum payload | 115 kg |
| Number of persons allowed | 1 adult (no children) |
| Service pressure | 1.0 bar (15 psi) for both chambers |
| Main material | PVC (estimation) |
| Type of pump included | Air pump with pressure gauge |
| Included accessories | Paddle (blade + telescopic shaft + kayak blade), fin, inflatable seat, pump, hose with adapters, valve key, strap, leash, repair kit, backpack |
| Recommended use | Protected river areas up to 150 m, wind ≤ force 4, waves ≤ 0.3 m |
| Weather conditions | Do not use in strong wind or breaking waves |
| Minimum age | 14 years |
| Backpack capacity | 15 kg max |
| Cleaning | Fresh water and mild soap, dry completely |
| Storage | Dry, ventilated place, away from sunlight and temperature variations |
| Warranty | Legal warranty of conformity (2 years) + commercial warranty (see customer service) |
| Spare parts | Available during warranty period (valve, patches, etc.) |
| Repairability | Repair kit included for small leaks; replaceable valve |
Frequently Asked Questions - IAN 404410 CRIVIT
User questions about IAN 404410 CRIVIT
0 question about this device. Answer the ones you know or ask your own.
Ask a new question about this device
Download the instructions for your Inflatable paddleboard in PDF format for free! Find your manual IAN 404410 - CRIVIT and take your electronic device back in hand. On this page are published all the documents necessary for the use of your device. IAN 404410 by CRIVIT.
USER MANUAL IAN 404410 CRIVIT
text_image
CRIVIT PDF ONLINE www.lidl-service.comALLROUND-SUP, AUFBLASBAR
DE AT CH
ALLROUND-SUP, AUFBLASBAR
Gebrauchsanweisung
IT CH
SUP ALLROUND, GONFIABILE
Istruzioni d'uso
FR CH
STAND UP PADDLE POLYVALENT - GONFLABLE
Instructions for use
A
text_image
Diagram of a laboratory apparatus with labeled components, showing a funnel-like structure and two numbered parts.
text_image
3 5 4 4a 4a 4 2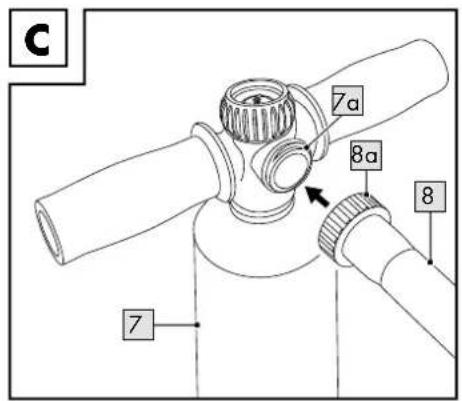
text_image
C 7a 8a 8 7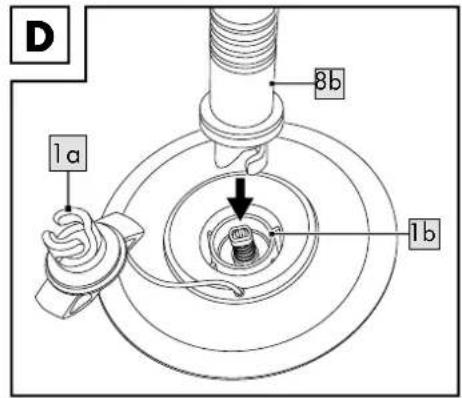
text_image
D 1a 8b 1b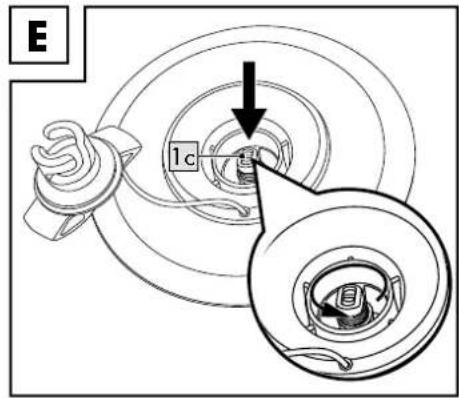
text_image
E 1c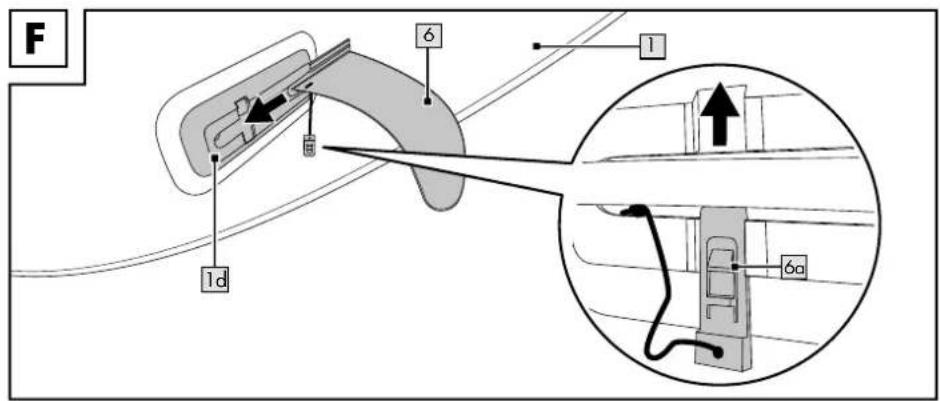
text_image
F 1d 6 1 6a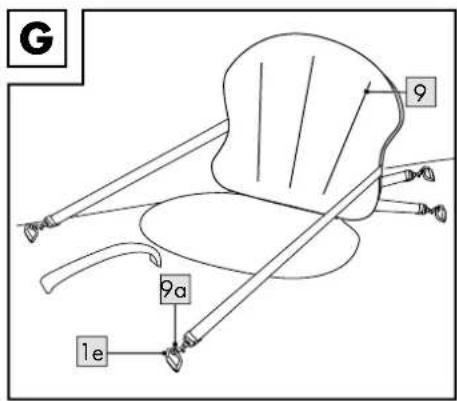
text_image
G 9 9a 1e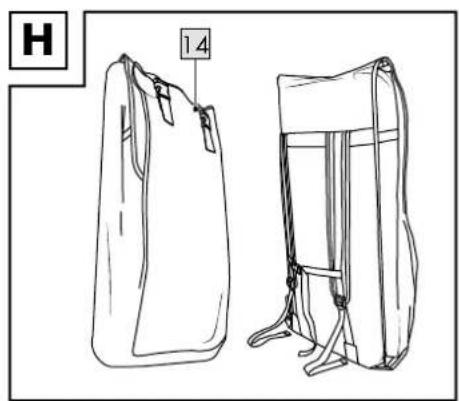
natural_image
Line drawing of two different backpacks with visible straps and front views (no text or symbols)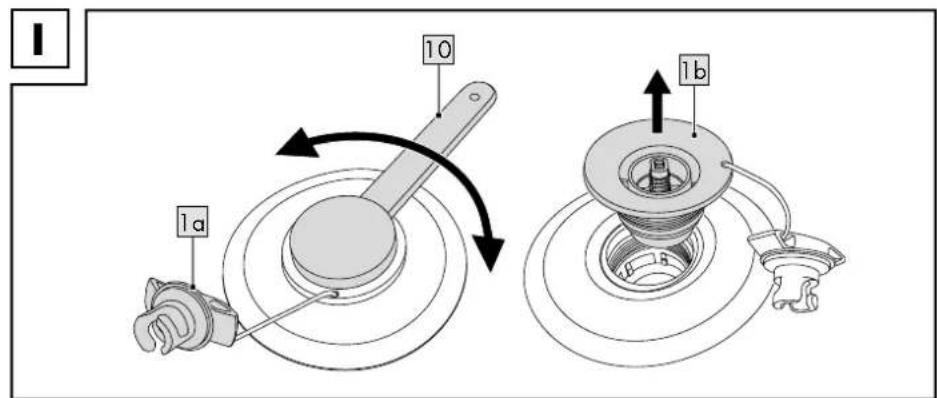
text_image
1 10 1a 1b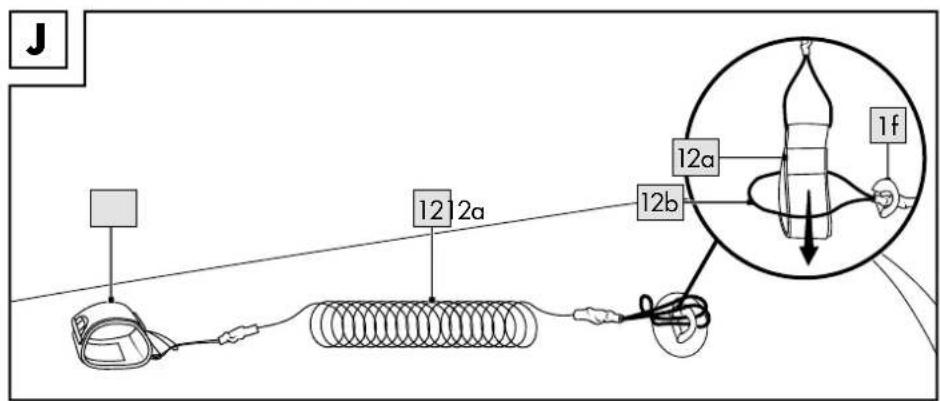
text_image
J 12 12a 12b 12a 1f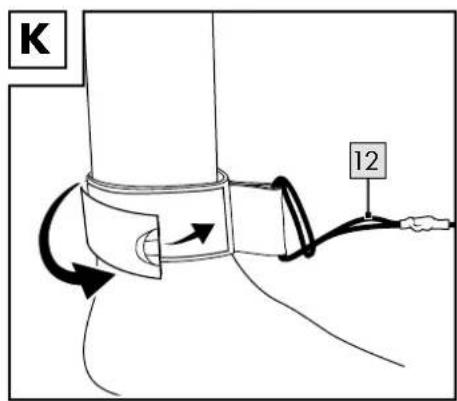
text_image
K 12You have chosen to purchase a high-quality product. Familiarise yourself with the product before using it for the first time.

Read the following instructions for use carefully.
Use the product only as described and only for the specified applications. Store these instructions for use carefully. When passing the product on to third parties, please also hand over all accompanying documents. They contain important details about the product, including instructions for assembly, use and maintenance, as well as safety regulations. There is always a risk associated with water sports; to avoid injury, or even death, it is therefore important that you have detailed knowledge about this product.
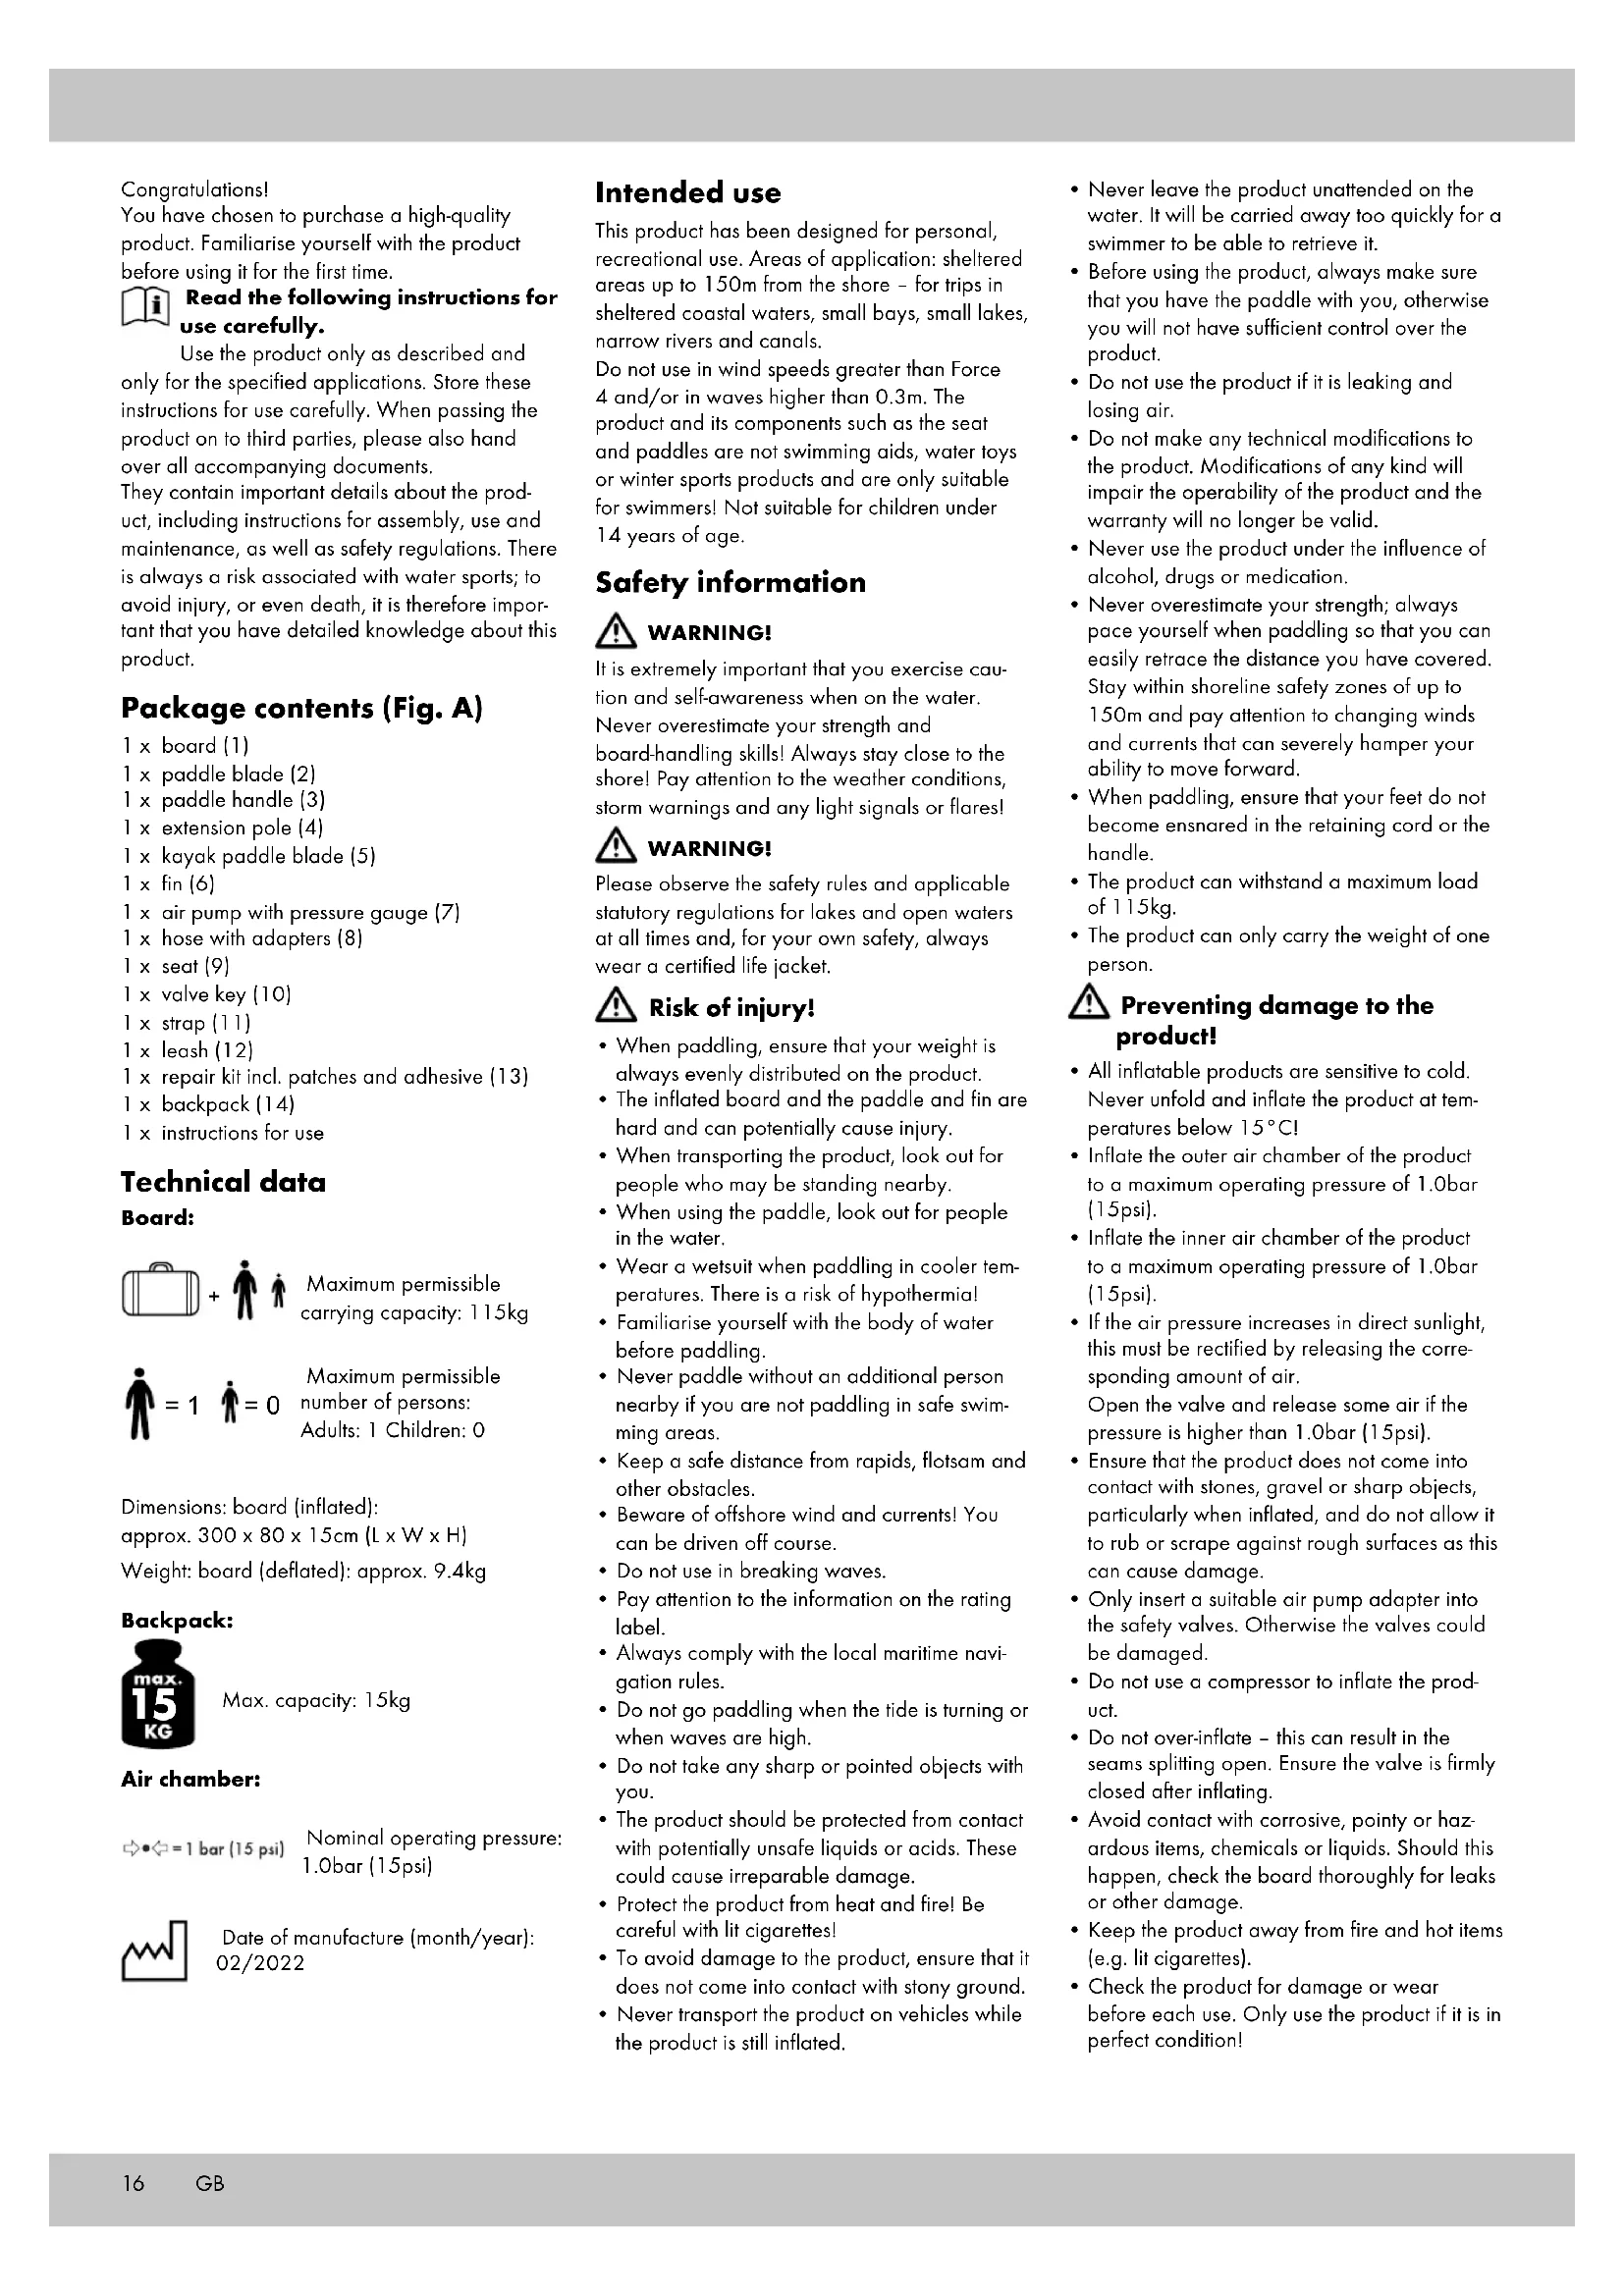
Package contents (Fig. A)
1 x board (1)
1 x paddle blade (2)
1 x paddle handle (3)
1 x extension pole (4)
1 x kayak paddle blade (5)
1 x fin (6)
1 x air pump with pressure gauge (7)
1 x hose with adapters (8)
1 x seat (9)
1 x valve key (10)
1 x strap (11)
1 x leash (12)
1 x repair kit incl. patches and adhesive (13)
1 x backpack (14)
1 x instructions for use
Technical data
Board:
Maximum permissible carrying capacity: 115kg
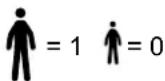
Maximum permissible number of persons: Adults: 1 Children: 0
Dimensions: board (inflated):
approx. 300 x 80 x 15cm (L x W x H)
Weight: board (deflated): approx. 9.4kg
Backpack:
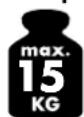
Max. capacity: 15kg
Air chamber:
→●⇐=1 bar (15 psi)
Nominal operating pressure: 1.0bar (15psi)

Date of manufacture (month/year): 02/2022
Intended use
This product has been designed for personal, recreational use. Areas of application: sheltered areas up to 150m from the shore – for trips in sheltered coastal waters, small bays, small lakes, narrow rivers and canals.
Do not use in wind speeds greater than Force 4 and/or in waves higher than 0.3m. The product and its components such as the seat and paddles are not swimming aids, water toys or winter sports products and are only suitable for swimmers! Not suitable for children under 14 years of age.
Safety information
WARNING!
It is extremely important that you exercise caution and self-awareness when on the water. Never overestimate your strength and board-handling skills! Always stay close to the shore! Pay attention to the weather conditions, storm warnings and any light signals or flares!
WARNING!
Please observe the safety rules and applicable statutory regulations for lakes and open waters at all times and, for your own safety, always wear a certified life jacket.
Risk of injury!
- When paddling, ensure that your weight is always evenly distributed on the product.
- The inflated board and the paddle and fin are hard and can potentially cause injury.
- When transporting the product, look out for people who may be standing nearby.
- When using the paddle, look out for people in the water.
- Wear a wetsuit when paddling in cooler temperatures. There is a risk of hypothermia!
- Familiarise yourself with the body of water before paddling.
- Never paddle without an additional person nearby if you are not paddling in safe swimming areas.
- Keep a safe distance from rapids, flotsam and other obstacles.
- Beware of offshore wind and currents! You can be driven off course.
- Do not use in breaking waves.
- Pay attention to the information on the rating label.
- Always comply with the local maritime navigation rules.
- Do not go paddling when the tide is turning or when waves are high.
- Do not take any sharp or pointed objects with you.
- The product should be protected from contact with potentially unsafe liquids or acids. These could cause irreparable damage.
- Protect the product from heat and fire! Be careful with lit cigarettes!
- To avoid damage to the product, ensure that it does not come into contact with stony ground.
- Never transport the product on vehicles while the product is still inflated.
- Never leave the product unattended on the water. It will be carried away too quickly for a swimmer to be able to retrieve it.
- Before using the product, always make sure that you have the paddle with you, otherwise you will not have sufficient control over the product.
- Do not use the product if it is leaking and losing air.
- Do not make any technical modifications to the product. Modifications of any kind will impair the operability of the product and the warranty will no longer be valid.
- Never use the product under the influence of alcohol, drugs or medication.
- Never overestimate your strength; always pace yourself when paddling so that you can easily retrace the distance you have covered. Stay within shoreline safety zones of up to 150m and pay attention to changing winds and currents that can severely hamper your ability to move forward.
- When paddling, ensure that your feet do not become ensnared in the retaining cord or the handle.
- The product can withstand a maximum load of 115kg.
- The product can only carry the weight of one person.
Preventing damage to the product!
- All inflatable products are sensitive to cold. Never unfold and inflate the product at temperatures below 15^
- Inflate the outer air chamber of the product to a maximum operating pressure of 1.0bar (15psi).
- Inflate the inner air chamber of the product to a maximum operating pressure of 1.0bar (15psi).
- If the air pressure increases in direct sunlight, this must be rectified by releasing the corresponding amount of air.
Open the valve and release some air if the pressure is higher than 1.0bar (15psi).
- Ensure that the product does not come into contact with stones, gravel or sharp objects, particularly when inflated, and do not allow it to rub or scrape against rough surfaces as this can cause damage.
- Only insert a suitable air pump adapter into the safety valves. Otherwise the valves could be damaged.
- Do not use a compressor to inflate the product.
- Do not over-inflate – this can result in the seams splitting open. Ensure the valve is firmly closed after inflating.
- Avoid contact with corrosive, pointy or hazardous items, chemicals or liquids. Should this happen, check the board thoroughly for leaks or other damage.
- Keep the product away from fire and hot items (e.g. lit cigarettes).
- Check the product for damage or wear before each use. Only use the product if it is in perfect condition!
Assembly
Follow the step-by-step assembly instructions in the order given.
-
Select a suitable area that is clean and smooth and has enough room to unpack and unfold the product. Make sure that all the parts are included and are in perfect condition.
-
When assembling the product for the second time, and subsequently, check for any damage, holes or tears and seal them as described further on. Once you are on the water, it is too late to repair any damage.
Assembling the (kayak) paddle (Fig. B)
- Release the locking lever (4a) on the extension pole (4).
- Insert the paddle handle (3)/kayak paddle blade (5) into the extension pole.
- Pull the paddle handle/kayak paddle blade out of the extension pole to the desired length.
Note: please refer to the section 'Adjusting the paddle length' to set the handle to the correct length.
- Press the locking lever against the extension pole in order to lock the paddle handle/kayak paddle blade.
- Insert the open end of the extension pole into the end of the paddle blade (2). The pin on the extension pole must click audibly into the pin-hole of the paddle blade.
Disassembling the (kayak) paddle
Proceed in the reverse order to disassemble the paddle.
Inflating the board

WARNING!
- Inflate the air chambers in the correct sequence.
- Avoid over-inflating the air chambers, otherwise you risk over-stretching the seams or even splitting them.
- Operating pressure can increase when exposed to the sun. Compensate the air pressure by releasing air from the board.
- Use commercially available foot pumps or single action pump with the appropriate attachments and pressure gauge to inflate the board.
- Specially designed electrical air pumps for SUP boards are also suitable for inflation. These air pumps are pre-set at 1.0bar or 1.5psi and automatically turn themselves off once this air pressure has been reached. Always check the inflated air pressure. If, contrary to expectation, the air pressure is not 1.0bar (15psi), re-inflate manually, or release air, until the nominal pressure has been achieved.
- Do not use a compressor or compressed air canister to inflate the product. This can lead to damage.
• Always fully inflate the board. - Do not inflate the board near sharp or pointed objects, or on rough or stony ground.
• Always fully inflate each air chamber.

IMPORTANT!
- Only open the valve to inflate and deflate. Otherwise it can become contaminated.
- The area around the valve must always be clean and dry.
- Ensure that sand or other contaminants do not get into the valve.
Inflation sequence
Inflate the chambers in the following sequence:
- Outer air chamber 1.0bar (15psi)
- Inner air chamber 1.0bar (15psi) 2
Filling the air chambers
Important!
- The optimal operating pressure for both air chambers is 1.0bar.
- The outer air chamber expands after inflation and pushes against the inner air chamber which may cause the operating pressure of the inner air chamber to exceed 1.0bar.
- Because fluctuations may occur, check the air pressure in the inner air chamber once more after inflating the outer air chamber and adjust the operating pressure accordingly, if necessary.
- Screw the female thread (8a) of the hose (8) onto the thread (7a) of the air pump (7) (Fig. C).
Note: ensure that you screw the hose onto the thread marked 'OUT'.
- Twist the valve cap (1a) anticlockwise out of the valve (1b) (Fig. D).
- Place the end of the hose (8b) onto the valve and screw it on tightly clockwise (Fig. D).
Note: the valve pin (1c) of the outer chamber 1 must be in the closed position when doing so (Fig. E).
The valve pin of the inner chamber 2 must be in the open position.
After inflating the outer chamber, the valve pin of the inner chamber must also be set to the closed position.
-
Inflate the outer air chamber 10 a maximum of 1.0bar (15psi) with the air pump.
-
Stop inflating once the pressure gauge indicates 1.0bar, or 15psi.
-
Inflate the inner air chamber to a maximum of 1.0bar (15psi) with the air pump.
-
Stop inflating once the pressure gauge indicates 1.0bar, or 15psi.
-
Turn the end of the hose anticlockwise to remove it from the valve, and place the valve cap onto the valve.
-
Turn the valve cap clockwise to tighten it.
-
Check the operating pressure in the inner air chamber 2 and adjust it if necessary.
Deflating (Fig. E)
- Turn the valve cap anticlockwise.
- Remove the valve cap and press the valve pin (1c) down.
- Press the valve pin down and turn it 90^ in any direction until it stays in position. Leave it in this position until all the air has been released.
- After deflating, turn the valve by 90^ once again. The valve pin returns to its original position.
Mounting the fin (Fig. F)
- Insert the fin (6), with the rounded bottom end facing forward, into the fin groove (1d) on the underside of the board (1).
Note: make sure that you place the fin into the fin groove completely.
- Insert the pin (6a) into the fin groove to secure the fin.
Removing the fin
- Push in the pin (6a) to release it from the fin groove (1d).
- Pull the fin (6) out of the fin groove.
Inflating the seat (Fig. G)

WARNING!
- Avoid over-inflating the air chamber, otherwise you risk over-stretching or even splitting the seams.
- Use commercially available foot pumps or single action pump with the appropriate attachments and pressure gauge to inflate the seat (9).
- Do not use a compressor or compressed air canister to inflate the seat. This can lead to damage.
• Always inflate the seat completely. - Do not inflate the seat near sharp or pointed objects, or on rough or stony ground.
• Always fully inflate each air chamber.

IMPORTANT!
- Only open the valve to inflate and deflate. Otherwise it can become contaminated.
- The area around the valve must always be clean and dry.
- Ensure that sand or other contaminants do not get into the valve.
- Attach the adapter to the hose with adapters (8).
- Open the valve and inflate the seat with the appropriate adapter.
- Close the valve and press it in.
Proceed in the reverse order to deflate.
Installing the seat (Fig. G)
Fix the seat (9) to the board by fastening the four straps (9a) to the four rectangular rings (1e).
Use
Adjusting the paddle length
Before use, adjust the paddle length to your height. There are no fixed guidelines determining the correct length for any particular height.
We recommend following this formula to determine the correct length: height + 20cm (8in).
You can also determine the paddle length in the following way:
- Raise your non-dominant arm straight overhead.
- Use your other hand to place the paddle under the raised arm.
- Extend or shorten the paddle until it fits under the wrist of the raised arm.
Important: do not pull the paddle handle (3) out past the 'STOP' mark on the extension pole (4).
Otherwise, an appropriate level of stability cannot be guaranteed.
Attaching the leash to the product (Fig. J)
Attach the leash (12) to the back D-ring (1f).
-
Pull the loop (12b) of the leash through the D-ring.
-
Pull the ankle attachment (12a) through the loop of the leash until there is a knot on the D-ring.
Using the leash (Fig. K)

WARNING!
- Never attach the leash (12) to your ankle when you are using the product on stretches of flowing water (e.g. water with rapids and rivers).
- Never attach the leash to your ankle in offshore winds.
- When using the product in deep water, attach the leash to your ankle.
Transporting the product in the backpack
Note: the backpack is intended to be used exclusively for the transport and storage of the board and its accessories.
You can store or transport the product in the backpack (14) (Fig. H).
Disassemble the product in the reverse order to that shown in the 'Assembly' section. Ensure that the product is completely clean and dry.
- Lay the board (1) on a clean, flat, dry surface.
- Roll up the board and fasten it with the strap (11).
- Place the board, together with all other components, into the backpack.
Care, storage, repairs and maintenance
Care

WARNING!
Do not use harsh cleaning agents, brushes with metal or nylon bristles, or any sharp or metallic objects such as knives, or similar objects. Only use mild cleaning agents.
Clean the board after every use and only when the valve is closed.
- Remove the fin (6) from the board (1).
- Place the board on a clean, flat and dry surface.
- Clean the board and fin with fresh water and mild soap in order to remove any salt crystals, grains of sand and any other minor contamination.
- Wipe everything down with a soft, dry cloth.
- Let the board and fin dry completely afterwards.
Storage

WARNING!
Mould may form if the product is not stored properly.
- Store the product in a clean, dry, well-ventilated location away from direct sunlight, where it is not exposed to major temperature fluctuations.
-
When not in use for an extended period, we recommend that you disassemble the product completely and store it in the backpack provided.
-
If the product will not be in use for an extended period of time, completely open the zip fastener on the backpack to ensure the product is well ventilated.
- Store the product in a secure place, out of reach of children.
- Do not place heavy or sharp objects on the product.
• After an extended storage period, check the product for wear and tear, or signs of ageing.
Repairs

WARNING!
Before every use, check the board for pressure loss, holes or tears. If the board is leaking air, this could be due to a leaking valve, a defective valve, or a leak in the board itself. Under no circumstances should you attempt to repair larger damaged areas yourself. Minor damage can be repaired using the repair kit (13) supplied.
Valve
To check whether the valve is leaking or defective, proceed as follows:
- Turn the valve cap (1a) anticlockwise and remove it from the valve (1b).
- Ensure that there is no sand, or other foreign objects, in the valve.
- Fully inflate the board (1).
- Close the valve.
- Rinse the area of the board around the valve with soapy water.
If bubbles form around the valve, the valve must either be tightened or replaced.
• Tightening the valve (Fig. I)
- Turn the valve cap (1a) anticlockwise and remove it from the valve (1b).
- Place the valve key (10) on the valve until it fully grips the valve.
- Tighten the valve by turning the valve key clockwise.
- Close the valve with the valve cover and rinse the area of the board around the valve with soapy water.
If no more bubbles form, the valve is tightly sealed.
- Replacing the valve (Fig. I)
If bubbles are still forming around the valve, even after you've tightened it, it will need to be replaced.
- Turn the valve cap (1a) anticlockwise and remove it from the valve (1b).
- Release all of the air from the board.
- Place the valve key (10) on the valve until it fully grips the valve.
- Turn the valve key anticlockwise until the valve can be removed from the board.
- Remove the defective valve from the board.
- Insert a new valve into the board.
Note: you may order a replacement valve from the customer service address below. For a better seal, we recommend that you smear a little silicone grease or petroleum jelly around the valve.
-
Place the valve key onto the valve and tighten the valve by turning it clockwise.
-
Place the valve cover on the valve and tighten it by turning it clockwise.
Leaks
Only repair leaks in the board with a suitable adhesive. An adhesive is included in the package contents. Repairs with unsuitable adhesive can lead to further damage!
You can find suitable adhesives in specialist shops.
Note: small leaks (smaller than 2mm) can also be repaired with just the adhesive, by applying it directly to the leaky area. Larger leaks (larger than 2mm) can be repaired as follows:
- Completely release the air from the board.
- Thoroughly clean the area to be repaired.
- Dry the cleaned area.
- Cut a patch that is large enough to cover the damaged area and extends 1.5cm around it on all sides.
- Apply the adhesive to the leak and to the patch itself. Let the adhesive dry for approx. 2–4 minutes.
-
Firmly press the patch onto the leak with a soft object. Be sure to work on an even surface without any creases or folds. Using a rounded object, gently remove any air bubbles, moving outwards from the centre.
-
Let the adhesive dry for at least 12 hours after the repair.
-
After the drying process is complete, add more adhesive to the edges of the patch.
-
Let the adhesive dry for approx. 4 hours. Important: before taking the board into the water after repairing it, test the repaired area to check that it is sealed. Under no circumstances should you attempt to repair very large damaged areas yourself. Take the board to a specialist repair shop.
Maintenance
Check regularly that the air pump is well lubricated before and during operation. In order to lubricate it, open the upper cover and apply a thin coat of oil or grease to the seals and the line.
Disposal
Dispose of the article and the packaging materials in accordance with current local regulations. Packaging materials such as foil bags are not suitable to be given to children. Keep the packaging materials out of the reach of children.

Dispose of the products and the packaging in an environmentally friendly manner.

The recycling code is used to identify various materials for recycling.
symbol – which is meant to reflect the recycling cycle – and a number which identifies the material.
IAN: 404410_2107
GB Service Great Britain
Tel.: 0800 404 7657
E-Mail: deltasport@lidl.co.uk
DELTA-SPORT HANDELSKONTOR GMBH
Wragekamp 6 • DE-22397 Hamburg
GERMANY

02/2022