FTRD22LASS - Oven Furrion - Free user manual and instructions
Find the device manual for free FTRD22LASS Furrion in PDF.
| Product Type | Built-in Electric Oven |
| Brand | Furrion |
| Model | FTRD22LASS |
| Category | Oven |
| Power Supply | 120 V AC, 60 Hz, 1400 W |
| Interior Volume | 57.6 L |
| Dimensions (W x H x D) | 628 mm x 532 mm x 589 mm (24¾ in x 21 in x 23³⁄₁₆ in) |
| Material | Stainless steel, glass |
| Number of racks | 2 adjustable racks + 1 drip tray |
| Cooking modes | Conventional (top heat), Convection, Defrost |
| Interior lighting | Halogen bulb 25 W, type G9 (300 °C max.) |
| Timer | 24 h with alarm (30 s or 2 min) |
| Clock | 12-hour format |
| Safety | Grounding mandatory; hot surfaces indicated |
| Cleaning | Soft cloth and soapy water; no abrasive cleaners |
| Installation | Built-in; cabinet cutout; secured by 4 screws |
| Replaceable parts | Oven bulb (G9 25W) and control knob LED indicator |
| Compliance | CSA C22.2 No. 61-16, UL 858 |
| Warranty | See included brochure |
Frequently Asked Questions - FTRD22LASS Furrion
User questions about FTRD22LASS Furrion
0 question about this device. Answer the ones you know or ask your own.
Ask a new question about this device
Download the instructions for your Oven in PDF format for free! Find your manual FTRD22LASS - Furrion and take your electronic device back in hand. On this page are published all the documents necessary for the use of your device. FTRD22LASS by Furrion.
USER MANUAL FTRD22LASS Furrion
natural_image
Line drawing of a standard oven with two control knobs and a door (no text or symbols)Thank you for purchasing this Furrion® product. Before operating your new appliance, please read these instructions carefully. This instruction manual contains information for safe use, installation and maintenance of the appliance.
Please keep this instruction manual in a safe place for future reference. This will ensure safe use and reduce the risk of injury. Be sure to pass on this manual to new owners of this appliance.
The manufacturer does not accept responsibility for any damages due to not observing these instructions.
Table of Contents
Table of Contents....2
Explanation of Symbols 3
Important Safety Instructions....3
General Safety Warnings 3
Oven Safety Warnings 4
Product Overview 5
Installation 5
Display and Buttons....5
What's in the Box....5
Cabinet Cutout Instructions....6
Oven Installation (without Cooktop) 6
Oven Installation (with Cooktop) 6
Electrical Connection 7
Operation....7
Using Your Oven....7
Conventional Cooking....7
Fan Cooking....7
Defrosting....7
Baking Cakes 8
Cooking Fish and Meat 8
Cooking Advice 8
Cleaning and Maintenance 8
The Oven Door....9
Replacing an Oven Light 10
Replacing the Control Knob LED 10
Storage 11
Troubleshooting....11
Specification 11
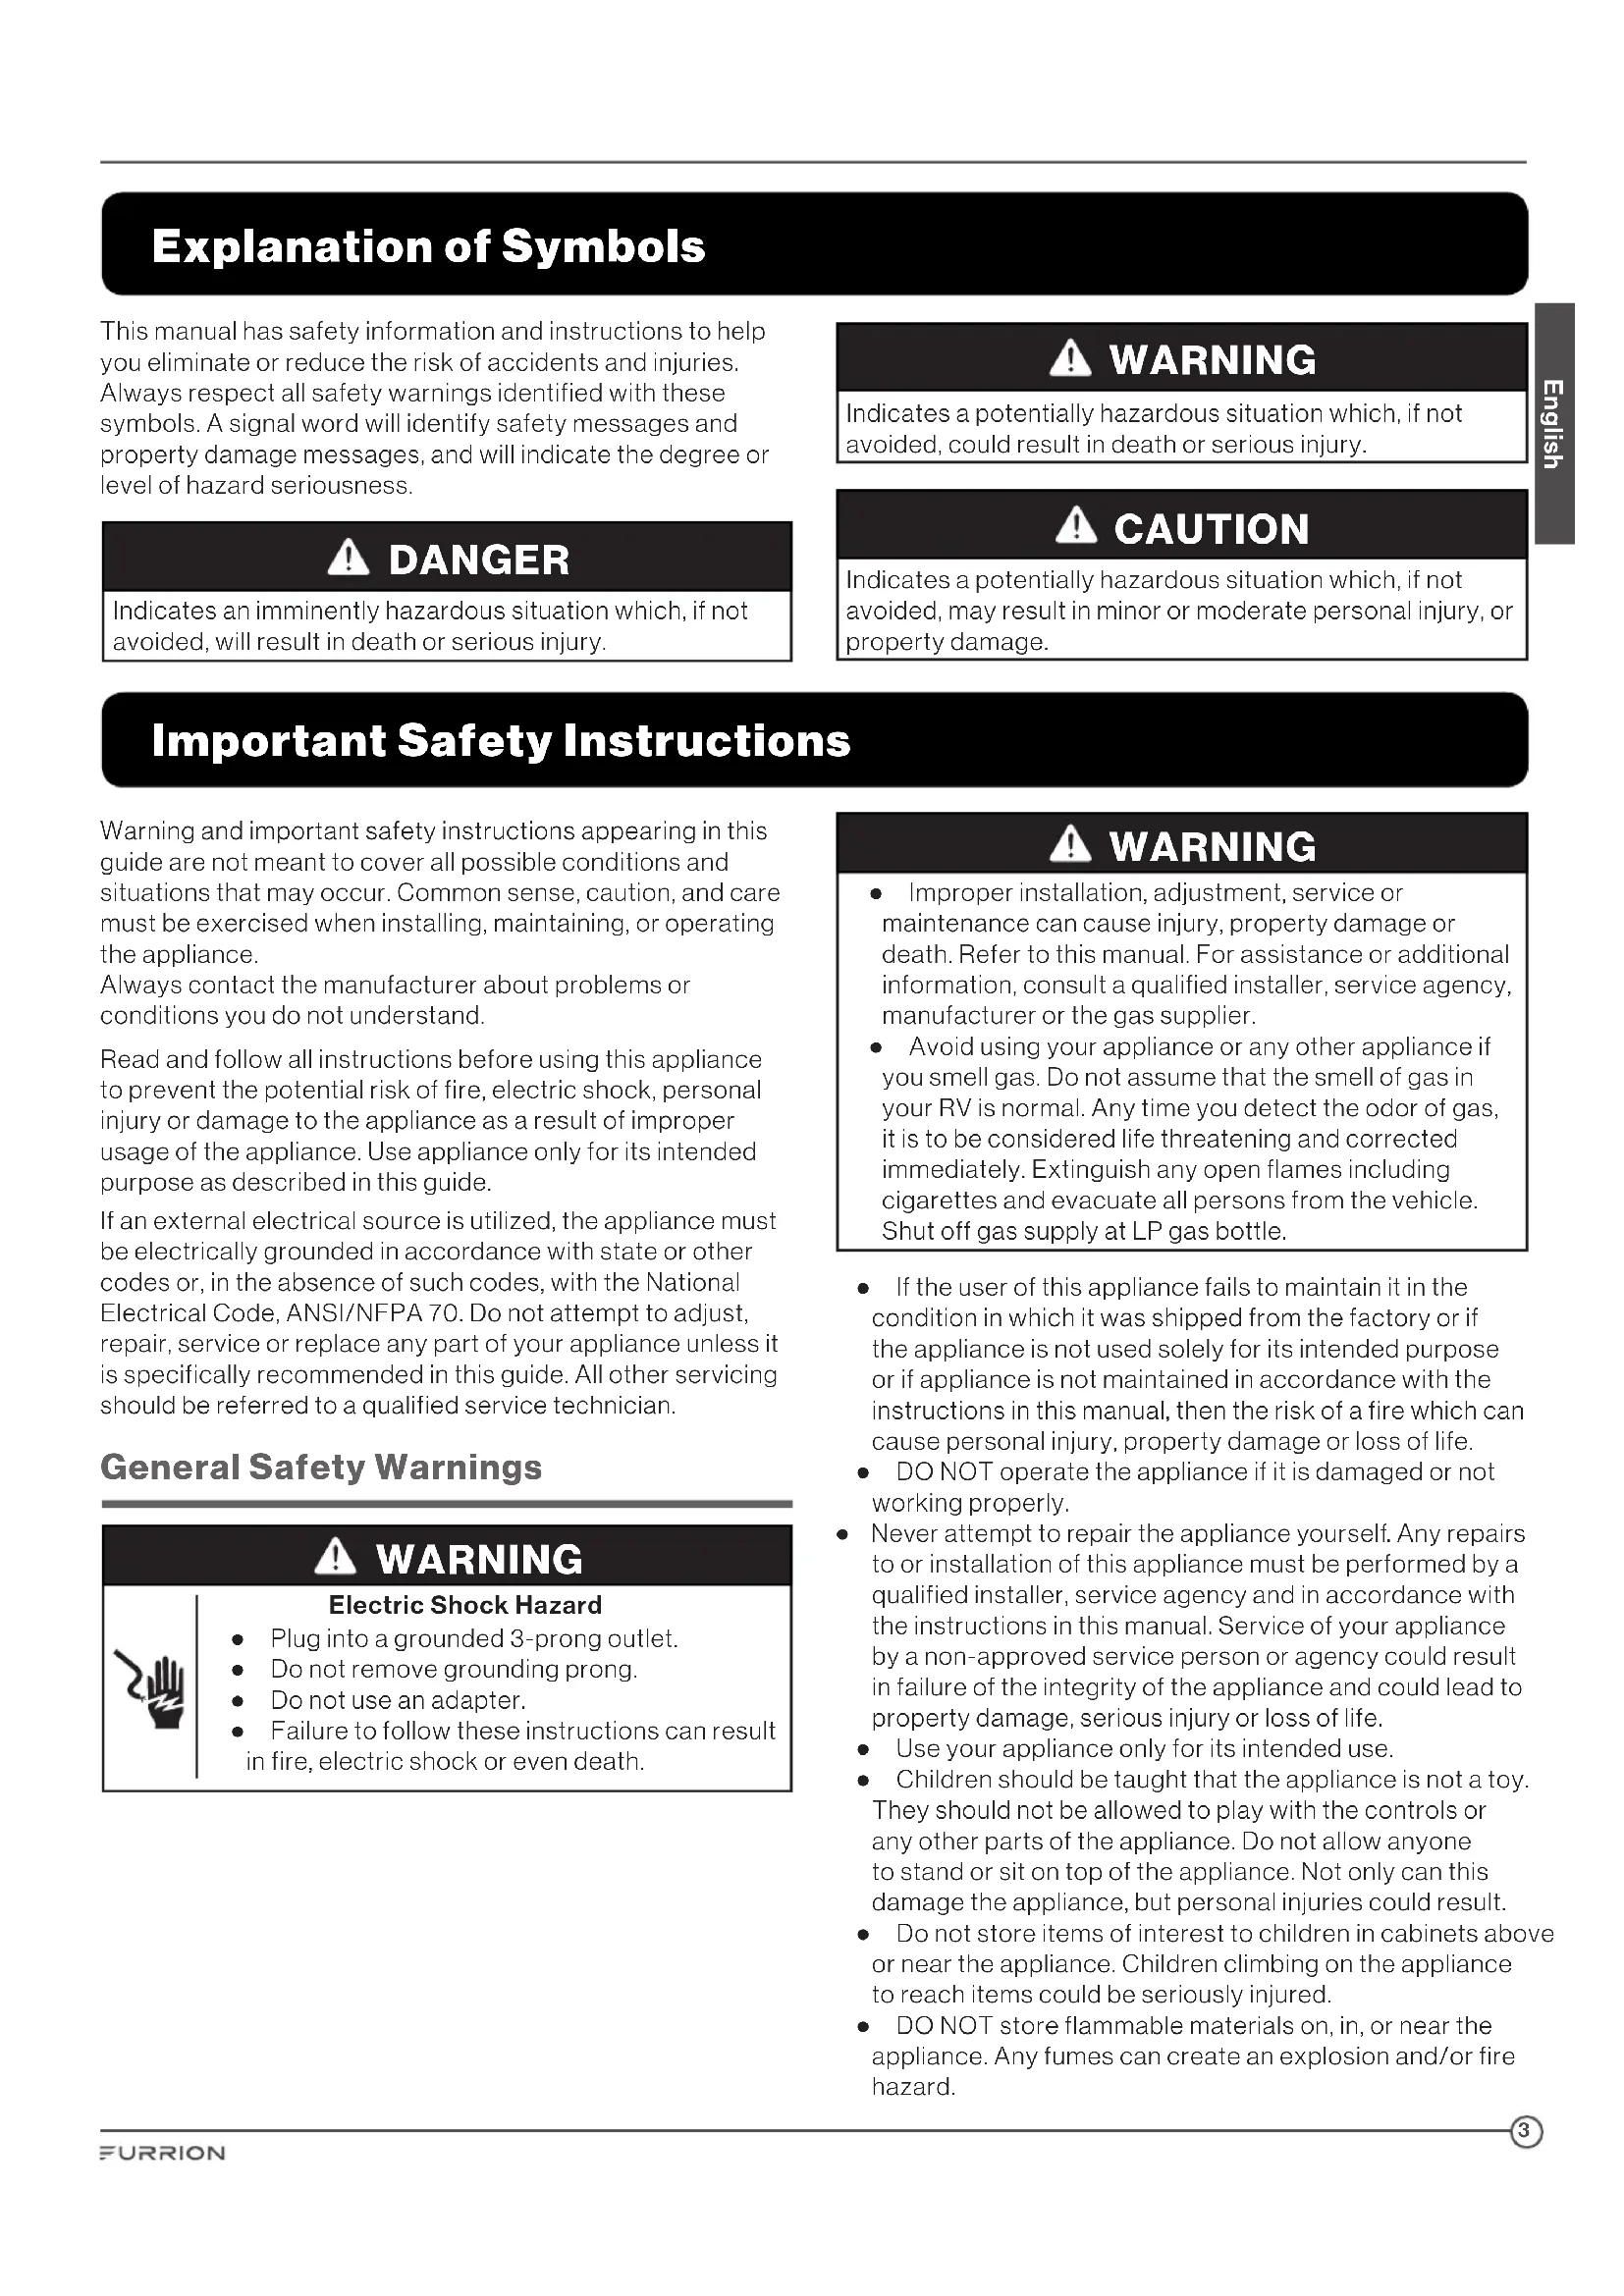
Explanation of Symbols
This manual has safety information and instructions to help you eliminate or reduce the risk of accidents and injuries. Always respect all safety warnings identified with these symbols. A signal word will identify safety messages and property damage messages, and will indicate the degree or level of hazard seriousness.

DANGER
Indicates an imminently hazardous situation which, if not avoided, will result in death or serious injury.

WARNING
Indicates a potentially hazardous situation which, if not avoided, could result in death or serious injury.

CAUTION
Indicates a potentially hazardous situation which, if not avoided, may result in minor or moderate personal injury, or property damage.
Important Safety Instructions
Warning and important safety instructions appearing in this guide are not meant to cover all possible conditions and situations that may occur. Common sense, caution, and care must be exercised when installing, maintaining, or operating the appliance.
Always contact the manufacturer about problems or conditions you do not understand.
Read and follow all instructions before using this appliance to prevent the potential risk of fire, electric shock, personal injury or damage to the appliance as a result of improper usage of the appliance. Use appliance only for its intended purpose as described in this guide.
If an external electrical source is utilized, the appliance must be electrically grounded in accordance with state or other codes or, in the absence of such codes, with the National Electrical Code, ANSI/NFPA 70. Do not attempt to adjust, repair, service or replace any part of your appliance unless it is specifically recommended in this guide. All other servicing should be referred to a qualified service technician.
General Safety Warnings

WARNING
Electric Shock Hazard

- Plug into a grounded 3-prong outlet.
- Do not remove grounding prong.
- Do not use an adapter.
- Failure to follow these instructions can result in fire, electric shock or even death.

WARNING
- Improper installation, adjustment, service or maintenance can cause injury, property damage or death. Refer to this manual. For assistance or additional information, consult a qualified installer, service agency, manufacturer or the gas supplier.
-
Avoid using your appliance or any other appliance if you smell gas. Do not assume that the smell of gas in your RV is normal. Any time you detect the odor of gas, it is to be considered life threatening and corrected immediately. Extinguish any open flames including cigarettes and evacuate all persons from the vehicle. Shut off gas supply at LP gas bottle.
-
If the user of this appliance fails to maintain it in the condition in which it was shipped from the factory or if the appliance is not used solely for its intended purpose or if appliance is not maintained in accordance with the instructions in this manual, then the risk of a fire which can cause personal injury, property damage or loss of life.
- DO NOT operate the appliance if it is damaged or not working properly.
- Never attempt to repair the appliance yourself. Any repairs to or installation of this appliance must be performed by a qualified installer, service agency and in accordance with the instructions in this manual. Service of your appliance by a non-approved service person or agency could result in failure of the integrity of the appliance and could lead to property damage, serious injury or loss of life.
- Use your appliance only for its intended use.
- Children should be taught that the appliance is not a toy. They should not be allowed to play with the controls or any other parts of the appliance. Do not allow anyone to stand or sit on top of the appliance. Not only can this damage the appliance, but personal injuries could result.
- Do not store items of interest to children in cabinets above or near the appliance. Children climbing on the appliance to reach items could be seriously injured.
-
DO NOT store flammable materials on, in, or near the appliance. Any fumes can create an explosion and/or fire hazard.
-
Do not wear loose fitting clothing or long-hanging sleeved clothing while using the appliance.
- Use only dry potholders to remove hot utensils. Using damp potholders on hot surfaces could result in burns to hands. Do not use a towel or bulky cloth for a pot holder.
- Never heat an unopened container. Pressure build-up within the container can cause it to explode.
- Do not use water on grease fires. Never pick-up a flaming pan. Smother a flaming pan with a lid or flat pan. Flaming grease outside the pan can be extinguished with baking soda or a multipurpose dry chemical fire extinguisher.
- This appliance is intended to be built-in to a cabinet structure only and is not intended for attachment to the building structure.
- DO NOT use this appliance for warming or heating vehicle.
• DO NOT use an extension cord to connect this appliance.
If the power supply cord is too short, have a qualified electrician or serviceman install an outlet near the appliance.
Oven Safety Warnings

WARNING
FOOD POISONING HAZARD
Do not let food sit in oven more than one hour before or after cooking, doing so can result in food Poisoning sickness.
- Keep your arms and face away from being directly above the cooking area while operating the appliance.
• Always cook with the oven door closed. - Use Care When Opening Door - Let hot air or steam escape before removing or replacing food.
- DO NOT TOUCH HEATING ELEMENTS OR INTERIOR SURFACES OF OVEN – Heating elements may be hot even though they are dark in color. Interior surfaces of an oven become hot enough to cause burns. During and after use, do not touch, or let clothing or other flammable materials contact heating elements or interior surfaces of oven until they have had sufficient time to cool. Other surfaces of the appliance may become hot enough to cause burns – among these surfaces are (identification of surfaces – for example, oven vent openings and surfaces near these openings, oven doors, and windows of oven doors).
- DO NOT touch the outer surface of the oven door or the oven vent while the oven is in use. These areas may become hot enough to cause burns. During and after use, do not let clothing or other flammable materials contact these areas until they have had sufficient time to cool.
• DO NOT use oven as a storage area.
- Always place oven racks in desired location while oven is cool. If rack must be moved while oven is hot, do not let potholder contact hot heating element in oven.
- Use care when opening the oven door, let hot air or steam escape before removing or replacing food.
- Do not cover the oven vent openings whenever oven is being used. Covering the vents restricts the air flow and can cause damage or explosion to the product and potentially affect your cooking results.
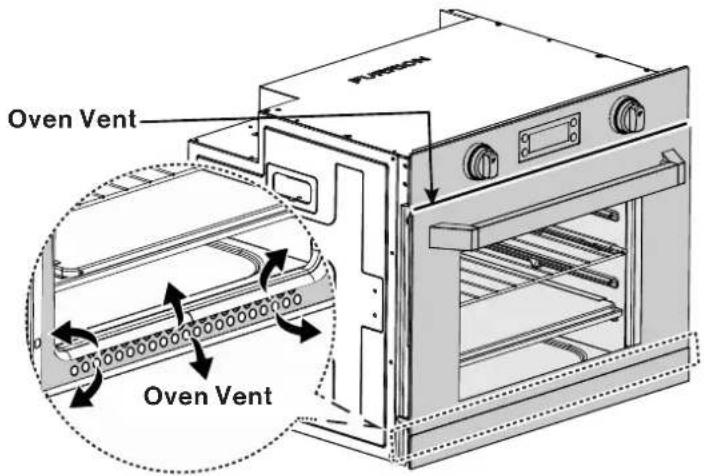
text_image
Oven Vent Oven VentGrounding Instructions
This appliance must be grounded. In the event of an electrical fault, grounding reduces the risk of electric shock by providing a short circuit path for the electric current. This appliance is equipped with a cord having a grounding wire with a grounding plug. The plug must be plugged into an outlet that is properly installed and grounded.

WARNING
Improper use of the grounding plug can result in a risk of electric shock.
Consult a qualified electrician or serviceman if the grounding instructions are not completely understood or if doubt exists as to whether the appliance is properly grounded.
- If you have any questions about the grounding or electrical instructions, consult a qualified electrician or service person.
- Neither Furrion nor the dealer can accept any liability for damage to the oven or personal injury resulting from failure to observe the electrical connection procedures.
Product Overview
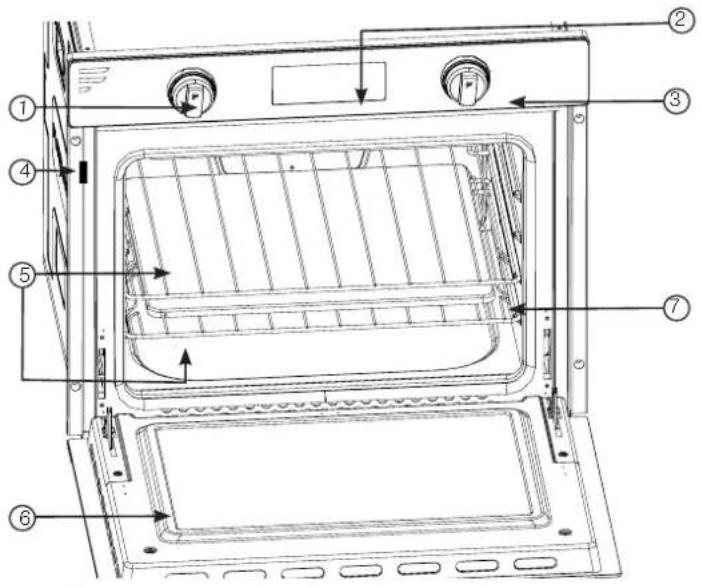
text_image
Technical diagram of an oven with numbered parts for identification and assembly referenceItem Description
| 1 | Oven Control Knob |
| 2 | LED Display |
| 3 | Oven Thermostat Control Knob |
| 4 | Product Rating Label |
| 5 | Adjustable Oven Rack |
| 6 | Oven Door |
| 7 | Drip Tray |
Display and Buttons

text_image
88:88Display or Buttons Description
| OFF | Neutral position |
| The oven light will stay on even without any cooking function. | |
| The top central heating element comes on. | |
| The top central heat element and fan come on. This combination of features increases the effectiveness of the unidirectional thermal radiation of the heating elements through forced circulation of the air throughout the oven. This helps prevent food from burning on the surface, allowing the heat to penetrate right into the food. | |
| The defrost function uses the oven fan to circulate air at room temperature around the cavity, enabling you to defrost food more quickly. | |
| Will be lit when the heat element is on. When the oven cavity temperature is up to the setting requirement, the icon light will be off. | |
| Will be lit when timer program setting is working, after the setting is finished, it will be off. | |
| Will be lit when the timer is set. Remains lit while alarm sounds. Alarm continues for 30 seconds before shutting off. Alarm icon will remain lit until manually pressing the "TIMER ON/OFF" button. | |
| Press to increase/decrease the Clock/Timer setting. | |
| TIMER ON OFF | Press to turn on/off the timer display. |
| Clock Setting:The clock is with 12 hours format. Press once to enter the clock setting, the ☑on will flash on screen. Press +/- button to adjust the clock to desired setting. Press TIMER ON/OFF button to finish the clock setting. Timer Setting:The timer is with 24 hours format. Press the Clock button twice to enter the Timer Setting, the ☑on will flash on screen. Press +/- button to adjust the timer to desired setting. Press TIMER ON/OFF to finish the timer setting. |
Installation
WARNING
Installation of this appliance must be made in accordance with the instructions provided in this manual. No agent, representative or employee of Furrion or other persons have the authority to change, modify or waive any provision of the instructions contained in this manual.
What's in the Box
Make sure you have all the following items included in the packaging. If any item is damaged or missing, contact your dealer.
Electric Oven x 1
- Racks x 2
- Drip Tray x1
• Instruction Manual x 1
- Warranty Leaflet x 1
NOTE: Do not put the Drip Tray into the oven body while the recreational vehicle is moving.
Cabinet Cutout Instructions
- For proper operation of your cooking appliance, the cabinet must be properly constructed and squared with respect to the counter top and the cabinet face.
- For proper operation of these units, the cabinet must be level and the bottom of the appliance must be supported.
NOTE: When use this appliance together with Furrion gas cooktop or induction cooktop, please ensure the cabinet cutout must be located with respect to the minimum clearance to combustible materials (minimum clearances from combustible materials: 2 inches from the sides and 30 inches from the top if a cooktop is installed). When planning the location, consider curtains or other combustible materials installed around the oven. The minimum distance between the floor and the bottom of the cutout opening is Min. 9¼" (235mm).
Oven without Cooktop (Fig. 1)
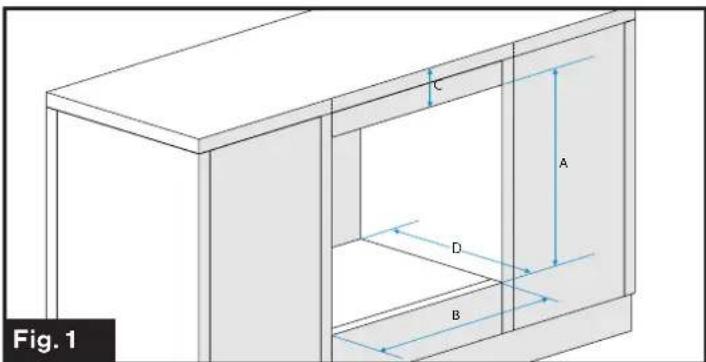
text_image
Fig. 1 C A D B| ABCD | |||
| 20 12 "525mm | 23 12 "597mm | Min. 4"101mm | Min. 16 18 "522mm |
Oven with Gas Cooktop (Fig. 2)
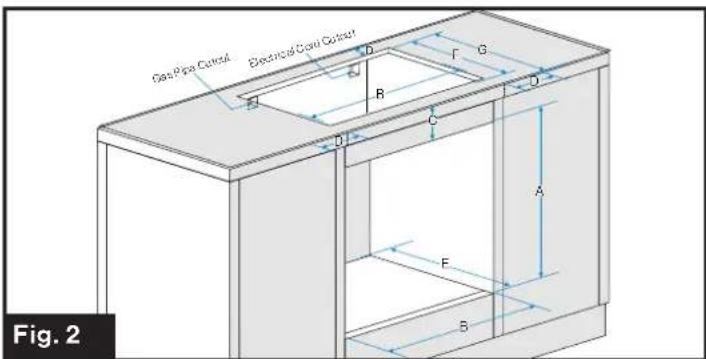
text_image
Gas Pipe Cutout Electrical/Cool Cutout Fig. 2| ABCDEFG | ||||||
| 20 12 "525mm | 23 12 "597mm | Min. 4"101mm | Min. 2"51mm | Min. 16 18 "522mm | 14 38 "365mm | 16 12 "419mm |
Oven with Induction Cooktop (Fig. 3)
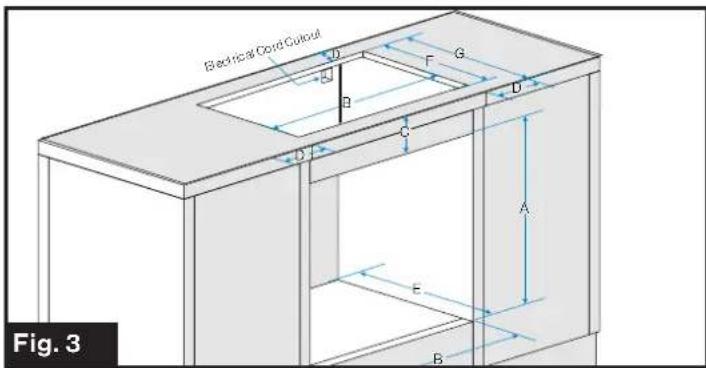
text_image
Electrical Cord Cutout D G F B C D A E B Fig. 3| ABC | DE | F | G | ||
| 20 12 *525mm | 23 12 "597mm | Min. 4"101mm | Min. 2"51mm | Min. 16 14 "522mm | 14 14 *362mm |
Oven Installation (without Cooktop)
When the cabinet has been prepared according to the dimensions given.
- Remove the oven from its packaging carefully and discard the plastic and foam packaging.
- Slide the oven into the cabinet opening by grasping the two built in handles on each side of the oven. Do not use the handle on the door for lifting the oven. (Fig. 4)
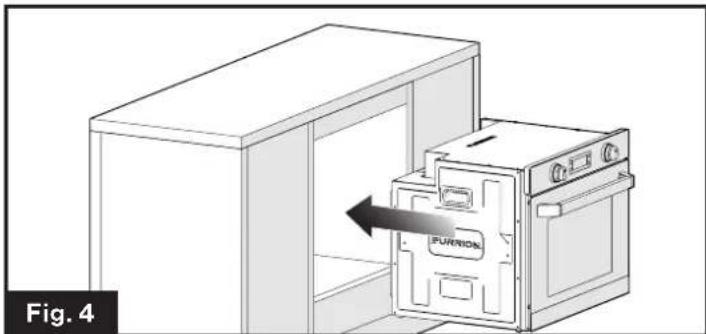
natural_image
Diagram of a kitchen oven with an open door labeled 'FURNION' and an arrow indicating direction, no text or symbols present.- Verify the oven is level from side to side and front to rear.
- Open the oven door and securely fasten the oven in place with four screws (Not provided). (Fig. 5)
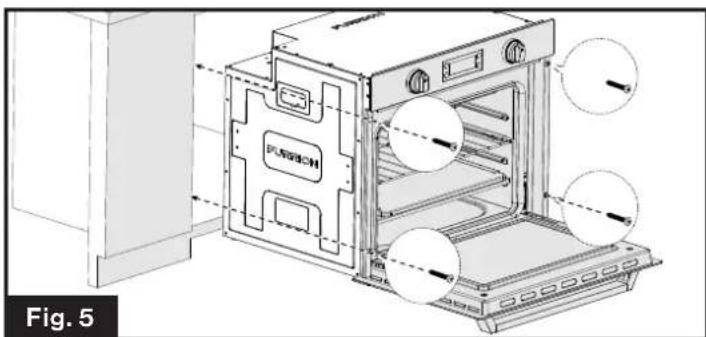
natural_image
Technical line drawing of an oven with labeled components and airflow indicators (no text or symbols beyond labels)Oven Installation (with Cooktop)
NOTE: This oven is designed to be able to be used with a Furrion gas or induction cooktop,, please refer to corresponding cooktop instruction manual on how to construct the cabinet when a cooktop is installed.
Cooktop Installation (Optional) (Fig. 6)
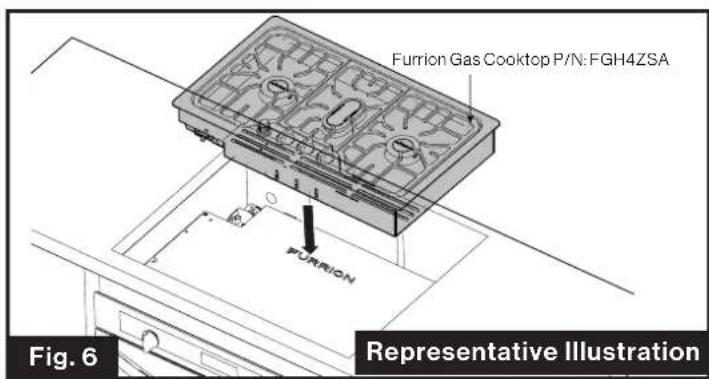
text_image
Furrion Gas Cooktop P/N: FGH4ZSA FURION Fig. 6 Representative IllustrationCooktop Installation (Optional) (Fig. 7)
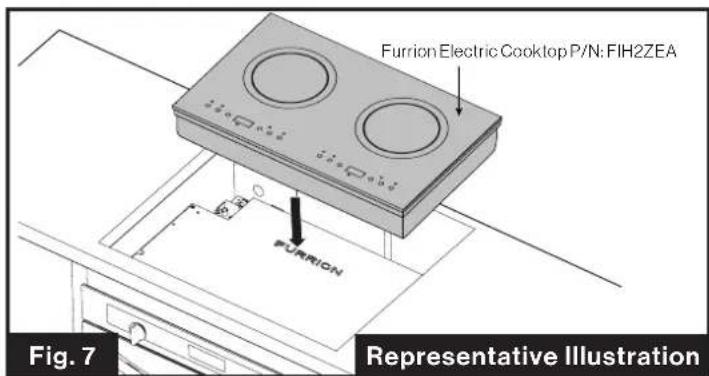
text_image
Furrion Electric Cooktop P/N: FIH2ZEA FURION Fig. 7 Representative IllustrationElectrical Connection
- Feed the electrical cables through the Electrical Cutout on the upper right rear corner of the cabinet.
- Plug the power cord from the induction cooktop into a dedicated 15 amp electrical outlet.
- See next "Wiring Diagram" section for detail.
Wiring Diagram (Fig. 8)
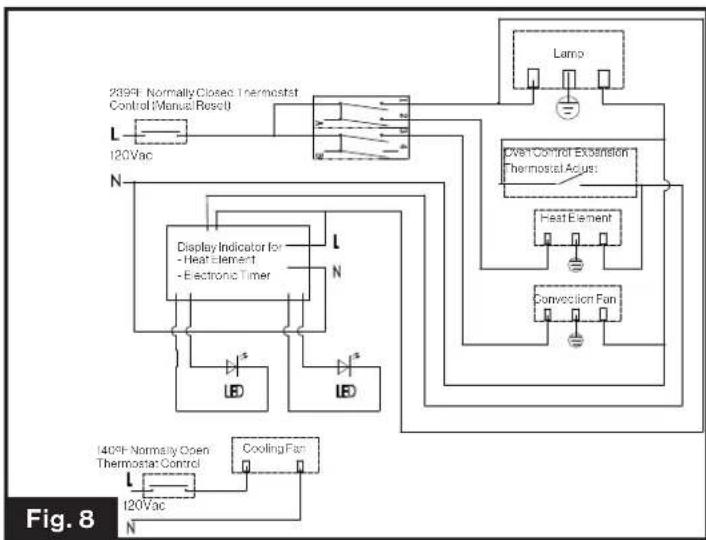
flowchart
graph TD
    A["235FI Normally Closed Thermostat Control Manual Resol"] --> B["L"]
    B --> C["120Vac"]
    C --> D["N"]
    D --> E["Display Indicator for - Heat Element - Electronic Timer"]
    E --> F["LB"]
    E --> G["LB"]
    F --> H["L"]
    G --> I["LB"]
    J["Lamp"] --> K["Open Control Extension Thermostat Acus"]
    K --> L["Heat Element"]
    L --> M["Convection Fan"]
    N["140°F Normally Open Thermostat Control"] --> O["L"]
    O --> P["120Vac"]
    P --> Q["N"]
    Q --> R["Cooling Fan"]
Operation
IMPORTANT: Before cooking for the first time, carefully wash the oven accessories.
Once the oven has been installed:
1. Set the thermostat knob to max 475 °F (246°C).
2. Switch the oven function control knob to top central cooking position ☐
3. Allow the oven to run empty for approximately 45 minutes.
4. Open the window for ventilation.
NOTE: During this time, an unpleasant odor may be emitted. This is normal, and is caused by residues of manufacturing. Repeat the procedure for top central cooking and fan function once completed, let the oven cool down and clean the oven cavity with a soft cloth soaked in warm soapy water.
Using Your Oven
- Stand clear when opening the drop down oven door. Always hold the oven door handle until it is fully opened.
- The oven has four shelf levels. The shelf positions are counted from the bottom of the oven.
- Do not place cookware directly on the oven base.
Conventional Cooking
Turn the oven function control knob to the position and set thermostat to the desired temperature.
Fan Cooking
Turn the oven function control knob to the position and set thermostat to the desired temperature. The fan will circulate heated air into the oven. If you are cooking more than one dish in the fan oven, place the shelves on the first and third position from the bottom. If you are cooking only one dish in the fan oven, use the lower position, as this will give you better results.
Defrosting
Turn the oven function control knob to the position and set thermostat to 0 position. The oven fan operates without heat and circulates the air, at room temperature, inside the oven.
Cooking Advice
The oven offers a wide range of alternatives which allow you to cook any type of food in the best possible way. With time you will learn to make the best use of this versatile cooking appliance and the following directions are only a guideline which may be varied according to your own personal experience.
Using the Grill
Important: always use the grill with the oven door closed.
For the "Conventional Cooking" mode use the rack inside the baking tray under the centre of the grill and place it on the third or fourth rack from the bottom.
When using this mode, we recommend you set the temperature to the highest setting.
For the "Fan Cooking" mode place the tray with the drip tray on the second or third rack from the bottom. (See the rack position as below.)
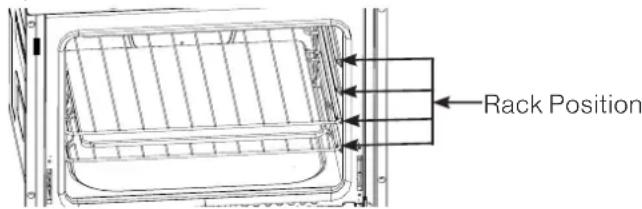
text_image
Rack PositionBaking Cakes
When baking cakes, always place in the oven after it has been preheated (about 15 minutes). The temperature is normally around 350^ F ( 176^ C). Do not open the door while the cake is baking in order to prevent it from dropping.
In General
| Pastry is too dry | Increase the temperature by 50°F (10°C) and reduce the cooking time. |
| Pastry dropped | Use less liquid or lower the temperature by 50°F (10°C). |
| Pastry is too dark on top | Place it on a lower rack, lower the temperature, and increase the cooking time. |
| Cooked well on the inside but sticky on the outside | Use less liquid, lower the temperature, and increase the cooking time. |
| The pastry sticks to the pan | Grease the pan well and sprinkle it with a dusting of flour or use greaseproof paper. |
Cooking Fish and Meat
When cooking white meat, fowl and fish, use temperature settings from 350^ F ( 176^ C) to 425^ F ( 218^ C).
For red meat that should be well done on the outside while tender and juicy in the inside, it is a good idea to start with a high temperature setting “400°F (205°C)\~425°F (218°C)” for a short time, then turn the oven down afterwards.
In general, the larger the roast, the lower the temperature setting. Place the meat on the center of the rack and place the dripping pan beneath to catch the fat.
Make sure that the drip tray is placed in the center of the oven. If you would like to increase the amount of heat from below, use the low rack heights. For savory roasts (especially duck and wild game), dress the meat with lard or bacon on the top.
Cleaning and Maintenance
- Make sure all controls are OFF and the oven or cooktop is cool before cleaning.
- Make sure that all oven surfaces are cool before cleaning or disassembling oven.
- DO NOT use oven cleaners, bleach, or rust removers on the oven.
- DO NOT obstruct the flow of combustion and ventilation air.
- Clean oven with oven cleaner only. Follow directions on the container.
- Never use a wire brush or metallic item for cleaning burner ports or orifices. Brush may "shed" bristles that may lodge in the orifice or burner ports and cause a fire or explosion.
- Clean all surfaces as soon as possible after boilovers or spillovers.
-
DO NOT use steel wool, or abrasive cleaners, or acid type cleaners such as chlorine bleach on your cooktop or drip tray systems. They will damage your oven or cooktop. Use only non-abrasive plastic scrubbing pads.
-
DO NOT allow foods containing acids (such as lemons or tomato juice, or vinegar) to remain on porcelain or painted surfaces. Acids may remove the glossy finish. Wipe up egg spills when cooktop is cool.
- DO NOT wash warm porcelain surfaces. Allow these areas to cool before cleaning. You could burn yourself or the porcelain could crack.
- Pitting and discoloration will result if spills are allowed to remain for any length of time on stainless steel.
- DO NOT allow spillovers to remain on the burner caps. The caps could become permanently stained.
- When cleaning around the burners use care to prevent damage to the electrode (if so equipped). If a sponge or cloth should catch the metal igniter electrode, it could damage or break the electrode. If this occurs the burner will not light.
The Oven Door
WARNING
When removing the door:
- Make sure oven is cool and power to the oven has been turned off before removing the door. Failure to do so could result in electrical shock or burns.
- Do not place excessive weight on an open oven door or stand on an open oven door as, in some cases, it could cause the range to tip over, break or damage the door to the extent that the range would be unsafe to use, or cause serious injury to the user.
- The oven door is heavy and fragile. Use both hands to remove the oven door. The door front is glass. Handle carefully to avoid breaking.
- Grasp only the sides of the oven door. Do not grasp the handle as it may swing in your hand and cause damage or injury.
- Failure to grasp the oven door firmly and properly could result in personal injury or product damage.
-
To avoid injury from hinge bracket snapping closed, be sure that both levers are securely in place before removing door. Also, do not force door open or closed - the hinge could be damaged and injury could result.
-
Be sure to read the above WARNING before attempting to remove oven door.
- Open the door all the way. (Fig. 9)
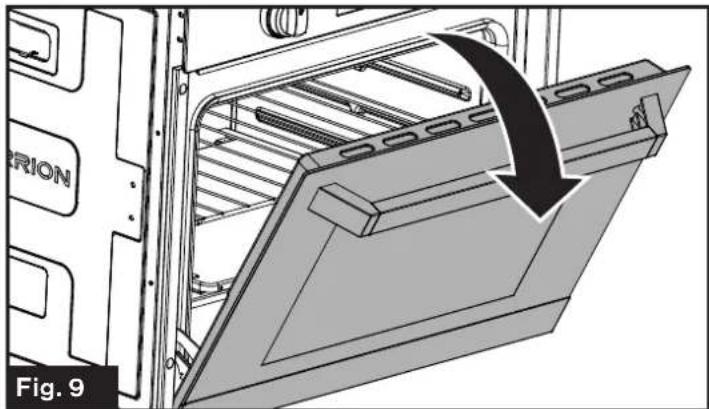
natural_image
Technical diagram of an oven with a curved arrow indicating motion or force, labeled 'Fig. 9' (no text or symbols on the diagram itself)- Flip levers on hinges (one on each side) toward you. (Fig. 10)
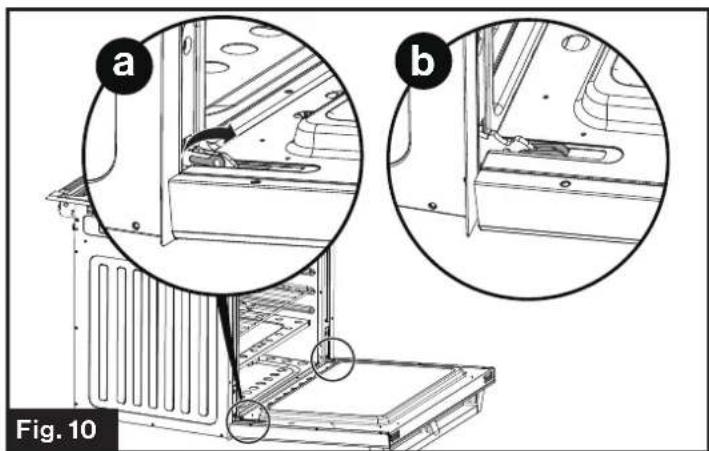
natural_image
Technical diagram of a refrigerator interior showing two views (a and b) with mechanical components and structural details, labeled Fig. 10 (no text or symbols on the diagram itself)- Close the door until it stops. (Fig. 11)
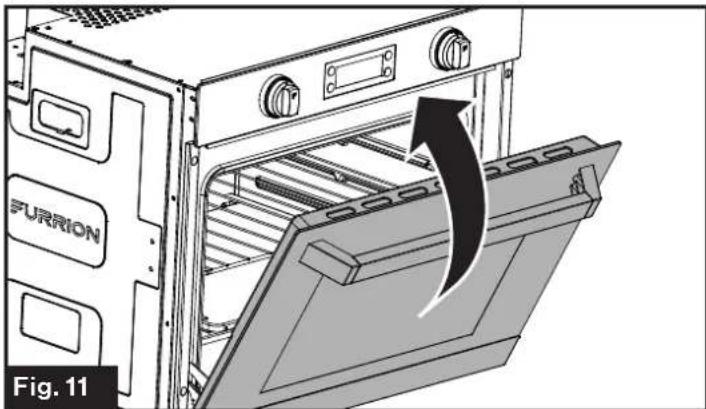
natural_image
Diagram of an oven with a furrion unit and a door, showing internal structure and airflow direction (no text or symbols)- Holding the door firmly on both sides and using both hands, pull the door straight out of the hinge slots. (Fig. 12, Fig. 13 and Fig. 14) Hold firmly, the door is heavy.
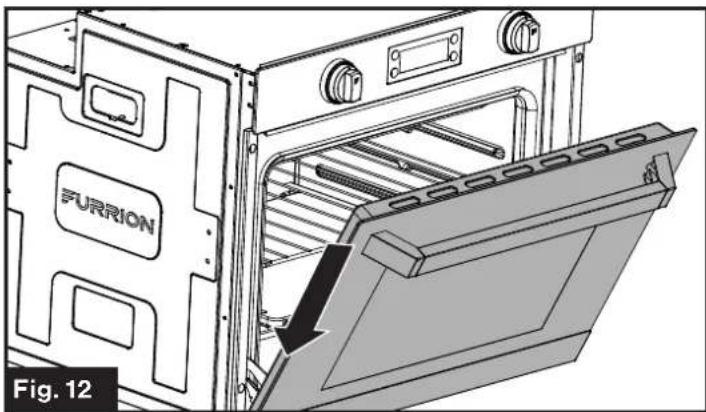
natural_image
Technical illustration of an oven with labeled components, showing internal structure and a highlighted opening (no text or symbols beyond branding)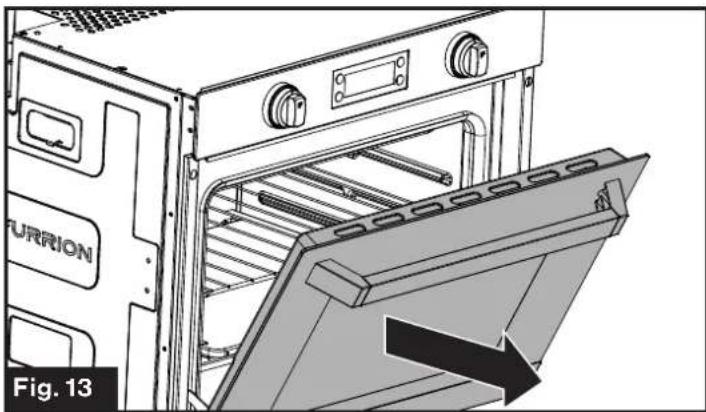
natural_image
Technical illustration of an oven with a door panel and label 'FURRION', showing internal structure without any text or symbols.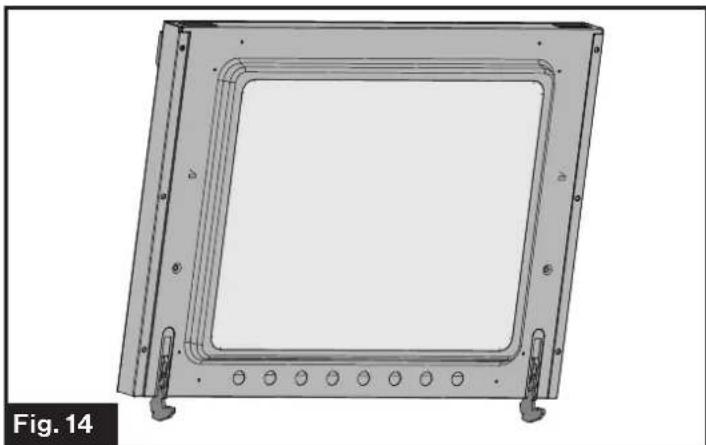
natural_image
Technical drawing of a square frame with mounting holes and internal channels (no text or symbols)- Place the door on a flat surface that is protected so the door does not damage the material of the surface.
Replacing an Oven Light
- Disconnect the oven from the power supply by means of the switch used to connect the appliance to the electrical mains, or unplug the appliance if the plug is accessible.
- Remove the glass cover of the lamp-holder. (Fig. 15)
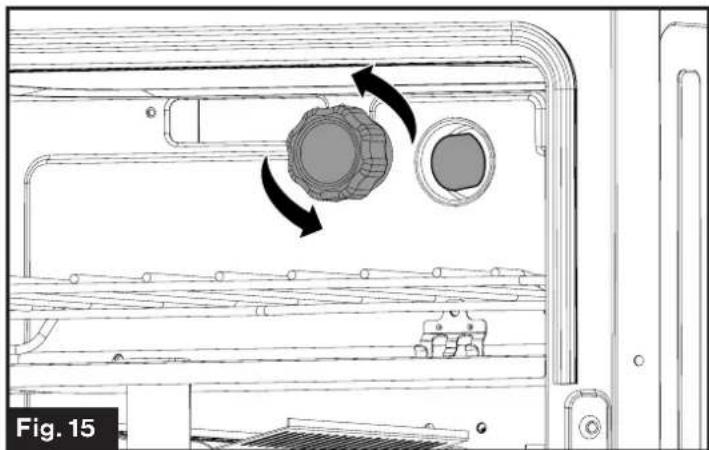
natural_image
Technical line drawing of a mechanical component with two circular features and directional arrows indicating motion (no text or symbols)-
Remove the lamp and replace with a lamp resistant to high temperatures (572°F) with the following characteristics:
-
Voltage: 120V
- Wattage: 25W
- Type: G9
-
Lamp Type: Halogen
-
Replace the glass cover.
-
Reconnect the power to the oven.
To reorder the Furrion oven light bulb replacement, please call Furrion service for assistance.
Replacing the Control Knob LED

WARNING
Any repairs to or installation of this appliance must be performed by a qualified installer, service agency and in accordance with the instructions in this manual.
-
Disconnect the oven from the power supply by means of the switch used to connect the appliance to the electrical mains, or unplug the appliance if the plug is accessible.
-
Grasp and pull on the control knob with the broken LED light. (Fig. 16)
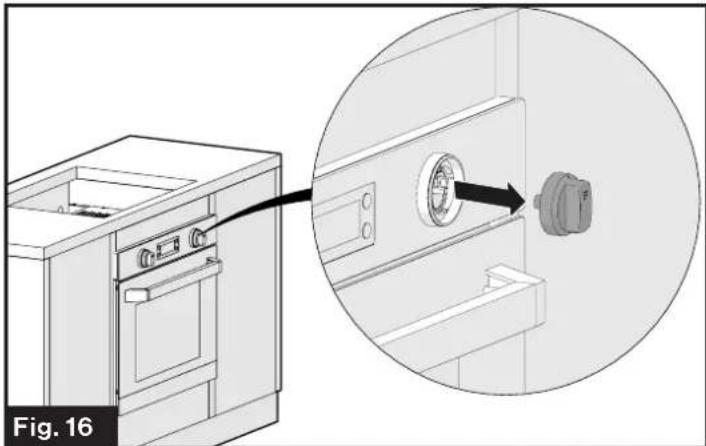
natural_image
Technical illustration of a kitchen appliance with a magnified inset showing a close-up of the interior (no text or symbols present)- Remove the two screws holding the LED light using a Phillips screwdriver. (Fig. 17)

natural_image
Technical illustration of a kitchen appliance with a close-up view showing internal components connected to a wall-mounted fixture (no text or symbols present)- Remove the LED assembly and disconnect the wire from the base of the LED assembly. (Fig. 18)
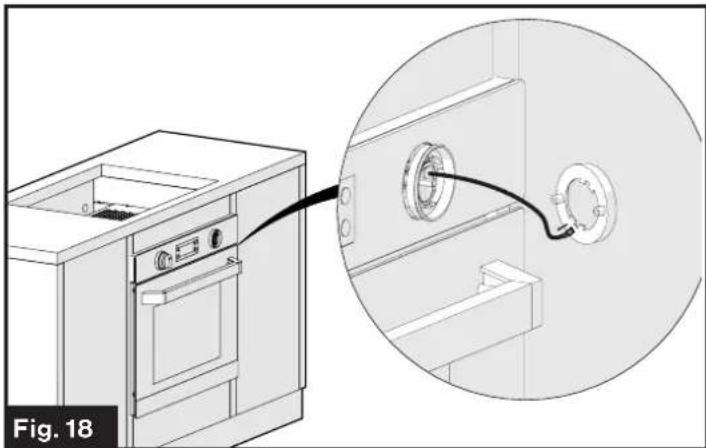
natural_image
Technical illustration of a kitchen appliance connected to a wall-mounted pipe fitting (no text or symbols present)- Plug the wire harness connector into the new LED assembly.
- Reattach the LED assembly to the console with the 2 screws removed in step 3. Ensure the wires are not pinched during this process.
- Reattach the control knob by aligning the stem of the control into the opening in the control knob housing and pushing it back into position.
Storage
Dry all surfaces and burner box, then spray surfaces with cooking oil substance to preserve the surface from rusting during long term storage. Wipe off oil coating before reuse.
Troubleshooting
Before calling for service, review this list. It may save you both time and expense. This list includes common experiences that are not the result of defective workmanship or material in your appliance.
Problem Possible Cause/Solution
| The oven does not come on | Check that both a function and a temperature have been selected. |
| Check the appliance is wired properly, and the socket switch or the switch from the mains supply to the oven are ON. | |
| The oven light does not come on | Turn on the oven function control knob on a function. |
| Buy a new oven light bulb, asking for it at your local Service Center and replace it by following the instruction provide in this manual. | |
| It takes too much time to finish the dishes, or they are cooked too fast | Refer to the contents of this booklet, especially to the chapter “Cooking Advice”. |
| Steam and condensation settle on the food and the oven cavity | DO NOT leave dishes in the oven after the cooking is completed. |
Specification
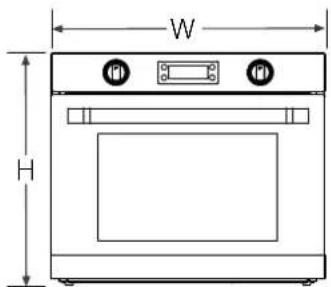
text_image
W HFront View
text_image
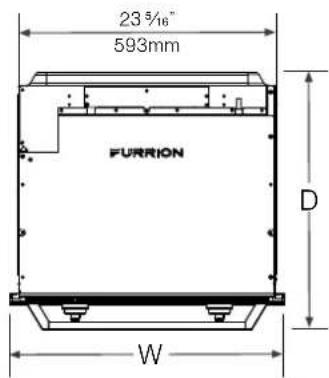
23 5/16" 593mm FURRION D WTop View
text_image
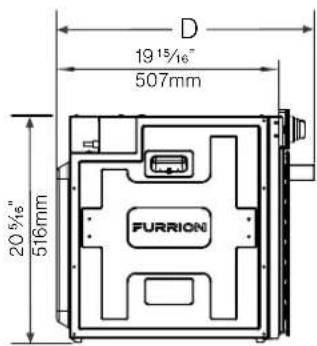
D 19 15/16" 507mm 20 5/16" 516mm FURRIONSide View
Technical Specifications
| Power Supply | Electric |
| Wattage | 1400W |
| Power Input | 120V AC, 60Hz |
| Inner Volume | 57.6L |
| Product Dimensions (W*H*D) | 24 3/4" x 21" x 23 3/16"628mm x 532mm x 589mm |
This appliance conforms with the directives:
CSA C22.2 No. 61-16 - Household Cooking Ranges.
UL 858 16th Ed - Household Electric Ranges.
text_image
Technical diagram of an oven with numbered parts for identification and assembly reference.Article Description
natural_image
Diagram of a kitchen appliance with an oven and door, showing a piston mechanism (no text or symbols)natural_image
Technical line drawing of an oven with labeled components and directional arrows, no readable text or symbols present.natural_image
Technical diagram of an oven with a black arrow indicating a directional change, labeled 'Fig. 9' (no text or symbols on the diagram itself)natural_image
Diagram of an oven with a furrion unit and a door, showing internal structure and airflow direction (no text or symbols)natural_image
Technical illustration of an oven with labeled components and a highlighted interior space, showing internal structure without any text or symbols.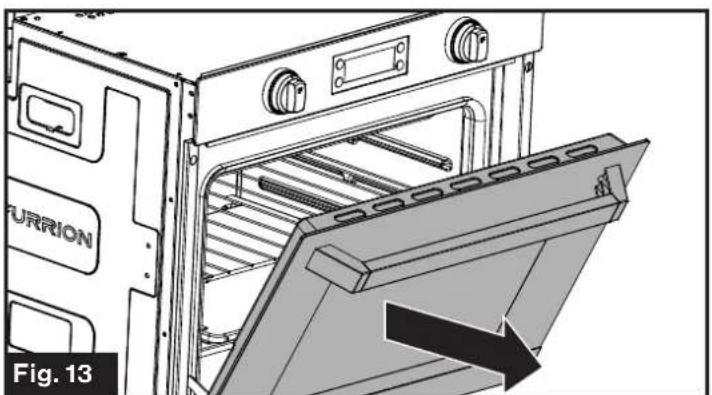
natural_image
Technical illustration of an oven with a label pointing to the interior panel (no text or symbols on the diagram itself)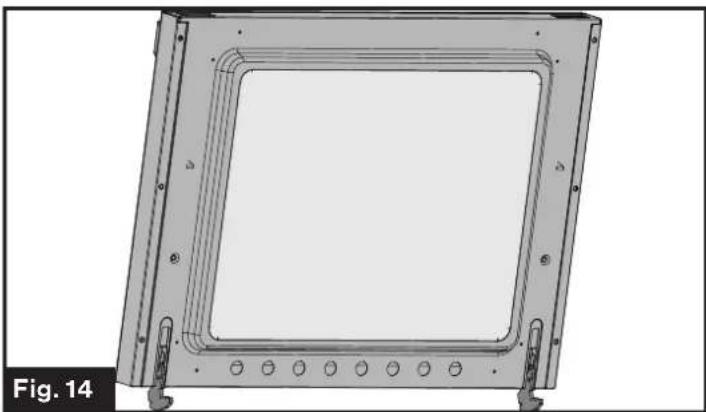
natural_image
Technical drawing of a square frame with mounting holes and internal channels (no text or symbols)natural_image
Technical line drawing of a mechanical component with two circular features and directional arrows indicating motion (no text or symbols)natural_image
Technical illustration of a kitchen appliance with a magnified inset showing a close-up of the interior panel (no text or symbols present)natural_image
Technical illustration of a kitchen appliance with a close-up view showing internal components connected to a wall-mounted device (no text or symbols present)natural_image
Technical illustration of a kitchen appliance with an inset close-up showing a pipe connecting a circular component (no text or symbols)text_image
Technical diagram of an oven with numbered components for identificationObjeto Descripción
natural_image
Diagram of a kitchen appliance with an oven and door, showing internal components and airflow direction (no text or symbols)natural_image
Technical line drawing of an oven with labeled components and airflow indicators (no text or symbols beyond labels)natural_image
Technical diagram of an oven or refrigerator interior showing internal structure and a black arrow indicating rotation (no text or symbols present)natural_image
Diagram of an oven with a Purrion label and airflow arrow indicating process (no text or symbols beyond labels)natural_image
Technical line drawing of an oven with labeled components, showing internal structure and mounting bracket (no text or symbols beyond branding)
natural_image
Technical illustration of an oven with a label 'FURION' and an arrow indicating a component, no readable text or symbols beyond the label.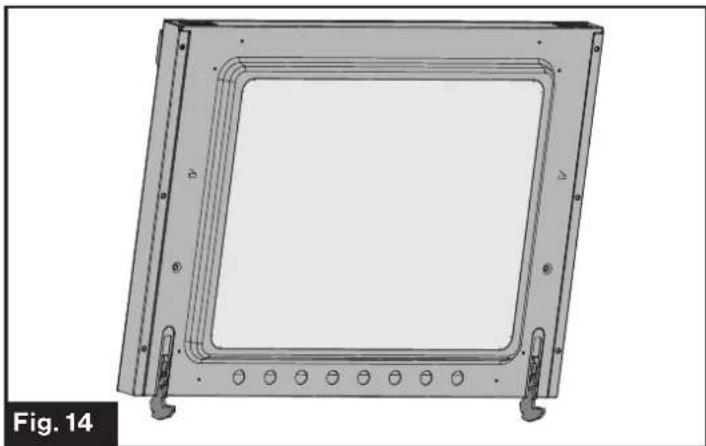
natural_image
Technical drawing of a square frame mounted on a metal frame with mounting holes (no text or symbols)natural_image
Technical diagram of a mechanical device showing internal components with directional arrows indicating motion (no text or symbols)natural_image
Technical diagram showing a washing machine with an inset close-up of the component (no text or symbols present)natural_image
Technical illustration of a kitchen appliance with a close-up view showing internal components connected to a wall-mounted device (no text or symbols present)natural_image
Technical illustration of a kitchen appliance connected to a wall-mounted pipe fitting (no text or symbols present)natural_image
Abstract black geometric shape on white background (no text or symbols)FURRION
Furrion Innovation Center & Institute of Technology
- 52567 Independence Ct., Elkhart, IN 46514, USA - Toll free:1-888-354-5792
- Email: support@furrion.com
©2007-2019 Furrion Ltd. Furrion* and the Furrion logo are trademarks licensed for use by Furrion Ltd. and registered in the U.S. and other countries.