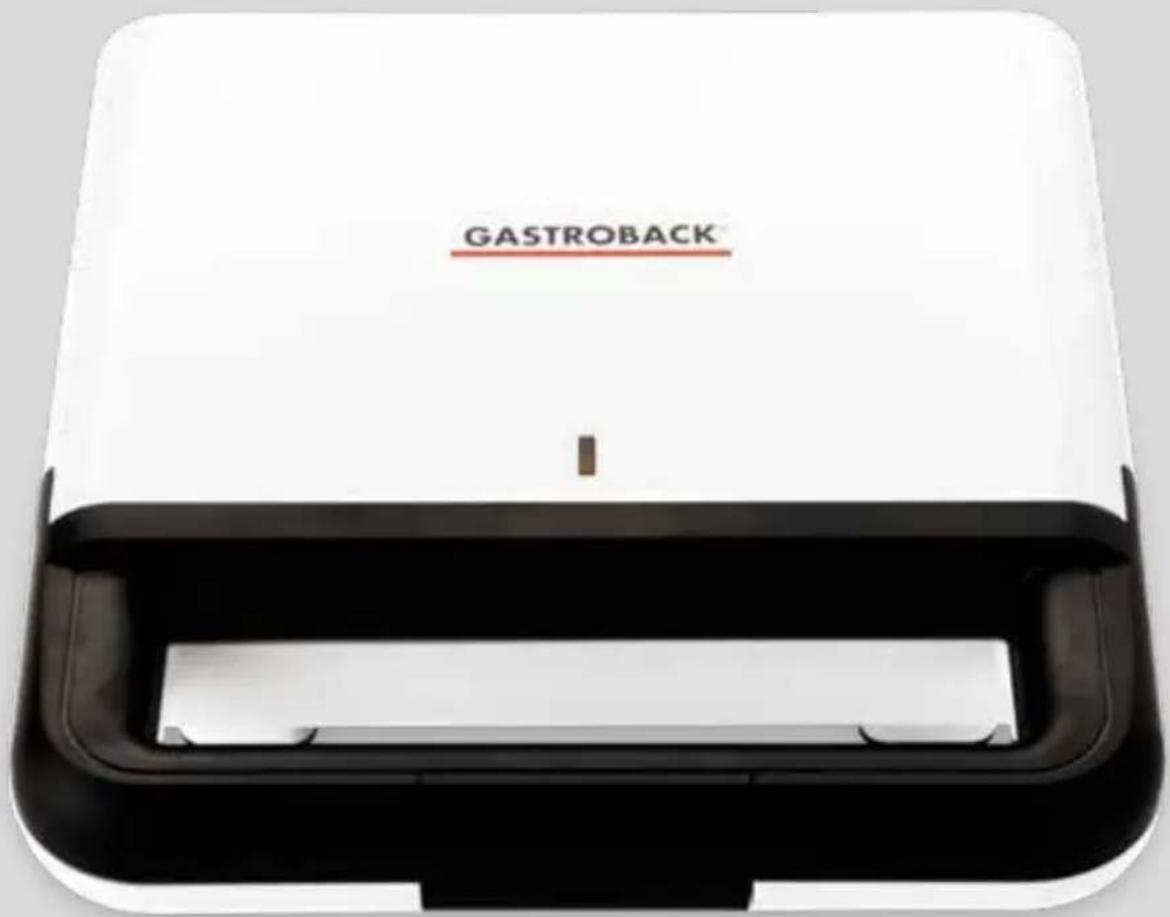
Design Sandwich Maker 42443 - Croque monsieur clip Gastroback - Free user manual and instructions
Find the device manual for free Design Sandwich Maker 42443 Gastroback in PDF.

| Product type | Design sandwich maker / grilled cheese press |
| Brand | Gastroback |
| Model | Design Sandwich Maker 42443 |
| Power supply | 230 - 240 V AC, 50/60 Hz, 750 W |
| Dimensions (closed) | 232 x 230 x 90 mm |
| Dimensions (open) | 232 x 292 x 256 mm |
| Weight | Approx. 1.48 kg |
| Cord length | Approx. 100 cm |
| Heating plate dimensions | 224 x 120 mm (each plate) |
| Operating temperature | 185 ± 10 °C, reached in about 2 minutes |
| Plate coating | High-performance non-stick |
| Main functions | Cooking pancakes, toasting bread, making waffles, omelettes, meatballs, donuts |
| Locking system | Automatic locking bar on the handle |
| Overheating protection | Integrated safety fuse |
| Indicator lights | Power indicator (red) and Ready indicator (green) |
| Care and cleaning | Clean after cooling with a damp cloth; do not immerse; do not use abrasive cleaners |
| Usage | Household use only |
| Spare parts / Repairability | Repair only by authorized center; contact Gastroback customer service |
| Certification | CE |
Frequently Asked Questions - Design Sandwich Maker 42443 Gastroback
User questions about Design Sandwich Maker 42443 Gastroback
0 question about this device. Answer the ones you know or ask your own.
Ask a new question about this device
Download the instructions for your Croque monsieur clip in PDF format for free! Find your manual Design Sandwich Maker 42443 - Gastroback and take your electronic device back in hand. On this page are published all the documents necessary for the use of your device. Design Sandwich Maker 42443 by Gastroback.
USER MANUAL Design Sandwich Maker 42443 Gastroback
Read all provided instructions before first usage!
Model and attachments are subject to change
For household use only!
DEUTSCH
ENGLISH
FRANÇAIS
ESPAÑOL
ITALIANO
TABLE OF CONTENTS
Important Safeguards 35
General Safety Instructions.... 35
Important Safeguards for Electrical Appliances 38
High Temperatures - Risk of Burns 39
Non-Stick Coating 40
Technical Specifications....41
Knowing Your Design Sandwichmaker 42
Properties of Your Design Sandwichmaker 43
Over-Heat Protection 43
Tips for Best Results....43
General Hints....44
Baking Times and Amounts for Various Tasks 45
Before First Use....46
Operation 47
After Usage 49
Solving Problems....50
Care and Cleaning 51
Cleaning the Appliance 51
Storage 52
Notes for Disposal....53
Information And Service....53
Warranty 54
Recipes 55
IMPORTANT NOTE - PLEASE READ CAREFULLY - BEFORE YOU USE THE DEVICE!
All GASTROBACK® products are intended for food processing of food products and groceries. For reasons of health protection and hygiene, products that are used on a daily basis or used only once, are not allowed to be returned. Check the goods just as you would do in a retail store.
You only have to pay for a possible loss in value of the goods, if this loss of value is due to a non-necessary for the examination of the nature, characteristics and function of the goods handling.
An unnecessary way to check the nature, characteristics and function of the goods is the processing of food products or groceries into food and drinks.
If you have any questions about GASTROBACK® products, if your unit is not working properly straight away or if you need any accessories or spare parts for your GASTROBACK® product please contact our customer service before returning.
Monday to friday (except on holidays) from 8am to 4pm
E-Mail: info@gastroback.de
DEAR CUSTOMER!
Your new DESIGN SANDWICHMAKER is a versatile aid for preparing a wide variety of small meals as well as a lot of snacks and desserts. For this, the appliance can bake almost all types of batter an/or dough prepared from quite different ingredients, or even roast slices of bread. The outstanding compact and light design and uncomplicated usage give a convenient assistant for your hobby, leisure time, and holiday.
Via the high-performance non-stick coating of the heating plates, there is no need to add any surplus fat, making it easy to meet modern diet requirements. Even the annoying cleaning is done in a rush.
These instructions for use will inform you about the various functions and features, which make it easy to take pleasure in your new DESIGN SANDWICHMAKER.
We hope that you will enjoy your new DESIGN SANDWICHMAKER.
Carefully read all instructions, before operating this appliance and save all instructions for further reference. These instructions are an essential part of the appliance. Do not pass the appliance without this booklet to third parties. Do not attempt to use this appliance in any other way and for any other purpose, than described in these instructions (intended use). Any other use, especially misuse, can cause severe injuries or damage by electric shock, heat, or fire.
Any operation, repair and technical maintenance of the appliance or any part of it, that is not described in these instructions may only be performed at an authorised service centre (see: 'Warranty'). Please contact your vendor.

GENERAL SAFETY INSTRUCTIONS
Please adhere strictly to the following instructions to avoid hazard due to high temperature, fire, or electric shock, causing injuries to persons and/or damage.
- This appliance is for household use only and NOT intended for use in moving vehicles. Do not operate or store the appliance in humid or wet areas or outdoors. Exclusively use the appliance for cooking food that is fit for consumption. Check the entire appliance regularly for proper operation (e.g. check for distortion, cracks, pollution, and brittle, melted, corroded, or excessively frayed parts, coatings, or pins). Do not operate the appliance with accessories, attachments or spare parts that are not recommended by the manufacturer. Do not operate the appliance when the appliance or any part of it is likely to be damaged. The appliance or its parts are likely to be damaged, if the appliance has been subject to inadmissible strain (e.g. overheating, mechanical or electric shock, liquids running into the housing) or if the appliance is not working properly (e.g. overheating). If one of these cases occur during operation, immediately unplug the appliance, and get in contact with an authorized service centre for examination and/or repair. Do not attempt to repair the appliance or replace any part of it (e.g. the power cord) on your own. Operate the appliance on a well accessible, stable, level, dry, and suitable large table or counter that is resistant against water, fat, and heat.
Do not place the appliance over a power cord or on inclined, wet or plastic surfaces, or plastic coatings (e.g. paint), or surfaces that could crack due to local heat (e.g. glass, stone). During operation, do not place any napkins, clothes, or other foreign objects on or under the appliance. Even while the appliance is cold, do not place the appliance on sensitive and valuable surfaces (e.g. coated furniture). During operation keep the appliance in an appropriate distance of at least 50 cm on each side to the edge of the working space and to any sensitive or inflammable objects to avoid risk of fire and damage due to heat, steam, and splashes. Do not operate the appliance under over hanging boards or drop lights. Do not place the appliance or any part of it on or near hot surfaces (e.g. range, burner, heater, or oven).
- RISK OF EXPLOSION AND FIRE! Do not heat any highly alcoholic beverages or food (e.g. mulled wine, grog) via the appliance. Due to the heat, volatile materials (e.g. highly alcoholic beverages and food, mineralized spirit, camping gas) may evaporate easily, generating an inflammable mixture that could catch fire by any source of ignition (e.g. lit candles, cigarettes, parts of the appliance), causing severe injuries to persons and serious damage. Do not operate the appliance near any inflammable, volatile materials to avoid high risk of injuries and damage. The appliance is NOT suited for flambéing!
- Residues of food on the heating elements could be burnt to charcoal during operation and therefore catch fire. Before operating the appliance, always check whether the heating plates are completely clean, dry, and undamaged.
- This appliance can be used by persons with reduced physical, sensory or mental capabilities or lack of experience and knowledge (including children aged from 8 years on), if they have been given supervision or instruction concerning the use of the appliance in a safe way and understand and consider the hazards involved. Cleaning and user maintenance may not be made by children unless they are elder than 8 and supervised. Children must always be supervised to ensure that they do not play with the appliance or any parts of the appliance or the packaging. Always keep the appliance where
it is dry, frost-free, and clean, and where children younger than 8 years and animals cannot reach it. Do not leave the appliance or any part of it unattended, when it is in reach of children younger than 8 years and animals.
- Fresh moistened food may splash, when placed on the hot heating plate, and hot steam may escape. During operation, do not hold any part of your body or delicate objects over or near the heating plates. Always ensure that persons (including you) stay in sufficient distance to the appliance during operation. Always expect that splashes of hot fat and juices will escape from the heating plates.
- Before opening the lid, always ensure to fold up the dark locking bar at the handle. Do not use violence. Open and close the lid carefully to avoid that the appliance falls over.
- Do not use any hard or sharp-edged objects with the appliance (e.g. metal scrapers). For example, use heat-resistant plastic or wooden barbecue tongs for removing your food. Do not use any utensils that could melt, burn, crack, get distorted, or give off harmful substances, when exposed to heat.
- Do not leave the appliance unattended, when it is connected to the power supply. Always unplug the appliance, and leave the appliance cool down, before moving, or cleaning the appliance, or when the appliance is not in use. Do not place any hard and/or heavy objects on the appliance or any part of it.
- Always ensure to empty the heating plate and engage the lid correctly at the base, before tilting and lifting the appliance by the handle (see: 'Properties of Your Design Sandwichmaker'). Do not hold the appliance at the power cord or the open lid for moving the appliance.
- Do not use any abrasive cleaners, cleaning pads (e.g. metal scouring pads, grill cleaner), or any corrosive chemicals (e.g. bleach, disinfectants) for cleaning. Do not place the appliance or any part of it in an automatic dishwasher.
- Do not leave any food dry on the appliance. Always clean the appliance after each use (see: 'Care and Cleaning'). Always keep the appliance, where it is clean and dry.

IMPORTANT SAFEGUARDS FOR ELECTRICAL APPLIANCES
The appliance is heated electrically. Place the appliance near a suitable wall power outlet to connect the appliance directly to a protected mains power supply with protective conductor (earth/ground) connected properly. Ensure that the voltage rating of your mains power supply corresponds to the voltage requirements of the appliance (230 - 240 V, 50/60 Hz, AC, rated for at least 10 A). The power outlet socket must be installed separately from other power outlet sockets to avoid interference with other appliances.
The installation of a residual current operated circuit breaker (r.c.c.b.) with a maximum rated residual operating current of 30 mA in the supplying electrical circuit is strongly recommended. If in doubt, contact your electrician for further information.
- In various foreign countries, the specifications for power supplies are subject to incompatible norms. Therefore, it is possible that power supplies in foreign countries do not meet the requirements for safe operation of the appliance. Thus, before operating the appliance abroad, ensure that safe operation is possible. Do not use any desk top multi socket outlet, external timer, or remote control systems.
- It is best to avoid using an extension cord, but if you wish to use one, ensure that it is of sufficient length and rated for a maximum continuous current of at least 10 A with safety plug, safety coupler plug, and protective conductor (earth/ground) connected properly.
- When laying power cords, always ensure that no one will step on the power cord or trip over the power cord, pull the appliance by the power cord, or gets entangled. Also, ensure that no tension is applied to any part of the power cord. Do not let the plug or power cord hang over the edge of the table or counter. It is best to tie the extension cord loosely onto the leg of the table using a separate cord. To disconnect: Always unplug the extension cord from the power supply first. Always grasp the plug for disconnecting the power cord.
- Always handle power cords with care. The pins of the power plug must be smooth, clean, and without any discolouration. Always completely unwind the power cord before use. Do not place the appli-
ance on a power cord. The power cord may never touch hot surfaces or sharp edges. Power cords may never be knotted, twisted, pulled, strained or squeezed.
- Do not touch the appliance or power plug with wet hands when the appliance is connected to the power supply. DO NOT pour or spill any liquids on or in the housing of the appliance or on the power cord. Do not place or immerse the appliance or power cord in water or other liquids. Always keep the appliance and the table or counter clean and dry, and wipe off spilled liquids immediately. Do not place the appliance on wet surfaces. When liquids overflowed or are spilled into the housing or on the power cord, do not touch the appliance but immediately unplug the appliance. Thereafter, clean the appliance and let it dry for at least 1 day (see: 'Care and Cleaning').

HIGH TEMPERATURES - RISK OF BURNS
The DESIGN SANDWICHMAKER is designed for baking dough and batter or roasting baked goods. For this purpose, the heating plates are heated electrically to high temperature, as soon as the appliance is connected to the power supply. Thus, improper handling could cause severe injuries and damage. Please keep this in mind to avoid burns and damage.
- Do not leave the appliance connected to the power supply without supervision to avoid a hazard due to high temperature, electricity, and fire.
- The heating plates and complete exterior of the appliance can be very hot during operation and some time thereafter. Additionally, during cooking of your food, hot steam and splashes could escape. If required, protect your hands and arms with oven gloves. While the appliance is hot: Do not touch the hot surfaces with any parts or your body or any objects sensitive to heat, but only touch the appliance at the handle.
- The appliance is intended exclusively for heating edible food. Do not place any foreign objects (e.g. cups, dishes, or pots) on the heating plates to avoid damage. Do not leave any foreign objects on the heating plates (e.g. barbecue utensils).
- Always leave the appliance and all its parts cool down before moving and cleaning the appliance. Do not place the appliance on heat-sensitive surfaces, while the appliance is hot. Always ensure that the heating plates are completely empty, before tilting or moving the appliance or storing the appliance to the upright position.

NON-STICK COATING
The heating plates of your DESIGN SANDWICHMAKER are provided with a high quality non-stick coating. Therefore, food can be removed from the heating plates easily. Please adhere to the following precautions:
- Before first use: wipe the non-stick coatings of the heating plates with a little cooking oil. Thereafter, there is no need to add any further oil for cooking.
- Do not use the appliance, when the non-stick coating is scratched, cracked or detached due to overheating.
- Only use wooden or heat-resistant plastic cooking utensils with the appliance. Do not use any hard or sharp-edged objects. We will not be liable for damage to the non-stick coating, if unsuited utensils or similar objects have been used (e.g. metal barbecue utensils, metal scourers, wire brushes).
- Do not use any oven cleaner or spray-on non-stick coatings with the appliance.
TECHNICAL SPECIFICATIONS
| Item-No.: | 42443 |
| Name: | Design Sandwichmaker |
| Power supply: | 230-240 V AC, 50/60 Hz |
| Power consumption: | 750 W |
| Length of power cord: | approx. 100 cm |
| Weight: | approx. 1,48 kg |
| Dimensions (W x D x H): | approx. 232 x 230 x 90 mm (closed)approx. 232 x 292 x 256 mm (open) |
| Size of heating plates: | Bottom / Lid: 224 x 120 mm |
| Operating Temperature: | 185 +/- 10 °C; reached in approx. 2 minutes |
| Certification: |
These specifications may change without notice.
KNOWING YOUR DESIGN SANDWICHMAKER
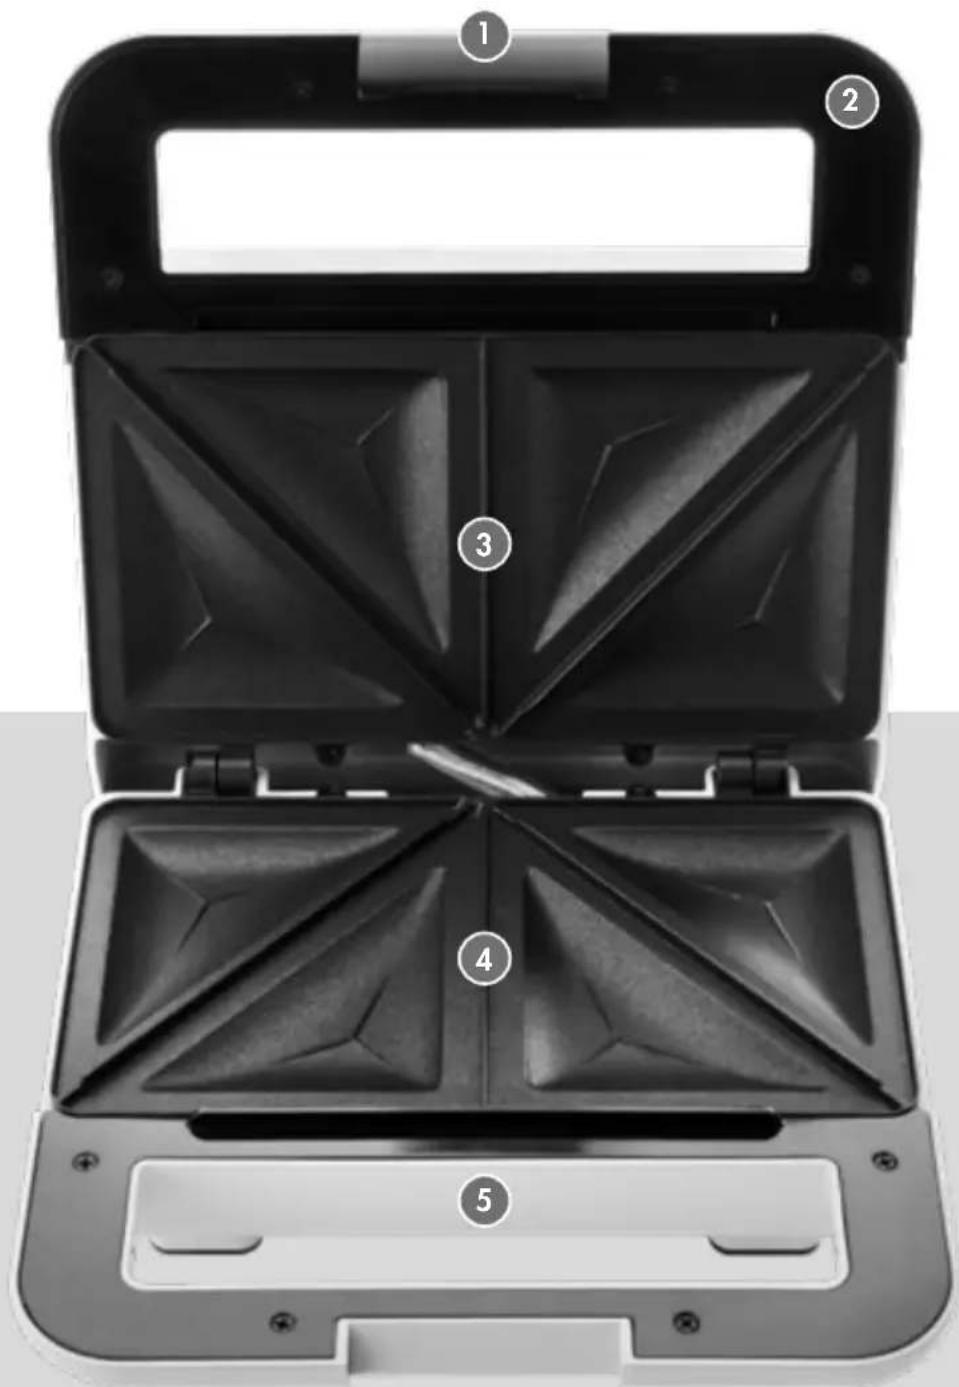
1 LOCKING BAR - Automatically engages, when the lid is closed.
2 STABLE LID FRAME with thermally insulated handle.
3 LID with separate heating plate.
4 BASE with lower heating plate.
5 COATED HOUSING

Green ready indicator
Illuminates as soon as the operating temperature is reached.
Red power indicator
Illuminated, when the appliance is live and heating
PROPERTIES OF YOUR DESIGN SANDWICHMAKER
Using your new DESIGN SANDWICHMAKER, baking of almost any type of dough and batter is possible: for waffles, omelets, cookies, small cakes, pancakes, meatballs, vegetable rissoles, and potato fritters. Even roasting bread slices for your morning toast and the required toppings for sandwiches is possible. The handling is as easy as could be.
The heating plates are temperature controlled and automatically provide a constant temperature. Adjust the browning of your food via the baking time. Each portion is typically done in 2 - 4 minutes (batter for small cakes and meatballs) or approx. 10 minutes (e.g. bread dough and potato fritters).
The high-performance non-stick coating makes it possible to bake without any additional fat. Even pieces of cake and potato fritters do not need any fat and/or breadcrumbs for getting off the heating plates without effort.
Locking bar of the lid - The locking bar is integrated in the handle and engages automatically, whenever you close the lid (see: 'Knowing Your Design Sandwichmaker'). With the lid closed correctly, conveniently you can carry the appliance at the handle and store it in an upright position.
IMPORTANT - The lid must be unlocked first, every time before you attempt to open the lid. With the locking bar pulled open, the lid will open easily and without any resistance. DO NOT attempt to open the lid with violence!
OVER-HEAT PROTECTION
On normal operation, overheating cannot occur due to the integrated temperature control device. However, an additional fuse switches off the appliance automatically, if overheating occurs. In this case, return the appliance to an authorised service centre for examination and repair. Get in contact with your vendor.
TIPS FOR BEST RESULTS
This chapter provides various crucial hints for preparing, roasting, and baking of your food.
CAUTION – Do not overfill the wells of the heating plate! Food may not run out over the rim of the heating plates. With mixtures that rise or swell during baking (e.g. cake dough, aerated snacks), at the maximum, fill the wells of the lower heating plate up to the rim. When food runs out, open the lid and carefully remove any surplus food at the rim of the heating plate.
GENERAL HINTS
- Operating the appliance with the lid open is possible. However, in almost all cases, the results will be better, when avoiding this practice, and therefore, baking your food only shortly (some minutes) with the lid closed.
- Roast bread slices and toppings for sandwiches separately.
- Leave frozen food thaw completely, before baking via the appliance.
- After baking, your food should build a solid body, that can be removed in one single piece from each well of the lower heating plate. In most cases, you should use a wooden or heat-resistant plastic scraper for this. Most types of ingredients can be combined (e.g. fruit, vegetables, minced meat, liver, etc.) with egg and/or flour to get a suitable dough. Alternatively, coat this types of food in some yeast dough.
- Please keep in mind, that some types of fresh food may give off a lot of juices when heated (e.g. tomatoes). In these cases, you should prefer canned or pre-cooked food and let it drain thoroughly.
- Remove surplus juices from the wells of the heating plate, before placing in the next portion. For this, alternately roast some bread slices after each portion. This may give a spicy side dish for your meal. Try to adjust the amounts of dough according to the following guidelines.
- Dough that will rise during baking (e.g. cake, bread): After baking, the dough should have risen just to touch the upper heating plate. Accordingly, leave free space in the individual wells.
- Dough that will NOT rise when heated (e.g. meatballs, potato fritters): Before baking, the dough should completely fill up the wells of the heating plates, when the lid is closed. Therefore, fill an appropriate heap into the wells of the lower heating plate.
- If there is not enough dough for filling all wells properly, in many cases, it is better to keep the optimum amount of dough for each well and leave the remaining wells empty. The required baking time strongly depends on the ingredients of your food (e.g. type, freshness, thickness, aeration) and the desired consistency. Check the results during baking. This is the best way of determining the optimum baking time for your recipe ideas.
- Depending on the humidity of your food and the progress of the baking cycle, various amounts of steam will escape from under the lid. This can be an indicator for keeping the required baking time.
BAKING TIMES AND AMOUNTS FOR VARIOUS TASKS
NOTE
Please consider that the baking times given here are only guidelines. The optimum baking time depends on your individual liking, the type and freshness of the ingredients and, of course, your recipe. Adjust the baking time accordingly. When making your first tries using a new recipe, you should check your food intermediately.
ROLLS:
Before baking a heavy bread dough, form balls of the dough. Adapt the amount of dough to the extent, the dough is supposed to rise during baking. Start with 4-5 cm balls (diameter) and make fitting triangles of the balls. For each baking cycle, place a dough triangle in each well of the lower heating plate. Then close the lid.
Baking time: 4-10 minutes; depending on the content of sugar and proteins.
YEAST CAKES:
Similar to bread dough, form balls of appropriate size and make fitting triangles. When embedding various further ingredients (e.g. pieces of fruit, chocolate, nut butter, jam and may others), ensure to close the dough sleeve completely, before placing the triangles onto the heating plate.
Baking time: 3-5 minutes; depending on the content of sugar and proteins of the dough.
SHORT-CRUST PASTRY:
Similar to bread dough, form balls, but adapt the amount to the desired size of your pastries. Make fitting triangles of the balls as well, but press the dough flat into the wells for getting a layer of the desired thickness. Then close the lid.
Baking time: 4-8 minutes; depending on the ingredients and desired consistency.
ROASTING BREAD:
Almost any types of bread can be used (white, wholegrain, raisin loaf, etc.). Cut the bread slices to fitting pieces. Raisin bread, brioche or other sweet types of bread, which contain a lot of sugar, will tend to brown quicker.
Place the desired toppings on the bread slices after roasting, because bread slices with toppings can only be roasted with the lid open. Therefore, the topping will stay raw. It is better to bake the toppings separately (see below).
Baking time: depending on the type of bread and desired browning.
SMALL CAKES, WAFFLES, PANCAKES:
Mix a glutinous dough and fill the wells of the lower heating plate no more than up to the rim. Keep in mind, that the dough swells up during baking. There is no need to use any baking powder, when beating the egg white and folding it in, shortly before baking.
Baking time: 2-4 minutes.
MEATBALLS / RISSOLES:
For baking small meatballs with minced meat, fish, or vegetables fill up to approx. 2 heaped tablespoons of the prepared dough in each well of the lower heating plate, before closing the lid. When using bread for making your meatballs juicy and soft, do not soak the bread before mixing the dough, because this would produce too much juices and could cause overflow. Simply cut or tear the bread to small pieces.
Baking time: 3-4 minutes.
TOPPINGS CONTAINING EGGS:
Cut the ingredients to small cubes (max. 1/2 cm or 1/4 inch). Combine the cubes with a mixture of some beaten egg, flour and spices to taste. After preparing the required bread slices (roasted or freshly baked) fill the mixture for the toppings into the wells and bake until done.
Baking time: approx. 3 minutes, depending on the ingredients.
POTATO FRITTERS:
Prepare the dough according to your recipe. Fill the wells of the heating plate with appropriate portions and bake with the lid closed.
Baking time: approx. 10 minutes, depending on the desired consistency.
BEFORE FIRST USE
⚠ WARNING – DO NOT let children play with the appliance, or any part of it, or the packaging! Always unplug and leave the appliance cool down (at least 15 minutes with the lid open), before cleaning or moving the appliance. Do not immerse the appliance or power cord in water or other liquids or spill any liquids on or in it. Do not place the appliance or power cord in an automatic dishwasher.
Even the exterior of the appliance may get hot during operation. Only touch the
appliance at the handle during operation and while the appliance is still hot.
CAUTION – The lid is locked to the base automatically, whenever you close the lid completely (see: 'Properties of Your Design Sandwichmaker'). Do not attempt to open the lid with violence. Always ensure to fold out the locking bar at the handle, before opening the lid.
- Unpack the appliance and all accessories carefully. Check that the appliance is undamaged (see: 'Knowing Your Design Sandwichmaker').
- Remove all shipping materials and promotional materials, but DO NOT remove the model label.
- Before first use and after an elongated period of storage, clean the appliance (see: 'Care and Cleaning').
IMPORTANT - When using the appliance for the very first time, you may notice a fine smoke haze and some smoke may escape. This is caused by the first heating of the components. There is no need for concern. To avoid any influence on the taste of your food, you should let the appliance operate approx. 20 minutes without any food on it. This cannot cause any damage to the non-stick coating.
- Before the very first use: Put the appliance into service (see below: 'Operation'). Ensure good ventilation and, without any food on it, leave the appliance operate for approx. 20 minutes with the lid closed. Thereafter, unplug the appliance, open the lid and leave the appliance cool down to room temperature (15 - 20 minutes). Wipe the heating plates with some clean, damp kitchen towel. Then wipe dry thoroughly. Drip some drops of cooking oil on a dry, clean kitchen towel and wipe the non-stick coatings of the heating plates. The appliance is now ready for use.
OPERATION
WARNING – Always ensure that the appliance and all its parts and accessories are out of reach of children under 8 years. The surfaces (even the exterior) may become very hot as soon as you connect the appliance to the power supply. During operation and while the appliance is still hot, only touch the appliance at the handle to avoid burns.
To avoid risk of overheating and fire: During operation, do not place or pour any inflammable materials on the appliances (e.g. alcoholic food). Do not leave any food carbonize on the grilling surfaces. Do not place the appliance near inflammable materials (e.g. alcohol, mineralized spirit, camping gas). Do not place any
clothes or tissue or other foreign objects on or under the appliance during operation (e.g. clothes, tissue). Do not block the ventilation slits at the bottom of the base. During operation, the used power outlet must be freely accessible all the time.
⚠️ CAUTION – Do not operate the appliance on surfaces that are sensitive to heat or could burst, when heated locally (e.g. glass, stone; see: 'General Safety Instructions'). The lid gets locked to the base, whenever the lid is closed. Do not attempt to open the lid with violence. Only use cooking utensils made of wood or heat-resistant plastics.
IMPORTANT - During the very first use, the appliance may give off some light smoke or burning smell from under the heating plates. This is normal and will subside with further use (see: 'Before First Use'). Ensure good ventilation.
Before preparing and baking your food via the appliance, get yourself an overview on the crucial know-how given in chapter 'Tips for Best Results'. This way, you can derive pleasure from the results just from the start. Prepare your food for baking. Remove all inedible parts (e.g. stalks and bones). Mix a dough according to your recipe.
- Completely unwind the power cord of the appliance. Then place the appliance on a suitable heat-resistant surface (see: 'General Safety Instructions') near a suitable wall power outlet (see: 'Important Safeguards for Electrical Appliances'). On each side and to the edge of the working surface, keep at least 50 cm of free space. While pulling the lower edge of the locking bar, open the lid via the handle and ensure that the heating plates are clean and there are no foreign objects within the appliance. Close the lid. With the lid closed, the grilling surfaces will reach the set baking temperature quickly, and without useless energy loss.
WARNING - RISK OF BURNS - The appliance gets hot as soon as it is connected to the power supply. Only touch the appliance at the centre of the handle! Ensure that you do not tip over the appliance, when opening the lid. Food may splash and steam could escape, when placing fresh food onto the hot heating plate. Ensure that all persons present (including you) stay in sufficient distance to the appliance.
NOTE
You may notice that the appliance toggles repeatedly between power indicator and ready indicator during operation. This is caused by correctly keeping the baking temperature.
- Insert the power plug in a suitable wall power outlet (see: 'Important Safeguards for Electrical Appliances'). The power indicator illuminates red. The appliance
reaches the fixed baking temperature within approx. 2 minutes. The ready indicator illuminates green, indicating that the appliance is ready for baking your food.
- While pulling the lower edge of the locking bar, open the lid and fold it up to the stable position. Fill appropriate portions of your food into the wells of the lower heating plate (see: 'Tips for Best Results').
NOTE
After placing food onto the heating plate, you should close the lid whenever possible. This way, your food will be baked evenly, the required baking time is reduced, and you avoid useless energy loss. When filling more than 1 well, flatten the single portions for getting the same thickness in each well. This will aid an even browning of all portions.
- Close the lid and bake your food to the desired consistency. If required, check the baking process intermediately (see: 'Tips for Best Results') by shortly opening the lid.
- When your food is done open the lid and take your food from the heating plate via plastic or wooden barbecue utensils. Immediately thereafter, you may place fresh food onto the heating plate.
AFTER USAGE
⚠️ CAUTION – Always keep the appliance out of reach of children younger than 8 years and animals. Do not move the appliance and do not touch the heating plates, while the appliance is still hot.
IMPORTANT - Do not hold the appliance at the power cord. Always empty the heating plate completely, close the lid and ensure that the locking bar engaged correctly, before tilting and/or moving the appliance via the handle.
- Unplug the appliance and remove all remaining food. Leave the appliance cool down completely with the lid open (15 - 20 minutes).
- Clean the appliance and its parts after each use (see: 'Care and Cleaning').
SOLVING PROBLEMS
Most problems during use can be solved easily. Use the hints in the following table as an assistance.
| Problem The Possible | Reason The Easy Solution | |
| After switching on the appliance, you notice a burnt smell. May be, some smoke escapes from under the heating plates. | The appliance is heated for the very first time. | In this case, this is normal and no need to concern. Prepare the appliance for the very first operation (see: ‘Before First Use’). Ensure good ventilation. |
| Steam and odours escape from your food during baking. | This is normal and no need to concern. Ensure to remove your food in time. | |
| The heating plates are polluted. | Immediately unplug the appliance and leave the appli-ance cool down. Then thoroughly clean the heating plates of the base and lid (see: ‘Care and Cleaning’). | |
| A severe problem occurred. | Immediately unplug the appliance and leave the appli-ance cool down. Get in contact with your vendor. | |
| You cannot open the lid. | The lid is still locked to the base. | Pull out the lower edge of the dark locking bar in the centre of the handle, while moving the lid up. Do not use violence! The lid engages automatically, whenever you close the lid. |
| You cannot close the lid completely. The locking bar does not engage. | The currently baked porti-on of food is too thick. | Possibly, you can bake your food with the lid open. However, keep in mind, that the upper side will not be baked with this method. Take out an appropriate amount of food. Then try again. Bake bread slices and toppings for sandwiches separately. |
| Unexpectedly, the appliance does not work any longer. | The overheat protection has been triggered. | For your safety, the appliance switches off completely, when overheating of the heating plates occurs (see: ‘Pro-perties of Your Design Sandwichmaker’). Get in Contact with your vendor for examination and repair. |
| The connection to the power supply is inter-rupted. | Ensure that the power cord is still connected to the power outlet. When using an extension cord, check the connec-tions of the extension cord too. Ensure that the power outlet used is still live. Connect a lamp. Always ensure that nobody gets entangled in the power cord or pulls at the power cord. Avoid overloading the power outlet used. Do not let the coupling hang down freely from the table (see: ‘Technical Specifications’ and ‘Important Safegu-ards for Electrical Appliances’). | |
| A severe problem occurred. | Immediately unplug the appliance. Contact your vendor for examination and repair. |
CARE AND CLEANING
WARNING – RISK OF BURNS – Always ensure that the appliance is out of reach of children younger than 8 years and animals.
Before moving or cleaning the appliance: Always unplug the appliance, and wait until the appliance cooled down completely (15 - 20 minutes with the lid open). Do not move the appliance while it is hot, to avoid severe injuries and damage due to hot surfaces, juices, and condensate.
CAUTION – Keep in mind that fat, juices, and condensate could drip from the heating plates, when moving the appliance after usage. Wipe off any remaining juices in the wells of the lower heating plate, before tilting the appliance.
Before carrying the appliance by the handle, always ensure that the lid is locked securely to the base (see: 'Properties of Your Design Sandwichmaker').
Do not use any abrasive, hard, or sharp-edged objects and/or corrosive chemicals (e.g. abrasive cleaner, scouring pads, bleach) for cleaning the appliance or any parts of it, to avoid damage to the surfaces. Do not place or immerse the appliance or power cord in water or any other liquid. Do not spill or drip any liquids on or in the appliance or power cord to avoid electric shock, overheating, and risk of fire. Do not clean the appliance or power cord in an automatic dishwasher. Do not use violence. Handle the appliance with care to avoid damage to the hinge of the lid.
IMPORTANT - Ensure to clean the heating plates thoroughly. Residues of food may go bad and mouldy, thus building harmful, toxic substances, and/or may be burnt in, give off smoke, and even catch fire when the appliance is used again.
CLEANING THE APPLIANCE
- Unplug the appliance and, with the lid open, leave the appliance cool down completely (15-20 minutes).
- Dry crumbs may be removed via a DRY nylon brush. For this, with the lid open you may carefully tilt the appliance to its side.
- Wipe the surfaces of the appliance and the power cord via a soft, not dripping cloth moistened with a little warm dishwater. Doing so, always ensure not to drip water into the interior or onto the appliance.
- Wipe the appliance via a cloth moistened with clear water. Thoroughly dry all parts after cleaning. Then, leaving the lid of the appliance in the upper open position, leave the appliance dry naturally for approx. 30 minutes where it is out of reach of children younger than 8 years and animals.
- After cleaning, close the lid for protecting the non-stick coatings from dust and damage.
STORAGE
WARNING – Children must always be supervised that they do not play with the appliance or any part of it. When the appliance is not in use, always unplug the appliance and wait until the appliance cooled down completely, before cleaning and moving the appliance for storage. Do not leave the appliance unattended, when it is connected to the power supply to avoid a hazard due to hot surfaces, electric shock or fire.
⚠️ CAUTION – For moving the appliance, do not hold the appliance by the power cord or by the open lid to avoid damage. Handle power cords with care. Power cords may never be knotted, twisted, pulled, strained, or squeezed. Always ensure that no one will pull the appliance by the power cord. Ensure to store the appliance where it is clean and safe from and inadmissible strain (mechanical or electric shock, frost, heat, moisture, direct sunlight) and where it is out of reach of children younger than 8 years and animals. Do not place any hard or heavy objects on or in the appliance or any part of it to avoid damage.
- Always clean the appliance and all its parts before storing (see: 'Care and Cleaning').
- For moving the appliance: Before lifting the appliance by the handle, always ensure that the lid is securely locked to the base of the appliance and will not open unintentionally! Carry the appliance by the handle, holding the power cord to prevent it from hanging down.
- Place the appliance on a clean and stable surface, where it cannot fall. If you wish to store the appliance in upright position, ensure that it has a stable stand and will not tilt or fall over.
- Lay the power cord loosely around the appliance.
NOTES FOR DISPOSAL

Dispose of the appliance and packaging must be effected in accordance with the corresponding local regulations and requirements for electrical appliances and packaging. Please contact your local disposal company.
Do not dispose of electrical appliances as unsorted municipal waste, use separate collection facilities. Contact your local government for information regarding the collection systems available. If electrical appliances are disposed of in landfills, dumps, or refuse incineration, hazardous substances can leak into the groundwater or can be emitted into air, thus getting into the food chain, and damaging your health and well-being as well as poisoning flora and fauna. When replacing old appliances with new once, the vendor is legally obligated to take back your old appliance for disposal at least for free of charge.
INFORMATION AND SERVICE
Please check www.gastroback.de for further information.
For technical support, please contact Gastroback Customer Care Center by phone: +49 (0)4165/22 25-0 or e-mail info@gastroback.de.
Please refer to our home page for a copy of these operating instructions in pdf format.
WARRANTY
We guarantee that all our products are free of defects at the time of purchase. Any demonstrable manufacturing or material defects will be to the exclusion of any further claim and within 2 years after purchasing the appliance free of charge repaired or substituted. There is no Warranty claim of the purchaser if the damage or defect of the appliance is caused by inappropriate treatment, over loading or installation mistakes. The Warranty claim expires if there is any technical interference of a third party without a written agreement. The purchaser has to present the sales slip in assertion-of-claim and has to bear all charges of costs and risk of the transport.
Note
For repair and service, please send Gastroback products to the following address:
Gastroback GmbH, Gewerbestr. 20, D-21279 Hollenstedt, Germany.
Please agree that we cannot bear the charge of receipt.
Submission of appliances: Please ensure packing the appliance ready for shipment without accessories. Add the sales slip and a short fault description. The processing time after receipt of the defective appliance will be approx. 2 weeks; we will inform you automatically. After the warranty period, please send defective appliances to the given address. You will get a free quotation and, thereafter, can decide, whether we shall repair the appliance to the costs possibly accrued, send back the defective appliance for free of charge, or dispose of the appliance for free of charge.
The appliance is intended for household use only and NOT suited for commercial, industrial or trade usage. Do not attempt to use this appliance in any other way or for any other purpose than the intended use, described in these instructions. Any other use is regarded as unintended use or misuse, and can cause severe injuries or damage. There is no warranty claim of the purchaser if any injuries or damages are caused by unintended use.
CINNAMON CAKELETS
INGREDIENTS FOR THE DOUGH:
• 3 Eggs, egg whites and yolk separated
• 2 teaspoons ground cinnamon
• 1 teaspoon spice mixture for ginger bread
- 1 tablespoon cacao powder
• 1/2 ampoule butter vanilla
• 1/2 ampoule rum flavour
- 30 - 40 g caster sugar
- 1 pinch of salt
• 150 g plain flour
- 150 ml low-fat milk
INGREDIENTS FOR DECORATION:
• 30 - 60 g dark chocolate coating
- 40 g icing sugar
To taste - almonds, choc curls, peanut halves, marzipan leaves, or others.
PREPARATION:
DOUGH
- Separate yolks and egg whites. Whisk the egg whites until they are stiff and shiny.
- Whisk yolks, salt, sugar, spices, milk, and flavours until they are frothy.
- Add the flour to the yolk mixture and stir until a smooth, glutinous mixture is generated. If required, add a little milk or some more flour, if the mixture is too heavy or too runny.
- Via a table spoon, fold in the egg whites. Put the appliance into operation.
- When the green ready indicator illuminates, pour a portion of the cake mixture into the wells of the lower heating plate. Close the lid and leave the appliance bake the mixture for approx. 3 minutes.
- Remove the cinnamon cakelets, placing them onto a cake rack. Immediately thereafter, you may fill the next portion of cake mixture into the wells.
- Leave the cakelets cool down.
COATING
- Melt the chocolate in a bain-marie.
- Cover each cakelet with a thin layer of chocolate and press a piece of decoration (almond, peanut half, or others) into the chocolate while the coating is still soft.
- Via a sieve, spread a little icing sugar onto the chocolate coating.
TIP - The appliance will bake almost each type of cake dough. Simply make the dough somewhat more runny than usual. There is no need to add baking powder, when beating the egg whites, and folding them into the dough just before baking.
SWEET SENSATION
INGREDIENTS FOR THE DOUGH:
• 400 g wheat flour
- 240 ml low-fat milk
- 7 g powdered/dried yeast
- 60 - 80 g fine caster sugar
- 8 g vanilla sugar (1 pack)
• 2 teaspoons coriander, finely ground
• 1/2 teaspoon clove, finely ground
- 1 pinch of salt
• Some icing sugar for decoration
INGREDIENTS FOR THE FILLING:
- 1 small apple, peeled and without seeds, cut some fitting triangles (max. 1/2 cm thick)
- 1 small banana, peeled, cut lengthwise in 3 stripes, cut triangles from the central stripe
• 4 -10 cherries, halved, without stones
• 2 bars of dark chocolate, broken to fitting pieces - 50-100 g marzipan
- 50 -100 g nougat or your favourite nut butter
TIP - You may use anything that may taste well, when combined with a sweet yeast cake (e.g. pineapple, apricot, berries, Vanilla custard, jam). Just give it a try.
PREPARATION:
- Mix flour, yeast, sugar, coriander, salt, and clove powder.
- Add the milk and knead a heavy dough.
- Leave the dough rise for approx. 40 minutes at 30 - 35 °C. Thereafter, kneed the dough again and let the dough rise again for approx. 40 minutes at 30 - 35 °C.
- Shortly kneed the dough for getting out large bubbles. Then build balls of approx. 4-5 cm in size. On a smooth floured surface, roll out the balls to thin discs.
- Place a portion of one type of filling (e.g. an apple slice or a small heap of nut butter) on one half of each dough disc. Usually, there should be only one type of filling in each cookie, but there is no restriction to trying any combination you like.
- Fold the empty half of the dough disc onto the filling and thoroughly close the dough sleeve. The filling must be covered in dough completely. Knead the dough sleeve to the correct triangle shape.
- Bake the dough triangles until they get a golden colour (2 - 4 minutes).
- Leave the cookies cool down on a cake rack. Spread some icing sugar on each cookie. Alternatively coat with icing.
TIP - The optimum amount of filling depends on the thickness of the dough discs. Do not make too large dough discs. They must fit easily into the wells of the lower heating plate and leave some free space for the dough to rise during baking.
MEATBALLS
INGREDIENTS:
- 250 g minced meat
• 1 onion, finely chopped
•legg - 5 - 7 slices toasting bread
• 1 teaspoon of your favourite barbecue spice mixture
• 1 teaspoon sweet capsicum spice
- Salt to taste
PREPARATION:
- Tear one slice of toasting bread to small flakes and keep the other slices at hand.
- Then, thoroughly mix the bread flakes, minced meat, chopped onion, egg, and spices.
- When the appliance reached the operating temperature, fill an appropriate portion of the meat mixture in each well of the heating plate.
- With the lid closed, roast the meatballs until they get a crispy crust (approx. 3 - 4 minutes).
- After removing the meatballs, shortly roast a slice of bread in each well.
- After removing the bread, roast the next portion of the meat mixture and thereafter the next slices of bread.
- Serve the meatballs with the roasted bread slices.
POTATO FRITTERS
INGREDIENTS:
- 400 g potatoes, peeled
• 1 onion, finely chopped
•1egg
• 1 heaped tablespoon flour
• 1/2 teaspoon ground nutmeg
• 1 pinch of ground, dried basil
- 1 pinch of salt

TIP - Keep your favourite ingredients for serving at hand. For example: cinnamon and sugar, apple sauce, etc.
PREPARATION:
- Grate the potatoes. Then, add the other ingredients and mix thoroughly.
- Wait until the appliance reaches operating temperature. Then fill a portion of the potato mixture into the wells of the heating plate.
- Bake until the potato fritters get a slightly golden crust (8 - 10 minutes).
- Serve to taste with cinnamon and sugar, apple sauce, or other side dishes.
SPANISH EGG
INGREDIENTS:
•1egg
•1/2capsicum
- 1 small onion
- 1 small canned tomato
• 2 heaped teaspoons flour
• 1/2 teaspoon concentrated tomato purée
- 1 pinch of pepper
- 1 pinch of salt
• 1/2 teaspoon dried, ground basil
PREPARATION:
- Beat the egg with flour, tomato purée, basil, pepper and salt to an even, frothy mixture.
- Cut capsicum, tomato and onion in small cubes or short stripes.
- Combine egg and vegetables.
- Wait until the appliance reaches operating temperature. Then fill a portion of the egg mixture into the wells of the heating plate.
- Bake the mixture until it is golden brown (2 - 3 minutes).
- Remove the egg triangles and put the next portion into the wells.
- Serve with toast or on rice.
GASTROBACK®
MACHINE À SANDWICHES
DESIGN