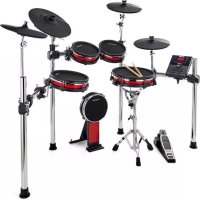
CompactKit 7 - Electronic musical instrument ALESIS - Free user manual and instructions
Find the device manual for free CompactKit 7 ALESIS in PDF.
| Product Type | Portable electronic drum kit |
| Brand | Alesis |
| Model | CompactKit 7 |
| Power supply | Power adapter (power cable included) |
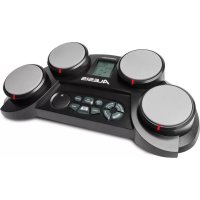
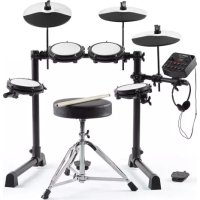
| Number of pads | 7 touch-sensitive drum pads |
| Number of kits | 50 kits (45 presets + 5 user) |
| Number of voices | 265 percussion and drum sounds |
| Number of songs | 100 built-in songs (including 1 demo) |
| Included pedals | 2 pedals (bass drum and hi-hat) |
| Auxiliary input | 3.5 mm stereo jack |
| Headphone output | 6.35 mm stereo jack (disables speakers) |
| USB port | USB-B for MIDI control |
| Built-in speakers | 2 stereo speakers |
| Metronome | Human voice or click, adjustable |
| Reverb | 4 levels (r0 to r3) |
| Recording | Single session, non-volatile memory |
| Control panel | LCD screen and navigation keys |
| Maintenance and cleaning | Wipe with a dry, soft cloth |
| Safety | Use the provided adapter; do not expose to moisture |
| Spare parts and repairability | Contact Alesis support for any repairs |
| General information | Manual available online at notice-facile.com |
Frequently Asked Questions - CompactKit 7 ALESIS
User questions about CompactKit 7 ALESIS
0 question about this device. Answer the ones you know or ask your own.
Ask a new question about this device
Download the instructions for your Electronic musical instrument in PDF format for free! Find your manual CompactKit 7 - ALESIS and take your electronic device back in hand. On this page are published all the documents necessary for the use of your device. CompactKit 7 by ALESIS.
USER MANUAL CompactKit 7 ALESIS
User Guide (English)
Introduction
Box Contents
CompactKit 7 Power Adapter
(2) Drum Sticks User Guide
(2) Footswitch Pedals Safety & Warranty Manual
Support
For the latest information about this product (system requirements, compatibility information, etc.) and product registration, visit alesis.com.
For additional product support, visit alesis.com/support.
Features
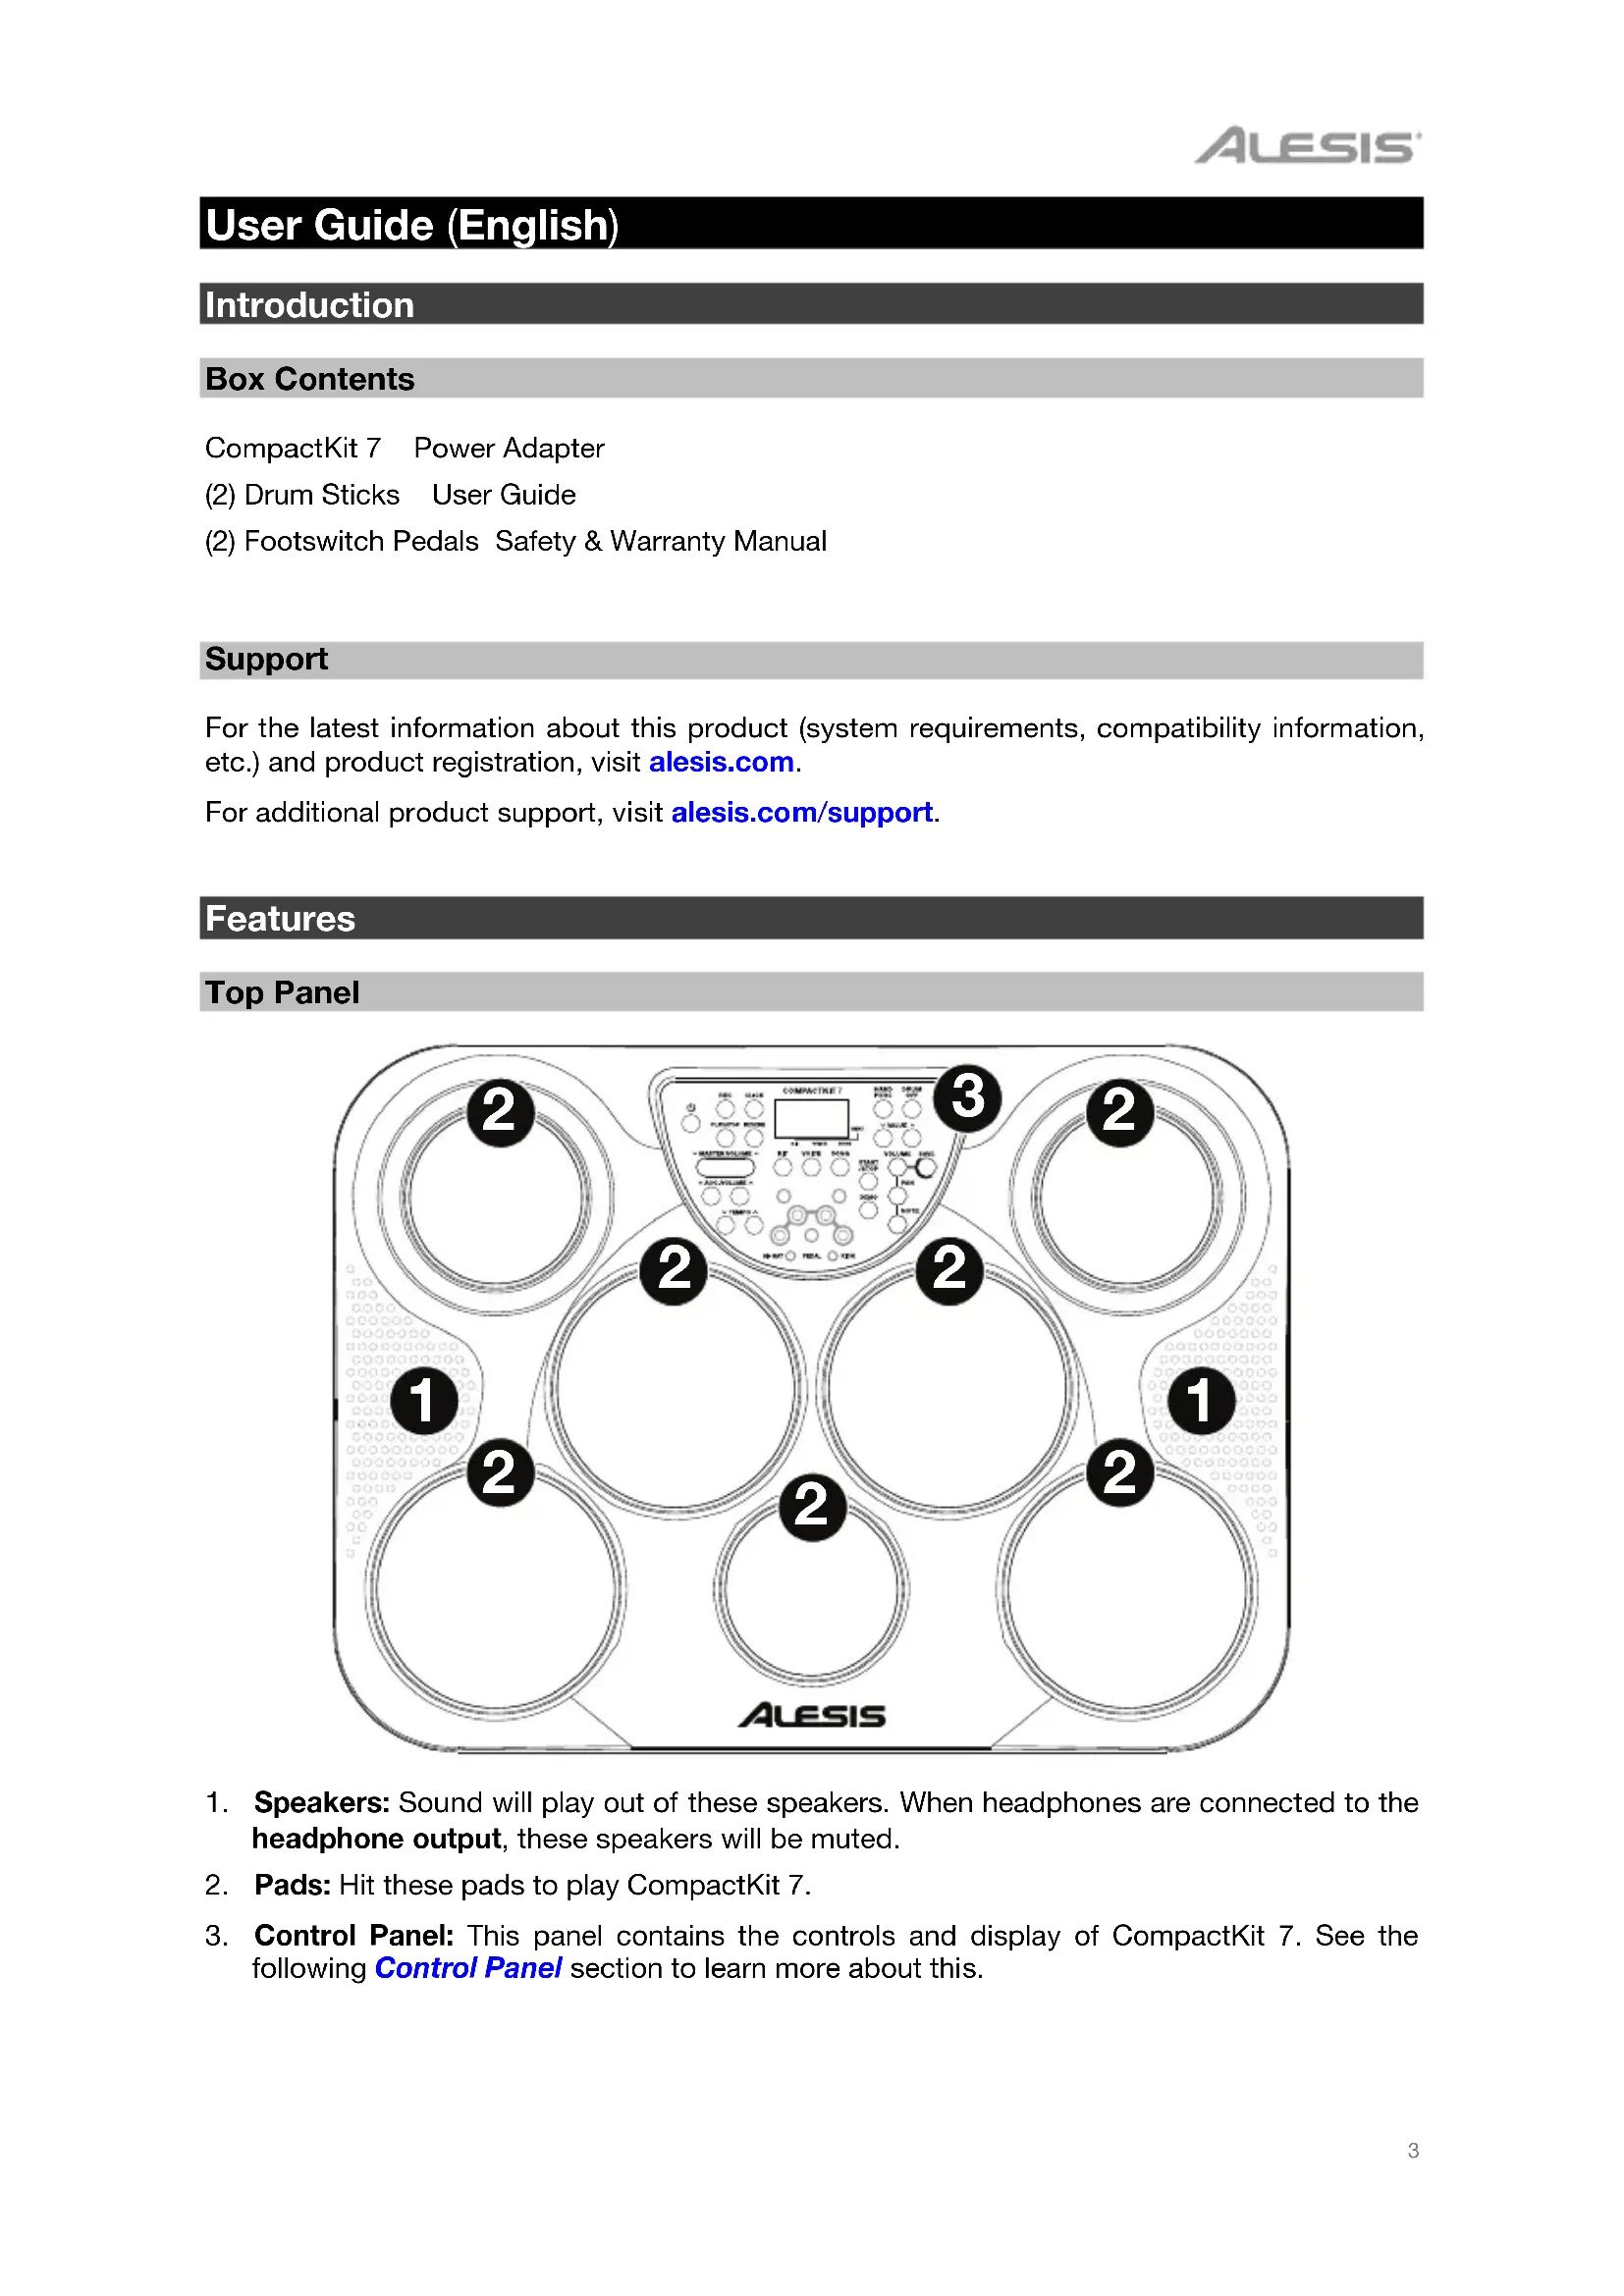
Top Panel

- Speakers: Sound will play out of these speakers. When headphones are connected to the headphone output, these speakers will be muted.
- Pads: Hit these pads to play CompactKit 7.
- Control Panel: This panel contains the controls and display of CompactKit 7. See the following Control Panel section to learn more about this.
Control Panel
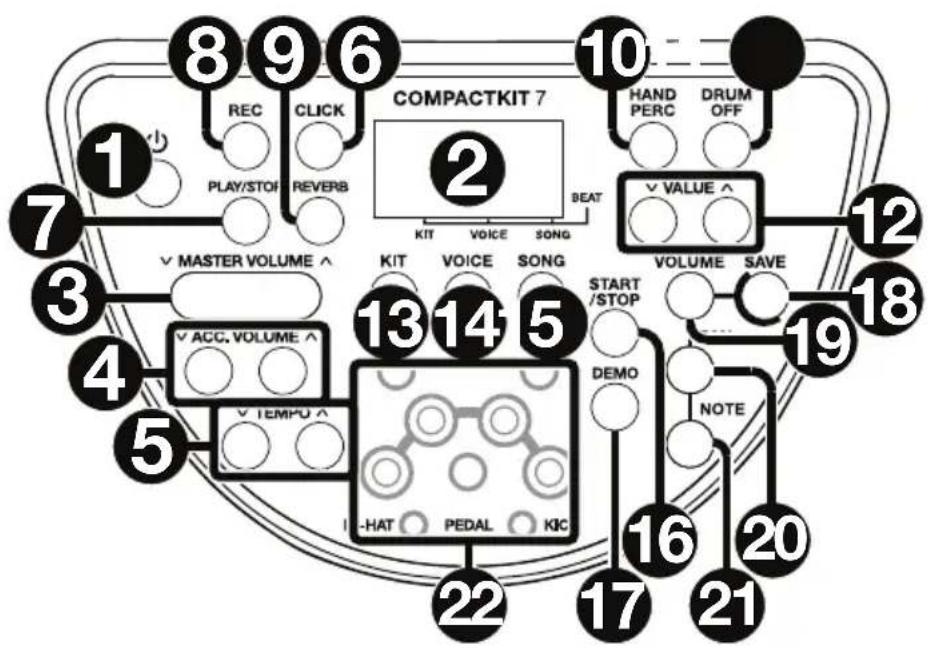
- Power Button: Press this button to power CompactKit 7 on or off.
- Display: This LCD shows information relevant CompactKit 7's current operation.
- Master Volume Down/Up: Use these buttons to adjust the master volume.
- Acc. Volume Down/Up: Use these buttons to adjust the volume of the accompaniment (everything but the drum sounds in a song).
- Tempo Down/Up: Use these buttons to adjust the tempo.
- Click: Press this button to activate or deactivate the metronome ("click").
- Play/Stop: Press this button to start or stop playback of your recording.
- Rec: Press this button to start or stop recording.
- Reverb: Press this button to change the reverb level. See Operation >Reverb to learn how to do this.
- Hand Perc: Press this button to select Song 077 and Kit 015 instantly. Kit 015 uses sounds from hand percussion instruments rather than standard drums.
- Drum Off: Press this button to activate or deactivate the drum part of a song.
- Value Down/Up: Use this buttons to adjust the setting shown in the display. See Operation to learn more.
- Kit: Press this button, and then use the Value Down/Up buttons to select a drum kit. See Operation > Kits to learn more.
- Voice: Press this button, and then use the Value Down/Up buttons to select a voice for a pad. See Operation > Kits to learn more.
- Song: Press this button, and then use the Value Down/Up buttons to select a song. See Operation > Songs to learn more.
- Start/Stop: Press this button to start or stop the current song.
- Demo: Press this button to start or stop the demo song.
-
Save: Press this button to save the current kit to a User Kit.
-
Volume: Press this button, and then use the Value Down/Up buttons to adjust the volume of a specific pad. See Operation > Kits > Editing to learn more.
- Pan: Press this button, and then use the Value Down/Up buttons to adjust the panning of a specific pad. See Operation > Kits > Editing to learn more.
- Note: Press this button, and then use the Value Down/Up buttons to adjust the MIDI note of a specific pad. See Operation > Kits > Editing to learn more.
- Indicators: Each of these lights illuminates when its corresponding pad is being played.
Rear Panel
- Power Input: Connect this input to a power outlet using the included power adapter.
- Kick Input: Connect one of the included footswitches to this input. When you press the footswitch, CompactKit 7 will receive the message in the same manner as it does when you hit a pad.
- Hi-Hat Input: Connect one of the included footswitches to this input. If you hit the hi-hat pad while pressing the footswitch, it will produce a closed hi-hat sound. If you hit the hi-hat pad while the footswitch is up, it will produce an open hi-hat sound. If you press the footswitch without hitting a pad, it will produce a hi-hat pedal sound.
- Headphone Output: Connect 1/4" (6.35 mm) stereo headphones (optional, sold separately) to this output. When headphones are connected, the speakers will be muted.
- Aux In: Connect an optional audio source (e.g., smartphone, computer, etc.) to this input using a standard 1/8" (3.5 mm) stereo cable (not included).
- USB Port: Connect this port to a USB port on your computer using a standard USB cable (not included). This will let you use CompactKit 7 as a USB MIDI controller. See the Operation > USB MIDI section to learn more about this.
Operation
Kits
Selecting
CompactKit 7 has several different drum kits. Each kit is a collection of sounds that make up a typical drum set.
To select a kit, press Kit and then use the Value Down/Up buttons to select the kit number (Preset Kit 001-045 or User Kit 046-050). A dot will appear in the display above Kit to indicate you are selecting the kit.
To adjust the master volume, use the Master Volume Down/Up buttons (L00-L16).
Editing
CompactKit 7 lets you configure each pad separately. You can select an independent voice (sound), volume, panning, and MIDI note for each pad.
Note: The MIDI note doesn't affect the sound of the kit during normal operation. It affects the MIDI note the pad sends to your computer over its USB port (e.g. to your recording software, virtual instrument plugin, etc.). See USB MIDI to learn more.
To change the voice of a pad or footswitch:
- Press Voice. A dot will appear in the display above Voice to indicate you are adjusting a voice setting.
- Hit a pad or press a footswitch to select it.
- Use the Value Down/Up buttons to select a voice (001-265) for the pad or footswitch.
To change the sound of another pad, repeat Steps 2-3.
To set the volume of a pad or footswitch:
- Press Volume. A dot will appear in the display above Voice to indicate you are adjusting a voice setting.
- Hit a pad or press a footswitch to select it.
- Use the Value Down/Up buttons to set the volume (L00-L31) for the pad or footswitch.
To set the volume of another pad, repeat Steps 2-3.
To set the panning of a pad or footswitch:
- Press Pan. A dot will appear in the display above Voice to indicate you are adjusting a voice setting.
- Hit a pad or press a footswitch to select it.
- Use the Value Down/Up buttons to set the panning (P-8 [left] to P 0 [center] to P 8 [right]) for the pad or footswitch.
To set the panning of another pad, repeat Steps 2-3.
To set the MIDI note of a pad or footswitch:
- Press Note. A dot will appear in the display above Voice to indicate you are adjusting a voice setting.
- Hit a pad or press a footswitch to select it.
- Use the Value Down/Up buttons to adjust the note (n00-n99) for the pad or footswitch. To set the note of another pad, repeat Steps 2-3.
Saving
After making changes to a kit, remember to save it. This prevents your changes from being lost when you select a different kit or when you power CompactKit 7 off.
To save a kit:
- Select the kit you want to save by pressing Kit and then using the Value Down/Up buttons to select the kit number.
- Press Save. The kit number will flash in the display.
- Use the Value Down/Up buttons to select a User Kit (046-050). The current kit will overwrite this User Kit.
- Press Save. The kit number will stop flashing, and that kit will be selected.
Songs
CompactKit 7 has several songs consisting of drum parts and accompaniment. You can play the song with or without the accompaniment. Each song has its own default tempo and default kit. You can change either.
To select a song, press Song and then use the Value Down/Up buttons to select the song number (001-100). A dot will appear in the display above Song to indicate you are selecting the song.
To play or stop the song, press Start/Stop. (Songs 001-080 will loop until you stop them. Songs 081-100 will stop when they are finished.)
To play or stop the demo song, press Demo.
To adjust the master volume, use the Master Volume Down/Up buttons (L00-L16).
To adjust the volume of the accompaniment, use the Acc. Volume Down/Up buttons (A00-A16).
To adjust the tempo of the song, press Tempo, and then use the Value Down/Up buttons to select the tempo (030-280 beats per minute). This also sets the tempo of the metronome.
To use the metronome, press Click once to use a human voice (counting each beat). Press Click again to use a standard metronome "click." Press Click once more to deactivate the metronome.
To activate or deactivate the drum part of a song, press Drum Off.
Reverb
You can apply a reverb effect to the sound of CompactKit 7. This will affect the currently selected kit as well as the current song.
To adjust the amount of reverb, press Reverb, and then use the Value Down/Up buttons to select the level (r-0 - r-3).
Recording and Playback
You can use CompactKit 7 to record your performance and play it back.
To record your performance:
- Select the desired kit, song, tempo, and reverb level (as described earlier). Also, if you want to activate or deactivate the drum part of the song, press Drum Off.
- Press Rec. Its light will flash.
- To start recording, hit a pad or press Start/Stop. The metronome will count off the tempo, but it will not be recorded. To deactivate the metronome, press Click.
- To stop recording, press Start/Stop.
Important:
- If the memory is full before you stop recording, FL will appear in the display, and it will stop recording automatically.
- When you record a new performance, it will overwrite the previously recorded performance.
- When you power CompactKit 7 off, the recording will remain in the memory.
To play back your recorded performance, press Play/Stop.
USB MIDI
When CompactKit 7 is connected to your computer's USB port, you can use it as a USB MIDI controller. In this scenario, the metronome, song, and kit sounds will not be recorded. Instead, you can play the pads and footswitches, each of which will send MIDI note messages to your computer (e.g. to your recording software, virtual instrument plugin, etc.).
See Kits > Editing to learn how to set the MIDI note for each pad or footswitch.
Assistance technique
Technical Specifications
| Pads | 7 velocity-sensitive pads with indication lights on control panel 2 footswitch inputs on rear panel |
| Sounds | 265 drum and percussion sounds |
| Songs | 80 looped songs 20 fixed-length songs 1 demo song |
| Connections | (2) 1/4” (6.35 mm) inputs (for kick and hi-hat footswitches, included) (1) 1/4” (6.35 mm) stereo headphone output (1) 1/8” (3.5 mm) stereo auxiliary input (1) power input |
| Power | 12V DC, 2 A, center-positive power adapter (included) (6) C batteries |
| Dimensions (width x depth x height) | 19.7” x 14.6” x 6.2” 500 mm x 370 mm x 157 mm |
| Weight | 7.3 lbs. 3.3 kg |
Specifications are subject to change without notice.
Trademarks and Licenses
Alesis is a trademark of inMusic Brands, Inc., registered in the U.S. and other countries. All other product or company names are trademarks or registered trademarks of their respective owners.