Q Mini - DJ Equipment ALESIS - Free user manual and instructions
Find the device manual for free Q Mini ALESIS in PDF.

| Product Type | USB MIDI Master Keyboard |
| Brand | Alesis |
| Model | Q Mini |
| Category | DJ Equipment / MIDI Controller |
| Number of Keys | 32 keys (2.5 octaves) velocity-sensitive |
| Connectivity | 1 USB port (power and data) |
| Power Supply | Via USB port (5V, 500mA) |
| Dimensions (approx.) | 41 x 17 x 6 cm |
| Weight (approx.) | 1.2 kg |
| Control Buttons | Pitch bend (2 buttons), modulation (1 button), rotary volume, sustain |
| Octave Buttons | Octave +/-, backlit (red/green), transposition up to ±4 octaves |
| Advanced MIDI Functions | Program change, bank LSB/MSB, MIDI channel (1-16), transposition, global tuning |
| Controller Assignment | Customizable via Edit mode (pitch, modulation, volume, octave buttons) |
| Velocity Curves | 4 preset curves + fixed value (0-127) |
| Sustain Mode | Latched (toggle) or momentary |
| Panic Function | Resets all controllers and turns off stuck notes |
| Compatibility | Windows, macOS, iOS (via adapter), Linux (MIDI class compliant) |
| Included Software | Software download card (not specified) |
| Box Contents | Q Mini keyboard, USB cable, quick start guide, safety instructions |
| Maintenance | Clean with a soft, dry cloth. Avoid moisture and extreme temperatures. |
| Repairability | Spare parts not provided by the manufacturer. Contact Alesis support for repairs. |
Frequently Asked Questions - Q Mini ALESIS
User questions about Q Mini ALESIS
0 question about this device. Answer the ones you know or ask your own.
Ask a new question about this device
Download the instructions for your DJ Equipment in PDF format for free! Find your manual Q Mini - ALESIS and take your electronic device back in hand. On this page are published all the documents necessary for the use of your device. Q Mini by ALESIS.
USER MANUAL Q Mini ALESIS
User Guide (English)
Introduction
Box Contents
Q mini
Software Download Card
USB Cable
Quickstart Guide
Safety & Warranty Manual
Support
For the latest information about this product (system requirements, compatibility information, etc.) and product registration, visit alesis.com.
For additional product support, visit alesis.com/support.
Connecting Your Keyboard
- Plug the USB cable provided with your Q mini keyboard to a free USB port on your computer.
- Plug the other end of the USB cable into the USB input on the Q mini keyboard.
The single USB cable not only powers the keyboard but also sends MIDI data to and from your computer system.
If you intend to use your Q mini with a USB hub, make sure the USB hub uses an external power supply. Using a passive USB hub which does not use a power supply may not provide enough power if other devices are connected to the hub.
We do not recommend connecting an audio interface to the same USB hub as the Q mini.
Getting Started
Once you have finished the installation, you will need to configure your music software for use with Q mini. Connect Q mini to your computer and then open your software. In your software's Preferences, Options, or Device Set-Up menu, select Q mini.
For further information about configuring your software to receive MIDI data from your Q mini, and using software instruments with the application, refer to the documentation provided with that product.
Keybed
The Q mini keyboard has 2 1/2 playable octaves. The range of the keyboard is approximately in the middle of an 88-note keyboard. Using the Oct/Data "+" or "-" buttons, you can access the full 88 keyboard range of a large piano keyboard.
Octave/Data Buttons (Oct/Data)
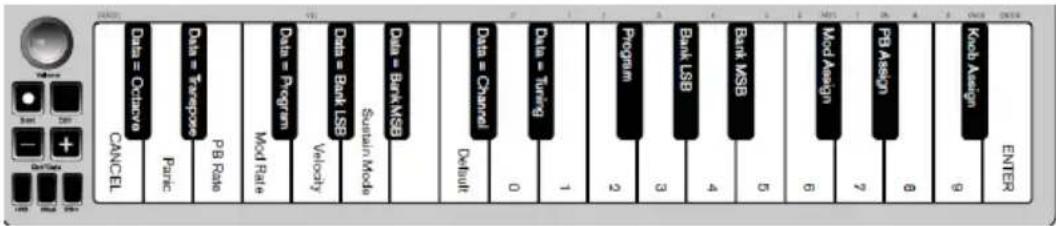
text_image
Data = Octave CANCEL Data = Warehouse Panc PB Rate Mod Rate Data = Program Velocity Sustain Mode Bark MSB Data = Channel Default 0 Data = Turning 1 Program 2 Bank LSB 3 Bank MSB 4 Mod Assign 5 6 7 8 9 KB Assign ENTER Koch AssignThe assignable Octave buttons are used to shift the keyboard up or down in one-octave increments (12 semitones at a time). This extends the range of the keyboard up to four Octaves in either direction, which lets you play notes that lie outside of the 32 keys.
In their default state, such as when you first switch on your Q mini keyboard, the buttons are backlit in red. However, when you press either of them the color of that button turns green indicating that the octave change is active.
If you press the octave "+" button once, the button will turn green indicating the keyboard's octave is now shifted up. If you press the octave "+" key again, you will shift one more octave up, and so on.
To shift the octave down, press the octave “-” button and notice that the button turns green. If only the octave “-” key is lit green, the octave is shifted down and, if only the octave “+” key is lit in green, the octave is shifted up.
To return the octave shift to 0, press both the octave "+" and "-" buttons together. Both LEDs will return to their normal red color at half brightness, indicating that the octave shift has returned to 0.
You can assign other functions to these buttons in Edit Mode.
Pitch Bend Buttons
As the name indicates, the assignable pitch bend buttons are primarily used to bend the notes played on the keyboard up or down. Pressing and releasing these buttons while playing lets you play phrases not normally associated with keyboards, such as guitar-style phrases.
Your sound source determines if and how far you can bend the note. The usual setting is two semitones; however you should refer to the documentation provided with your sound source for information about how to change the Pitch Bend range.
You can also reassign these buttons in Edit Mode.
Modulation Button
The modulation button takes the place of a wheel that is typically used for modulation of the sound you are playing. The depression of the button mimics the rotation of a wheel. This type of real-time controller was originally introduced on electronic keyboard instruments to give the performer options such as adding vibrato, just like players of acoustic instruments do.
Just like the pitch bend buttons, the modulation button is fully MIDI-assignable.
The default Continuous Controller number (MIDI CC) for Modulation is 1.
You can also reassign this button in Edit Mode.
Volume Knob
The Volume Knob sends a MIDI message that controls the volume of the notes you are playing.
The Volume Knob is assigned the default Continuous Controller number (MIDI CC) of 7 and can also be assigned to different parameters, such as pan (balance), attack, reverb, chorus and many more.
Refer to your MIDI hardware or software documentation to confirm that it is able to receive MIDI Volume messages.
Sustain Button
The Sustain button can be used for sustaining the sound that you are playing, without having to keep your hands on the keyboard (just like the sustain pedal on a piano). Pressing the Sustain button engages Sustain; pressing it again disengages Sustain.
You can change how this button behaves in Edit Mode.
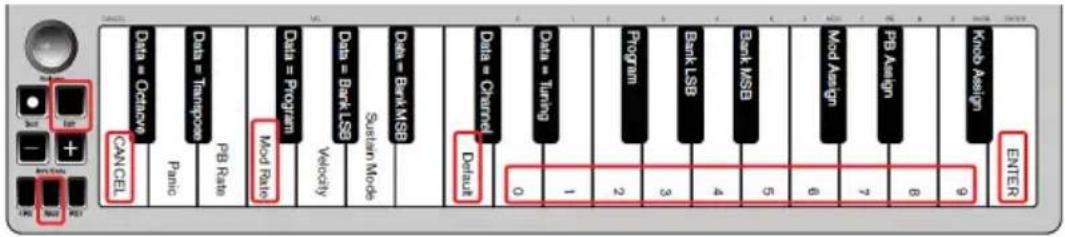
Edit Button
The Edit button is used to access the advanced Q mini functions located on the keyed.
Pressing the Edit button switches your keyboard into Edit Mode. The Edit button turns blue, and you can use the keys to select various advanced functions and enter data.
Depending on the function, your keyboard will exit Edit Mode as soon as a function is selected, or the Cancel or Enter keys are pressed. At this point, the Edit button light will dim, and the keyboard can be used for playing notes again.
Edit Mode
Octave/Data Buttons
By default the Octave/Data "+" and "-" buttons are used for shifting the Q mini keypad up or down one octave at a time. Whenever you power up the keyboard, the octave setting will be at the default value of "0," and the buttons will be red in color at half-brightness.
When the “+” button is used for raising the octave it will either illuminate or flash at full-brightness based on the octave chosen, and the “-” remains at half-brightness. Pressing the “-” button has the opposite affect, such that it will illuminate or flash at full-brightness based on the octave chosen, while the “+” button remains at half-brightness. The following table lists the colors used to identify each octave:
| OFF | GREEN | ORANGE | RED | RED Flashing |
| 0 | +1 | +2 | +3 | +4 |
| 0 | -1 | -2 | -3 | -4 |
If the Octave/Data buttons have been assigned to one of the 6 additional functions as described in "Reassigning the Octave/Data Buttons", you can reassign and use them for their default function (Octave) using the method described below.
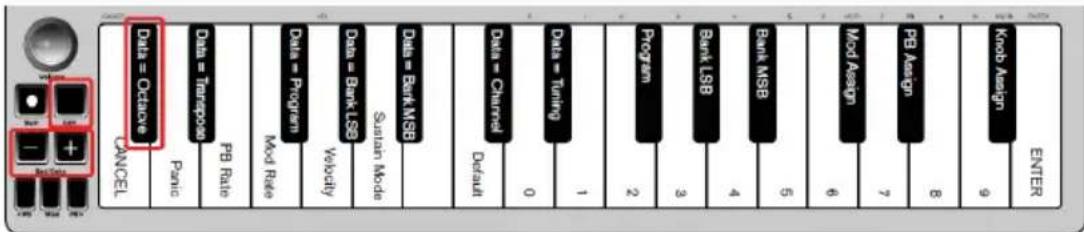
text_image
Data = Octave CANCEL Data = Transpose Panc PB Rate Mod Rate Data = Program Velocity Sustain Mode Data = Bank-LSB Data = Bank-MSB Data = Channel Default 0 1 2 3 4 5 6 7 8 9 Knob Assign ENTERTo reassign the "+" and "-" buttons to the Octave function and choose a new octave setting:
- Press the Edit button. The Edit button light will illuminate to full brightness indicating that the keyboard is in Edit mode.
- Press the "DATA = OCTAVE" key (C#, first black key on the left).
The keyboard exits Edit mode as soon as the "DATA = OCTAVE" key is pressed and both Octave buttons "+" and "-" will be red at half-brightness. - Press either the "+" or "-" button to raise or lower the octave.
To return to the default octave setting:
Simultaneously press the "+" and "-" buttons. Both buttons will return to red at half-brightness.
The Data=Octave assignment is retained when the keyboard is turned off.
Reassigning the Octave/Data Buttons
In addition to setting an octave shift, the Octave/Data "+" and "-" buttons can also be assigned to control any one of the six additional MIDI functions described in this section.
In the diagram below, you will see that the first 7 black keys are labeled "DATA = ____." Use these keys to select which function to assign to the Octave/Data buttons. When assigned to these functions, both buttons will remain lit, regardless of the current setting of that function.
The six additional functions that you can assign the Octave/Data button to are described in the following sections:

text_image
Data = October Data = Transport Data = Program Data = Bank LSB Data = Bank MSB Data = Channel Data = Tuning Program Bank LSB Bank MSB Mod Assign PB Assign Knob Assign ENTER Patio PB Rate Mod Rate Velocity Sustatin Mode Default 0 1 2 3 4 5 6 7 8 9 CANCELTranspose
In some cases it may be useful to raise or lower the pitch by a number of semitones (half-steps) as opposed to an entire octave. For example, if you are playing a song with a singer that is having difficulty singing the top notes, you may want to reduce the pitch by one or two semitones. This is achieved using the Transpose function. When assigned to this parameter, the keyboard can be transposed a maximum of one octave in either direction. The Data=Octave assignment is retained when the keyboard is turned off.
To assign the Octave "+" and "-" buttons to the Transpose function:
text_image
Data = Octacve CANCEL Data = Transport Panc FB Rate Data = Bark USB Velocity Mod Rate Data = Program Default 0 1 2 3 4 5 6 7 8 9 KBb Assign Enter SBkb Assign Mod Assign Bank MSB Bank LSB Data = Channel Sustain Mode Default Data = Tuning Program Data = Bark MSB SBkb Assign FB Assign End- Press the Edit button. The Edit button light will illuminate to full brightness.
- Press the "DATA = TRANSPOSE" key, (D#, 2nd black key from the left).
The keyboard exits Edit Mode as soon as the "DATA = TRANSPOSE" key is pressed, and the Edit light will return to half brightness.
- Press the "+" key and you will hear the pitch of the note get higher. Press the "-" key and you will hear the pitch get lower.
- Press both "+" and "-" together to cancel Transpose and return Transpose to zero.
The DATA=TRANSPOSE assignment is retained when the keyboard is turned off.
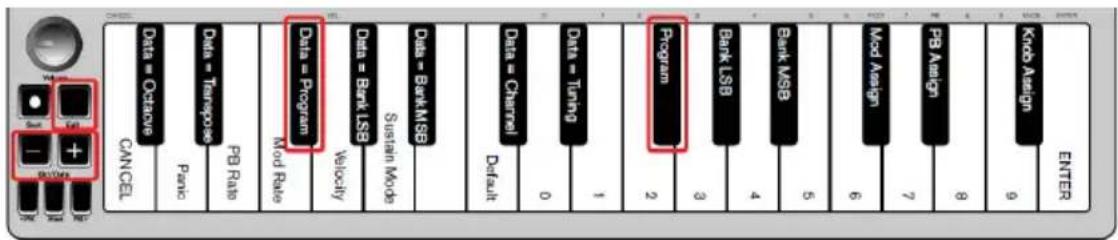
Program Change
Program Changes are used to change the instrument or voice you are using. For example, you could use this function to change the instrument to a bass sound.
text_image
Data = Octane Data = Teregose PB Rate CANCEL Panic Mod Rate Data = Program Data = Bank LSB Velocity Sustain Mode Data = Bank MSB Data = Channel Default 0 1 2 3 4 5 6 7 FB Assign 9 Knob Assign ENTERYou can send a program change by:
- Sending an Incremental or Decremental program change using the Octave/Data buttons in conjunction with the "Data=Program" key, which lets you step through each program number in either direction. If your MIDI hardware or software can receive MIDI Program changes, the buttons will increment or decrement between 0 and 127.
- or - - Entering the program number using the numerical keys (0 - 9) in conjunction with the "PROGRAM" key on your Q mini.
Both methods are explained below:
To send Incremental or Decremental Program Change messages:
- Press the Edit button to engage Edit Mode. The Edit button light will illuminate to full brightness.
- Press the "Data=Program" key, which is the black key above F (F#, 3rd black key from the left).
- The Edit Mode button will return to half brightness as soon as the "Data=Program" key has been pressed.
- Press the Octave/Data "+" or "-" button to step upwards or downwards through the sounds while continuing to play notes, until you find the instrument you want to use.
Pressing the "+" and "-" buttons simultaneously will recall Program 0, which selects a grand piano sound if you are playing a General MIDI (GM) Instrument.
The Data=Program assignment is retained when the keyboard is turned off. However, the setting is not.
To send a Program Change message using the numerical keys:
- Press the Edit button to enter Edit Mode. The Edit button will illuminate to full brightness.
- Press the "PROGRAM" key (F#, 6th black key from the right).
- Use the numerical keys (0 - 9) to enter the program number for the instrument you wish to play.
- Press the "ENTER" key (G, last white key on the right) to exit Edit Mode. The Edit button will return to half brightness indicating that programming is complete.
If you have made an error while entering the numerical data value, press the CANCEL key (C, first white key on the left). This exits Edit Mode without sending a program change message.
To return Program function to the default setting (Program 0):
- Press the Edit button to enter Edit Mode. The Edit button will illuminate to full brightness.
- Press the "PROGRAM" key (F#, 6th black key from the right as indicated in the graphic above).
- Press the "DEFAULT" key (C, 8th white key from the left). The Edit light will dim to half brightness indicating that programming is complete.
The program change message has been sent, selecting the default value of General MIDI Instrument "0" (Grand Piano).
Bank LSB and Bank MSB
Program Changes are most commonly used to change instruments and voices. However, the number of instruments accessible via Program Changes is limited to 128. However, some devices have more than 128 patches and require a different method of accessing these extra sounds. Most modern hardware synthesizers and many software synthesizer programs have hundreds of patches that are organized in banks of sounds.
Generally, these devices use Bank LSB and Bank MSB messages to access the banks, then use program changes within the banks to access specific patches. Most devices only accept MSB messages, but you should refer to the documentation for your device or software to confirm which bank message must be sent first, as this is determined by each manufacturer.
You can send either message type by:
- Sending an Incremental or Decremental change using the Octave/Data buttons, which lets you step through each bank number in either direction.
- or -
- Entering the bank number using the numerical keys (0 - 9) on your Q mini. Both methods are explained below for each message type:
To send Incremental/Decremental Bank LSB changes using the Oct/Data buttons:

text_image
Data = October PB Rate Mod Ratio Data = Program Data = Program Data = Bus Status in Mode Velocity Data = Bank LSB Data = BeMSB Data = Channel Data = Tuning Program Bank LSB Bank MSB Mod Assign FB Assign Knd Assign EXIT 0 1 2 3 4 5 6 7 8 9 CANCEL Pavio Data = Transport Data = Program Data = Bus Data = Channel Detail- Press the Edit button to enter Edit Mode. The Edit button will illuminate to full brightness.
- Press the "DATA = BANK LSB" key (G#, 4th black key from the left).
- Press the Octave/Data "+" or "-" button to step upwards or downwards through the Bank LSB values. This takes you through each bank of sounds.
To send Incremental/Decremental Bank MSB changes using the Oct/Data buttons:
- Press the Edit button to enter Edit Mode. The Edit button will illuminate to full brightness.
- Press the "Data = Bank MSB" key (A#, 5th black key from the left).
- Press the Octave/Data “+” or “-” button to step upwards or downwards through the Bank MSB values. This takes you through each bank of sounds.
The Data=Bank LSB, Data=Bank MSB value or any data assigned to LSB or MSB is not retained when the keyboard is turned off. However, the assignment data keys will be.
To send Bank LSB Changes using the numerical keys:
- Press the Edit button to enter Edit Mode. The Edit button will illuminate to full brightness.
- Press the "BANK LSB" key (G#, 5th black key from the right).
- Use the numerical keys (0 - 9) to enter the Bank LSB number for the bank of sounds you wish to access.
- Press the "ENTER" key (G, last white key on the right). The Edit button will return to half brightness indicating that programming is complete.
To send Bank MSB Changes using the numerical keys:
- Press the Edit button to enter Edit Mode. The Edit button will illuminate to full brightness.
- Press the "BANK MSB" key (A#, 4th black key from the right).
- Use the numerical keys (0 - 9) to enter the Bank MSB number for the bank of sounds you wish to access.
- Press the "ENTER" key (G, last white key on the right). The Edit button will return to half brightness indicating that programming is complete.
To recall the default bank number (0): Simultaneously press the “+” and “-” buttons.
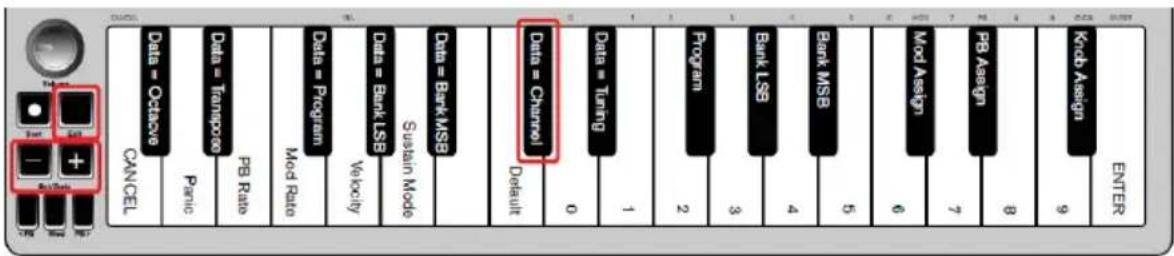
Channel
MIDI data from the keyboard can be sent on any of 16 MIDI Channels. However, certain MIDI devices and software require transmission of MIDI data on a specific channel number. If this is the case, you can change the MIDI channel number as described below.
To change the MIDI Channel number:
text_image
Data = Octave CANCEL Data = Transporte Pacnio PB Rate Mod Rate Data = Program Velocity Data = Bank LSB Sustain Mode Default Data = Bank MSB Data = Channel 0 1 2 3 4 5 6 7 8 9 PKcb Assign Enter Model Assign PB Assign 7 8 9- Press the Edit button to enter Edit Mode. The Edit button will illuminate to full brightness.
- Press the "DATA = CHANNEL" (named C#, 6th black key from the left). The Edit button light will return to half-brightness.
- Press the Octave/Data "+" or "-" button to step upwards or downwards through the MIDI Channel numbers.
Pressing both the "+" and "-" buttons together will recall Channel 1. When Channel 16 is reached and "+" is pressed, Channel 1 will be selected. The "+" and "-" button LEDs will not change, since it is not possible to have a Channel with a negative value. For example, if a device specifies that you need to send data on Channel 10, press the + button nine times to change from the channel 1 to select Channel 10.
The Data=Channel value is retained when the keyboard is turned off.
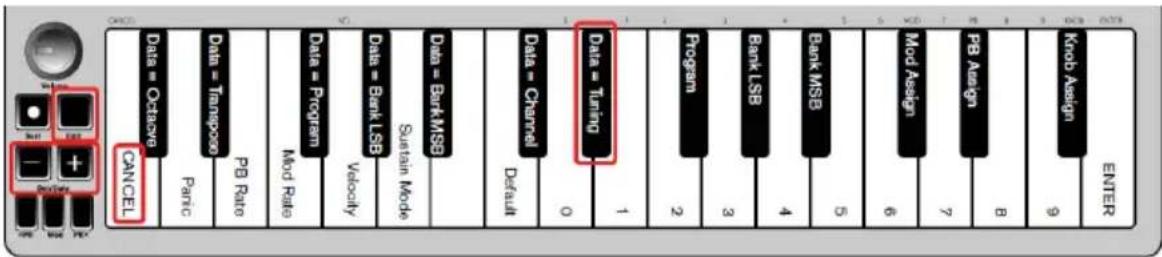
Tuning
The Tuning function can be used to alter the instrument being controlled to have its pitch shifted to be slightly sharp or slightly flat. The default Tuning value is 64, and it can be raised to 128 or lowered to 0 as described below.
text_image
CANCEL Data = October Data = Transport PB Rate Mod Rate Data = Program Data = Bank LSB Velocity Sustain Mode Data = Bank MSB Default Data = Channel 0 Data = Tuning 1 Program Bank LSB Bank MSB 5 6 Mod Assign 7 PB Assign 8 Knob Assign 9 ENTER CANCELCheck your third party hardware or software documentation to confirm that your sound source responds to "MIDI Master Tune."
To assign the “+” and “-” keys to control the Tuning function:
- Press the Edit button to enter into Edit Mode. The Edit button light will illuminate to full brightness.
- Press the "DATA = TUNING" key (D#, seventh black key from the right). The Edit button will return to half-brightness. The Oct/Data "+" button will illuminate green, and the "-" button will be red.
- Press “+” or “-” while continuing to play notes until the instrument is tuned to the pitch that you want.
Selecting a value below the default setting of 64, changes the Oct/Data “-” button from red to green. Selecting a value greater than 64, changes the Oct/Data “+” button from red to green.
To return the tuning to the default setting (concert pitch):
Press the Oct/Data “-” and “+” buttons simultaneously. Both buttons will return to their default value of red at half-brightness.
Modulation Button
It is possible to assign other MIDI controls to the Modulation button, such as:
- 01 Modulation
- 07 Volume
• 10 Pan (balance)
• 05 Portamento
There are 131 parameters in total including the 128 standard MIDI Control Change messages (MIDI CCs). However, for these parameters to have any effect on the sound, the receiving MIDI device or software must be able to read and respond to these MIDI effect messages. Most devices will at least respond to volume, modulation, and pan data.

text_image
Data = October Data = Transpose PB Rate PB Mod Rate Data = Program Data = Bank LSB Sustain Mode Data = Bank MSB Data = Channel Default Data = Tuning 1 2 3 4 5 6 7 8 9 PB Assign Knob Assign ENTER CANCE 0 CANCE +The process of assigning an effect to the Modulation button and reverting to the default setting is explained below.
To assign a parameter to the Modulation button using the numerical keys:
These instructions use the example of assigning the parameter number 131 (Channel Aftertouch) to the Modulation button, but the concept also applies when assigning other parameters.
- Press the Edit button. The Edit button light will illuminate to full brightness.
- Press the "MOD ASSIGN" key (C#, 3rd black key from the left).
- Press E (10th white key from the right) to enter "1."
- Press G (8th white key from the right) to enter "3."
-
Press E (10th white key from the right) to enter "1."
-
Press the "ENTER" key (G, last white key on the right). The Edit button will dim to half brightness indicating that programming is complete.
If you have made an error while entering the numerical data value, you can press the CANCEL key (C, first white key on the left) to exit Edit Mode without changing the effect assigned to the Modulation button.
The Modulation button assignment is retained when the keyboard is turned off.
To return the Modulation button to the default settings:
- Press the Edit button to engage Edit Mode and the Edit button light will illuminate to full brightness.
- Press the "MOD ASSIGN" key (C#, 3rd black key from the left).
- Press the "DEFAULT" key (C, 8th white key from the left). The Edit light will dim to half brightness indicating that programming is complete.
Modulation Rate
text_image
Data = October Data = Transport PB Rate Mod Rate Data = Program Data = Bank LS3 Velocity Sustain Mode Bank MSB Data = Channel Default 0 1 2 3 4 5 6 7 8 9 Knob Assign ENTER CANCEL Panic PUB Rate PUB Rate PUB Rate PUB Rate PUB Rate PUB RateIt is possible to alter the sensitivity of the Modulation button effects using the "Mod Rate" function. This lets you adjust the ramp up time for effects assigned to the Modulation button. The range for Modulation Rate is 0 - 127, with a default setting of 64. The lower the value, the slower the rate and vice versa.
As an example, the following set of instructions and accompanying table of values explains how to use the "Mod Rate" function when changing the ramp time from the default value of 64 to 127.
| Value Rate | |
| 0 | Ramp |
| 64 [default] Ramp occurs relatively quickly | |
| 126 | Ramp |
| 127 | No ramp. Only one value is sent – min. or max |
occurs
occurs
To adjust the Modulation Rate:
- Press the Edit button. The Edit button light will illuminate to full brightness.
- Press the "Mod Rate" key (F, 4th white key from the left).
- Press E (10th white key from the right) to enter "1."
- Press F (9th white key from the right) to enter "2."
- Press D (4th white key from the right) to enter "7."
If you have made an error while entering the numerical data value, you can press the "CANCEL" key (C, first white key on the left) to exit Edit Mode without making any changes.
As an alternative to steps 3 through 5, you can use the "+" and "-" buttons to change the value.
- Press the "ENTER." key (G, last white key on the right.)
- Press the "Mod" button to hear change in the effect rate.
The Mod Rate value is retained when the keyboard is turned off.
To return the Modulation Rate to the default settings:
- Press the Edit button. The Edit button light will illuminate to full brightness.
- Press the "Mod Rate" key (F, 4th white key from the left).
- Press the "DEFAULT" key (C, 8th white key from the left). The Edit light will dim to half brightness indicating that programming is complete.
Pitch Bend Buttons
text_image
PB Assign TAB TAB Assign TAB TAB Assign TAB TAB Assign TAB TAB Assign TAB TAB Assign TAB TAB Assign TAB TAB Assign TAB TAB Assign TAB TAB Assign TAB TAB Assign TAB TAB Assign TAB TAB Assign TAB TAB Assign TAB TAB Assign TAB TAB Assign TAB TAB Assign TAB TAB Assign TAB TAB Assign TAB TAB Assign TAB TAB Assign TAB CAS CAS CAS CAS CAS CAS CAS CAS CAS CAS CAS CAS CAS CAS CAS CAS CAS CAS CAS CAS CAS CAS CAS CAS CAS CAS CAS CAS CAS CAS CAS CAS CAS CAS CAS CAS CAS CAS CAS CAS CAS CAS CAS CAS CAS CAS CAS CAS CAS CAS CANCEL Data = Octabove Pancb Data = Transpose PB Rate Mod Rate Mod Rate Mod Rate Mod Rate Mod Rate Mod Rate Mod Rate Mod Rate Mod Rate Mod Rate Mod Rate Mod Rate Mod Rate Mod Rate Mod Rate Mod Rate Mod Rate Mod Rate Mod Rate Mod Rate Mod Rate Mod Rate Mod Rate Mod Rate Mod Rate Mod Rate Mod Rate Mod Rate Mod Rate Mod Rate Mod Rate Mod Rate Mod Rate Mod Rate Mod Rate Mod Rate Mod Rate Mod Rate Mod Rate Mod Rate Mod Rate Mod Rate Mod Rate Mod Rate Mod Rate Mod Rate Mod Rate Mod Rate Mod Rate Mod Rate Mod Rate Modern Mode Sustain Mode Sustain Mode Sustain Mode Sustain Mode Sustain Mode Sustain Mode Sustain Mode Sustain Mode Sustain Mode Sustain Mode Sustain Mode Sustain Mode Sustain Mode Sustain Mode Sustain Mode Sustain Mode Sustain Mode Sustain Mode Sustain Mode Sustain Mode Sustain Mode Sustain Mode Sustain Mode Sustain Mode Sustain Mode Sustain Mode Sustain Mode Sustain Mode Sustain Mode Sustain Mode Sustain Mode Sustain Mode Sustain Mode Sustain Method Sustain Method Sustain Method Sustain Method Sustain Method Sustain Method Sustain Method Sustain Method Sustain Method Sustain Method Sustain Method Sustain Method Sustain Method Sustain Method Sustain Method Sustain Method Sustain Method Sustain Method Sustain Method Sustain Method Sustain Method Sustain Method Sustain Method Sustain Method Sustain Method Sustain Method Sustain Method Sustain Method Sustain Method Sustain Method Sustain Method Sustain Method Sustain Method Sustain Method LSB B A B C D E F G H I J K L M N O P Q R T U V W X Y Z C D E F G H I J K L M N O P Q R T U V W X Y Z C D E F G H I J K L M N O P Q R T U V W X Y Z C D E F G H I J K L M N O P Q R T U V W X Y Z C D E F G H I J K L M N O P Q R T U V W X Y Z C D E F G H IJ K L M N O P Q R T U V W X Y Z C D E F G H I J K L M N O P Q R T U V W X Y Z C D E F G H I J K L M N O P Q R T U V W X Y Z C D E F G H I J K L M N O P Q R T U V W X Y Z C D E F G H I J K L M N O P Q K L M N O P Q K L M N O P Q K L M N O P Q K L M N O P Q K L M N O P Q K L M N O P Q K L M N O P Q K L M N O P Q K L M N O P Q K L M N O P Q K L M N O P Q K L M N O P Q K L M N O P Q K L M N O P Q K I N N N N N N N N N N N N N N N N N N N N N N N N N N N N N N N N N N N N N N N N N N N N N N N N N N N N N N N N N N N N N N N N N N N N N N N N N N N N N N N N N N N N N N N N N N N N N N N N N N N NNTo assign the Pitch Bend buttons to a parameter:
- Press the Edit button. The Edit button light will illuminate to full brightness.
- Press the "PB ASSIGN" key (D#, 2nd black key from the right).
- Use the Numerical Data Entry keys (0-9) to enter the number of the effect.
If you have made an error while entering the numerical data value, you can press the "CANCEL" key (C, first white key on the left) to exit Edit Mode without making any changes. As an alternative to steps 3 through 5, you can use the "+" and "-" buttons to change the value.
- Press the "ENTER" key (G, last white key on the right); the Edit light will dim to half brightness indicating that programming is complete.
- Press the Pitch Bend “>” button to increase the value of the effect.
The Pitch Bend button assignments are retained when the keyboard is turned off.
To return the Pitch Bend buttons to the default parameter:
- Press the Edit button. The Edit button light will illuminate to full brightness.
- Press the "PB ASSIGN" key (D#, 2nd black key from the right).
- Press the "DEFAULT" key (C, 8th white key from the left). The Edit light will dim to half brightness indicating that programming is complete.
Pitch Bend Rate
It is possible to alter the sensitivity of the Pitch Bend buttons using the Pitch Bend Rate function. This lets you adjust the pitch bend ramp up time. The default setting is 80, with a range of 0 - 127. As shown in the following table, the lower the value, the slower the Pitch Bend Rate and vice versa.
| Value Rate | |
| 0 | Ramp |
| 80 [default] Ramp occurs relatively quickly | |
| 126 | Ramp |
| 127 | No ramp. Only one value is sent – min. or max |
The Pitch Bend Rate can be adjusted using the "PB RATE" key in conjunction with the numerical keys. The following instructions use the example of changing the Pitch Bend Rate to 127.
text_image
CANCEL Data = Octave Data = Tanipose PB Rate Data = Program Mod Rate Data = Bank LSB Velocity Sustain Mode Data = Bank MSB Data = Channel Default 0 1 2 3 4 5 6 7 8 9 OKB Assign PUB Assign KBb Assign ENTER CANCEL Panc CNC CNC CNCTo adjust the Pitch Bend Rate:
- Press the Edit button to engage Edit Mode and the Edit button light will illuminate to full brightness.
- Press the "PB RATE" key (E, 3rd white key from the left).
- Press E (10th white key from the right) to enter "1."
- Press F (9th white key from the right) to enter "2."
- Press D (4th white key from the right) to enter "7."
If you make an error while entering the value, press the "CANCEL" key to exit Edit Mode without making any changes. As an alternative to steps 3 through 5, you can use the "+" and "-" buttons to change the value. - Press the "ENTER" key (G, last white key on the right); the Edit light will dim to half brightness indicating that programming is complete.
- Press the "PB>" button while playing to hear how the Pitch Bend will occur faster than before.
The PB Rate setting is retained when the keyboard is turned off.
To return the Pitch Bend Rate to the default setting:
- Press the Edit button. The Edit button light will illuminate to full brightness.
- Press the "PB RATE" key (E, 3rd white key from the left).
- Press the "DEFAULT" key (C, 8th white key from the left). The Edit light will dim to half brightness indicating that programming is complete.
Volume Knob
text_image
Data = October Data = Transpose PB Rate Panc Data = Program Mod Rate Data = Bank MSB Sustain Mode Velocity Data = Channel Data = Turing Program Bank LSB Bank MSB Mod Assign KB Assign KB Assign Keob Assign CANCE 0 1 2 3 4 5 6 7 8 9 ENTERTo assign the Volume Knob to an effect:
- Press the Edit button. The Edit button light will illuminate to full brightness.
- Press the "KNOB ASSIGN" key (F#, 1st black key from the right).
- Use the Numerical Data Entry keys (0 - 9) to enter the number of the parameter you want to assign to the Volume Knob.
If you have made an error while entering the parameter number, you can press the "CANCEL" key (C, first white key on the left) to exit Edit Mode without making any changes. As an alternative to step 3, you can use the "+" and "-" buttons to change the parameter. - Press the "ENTER" key (G, last white key on the right); the Edit light will dim to half brightness indicating that programming is complete.
- Move the Volume knob clockwise to increase the parameter value.
The Volume Knob assignment is retained when the keyboard is turned off.
To return the Volume Knob to its default parameter (07 - Volume):
- Press the Edit button. The Edit button light will illuminate to full brightness.
- Press the "KNOB ASSIGN" key (F#, 1st black key from the right).
- Press the "DEFAULT" key (C, 8th white key from the left). The Edit light will dim to half brightness indicating that programming is complete.
Velocity
When you play your Q mini, the sound you hear will be affected by how hard you press the key. Pressing the key very lightly will result in the sound from your software being heard very softly, while pressing the key very hard will result in it being heard very loudly. Normal playing will result in the sound from your software to be heard somewhere in between.
Your Q mini offers the velocity settings described in the table below, called Velocity Curves. While the keyboard is in Edit mode, you can follow the instructions below to choose a Velocity Curve that either suits your playing style or the kind of "feel" or dynamics you want an instrument part to have.
| Value entered Curve Notes | ||
| 0 | Low | The curve generates lower velocities for the same force, making it easier to play softly. |
| 1 [default setting] Normal | This curve is mid-way between the other two. | |
| 2 | High | The curve generates higher velocities for the same force, making it easier to play loudly. |
| 3 | Stepped | This curve outputs velocity values of 100 and 127 only, as used in some drum machines. |
| From 4 to 127 Fixed | Velocity is fixed at the selected value. All notes will play at the specified velocity. |
To select a new Velocity Curve:
- Press the Edit button to engage Edit Mode and the Edit button light will illuminate to full brightness.
- Press the "VELOCITY" key (G, 5th white key from the left).
- Use the Numerical Data Entry keys (0 - 9) to enter the number of the Velocity Curve you want to use. If you have made an error while entering the Effect number, you can press the "CANCEL" key (C, first white key on the left) to exit Edit Mode without making any changes.
As an alternative to step 3, you can use the "+" and "-" buttons to change the value. - Press the "Enter" key G (last white key on the right) to commit the change. The Edit button will dim to normal half brightness indicating that programming is complete.
The Velocity Curve setting is retained when the keyboard is turned off.
To return the Velocity Curve to the default setting, perform the following steps:
- Press the Edit button to engage Edit Mode. The Edit button light will illuminate to full brightness.
- Press G (5th white key from the left), representing "Velocity."
- Press C (8th white key from the left), representing "Default", the Edit light will dim to half brightness indicating that programming is complete.
text_image
Data = Odecore Data = Tarepose PB Rate Data = Program Mod Rate Data = Bank LSB Data = Bank MSB Data = Channel Default 0 1 2 3 4 5 6 7 8 9 Pain CANCE Program Bank LSB Bank MSB Mod Assign PB Assign Knob Assign ENTERSustain Mode
The Sustain button can work in two different modes called Latching and Momentary. Latching mode is the default setting in which momentarily pressing the Sustain button and playing a note causes it to sustain after it has been played without keeping your hands on the keyboard. However, the sound will not stop until the button is pressed again.
Momentary mode works in the same manner as a traditional sustain pedal, such that holding the Sustain button down and playing a note causes it to sustain until the button is released.
text_image
DAYS Data = October CANCEL Data = Transpose Park Data = Program Mod Ratio Data = BankUSB Velocity Sustain Mode Default Data = Channel Default 0 1 2 3 4 5 6 7 8 9 Koch Assign ENTERTo change the Sustain mode from Latching to Momentary:
- Press the Edit button. The Edit button light will illuminate to full brightness.
- Press the "SUSTAIN MODE" key (A, 6th white key from the left). The Edit mode button will dim to half brightness indicating that programming is complete.
Now holding the Sustain button down and playing a note will cause it to sustain until the button is released.
The Sustain Mode setting is retained when the keyboard is turned off.
To return the Sustain button to Latching mode (default):
- Press the Edit button. The Edit button light will illuminate to full brightness.
- Press the "SUSTAIN MODE" key (A, 6th white key from the left). The Edit mode button will dim to half brightness indicating that programming is complete.
Now pressing the Sustain button and playing a note will cause it to sustain until the button is pressed a second time.
Troubleshooting
Troubleshooting MIDI Functionality
Q mini has been designed to make working with MIDI on your computer as simple as possible. However, you may experience some difficulties. In many cases, the keyboard is not at fault, as the problem lies with the receiving device or software. To counter this, the Panic and Full Reset functions are available to assist you.
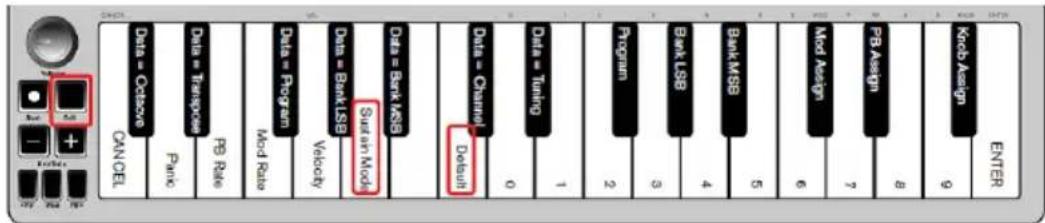
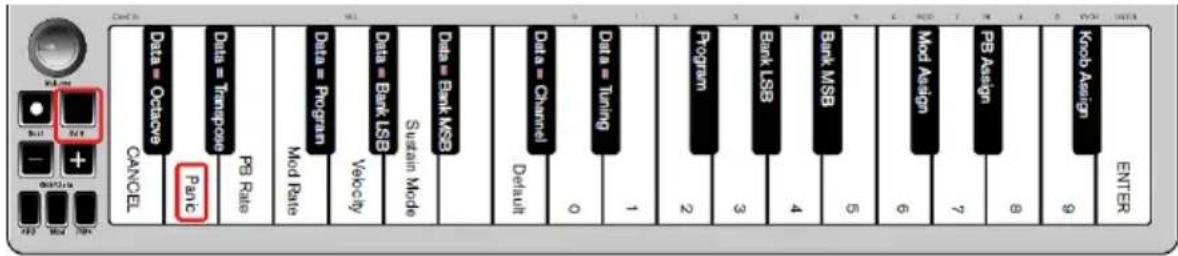
Panic Button (All Notes Off + Reset All Controllers)
If there are notes that will not stop playing, or if you find there is an effect on a voice that you do not want, you can send a Reset All Controllers MIDI message.
text_image
Data Data = October Data = Transport PB Rate Data = Program Mod Rate Data = Bank LSB Data = Bank MSB Data = Channel Default 0 1 2 3 4 5 6 7 8 9 Kodb Assign ENTER CANCEL Panci CancelTo send a Reset All Controllers message:
- Press the Edit button to enter Edit Mode and the Edit button will illuminate to full brightness.
-
Press the "PANIC." key (D, 2nd white key from the left):
-
An "All Notes off" MIDI message is sent.
• MIDI Controller 121, Value 0 and MIDI Controller 123, Value 0 is sent out on ALL MIDI Channels 1 - 16 - Edit Mode will disengage as soon as the Panic button is pressed, the Edit light will go to half brightness indicating that programming is complete.
Full Reset
To send a Full Reset message:
-
Make sure your computer is running.
-
Switch on the Q mini by plugging in the USB Cable from your computer while simultaneously holding down the Oct/Data "+" and "-" buttons.
This will reset all Data=____ and controller assignments to the following values:
| Parameter Factory Default | |
| Program Number 000 | |
| Bank MSB Number 000 | |
| Bank LSB Number 000 | |
| Channel Number 00 (channel 1) | |
| Octave shift 000 | |
| Transpose shift 000 | |
| Modulation Button MIDI CC 001 | |
| Volume Knob MIDI CC 007 | |
| Pitch Bend Buttons Pitch Bend | |
| Octave Buttons - Assignment | Data = Octave |
| Velocity | 1 = Normal |
General Troubleshooting
Here are answers to common questions you may have while using your Q mini keyboard:
My Alesis hardware suddenly stopped working.
If your Alesis hardware suddenly stops working, try the following:
- Disconnect, wait 10 seconds, reconnect.
- Try connecting to different USB ports.
- Try using a different USB cable.
I have plugged the Q mini into my computer but the lights on the keyboard will not work.
Not all USB ports are powerful enough for a device such as a Q mini. Try plugging it into another USB Port to see if that remedies the problem. You can also connect a powered USB hub to your computer and then plug your Q mini into the hub.
When I press a key, there is a delay before I hear the note.
This delay, which occurs more often on Windows systems, is known as latency. This issue is caused by the time it takes for your recording software to receive and process the MIDI data transmitted from your Q mini, and then send the resulting audio signal to your audio interface or sound card, and out to your speakers or headphones.
To reduce the amount of latency, you will need to select a new driver from the available choices listed in the audio preferences (or audio options) window within your software. If you are not sure how to access the audio preferences, refer to the documentation provided with your software for instructions about how to do so.
If you are still experiencing a latency issue, you can find further troubleshooting information on our website at: alesis.com/support.
text_image
Enter Knob Assign 9 PB Assign 8 Bank MSS 7 Mod Assign 6 Program 5 Bank LSB 4 Bank MSB 3 Data = Timing 2 Data = Chased 1 0 Default Data = Bank MSS Data = October PNC Data = Transpase PB Rate Data = Block LSB Switch Mode Velocity Data = Program Mod Ratio Data = October CANCELBotones de octava/datos (Oct/Data)
text_image
Data = October CANCEL Data = Transporter Panc Data = Program Mod Rate PB Rate Data = Bank LSB Velocity Data = Channel Sustain Mode Sustain Mode Mod Rate Data = Bank MSB Default Data = Tuning 0 1 2 3 4 5 6 7 8 9 Program Bank LSB Bank MSB Mod Assign PB Assign Knob Assign ENTERtext_image
Data = October Data = Transpose Data = Program Data = Bank LSB Data = Bank MSB Data = Channel Data = Tuning CANCEL Panic PB Rate Mod Rate Volocity Sustain Mode Default 0 1 Program Bank LSB Bank MSB Mod Assign PB Assign Knob Assign ENTERtext_image
Data = October Data = October Data = Transport Data = Transport Data = Program Data = Program Data = Program Data = Channel Data = Channel Data = Tuning Data = Tuning Data = Bank LSB Data = Bank MSB Data = Bank MSB Data = Bank MSB Data = Bank LSB Data = Bank MSB Data = Bank MSB Data = Bank LSB Data = Bank MSB Data = Bank MSB Data = Bank MSB Data = Bank MSB Data = Bank MSB Data = Bank MSB Data = Bank MSB Data = Bank MSB Data = Bank MSB Data = Bank MSB Data = Bank MSB Data = Bank MSB Data = Bank MSB Data = Bank MSB Data = Bank MSB Data = Bank MSB Data = Bank MSB Data = Book MSB Data = Book MSB Data = Book MSB Data = Book MSB Data = Book MSB Data = Book MSB Data = Book MSB Data = Book MSB Data = Book MSB Data = Book MSB Data = Book MSB Data = Book MSB Data = Book MSB Data = Book MSB Data = Book MSB Data = Book MSB Data = Book MSB DINATE PANIC MOD Rate CANCELL PANIC MOD Rate PANIC MOD Rate PANIC MOD Rate PANIC MOD Rate PANIC MOD Rate PANIC MOD Rate PANIC MOD Rate PANIC MOD Rate PANIC MOD Rate PANIC MOD Rate PANIC MOD Rate PANIC MOD Rate PANIC MOD Rate PANIC MOD Rate PANIC MOD Rate PKT10000000000000000000000000000000000000000000000000000000000000000000000000000000000000000000000000000text_image
CANCE Data = October Panic PB Rate Mod Rate Data = Transport Velocity Sustain Mode Data = Bank MSB Default Data = Channel 0 1 2 Program Bank LSB 4 5 6 Mod Assign 7 PB Assign 8 9 Knob Assign ENTER CANCEL +text_image
Data = October CANCEL Data = Transport PB Rate Mod Rate Data = Program Data = Bank LSB Velocity/ Sustain Mode Default Data = Bank MSB Data = Channel Default Data = Tuning 0 1 2 3 4 5 6 7 8 9 KBb Assign PB Assign NOTER NOTICE NOTICE +text_image
Data = October CANCEL Data = Transporter Panc PB Rate Mod Rate Data = Program Velocity Data = Bank LSB Sustain Mode Sustain Mode Data = Bank MSB Default Data = Channel 0 1 2 3 4 5 6 7 8 9 KBn Assign Entertext_image
Data = October CANCEL Data = October Panic Data = Transport PB Rate Data = Program Mod Rate Data = Bank MSB Sustain Mode Velocity Data = Bank LSB Default Data = Channel 0 1 2 3 4 5 6 7 8 9 Knob Assign ENTERtext_image
Data = Octave Data = Transpose PB Rate Data = Program Mod Rate Data = BankLSB Velocity Sustain Mode Data = Bank MSB Data = Channel Default Data = Tuning Program Bank LSB Bank MSG Mod Assign PB Assign KB Assign Krab Assign ENTER CANCE 0 1 2 3 4 5 6 7 8 9text_image
CANCE Data = Octave Data = Transpos Data = Program Data = Bank LSB Data = Bank MSB Data = Channel Data = Tuning Program Bank LSB Bank MSB Mod Assign PB Assign Knob Assign ENTER CANCE Panic PB Rate Mod Ratio Velocity Sustain Mode Default 0 1 2 3 4 5 6 7 8 9text_image
Data = October Data = Transpose PB Rate Data = Program Mod Rate Data = Bank LSB Velocity Sustain Mode Data = Bank MSB Data = Channel Default 0 1 2 3 4 5 6 7 8 9 TAB Design KBb Assign ENTER CANCEL Panc CANCELtext_image
CANCEL Data = October Data = Transport PB Rate Data = Program Mod Rate Data = Bank LSB Velocity Sustain Mode Sustain Mode Data = Bank MSB Data = Channel Default Data = Tuning 0 1 2 3 4 5 6 7 8 9 TAB Assign KBb Assign Entertext_image
OK Cancel Data = October Data = Transpose PB Rate Mod Rate Data = Program Mod Rate Velocity Data = Bank LSB Sustain Mode Data = Bank MSB Data = Channel Default 0 1 2 3 4 5 6 7 8 9 Knob Assign ENTERtext_image
Data = October Data = Transpose PB Rate Data = Program Mod Rate Data = Bank LSB Valvolty Sustan Mode Data = Bank MSB Data = Channel Default Data = Timing Program Bank LSB Bank MSB Mod Assign PB Assign Knob Assign ENTER CANCE Pamp 0 1 2 3 4 5 6 7 8 9text_image
Data = Octave CANCEL Data = Transporte Panc PB Rate Mod Rate Data = Program Velocity Data = Bank USB Sustain Mode Data = Bank MSB Data = Channel Default Data = Tuning 0 1 2 3 4 5 6 7 8 9 PB Assign Knob Assign ENTERAssistance technique
Bouton de sustain (Sust)
text_image
Data = October CANCEL Data = Transporter Panic PG Rate Mod Rate Data = Bank MSB Sustain Mode Bank LSB Data = Bank LSB Velocity Data = Channel Default Data = Tuning 0 1 2 3 4 5 6 7 8 9 Kroch Assign MOD Assign PG Assign 8 ENTERtext_image
Data = October Data = October Data = Program Data = Program Data = Bank LSB Data = Bank MSB Data = Channel Data = Tuning Program Bank LSB Bank MSB Mod Assign PB Assign Knob Assign ENTER Patio PBP Rate Mod Rate Velocity Sustain Mode Sustain Mode Default 0 1 2 3 4 5 6 7 8 9 CNCI 7 24 3 4 5 6 7 8 9 CNCI 7 24 3 4 5 6 7 8 9 CNCI 7 24 3 4 5 6 7 8 9text_image
ORCL Data = Octave CANCEL Data = Transpose Panc PB Rate Mod Rate Data = Program Velocity Sustain Mode Sustain Mode Data = Bank LSB Data = Bank MSB Data = Channel Default 0 1 2 3 4 5 6 7 8 9 KBb Assign Enter Bank LSB Bank MSB Mod Assign FB Assign Knob Assigntext_image
Data = Program Data = Bank L5B Data = Transpose Data = Octave CANCE PB Rate Mod Rate Velocity Sustain Mode Data = Bank MSB Data = Channel Default 0 1 2 3 4 5 6 7 8 9 Program Bank LSB Bank MSB Mod Assign PB Assign Knob Assign ENTERtext_image
Data = Octive CANCEL Data = Transporte Panic PE Rate Mod Rate Data = Program Velocity Sustain Mode Default Data = Bank LSB Data = Bank MSB Data = Channel Default 0 1 2 3 4 5 6 7 8 9 Kndb Assign ENTERtext_image
TANCEL Data = Octave CANCEL Data = Transporte Pacric PB Rate Mod Rate Data = Program Velocity Data = Bank LSG Sustain Mode Sustain Mode Data = Bank MSB Default Data = Channel 0 1 2 3 4 5 6 7 8 9 KBb Assign Enter PB Assign B 9text_image
CANCEL Data = October Data = Transpose PB Rate Mod Rate Data = Program Data = Bank LSB Sustain Mode Data = Bank MSB Data = Channel Default 0 1 2 3 4 5 6 7 8 9 TAB Assign PKob Assign ENTER CANCEL Panic Panceltext_image
Data = October CANCE Data = Transport PB Rate Mod Rate Data = Program Data = Bank LSB Velocity Sustain Mode Data = Bank MSB Data = Channel Default 0 1 Program Bank LSB Bank MSB Mod Assign PB Assign 9 Knob Assign ENTERtext_image
ON/OSS Data = October Data = Transpose PB Rate Mod Rate CANCEI Data = Program Data = Bank LSB Velocity Sustain Mode Data = Bank MSB Data = Channel Default 0 1 2 3 4 5 6 7 8 9 TAB Assign PKb Assign ENTERtext_image
CANCE Data = Outactive Data = Transpose PB Rate Mod Rate Data = Program Data = Bank LSB Sustain Mode Default Data = Channel Data = Tuning Program Bank LSB Bank MSB Mod Assign PB Assign Knob Assign ENTER 0 1 2 3 4 5 6 7 8 9text_image
CANCEL Data = Octacopy Data = Transpose PB Rate Data = Program Mod Rate Data = Bank LSB Velocity Sustain Mode Data = Bank MSB Data = Channel Default Data = Tuning 0 1 2 3 4 5 6 7 8 9 PKD Assign Pb Assign Knob Assign ENTER CANCEL Panic PRT Start +text_image
OK Cancel Data = October Data = Transpose FB Rate Mod Rate Data = Program Data = Bank LSB Velocity Data = Bank MSB Sustain Mode Data = Channel Default 0 1 2 3 4 5 6 7 8 9 Knob Assign ENTER CANCE Panic SBF Max. PB1text_image
CANCEL Data = Octave Panic Data = Transpose PB Rate Mod Rate Data = Program Data = Bank LSB Velocity Sustain Mode Data = Bank MSB Data = Channel Default 0 1 2 3 4 5 6 7 8 9 KOOB Assign ENTERtext_image
DUAL Data = Optimize Panc PB Rate Mod Rate Data = Transpose Data = Program Data = Bank LSB Velocity Sustain Mode Data = Bank MSB Data = Channel Default 0 1 2 3 4 5 6 7 8 9 ENO ENTR PKT OKT Deliva CINN OKT PMS Knob Assign Entertext_image
Details Data = October Data = Transport Data = Program Data = Program Mod Rate Data = Bank USB Velocity Data = Bank MSB Sustain Mode Default Data = Channel Default Data = Tuning 0 1 2 3 4 5 6 7 8 9 PB Assign Mod Assign PB RSB Knob Assign ENTER CANCEL Panc PB Rate Dust Date VPS Ver/ PSstext_image
Data = October PB Rate Data = Transpose PB Rate Data = Program Mod Rate Data = Bank LSB Velocity Data = Bank MSB Sustain Mode Default Data = Channel Default Data = Tuning 1 2 3 4 5 6 7 8 9 KBb Assign Enter CANCEL Panc OK Sust +/-text_image
Data = October CANCEL Data = October Panc Data = October PB Rate Mod Rate Data = Program Velocity Data = Barb LSB Sension Mode Default Data = Barb MSB Data = Channel 0 1 2 3 4 5 6 7 8 9 Kneb Assign ENTER Mod Assign PB Assign 8 9text_image
Data = October Data = Transpose Data = Program Data = Bank MSB Data = Channel Data = Tuning Program Bank LSB Bank MSB Mod Assign PBI Assign Kndb Assign ENTER CANCEL Panic PB Rate Mod Rate Velocity Solan Mode Default 0 1 2 3 4 5 6 7 8 9text_image
DANCE Data = O-Leave CAN CEL Data = O-Leave Data = Transpose Panic PB Rate Mod Rate Data = Program Velocity Sustain Mode Sustain Mode Default Data = Bank MSB Data = Bank LSB Data = Channel Default Data = Turing 0 1 2 3 4 5 6 7 8 9 KBb Assign Enter Program Bank LSB Bank MSB Mod Assign PB Assign Knob Assigntext_image
Data = Program Data = Bank MSB Data = Channel Default 0 1 2 3 4 5 6 7 8 9 Enter CANCEL Data = Octacre Panic Data = Transpose PB Rate Mod Rate Volocity Sustain Mode Data = Bank LSB Data = Program Data = Tuning Program Bank LSB Bank MSB Mod Assign PB Assign Kroob Assigntext_image
Data = Octave CANCEL Data = Transporte Panc PB Rate Mod Rate Data = Program Data = Bank LSB Sustain Mode Mod Activity Default Data = Channel Data = Tuning 0 1 2 3 4 5 6 7 8 9 Bank LSB Bank MSB Mod Assign PB Assign Knob Assign ENTERtext_image
OPOL Data = Octimize CANCEL Data = Transpose PB Rate Mod Rate Data = Program Velocity Sustain Mode Data = Bank MSB Default Data = Channel 0 1 Program Bank LSB Bank MSB 5 Mod Assign FB Assign 7 9 Knob Assign ENTERtext_image
CANCE Data = Octave Data = Transpose Data = Program Data = Bank LSB Data = Bank MSB Data = Channel Data = Tuning Program Bank LSB Bank MSB Mod Assign PB Assign Knob Assign ENTER CANCEL Panic PB Rate Mod Rate Velocity Sustain Mode Default 0 1 2 3 4 5 6 7 8 9text_image
Wise Bant + - Gur Rate ON PAC PBC CANCEL Data = Octecore Panic Data = Transpose PB Rate Mod Rate Data = Program Velocity Data = Bank LSB Sustain Mode Data = Burk MSB Data = Channel Default 0 1 2 3 4 5 6 7 8 9 TAB Assign PKoab Assign ENTERtext_image
Data = October Data = Transporter Data = Program Data = Bank LSB Data = Bank MSB Data = Channel Data = Tuning Program Bank LSB Bank MSB Mod Assign PB Assign Knob Assign ENTER PB Rate Panc Mod Rate Velocity Sustain Mode Default 0 1 2 3 4 5 6 7 8 9 CANCELtext_image
OKEN Data = Octave PB Rate Panc CANCEL Data = Tarepose Mod Rate Data = Program Velocity Sustain Mode Data = Bank MSB Data = Channel Default 0 1 2 3 4 5 6 7 8 9 Program Bank USB Bank MSB Mod Assign PB Assign Knob Assign ENTERtext_image
CANCEL Data = Octave CANCEL Data = Transpose Panc Data = Transport PB Rate Mod Rate Data = Program Mod Rate Data = BankLSB Velocity Data = Bank MSB Sustan Mode Default Data = Channel Default 0 1 2 3 4 5 6 7 8 9 Program Bank LSB Bank MSB Mod Assign PB Assign Knob Assign ENTERtext_image
Data = Octacove Data = Transporte PB Rate Data = Program Mod Rate Data = Bank LSB Velocity Data = Bank MSB Sustain Mode Default Data = Channel 0 Data = Tuning 1 Program 2 Bank LSB 3 Bank MSB 4 Mod Assign 5 PB Assign 6 Knob Assign 7 ENTERtext_image
Data = Octave CANCEL Data = Transpose PB Rate Data = Program Mod Rate Data = Bank LSB Volocity Sustain Mode Sustain Mode Data = Bank MSB Default Data = Channel 0 1 2 3 4 5 6 7 8 9 Knob Assign ENTERFull Reset
text_image
Data = October CANCEL Data = Transpose PB Rate Mod Rate Data = Program Velocity Data = Bank LSB Sustain Mode Sustain Mode Data = Bank MSB Default Data = Channel 0 Data = Tuning 1 Program 2 Bank LSB 3 Bank MSB 4 6 Mod Assign 5 PB Assign 6 Knob Assign 7 ENTEROktav-Taster (Oct/Data)
text_image
Data - October CANCEL Data = Transport PB Rate Mod Rate0 Data = Program Velocity Data = Bank LSB Sustain Mode Data = Bank MSB Data = Channel Default 0 1 2 3 4 5 6 7 8 9 TAB Assign PKB Assign Entertext_image
Data = October Data = Transpose PB Rate Data = Program Data = Bank LSB Data = Bank MSB Data = Channel Data = Tuning CANCEL Panc Mod Rate Velocity Surlan Mode Default 0 Program Bank LSB Bank MSB Mod Assign PB Assign Knob Assign ENTER 9 8 7 6 5 4 3 2 1 0 9 8 7 6 5 4 3 2 1 0 0 0 0 0 0 0 0 0 0 0 0 0 0 0 0 0 0 0 0 0 0 0 0 0 0 0 0 0 0 0 0 0 0 0 0 0 0 0 0 0 0 0 0 0 0 0 0 0text_image
Data + OK OK OK OK OK OK OK OK OK OK OK OK OK OK OK OK OK OK OK OK OK OK OK OK OK OK OK OK OK OK OK OK OK OK OK OK OK OK OK OK OK OK OK OK OK OK OK OK OK OK OKtext_image
Data = October Data = Transporter PB Rate PB Rate CANCEL CANCE Sunt Cap - + SBP Rate Mod Ratio Data = Program Data = Bank LSB Data = Bank MSB Data = Channel Data = Tuning Program Bank LSB Bank MSB Mod Assign PB Assign Knob Assign ENTER 0 1 2 3 4 5 6 7 8 9text_image
CANCE Data = Octave CANCEL Data = Transporte Panic PB Rate Mod Rate Data = Program Velocity Data = Bank LSB Sustain Mode Default Data = Channel Default 0 1 2 3 4 5 6 7 8 9 KBb Assign ENTER Program Bank LSB Bank MSBtext_image
CANCE Data = Octacve PB Rate Panc CANCEL Data = Transporte Mod Rate Data = Program Velocity Suetam Mode Suetam Mode Mod Rate Data = Bank LSB Data = Bank MSB Data = Turing Default Data = Channel 0 1 2 3 4 5 6 7 8 9 KEvb Assign PKb Assign Mod Assign Bank MSB Bank LSS Program Entertext_image
Data = October Data = October Data = October Data = October Data = October Data = October Data = October Data = October Data = October Data = October Data = October Data = October Data = October Data = October Data = October Data = October Data = October Data = October Data = October Data = October Data = October Data = October Data = October Data = October Data = October Data = Octobertext_image
DANCE Data = October Data = Transport Data = Program Data = Bank LSB Data = Bank MSB Data = Channel Data = Tuning Program Bank LSB Bank MSB Mod Design PB Assign Knob Assign ENTER CANCEL Panc PB Rate Mod Rate Velocity Sunlit Mode Default 0 1 2 3 4 5 6 7 8 9text_image
Data = Octavo Data = Transpose PB Rate Mod Rate Data = Program Data = Bank LSB Velocity Sustain Mode Data = Bank MSB Data = Channel Default Data = Tuning Program Bank LSB Bank MSB Mod Assign PB Assign Krob Assign ENTER 0 1 2 3 4 5 6 7 8 9text_image
CANCE Data = October Data = Transparent Data = Program Data = Bank LSB Data = Bank MSB Data = Channel Default Data = Tuning Program Bank LSB Bank MSB Mod Assign PB Assign Knob Assign ENTER 0 1 2 3 4 5 6 7 8 9 CANCE Panic PB Rate Mod Rate Velocity Sustain Mode Data = Mod Rate Data = Transporter Data = October Time Add Add Canceltext_image
Data = October Data = Transporter Data = Program Data = Bank LSB Data = Bank MSB Data = Channel Data = Tuning Program Bank LSB Bank MSB Mod Assign PB Assign Kndb Assign ENTER CANCE Pain PB Rate Mod Rate Velocity Suzan Mode Default 0 1 2 3 4 5 6 7 8 9text_image
OK Cancel Data = October Data = Transpose PB Rate Mod Rate Data = Program Data = Bank LSB Velocity Sustain Mode Data = Bank MSB Data = Channel Default Data = Turning Program Bank LSB Bank MSB Mod Design PB Assign 9 Knob Assign ENTER 0 1 2 3 4 5 6 7 8 9text_image
Data = October Data = Transpose PB Rate Data = Program Mod Rate Data = Bank LSB Velocity Sustain Mode Data = Bank MSB Data = Channel Default 0 1 2 3 4 5 6 7 8 9 OK/Cancel Program Bank LSB Bank MSB Mod Assign PB Assign Knob Assign ENTERtext_image
KEYSTATION MINI32 M-AUDIO Data = Octube CANCEL Data = Transcope Piano FB Rate Mod Rate Data = Program Mod Rate Data = Bank LSB Velocity Sustain Mode Data = Bank MSB Data = Channel Default 0 1 2 3 4 5 6 7 8 9 Knob Assign ENTER Program Bank LSB Bank MSB Mod Assign FB Audio OKB Assign EnterFehlerbehebung
text_image
OK Data = Cutoff CANCEL Data = Transferase PB Rate Painc Data = Program Mod Rate Data = Bank LSB Velocity Sustain Mode Sustain Mode Data = Bank USB Data = Channel Default 0 1 2 3 4 5 6 7 8 9 Enter SB SB SB SB SB SB SB SB SB SB SB SB SB SB SB SB SB SB SB SB SB SB SB SB SB SBVollständiger Reset
Wheel and Fader User Assignments
| 00 Bank Select 38 Data Entry LSB 112 Controller 112 | |
| 01 Modulation 39 Channel Volume LSB 113 Controller 113 | |
| 02 Breath Control 40 Balance LSB 114 Controller 114 | |
| 03 Controller 3 41 Controller 41 15 Controller 115 | |
| 04 Foot Control 42 Pan LSB 116 Controller 116 | |
| 05 Porta Time 43 Expression LSB 117 Controller 117 | |
| 06 Data Entry 44 Controller 44 18 Controller 118 | |
| 07 Channel Volume 45 Controller 45 119 Controller 119 | |
| 08 Balance 46 Controller 46 | |
| 09 Controller 9 47 Controller 47 20 All Sound off | |
| 10 Pan 48 Gen Purpose 1 LSB 121 Reset all Controllers | |
| 11 Expression 49 Gen Purpose 2 LSB 122 Local Control | |
| 12 Effects Controller 1 50 Gen Purpose 3 LSB 123 All Notes Off | |
| 13 Effects Controller 2 51 Gen Purpose 4 LSB 124 Omni Off | |
| 14 Controller 14 52 Controller 52 125 Omni On | |
| 15 Controller 15 53 Controller 53 126 Mono On (Poly Off) | |
| 16 Gen Purpose 1 54 Controller 54 127 Poly On (Mono Off) | |
| 17 Gen Purpose 2 55 Controller 55 Extra RPN Messages: | |
| 18 Gen Purpose 3 56 Controller 56 128 Pitch Bend sensitivity | |
| 19 Gen Purpose 4 57 Controller 57 129 Fine Tune | |
| 20 Controller 20 58 Controller 58 130 Coarse Tune | |
| 21 Controller 21 59 Controller 59 131 Channel Pressure | |
| 22 Controller 22 60 Controller 60 | |
| 23 Controller 23 61 Controller 61 | |
| 24 Controller 24 62 Controller 62 | |
| 25 Controller 25 63 Controller 63 | |
| 26 Controller 26 64 Sustain Pedal | |
| 27 Controller 27 65 Portamento | |
| 28 Controller 28 66 Sostenuto | |
| 29 Controller 29 67 Soft Pedal | |
| 30 Controller 30 68 Legato Pedal | |
| 31 Controller 31 69 Hold 2 | |
| 32 Bank Select LSB 70 Sound Variation | |
| 33 Modulation LSB 71 Resonance | |
| 34 Breath Control LSB 72 Release Time | |
| 35 Controller 35 73 Attack Time | |
| 36 Foot Control LSB 74 Cut-off Frequency | |
| 37 Porta Time LSB 75 Controller 75 | |
| 38 Data Entry LSB 76 Controller 76 | |
| 39 Channel Volume LSB 77 Controller 77 | |
| 40 Balance LSB 78 Controller 78 | |
| 41 Controller 41 79 Controller 79 | |
| 42 Pan LSB 80 Gen Purpose 5 |
Technical Specifications
| Power | USB bus powered |
| Dimensions (Length x Width x Height) | 16.46" x 4.13" x 0.78"; 418 mm x 105 mm x 20 mm |
| Weight | 1 lb.; 0.5 kg |
Specifications are subject to change without notice.
Trademarks and Licenses
Alesis is a trademark of inMusic Brands, Inc., registered in the U.S. and other countries.
Windows is a registered trademark of Microsoft Corporation in the United States and other countries.
All other product or company names are trademarks or registered trademarks of their respective owners.
alesis.com