V25 MKII - DJ Equipment ALESIS - Free user manual and instructions
Find the device manual for free V25 MKII ALESIS in PDF.
| Product Type | MIDI Keyboard Controller |
| Brand | Alesis |
| Model | V25 MKII |
| Category | DJ Equipment / MIDI Controller |
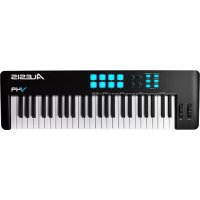
| Number of Keys | 25 velocity-sensitive keys |
| Wheels | Pitch Wheel and Modulation (MIDI CC #01) |
| Pads | 8 velocity-sensitive pads |
| Rotary Knobs | 4 assignable knobs (270° rotation) |
| Arpeggiator | Built-in: modes Up, Down, incl, excl, Order, Rand, Latch; octave 1-4; swing; gate; internal/external sync |
| Note Repeat | Yes, with tempo control, time division, and swing |
| Tap Tempo | Yes |
| Full Level | Yes (maximum velocity for pads) |
| Octave Transposition | Octave Down/Up buttons with simultaneous reset |
| Power | USB bus-powered (via USB 2.0 port) |
| Connectivity | USB 2.0 (MIDI and editor port), sustain input (6.35 mm) |
| Security | Kensington lock connector |
| Box Contents | V25 MKII, USB cable, software download card, user guide, safety instructions |
| Editing Software | V25 MKII Editor (free download at alesis.com) |
| Compatibility | MIDI-compatible DAW software |
Frequently Asked Questions - V25 MKII ALESIS
User questions about V25 MKII ALESIS
0 question about this device. Answer the ones you know or ask your own.
Ask a new question about this device
Download the instructions for your DJ Equipment in PDF format for free! Find your manual V25 MKII - ALESIS and take your electronic device back in hand. On this page are published all the documents necessary for the use of your device. V25 MKII by ALESIS.
USER MANUAL V25 MKII ALESIS
User Guide (English)
Introduction
Box Contents
V25 MKII USB Cable Software Download Card
User Guide Safety & Warranty Manual
Support
For the latest information about this product (system requirements, compatibility information, etc.) and product registration, visit alesis.com.
For additional product support, visit alesis.com/support.
Quick Start
Device Setup in Software
To select V25 MKII as a controller for your digital audio workstation (DAW):
- Connect V25 MKII to your computer using a standard USB cable. (If you are connecting V25 MKII to a USB hub, make sure it is a powered hub.)
- Open your DAW.
- Open your DAW's Preferences, Options, or Device Setup, select V25 MKII as your hardware controller, and then close that window.
Your V25 MKII is now able to communicate with your software.
V25 MKII Editor Installation
We recommend visiting alesis.com and downloading the V25 MKII Editor, which gives you a visual and intuitive way to edit the various MIDI messages that V25 MKII's controls send to your computer.
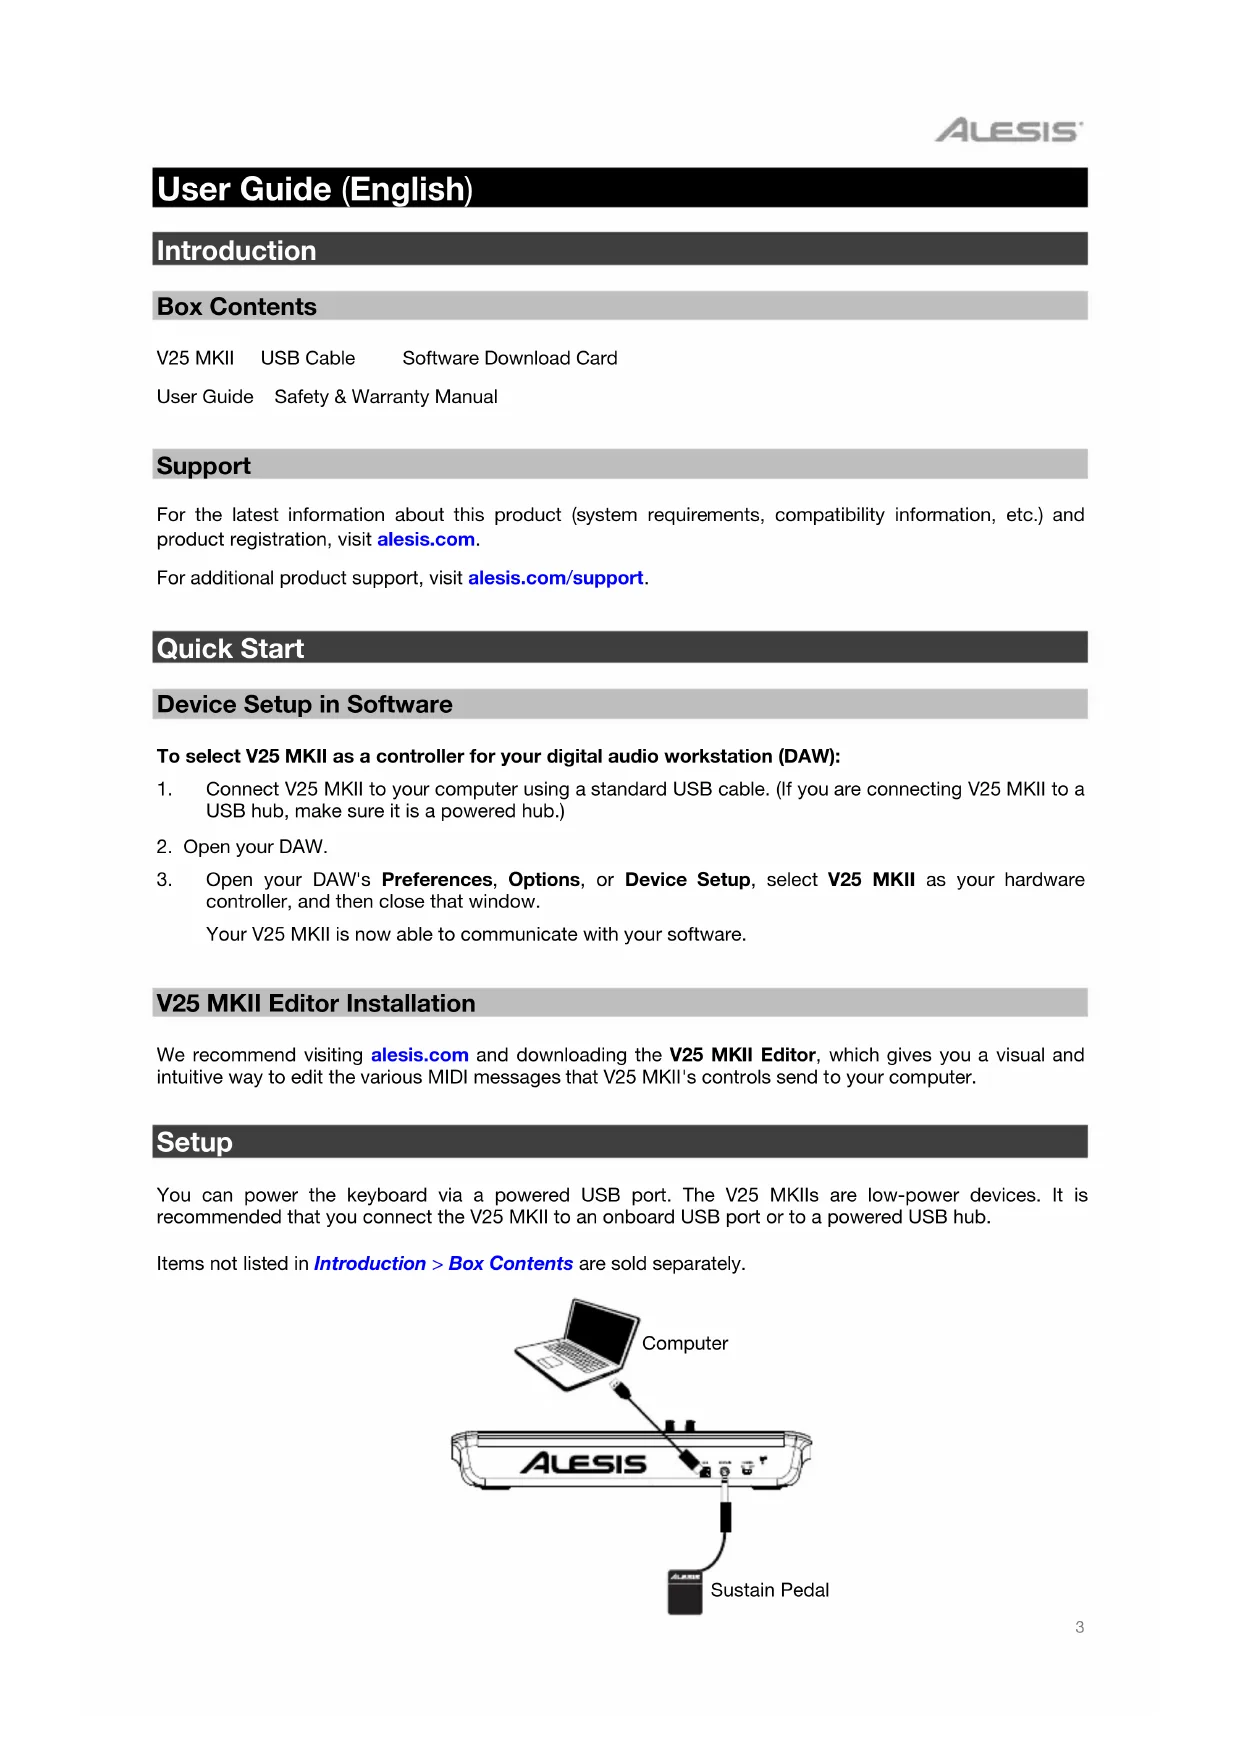
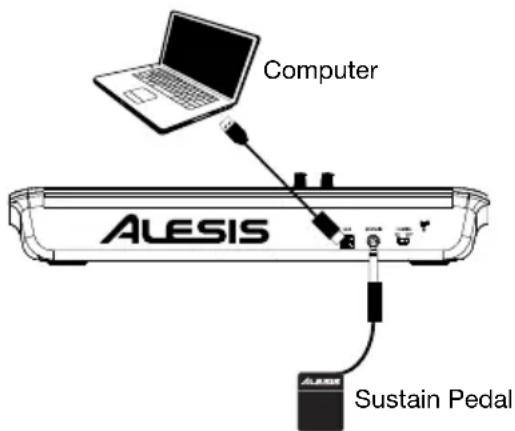
Setup
You can power the keyboard via a powered USB port. The V25 MKIIs are low-power devices. It is recommended that you connect the V25 MKII to an onboard USB port or to a powered USB hub.
Items not listed in Introduction > Box Contents are sold separately.
Features
Top Panel
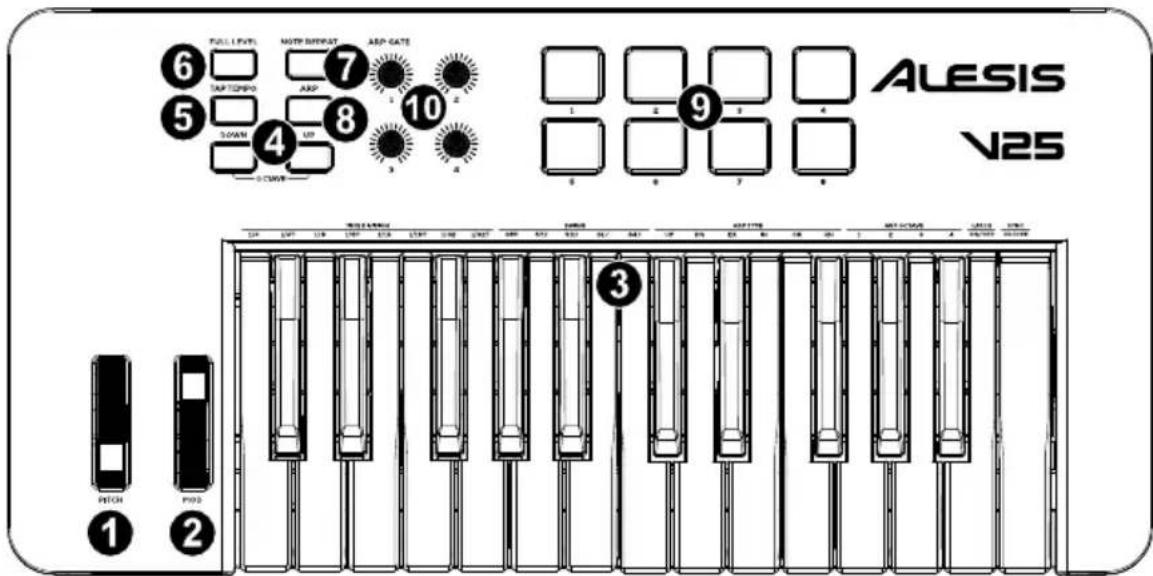
- Pitch: Moving this wheel sends MIDI Pitch Bend information.
- Mod (Modulation): Moving this wheel sends continuous controller data-MIDI CC #01 (modulation), by default.
You can also use the V Editor software to set this wheel to send a different MIDI CC message to your software. See the V Editor's User Guide to learn how to do this.
- Keyboard: This 25-note keyboard is velocity-sensitive and, in conjunction with the Octave Down/Up buttons, can access the full range of 127 available MIDI notes. You can use the keys to access certain additional commands, as well.
- Octave Down / Up: Use these buttons to shift the keyboard's range up or down. Press both buttons simultaneously to reset the octave shift to "zero."
- Tap Tempo: Tap this button at the desired rate to determine the tempo of the Arpeggiator.
Note: This button is disabled if the Arpeggiator is syncsed to an external clock.
- Full Level: Press this button to activate or deactivate Full Level Mode in which the pads always play at a maximum velocity (127), no matter how hard or soft you hit them.
-
Note Repeat: Press this button to activate or deactivate Note Repeat Mode in which striking a pad will cause the pad to retrigger at a rate based on the current Tempo, Time Division, and Swing settings.
-
Arpeggiator On/Off: Press this button to turn the Arpeggiator on or off. Pressing it during a latched arpeggio will stop the arpeggio.
Note: The Time Division, Swing, Tempo, and Tempo Sync settings are also shared with the Note Repeat function. If these settings are changed in Arpeggiator mode, they will also be changed in the Note Repeat mode, and vice versa.
Hold down Arpeggiator On/Off and press a key on V25 MKII's keyboard to enter new settings for the Arpeggiator:
- Time Division: 1/4 note, 1/4 note triplet (1/4T), 1/8 note, 1/8 note triplet (1/8T), 1/16 note, 1/16 note triplet (1/16T), 1/32 note, or 1/32 note triplet (1/32T).
- Arp Type: The mode determines how the arpeggiated notes are played back.
Up: Notes will sound from the lowest to the highest.
Down: Notes will sound from the highest to lowest.
Incl (Inclusive): Notes will sound from the lowest to the highest, and then back down. The lowest and highest notes will sound twice at the directional change.
Excl (Exclusive): Notes will sound from the lowest to the highest, and then back down. The lowest and highest notes will sound only once at the directional change.
O Order: Notes will sound in the order they were pressed.
o Rand (Random): Notes will sound in random order.
- Latch: The Arpeggiator will continue to arpeggiate the notes even after you lift your fingers. While holding down the keys, you can add more notes to the arpeggiated chord by pressing down additional keys. If you press the keys, release them, and then press down a new combination of notes, the Arpeggiator will memorize and arpeggiate the new notes.
- Arp Octave: This controls the number of octaves (1-4) that the played notes will arpeggiate through.
- Swing: Off (no swing), 57% , 59% , 61% , or 64% .
- Sync: This controls whether the controller will use its own internal MIDI clock to generate the messages or whether the controller will use an external MIDI clock tempo received via USB to know when to generate the MIDI messages. The external mode is typically used if using DAW software.
Hold down Arpeggiator On/Off and turn Knob 1 to adjust the Gate parameter. This parameter determines how much length the arpeggiator's notes will have. The shorter the gate, the shorter the note. Similarly, the longer the gate, the longer the note. This parameter can be changed while an arpeggio is already playing for an exciting effect.
-
Pads: The pads can be used to trigger drum hits or other samples in your software. The pads are velocity-sensitive, which makes them very responsive and intuitive to play. You can use the free, downloadable V25 MKII Editor to assign what MIDI message each pad sends. See the V Editor's User Guide to learn how to do this.
-
Assignable Knobs: Use these 270^ knobs to send MIDI CC messages to your software. You can use the free, downloadable V25 MKII Editor to assign what MIDI CC message each knob sends. See the V Editor's User Guide to learn how to do this.
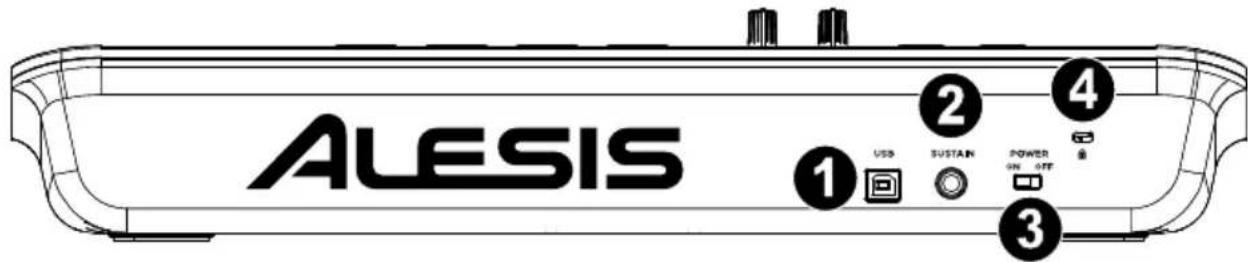
Rear Panel
-
USB: The USB 2.0 port delivers power to the keyboard and transmits MIDI data when connected to a computer.
-
Port 1 (labeled V25 MKII in software) is the port for which all MIDI messages will travel from the controller to the computer, and vice versa.
-
Port 2 (labeled EDITOR in software) is the port used to transfer data back and forth between the controller and the V25 MKII Editor software.
-
Sustain: Connect an optional 1/4'' TS sustain pedal to this input. You can also use the V Editor software to set the sustain pedal to send other MIDI CC messages to your software. See the V Editor's User Guide to learn how to do this.
- Power On/Off: Use this switch to power the device on or off. When this switch is set to the "on" position, V25 MKII is powered through the USB connection to your computer.
Press and hold the Octave Down and Octave Up buttons while turning on the power to restore the keyboard to factory default settings.
- Kensington® Lock Connector: This connector is compatible with standard laptop-style Kensington security cables for theft protection.
Technical Specifications
| Power | Via USB |
| Dimensions (width x depth x height) | 16.92” x 9.6” x 3.72” |
| 43.0 x 24.4 x 9.4 cm | |
| Weight | 3.9 lbs. |
| 1.75 kg |
Specifications are subject to change without notice.
Trademarks & Licenses
Alesis is a trademark of inMusic Brands, Inc., registered in the U.S. and other countries. Kensington is a registered trademark of ACCO brands. All other product names, company names, trademarks, or trade names are those of their respective owners.