UXB1200DYS - Range hood JENN-AIR - Free user manual and instructions
Find the device manual for free UXB1200DYS JENN-AIR in PDF.
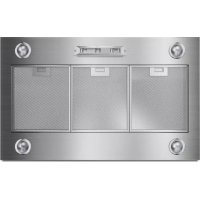
| Product Type | Under cabinet range hood |
| Brand | JENN-AIR |
| Model | UXB1200DYS |
| Width | 76.2 cm (30 inches) |
| Depth | 50.8 cm (20 inches) |
| Height | 15.2 cm (6 inches) |
| Weight | 11.3 kg (25 lb) |
| Power supply | 120 V, 60 Hz, 5 A |
| Maximum airflow | 1170 ft³/min (1170 CFM models) |
| Number of motors | 1 or 2 (depending on configuration) |
| Lighting | Infrared lamps (depending on model) |
| Filters | Removable metal grease filters |
| Ventilation speeds | Multiple (depending on model) |
| Venting | To the outside via metal duct |
| Installation | Under cabinet or wall-mounted |
| Cleaning | Clean filters regularly, surfaces with a damp cloth |
| Safety | Fire trigger, automatic shut-off (depending on model) |
| Spare parts | Available through authorized service |
| Repairability | Repairability index not disclosed |
| Warranty | 1 year (depending on conditions) |
Frequently Asked Questions - UXB1200DYS JENN-AIR
User questions about UXB1200DYS JENN-AIR
0 question about this device. Answer the ones you know or ask your own.
Ask a new question about this device
Download the instructions for your Range hood in PDF format for free! Find your manual UXB1200DYS - JENN-AIR and take your electronic device back in hand. On this page are published all the documents necessary for the use of your device. UXB1200DYS by JENN-AIR.
USER MANUAL UXB1200DYS JENN-AIR
INSTALLATION INSTRUCTIONS 585 CFM AND 1170 CFM INTERNAL BLOWERS FOR RANGE HOODS
INSTRUCTIONS D'INSTALLATION
VENTILATEURS INTERNES AVEC DÉBIT DE 585 PI³/MIN ET 1170 PI³/MIN POUR HOTTES D'ÉVACUATION
INSTRUCCIONES DE INSTALLACION DE SOPLADORES INTERNOS DE 585 CFM Y 1170 CFM PARA CAMPANAS DE ESTUFA
Table of Contents/Table des matrières/Tabla de contentsidos
RANGE HOOD SAFETY. 2
INSTALLATION REQUIREMENTS....4
Tools and Parts. 4
INSTALLATION INSTRUCTIONS....4
Prepare Internal Blower System.....4
Install Range Hood Blower Motor...5
ASSISTANCE OR SERVICE. 6
In the U.S.A. 6
In Canada 6
SECURITE DE LA HOTTE DE CUISINIÈRE....7
EXIGENCES D'INSTALLATION. 9
Outils et pieces. 9
INSTRUCTIONS D'INSTALLATION 9
ASSISTANCE OU SERVICE 12
Aux E.-U 12
Au Canada. 12
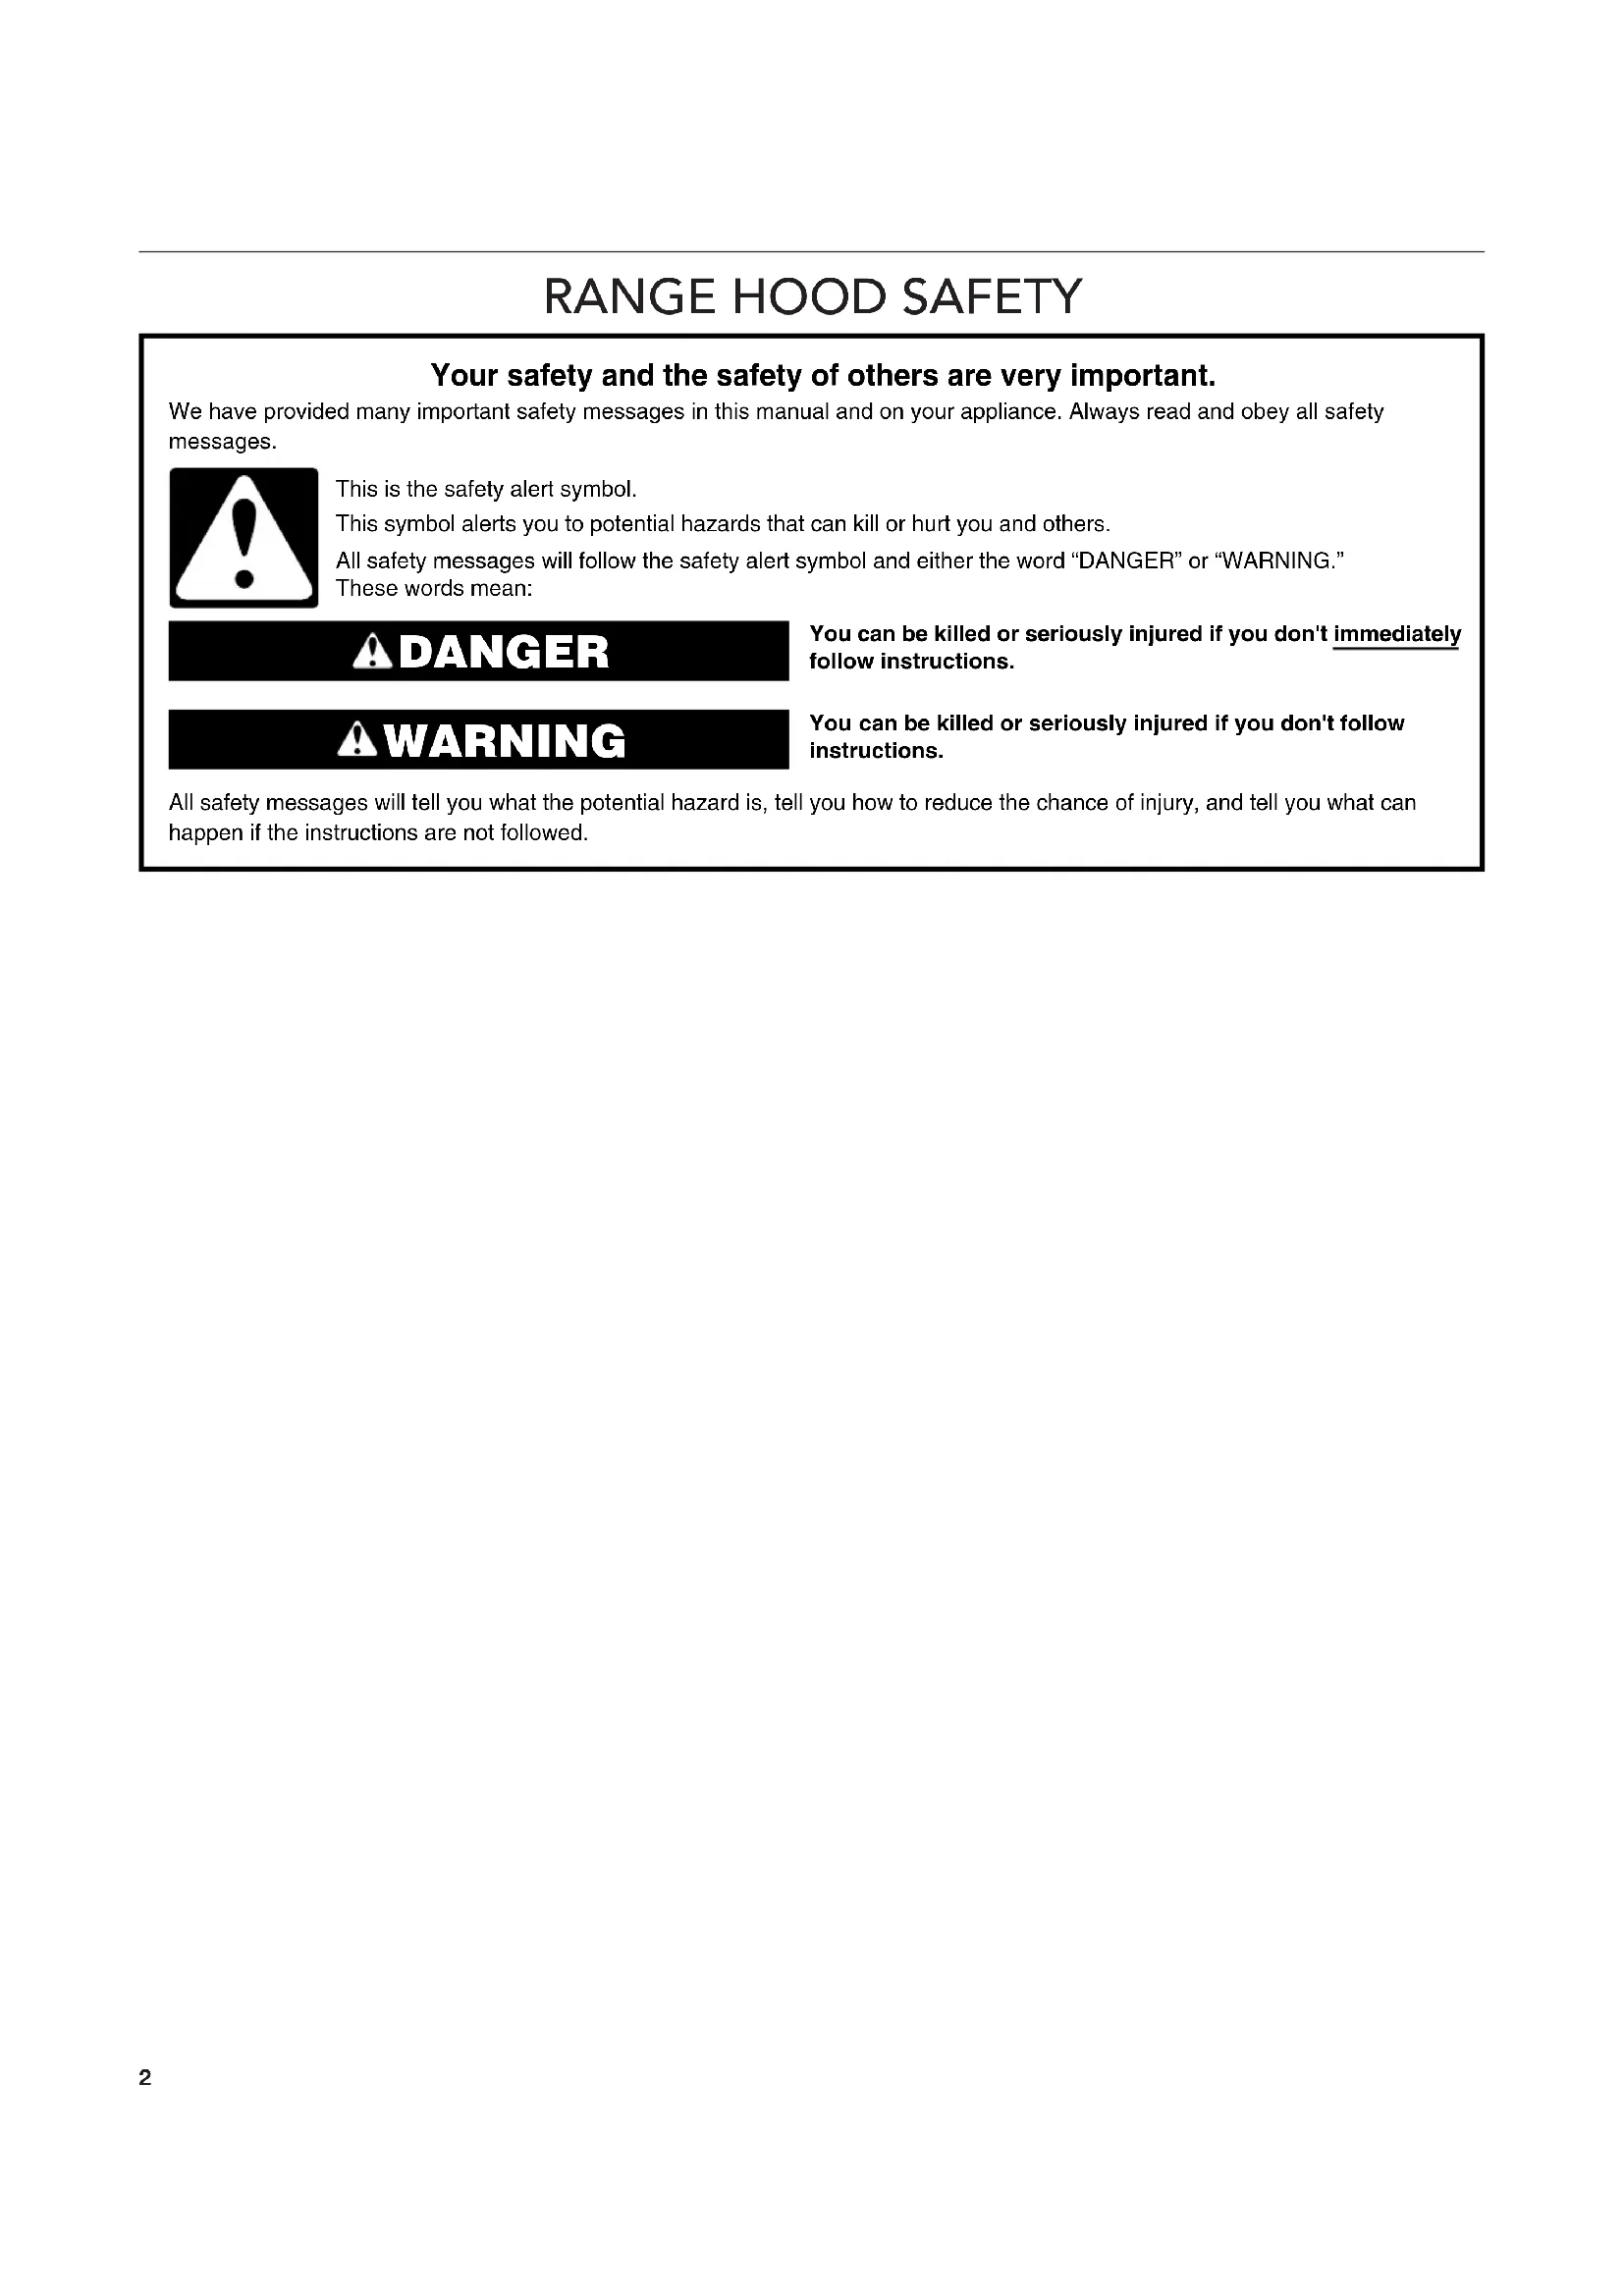
Your safety and the safety of others are very important.
We have provided many important safety messages in this manual and on your appliance. Always read and obey all safety messages.

This is the safety alert symbol.
This symbol alerts you to potential hazards that can kill or hurt you and others.
All safety messages will follow the safety alert symbol and either the word "DANGER" or "WARNING."
These words mean:
ADANGER
WARNING
You can be killed or seriously injured if you don't immediately follow instructions.
You can be killed or seriously injured if you don't follow instructions.
All safety messages will tell you what the potential hazard is, tell you how to reduce the chance of injury, and tell you what can happen if the instructions are not followed.
IMPORTANT SAFETY INSTRUCTIONS
WARNING: TO REDUCE THE RISK OF FIRE, ELECTRIC SHOCK, OR INJURY TO PERSONS, OBSERVE THE FOLLOWING:
Use this unit only in the manner intended by the manufacturer. If you have questions, contact the manufacturer.
Before servicing or cleaning unit, switch power off at service panel and lock the service disconnecting means to prevent power from being switched on accidentally. When the service disconnecting means cannot be locked, securely fasten a prominent warning device, such as a tag, to the service panel.
■ Installation work and electrical wiring must be done by qualified person(s) in accordance with all applicable codes and standards, including fire-rated construction.
- Do not operate any fan with a damaged cord or plug. Discard fan or return to an authorized service facility for examination and/or repair.
Sufficient air is needed for proper combustion and exhausting of gases through the flue (chimney) of fuel burning equipment to prevent back drafting. Follow the heating equipment manufacturer's guideline and safety standards such as those published by the National Fire Protection Association (NFPA), and the American Society for Heating, Refrigeration and Air Conditioning Engineers (ASHRAE), and the local code authorities.
- When cutting or drilling into wall or ceiling, do not damage electrical wiring and other hidden utilities.
Ducted fans must always be vented to the outdoors.
CAUTION: For General Ventilating Use Only. Do To Exhaust Hazardous Or Explosive Materials And Vapors.
CAUTION: To reduce risk of fire and to properly exhaust air, be sure to duct air outside -Do not vent exhaust air into spaces within walls or ceilings or into attics, crawl spaces, or garages.
WARNING: TO REDUCE THE RISK OF FIRE, USE ONLY METAL DUCTWORK.
WARNING: TO REDUCE THE RISK OF A RANGE TOP GREASE FIRE:
- Never leave surface units unattended at high settings. Boilovers cause smoking and greasy spillovers that may ignite. Heat oils slowly on low or medium settings.
Always turn hood ON when cooking at high heat or when flambeing food (i.e. Crepes Suzette, Cherries Jubilee, Peppercorn Beef Flambé).
Clean ventilating fans frequently. Grease should not be allowed to accumulate on fan or filter.
Use proper pan size. Always use cookware appropriate for the size of the surface element.
WARNING: TO REDUCE THE RISK OF INJURY TO PERSONS IN THE EVENT OF A RANGE TOP GREASE FIRE, OBSERVE THE FOLLOWING*:
SMOTHER FLAMES with a close-fitting lid, cookie sheet, or metal tray, then turn off the burner. BE CAREFUL TO PREVENT BURNS. If the flames do not go out immediately, EVACUATE AND CALL THE FIRE DEPARTMENT.
NEVER PICK UP A FLAMING PAN - You may be burned.
DO NOT USE WATER, including wet dishcloths or towels - a violent steam explosion will result.
Use an extinguisher ONLY if:
- You know you have a Class ABC extinguisher, and you already know how to operate it.
- The fire is small and contained in the area where it started.
Use The fire department is being called.
- You can fight the fire with your back to an exit.
Based on "Kitchen Fire Safety Tips" published by NFPA.
■WARNING: To Reduce The Risk Of Fire Or Electric Shock, Do Not Use This Fan With Any Solid-State Speed Control Device.
This appliance is not intended for use by people (including children) whose physical, sensory or mental capacities are different or impaired or who lack the necessary experience or knowledge/expertise to do so, unless such persons are supervised or are trained to operate the appliance by a person who accepts responsibility for their safety.
READ AND SAVE THESE INSTRUCTIONS
INSTALLATION REQUIREMENTS
Tools and Parts
Gather the required tools and parts before starting installation. Read and follow the instructions provided with any tools listed here.
Tools needed
Phillips screwdriver
Parts supplied (585 CFM models)
Remove parts from packages. Check that all parts are included.
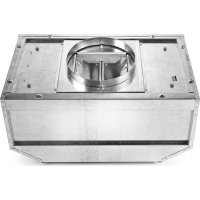
Blower assembly
Motor support bracket
Motor spring clip
Two 6× 1 mm nuts
Five 4.2 × 8 mm screws
Two 6 x 16 mm screws
Two 6.4× 11 mm lock washers
T-20 Torx† adapter
Parts supplied (1170 CFM models)
Remove parts from packages. Check that all parts are included.
Blower assembly
Motor support bracket
Motor spring clip
Five 6 x 1 mm nuts
Five 4.2× 8 mm screws
Five 6 x 16 mm screws
Five 6.4 × 11 mm lock washers
T-20 Torx adapter
INSTALLATION INSTRUCTIONS
Prepare Internal Blower System
IMPORTANT: Perform steps 1-4 before mounting the range hood.
- Remove grease filters from range hood. See the "Range Hood Care" section in the Use and Care Guide.
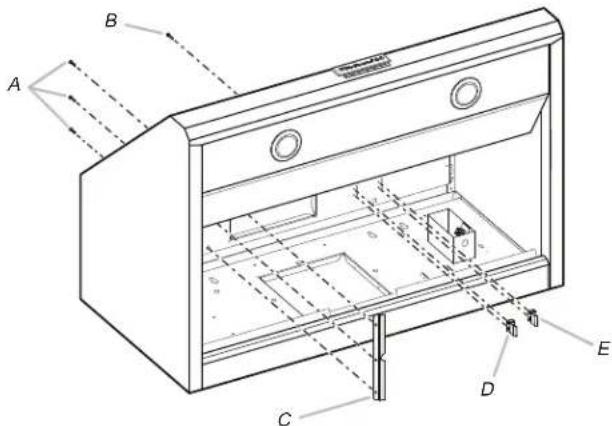
- Install the motor support bracket using three 4.2 × 8 mm screws. Screw bracket to the inside top or back (alternate location on some models), toward the left side of the range hood.
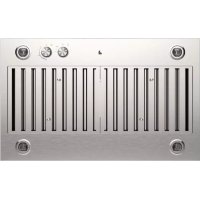
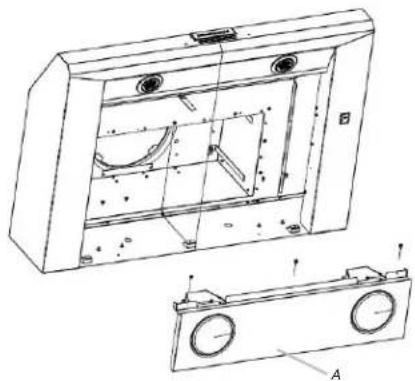
- Only for models KVWC956KSS and KVWC958KSS remove 4 screws on the back of the infrared lamps. Remove 2 side screws from the back of the infrared lamps. Remove the crossbar (A) by pulling in the direction of the installer (under the hood, hold the crossbar with one hand to avoid damaging the hood).
- Install motor spring clip using two 4.2 × 8 mm screws. Screw spring clip to the inside top or back (alternate location on some models) of the range hood at the proper location for the selected motor system. Slide the mounting tab of the spring clip through the slot in the panel and secure with the screws. Use the inside set of mounting holes for the single motor system. Use the outside set of mounting holes for the dual motor system.
TORX and T20 are registered trademarks of Acument Intellectual Properties, LLC
A. Three 4.2 × 8 ~mm screws for motor support bracket
B. Two 4.2 × 8 mm screws for motor spring clip
C. Motor support bracket
D. Motor spring clip (single motor assembly location)
E. Motor spring clip (dual motor assembly location)
-
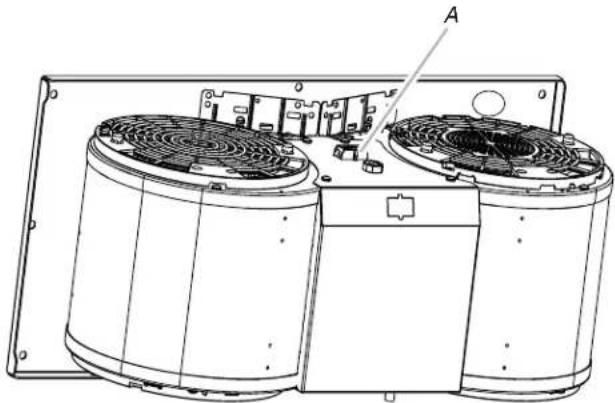
Install the 6 mm nuts to the outside top or outside back (alternate location on some models) of the range hood at the proper location for the selected motor system.
-
Two 6 mm nuts are required for the single motor system. Clip nuts into the small square notches located at the left and right end of the square vent opening.
Five 6 mm nuts are required for the dual motor system. Clip nuts into the small square notches, one located in the front of the square vent opening and the other four located at the left and right ends of the square vent opening.
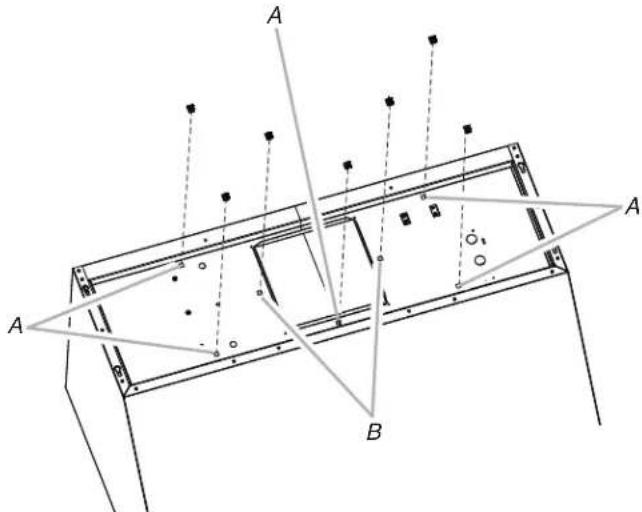
A. Clip nut (6 mm) locations for dual motor assembly (quantity five)
B. Clip nut (6 mm) locations for single motor assembly (quantity two)
- Mount range hood using the Installation Instructions that came with your range hood model.
Install Range Hood Blower Motor
- Install the range hood blower motor assembly inside the range hood canopy with the wiring connection to the left for the single motor system and to the front or top for the dual motor system.
Single Blower Motor Assembly
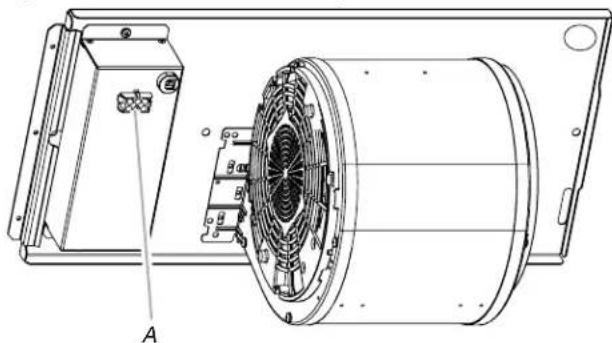
A. Wiring connection
Dual Blower Motor Assembly
A. Wiring connection
- Slide the left mounting plate flange under the motor mounting bracket.

A. Motor mounting bracket
B. Mounting plate left flange
- Run the power supply wires and connector from the range hood through the hole in the right end of the motor mounting plate.
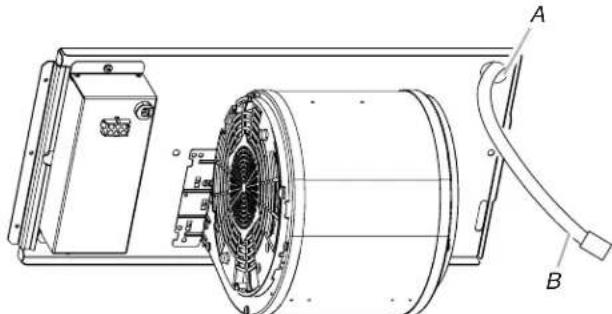
A. Motor mounting plate hole
B. Power supply wires and connector
- Push the right end of the motor mounting plate up and snap it into the spring tab.
NOTE: The spring tab should be outside the slot in the mounting plate.
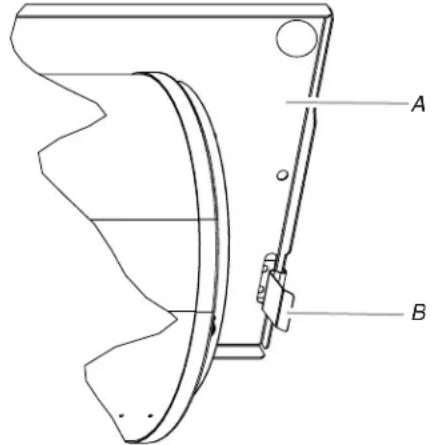
A. Motor mounting plate
B. Spring clip
- Align mounting holes in motor mounting plate with motor mounting clip nuts and install 6 × 16 ~mm screws and 6.4 ~mm lock washers (two for single motor; five for dual motor).
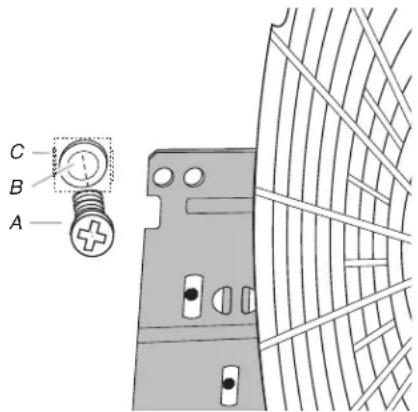
A. Screw with lock washer
B. Mounting hole in motor mounting plate
C. Clip nut (6 mm)
- Attach power cord connector from the range hood to connector on wiring box.

A. Wiring box connector
B. Power supply connector from range hood
- Only for models KVWC956KSS and KVWC958KSS return the crossbar to its original place and replace the side screws. Fix the 4 rear screws to secure the crossbar. Reconnect the lamp harness. Fit the filters.
ASSISTANCE OR SERVICE
When calling for assistance or service, please know the purchase date and the complete model and serial number of your appliance. This information will help us to better respond to your request.
If you need replacement parts
If you need to order replacement parts, we recommend that you use only factory specified parts. Factory specified parts will fit right and work right because they are made with the same precision used to build every new appliance. To locate factory specified replacement parts in your area, call us or your nearest designated service center.
In the U.S.A.
Call the KitchenAid Customer eXperience Center toll-free: 1-800-422-1230 or visit our website at www.kitchenaid.com.
Our consultants provide assistance with:
■ Scheduling of service. KitchenAid appliances designated service technicians are trained to fulfill the product warranty and provide after-warranty service anywhere in the United States.
■Features and specifications on our full line of appliances.
Referrals to local KitchenAid appliance dealers.
■Installation information.
Use and maintenance procedures.
■Accessory and repair parts sales.
■Specialized customer assistance (Spanish speaking, hearing impaired, limited vision, etc.).
For further assistance:
If you need further assistance, you can write to KitchenAid with any questions or concerns at:
KitchenAid Brand Home Appliances
Customer eXperience Center
553 Benson Road
Benton Harbor, MI 49022-2692
Please include a daytime phone number in your correspondence.
In Canada
Call the KitchenAid Customer eXperience Center toll-free:
1 800 807-6777 or visit our website at www.kitchenaid.com.
Our consultants provide assistance with:
■Scheduling of service. KitchenAid appliances designated service technicians are trained to fulfill the product warranty and provide after-warranty service anywhere in Canada.
Features and specifications on our full line of appliances.
Referrals to local KitchenAid appliance dealers.
Use and maintenance procedures.
■Accessory and repair parts sales.
For further assistance:
If you need further assistance, you can write to KitchenAid with any questions or concerns at:
Customer eXperience Centre
KitchenAid Canada
200 - 6750 Century Ave.
Mississauga, Ontario L5N 0B7
Please include a daytime phone number in your correspondence.
SECURITE DE LA HOTTE DE CUISINIÈRE
ASSISTANCE OU SERVICE
KitchenAid Brand Home Appliances
Customer eXperience Center
553 Benson Road
Benton Harbor, MI 49022-2692
Customer eXperience Centre
KitchenAid Canada LP
200-6750 Century Ave.
Mississauga, Ontario L5N 0B7
KitchenAid Brand Home Appliances
Customer eXperience Center
553 Benson Road
Benton Harbor, MI 49022-2692
Customer eXperience Centre
KitchenAid Canada
200-6750 Century Ave.
Mississauga, Ontario L5N 0B7