
DA3530A - Audio System LG - Free user manual and instructions
Find the device manual for free DA3530A LG in PDF.

| Product Type | Home cinema audio system with DVD player |
| Brand | LG |
| Model | DA3530A |
| Dimensions (W x H x D) | 360 x 82 x 388 mm |
| Weight | 4.6 kg |
| Power supply | AC 220-240 V, 50 Hz |
| Power consumption | 70 W |
| Compatible disc formats | DVD-Video, Audio CD, Video CD, CD-R/RW (MP3) |
| Playback functions | Programmed playback, A-B repeat, zoom, slow motion, frame-by-frame advance |
| Radio | FM/AM with 30 station presets |
| Sound modes | DTS, Dolby Digital, Dolby Pro Logic, Hall, Theater, Stereo |
| Output power | 30 W + 30 W (stereo, 8 Ω, 1% THD) |
| Speakers | 6 speakers: front (2), center (1), rear (2), passive subwoofer |
| Connectivity | Video/audio inputs (VIDEO 1, 2), S-Video output, subwoofer output |
| Maintenance and cleaning | Soft dry cloth; avoid solvents; lens cleaning by technician |
| Safety | Class 1 laser; do not open the casing; avoid exposure to humidity |
| Supplied accessories | Remote control, AAA batteries, FM/AM antennas, audio/video cables, speaker cables |
| Operating temperature | 5°C to 35°C |
Frequently Asked Questions - DA3530A LG
User questions about DA3530A LG
0 question about this device. Answer the ones you know or ask your own.
Ask a new question about this device
Download the instructions for your Audio System in PDF format for free! Find your manual DA3530A - LG and take your electronic device back in hand. On this page are published all the documents necessary for the use of your device. DA3530A by LG.
USER MANUAL DA3530A LG
(DA-3530A, FE-3500TE, FE-3500WE)


Before connecting, operating, or adjusting this product, please read this instruction booklet carefully and completely.
WARNING: TO REDUCE THE RISK OF FIRE OR ELECTRIC SHOCK, DO NOT EXPOSE THIS PRODUCT TO RAIN OR MOISTURE.
CAUTION: THIS DVD RECEIVER EMPLOYS A LASER SYSTEM.
TO ENSURE PROPER USE OF THIS PRODUCT, PLEASE READ THIS OWNER'S MANUAL CAREFULLY AND RETAIN FOR FUTURE REFERENCE, SHOULD THE UNIT REQUIRE MAINTENANCE, CONTACT AN AUTHORIZED SERVICE LOCATION-SEE SERVICE PROCEDURE.
USE OF CONTROLS, ADJUSTMENTS OR THE PERFORMANCE OF PROCEDURES OTHER THAN THOSE SPECIFIED MAY RESULT IN HAZARDOUS RADIATION EXPOSURE.
TO PREVENT DIRECT EXPOSURE TO LASER BEAM, DO NOT TRY TO OPEN THE ENCLOSURE. VISIBLE LASER RADIATION WHEN OPEN THE ENCLOSURE. DO NOT STARE INTO BEAM.
THE APPARATUS SHALL NOT BE EXPOSED TO DRIPPING OR SPLASHING AND THAT NO OBJECTS FILLED WITH LIQUIDS, SUCH AS VASES, SHALL BE PLACED ON THE APPARATUS.
WARNING: CHANGES OR MODIFICATIONS NOT EXPRESSLY APPROVED BY THE PARTY RESPONSIBLE FOR COMPLIANCE COULD VOID THE USER'S AUTHORITY TO OPERATE THE EQUIPMENT.

This product is manufactured to comply with the radio interference requirements of EEC DIRECTIVE 89/336/EEC, 93/68/EEC and 73/23/EEC.
RECORD YOUR MODEL NUMBER (Now, while you can see it)
The model and serial number of your new DVD receiver are located on the back of the DVD receiver cabinet. For your future convenience, we suggest that you record these numbers here:
MODEL NO.
SERIAL NO.
Introduction
Safety Precautions....2
Table of Contents....3
□ Precautions 4
Notes on Discs 5
□ Identification of Controls 6-9
Front Panel/Display window....6
Rear Panel 7
Remote Control....8
Preparing the Remote Control....9
Operating with the Remote Control 9
Connections
Antenna Connections....10
☐ Speaker System Connection ..... 11
☐ Connecting to a TV and VCR....12
Basic Operations
☐ Basic Playback....13-14
Special Playback....15-16
Still Picture....15
Frame Advance 15
Skipping chapters and tracks forward or back .. 15
Scanning at High Speed....16
Playing in Slow-Motion 16
Operation Using GUI Menu Icons
☐ General Information about GUI menu icons .... 17
☐ Detailed description of each GUI menu icon....18
Advanced Operation
□ Using a title menu ..... 19
□ Using a DVD menu 19
□ Memorizing Settings for Viewed DVDs ..... 20
□ Changing subtitle language ..... 21
□ Changing audio soundtrack language....21
□ Viewing from another angle ..... 22
□ Repeat Play 23
□ Storing markers in memory to be viewed
(listened to) again 24
□ Zoom Feature 25
Sleep Timer Setting 25
Program Play....26
□ Playback with MP3 27-28
Radio Operation
☐ Presetting the radio stations....29
□ Listening to the radio 30
Sound Operation
□ Selecting a Sound mode .... 31
□Enjoying the Surround Effect 32
Constituent Elements 32
Sound feature in the Room 32
Speaker Positioning 32
□ Delay Time Setting....33
☐ Setting the Sound Level....34 Setting the sound level of the desired channel....34 Setting the Balance between each channels by using the test tone....34
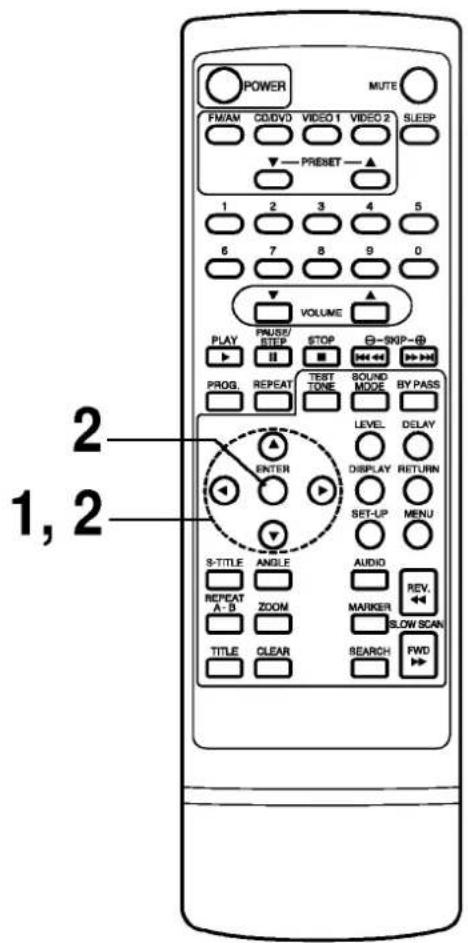
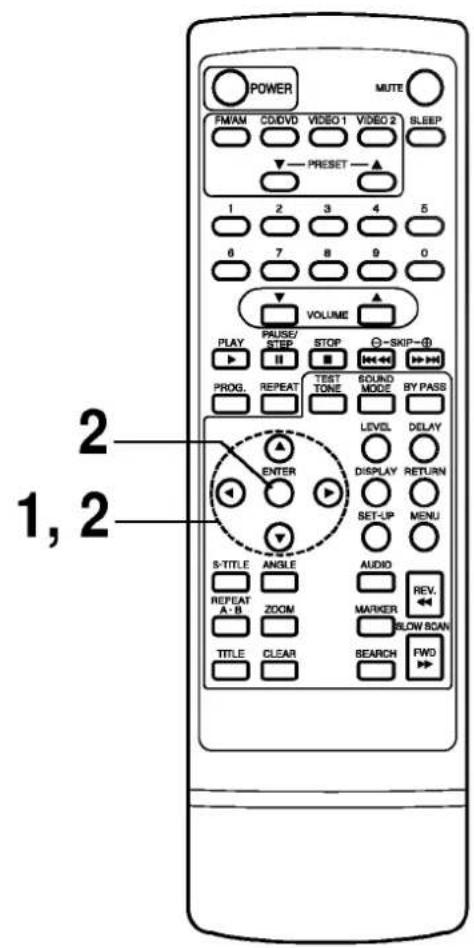
Initial Settings
Common procedures of initial settings ..... 35
□ Selecting disc Languages ..... 36
☐ Selecting rating level and password ..... 37-38
□ Selecting TV Aspect....39
□ Selecting Menu Language ..... 40
□ Selecting PBC (Playback Control) ..... 40
☐ Table of Languages and Their Abbreviations ... 41
Reference
□ Disc Requirements/Copyright Information.....42
Before Calling Service Personnel 43-44
Specifications....45
Notes on handling
☐ When shipping the DVD receiver, always use the original shipping carton and packing materials.
For maximum protection, repack the unit as it was originally packed at the factory.
☐ Do not use volatile liquids, such as insect spray, near the DVD receiver. Do not leave rubber or plastic products in contact with the DVD receiver for a long time. They will leave marks on the finish.
☐ The top and rear panels of the DVD receiver may become warm after a long period of use. This is normal and not a malfunction.
☐ When the DVD receiver is not in use, be sure to remove the disc and turn off the power.
☐ If you do not use the DVD receiver for a long period, the unit may not function properly in the future. Turn on and use the DVD receiver occasionally.
Notes on Locating
☐ When you place this DVD receiver near a TV, radio, or VCR, the playback picture may become poor and the sound may be distorted. In this case, move the DVD receiver away from the TV, radio, or VCR.
Notes on Cleaning
Use a soft, dry cloth for cleaning.
☐ For stubborn dirt, soak the cloth in a weak detergent solution, wring well and wipe. Use a dry cloth to wipe it dry. Do not use any type of solvent, such as thinner and benzine, as they may damage the surface of the DVD receiver.
☐ If you use a chemical saturated cloth to clean the unit, follow that product's instructions.
Warning: Cleaning and adjustment of lenses and/or other components of playback mechanism should be performed by a qualified service technician.
To Obtain a Clear Picture
The DVD receiver is a high technology, precision device. If the optical pick-up lens and disc drive parts are dirty or worn down, the picture quality becomes poor. To obtain a clear picture, we recommend regular inspection and maintenance (cleaning or parts replacement) every 1,000 hours of use depending on the operating environment. For details, contact your nearest dealer.
Notes on Moisture Condensation
Moisture condensation damages the DVD receiver. Please read the following carefully.
Moisture condensation occurs, for example, when you pour a cold drink into a glass on a warm day. Drops of water form on the outside of the glass. In the same way, moisture may condense on the optical pick-up lens inside this unit, one of the most crucial internal parts of the DVD receiver.

Moisture condensation occurs during the following cases.
☐ When you bring the DVD receiver directly from a cold place to a warm place.
☐ When you use the DVD receiver in a room where you just turned on the heater, or a place where the cold wind from the air conditioner directly hits the unit.
In summer, when you use the DVD receiver in a hot and humid place just after you move the unit from an air conditioned room.
☐ When you use the DVD receiver in a humid place.
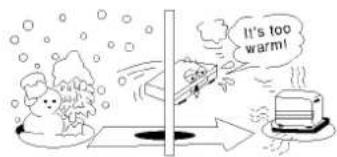
☐ Do not use the DVD receiver when moisture condensation may occur.
If you use the DVD receiver in such a situation, it may damage discs and internal parts. Remove the disc, connect the power cord of the DVD receiver to the wall outlet, turn on the DVD receiver and leave it "ON" for two or three hours. After two or three hours, the DVD receiver will have warmed up and evaporated any moisture. Keep the DVD receiver connected to the wall outlet and moisture condensation will seldom occur.
This section shows you how to handle, clean, and store discs.
On Handling Discs
- Do not touch the playback side of the disc.
- Do not attach paper or tape to discs.

On Storing Discs
Do not store discs in a place subject to direct sunlight or near heat sources.
Do not store discs in places subject to moisture and dust such as a bathroom or near a humidifier.
Store discs vertically in a case. Stacking or placing objects on discs outside of their case may cause warping.
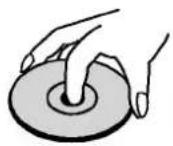
On Cleaning Discs
- Fingerprints and dust on the disc cause picture and sound deterioration. Wipe the disc from the center outward with a soft cloth. Always keep the disc clean.
If you cannot wipe off the dust with a soft cloth, wipe the disc lightly with a slightly moistened soft cloth and finish with a dry cloth.
Do not use any type of solvents such as thinner, benzine, commercially available cleaners or anti-static spray for vinyl LPs. They may damage the disc.

About This Owner's Manual
- This owner's manual explains the basic instructions of this DVD receiver.
Some DVD video discs have functions that may not be explained in this owner's manual. Therefore, some instructions may differ from this owner's manual, and there may be extra instructions. In this case, follow the instructions displayed on the TV screen or package.
“ ” may appear on the TV screen during operation. This icon means the function explained in this owner's manual is not available on that specific DVD video disc.
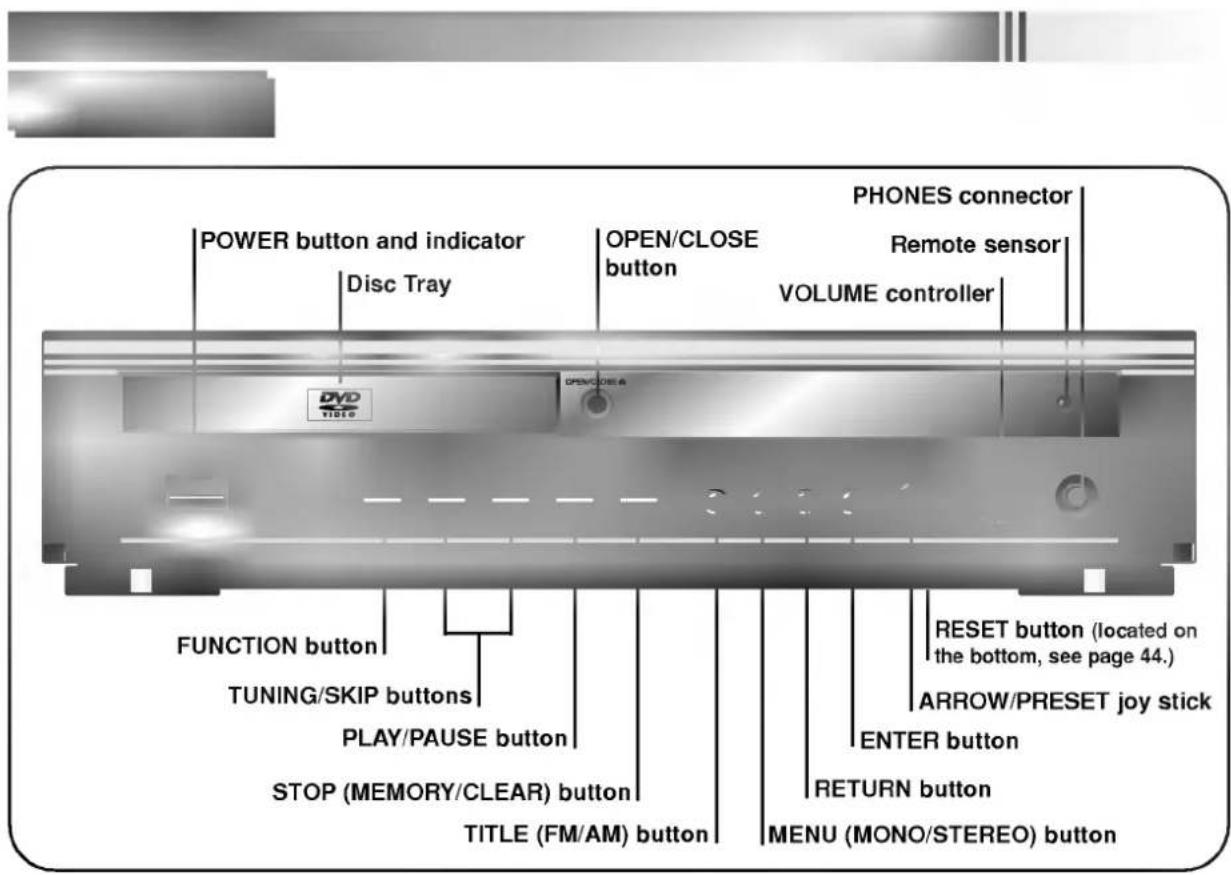
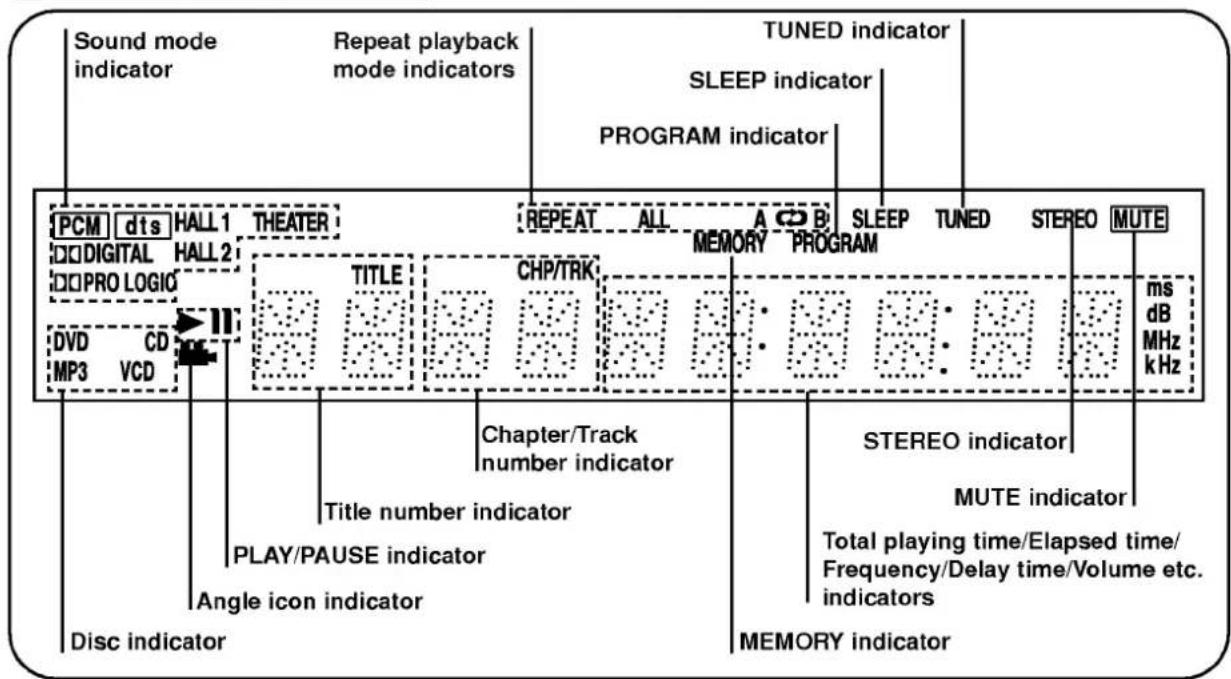
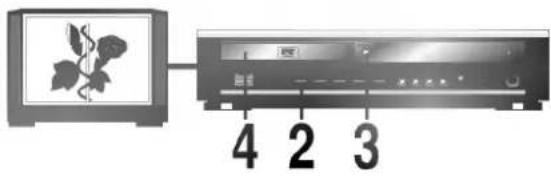
Display Window
Rear Panel
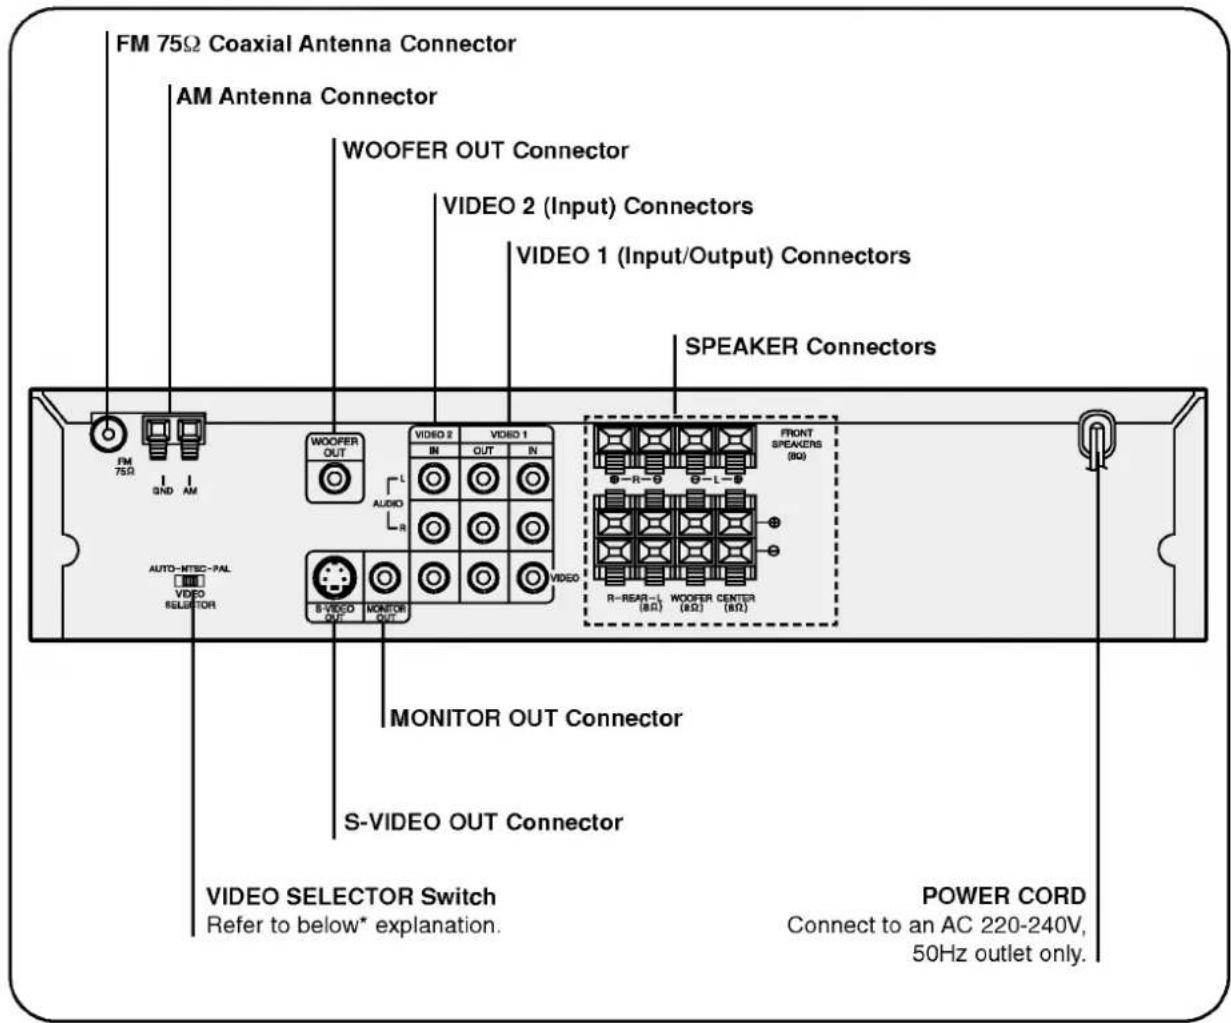
\*VIDEO SELECTOR Switch
You can enjoy NTSC or PAL discs by using your VIDEO SELECTOR switch to choose the appropriate system.
- If you try to play back PAL disc with NTSC-TV. The DVD receiver will not playback the disc.
- When the selected VIDEO SELECTOR switch does not coincide with the system of your TV, normal color picture may not be displayed.
- Adjust the VIDEO SELECTOR switch when the power is turned off.
- When you playback NTSC disc with PAL-TV, some discs may produce black bands at the top and bottom of the screen.
| Position of VIDEO SELECTOR switch | Connected TV | Available disc |
| PAL | PAL | NTSC/PAL DVD disc |
| NTSC | NTSC | NTSC DVD disc |
| AUTO | MULTI system TV | NTSC/PAL DVD disc |
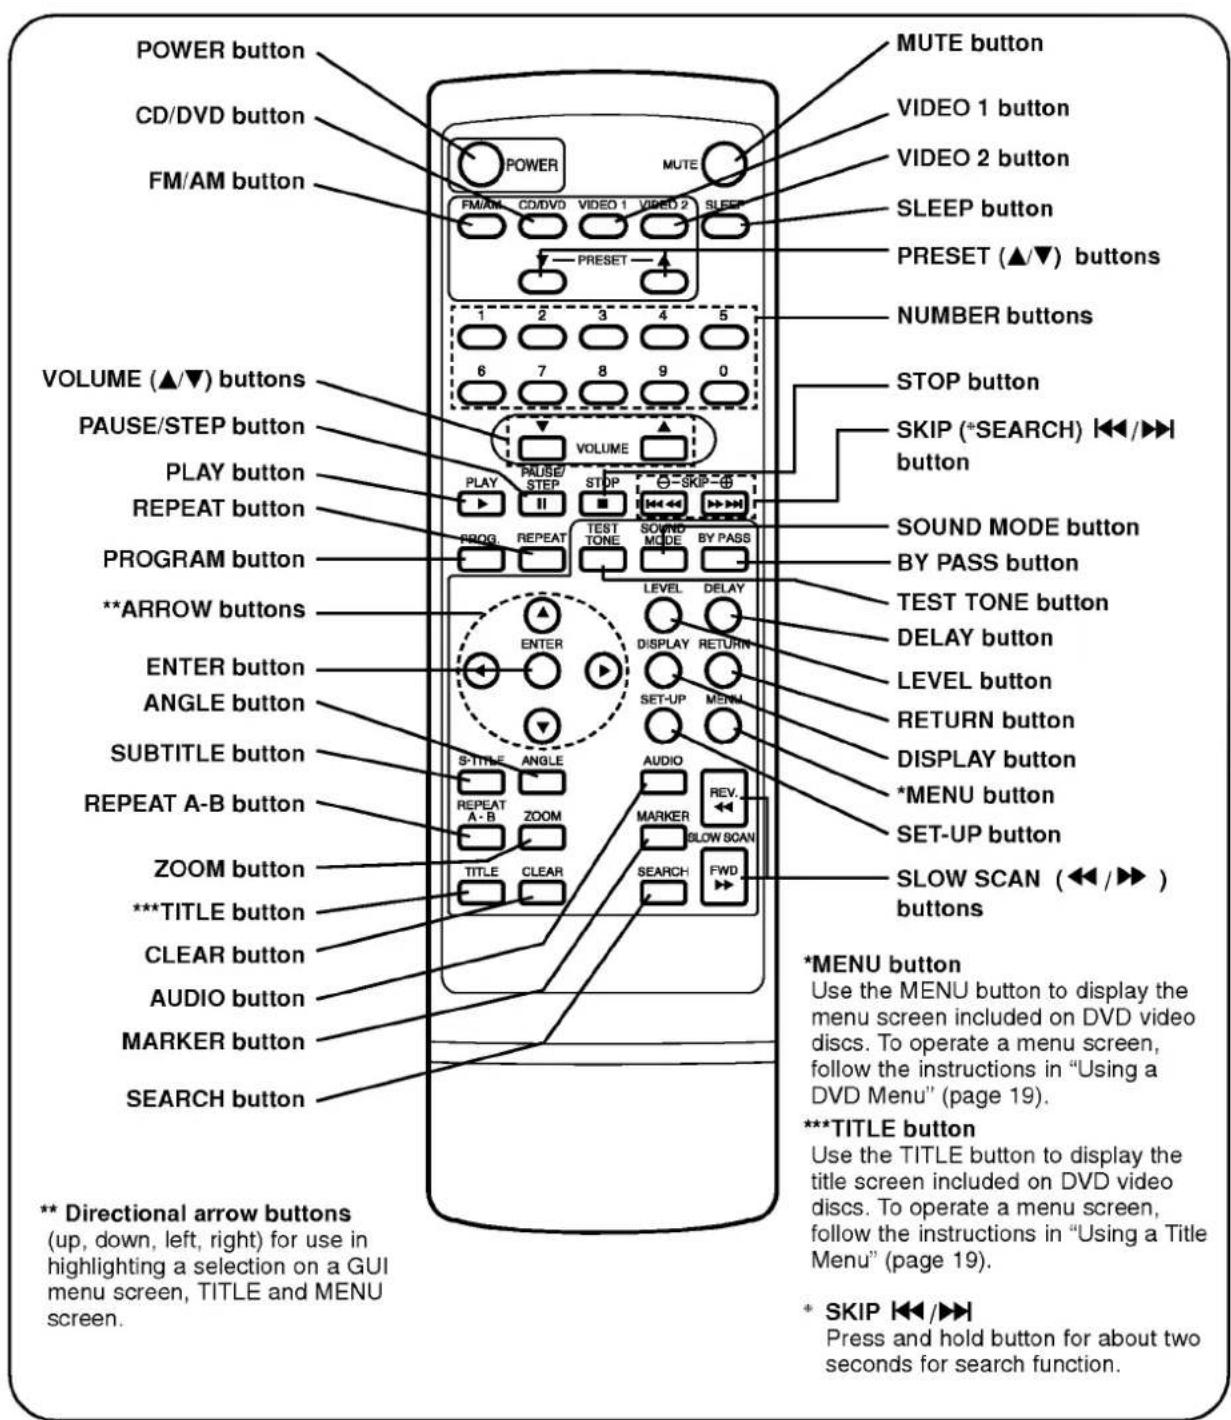
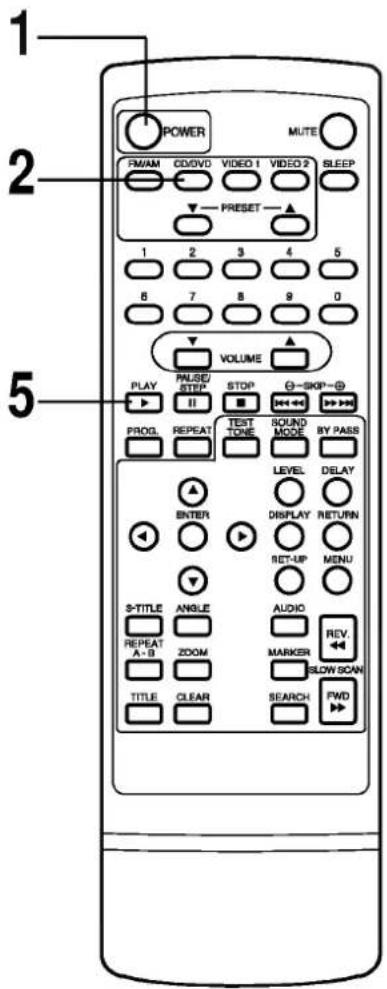
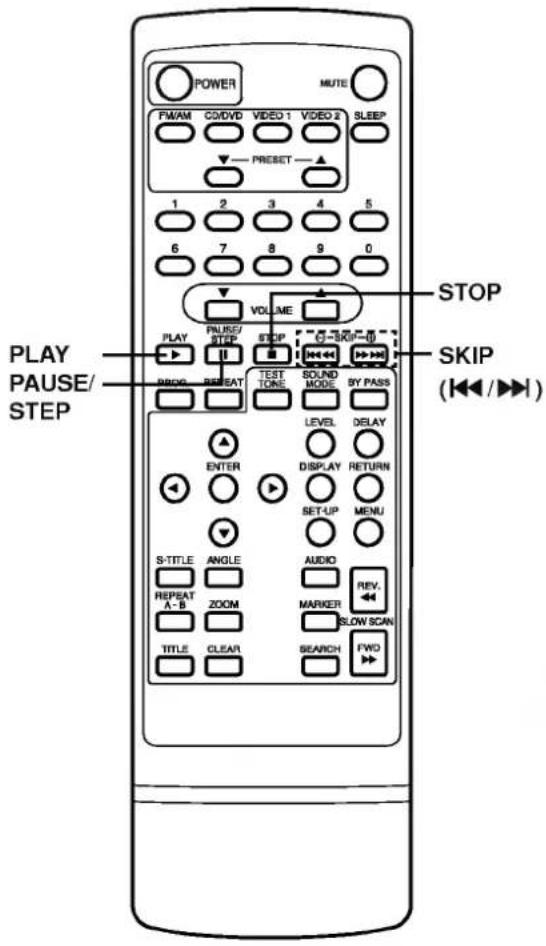
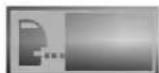
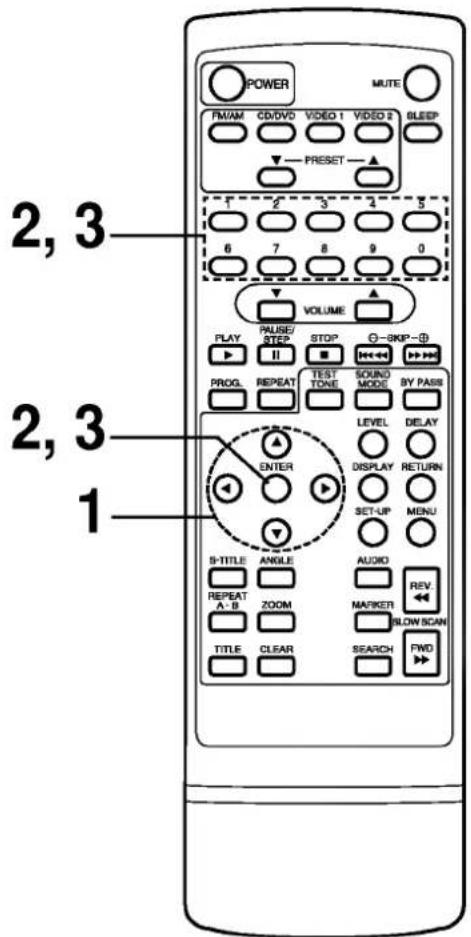
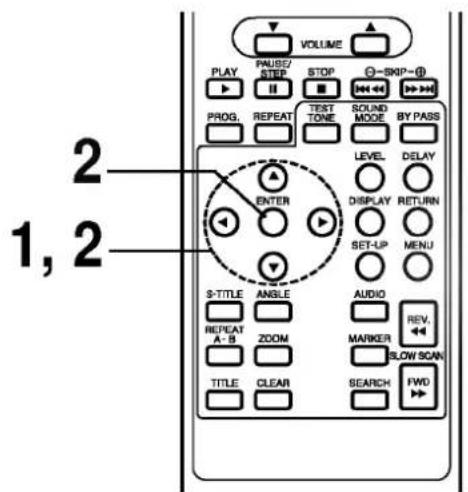
REMOTE CONTROL
You will find instructions for each of the remote control functions in the appropriate sections of this instruction manual.
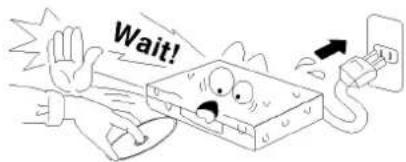
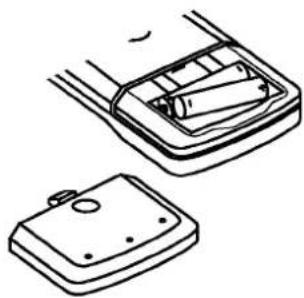
Preparing the Remote Control
Insert the batteries into the remote control so you can use it to operate the DVD receiver.

Open the battery cover.

Insert batteries (AAA size).
● Make sure to match the + and - on the batteries to the marks inside the battery compartment.

Close the cover.
natural_image
Technical line drawing of a mechanical component with two views (top and side), no text or symbols present.○ Improper use of batteries may cause battery leakage and corrosion.
To operate the remote control correctly, follow the instructions.
Do not insert the batteries into the remote control in the wrong direction.
Do not charge, heat, open, or short-circuit the batteries. Do not throw the batteries into fire.
Do not leave dead or exhausted batteries in the remote control.
Do not use different types of batteries together, or mix old and new batteries.
If you do not use the remote control for a long period of time, remove the batteries to avoid possible damage from battery corrosion.
If the remote control does not function correctly or if the operating range becomes reduced, replace all batteries with new ones.
If battery leakage occurs, wipe the battery liquid from the battery compartment, then insert new batteries.
The batteries should last about one year with normal use.
Operating with the Remote Control
This section shows you how to use the remote control.
Point the remote control at the remote sensor and press the buttons.
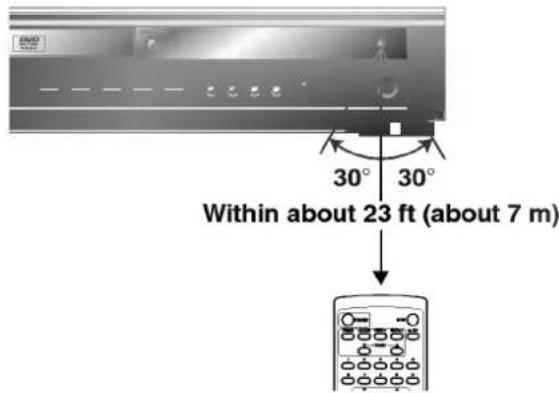
Distance: About 23 ft (7 m) from the front of the remote sensor
Angle: About 30° in each direction of the front of the remote sensor
* Do not expose the remote sensor of the DVD receiver to a strong light source such as direct sunlight or illumination. If you do so, you may not be able to operate the DVD receiver with the remote control.
- Direct the remote control at the remote sensor of the DVD receiver.
Do not drop or give the remote control a shock.
Do not leave the remote control near an extremely hot or humid place.
Do not spill water or put anything wet on the remote control.
Do not open the remote control.
Connect the supplied FM/AM antennas for listening to the radio.
- Connect the AM loop antenna to the AM antenna connector.
- Connector the FM wire antenna to the FM 75Ω coaxial connector.
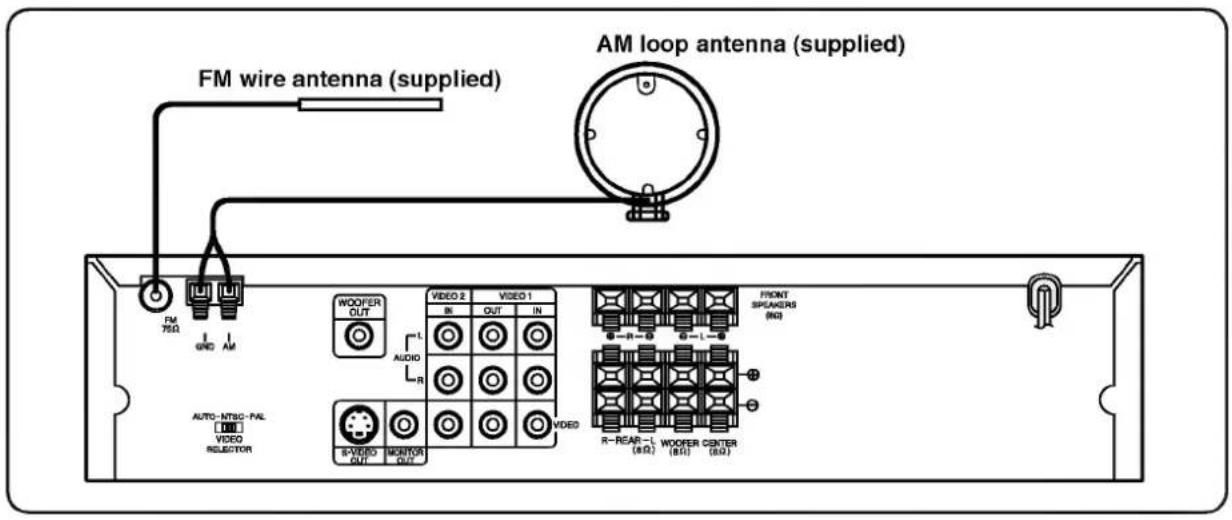
To prevent noise pickup, keep the AM loop antenna away from the DVD Receiver and other component.
- Be sure to fully extend the FM wire antenna.
○ After connecting the FM wire antenna, keep it as horizontal as possible.
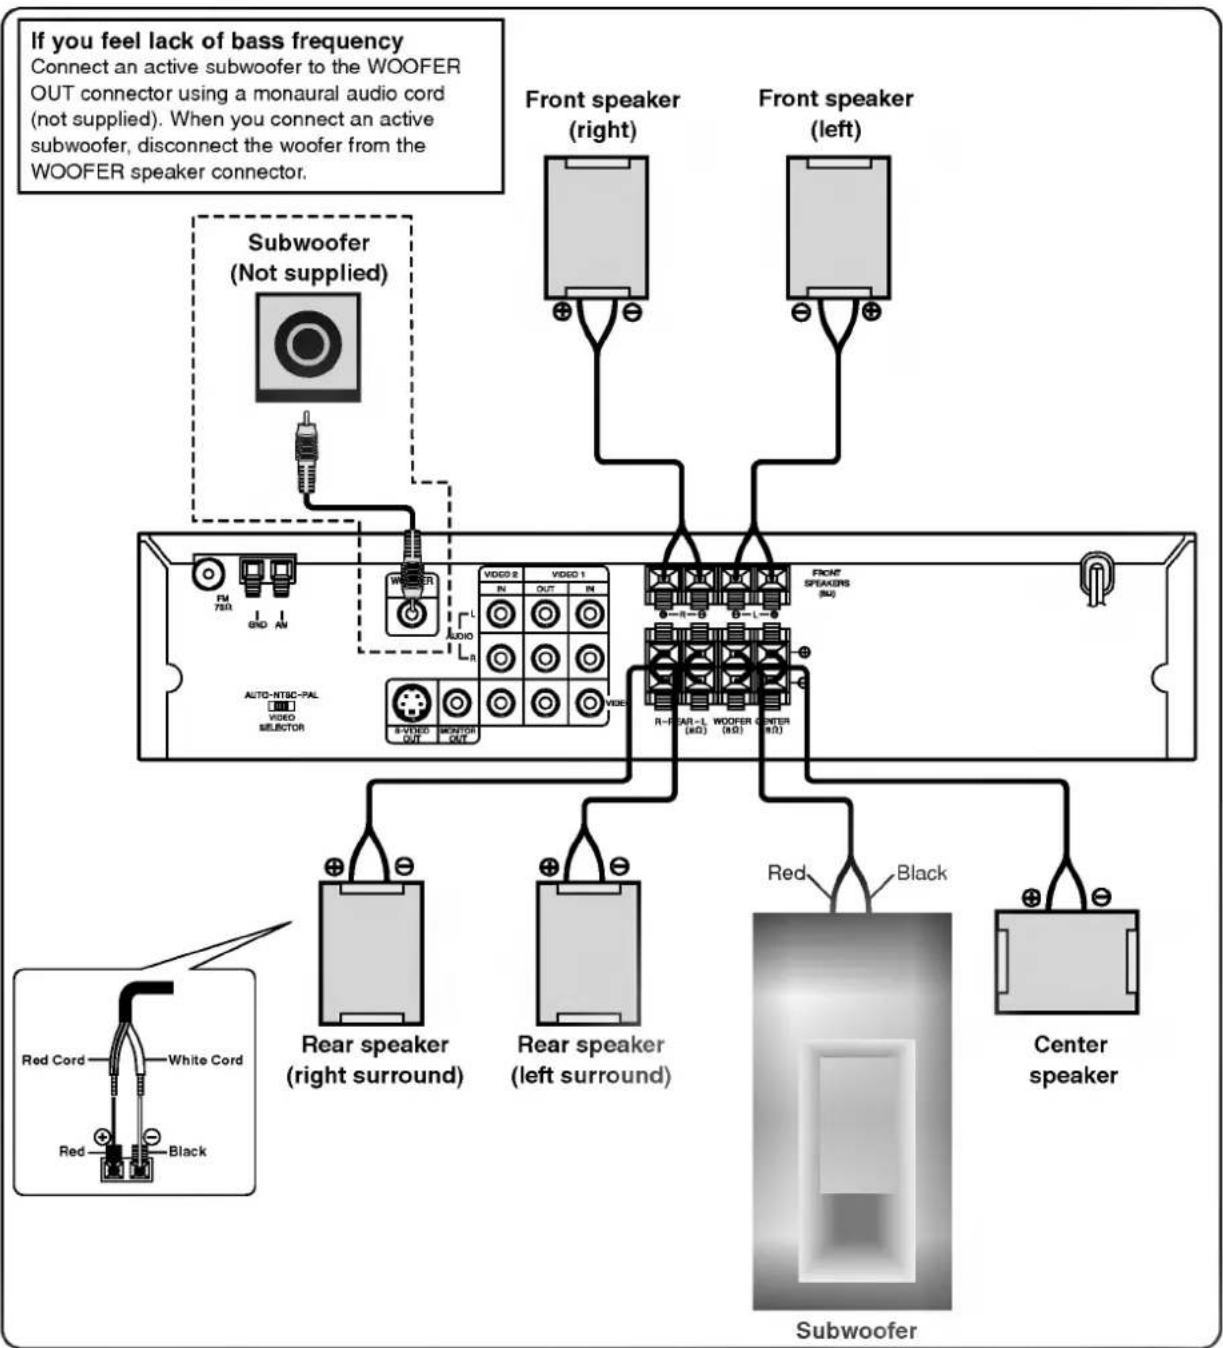
Connect the speakers using the supplied speaker cords by matching the colors of the terminals and those of the cords. To obtain the best possible surround sound, adjust the speaker parameters (distance, level, etc.)
flowchart
graph TD
    A["If you feel lack of bass frequency"] --> B["Subwoofer (Not supplied)"]
    B --> C["Front speaker (right)"]
    B --> D["Front speaker (left)"]
    C --> E["Video 2"]
    D --> F["Video 1"]
    E --> G["Video R"]
    F --> H["Video R"]
    G --> I["Video R"]
    H --> J["Video R"]
    I --> K["Video R"]
    J --> L["Subwoofer"]
    K --> M["Subwoofer"]
    N["Red Cord"] --> O["White Cord"]
    P["Red"] --> Q["Black"]
    R["Rear speaker (right surround)"] --> S["Video 2"]
    T["Rear speaker (left surround)"] --> U["Video 1"]
    V["Center speaker"] --> W["Subwoofer"]
    X["Auto-NTSC-PAL [HD"] VIDEO SELECTOR] --> Y["Video 2"]
    Z["Video 1 OUT"] --> AA["Video 1"]
    AB["Video 2 OUT"] --> AC["Video 1"]
    AD["Video 2 OUT"] --> AE["Video 1"]
    AF["Video 2 OUT"] --> AG["Video 1"]
    AH["Rear Speaker (right surround)"] --> AI["Video 2"]
    AJ["Rear Speaker (left surround)"] --> AK["Video 1"]
    AL["Red"] --> AM["Black"]
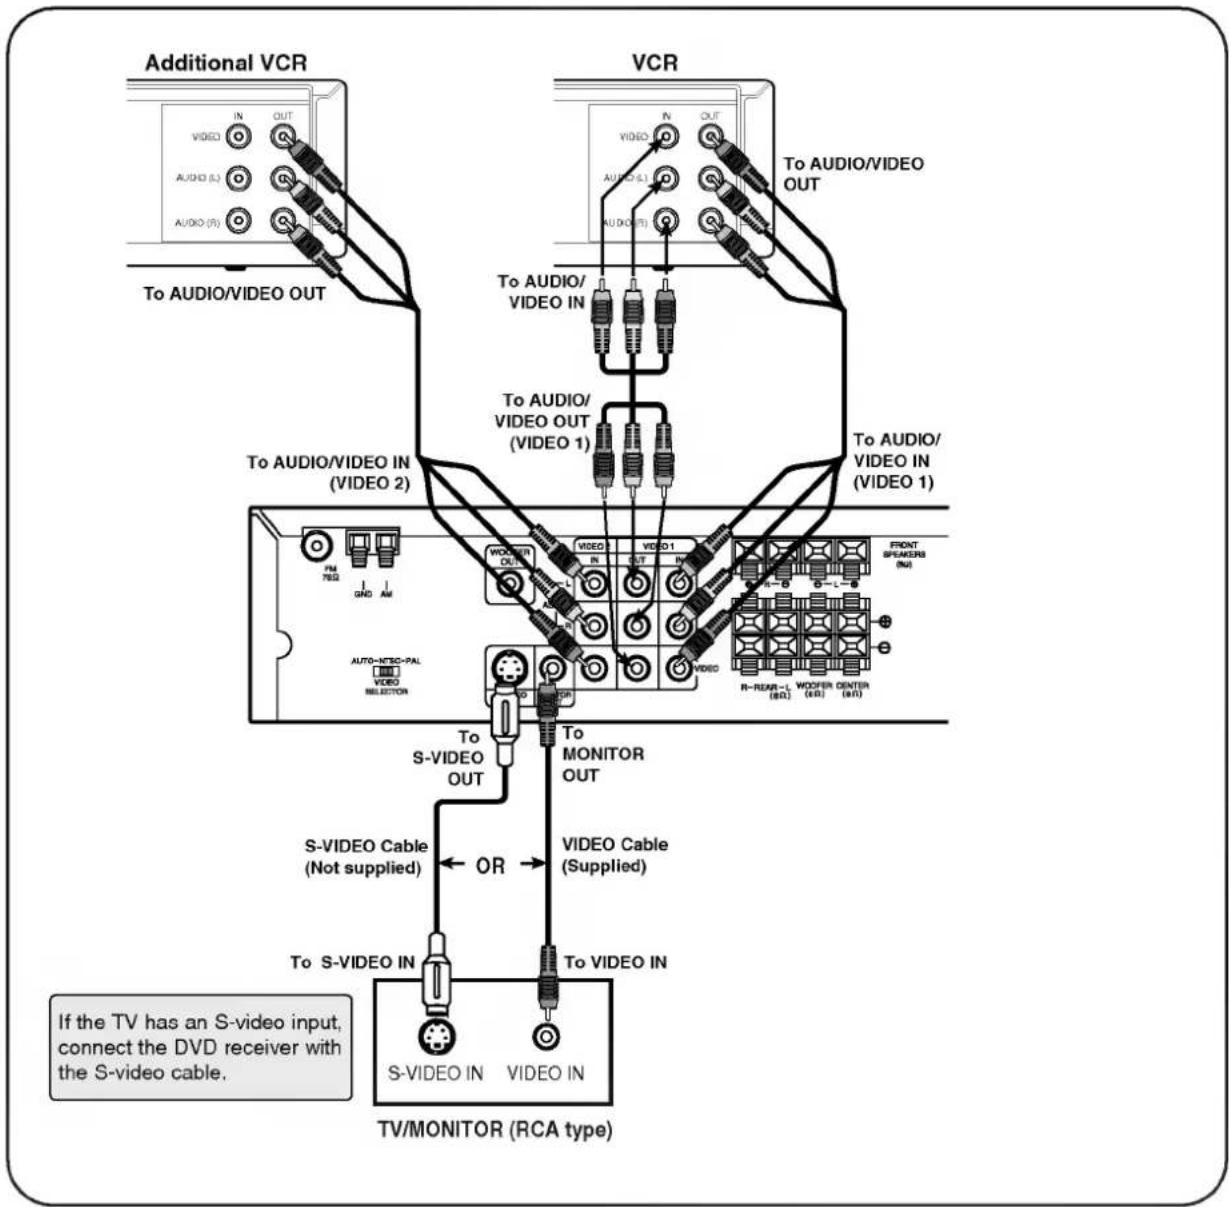
Connect the DVD receiver to your TV and VCR.
- Connect a TV(Monitor) to the MONITOR OUT or S-VIDEO OUT connector.
- Connect a VCR to the VIDEO 1 connectors.
- Connect a additional VCR to the VIDEO 2 connectors.
flowchart
graph TD
    A["Additional VCR"] -->|To AUDIO/VIDEO OUT| B["VCR"]
    B -->|To AUDIO/VIDEO OUT| C["TV/MONITOR (RCA type)"]
    C -->|S-VIDEO IN| D["S-VIDEO IN"]
    C -->|S-VIDEO IN| E["VIDEO IN"]
    C -->|S-VIDEO Cable (Not supplied)| F["Video Cable (Supplied)"]
    C -->|OR| G["Monitor OUT"]
    G --> H["Video Cable (Supplied)"]
    H --> I["Front Speakers (IN)"]
    H --> J["R-REAR-L (BD)"]
    H --> K["WOOFIR CENTER (WR)"]
    B -->|To AUDIO/VIDEO IN| L["Video 1"]
    B -->|To AUDIO/VIDEO IN| M["Video 2"]
    B -->|To AUDIO/VIDEO OUT| N["Video 1"]
    style A fill:#f9f,stroke:#333
    style B fill:#ccf,stroke:#333
    style C fill:#cfc,stroke:#333
    style D fill:#fcc,stroke:#333
    style E fill:#fcc,stroke:#333
    style F fill:#cff,stroke:#333
    style G fill:#ffc,stroke:#333
    style H fill:#ffc,stroke:#333
    style I fill:#fcc,stroke:#333
    style J fill:#fcc,stroke:#333
    style K fill:#fcc,stroke:#333
- Refer to the owner's manual of your TV as well.
When you connect the DVD receiver to your TV, be sure to turn off the power and unplug both units from the wall outlet before making any connections.
Connect the DVD receiver to your TV directly. If you connect the DVD receiver to a VCR, the playback picture will be distorted because DVD video discs are copy protected.
The signal of S-VIDEO OUT jack will output only when the function mode is selected to CD/DVD.
When you select the function mode to VIDEO 1, the signal of VIDEO 1 Output Jacks is not flow out.

This section shows you the basics on how to play back a DVD video disc.
Example of interactive DVD On-Screen Menu
Preparations
- When you want to play back DVD video discs, turn on the TV and select the video input source connected to the DVD receiver.
- When you want to enjoy the sound of DVD video discs or audio CDs from the audio system, turn on the audio system and select the input source connected to the DVD receiver.
● For connection details, see pages 10 through 12. - Set the playback picture size according to the aspect ratio of the connected TV at the SET-UP menu (TV Aspect).
Press POWER.
The DVD receiver turns on and the display window lights.
Press FUNCTION on the front panel repeatedly or CD/DVD on the Remote control to select
Press OPEN/CLOSE.
The disc tray opens.
- You can open the disc tray by pressing this button even if the DVD receiver is in standby mode.
Place a disc on the disc tray with the playback side down.
● There are two different disc sizes. Place the disc in the correct guide on the disc tray. If the disc is out of the guide, it may damage the disc and cause the DVD receiver to malfunction.
- Do not place anything except 3" discs or 5" discs on the disc tray.
Press PLAY.
The disc tray is automatically closed and playback begins.
- If the disc is placed in upside down (and it is a single sided disc), "NO DISC" or "DISC ERROR" appears on the TV screen.
- If you insert an audio CD, the CD indicator lights up in the DVD display. The title number does not appear.
● After playing back all of the chapters in the title, the DVD receiver automatically stops and returns to the menu screen.
When a menu screen appears on the TV screen.
In case of interactive DVDs with control, a menu screen appears on the TV screen. Perform step 6 on page 14 to start play.
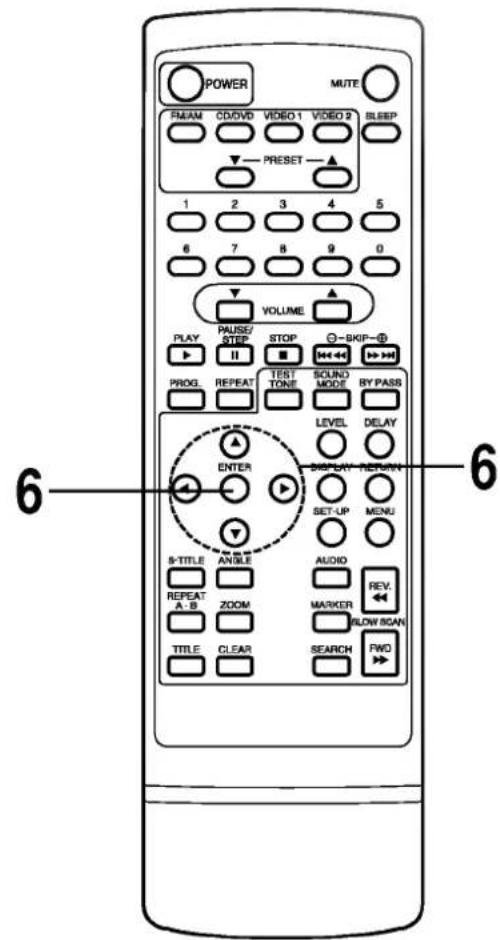


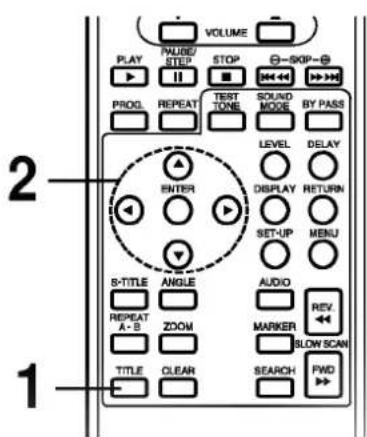
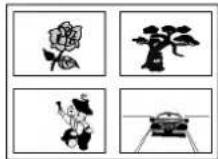
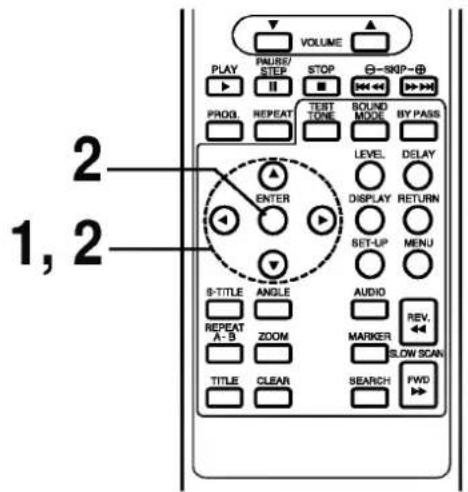
Press ▲/▼/◄/► and press ENTER, or press the numeric button(s), to select the desired item.

OR
natural_image
Four-panel image showing different types of plant or food illustrations: rose, tree, flower, and pot (no text or symbols)Play of the selected item now begins.
- For further information, also refer to the jacket or case of the disc you are playing.
After operation
When the unit is not in use, remove the disc and press POWER to turn off the DVD receiver.
Video CD
This contains recordings of pictures and sound whose quality is on a par with that of video tape. This DVD receiver also supports Video CDs with playback control (Version 2.0).
What is playback control (PBC)?
If a Video CD has "playback control" written on its disc or jacket, it means that particular scenes or information can be selected for viewing interactively with the TV monitor using the menu screen.
Do not move the DVD receiver during playback. Doing so may damage the disc and the DVD receiver.
Use the OPEN/CLOSE button on the DVD receiver to open and close the disc tray. Do not push the disc tray while it is moving. Doing so may cause the DVD receiver to malfunction.
Do not push up the disc tray or put any objects other than discs on the disc tray. Doing so may cause the DVD receiver to malfunction.
Keep your fingers well clear of the disc tray as it is closing. Be especially careful with children's fingers around the closing disc tray as there is a risk of personal injury.
When "☒" appears on the TV screen while a button is pressed, it means that this function is not available on the disc you are playing.
Depending on the DVD disc, some operations may be different or restricted. Refer to the jacket or case of the disc you are playing.


Press STOP during playback.
- When play is stopped, the unit records the point where STOP was pressed (RESUME function). Press PLAY and play will resume from this point.
Resume function will be cleared when the STOP is pressed on the STOP mode.
Resume function will be cleared when the power is turned off and then on.
○ Opening the disc tray cancels Resume function.
The Resume function may not be available on some DVD discs or Video CDs (version 2.0).
Press PAUSE/STEP during playback.
- DVD/Video CD
The DVD receiver will be placed in the still picture mode.
CD
The DVD receiver will be placed in the pause mode.
Frame advance (DVD and Video CD only)
Press PAUSE/STEP during still playback.
(Each time you press PAUSE/STEP, the picture advances one frame)
To resume normal playback, press PLAY.
Skipping chapters and tracks forward or back
Skipping forward
Press SKIP ▶▶ during playback.
A chapter (DVD) or a track (CD/Video CD) is skipped each time the button is pressed.
Skipping back
Press SKIP ◀ during playback.
- When the button is pressed once midway through a chapter/track, the DVD receiver returns to the start of that chapter/track. When it is pressed again, a chapter/track is skipped each time the button is pressed.
For your reference:
- When SKIP is pressed during menu play of video CDs equipped with PBC (Version 2.0), a menu screen may sometimes be recalled.
You can play back discs at various speeds.
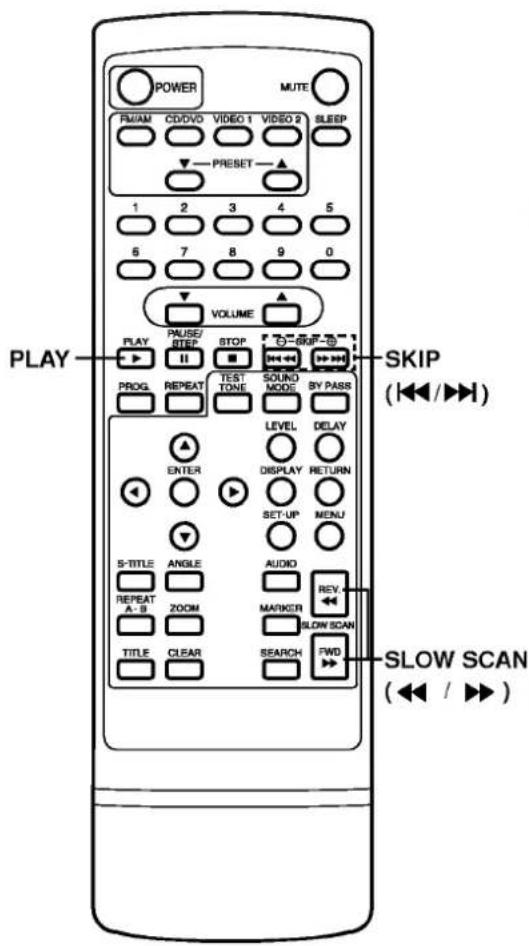
To Scan at fast forward or fast reverse playback.
Press and hold SKIP ◀◀ or ▶▶ button for about two seconds during playback.
[TV screen]

- The speed of advance (reverse) is relatively slow at first. When the button is pressed again, the speed becomes faster. (Each time the button is pressed, the speed increases up to 4 steps (DVD), 3 steps (Video CD) or 1 step (CD).)
● The speed will be retained even after the button is released.
To return to normal playback, press PLAY.
The DVD receiver does not play back sound during the high speed reverse and forward playback of DVD video discs. However, the DVD receiver plays back sound during fast forward or fast reverse playback of audio CDs.
Playing in slow-motion (DVD and Video CD only)
Press SLOW SCAN ◀ or ▶ during playback.
The playback speed becomes 1/16 of the normal speed.
[TV screen]

● The speed of slow-motion is slow at first. When the button is pressed again, the speed becomes faster. (Each time the button is pressed, the speed increase up to 4 steps (DVD) or 3 steps (Video CD).)
● The speed will be retained even after the button is released.
To return to normal playback, press PLAY.
The sound is muted during slow-motion playback.
- Subtitles do not appear on the screen during slow motion playback.
The SLOW SCAN buttons do not work with Audio CDs.
The reverse slow does not work in case of Video CD.
This unit features GUI Menu Icons showing disc information (title/chapter/track number, elapsed playing time, audio/subtitle language, angle, and sound) and DVD receiver information (repeat play, play mode, marker, etc.). Some icons only show the indicated information. Other icons allow the settings to be changed.
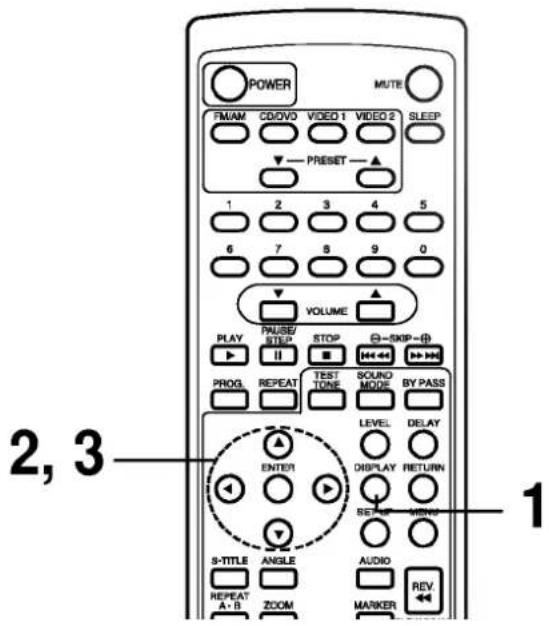


Common procedures

Press DISPLAY during playback.
● Title function can be accessed from the stop mode.

Press ▲/▼ to select the desired item.
● The current selected item is indicated by a yellow frame on its GUI menu icons.

Press ◀/▶ to select the desired setting.
- When numbers are displayed (e.g. title number), the numeric buttons can also be used for setting instead of ◀.
- For some functions, the setting will be registered immediately; for others, ENTER must be pressed.
To clear the GUI Menu Icons, press DISPLAY again.
Examples of GUI Menu Icons.
(The screens may differ depending on the disc contents.)
(DVD GUI)
(CD/Video CD GUI)
(Video CD (Version 2.0))


(DVD and CD GUI)


You can view information about a disc and its operational status on the TV screen.
Press DISPLAY during playback.
[TV screen] DVD GUI

FUNCTION (Press ▲/▼ to select desired item)
| To show the current title numberand to jump to the desired title number | ◀/▶, orNumericENTER |
| To show the current chapter numberand to jump to the desired chapter number | ◀/▶, or Numeric ENTER SKIP |
| To show the elapsed timeand directly select scenes by the desired time. | Numeric ENTER |
| To show the current audio soundtrack language,encoding method, channel numberand to change the settings. | ◀/▶,AUDIO |
| To show the current subtitles languageand to change the setting. | ◀/▶,S-TITLE |
| To show the current angle numberand to change the angle. | ◀/▶,ANGLE |
Press DISPLAY during playback.
[TV screen] CD/Video CD GUI
FUNCTION (Press ▲/▼ to select desired item)
| To show the current track numberand to jump to the desired track number | ◀▶, or Numeric ENTER SKIP |
| To show the elapsed time.(Display only) | —— |
| To show the current audio (STEREO, LEFT, RIGHT)and to select to the desired audio channel. | ◀/▶,AUDIO |

Some movie discs may contain two or more titles. If the disc has a title menu recorded on it, the TITLE button can be used to select the movie title. (The details of operation differ depending on the disc used.)
- Selecting a title may not be possible on certain DVD discs.

Press TITLE.
A list of the titles on the disc is displayed.
Pressing TITLE again to resume play from the scene when TITLE was first pressed.
- Resume play may not be possible on certain discs.

Press ▲/▼/◄/► and press ENTER or PLAY, or press the numeric button(s), to select desired title.
The selected title now starts playing.

Some DVDs have unique menu structures called DVD menus. For example, DVDs programmed with complex contents provide guide menus, and those recorded with various languages provide menus for audio and subtitle language. Although the DVD menu's contents and operation differ from disc to disc, the following explains the basic operation when this feature is used.


Press MENU during play.
The DVD menu available on the disc is now displayed.

Pressing MENU again resumes play from the scene when MENU was first pressed.
- Resume play may not be possible on certain discs.

Press ▲/▼/◄/► and press ENTER, or press the numeric button(s), to select desired item.
The selected item is now executed.

This unit stores, in memory, settings for the last DVD you have watched. Settings remain in memory even if you remove the disc from the DVD receiver, or switch power to OFF. If you load a disc that has its settings memorized, the "Resume disc from last position?" message will appear on the TV screen. When you start playing the disc, the memorized settings are automatically recalled.
You can memorize details for the following six settings.
Last Stop Position (Page 15)
TV Aspect (Page 39)
Disc Subtitle Language (Page 21, 36)
Disc Audio Language (Page 21, 36)
Disc Menu Language (Page 36)
Angle (Page 22)
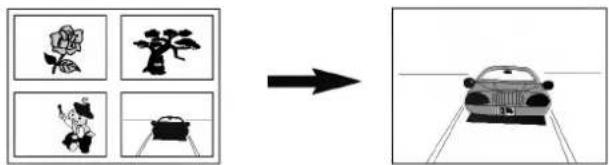
Load the DVD that was memorized.
It will appear on the TV screen as below
- If the screen is left for more than 10 seconds, playback will start from the beginning of the title automatically.
Press ◀/▶ to select "Yes" and press ENTER.
The memorized settings are automatically recalled.
natural_image
Top-down view of a car parked on a paved lot (no text or symbols visible)- Settings are stored in memory for use any time.
☐ You can store settings for up to 1 DVD in memory. If you memorize settings for more than 1 DVD previously memorized settings are erased in order from the last memorized settings. Subsequently, if you try to call up these previously memorized settings, you will get the latest settings that have taken their place.
○ Switching of the audio mode etc., is automatic on some discs.
This unit does not store settings in memory, if you remove the disc from the DVD receiver or switch power to the DVD receiver OFF when DVD or title menu is displayed on the TV screen.
It is possible to change the subtitle language to a different language from the one selected at the initial settings. (See page 36 for further info.) This operation works only with discs on which multiple subtitle languages are recorded.
In some cases, the subtitle language is not changed to the selected one immediately.
When a disc supporting the closed caption is played, the subtitle and the closed caption may overlap each other on the TV screen. In this case, turn the subtitle off.
When the desired language is not selected even after pressing the button several times, it means that the language is not available on the disc.
When the power is turned on or the disc is removed, subtitles appears in the language selected at the initial settings. If this language is not recorded on the disc, the disc's priority language appears.

Press S-TITLE during playback. When no subtitles are recorded, "OFF" will be displayed instead of the language number.
Press S-TITLE repeatedly until the desired language is selected. Number of the subtitle language being played back is shown.
To eliminate the On Screen Subtitles. Press S-TITLE repeatedly to select OFF at step 2.
It is possible to change the audio soundtrack language (or encoding method, channel number) to a different language from the one selected at the initial settings in case of DVD disc. (See page 36 for further info.) This operation works only with discs on which multiple audio soundtrack languages are recorded. And it is possible to change the audio channel in case of audio CD.
When the desired language is not selected even after pressing the button several times, it means that the language is not available on the disc.
When the power is turned on or the disc is removed, the language heard is the one selected at the initial settings. If this language is not recorded on the disc, only the available language on the disc will be heard.
Some discs may not respond to Audio feature.


• DVD Press AUDIO during play. Number of the audio soundtrack language being played back.

Press AUDIO repeatedly until the desired language (or encoding method, channel number) is selected.

• CD/Video CD Press AUDIO during play.
Press AUDIO repeatedly until the desired sound is selected.


Press ANGLE during playback.
Number of angle being played back.


Press ANGLE repeatedly until the desired angle is selected.

For your reference
- The ANGLE indicator will blink in the display window at scenes recorded at different angles to indicate that angle switching is possible.
- The angle number can be programmed beforehand; the angle will be switched to the selected number when the ANGLE indicator blinks.
This function only works for discs having scenes recorded at different angles.
Repeating viewing (listening) Press REPEAT during playback.
Each time this button is pressed, the TV screen changes as shown below and the disc will repeat a chapter or title (DVD) or a track (CD/Video CD).
• DVD
Repeat of chapter being played
Repeat of title being played
Cancel repeat mode (normal play)
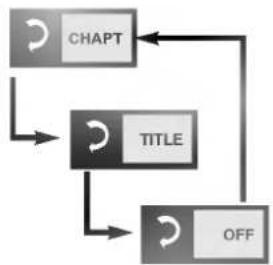
flowchart
graph TD
    A["CHAPT"] --> B["TITLE"]
    B --> C["OFF"]
    C --> A
- CD/Video CD
Repeat of track being played
Repeat of entire disc contents
Cancel repeat mode (normal play)
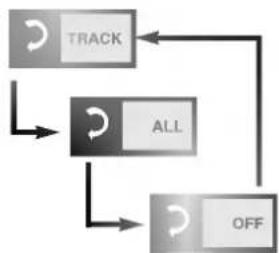
flowchart
graph TD
    A["TRACK"] --> B["ALL"]
    B --> C["OFF"]
    C --> A
To enjoy program repeat play (CD/Video CD) If REPEAT is pressed during program play, repeat play is operated as below.
Repeat of the current programmed track
Repeat of all programs
Cancel repeat mode (Program play)
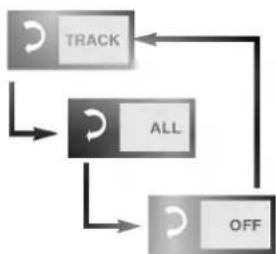
flowchart
graph TD
    A["TRACK"] --> B["ALL"]
    B --> C["OFF"]
    C --> A
To return to normal play
Press REPEAT several times until "OFF" is displayed.


Repeating sections between two specific points (A-B repeat)

Press REPEAT A-B during play at the point where repeat play is to start (A).

- You can select "OFF" at this step by pressing CLEAR.

Press REPEAT A-B during play at the point where repeat play is to be concluded (B).

Repeat play of the selection between points A and B starts.
To return to normal play
Press REPEAT A-B once "OFF" is displayed.

- Repeat play works only with discs for which the elapsed playing time appears in the display window during playback.
- Repeat play may not work correctly with some DVDs and some Video CDs.
A-B repeat play works only within a title DVD or a track CD/Video CD.
Some subtitles recorded around point A or B may fail to appear (DVD).
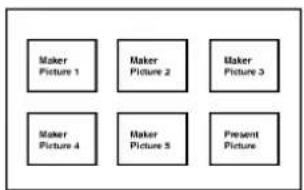
Storing a MARKER in the DVD memory is similar to marking your page in a book. It allows you to quickly return to any point on the disc.
Storing a marker in the memory

Press MARKER during play at the starting point to be viewed (listened to) again.
Indicates "1/5" is stored in the memory. Up to 5 markers can be stored in the memory.
Recalling/Clearing a marker

Press SEARCH during playback.
flowchart
graph TD
    A["Maker Picture 1"] --> B["Maker Picture 2"]
    B --> C["Maker Picture 3"]
    D["Maker Picture 4"] --> E["Maker Picture 5"]
    E --> F["Present Picture"]

Press ▲/▼/◄/► to select the marker to be recalled/cleared.

Press PLAY or ENTER to recall a marker. Or press CLEAR to clear a marker.
Play resumes from the point corresponding to the selected marker, or the selected marker is cleared.
● The "Present Picture" is not cleared.
These operations work only with discs for which the elapsed playing time appears in the display window during playback or stop.
Some subtitles recorded around the marker may fail to appear (DVD).
All the markers are cleared when the power is turned off or the disc is removed and when TV Aspect mode is changed on the SET-UP menu.
The marker is not stored when the DVD or title menu is displayed on the TV screen.
The Zoom feature allows you to "ZOOM-IN" and enlarge the picture on the screen to either 4 times (X4) or 16 times (X16) its normal size.
flowchart
graph TD
    A["(X4)"] --> B["(X16)"]
    B --> C["(Normal)"]
    D["Input"] --> A
    E["Input"] --> B
    F["Input"] --> C

Press ZOOM during normal playback or still playback.
- The square frame will be displayed in the centre of the picture. If no button is pressed for more than 10 seconds, the square frame will disappear.
• Each press of the ZOOM button changes the TV screen in the left sequence. - The magnification level will be displayed in the upper right corner of the zoom area.
If you press ▲/▼/◄/► buttons, the zoom point shifts.
Press ENTER. The selected frame is displayed in full size on the TV screen.
To resume normal playback. Press ZOOM repeatedly until the normal picture appears.
Some discs may not respond to the Zoom feature.
○ Zoom does not work on subtitles or menus included on DVD video discs.
You can set the DVD receiver to turn off automatically at a specified time.
Press SLEEP to set the desired sleep time.
The SLEEP indicator and sleep time appears in the display window.
Each time you press SLEEP, it is changed as the following order.
SLEEP 120 → 90 → 60 → 30 → OFF → 120
For your reference
- You can check the time remaining before the DVD receiver turns off.
Press SLEEP. The remaining time appears in the display window.
The DVD receiver plays the tracks on the disc in the order you specify.
Note: Program play function is possible only with audio CDs. It does not work with DVD movie discs and Video CDs (Version 2.0).


Press PROGRAM during playback or stop mode.
The program playback screen appears on the TV screen.
• To exit the screen, press PLAY or PROGRAM.

Press ▲/▼/◄/► and press the numeric button(s), to select the desired track number.
- Repeat step 2 to select another track.
- Up to 20 tracks can be programmed.

Press PLAY or ENTER to exit the screen.
The selected track is stored in the memory and play now begins in the programmed sequence.
- If you press PROGRAM to exit the screen, the selected tracks are not memorized.
After playback of all tracks programmed
Play is stopped.
Clearing the program
● To clear the programmed tracks one by one
Press ▲/▼/◄/► to select the unwanted number and then press CLEAR.
● To clear all the programmed tracks
Press ▲/▼/◄/► to select "Clear All" and then press ENTER. Press PLAY or ENTER to exit the screen. If you press PROGRAM to exit the screen, the programs are not cleared. (The programs are also cleared when the power is turned off or the disc is removed.)
MP3 CD-R/RW
To play an MP3 file

Load an MP3 disc.
The MP3 menu is displayed.
To play an MP3 file repeatedly
- If you press REPEAT button once during play, the current MP3 file will play repeatedly.
- If you press REPEAT button twice during play, the directory will play repeatedly.
- If you press REPEAT button three times, the repeat play will be cancelled.
Press ▲/▼ buttons to select the directory where MP3 files that you want to play are located and then press ENTER.

Press ▲/▼ button to select the desired MP3 file of the selected directory on your disc.
○ The directory and file name is only displayed in English.
○ If there is an impossible code to display, it will be displayed underlined (_) instead of English.
○ If a directory has no MP3 file, the “⊗” is displayed with the directory name.
○ This unit can play up to 256 files per disc. A disc recorded with more than 256 files cannot be played.
○ The maximum allowable depth of nested directory is 50.
○ Disc format is compatible with ISO9660 only.
If you record mp3 files using the software which cannot create a FILE SYSTEM, for example "Direct-CD" etc., it is impossible to playback mp3 files. We therefore recommend that you use "Easy-CD Creator", which creates an ISO9660 file system.
A single session disc requires mp3 files in the first track. If there is no mp3 file in the 1st track, it cannot playback mp3 files. If you wish to playback mp3 files, format all the data in the disc or use a new one.
If there are already data files which are not mp3 files on the CD-R disc, please, do not use that disc; use a new one instead. However, if the disc is a CD-RW disc, this does not apply.
If you want to return to the previous menu, press the RETURN button.

Press ENTER or PLAY to start playback of the file.
For your reference
- Press SKIP▶ or SKIP◀ to play the next file or previous file during playback.
- Press TITLE to move to 1st page of current directory during playback and press TITLE again to move to the next page within 5 seconds.
- Press MENU to move to the Root Directory during playback.
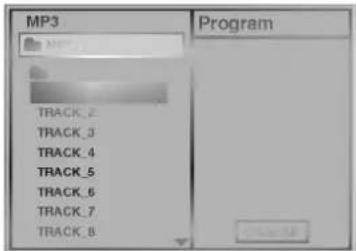
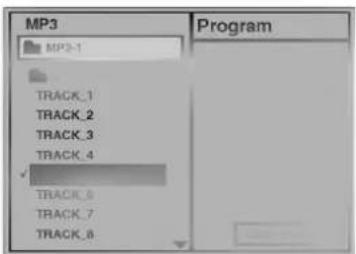
MP3 CD-R/RW
To program play an MP3 file

Press PROGRAM button to add an MP3 file to the program list.
To play an MP3 file repeatedly
- If you press REPEAT button once during play, the current MP3 file will play repeatedly.
- If you press REPEAT button twice during play, the all MP3 files on the program list will play repeatedly.
- If you press REPEAT button three times, the repeat play will be cancelled.

- Repeat steps 2 - 3 to select another track.
- Up to 60 files can be programmed.
Press ▶ button and select the desired MP3 file and press ENTER or PLAY button to play.
If you want to enter the main menu, press ◀ button.
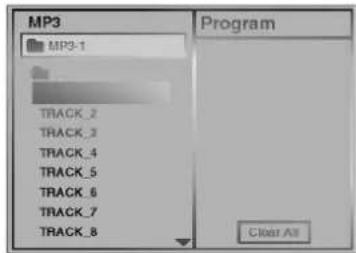
Clearing the program
● To clear the program one by one
Press ▲/▼/◄/► to select the unwanted MP3 file on the program list and then press CLEAR.
● To clear all the programs
Press ▲/▼/◄/► to select the "Clear All" and press ENTER.
After all programmed tracks are played
Play is stopped.
You can preset 30 stations for FM and AM. Before tuning, make sure that you have tuned down the volume to the minimum.
Press FUNCTION on the front panel repeatedly or FM/AM on the Remote control until the FM or AM appears in the display window.
And then every time you press FM/AM, FM and AM changes alternately.
Press and hold TUNING/SKIP ◀ or ▶ on the front panel for about two seconds until the frequency indication starts to change, then release.
Scanning stops when the DVD Receiver tunes in a station. "TUNED" and "STEREO" (for stereo program) appear in the display window.
Note: TUNED is only appeared when the signal is FM and STEREO.
Press MEMORY. A preset number will flash in the display window.
Press ▲ or ▼ on the front panel to select the preset number you want.
Press MEMORY again. The station is stored.
Repeat steps 3 to 6 to store other stations.
To tune in a station with a weak signal
Press TUNING/SKIP ◀ or ▶ repeatedly in step 3 to tune in the station manually.
To clear all the memorized stations
Press and hold MEMORY for about three seconds and "CLEAR ALL" is appeared in the display window and then press MEMORY again, the stations are cleared.
For your reference
If all stations have already been entered, MEM FULL message will appear in the display window for a moment and then a preset number will flash. To change the preset number, follow the steps 5-6 as above.
Preset radio stations in the DVD receiver's memory first (see "Presetting radio stations" on the previous page).
For your reference
• If an FM program is noisy
Press MONO/ST. on the front panel so that "STEREO" disappears in the display window. There will be no stereo effect, but the reception will improve. Press the button again to restore the stereo effect.
• To improve reception
Reorient the supplied antennas.
Press FM/AM until AM or FM appears in the display window.
The last received station is tuned in.
Press PRESET ▲ or ▼ repeatedly to select the preset station you want.
Each time you press the button, the DVD receiver tunes in one preset station at a time.
Adjust the volume by rotating VOLUME on the front panel or pressing VOLUME ▲ or ▼ repeatedly.
To turn off the radio
Press POWER to turn the DVD receiver off or select another function mode (DVD/CD, VIDEO 1 or VIDEO 2).
To listen to non-preset radio stations
- Use manual or automatic tuning in step 2.
- For manual tuning, press TUNING/SKIP ◀◀ or ▶▶ on the front panel repeatedly.
- For automatic tuning, press and hold TUNING/SKIP ◀◀ or ▶▶ for about two seconds on the front panel.
You can enjoy surround sound simply by selecting one of the pre-programmed sound fields according to the program you want to listen to.
Press SOUND MODE repeatedly until the sound mode you want appears in the display window.
See the table below for information on each sound mode.
For your reference
- The DVD Receiver memorizes the last sound mode selected for each program source.
Whenever you select a program source, the sound mode that was last applied is automatically applied again. For example, if you listen to CD with HALL1 as the sound mode, change to a different program source, then return to CD, HALL1 will be applied again. With the tuner, sound fields are memorized separately for all preset station.
- You can identify the encoding format of program software by looking at its packaging.
- Dolby Digital discs are labeled with the logo.
- Dolby Surround encoded programs are labeled with the logo.
- DTS Digital Surround discs are marked with DTS.
When you play sound tracks with 96 kHz sampling frequency, the output signals will be converted to 48 kHz (sampling frequency).
| Sound Mode | Effect |
| dts | Allows you to enjoy 5.1(or 6) discrete channels of high quality digital audio from DTS program sources bearing the trademark such as discs, DVD and compact discs, etc. DTS Digital Surround delivers up to 6 channels of transparent audio(which means identical to the original masters) and results in exceptional clarity throughout a true 360 degree sound field. The term DTS is a trademark of DTS Technology, LLC. Manufactured under license from DTS Technology, LLC. |
| DIGITAL | The Dolby Digital surround format lets you enjoy up to 5.1 channels of digital surround sound from a Dolby Digital program source. If you play DVD of laser discs with “DIGITAL” mark, you can enjoy even better sound quality, greater spatial accuracy, and improved dynamic range. This is because Dolby Digital delivers up to 5 totally discrete, audio channels (front left and right, center, and rear left and right), plus 0.1 channel called LFE*(bass-only effects channel) *LFE=Low Frequency Extension. This channel delivers separate non-directional bass signals to the subwoofer for more dynamic deep bass sound effects. |
| DIPRO LOGIC | Use this mode when playing movie or Dolby Digital 2 channel which carries the “DIGITAL” mark. This mode provides the effect of being in a movie theater or live concert house-an effect with an intensity which can only be obtained through DOLBY PRO LOGIC SURROUND. The effect of the front/back/left/right movement of the sound image, as well as the sense of fixed position in the sound image, is much clearer and more dynamic than before. |
| HALL1 | When playing recordings of live music and classic, this mode provides a feeling similar to actually being in a small concert hall. |
| HALL2 | When playing recordings of live music and classic, this mode provides a feeling similar to actually being in a large concert hall. |
| THEATER | This mode provides a three dimensional effect similar to that of movie theater. |
| 2CH STEREO | Outputs the sound from the front left and right speakers and subwoofer. Standard two channel (stereo) sources completely bypass the sound field processing. This allows you to play any source using only the front left and right speakers and subwoofer. You can select 2CH STEREO by pressing BY PASS on the remote control. |
Speaker Positioning Example
We recommend that you use the magnetic shielded speakers for the front left/right speakers and center speakers to protect from the video noise of the nearby television.
Use the speakers that have a similarity in the sound character of all speakers.
DTS Digital Surround, Dolby Digital and Dolby Pro Logic are used to enjoy the 3-dimensional sound effect with video image. And you need to use the devices as the following.
- Use the Hi-Fi Stereo VCR to play the program sources.
- Use the large sizes TV monitor for high quality video image.
- Use the program sources (e.g. LD, DVD, VIDEO TAPE etc.) marked with DTS Digital Surround (AIDS) or Dolby Surround (MIDMAP or MIDMAP BORROUED).
Manufactured under license from Dolby Laboratories. "Dolby", "Pro Logic", and the double-D symbol are trademarks of Dolby Laboratories. Confidential Unpublished works. Copyright 1992-1997 Dolby Laboratories. All rights reserved.
Manufactured under license from Digital Theater Systems, Inc. US Pat. No. 5,451,942 and other worldwide patents issued and pending. "DTS" and "DTS Digital Surround" are trademarks of Digital Theater Systems, Inc. Copyright 1996 Digital Theater Systems, Inc. All rights reserved.
If the room is made of concrete and thin woods, you cannot enjoy the sufficient surround effect. The wall of the room must have the appropriate absorption factor and a little sound reflection effect. If the room has the much reflection effect, replace the furniture and you need to hang a curtain etc.
In the case of normal position use the 6 speakers (2 front speakers, center speaker, 2 rear speakers and subwoofer). If you want to play the excellent bass sound, DTS digital surround or Dolby Digital surround, you should connect a subwoofer.
- Front speakers
We recommend that the height of the tweeter of the front speakers and listener's ears are same height. And by hearing position set up the interval between speakers to 45 degree. - Center speaker
It is ideal that the center speakers and front speakers are same height. But in normally place it above or below the television. - Rear speakers
Place left and right behind the listening area. These speakers recreate sound motion and atmosphere. Required for surround playback. For best results, do not install the rear speakers too far behind the listening position and install them at or above the level of the listener's ears. It is also effective to direct the rear speakers towards a wall or ceiling to further disperse the sound. In case of the small sizes from the front to rear of the room, if the listener is near the rear wall set the rear speakers opposite each other, and set the rear speakers above 60-90 cm than the listener's ears, and set up it looks down.
- Subwoofer
Without notice for the setting position place it an appropriate position.
In Dolby Digital or Dolby Pro Logic mode it is assumed that the interval from the listener to each speakers is same. But if the interval from the center or rear left and right speakers to the listener is closer than the interval from the listener to the front left and right speaker, the sound of center or rear left and right speaker will reach first than the sound of the front speakers to the listener.
In Dolby Digital and Dolby Pro Logic mode for improvement of this problem, by setting the delay time of the center or rear left and right speaker the sound from all speakers will arrive simultaneously to the listener.
flowchart
graph TD
    A["(A)"] --> B["C"]
    B --> C["DC"]
    C --> D["DF"]
    D --> E["DS"]
    E --> F["SL"]
    E --> G["SR"]
    G --> H["(B)"]
    style A fill:#000,stroke:#000,color:#fff
    style B fill:#000,stroke:#000,color:#fff
    style C fill:#000,stroke:#000,color:#fff
    style D fill:#000,stroke:#000,color:#fff
    style E fill:#000,stroke:#000,color:#fff
    style F fill:#000,stroke:#000,color:#fff
    style G fill:#000,stroke:#000,color:#fff
    style H fill:#000,stroke:#000,color:#fff
- You can adjust the center delay time only in the Dolby Digital mode and its delay time appears.
The interval from the speakers to the listener. If the distance from the listener to each speakers is same, in the Dolby Digital and Dolby Pro Logic mode the delay time of each speakers is as following.
In Dolby Digital mode
Center delay time : 0ms
Rear delay time: 5ms
In Dolby Pro Logic mode
Center delay time : cannot setting
Rear delay time : 15-30ms
If the rear delay time is set in Dolby Digital mode, in the Dolby Pro Logic mode the delay time will be automatically set.
The delay time is 1 msec per 30 cm.
If the center and rear speakers are further than the front speakers from the listener, the delay time will be at minimum.
If the distance of Ds is equal to or longer than the DF in the left figure, set the Surround Delay Time as 0ms. Otherwise, change the setting according to the below.
Ex) If the distance from front speakers to the listener is 3 m and from rear speakers from the listener is 1.5 m, in the Dolby Digital mode the rear delay time is 5 msec.
3m (DF) - 1.5m (Ds) = 1.5m (B)
1.5m (B) = 150cm / 30cm = 5msec
Center delay time setting (Dolby Digital mode only)
If the distance of DF is equal to the distance of Dc in the left figure, set the Center Delay Time as 0ms. Otherwise, change the setting according to the table below.
Ex) If the distance from the front speakers to the listener is 3m and from the center speaker to the listener is 2.4m, the center delay time is 2msec.
3m (DF) - 2.4m (Dc) = 60cm (A)
60cm (A) / 30cm = 2msec
Setting the delay time in the Dolby Digital and Dolby Pro Logic mode

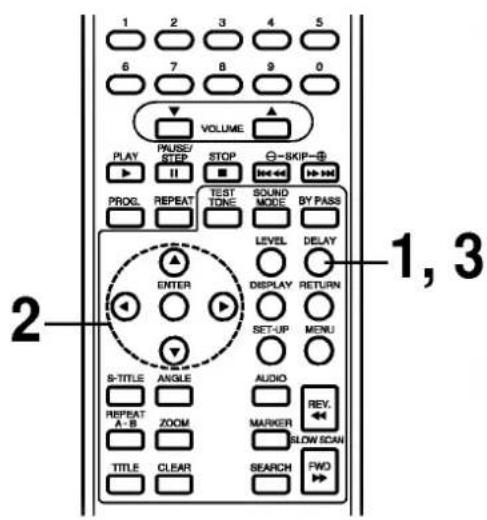
Press DELAY.
The current surround delay time is appeared in the display window.
You can select center delay time by pressing ◀ in the Dolby Digital mode only.

Press ▲/▼ to change the delay time.

If setting is complete, press DELAY.
Setting the sound level of the desired channel

Press LEVEL.
The LEVEL indicator will appear in the display window.

Press ◀/▶ to select a desired speaker to set.
Each time you press the ◀/▶ button, it is changed as the following order;
FL (Front Left) → C (Center) → FR (Front Right) → SR (Surround Right) → SL (Surround Left) → SW (Subwoofer) → FL (Front Left)
- On the 2 channel stereo mode, you can only select the SW (Subwoofer).

Press ▲/▼ to adjust the sound level of the selected channel.

Repeat step 2-3 and adjust the sound level of the other channels.

If setting is complete, press LEVEL.
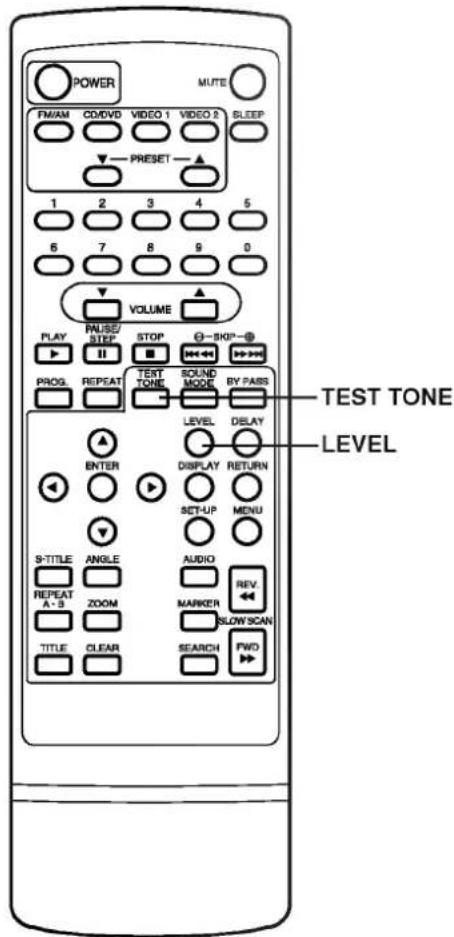
Setting the Balance between each channels by using the test tone
In Dolby Digital and Dolby Pro Logic mode by using the test tone function you can easily adjust the sound balance of the speakers from the listener's position.

Select the test tone mode by pressing TEST TONE.
- A hiss noise comes out for 2 seconds from each speakers in the following order; FL (Front Left) → C (Center) → FR (Front Right) → SR (Surround Right) → SL (Surround Left) → SW (Subwoofer) → FL (Front Left)

Adjust the sound level the same way as described in "Setting the sound level of the desired channel" above, so that all the speaker's sound level is same from the listener's position.
- During operating the test tone, if you adjust the sound level, it will be paused in the current speaker channel.
For your reference
- To adjust the volume of all the speakers at one time. Use the VOLUME control.
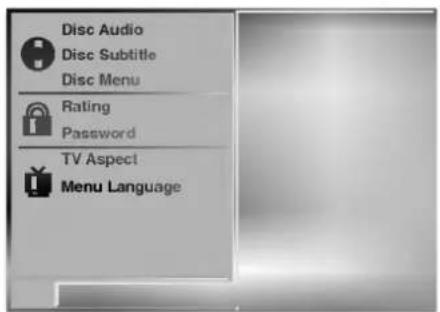
Once the initial settings have been completed, the DVD receiver can always be operated under the same conditions (especially with DVD discs). The settings will be retained in the memory until they are changed, even if the power is switched off.
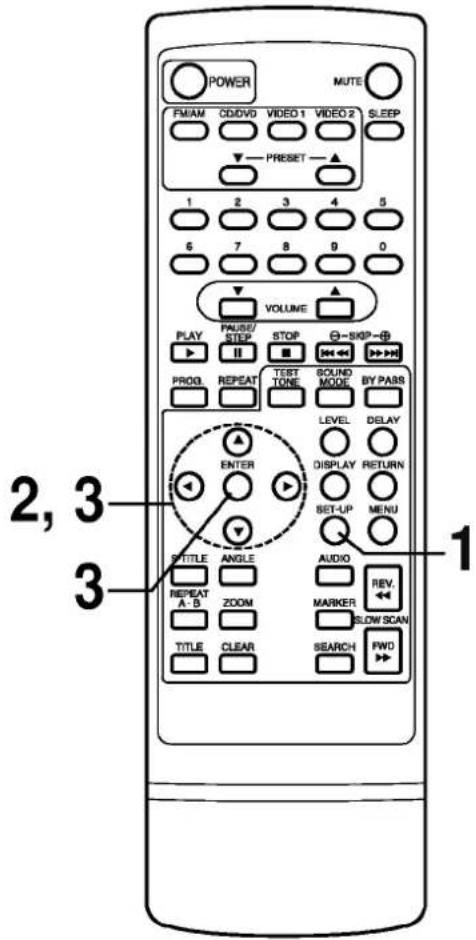

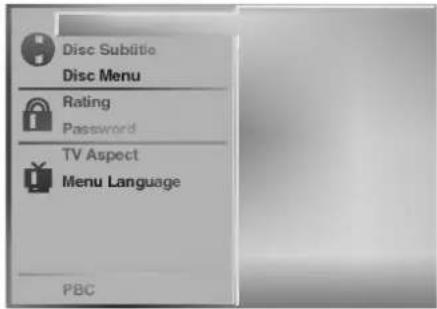
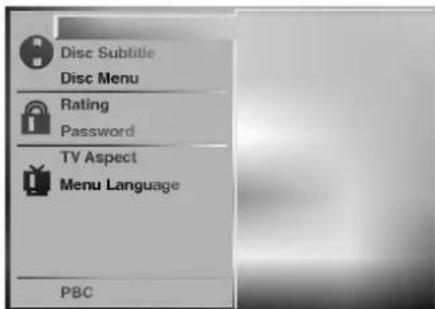
Selection of initial settings
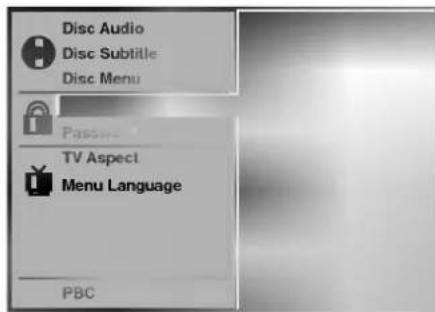
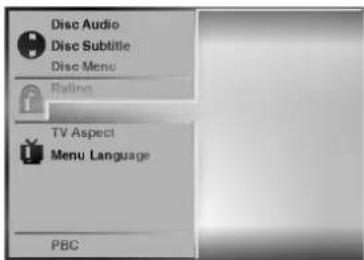
Press SET-UP in the stop or playback mode. The SET-UP menu is displayed.
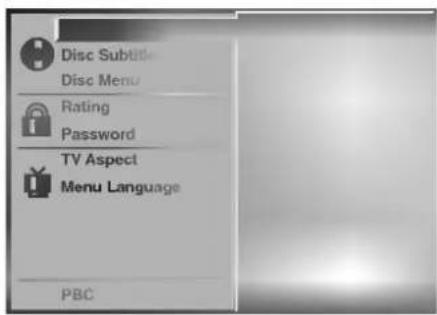
Press ▲/▼ to select the desired item.
The screen will show the current setting for the selected item, and the alternate setting(s).
• Disc Audio (see page 36.)
• Disc Subtitle (see page 36.)
• Disc Menu (see page 36.)
• Rating (see page 37.)
- Password (see page 38.)
• TV Aspect (see page 39.)
- Menu Language (see page 40.)
- PBC (see page 40.)
Press ▶ and then ▲/▼ to select the desired setting and press ENTER.
- Some items require additional steps. (See the respective page.)
When the alternate setting is selected the screen returns to the Initial Settings display.
To exit SET-UP menu
Press SET-UP, RETURN or PLAY.
This is to select the audio soundtrack language, subtitle language and the language used in title menus or DVD menus which will always be used for every disc to be played back.
When you play back a DVD video disc, the DVD receiver automatically displays the pre-selected subtitle language if it is included on the disc.


At the setup screen, press ▲/▼ to select "Disc Audio" and press ▶.

Press ▲/▼ to select the desired language and then press ENTER.
Original : The original language of each disc will be selected. English : The English will be Selected.
Other : Another language can be selected. You can input 4-digit language code. (Refer to the language codes on page 41. Press CLEAR if an incorrect language code is entered.)
The "Disc Subtitle" and "Disc Menu" are selected by the same method.
If the language selected is not available on the disc, the original language designated by each disc will be selected.
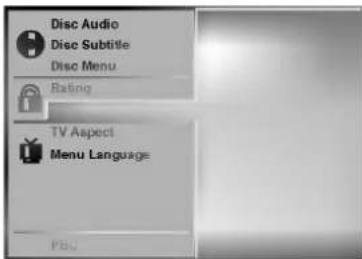
This is to prohibit the playing of specified DVDs which are unsuitable for children.
- Some DVD discs contain a restriction level which enables parents to remove scenes or prevent playback of discs by children. DVD receivers are equipped with a password designed to prevent children from changing the level.

Selecting rating level (DVD only)
At the SET-UP screen, press ▲/▼ to select "Rating" and press ▶.
Press ▲/▼ to select the desired level and press ENTER.

You cannot play DVD video discs rated higher than the level you selected unless you cancel the parental lock function. For example, when you select level 7, discs rated higher than level 7 are blocked and cannot be played.
If you change the level and enter a password, playback of all DVDs with ratings higher than your selection will be blocked, unless the correct password is entered again. For example: if you change the level to "5", the DVD receiver will not play discs with ratings of "6", "7" or "8" unless the correct password is entered on the remote control.

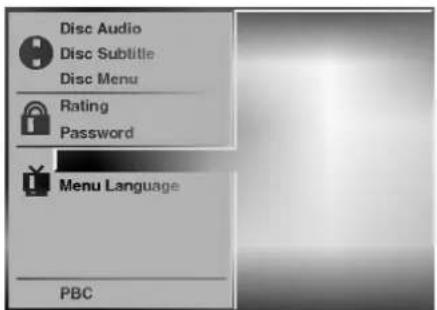
Setting your password (DVD only)
If you change the rating level to "7" or lower, you must enter a 4-digit "password" to prevent playback of discs with higher ratings.

At the SET-UP screen, press ▼ to select "Password" and press ▶.

Input a 4-digit password and press ENTER.
Example : 1234
Do not forget your password.

Input the 4-digit password again and press ENTER to verify.
Setting is finished.
● The rating is locked. Any disc whose rating is higher than the setting, cannot be played back unless the correct password is entered.
To change/clear memorized password

At the SET-UP screen, press ▼ to select "Password" and press ▶.

Input your password and press ENTER.
To clear your 4-digit password
If you forget your password, to clear the current password, follow the procedure below.
At the SET-UP screen
1 Press ▼ to select "Password" item.
2 Enter 6-digit number "210499" and then press ENTER.
The 4-digit password is cleared.
3 Enter a new password
Refer to "Setting your password" section on the right.

To change or clear your password, press ▲/▼ to select the "Change" or "Clear" and press ENTER.
To change the rating level/password, follow the steps on page 37-38 again.

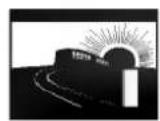
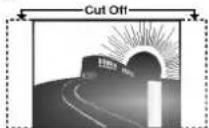
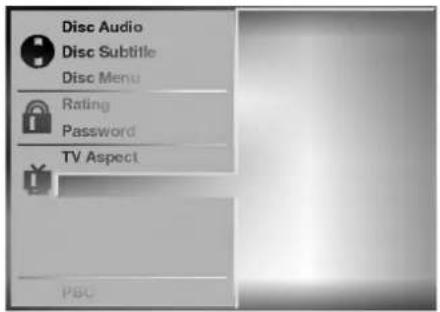
Select the appropriate screen type according to your TV set; conventional size screen (4:3) or wide-screen (16:9).
4:3 Letterbox
4:3 Panscan
16:9 Wide
At the SET-UP screen, press ▲/▼ to select "TV Aspect" and press ▶.
Press ▲/▼ to select the desired Aspect and press ENTER.
4:3 Letterbox : The video material not formatted in the Pan & Scan style is played back in the letterbox style (black bands appear at top and bottom of screen).
4:3 Panscan : Select when a conventional TV set is connected. The video material formatted in the Pan & Scan style is played back in that style (the left and right edges are cut off).
16:9 Wide : Select when a wide-screen TV set is connected. Played in "FULL" size. (Setting the wide-screen TV to "FULL" mode is also necessary.)
* Each screen shows an example when the video material for a wide-screen is played. (This setting does not affect the video material for conventional size.)

natural_image
Gray gradient banner with DVD and Video logos (no text or symbols on the banner itself)Selects language for SET-UP menus and displays on the TV.
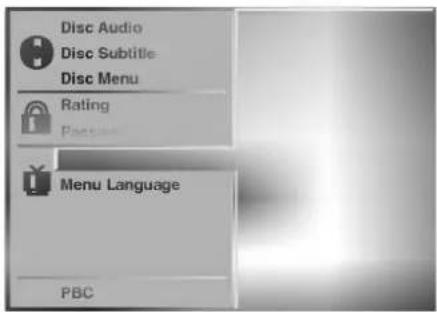
At the SET-UP screen, press ▲/▼ to select "Menu Language" and press ▶.
Press ▲/▼ to select the desired Language and press ENTER.
The PBC (Playback Control) settings can be changed.
At the SET-UP screen, press ▲/▼ to select "PBC" and press ▶.
Press ▲/▼ to select the desired item and press ENTER.
■ PBC On/Off
Set Playback Control (PBC) to On or Off
On: Video CDs with PBC are played back according to the PBC.
Off: Video CDs with PBC are played back in the same way Audio CDs.

Enter the appropriate code number for the initial settings "Audio", "Subtitle" and/or "Menu" (See page 36).
| Code | Language | Code | Language | Code | Language | Code | Language |
| 6565 | Afar | 7079 | Faroese | 7678 | Lingala | 8375 | Slovak |
| 6566 | Abkhazian | 7082 | French | 7679 | Laothian | 8376 | Slovenian |
| 6570 | Afrikaans | 7089 | Frisian | 7684 | Lithuanian | 8377 | Samoan |
| 6577 | Ameharic | 7165 | Irish | 7686 | Latvian, Lettish | 8378 | Shona |
| 6582 | Arabic | 7168 | Scots Gaelic | 7771 | Malagasy | 8379 | Somali |
| 6583 | Assamese | 7176 | Galician | 7773 | Maori | 8381 | Albanian |
| 6588 | Aymara | 7178 | Guarani | 7775 | Macedonian | 8382 | Serbian |
| 6590 | Azerbaijani | 7185 | Gujarati | 7776 | Malayalam | 8385 | Sudanese |
| 6665 | Bashkir | 7265 | Hausa | 7778 | Mongolian | 8386 | Swedish |
| 6669 | Byelorussian | 7273 | Hindi | 7779 | Moldavian | 8387 | Swahili |
| 6671 | Bulgarian | 7282 | Croatian | 7782 | Marathi | 8465 | Tamil |
| 6672 | Bihari | 7285 | Hungarian | 7783 | Malay | 8469 | Telugu |
| 6678 | Bengali; Bangla | 7289 | Armenian | 7784 | Maltese | 8471 | Tajik |
| 6679 | Tibetan | 7365 | Interlingua | 7789 | Burmese | 8472 | Thai |
| 6682 | Breton | 7378 | Indonesian | 7865 | Nauru | 8473 | Tigrinya |
| 6765 | Catalan | 7383 | Icelandic | 7869 | Nepali | 8475 | Turkmen |
| 6779 | Corsican | 7384 | Italian | 7876 | Dutch | 8476 | Tagalog |
| 6783 | Czech | 7387 | Hebrew | 7879 | Norwegian | 8479 | Tonga |
| 6789 | Welsh | 7465 | Japanese | 7982 | Oriya | 8482 | Turkish |
| 6865 | Danish | 7473 | Yiddish | 8065 | Panjabi | 8484 | Tatar |
| 6869 | German | 7487 | Javanese | 8076 | Polish | 8487 | Twi |
| 6890 | Bhutani | 7565 | Georgian | 8083 | Pashto, Pushto | 8575 | Ukrainian |
| 6976 | Greek | 7575 | Kazakh | 8084 | Portuguese | 8582 | Urdu |
| 6978 | English | 7576 | Greenlandic | 8185 | Quechua | 8590 | Uzbek |
| 6979 | Esperanto | 7577 | Cambodian | 8277 | Rhaeto-Romance | 8673 | Vietnamese |
| 6983 | Spanish | 7578 | Kannada | 8279 | Rumanian | 8679 | Volapük |
| 6984 | Estonian | 7579 | Korean | 8285 | Russian | 8779 | Wolof |
| 6985 | Basque | 7583 | Kashmiri | 8365 | Sanskrit | 8872 | Xhosa |
| 7065 | Persian | 7585 | Kurdish | 8368 | Sindhi | 8979 | Yoruba |
| 7073 | Finnish | 7589 | Kirghiz | 8372 | Serbo-Croatian | 9072 | Chinese |
| 7074 | Fiji | 7665 | Latin | 8373 | Singhalese | 9085 | Zulu |
This DVD receiver can play back the following discs.
| Disc mark | Contents | Disc size | Maximum playback time | |
| DVD video discs |  | Audio+Video (moving pictures) | 12 cm | Approx. 4 hours (single sided disc) |
| Approx. 8 hours (double sided disc) | ||||
| 8 cm | Approx. 80 minutes (single sided disc) | |||
| Approx. 160 minutes (double sided disc) | ||||
| Video CDs |  | Audio+Video | 12 cm | 74 minutes |
| 8 cm | 20 minutes | |||
| Audio CDs |  | Audio | 12 cm | 74 minutes |
| 8 cm | 20 minutes |
In addition, this unit can play back a CD-R or CD-RW that contains audio titles or MP3 files.
You cannot playback discs other than those listed above. (CD-ROM, CD-Extra, CD-G, photo CD, and CD-i discs can not be played on this DVD receiver.)
Region Management Information: This DVD receiver is designed and manufactured to respond to the Region Management Information that is recorded on a DVD disc. If the Region number described on the DVD disc does not correspond to the Region number of this DVD receiver, this DVD receiver cannot play that disc.
The Region number of this DVD receiver is 2.

You may not be able to play back some DVD video discs on this DVD receiver if they were purchased from outside your geographic area or made for business purposes.
When you try to play back an unauthorized disc, "Check Regional Code" appears on the TV screen.
It is forbidden by law to copy, broadcast, show, broadcast on cable, play in public, and rent copyrighted material without permission.
DVD video discs are copy protected, and any recordings made from these discs will be distorted.
This product incorporates copyright protection technology that is protected by method claims of certain U.S. patents and other intellectual property rights owned by Macrovision Corporation and other rights owners. Use of this copyright protection technology must be authorized by Macrovision Corporation, and is intended for home and other limited viewing uses only, unless otherwise authorized by Macrovision Corporation. Reverse engineering or disassembly is prohibited.
Symptoms and Correction
Check the following guide for the possible cause of a problem before contacting service.
| Symptom | Cause | Correction |
| No power. | The power cord is disconnected. | Plug the power cord into the wall outlet securely. |
| The power is on, but the DVD receiver does not work. | No disc is inserted. | Insert a disc. (Check that the DVD or, audio CD indicator in the DVD display is lit.) |
| No picture. | The TV is not set to receive DVD signal output. | Select the appropriate video input mode on the TV so the picture from the DVD receiver appears on the TV screen. |
| The video cable is not connected securely. | Connect the video cable into the jacks securely. | |
| The connected TV power is turned off. | Turn on the TV. | |
| There is no sound or only a very low-level sound is heard. | The equipment connected with the audio cable is not set to receive DVD signal output. | Select the correct input mode of the audio receiver so you can listen to the sound from the DVD receiver. |
| The audio cables are not connected securely. | Connect the audio cable into the jacks securely. | |
| The power of the equipment connected with the audio cable is turned off. | Turn on the equipment connected with the audio cable. | |
| The audio connecting cord is damaged. | Replace it with new one. | |
| The playback picture is poor. | The disc is dirty. | Clean the disc. |
| The DVD receiver does not start playback. | No disc is inserted. | Insert a disc.(Check that the DVD, or audio CD indicator in the DVD display is lit.) |
| An unplayable disc is inserted. | Insert a playable disc. (Check the disc type, color system and Regional code.) | |
| The disc is placed upside down. | Place the disc with the playback side down. | |
| The disc is not placed within the guide. | Place the disc on the disc tray correctly inside the guide. | |
| The disc is dirty. | Clean the disc. | |
| A menu is on the TV screen. | Press the SET-UP button to turn off the menu screen. | |
| The Rating level is set. | Cancel the Rating function or change the rating level. | |
| Severe hum or noise is heard. | The plugs and jacks are dirty. | Wipe them with a cloth slightly moistened with alcohol. |
| The disc is dirty. | Clean the disc. | |
| The speakers and components are connected poorly. | Connect the speakers and components securely. | |
| The DVD receiver is located with TV nearly. | Move your TV away from the audio components. |
Symptoms and Correction
| Symptom | Cause | Correction |
| Recording cannot be done. | The components are connected incorrectly. | Connect the components correctly. |
| The source is selected in correctly. | Select the source with FUNCTION button (CD/DVD, VIDEO 1, VIDEO 2 or Tuner). | |
| Radio stations cannot be tuned in. | The antennas are connected poorly. | Connect the antenna securely. |
| Adjust the antennas and connect an external antenna if necessary. | ||
| The signal strength of the stations is too weak (when tuning in with automatic tuning). | Tune in the station manually. | |
| No stations have been preset or preset stations have been cleared (when tuning by scanning preset stations). | Preset the stations(page 29). | |
| The remote control does not work properly. | The remote control is not pointed at the remote sensor of the DVD receiver. | Point the remote control at the remote sensor of the DVD receiver. |
| The remote control is too far from the DVD receiver. | Operate the remote control within about 23 ft (7 m). | |
| There is an obstacle in the path of the remote control and the DVD receiver. | Remove the obstacle. | |
| The batteries in the remote control are exhausted. | Replace the batteries with new ones. |
Using the RESET button (located on the bottom of DVD receiver)
This button is used to solve the problem as following symptom;
- When the power can not on, even if power cord is connected to the outlet.
- When the window display does not display.
- When the DVD receiver does not operate normally.
- Use a pencil or ball-pen when you press the RESET button.

NOTES:
- If the RESET button is pressed, then all memorized data will be cleared such as preset stations etc..
- Reset the settings according to instructions.
You can reset the DVD receiver also as below.
Unplug the power cord and then plug the power cord again after more than five seconds.
| [General] | Power supply | AC 220-240V, 50 Hz | ||
| Power consumption | 70 W | |||
| Mass | 10.2 lbs (4.6 kg) | |||
| External dimensions (W x H x D) | 360 x 82 x 388 mm (14.2 X 3.2 X 15.3 inches) | |||
| Operating conditions | Temperature: 5°C to 35°C, Operation status: Horizontal | |||
| Operating humidity | 5% to 90% | |||
| [CD/DVD] | Laser | Semiconductor laser, wavelength 650 nm | ||
| Signal system | PAL 625/50, NTSC 525/60 | |||
| Frequency response (audio) | 4 Hz to 20 kHz | |||
| Signal-to-noise ratio (audio) | More than 90 dB (1 kHz, NOP, 20 kHz LPF/A-Filter) | |||
| Dynamic range (audio) | More than 95 dB | |||
| Harmonic distortion (audio) | 0.15 % (1 kHz, at 12W position) | |||
| [Video] | Video input | 1.0 V (p-p), 75 Ω, negative sync., RCA jack | ||
| Video output | 1.0 V (p-p), 75 Ω, negative sync., RCA jack | |||
| S-video output | (Y) 1.0 V (p-p), 75 Ω, negative sync., Mini DIN 4-pin x 1(C) 0.3 V (p-p), 75 Ω | |||
| [Tuner] | FM | Tuning Range | 87.5 - 108 MHz | |
| Intermediate Frequency | 10.7 MHz | |||
| Signal-to Noise Ratio | 50 dB | |||
| Frequency Response | 150 - 12,000 Hz | |||
| AM(MW) | Tuning Range | 522 - 1,611 kHz | ||
| Intermediate Frequency | 450 kHz | |||
| [Amplifier] | Stereo mode | 30W + 30W (8 Ω at 1 kHz, THD 1 %) | ||
| Surround mode(* Depending on the sound mode settings and the source, there may be no sound output.) | Front: 30W + 30WCenter*: 30WSurround*: 30W + 30W (8Ω at 1 kHz, THD 1 %)Subwoofer*: 30W (8Ω at 60 Hz, THD 1 %) | |||
| Inputs | VIDEO 1, 2 | |||
| Outputs | VIDEO 1 (AUDIO OUT) : 2 VWOOFER: 2 V | |||
| [Speakers] | Satellite Speaker (FE-3500TE) | Passive Subwoofer (FE-3500WE) | ||
| Type | 1 Way 1 Speaker | 1 Way 1 Speaker | ||
| Impedance | 8 Ω | 8 Ω | ||
| Frequency Response | 120 - 20,000 Hz | 35 - 1,000 Hz | ||
| Sound Pressure Level | 84 dB/W (1m) | 83 dB/W (1m) | ||
| Rated Input Power | 30 W | 30 W | ||
| Max. Input Power | 60 W | 60 W | ||
| Net Dimensions (W x H x D) | 90 x 125 x 106 mm | 160 x 350 x 325 mm | ||
| Net Weight | 0.7 kg | 4.78 kg | ||
| [Supplied Accessories] | Audio cable . . . . . . . . . . . . . . . . . . . . . . . . . . . . . . . . . . . . . . . . . . . . . . . . . . . . . . . . . . . . . . . . . . . . . . . . . . . . . . . . . . . . . . . . . . . . . . . . . . . . | Video cable . . . . . . . . . . . . . . . . . . . . . . . . . . . . . . . . . . . . . . . . . . . . . . . . . . . . . . . . . . . . . . . . . . . . . . . . . . . . . . . . . . . . . . . . . . . . . . . . . . | 1Speaker cables . . . . . . . . . . . . . . . . . . . . . . . . . . . . . . . . . . . . . . . . . . . . . . . . . . . . . . . . . . . . . . . . . . . . . . . . . . . . . . . . . . . . . . . . . . . . . . . . . . . | |
| Speakers . . . . . . . . . . . . . . . . . . . . . . . . . . . . . . . . . . . . . . . . . . . . . . . . . . . . . . . . . . . . . . . . . . . . . . . . . . . . . . . . . . . . . . . . . . . . . . . . . . . AM loop antenna . . . . . . . . . . . . . . . . . . . . . . . . . . . . . . . . . . . . . . . . . . . . . . . . . . . . . . . . . . . . . . . . . . . . . . . . . . . . . . . . . . . . . . . . . . . . . . . . . . . FM antenna . . . . . . . . . . . . . . . . . . . . . . . . . . . . . . . . . . . . . . . . . . . . . . . . . . . . . . . . . . . . . . . . . . . . . . . . . . . . . . . . . . . . . . . . . . . . . . . . . . | ||||
* Designs and specifications are subject to change without notice.

LG
SYSTEME DVD
HOME CINEMA
MANUEL D'UTILISATION
MODÈLE :DA-3530
(DA-3530A, FE-3500TE, FE-3500WE)


natural_image
Abstract grayscale gradient with two horizontal bands of white highlights (no text or symbols)natural_image
Technical line drawing of a mechanical component with two views (top and side), no text or symbols present.natural_image
Four-panel image showing different types of flowers and objects, including rose, tree, flower, and plant (no text or symbols)natural_image
Top-down view of a car parked on a paved lot (no text or symbols visible)flowchart
graph LR
    A["Initial State"] --> B["Tracking Path"]
    B --> C["Final State"]
3m (DF) - 1.5m (Ds) = 1.5m (B)
1.5m (B) = 150cm / 30cm = 5msec
3m (DF) - 2.4m (Dc) = 60cm (A)
60cm (A) / 30cm = 2msec
natural_image
Two horizontal grayscale gradient bands with no text or symbols
- Introduction
- Connections
- Basic Operations
- Operation Using GUI Menu Icons
- Advanced Operation
- Radio Operation
- Sound Operation
- Initial Settings
- Reference
- Notes on handling
- Notes on Locating
- Notes on Cleaning
- Use a soft, dry cloth for cleaning.
- To Obtain a Clear Picture
- Notes on Moisture Condensation
- Moisture condensation damages the DVD receiver. Please read the following carefully.
- Moisture condensation occurs during the following cases.
- On Handling Discs
- On Storing Discs
- On Cleaning Discs
- About This Owner's Manual
- Rear Panel
- \*VIDEO SELECTOR Switch
- REMOTE CONTROL
- Preparing the Remote Control
- Operating with the Remote Control
- Preparations
- Press POWER.
- Press FUNCTION on the front panel repeatedly or CD/DVD on the Remote control to select
- Press OPEN/CLOSE.
- Place a disc on the disc tray with the playback side down.
- Press PLAY.
- When a menu screen appears on the TV screen.
- After operation
- Video CD
- What is playback control (PBC)?
- Press STOP during playback.
- Press PAUSE/STEP during playback.
- Frame advance (DVD and Video CD only)
- Press PAUSE/STEP during still playback.
- Skipping chapters and tracks forward or back
- Skipping forward
- Press SKIP ▶▶ during playback.
- Skipping back
- Press SKIP ◀ during playback.
- For your reference:
- To Scan at fast forward or fast reverse playback.
- Playing in slow-motion (DVD and Video CD only)
- Common procedures
- Press DISPLAY during playback.
- Press ▲/▼ to select the desired item.
- Press ◀/▶ to select the desired setting.
- Press TITLE.
- Press MENU during play.
- Load the DVD that was memorized.
- Press ◀/▶ to select "Yes" and press ENTER.
- For your reference
- Repeating viewing (listening) Press REPEAT during playback.
- • DVD
- - CD/Video CD
- To return to normal play
- Repeating sections between two specific points (A-B repeat)
- Storing a marker in the memory
- Recalling/Clearing a marker
- Press ZOOM during normal playback or still playback.
- If you press ▲/▼/◄/► buttons, the zoom point shifts.
- Press ENTER. The selected frame is displayed in full size on the TV screen.
- To resume normal playback. Press ZOOM repeatedly until the normal picture appears.
- Press SLEEP to set the desired sleep time.
- Each time you press SLEEP, it is changed as the following order.
- Clearing the program
- To play an MP3 file
- Load an MP3 disc.
- To play an MP3 file repeatedly
- Press ▲/▼ buttons to select the directory where MP3 files that you want to play are located and then press ENTER.
- Press ▲/▼ button to select the desired MP3 file of the selected directory on your disc.
- Press ENTER or PLAY to start playback of the file.
- To program play an MP3 file
- Press PROGRAM button to add an MP3 file to the program list.
- Press ▶ button and select the desired MP3 file and press ENTER or PLAY button to play.
- ● To clear the program one by one
- ● To clear all the programs
- After all programmed tracks are played
- To tune in a station with a weak signal
- To clear all the memorized stations
- To turn off the radio
- To listen to non-preset radio stations
- Press SOUND MODE repeatedly until the sound mode you want appears in the display window.
- In Dolby Digital mode
- In Dolby Pro Logic mode
- Center delay time setting (Dolby Digital mode only)
- Setting the delay time in the Dolby Digital and Dolby Pro Logic mode
- Press DELAY.
- Press ▲/▼ to change the delay time.
- If setting is complete, press DELAY.
- Setting the sound level of the desired channel
- Press LEVEL.
- Press ◀/▶ to select a desired speaker to set.
- Press ▲/▼ to adjust the sound level of the selected channel.
- Repeat step 2-3 and adjust the sound level of the other channels.
- If setting is complete, press LEVEL.
- Setting the Balance between each channels by using the test tone
- Select the test tone mode by pressing TEST TONE.
- Adjust the sound level the same way as described in "Setting the sound level of the desired channel" above, so that all the speaker's sound level is same from the listener's position.
- Selection of initial settings
- To exit SET-UP menu
- Selecting rating level (DVD only)
- Setting your password (DVD only)
- To change/clear memorized password
- To clear your 4-digit password
- ■ PBC On/Off
- Symptoms and Correction
- Using the RESET button (located on the bottom of DVD receiver)
- NOTES:
- You can reset the DVD receiver also as below.
- SYSTEME DVD
- HOME CINEMA
- MANUEL D'UTILISATION
Brand : LG
Model : DA3530A
Category : Audio System