
FFH-2020A - Audio System LG - Free user manual and instructions
Find the device manual for free FFH-2020A LG in PDF.


| Product Type | Mini Hi-Fi Audio System |
| Model | FFH-2020A |
| Brand | LG |
| Dimensions (W x H x D) | 200 mm x 300 mm x 250 mm |
| Weight | 5.0 kg |
| Power Supply | AC 120-240 V, 50/60 Hz |
| Power Consumption | 100 W |
| Output Power (RMS) | 2 x 50 W |
| Playback Media | CD, CD-R/RW, MP3 CD |
| Radio Tuner | FM, AM |
| Bluetooth | Yes, version 4.2 |
| USB Port | USB 2.0, supports MP3/WMA |
| Audio Input | 3.5 mm AUX |
| Speaker System | 2-way, bass reflex |
| Display | LCD with white LED backlight |
| Remote Control | Included (CR2025 battery) |
| Standby Power | < 1 W |
| Cleaning | Use a soft, dry cloth. Do not use liquid cleaners. |
| Safety Features | Auto power off after 15 minutes of inactivity |
| Spare Parts Availability | Contact LG service center for replacement parts |
| Reparability | Repairable by qualified technician; do not disassemble yourself |
Frequently Asked Questions - FFH-2020A LG
User questions about FFH-2020A LG
0 question about this device. Answer the ones you know or ask your own.
Ask a new question about this device
Download the instructions for your Audio System in PDF format for free! Find your manual FFH-2020A - LG and take your electronic device back in hand. On this page are published all the documents necessary for the use of your device. FFH-2020A by LG.
USER MANUAL FFH-2020A LG
MINI HI-FI AUDIO SYSTEM
OWNER'S MANUAL
MODEL : KR-2200A
Please read this manual carefully before operating your unit. Retain it for future reference.
Designs and specifications are subject to change without notice for improvement.
3 SAFETY INFORMATION
4 GETTING STARTED
4 Controls and Connections
4 Front Panel
5 Rear Panel
6 Display
7 Remote Control
8 Remote Control Operation
8 Batteries
8 Using the Remote Control
9 Connections
9 External Sources
9 Digital Outputs
9 Loudspeakers
10 Headphones
10 Antenna
10 Setting the Clock
1 Basic Operation
1 Auto Function Select System
1 Volume Adjustment
1 Tone Adjustments
1 Boost
1 EQ (Equalization)
1 Mute
11 Display Mode
1 Demo Mode
11 FM Stereo/ANR (AM Noise Reduction)
1 VM Ax
12 Listening to the Radio
12 Automatic Tuning
12 Manual Tuning
12 Programming Preset Stations
12 RDS (Radio Data System) Reception
13 Playing CDs
13 Basic Operation
13 Stopping Play
13 Pause
13 Skipping Discs
13 Direct Disc Access
13 Removing Discs
13 Changing Discs During Play
13 Important Notes
13 Searching Within a Track
13 Reverse Search
13 Forward Search
13 Track Skipping
13 Time Display
14 Repeating Tracks
14 Random Play
Programmed Play
Reviewing the Contents of the Play List
Clearing the Programmed Play List
Adding Tracks to a Previously Programmed Play List
Making Changes to the Play List
Using External (Auxiliary) Sources
Playing Tapes
Playback
Tape Counter
Recording Tapes
CD Sync Recording
Recording From Tape to Tape (Dubbing)
ADVANCED FEATURES
Dual Alarms and Timer Recording
Alarm and Timer Setting
To Cancel or Check the Timer
Alarm and Timer Notes
Setting the Sleep Timer
TROUBLESHOOTING
SPECIFICATIONS
ead first! Important Safety Precautions!

CAUTION
CAUTION: TO REDUCE THE RISK OF ELECTRIC SHOCK
DO NOT REMOVE COVER(OR BACK). NO USER SERVICEABLE PARTS INSIDE.
REFER SERVICING TO QUALIFIED SERVICE PERSONNEL.

Explanation Graphical Symbols:

The lightning flash with arrowhead symbol, within an equilateral triangle is intended to alert the user to the presence of uninsulated dangerous voltage within the product's enclosure that may be of sufficient magnitude to constitute a risk of electric shock to persons.
The exclamation point within an equilateral triangle is intended to alert the user to the presence of important operating and maintenance (servicing) instructions in the literature accompanying the appliance.
WARNING:
TO REDUCE THE RISK OF FIRE OF ELECTRIC SHOCK, DO NOT EXPOSE THIS APPLIANCE TO RAIN OR MOISTURE.
To avoid electrical shock, do not open the cabinet. Refer servicing to qualified personnel only.
CAUTION
Use of controls or adjustments or performance of procedures other than those specified herein may result in hazardous radiation exposure.
(FOR THE CUSTOMERS IN EUROPE)
If this product is marked with the CE-symbol, it means which is conformed to EMC regulation 89/336/EEC.
Laser component in this product is capable of emitting radiation exceeding the limit for Class 1.
CAUTION: INVISIBLE LASER RADIATION WHEN OPEN AND INTERLOCKS DEFEATED. AVOID EXPOSURE TO BEAM.
WARNING: OSYNLIG LASERSTR LNING N R DENNA DEL R PPNAD STR LEN R FARLIG.
This label is located on the interior
CLASS 1 LASER PRODUCT
KLASSE 1 LASER PRODUKT
LUOKAN 1 LASER LAITE
KLASS 1 LASER APPARAT
CLASSE 1 PRODUIT LASER
This Compact Disc player is classified as a CLASS 1 LASER product.
The CLASS 1 LASER PRODUCT label is located on the exterior.
(FOR CUSTOMERS IN CANADA)
CAUTION: TO PREVENT ELECTRIC SHOCK, DO NOT USE THIS (POLARIZED) PLUG WITH AN EXTENSION CORD, RECEPTACLE, OR OTHER OUTLET UNLESS THE BLADES CAN BE FULLY INSERTED TO PREVENT BLADE EXPOSURE.
This class B digital apparatus meets all requirements of the Canadian Interference-Causing Equipment Regulations.
WARNING:
SHOCK HAZARD - DO NOT OPEN
MISE EN GARDE:
Note to CATV system installer:
This reminder is provided to call the CATV system installer's attention to Article 820-40 of the NEC that provides guidelines for proper grounding and, in particular, specifies that the cable ground shall be connected to the grounding system of the building, as close to the point of cable entry as practical.
NOTE:
The interference potential to the device.
This equipment generates and uses radio frequency energy and if not installed and used properly, that is in strict accordance with the manufacturer's instructions, may cause interference to radio and television reception. It has been type tested and found to comply with the limits for a Class B computing device in accordance with the specifications in subparts J of Part 15 of FCC Rules, which are designed to provide reasonable protection against such interference in a residential installation. However, there is no guarantee that interference will not occur in a particular installation. If this equipment does cause interference to radio or television reception, which can be determined by turning the equipment off and on, the user in encouraged to try to correct the interference by one of more of the following measures:
Reorients or relocate the receiving antenna.
- Increase the separation between the equipment and receiver.
- Connect the equipment into an outlet on a circuit different from that to which the receiver is connected.
- Consult the dealer or an experienced radio/TV technician for help.
(FOR CUSTOMERS IN THE UNITED KINGDOM) WIRING INSTRUCTIONS
This appliance is supplied with a BS1363 approved 3 amp fused mains plug. When replacing the fuse always use a 3 amp BS1362 approved type. Never use this plug with the fuse cover omitted. To obtain a replacement fuse cover contact your supplying dealer or LG ELECTRONICS U.K.LTD.
If the mains sockets in your home differ, or are not suitable for the type of plug supplied, then the plug should be removed and a suitable type fitted. Please refer to the wiring instructions below:
Warning :
The mains plug severed from the mains lead of this appliance must be destroyed. A mains plug with bared wires is hazardous if engaged in a mains output line socket.
IMPORTANT
The wires in this mains lead are coloured in accordance with the following codes:
Blue : Neutral
Brown : Live
As the colour of the wires in the mains lead of this appliance may not correspond with the coloured markings identifying the terminals in your plug, proceed as follows:
The wire which is coloured blue must be connected to the terminal which is marked with the letter N or coloured black.
The wire which is coloured brown must be connected to the terminal which is marked with the letter L or coloured red.
If a 13 amp BS1363 plug or any other type of plug is used, 3 amp BS1362 approved fuse must be fitted either in the plug or at the distribution board.
Warning :
Do not connect either wire to the earth pin, marked with the letter E or with the earth symbol 12 or coloured green or green and yellow.
GETTING STARTED
Controls and Connections
Front Pane

① Power button
② Clock button
③ Alarm 1 button
4 Alarm 2 button
5 Set button
6 Tune Down/Up (AM/FM), Fast Forward/Rewind (Tape), Skip/Search (CD) button
⑦ Display
8 CD Tray
9 Remote Sensor
10 CD Tray Open/Close button
⑪ Volume knob
● Tape A/B Select button
13 Aux 1/2 Select button
14 ◆VMAx button
15 Boost button
16 EQ Select button
17 Counter Reset button
18 FM Stereo/ANR (AM Noise Reduction) button
19 Tape Deck B Eject
20 Tape Deck B (Rec/Play) Door
21 CD/Tuner Program button
GETTING STARTED Controls and Connections
22 Preset Up/Forward Play (Tape)/Play (CD) button
23 Record/Pause (Tape) button
24 Aux 1/MP3 Input jacks
25 Optical Digital Output jack
26 Preset Down/Reverse Play (Tape) button
27 Play Mode/Demo button
28 Hi-Speed (Tape to Tape) Dubbing button
29 Tape Deck A (Play) Door
30 Normal Speed (Tape to Tape) Dubbing button
● Tape Deck A Eject
Headphones jack
CD Control Buttons:
● Disc 1 button: Disc Direct Play button
● Disc 2 button: Disc Direct Play button
● Disc 3 button: Disc Direct Play button
Disc Skip button
- Random button
Time button
CD Sync (CD Synchro Dubbing) button
CD Pause button
● Tuner/Band (AM/FM) button
CD Function button - Stop/Reset (Tape, CD, Tuner Presets) button
Rear Panel
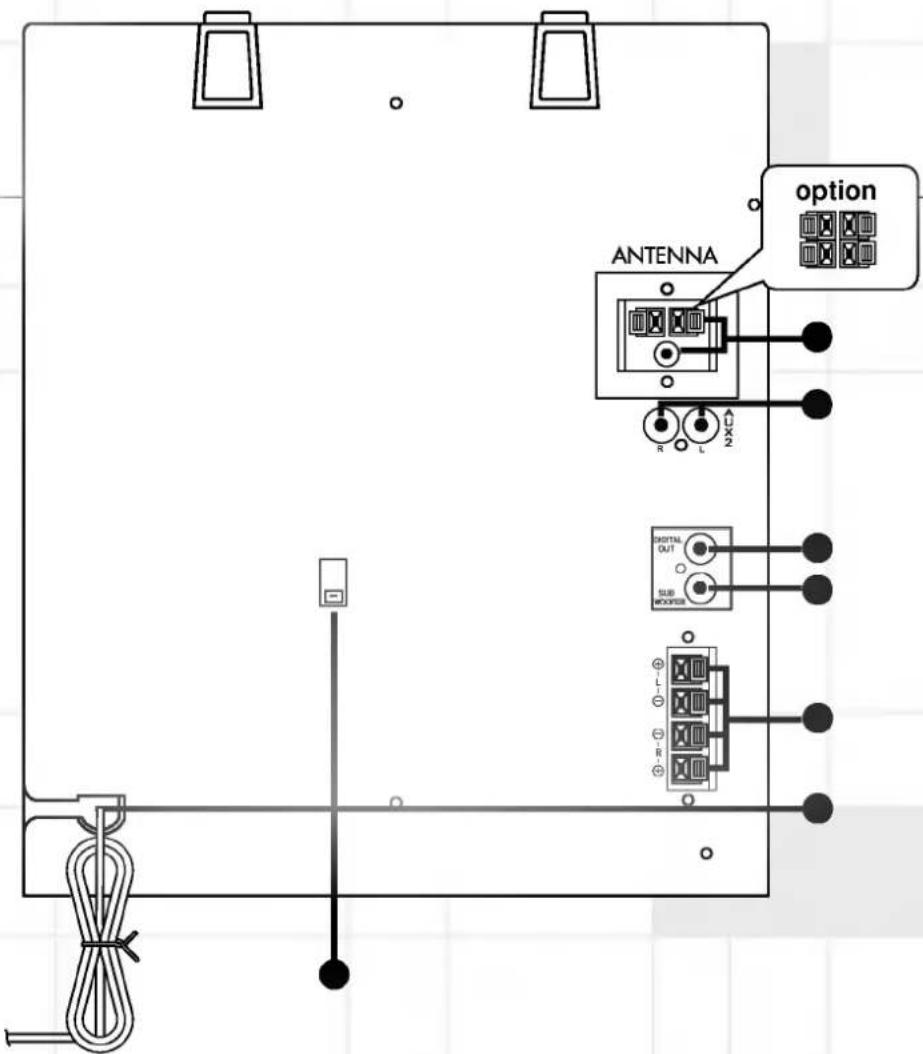
- Antenna terminals
Aux 2 Input jacks
Coaxial Digital Output jack
Subwoofer Output jack
Speaker Terminals
Power Cord
● Voltage Selector (Optional)
GETTING STARTED
Controls and Connections
Display

1 Volume Level
② Disc Number indicators
3 Information Display for Level, Function, Clock, Frequency, Tape Counter, CD Time, Programmed Play List
4 CD Track Numbers Remaining
5 CD Play Over indicator
6 CD Sync Recording indicator
7 CD Play/Pause indicator
8 Tape Direction indicators
9 Record indicator
10 Rewind indicator
11 Play Mode indicators
(Used only for Deck B)
12 Hi-Speed Dubbing indicator
13 Fast Forward indicator
14 Tape A/B indicator
15 CD Program indicator
16 CD Repeat indicators
17 CD Remaining Time indicator
18 Mute indicator
19 Sleep indicator
20 Super Boost indicator
21 Treble Boost indicator
22 PowerBass™ indicator
23 Alarm 1/2 indicator
24 Timer Recording indicator
25 CD Random Play indicator
26 RDS indicator-optional
27 ANR (AM Noise Reduction) indicator
FM Stereo indicator
FM Mono indicator
● Memory indicator
VMAx® indicator
GETTING STARTED
Controls and Connections
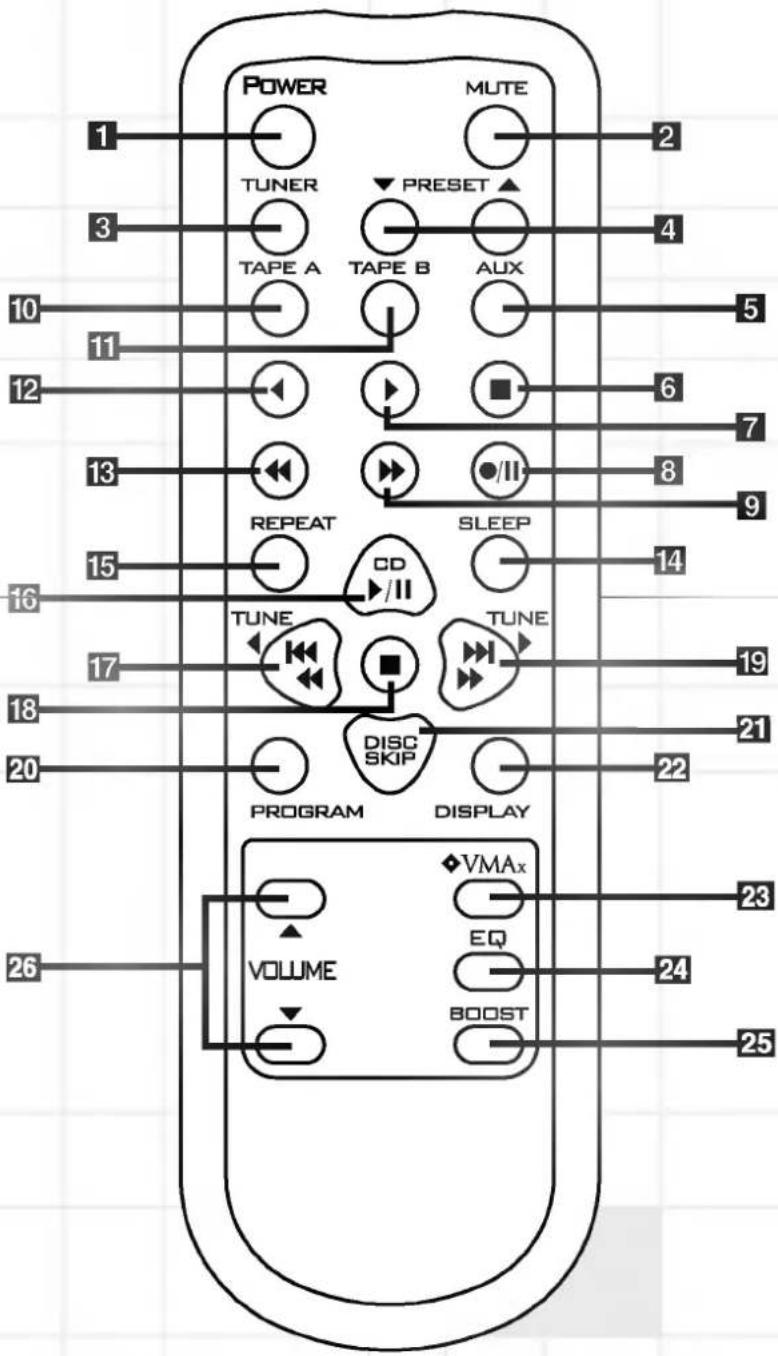
Remote Control
1 Power button
2 Mute button
3 Tuner/Band button
4 Tuner Preset ▼/▲ buttons
5 Aux 1/2 button
Tape Functions
6 Stop button ■
7 Forward Play button ▶
8 Record/Record Pause button ● II
9 Fast Forward button ▶
10 Tape A button
11 Tape B button
12 Reverse Play button
13 Rewind button
14 Sleep button
CD/Tuner Functions
15 Repeat button
16 Play/Pause button ▶II
17 Reverse Skip or Search (CD)/
Tune Down button
18 Stop/Clear button ■
19 Forward Skip or Search (CD)/
Tune Up button ▶▶ ▶▶
20 Program (CD) button
21 Disc Skip button (CD)
22 Display Mode button
23 VM Ax button
24 EQ Select button
25 Boost Select button
26 Volume Control ▲/▼ buttons
GETTING STARTED
Remote Control Operation
Batteries
Before using the remote control for the first time, insert two AAA (UM-4, IEC R03)-type high-quality batteries, as shown in the diagrams below. Be sure to observe correct battery polarity (+ and -), as installing the batteries incorrectly may damage the remote. Do not use different types of batteries together, and do not mix old ones with new ones.
Open the battery cover

Insert two AAA batteries

natural_image
Illustration of a cylindrical device with a battery and two rectangular components (no text or symbols)- When you are not going to use your System for an extended period of time, such as when you go on vacation, remove the batteries to prevent possible electrolyte leakage.
• After a period of time, when the remote control fails to operate accurately at maximum distance from the unit (23 feet, or 7 meters), replace the dead batteries with new ones.
Using the Remote Control

Control Range
The remote control device is designed for a maximum range of 23 feet (7 meters).
NOTE:
Strong light or obstacles between the remote control device and the main unit may interfere with the operation of the remote control.
GETTING STARTED Connections
External Sources
Two RCA-type jacks marked AUX 1 and AUX 2 are provided. The front input jacks (AUX 1/MP3) should be used for temporary connections, such as an MP3 player, MiniDisc (MD) player, video camera or video game. The rear input jacks (AUX 2) should be used for longer-term connections, such as a VCR or CD Recorder.

flowchart
graph TD
    A["Front"] --> B["Digital OUT"]
    B --> C["Digital OUT L-UX1 MPOR"]
    B --> D["Audio/MP3"]
    D --> E["MO recorder: MP3 player etc."]
    B --> F["Audio/PIER"]
    F --> G["Digital INPUT"]
    G --> H["Audio OUT"]
    H --> I["Desktop fiber cable"]
Figure 1
Digital Outputs
A front panel Optical 25 and a rear panel Coaxial ● Digital Output are provided. The front Optical Digital Output is intended for temporary connection of an MD recorder or any other portable device that has a digital input. The rear Coaxial Output should be used for more permanent hookups, such as a CD recorder, MD recorder, high-end computer sound card with digital inputs or MP3 encoder. Neither optical nor coaxial cables are supplied with this product and, if not included with the connecting unit, should be purchased separately.
To use the Optical Digital Output, remove the dust protection cap from the connector and firmly connect an optical digital cable (not supplied) so that the shapes of both the cable and the connector match. Keep the dust protection cap in a safe place, and always re-attach the cap when not using the connector to prevent dust from entering the connector.
Loudspeakers
Be sure to turn Power ① ① off before connecting the loudspeakers.
In these instructions, the "right speaker" and "left speaker" refer to the speakers as viewed from the listening position.
Speakers and electronics have corresponding (+) and (−) terminals. LG has used red to denote the (+) terminal and speaker wire, and black for the (−) terminal and speaker wire. It is important to connect both speakers identically: (+) on the speaker to (+) on the main unit, and (−) on the speaker to (−) on the main unit. Wiring “out of phase” results in thin sound, weak bass and a poor stereo image.
Insert the bare end of the red (+) wire of the right speaker into the red (+) terminal on the main unit that is marked R ●. Insert the bare end of the black (−) wire of the right speaker into the black (−) terminal on the main unit that is marked R ●. Follow the same procedure to connect the wires from the left speaker to the terminals on the main unit that are marked L ●.

flowchart
graph TD
    A["Subwoofer"] --> B["Black"]
    A --> C["Red"]
    D["Left Speaker"] --> E["Black"]
    F["Right Speaker"] --> G["Black"]
    H["Subwoofer (Optional)"] --> I["Red"]
    J["L"] --> K["Black"]
    L["R"] --> M["Black"]
Figure 2
Using Your System With an External Powered Subwoofer
The KR-2200A feature a Subwoofer Output jack ● that can be used with any unit powered subwoofer recommended by your unit dealer. The addition of a powered subwoofer dramatically extends and improves your system's bass response, and is highly recommended either at the time of initial purchase or as a future upgrade. Using a single RCA cable (not included), connect the subwoofer output to the L or R input of the powered subwoofer (the use of a Y-cable is not necessary but is OK). Set the main unit to a normal listening level, and adjust the level, frequency and phase controls on the powered subwoofer as directed in the subwoofer's owner's manual.
GETTING STARTED
Connections (cont.) Headphones
Connecting a headphone ● automatically disables the loudspeakers in order to provide a private listening session.
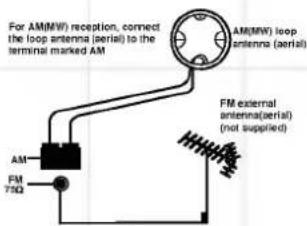
Antenna
Important
FM Antenna Connection
Unless radio signals are very weak, no external antenna is necessary. Simply connect the supplied FM indoor antenna wire to the terminal marked FM on the back of the unit ●.
AM Antenna Connection
Connect the supplied AM loop antenna to the terminal marked AM on the back of the unit
For the models for other countries figure (1), (2). For the European and U.K. model figure (3), (4).
(1) 2 BAND(FM/AM) AREA

(3) 3 BAND(FM/MW/LW) AREA

(4) 2 BAND[FM/AM(MW)] AREA
Setting the Clock
Setting the clock will be demonstrated with the example of 9:25 AM.
Although unit will retain the clock setting when you power it down into the Standby mode, the setting will be lost if the unit is unplugged or the electrical power is interrupted for more than 10 seconds. In that event, the clock setting will be erased, and the unit will display a blinking “— : —”.
When setting the time, remember that midnight is at 12:00 AM and noon is at 12:00 PM.
- Press the Clock button ②. (If the clock was previously set, press and hold the Clock button for more than 1.5 seconds.)
"12:00 AM" will blink in the Display ③, to indicate civilian 12-hour time. Press the Preset Up ② or Preset Down ⑳ button to display a blinking "0:00", which denotes 24-hour military time.
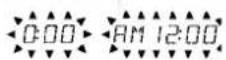
-
Choose between the 24-hour display or 12-hour display by pressing the Preset Up 22 or the Preset Down 26 buttons.
-
Press the Set/Station button ⑤ to store this setting and proceed to the next step.
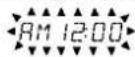
- Set the hour by pressing the Preset Up 22 or the Preset Down 26 buttons.
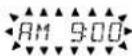
- Press the Set/Station button ⑤.

- Set the minute by pressing the Preset Up 22 or the Preset Down 26 buttons.

- Press the Set/Station button ⑤, and the clock will resume normal operation.
AM 9:25
GETTING STARTED
Basic Operation
Tone Adjustments
Boost
Each time the Boost button 15 is pressed, the tone changes as follows:

Auto Function Select System This system allows you to automatically switch sources by selecting a function associated with the new source in a single step, without having to press an input or source select button. That is, if, for example, the radio is playing and you wish to switch to playing a CD, you need only press the Disc 1 button ●, and the unit will automatically switch to CD mode, where the various function buttons will affect the CD changer rather than the tuner. (You can open the disc tray to change discs without affecting the tuner operation.) This applies for the following sources and functions:
- Using the remote control
Tuner: Preset ▲/▼ buttons 4
CD: Play/Pause ▶ button 16
Tape: Forward ◀ and Reverse ▶
Play buttons 712
- On the unit
CD: Disc Direct Play buttons
(DISC 1, 2, 3) ● ● ●
Volume Adjustment
Turn the Volume knob 11 clockwise to increase the sound level, or counterclockwise to decrease it. If you turn the volume up above the maximum level, the volume level flashes in the display. This is a warning to lower the volume in order to prevent possible damage to your loudspeakers. You may also adjust the volume by pressing the Volume Up or Down buttons 26 on the remote control.
Sound can be deceiving. Over time your hearing "comfort level" adapts to higher volumes of sound. What sounds "normal" can actually be loud and harmful to your hearing. Guard against this by choosing a safe level BEFORE your hearing adapts.
To Establish a Safe Level:
- Start your volume control at a low setting.
- Slowly increase the sound until you can hear it comfortably, clearly and without distortion.
Once You Have Established a Comfortable Sound Level:
- Do not exceed that level.
Taking a moment to do this now will help to prevent hearing damage or loss in the future. After all, we want you listening for a lifetime.
• PowerBass: Reinforces low frequencies
• Treble Boost: Reinforces high frequencies
• Super Boost: Reinforces both bass and treble
EQ (Equalization)
Press the EQ button ⑯ once to display the current sound mode.
Press the EQ button 16 repeatedly until the desired sound mode is displayed.
• FLAT: No additional equalization
• POP: Optimized for Top 40, R & B, Soul and Country music
- ROCK: Optimized for Hard Rock and Heavy Metal music
• CLASSICAL: Optimized for orchestral music
• JAZZ: Optimized for jazz music
Mute
(On Remote Control)
Press the M ute button 2 to mute your unit. The M ute function silences the unit, which is convenient for answering the telephone, etc. The M ute indicator 18 will appear on the display. Press the M ute button 2 a second time to resume normal play.
Display Mode
(On Remote Control)
For your visual enjoyment, your system offers a spectrum lighting display that "dances" in time to the music. You can select different displays by repeatedly pressing the Display Mode button 22, or you may turn the lighting display off.
Demo Mode
With the unit plugged in but turned off, press the Play Mode/Demo button 27 for a continuous visual display of the system's features.
Press it again to return to a display of the current time.
FM Stereo/ANR (AM Noise Reduction)
When the FM radio signal is too weak to be received in Stereo mode without interference, press the FM Stereo/ANR button 18 to switch to Mono mode for improved reception. When recording AM radio transmissions, press this button to reduce unwanted noise.
VM Ax®
VM Ax is proprietary technology that creates an ambient, simulated surround-sound stage from a stereo signal or Dolby® Pro Logic®-encoded material using only two loudspeakers. It can be used with music and movies to create a more enveloping sound. Press the VM Ax button on either the main unit 14 or the remote 23 to activate or deactivate the VM Ax mode. The VM Ax indicator on the display ● will be lit when VM Ax is active. In order to maximize the effect, the listener should be approximately 3m in front of the imaginary line between the two speakers, facing the speakers. The speakers should be facing the same direction, and should be placed even with each other. If used in a video application, the speakers should be to the right and the left of the screen, following all the other guidelines above. Please note that speakers are not shielded, and if placed too close to the screen may cause interference and degradation of the picture.
Speaker Placement

Speaker Placement in a Video Application

VMAX Virtual Surround

natural_image
3D rendering of a teapot with sound waves labeled 'Real Speaker' and 'Phantom' (no additional text or symbols)
Listening to the Radio
preset number is flashing, to store the station at that preset.
Automatic Tuning
- Turn on the Power ① ①
- Press the Tuner/Band button ● 3 repeatedly to choose either AM or RM (or SW, LW : optional) radio.
- Press and hold the Tuning Down/Up (Tune ▼/Tune ▲) button 61719 for more than 0.5 seconds. The unit will scan and automatically tune in a station of acceptable broadcast strength.
Manual Tuning
- Turn on the Power ① ①.
- Press the Tuner/Band button ● 3 repeatedly to choose either AM or FM (or SW, LW : optional) radio.
- Press the Tuning Dow n/Up (Tune ▲/ Tune ▼) button 6 17 19 briefly and repeatedly, until the desired station is tuned.
Programming Preset Stations
To Clear All Presets From Memory:
- While in Tuner mode (that is, the tuner was selected by pressing the Tuner/Band button ● 3), press and hold the CD/Tuner Program button 21 20 for more than 1.5 seconds so that RESET flashes in the display. The Memory indicator ● will appear in the display.
- While RESET is flashing in the display, press the Stop/Reset button ● 18.
Entering a Station Preset Into Memory:
- Press the Tuner/Band button ● 3 to select either the AM or FM band.
- Press the Tune ▼Tune ▲ buttons 61719 to tune in the desired station.
- To store the station at the next available Preset number, press the CD/Tuner Program button 2120 TWICE. The first press causes the preset number to flash 3, and the Memory indicator ● to appear in the display. The second press stores the station to that preset number.
- Alternatively, to store the station at a particular preset number of your choice, press the CD/Tuner Program button 2120 ONCE, so that the next available preset number flashes in the display. Press the Preset ▲/▼ buttons 22264 to choose a preset number, then press the CD/Tuner Program button 2120 again, while the
Tuning in Preset Stations:
Press and hold the Preset ▲/▼ buttons
22264 until the desired preset number appears, or press the buttons repeatedly.
RDS (Radio Data System) Reception - OPTIONAL
What is RDS?
RDS (Radio Data System) is a system gradually being introduced on FM in many countries, whereby an inaudible stream of data is transmitted in addition to the normal radio signal. The data appears as text in the front panel Information Display ③. This data can contain various types of information, including station identification, traffic and weather information and a list of alternative frequencies for the radio station being received.
- Press the Tuner/Band button ● 3 to select FM. RDS is not available on the AM band.
- Tune in the desired station as described above.
- When an RDS transmission is received, the display shows the station name and the RDS indicator 26 lights.
- To return to a display of the station frequency, press the Set/Station button ⑤.
Notes:
• RDS is only available for FM Reception.
- The station name is displayed automatically when an RDS station is received. However, if the signal is not strong enough, it may be possible to receive the audio signal without any RDS data.
- When an RDS station is first tuned in, the station name or other RDS information may be garbled for a few seconds while unit processes the signal. This is normal, and the correct information will appear automatically within a few seconds.
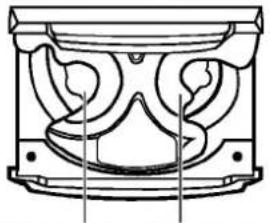
Your system will play discs displaying the Compact Disc Digital Audio logo 📄. It will also play properly finalized CD-R discs. The unit is not able to play CD-RW, DVD, Video CD, computer data discs, or any other type of disc except CD or CD-R, as noted above.
natural_image
Technical line drawing of a mechanical component with symmetrical cutouts and mounting holes (no text or symbols)Tray for Disc 1
Tray for Disc 2
Basic Operation
- Press the CD Function button ●.
-
Press the CD Open/Close button ⑩ to open the disc compartment.
-
Load up to three discs with the label side up. Each tray is numbered 1, 2 or 3 going counterclockwise around the carousel:
Playing one or two discs
Place discs on trays 1 and 2.
Playing three discs
After placing two discs, press the Disc Skip button ●21 to rotate the carousel. Place the next disc in tray 3.
To load a 3-in. (8cm) disc, put it in the inner depression of the tray. Never place more than one disc at a time in any of the three tray positions.
-
Press the CD Open/Close button ⑩ to close the disc compartment.
-
Press the Play (or ▶ on remote control) button 2216 to start play.
Play begins with the disc located on the left-hand side of the carousel just before closing the disc compartment, and proceeds counterclockwise around the carousel (in number order). All discs are played once only.
During playback, empty trays are skipped, and the unit proceeds counterclockwise to the next tray. The numbered indicator of any skipped tray will go out in the display ②.
The total number of audio tracks available on the disc being played will be displayed at the top of the display 4. As each track finishes playing, its corresponding number will go out. When a disc has more than 16 tracks, the
"OVER" indicator ⑤ will light, and the track number will appear only in the Information Display ③.
Stopping Play
Press the Stop/Reset button ● 18.
Pause
Press the CD Pause ▶■ button ●16. To resume play, press the CD Pause ▶■ button ●16 again, or press the Play button 2216.
Skipping Discs
During play or in the Stop mode, press the Disc Skip button ●21 to proceed to the next disc in order.
If the Disc Skip button ●21 is pressed while a disc is playing, This unit will skip to the next disc and start playing it. However, if the Disc Skip button ●21 is pressed while the unit is stopped, it will rotate the disc tray to the next disc, but it will NOT start playing.
Direct Disc Access
Press one of the Disc Direct (Disc 1, 2 or 3) buttons ●●● to start playing the disc in that tray. After it plays through that disc, unit will continue to the next disc in order.
Removing Discs
Press the CD Open/Close button 10 to open the disc compartment. You can remove two discs at a time. To remove the disc in the back tray, press the Disc Skip button ●21 to rotate the disc carousel.
Changing Discs During Play
The unit allows you to exchange two of the discs in the carousel while the third disc is playing. Simply open the disc compartment during play by pressing the CD Open/Close button 10, and remove or insert discs as described above. The disc located on the left side will be the next disc to be played after you close the disc compartment. This operation is not available during programmed play.
Important Notes
Do not tilt or move the unit with discs loaded. This may dislodge the discs. Usage under these conditions may damage the discs or the unit.
- Do not place more than one compact disc in one disc tray at the same time.
- If, during CD play, the video image of a nearby television is distorted, or if static is heard from a nearby radio, move this unit further away from the affected device.
Searching Within a Track
You can search for a particular point in a track during play by monitoring the high-speed cueing sound, or by observing the CD counter in the display ③.
Reverse Search
Press and hold the Reverse Search ◄◀◀◀◀ button ⑥17 and release it at the desired point.
Forward Search
Press and hold the Forward Search ▶▶▶▶I button ⑥19 and release it at the desired point.
Track Skipping
To return to the beginning of the current track, tap the Reverse Search ◀◀◀◀◀ button ⑥17 once.
To skip track(s) backward one by one, tap the Reverse Search ◄◀◀◀ button ⑥17 repeatedly.
To skip track(s) forward one by one, tap the Forward Search ▶▶▶▶1 button ⑥19 repeatedly.
REMEMBER - TAP the button 617 to CHANGE tracks; but PRESS and HOLD the ◄◄◄/►►►►◆ button 61719 to search WITHIN a track.
Time Display
Press the Time button ● to show the time remaining on the current disc ③ ⑰. Press it again to return to a display of the time elapsed ③.
ENJOYING YOUR SYSTEM Playing CDs
Basic Operation (cont.) Repeating Tracks
The Repeat function is only available using the remote control, and cannot be accessed from the front panel buttons.
Once Repeat play has been selected, the player will continue to repeat the selection until you cancel it by pressing the Repeat button 15 once, so that the Repeat indicator 16 in the display goes out.
Repeat play may be selected either during play or in the Stop mode. If a programmed play list is playing, you may select either one track to repeat, or all discs to repeat the entire play list.
Repeat One Track
Press the Repeat button 15 ONCE to display Repeat One 16, and press the Play (or ▶ on remote control) button 22 16 to start play.
Repeat One Disc
Press the Repeat button 15 TWICE to display Repeat One Disc 16, and press the Play (or ▶ on remote control) button 22 16 to start play.
Repeat All Tracks on All Discs
Press the Repeat button 15 THREE times to display Repeat All Disc 16, and press the Play (or ▶ on remote control) button 22 16 to start play.
Repeat Only Selected Tracks
Program the desired tracks as described in the next section, and press the Repeat button 15 while in Programming mode to display
Repeat One or Repeat All Disc 16.
If you program a play list during Repeat Play of an entire disc, the display will change to Repeat All Disc 16.
Random Play
Press the Random button ● before or during play, and the unit will play the tracks on the selected disc in random order. The Random indicator 25 will light in the display. To return to normal play, press the Random button ● again.
If you tap the Forward Search button 619, the unit will randomly select a new track. If you tap the Reverse Search button 617 once, it will go to the beginning of the current track. Tap the Reverse Search button 617 again, and the unit will randomly select a new track.
Programmed Play
You may program a play list of up to 20 tracks anywhere on up to 3 discs.
-
While in Stop mode, press the CD/Tuner Program button 2120.
-
Press one of the Disc Selector buttons ●
● or the Disc Skip button ●21 to select a disc. If the correct disc is already in position, then press the CD Skip/Search
1617 or 19 buttons once to select the disc so that it appears in the display 3.
-
Use the CD Skip/Search 617 or 619 buttons to select the desired track. For example, to select Track 6, press the CD Skip/Search 617 or 619 buttons repeatedly until track number "06" is displayed 3.
-
Press the CD/Tuner Program button 2120 to store the track in the play list.
-
Repeat Steps 2 through 4 to program up to 20 tracks into your play list. If you previously selected the correct disc, you do not need to repeat Step 2 in order to program additional tracks into your play list.
-
Press the Play 2216 button (or ▶ on remote control) to start play.
-
If you stop play in the middle of the play list so that the program does not appear in the display, the play list will remain stored in memory, but the next press of the Play button 22 7 will cause the entire current disc to play. To resume playing the programmed play list, press the CD/Tuner Program button 21 20, which will bring the program back to the display 3 15.
-
If you program several tracks on the same disc out of order, e.g., Track 8 before Track 7, JBL Soundgear will play the tracks back in the programmed order, even though the Track Number Display 4 lists the programmed tracks in numbered order.
-
The Disc Skip ●21 button does not operate during programmed play.
-
Random play cannot be selected while a programmed play list is playing.
Reviewing the Contents of the Play List
While in Stop mode, press the CD/Tuner Program button 2120 to display the disc number, track number, and program number. Continue to press the CD/Tuner Program button 2120 to step through the entire play list.
Clearing the Programmed Play List
There are three different ways to clear a previously programmed play list:
- While in Stop mode, press the CD/Tuner Program button 2120, and then press the Stop/Reset button ●18.
• Turn off the Power ①1. - Press the CD Open/Close button 10.
Adding Tracks to a Previously Programmed Play List
- Press the CD/Tuner Program button 2120 repeatedly to step through the play list until "00" is displayed as the track number 3.
- Select the desired track on the desired disc by pressing the Disc Direct buttons ●●● or Disc Skip button ●21 as necessary, and then by pressing the CD Skip/Search ◀◀◀ ◀◀ 617 or ▶▶▶▶I 619 buttons to proceed to the correct track.
- Press the CD/Tuner Program buttons 2120.
Making Changes to the Play List
- Press the CD/Tuner Program button 20 repeatedly until the disc and track number of the selected step is displayed 3. This track will be replaced in the play list by the new track you are about to program.
- Select the desired track on the desired disc by pressing the Disc Direct buttons ●●● or Disc Skip button ●21as necessary, and then by pressing the CD Skip/Search ◆◀◀ ◆◀ 617 or ▶▶▶▶I 619 buttons to proceed to the correct track.
- Press the CD/Tuner Program button 2120. It is not possible to delete a single step from the programmed play list.
Using External (Auxiliary) Sources
- Switch on the auxiliary device (TV, VCR or MP3 player) connected to the front or rear AUX 1 or AUX 2 jacks.
- Select the desired auxiliary device by repeatedly pressing the Aux 1/2 button ⑬⑤.
- See the Recording section on page 16 for information on tape recording from an auxiliary source.
Playing Tapes
Playback
This system can only use normal bias tapes. It is equipped with two cassette decks, "A" and "B". Deck A is used only for playback, and will stop at the end of each side of the tape. Deck B may be used for either playback or recording, and includes an auto reverse capability which can be controlled with the Play Mode button 27.
- Switch the unit on ①1.
- Open either cassette deck A or B by pressing gently on the door at the Eject position 19. Insert the cassette with the tape side to the bottom and the side that you wish to hear facing the front. Gently push the door to close it.
-
Press the Tape A/B button ●1011. If necessary, press the button again to select the other deck. This unit will display which deck has been selected ③ ⑭. The unit will not select a deck that does not have a tape loaded.
-
Auto reverse (for Deck B only): Press the Play Mode button 27 repeatedly to select:
-
One side : Unit plays the side that is facing the listener and stops automatically at the end of that side.
- All sides = >: Unit plays the front and reverse sides and stops automatically at the end of the tape.
- Endless loop (二): Unit plays both sides of tape six times in succession.
The unit will display the current Play mode 11
-
Press the Play button 227 to begin play-back. Press the Reverse Play button 2612 to play the reverse side of the tape. The direction of the tape will be indicated in the display 8.
-
In either the Stop or Play mode, press the Fast Forward ▶▶▶▶1 ⑥ ▶▶9 button to fast forward to the desired point, or to the end of the side. The Fast Forward indicator ⑬ will light in the display. To rewind, in either the Stop or Play mode, press the Rewind ◀◀◀◀◀ ⑥ ◀◀13 button. The Rewind indicator ⑩ will light in the display.
- To end playback, press the Stop/Reset button ●6. Alternatively, the unit will stop automatically at the end of the tape.
Tape Counter
The Tape Counter ③ will appear in the Information Display when in Tape mode. During Play or Fast Forward, the Tape Counter ③ increases and, during rewind, the tape counter decreases. While in Stop mode or while playing, press the Counter Reset button ⑰ to reset the counter to zero. This can be convenient for locating the point at which you wish to begin a recording session. Note, however, that the unit will automatically rewind the tape to its beginning and it will not stop when the counter reaches zero.
Recording From a CD, Radio or Externally Connected Equipment
Recordings can only be made using Deck B. Only normal bias tapes should be used.
- Power the unit on 11, and insert a blank tape into Deck B. Use the Fast Forward 69 or Rewind 613 buttons to proceed to the point where you wish the recording to start. Make sure to proceed past the tape leader to avoid missing the beginning of the source signal.
- Press the Play Mode button repeatedly to select recording on one side only = or to record on both sides in auto reverse mode =>. We do not recommend that you use the endless loop mode (=), as it may result in rerecording over desired material that was recorded earlier in the session.
- Select the source input: Tuner, CD, Aux 1/M P3, Aux 2 ● ● 13 16 3 5.
- Press the Rec/Pause button 238 to place the unit in the Recording Ready mode. The Record indicator 9 will flash.
- Press the Play button 227 to begin recording onto the front side of the tape, or the Reverse button 2612 to begin recording onto the reverse side of the tape. The direction of the tape will be indicated in the display 8. The unit will automatically start the input source and the recording session simultaneously.
- The recording may be interrupted to skip over undesired material by pressing the Rec/Pause button 238. To resume recording, press either the Rec/Pause button 238, or the Play button 227.
- To end the recording session (but not the input), press the Stop/Reset button ●6. Alternatively, the unit will stop recording automatically when it reaches the end of the tape.
The CD Sync recording function dubs a complete CD or programmed tracks automatically onto a cassette.
-
Select the CD Function ●.
-
Open the CD compartment with the CD Open/Close button ⑩, insert discs and close the CD compartment again.
-
If desired, program a play list of selected tracks (see Programmed Play section on p. 14).
If you wish to record only one track, use the Forward or Reverse Search buttons 61719 to select that track.
-
Insert a blank tape into Deck B. Use the Fast Forward 69 or Rewind 613 buttons to proceed to the point where you wish the recording to start. Make sure you have enough blank tape available to fully record the CD or programmed play list.
-
Press the Play Mode 27 button repeatedly to select recording on one side only = or to record on both sides in auto reverse mode =). We do not recommend that you use the endless loop mode (=), as it may result in rerecording over desired material that was recorded earlier in the session.
If unit is unable to finish recording a track on the first side of the tape, it will record that track completely on the reverse side.
- Press the CD Sync button ● to begin recording. The unit will play the tape in Mute mode for 7 seconds in order to skip the tape leader; then the CD player will begin playing and the unit will begin recording.
The system will not allow you to select a different input without stopping the recording session.
Recording From Tape to Tape (Dubbing)
This system will only dub recorded materials from Deck A to Deck B, since only Deck B is capable of recording. Use only normal bias tape in this system.
- Insert a previously recorded cassette in Deck A with the side you wish to copy facing toward you. Insert a blank cassette in Deck B with the side you wish to record on facing toward you.
- Press the Tape A/B button ●1011 to select the tape function, and press it repeatedly to select each deck so that you can rewind each tape to the beginning using the Rewind button 613.
- Press the Normal Dub button 30 to automatically start dubbing at normal (regular playback) speed. Alternatively, press the High Dub 28 button to automatically start dubbing at twice normal playback speed. The quality of the recording may be better if Normal Speed dubbing is used rather than High Speed Dubbing. When dubbing at high speed, turn down the Volume 1126 to prevent possible damage to the loudspeakers by the high-pitched playback of the source tape.
- During dubbing, the Pause button 238 will have no effect. You cannot change the speed of the dub during a dub. Although the Volume control 1126 will affect the level of playback, it will have no effect on the recording level, which is not adjustable.
- Press the Stop/Reset button ●6 to end the dubbing session. Alternatively, the unit will stop automatically at the end of the tape.
ADVANCED FEATURES
Dual Alarms and Timer Recording
Alarm and Timer Setting
Your system offers a flexible dual alarm and timer capability, which allows you to program the system to either play or record two different sources at two different times, for as long a duration as you choose.
- Make sure the current time displayed ③ is correct by pressing the Clock button ②; see the Setting the Clock section of this manual on p. 10 to set the clock correctly. If you plan on selecting the Tuner, make sure that the desired station has been programmed as a preset (see Programming Preset Stations section on p. 12).
-
Press the Alarm 1 ③ or Alarm 2 ④ button to enter the timer setting mode. (If the timer was previously set, press and hold the button for more than 1.5 seconds.) The Alarm/Timer clockface indicator will appear in the display ②3 and the available source selections - TUNER, CD, TAPE - will flash in the display in turn.
-
(a) If you want to select the Tuner, press the Set/Station button ⑤ while TUNER appears in the display window ③. "Play" and "Rec" will flash in turn.
(b) Press the Set/Station button ⑤ to select either Play or Rec.
- Play: Tuner plays only
- Rec: Tuner plays and is recorded by Deck B. Make sure that a blank cassette is loaded in Deck B and rewound to its beginning or desired starting point.
(c) Press the Preset Down or Up button 22264 to select a desired radio station. If no Preset stations have been programmed into memory, JBL Soundgear will default to the last tuned station.
(d) Press the Set/Station button ⑤ to enter the selected preset number.
- If you wish to select a CD or Tape, press the Set/Station button ⑤ while CD or TAPE appears in the display window ③.
If you have selected CD, or Tape A, "PLAY" and "REC" will flash alternately in the display ③. Press the Set/Station button ⑤ to select either PLAY or REC. If you choose to make a recording, make sure that a blank cassette is loaded in Deck B and rewound to its beginning or desired starting point.
-
Set the hour by pressing the Preset Down or Up buttons 22264.
-
Press the Set/Station button ⑤ to enter the hour the alarm will turn the selected source on. The minutes will flash ③.
-
Set the minutes by pressing the Preset Down or Up buttons 22264.
-
Press the Set/Station button ⑤ to enter the minutes. "OFF" will flash in the display ③, and the menu will now guide you through setting the time the system will turn off.
-
Program the time to turn off in the same way as the time to turn on, by using the Preset Down or Up buttons 22264 to select the hour or minute, and the Set/Station button 5 to enter the setting.
-
Set the volume level by pressing the Preset Down or Up buttons 22 26 4.
-
Press the Set/Station button ⑤ to enter the selected volume level. The clockface and the Alarm number (1 or 2) will remain lit in the display ②3, and the alarm will be set and armed.
-
When you turn the power off ①①, the unit will automatically turn itself on at the programmed time and play and/or record the selected source for as long as it has been programmed to play.
To Cancel or
Check the Timer:
Each time the Alarm 1 ③ or Alarm 2 ④ button is pressed you can arm or disarm that alarm. If the alarm was previously set, press the button ③④ twice to display the alarm settings. Press it once to disarm the alarm, but retain any settings in memory. When the alarm is armed, the clockface and alarm number (1 or 2) indicators will light in the display ②3 as will the REC indicator ②4 if applicable. When the alarm is disarmed, the indicators will go out.
Alarm and Timer Notes
-
The Alarm indicator 23 will flash when the unit is playing in Alarm mode. Press the Alarm button 34 to defeat the alarm, which will not shut the unit off.
-
When CD or Tape is selected for playback, if no disc is in the disc drawer or no cassette tape is in the cassette deck, the Tuner function will turn on instead.
-
When CD is selected for playback, Repeat All Disc will be selected automatically.
-
When TAPE is selected for playback, if both cassette decks have cassette tapes; the cassette tape in Deck B will play first.
-
If the unit is turned on manually, it will not shut off automatically at the programmed turn-off time.
-
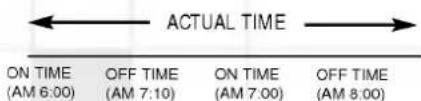
If both Alarm 1 and Alarm 2 are set, and their times do not overlap – that is, the earlier alarm is programmed to turn off before the later alarm will turn on – then both alarms will turn the unit on and off as programmed.
Alarm 1
ACTUAL TIME
ON TIME (AM 6:00)
OFF TIME (AM 7:00)
ON TIME (AM 7:10)
Alarm 2
ACTUAL TIME
- If the settings of the timers overlap, then the system will turn on at the earliest set turn-on time and play continuously until the later turn-off time. It will only play the source that was selected for the earlier timer, and will not play the source that was selected for the later timer.
Alarm 1
Alarm 2
Setting the Sleep Timer
(Available only using the remote control) When the sleep timer is used, the power is automatically turned off after the specified time has elapsed.
- To specify the time until the power is turned off, press the Sleep button 14. "SLEEP 90" will appear in the display 3 for about 5 seconds. This means that the unit will turn off automatically after 90 minutes. Each time the Sleep button 14 is pressed while the SLEEP display appears, the time interval before the unit will turn off is reduced by 10 minutes (e.g., 80...70...). Select the desired time interval before turn-off. 2. To check the remaining time until the power is turned off, while the sleep function is active, press the Sleep button 14 briefly. The time remaining until turn-off is displayed for about 5 seconds.
Note: If you press the Sleep button 14 while the sleep time is displayed, the SLEEP timer will reduce the time until turn-off.
- To cancel the sleep timer, press the Sleep button 14 repeatedly until "10" appears, and then press the SLEEP button once again while "10" is displayed.

TROUBLESHOOTING
If there is no sound from either of the speakers:
- Check that the unit is plugged into an active electrical outlet.
- Check that the unit is turned on, and that a source is selected and playing. If Tape or CD was selected, make sure that a cassette or disc has been inserted.
- Check that the Mute function has not been selected and, if it has, turn it off using the remote control.
- Adjust the Volume Control 11.
- Check all wires and connections between the main unit and the speakers (see page 9). Make sure all wires are connected, and that none of the speaker wires are frayed, cut or punctured.
- If an external (auxiliary) source was selected, make sure that the external unit is either plugged into an active electrical outlet or powered by fully charged batteries. Make sure that the external unit is turned on and playing. Make sure that all wires between the main unit and external unit are connected correctly, and that none of the wires are frayed, cut or punctured.
If there is no sound coming from one speaker:
- Check all wires and connections between the main unit and the speakers (see page 9). Make sure all wires are connected and that none of the speaker wires are fayed, cut or punctured.
If the system plays at low volumes but shuts off as volume is increased:
- Check all wires and connections between the main unit and the speakers (see page 9). Make sure all wires are connected, and that none of the speaker wires are frayed, cut or punctured.
If there is low (or no) bass output:
- Make sure the connections to the left and right speaker inputs ● have the correct polarity (+ and -).
- Consider experimenting with the Boost function 15 by selecting either PowerBass or Super Boost.
- Consider adding a powered subwoofer to your system.
If there is low (or no) treble output:
- Check all wires and connections between the main unit and the speakers (see page 9). Make sure all wires are connected, and that none of the speaker wires are frayed, cut or punctured.
- Consider experimenting with the Boost function 15 by selecting Treble Boost or Super Boost.
- As a preventive measure to avoid damaging your speakers, make sure never to exceed the maximum volume when playing your system.
If the unit does not respond to remote control commands:
- Make sure the batteries are not weak, and replace them if necessary.
- Make sure the remote sensor in the front panel of the main unit is not blocked.
- Make sure the remote is no further than 23 feet (7 meters) away from the main unit, and that it is aimed at the sensor head-on and not at too much of an angle (no more than 30 degrees from the center line).
- Turn off any fluorescent light in the vicinity of the main unit.
If the tuner (radio) buzzes or does not play properly:
• Make sure you have tuned in to a frequency that is in use in your area.
- Check the antenna connection, and adjust the placement of the antenna wires for best reception.
If RDS (Radio Data System) information does not appear in the display:
• Make sure you have selected the FM band, as RDS is not available on AM.
- When the station's signal is weak, the audio signal may come through without the RDS signal.
- For the first few seconds, the RDS data will be garbled until the unit fully processes the signal.
When attempting to delete a single preset station, all presets are erased:
It is not possible to delete a single Preset station, although it can be changed to a different station (see page 12).
When attempting to delete a single track from a programmed CD play list, the entire play list was erased:
It is not possible to delete a single track from a play list, although the track can be replaced by a different track (see page 14).
If no sound is heard when tape is playing:
• Make sure tape is not blank.
If tape does not record:
• Make sure record protection tabs have not been removed from cassette. If they have, you may cover the protection holes with adhesive tape.
• Make sure a source is playing.
- If dubbing, make sure the tapes are in the correct decks – the source in Deck A, and the blank in Deck B.
• Make sure you are not attempting to record onto a tape in Deck A, as that deck is for play-back only.
If tapes sound distorted:
- Make sure to use only normal bias tapes in the unit.
• Make sure tape heads are clean and demagnetized.
If a tape recording tapes over material recorded earlier in the same session:
- Make sure you have selected either One side or All sides, but not Endless loop, using the Play Mode function 27.
If a tape rewinds past zero:
The unit detects the beginning of the tape rather than the counter number and this behavior is normal.
If Deck A does not auto-reverse:
Deck A is not equipped with this feature, and will always stop at the end of each side.
If CD does not play:
• Make sure drawer contains disc to play.
• Make sure disc is not upside down in tray.
• Make sure disc is of type CD or CD-R only.
If CD skips or stutters during play:
• Make sure disc is not damaged.
- Make sure main unit is set securely on a stable surface, free from vibrations.
If the unit did not turn on at the programmed alarm time:
- Check programmed time – was AM or PM selected correctly? Was 24-hour or 12-hour time display selected as desired?
• Make sure the unit was not left turned on.
If the unit did not turn on and make a recording at the programmed alarm time:
• Make sure time was programmed correctly.
• Make sure a blank tape was inserted in Deck B and rewound.
SPECIFICATIONS
| Output Power | 130 Watts total65W + 65W (1% THD, 50Hz - 20kHz) | ||
| Sound Pressure Level | 107dB | ||
| Frequency Response | 45Hz ~ 20kHz | ||
| Signal-to-Noise Ratio (Aux Input) | 80dBA | ||
| Dimensions (W x H x D) | |||
| Main Unit | 273mm x 327mm x 343mm (10-3/4" x 12-7/8" x 13-1/2") | ||
| Speakers (each) | 219mm x 333mm x 248mm (8-5/8" x 13-1/8" x 9-3/4") | ||
| Net Weight | Main Unit | 8.73kg (19.2 lb) | |
| Speakers (each) | 4.91kg (10.8 lb) | ||
| Shipping Weight(system, accessories, packing) | 21.5kg (47.3 lb) | ||
| Speaker System | |||
| Type | Ported 2-way | ||
| Woofer | 6-1/2"(165mm) PolyPlasTM with rubber surround | ||
| Midrange | N/A | ||
| Tweeter | 13mm(1/2") Titanium-laminate dome with EOSTM waveguide | ||
| Impendance | 6Ω | ||
| Max Input power(MAIN) | 130W | ||
| CD | |||
| Frequency Response | 20Hz ~ 20kHz (+0, -2dB) | ||
| Signal-to-Noise Ratio | 70dBA | ||
| Tuner | |||
| FM | |||
| Tuning Range | 87.5MHz ~ 108MHz | ||
| Intermediate Frequency | 10.7MHz | ||
| Signal-to-Noise Ratio(Mono/Stereo, 98MHz) | 61/58dBA | ||
| Frequency Response | 30Hz ~ 15kHz | ||
| AM (MW) | |||
| Tuning Range | 522kHz ~ 1,611kHz, 530kHz ~ 1,720kHzor 530kHz ~ 1,610kHz | ||
| Intermediate Frequency | 450kHz | ||
| Frequency Response | 50Hz ~ 2,500Hz | ||
| SW (optional) | |||
| Tuning Range | 5.8MHz ~ 18MHz | ||
| Intermediate Frequency | 450kHz | ||
| LW (optional) | |||
| Tuning Range | 153kHz ~ 281kHz | ||
| Intermediate Frequency | 450kHz | ||
| Cassette Deck | |||
| FF, REW Time (C-60) | 120 sec. | ||
| Frequency Response | 20Hz ~ 20kHz (±3dB) | ||
| Signal-to-Noise Ratio | 43dBA | ||
| Channel Separation | 50dBA | ||
NOTE: All features and specifications are subject to change without notice.
- MINI HI-FI AUDIO SYSTEM
- OWNER'S MANUAL
- MODEL : KR-2200A
- ead first! Important Safety Precautions!
- CAUTION
- Explanation Graphical Symbols:
- WARNING:
- (FOR THE CUSTOMERS IN EUROPE)
- CAUTION: INVISIBLE LASER RADIATION WHEN OPEN AND INTERLOCKS DEFEATED. AVOID EXPOSURE TO BEAM.
- (FOR CUSTOMERS IN CANADA)
- MISE EN GARDE:
- Note to CATV system installer:
- NOTE:
- The interference potential to the device.
- (FOR CUSTOMERS IN THE UNITED KINGDOM) WIRING INSTRUCTIONS
- Warning :
- IMPORTANT
- GETTING STARTED
- Controls and Connections
- GETTING STARTED Controls and Connections
- CD Control Buttons:
- Remote Control
- Tape Functions
- Sleep button
- CD/Tuner Functions
- Remote Control Operation
- Batteries
- Control Range
- GETTING STARTED Connections
- External Sources
- Digital Outputs
- Loudspeakers
- Using Your System With an External Powered Subwoofer
- Connections (cont.) Headphones
- Antenna
- FM Antenna Connection
- AM Antenna Connection
- Setting the Clock
- Basic Operation
- Tone Adjustments
- Boost
- Volume Adjustment
- To Establish a Safe Level:
- EQ (Equalization)
- Mute
- Display Mode
- Demo Mode
- FM Stereo/ANR (AM Noise Reduction)
- VM Ax®
- Listening to the Radio
- Automatic Tuning
- Manual Tuning
- Programming Preset Stations
- RDS (Radio Data System) Reception - OPTIONAL
- Notes:
- Stopping Play
- Pause
- Skipping Discs
- Direct Disc Access
- Removing Discs
- Changing Discs During Play
- Important Notes
- Searching Within a Track
- Reverse Search
- Forward Search
- Track Skipping
- Time Display
- ENJOYING YOUR SYSTEM Playing CDs
- Basic Operation (cont.) Repeating Tracks
- Repeat One Track
- Repeat One Disc
- Repeat All Tracks on All Discs
- Repeat Only Selected Tracks
- Repeat One or Repeat All Disc 16.
- Random Play
- Programmed Play
- Reviewing the Contents of the Play List
- Clearing the Programmed Play List
- Adding Tracks to a Previously Programmed Play List
- Making Changes to the Play List
- Using External (Auxiliary) Sources
- Playing Tapes
- Playback
- Tape Counter
- Recording From a CD, Radio or Externally Connected Equipment
- Recording From Tape to Tape (Dubbing)
- ADVANCED FEATURES
- Dual Alarms and Timer Recording
- Alarm and Timer Setting
- To Cancel or
- Check the Timer:
- Alarm and Timer Notes
- Setting the Sleep Timer
- TROUBLESHOOTING
Brand : LG
Model : FFH-2020A
Category : Audio System