CBC63 - Car surveillance camera Aukey - Free user manual and instructions
Find the device manual for free CBC63 Aukey in PDF.
User questions about CBC63 Aukey
0 question about this device. Answer the ones you know or ask your own.
Ask a new question about this device
Download the instructions for your Car surveillance camera in PDF format for free! Find your manual CBC63 - Aukey and take your electronic device back in hand. On this page are published all the documents necessary for the use of your device. CBC63 by Aukey.
USER MANUAL CBC63 Aukey
Thank you for purchasing the AUKEY DR02 D Dual Dash Cameras. Please read this user manual carefully and keep it for future reference. If you need any assistance, please contact our support team with your product model number and Amazon order number.
Package Contents
Dual Dash Cameras (front and rear camera)
Dual-Port USB Car Charger
4m / 13ft USB Mini-B Cable
6m / 20ft USB Mini-B Cable
Two Sticker Mounts
Six 3M Stickers
Six Cable Clips
User Manual
Warranty Card
Optional Accessory: The AUKEY External GPS Antenna provides accurate position and speed data to the DR02 D that is saved and displayed on recorded videos. This extended information may support your case in any driving disputes or incidents.
Note: Please use a Class 10 micro SD memory card (Max 128 GB) for reliable recording and performance. Format the micro SD card in the dash camera before first use.
Visit www.aukey.com/downloads to download the latest firmware.
Product Diagram
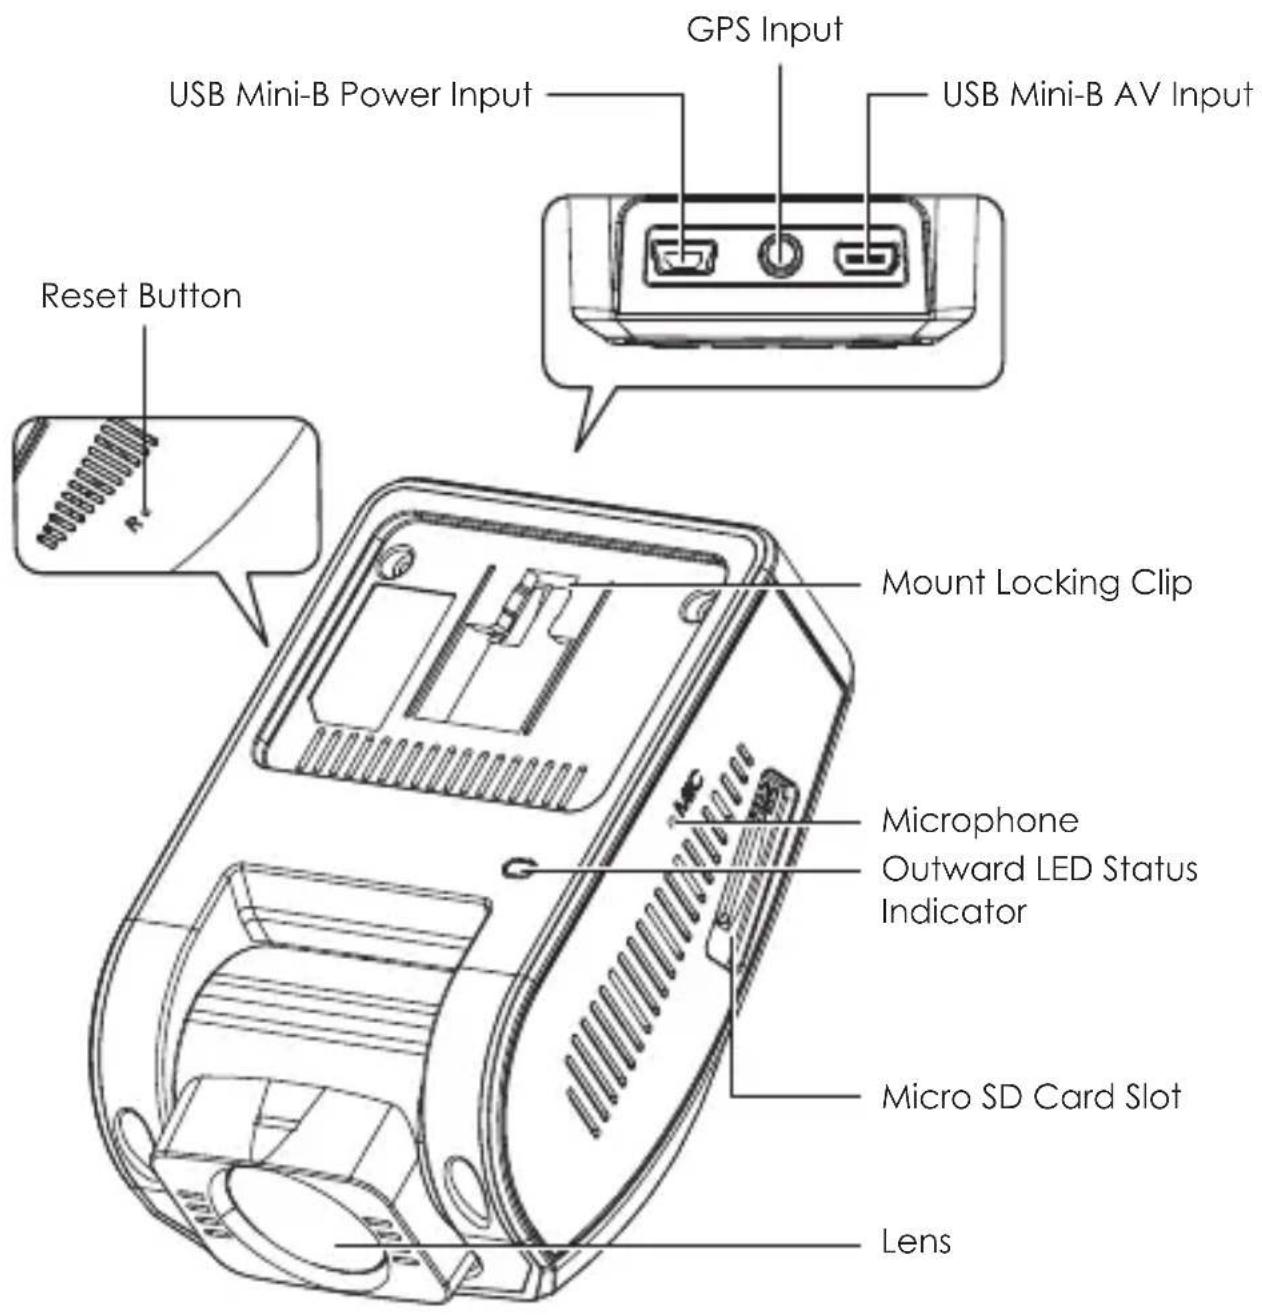
Front Camera
text_image
GPS Input USB Mini-B Power Input USB Mini-B AV Input Reset Button Mount Locking Clip Microphone Outward LED Status Indicator Micro SD Card Slot Lens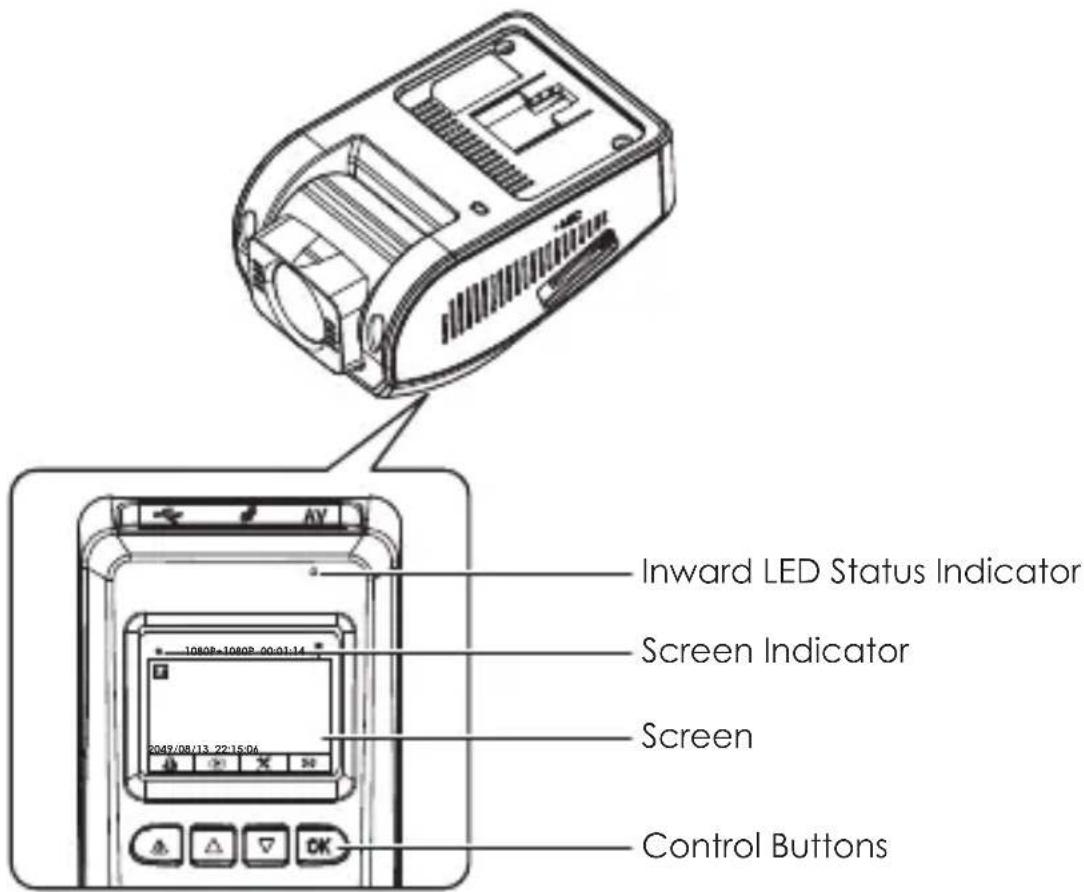
text_image
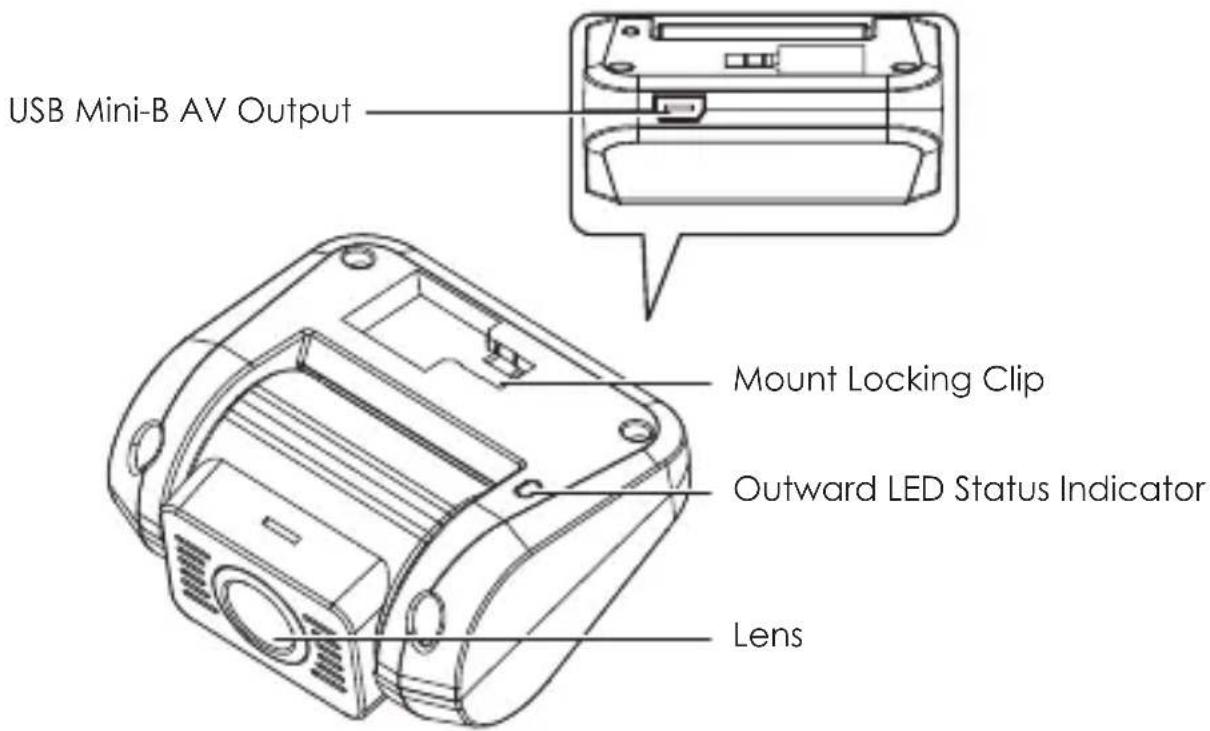
Inward LED Status Indicator Screen Indicator Screen Control ButtonsRear Camera
text_image
USB Mini-B AV Output Mount Locking Clip Outward LED Status Indicator LensSpecifications
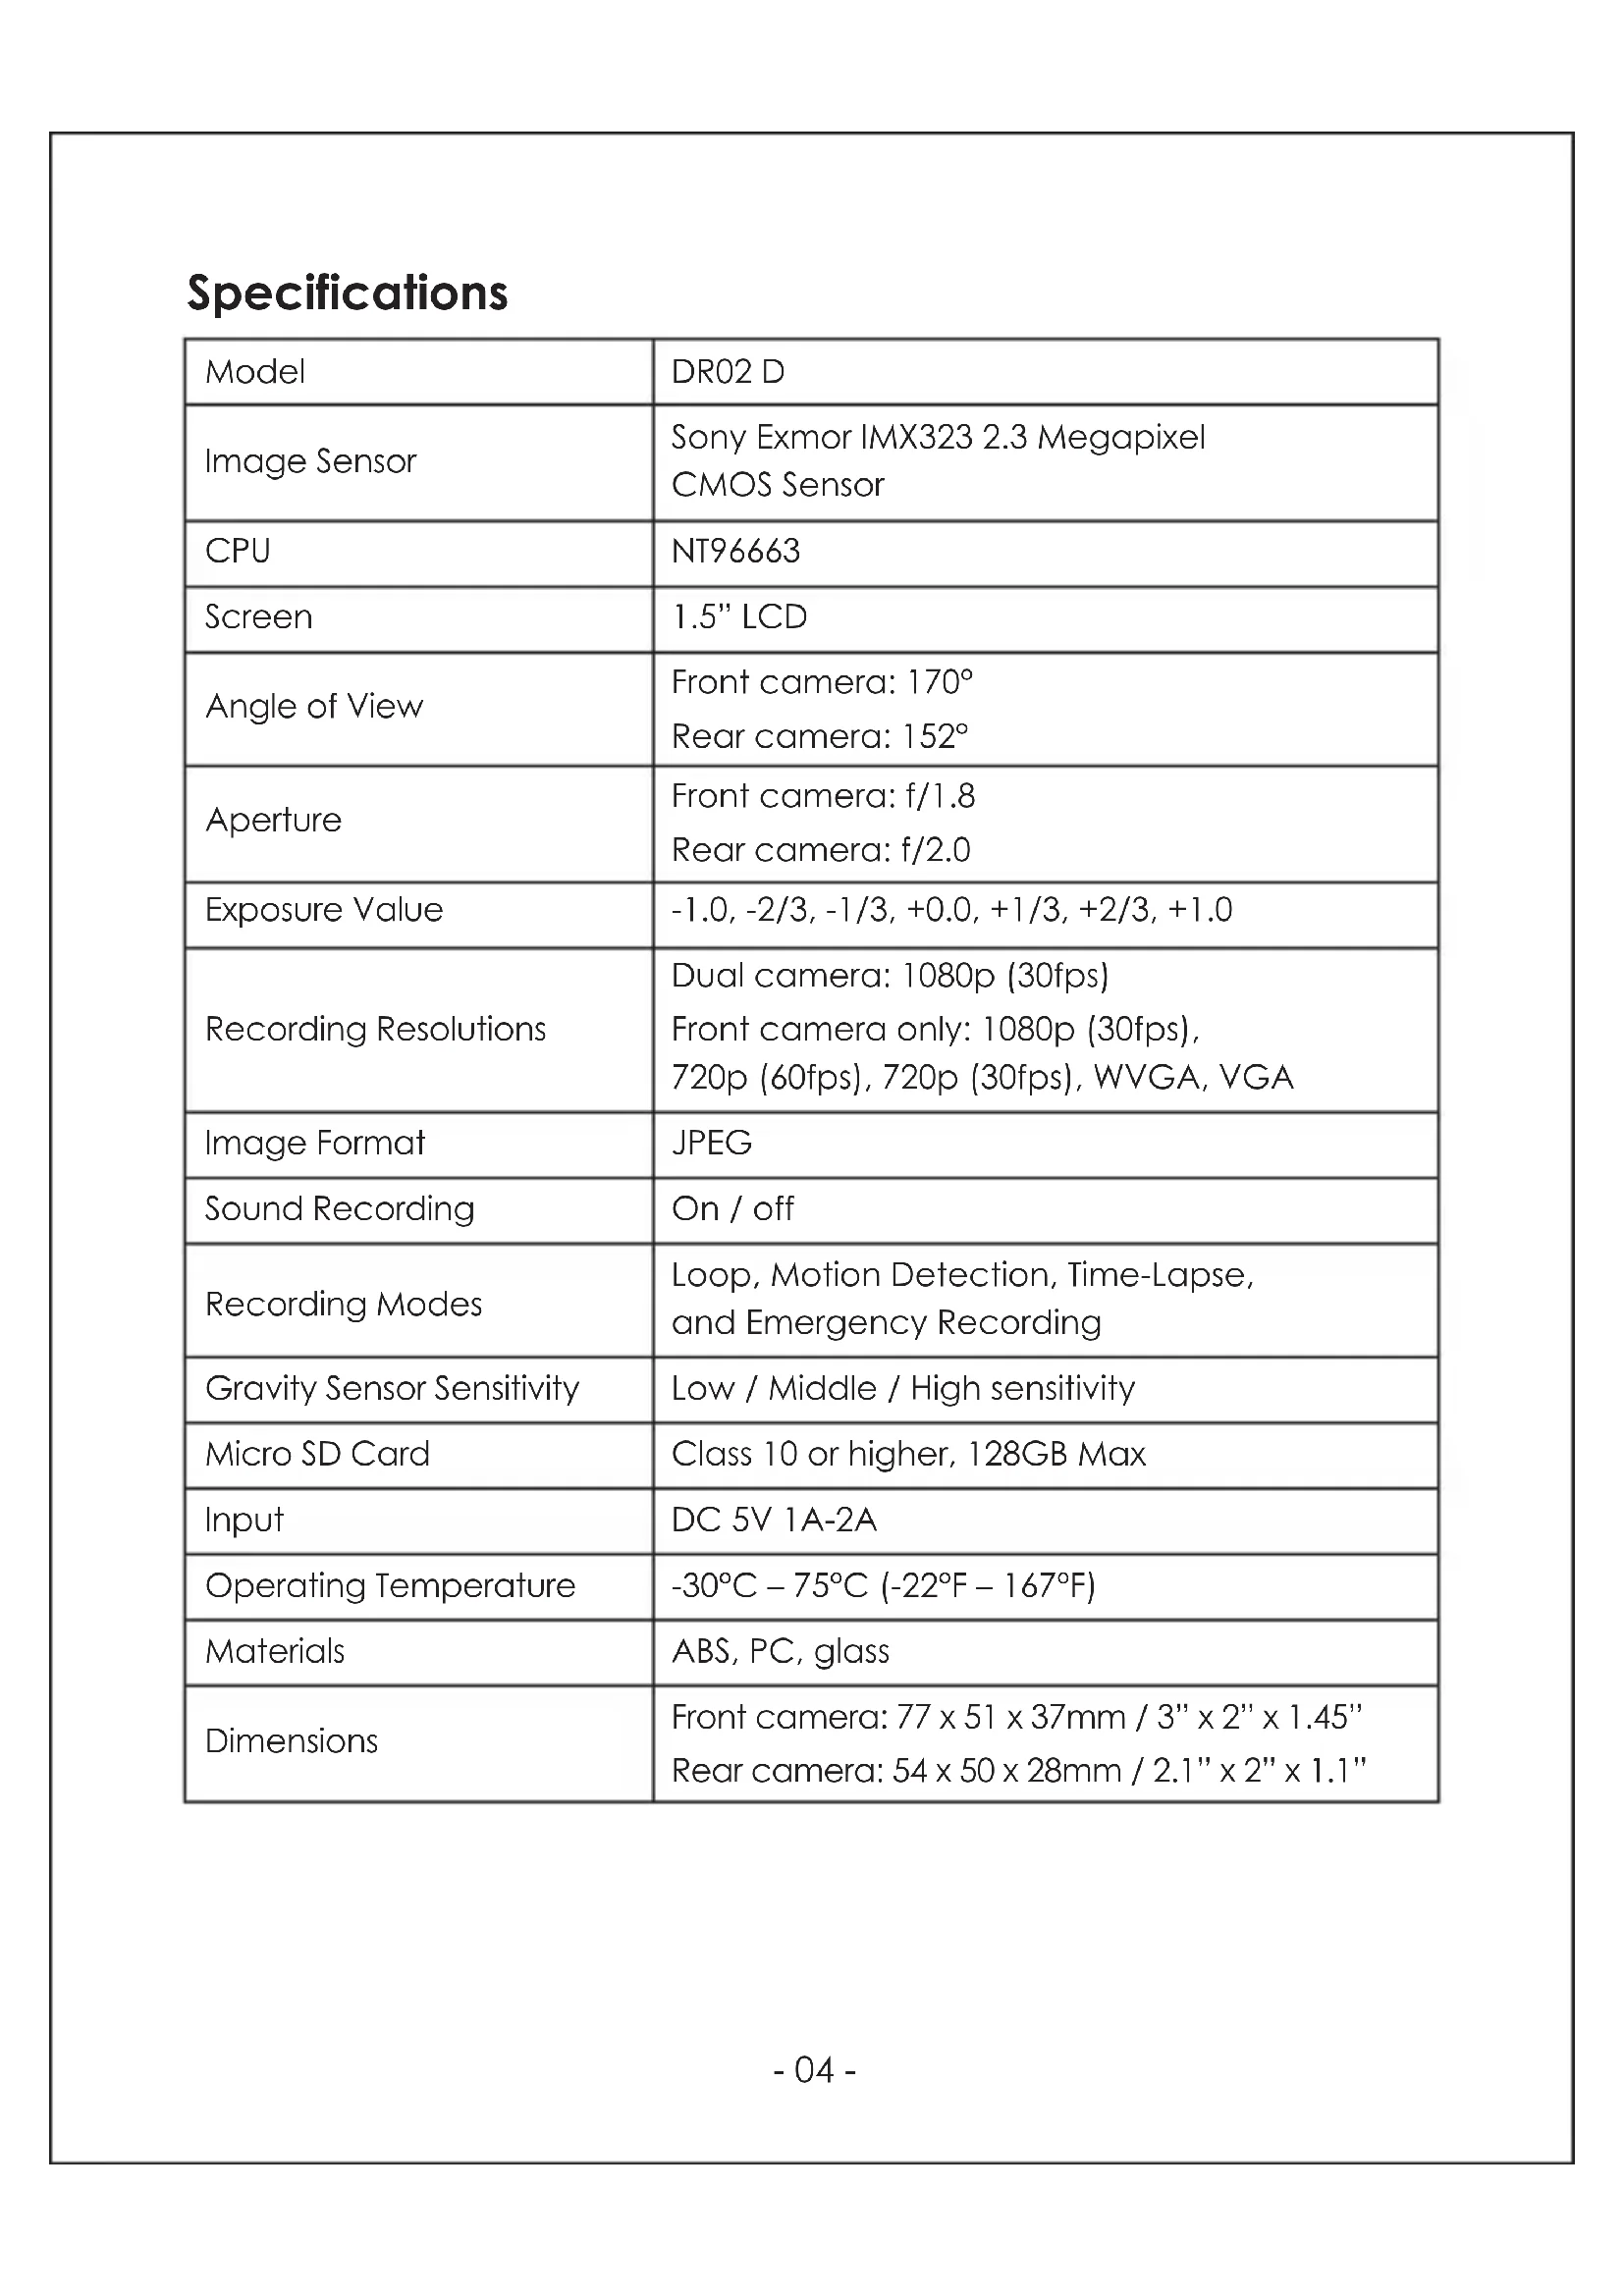
| Model | DR02 D |
| Image Sensor | Sony Exmor IMX323 2.3 MegapixelCMOS Sensor |
| CPU | NT96663 |
| Screen | 1.5" LCD |
| Angle of View | Front camera: 170°Rear camera: 152° |
| Aperture | Front camera: f/1.8Rear camera: f/2.0 |
| Exposure Value | -1.0, -2/3, -1/3, +0.0, +1/3, +2/3, +1.0 |
| Recording Resolutions | Dual camera: 1080p (30fps)Front camera only: 1080p (30fps),720p (60fps), 720p (30fps), WVGA, VGA |
| Image Format | JPEG |
| Sound Recording | On / off |
| Recording Modes | Loop, Motion Detection, Time-Lapse,and Emergency Recording |
| Gravity Sensor Sensitivity | Low / Middle / High sensitivity |
| Micro SD Card | Class 10 or higher, 128GB Max |
| Input | DC 5V 1A-2A |
| Operating Temperature | -30°C – 75°C (-22°F – 167°F) |
| Materials | ABS, PC, glass |
| Dimensions | Front camera: 77 x 51 x 37mm / 3" x 2" x 1.45"Rear camera: 54 x 50 x 28mm / 2.1" x 2" x 1.1" |
System LED Indicators
There are four indicators in total. Each camera unit has an LED indicator that faces outside (to let others know you have cameras active). The front camera has an LED indicator which faces inside and an on-screen indicator (both for your reference). The outward LED indicators on both cameras can be switched off if you want the dash camera system to be even less visible to people outside. Go to Setup > Detect Led > select Off > press OK.
| Outward LED Status Indicators | Inward LED Status Indicator | Screen Indicator | Meaning |
| Solid Green | Solid Green | Off | On; not recording |
| Flashing Green | Flashing Green | Flashing Red | On; recording |
Note: In Motion Detection mode, only the inward LED indicator will be on in standby. Once motion is detected, all indicators will operate the same as normal recording.
Control Buttons
| Button | Recording Mode | Playlist & Setup Menu | Playback Mode |
 | Enter Emergency Recording mode | Return to previous menu | Return to playlist / Stop |
 | View playlist (short press)Turn on/off Audio Recording (long press) | Move up | Delete / Rewind |
 | Open Setup menu (short press)Take a snapshot (long press) | Move down | Lock & Unlock / Fast-forward |
| Toggle screen view and turn off the screen | Enter / Confirm Play / Pause | ||
| Reset Button | Short press to restart the device (this won’t affect saved files) | ||
There are 3 screen view options—Dual view, front camera, and rear camera. When dash camera is powered on, press the OK button to switch views or switch off the screen (recording continues). 'Screen Saver' setting can also be used to automatically switch off the screen after 1 or 3 minutes.
Using a Micro SD Card
The camera doesn't include internal storage and requires a micro SD card (Class 10+ recommended and 128GB Max supported) to function. A 128GB micro SD card should store around 20 hours of 1080p recordings. Use a high-quality, branded card for maximum reliability. Insert a micro SD card into the front camera micro SD card slot. Later, when the camera is powered on, format it ('Format' option in Dash Camera 'Setup') to prepare the card for first use in the dash camera. Formatting will permanently erase any data on the micro SD card. For best performance, format periodically (after backing up any important files). 'Format Warning' in 'Settings' can be switched on to remind you to do this.
Installation & Powering On/Off
The diagram below shows the parts and exact way the cables must be connected. You may wish to connect and test the dash camera system before proper, long-term installation in your vehicle. For convenient testing in your home, a power bank or wall charger with 1A or 2A USB port can be used instead of the car charger.
Dual-Port USB Car Charger Front Camera Rear Camera
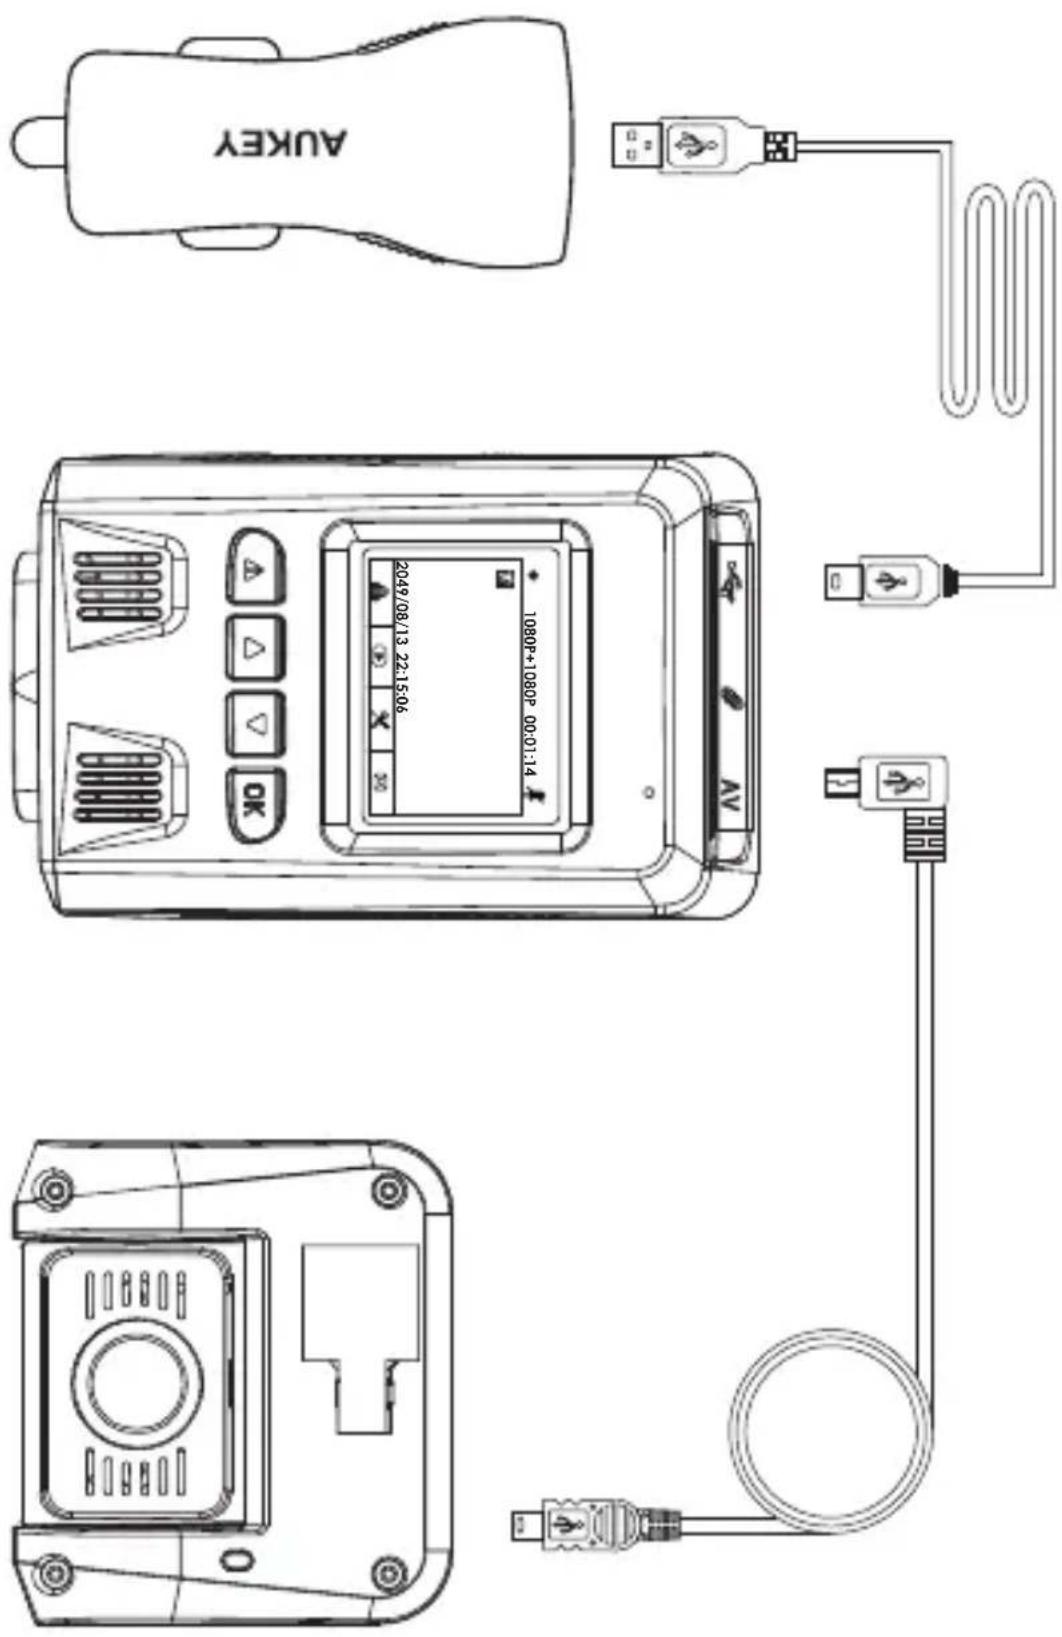
text_image
0 OK 2049/08/13 22:15:06 1080P+1080P 00:01:14 AUKEY4m / 13ft USB Mini-B Cable 6m / 20ft USB Mini-B Cable
- For optimal performance, install the AUKEY DR02 D front/rear camera in the top-center of your front/rear windshield, facing directly ahead/behind. Lens direction can be adjusted up and down
- Use the 6m/20ft Mini-B Cable (with an L-shaped connector at one end) to connect the two cameras. The L-shaped mini-B connector plugs into the Mini-B AV Input of the front camera and the other end into the Mini-B AV Output of the rear camera
- Connect the 4m/13ft USB Mini-B Cable (with a standard USB-A connector at one end) to one of the car charger ports and to the front camera Mini-B Power Input
- Cable routing should be as shown in the following two diagrams. Use the cable clips to help fix the two cables conveniently and safely. Careful placement of the cables and use of existing trim and carpeting to conceal them will give a tidier finish
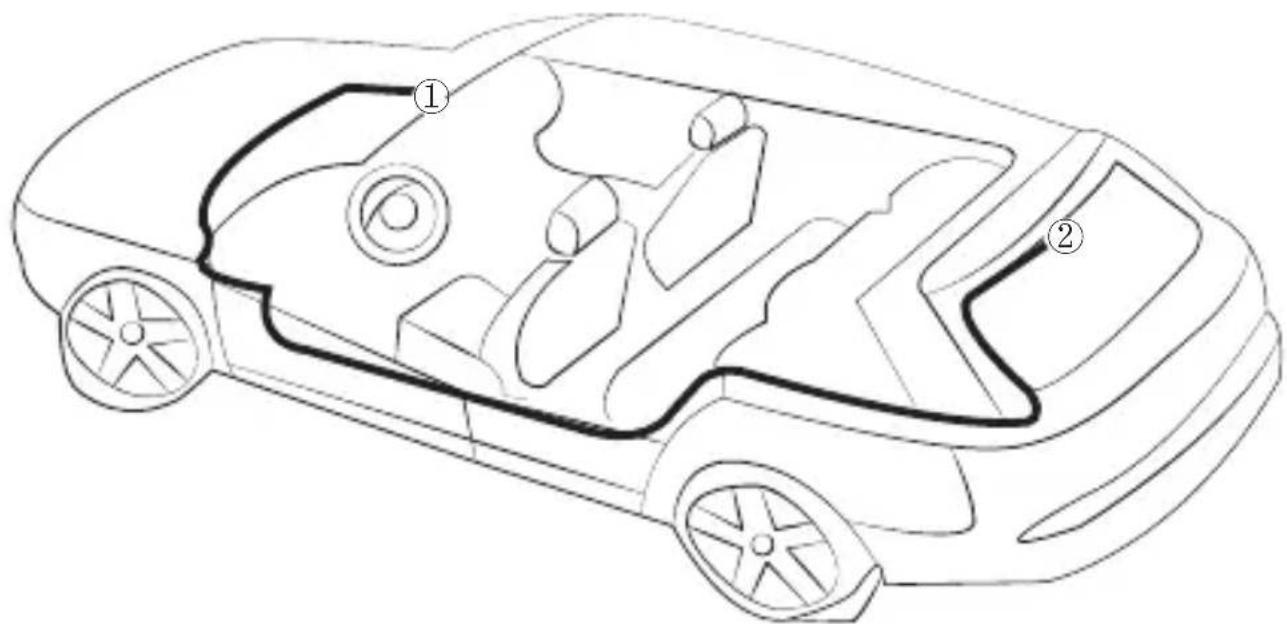
text_image
Technical diagram of a car interior with numbered components, likely for design or manufacturing reference.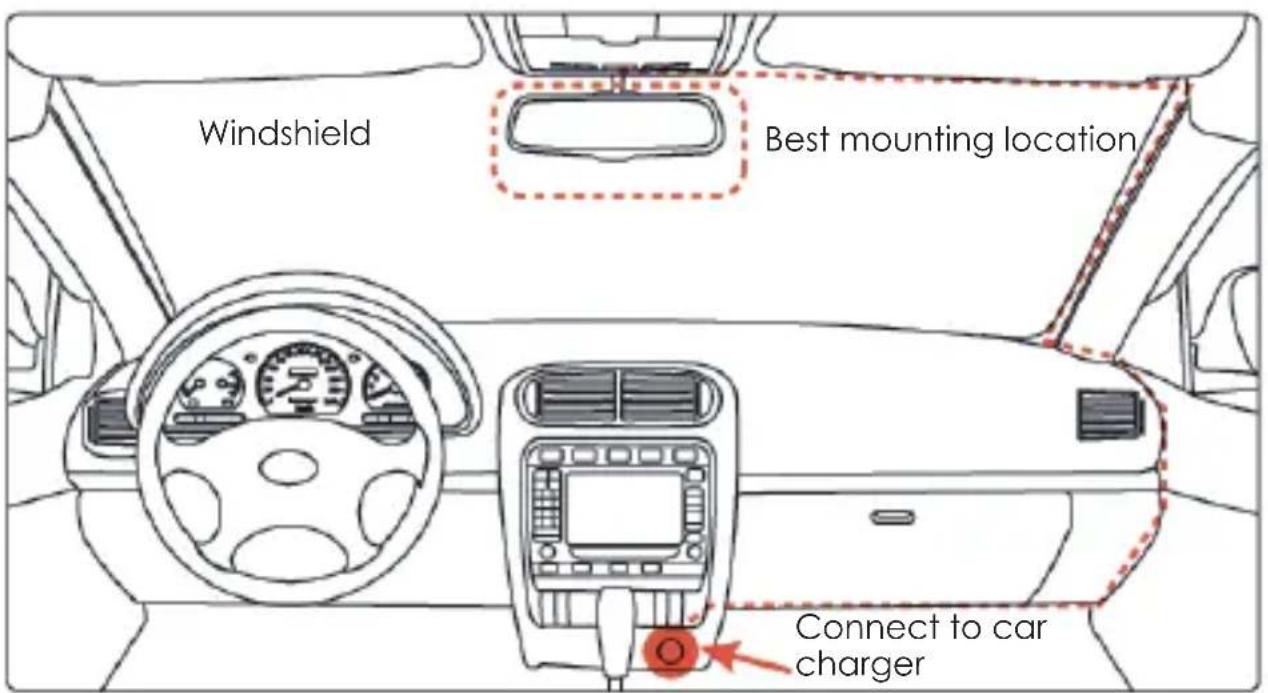
text_image
Windshield Best mounting location Connect to car chargerCaution: AUKEY is not responsible for any damage caused to or by the air bag due to incorrect placement of the device or its cables.
- To power on, insert the car charger into your car's 12V socket. After powering on each time you start your car, the system will start recording automatically. To power off, disconnect the car charger or connected mini-B cable
Note: Use the included cables to ensure optimum performance of AUKEY DR02 D.
Video Recording
Separate files are created for the recordings from front and rear camera, so you can view each camera's footage separately and at full size. The recordings are unaffected by choice of screen view or switching the screen off.
- Loop Recording: Recording will begin automatically after powering on with a micro SD card in the device. Each recorded file is up to ten minutes long, with old footage being replaced when micro SD card storage is full
- Motion Detection Recording: Switch on motion detection in 'Setup.' This function is designed to monitor when you've parked and left your vehicle but requires a continuous power supply. It will record video each time motion is detected by the front or rear camera
- Time-Lapse Recording: Switch on time-lapse recording in 'Setup.' This function will capture a picture per second to make a video played at 30fps
Emergency Recording
- Manual File Backup
Press 🔒 to back up the current file so that it won't be overwritten. A 🔒 icon will appear in the top left of the LCD screen to indicate a protected emergency recording is in progress
- Auto File Backup
Once the G-sensor is activated by a sudden impact, the device will automatically make a recording and protect it from being overwritten. Adjust G-sensor sensitivity in the 'Setup' menu
Note: Enter the playlist or setup menu (or disconnect power) to end emergency recording mode.
Snapshot
- Hold down ▼ for 3 seconds to take a snapshot while in recording mode
- The snapshot files are located in the \AUKEY\PHOTO folder on the micro SD card
- The icon will be shown after you take a snapshot. This won't interrupt the video recording
Audio Recording
Turn on/off audio recording by long-pressing ▲ when in recording mode (or by adjusting in 'Setup' menu). When audio recording is on, in-car audio will be recorded during video recording. Voicing details of possible hazards that may develop, especially when off-camera, may provide useful information. You can even use it to record car license plate numbers that may not be captured on the video.
USB File Transfer
- Connect the Dash Camera (with card inside) to your computer using your own USB mini-B data cable (the included cable is for power only). It should be recognized as a removable device (with a USB connector image displayed on-screen)
- Find the video recording files located in the \AUKEY\MOVIE folder (or \AUKEY\PHOTO for snapshots)
- Copy the files to your computer
Micro SD Card File Transfer
- Shut down the device (by disconnecting the power cable) and eject the micro SD card
- Insert the micro SD card into a computer micro SD card slot or reader and your computer will automatically detect the micro SD card
- Find the video recording files located in the \AUKEY\MOVIE folder (or \AUKEY\PHOTO for snapshots)
- Copy the files to your computer
Viewing Photos and Videos
- Press ▲ to enter the playlist
- View photos or videos by choosing either 'Photo File' or 'Video File'
-
Select the file you want to view and press ok
-
For videos, press ok again to begin playback
Deleting and Locking/Unlocking Photos and Videos
- Press ▲ to delete or ▼ to lock/unlock a photo or video file after selecting it from the playlist. If a video is being played, press ⚠ to stop it and then press ▲ to delete or ▼ to lock/unlock
- Once deleted, photos and videos can't be recovered
- If you lock a photo or video, it will be protected and not overwritten
Product Care & Use
- Ensure camera and mount are firmly fixed in place before use to avoid falls
- Keep away from liquids, extreme heat, and strong magnetic fields
- Avoid touching the lens surface. It may be cleaned with a cotton swab or lens cleaning paper. If any dirt is difficult to remove, a non-abrasive glasses lens cleaner may be used. Don't use corrosive solutions
- Keep important videos and photos backed up elsewhere to protect against file corruption or loss caused by any SD card issues
Warranty & Customer Support
For questions, support, or warranty claims, please contact us at the address below that corresponds with your region. Please include your Amazon order number and product model number.
Amazon US orders: support.us@aukey.com
Amazon EU orders: support.eu@aukey.com
Amazon CA orders: support.ca@aukey.com
Amazon JP orders: support.jp@aukey.com
*Please note, AUKEY can only provide after sales service for products purchased directly from AUKEY. If you have purchased from a different seller, please contact them directly for service or warranty issues.
natural_image
Technical line drawing of a device casing with a speech bubble indicating a component (no text or symbols present)Befestigungsplatte

natural_image
Technical line drawing of a mechanical housing component (no text or symbols)Äußere LED-Anzeige
Objektiv
Spezifikationen
text_image
Technical line drawing of a car interior with numbered components labeled ① and ②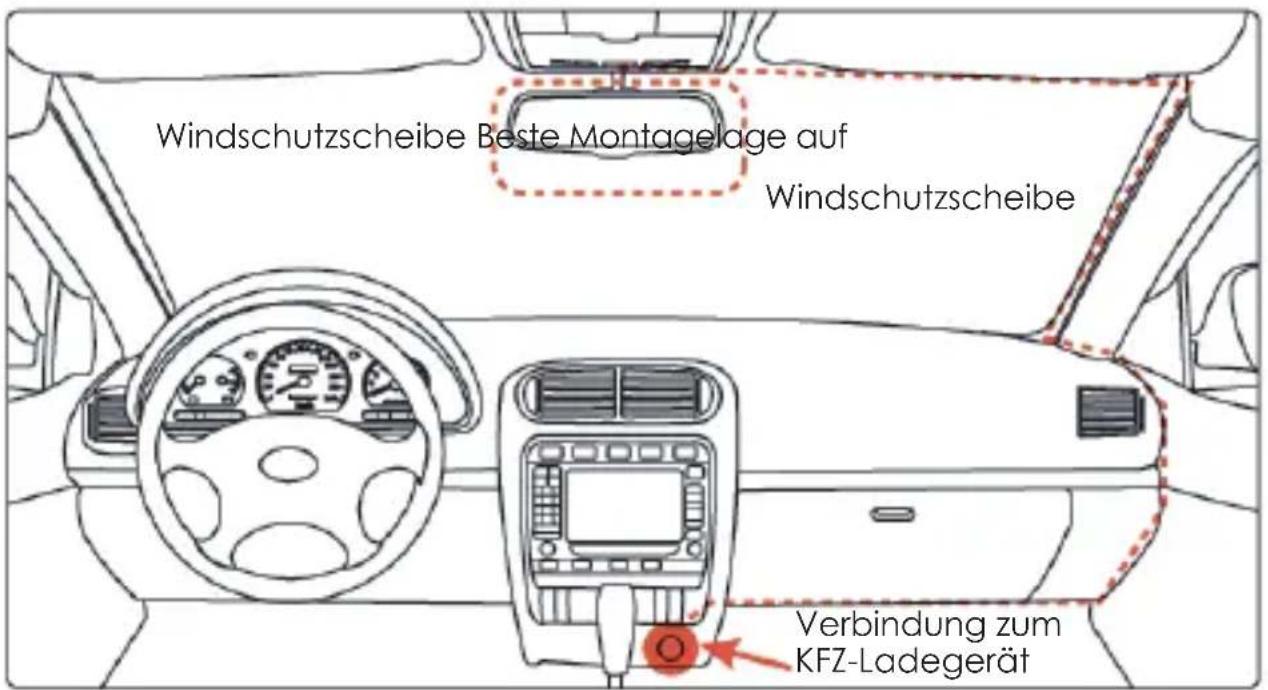
Deux supports autocollants
Six autocollants 3M
Six clips de câble
Mode d'Emploi
Carte de garantie
text_image
Technical diagram of a car interior with numbered components, likely for assembly or maintenance reference.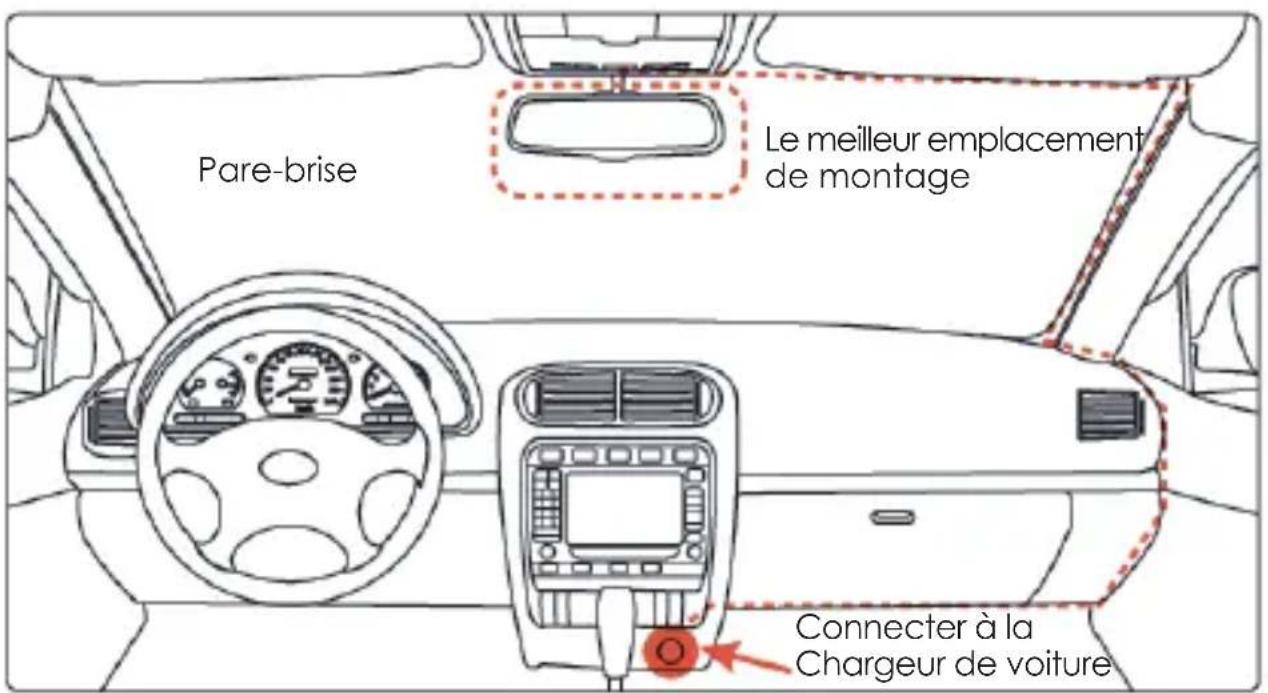
Amazon EU commandes: support.eu@aukey.com
text_image
Technical diagram of a car interior with numbered components, likely for design or manufacturing reference.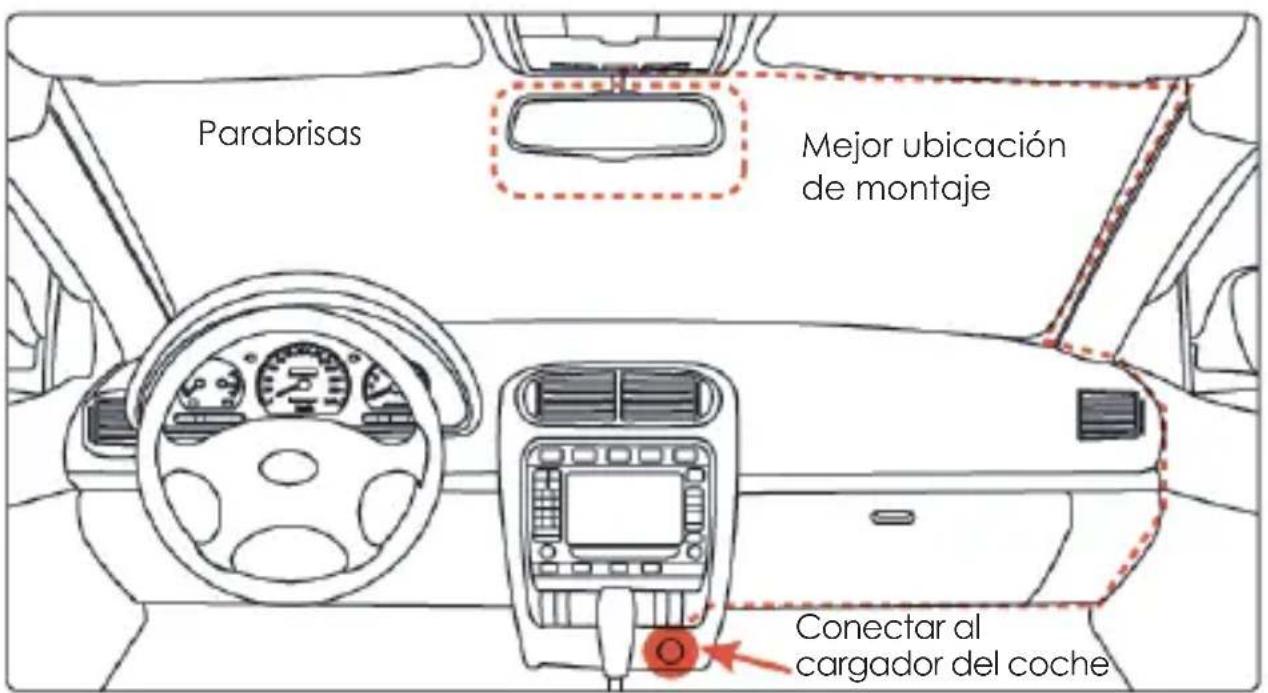
text_image
Technical diagram of a car interior with numbered components, likely for assembly or maintenance instructions.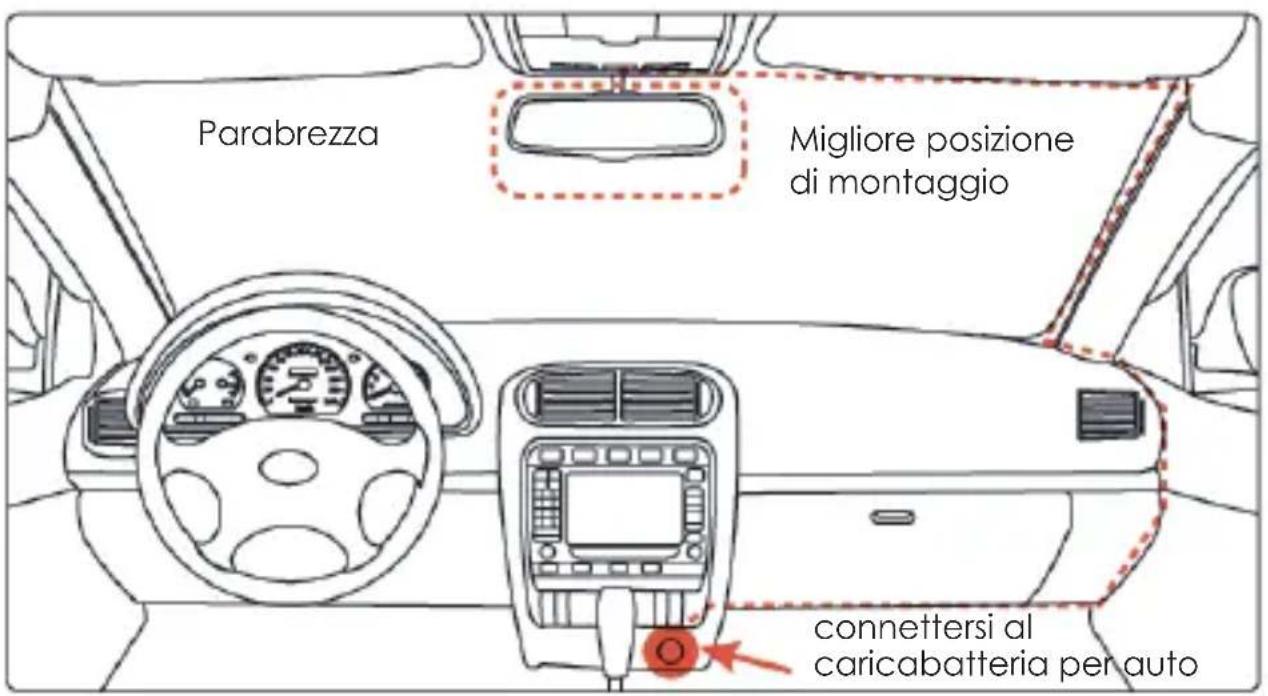
text_image
Technical diagram of a car with numbered parts labeled ① and ②, showing interior compartments and wheelways.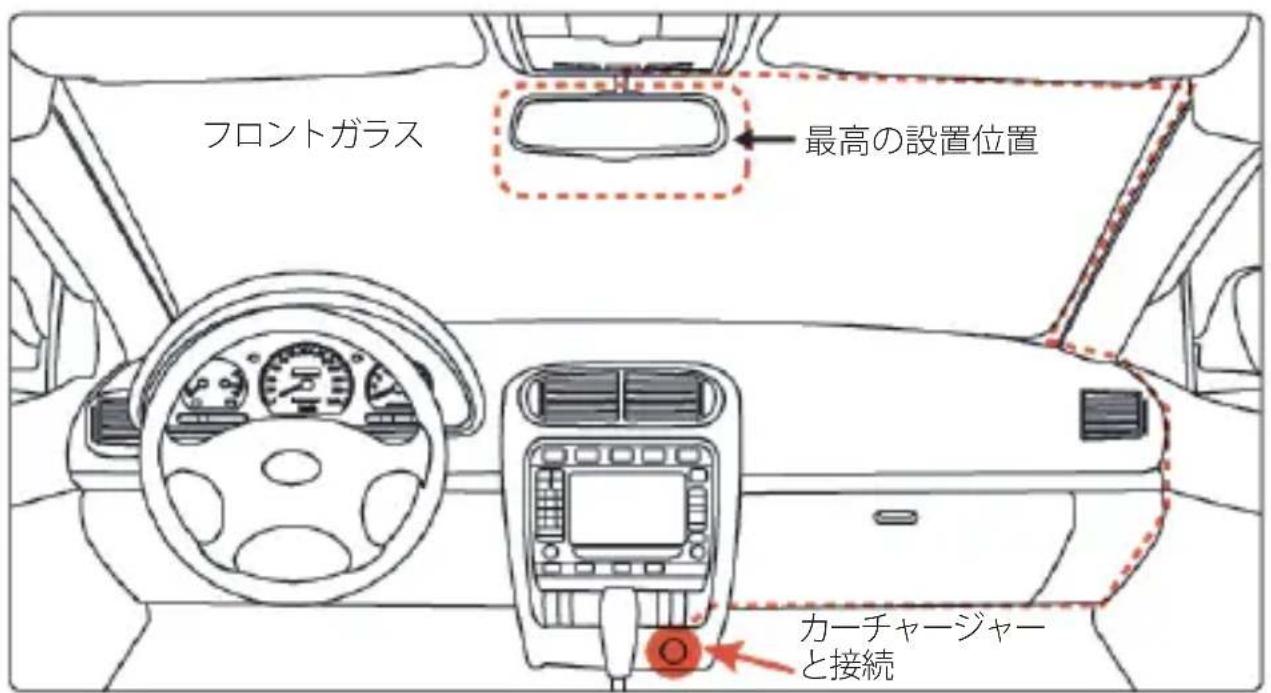
www.aukey.com | support@aukey.com
No.102, Building P09, Electronics Trade Center
Huanan City, Pinghu Town, Longgang District
Shenzhen, Guangdong, 518111, CN


Made in China