
SKRI 2000 A1 - Radio SILVERCREST - Free user manual and instructions
Find the device manual for free SKRI 2000 A1 SILVERCREST in PDF.

| Product type | Under-cabinet radio with iPod/iPhone dock |
| Brand | SILVERCREST |
| Model | SKRI 2000 A1 |
| Dimensions (W x H x D) | Approx. 30 x 15.7 x 8.4 cm |
| Weight | Approx. 1070 g |
| Power supply | 7 V DC, 2 A mains adapter (supplied) |
| Backup battery | 1 x CR2032 (3 V) for clock |
| Remote control battery | 1 x CR2025 (3 V) |
| Radio frequency range | FM: 87.5 - 108 MHz |
| Speaker output power | 2 x 1 W (10% distortion) |
| Power consumption | Operation: approx. 5 W; Standby: approx. 1.8 W |
| Operating temperature | +5 °C to +40 °C |
| Permissible humidity | 5 - 90% (non-condensing) |
| Main functions | FM radio, dual alarm/wake-up, kitchen timer, iPod/iPhone dock, AUX input, sleep function, dimmer |
| Auxiliary audio input | 3.5 mm jack socket (AUX IN) |
| iPod/iPhone compatibility | iPod touch, iPod nano, iPod classic, iPhone (with charging dock) |
| Antenna | FM wire antenna (portable) |
| Mounting options | Under a suspended cabinet (mounting plate supplied) or on fold-down feet |
| Care and cleaning | Disconnect before cleaning; use a soft, dry cloth; avoid moisture |
| Safety | Short-circuit protection, do not expose to water, use only the supplied adapter |
| Warranty | 3 years |
| After-sales service (France) | Tel.: 0800 919270, email: kompernass@lidl.fr |
| Supplied accessories | Mains adapter, mounting plate, brackets, safety bracket, remote control, 3.5 mm jack cable, CR2032 and CR2025 batteries |
Frequently Asked Questions - SKRI 2000 A1 SILVERCREST
User questions about SKRI 2000 A1 SILVERCREST
0 question about this device. Answer the ones you know or ask your own.
Ask a new question about this device
Download the instructions for your Radio in PDF format for free! Find your manual SKRI 2000 A1 - SILVERCREST and take your electronic device back in hand. On this page are published all the documents necessary for the use of your device. SKRI 2000 A1 by SILVERCREST.
USER MANUAL SKRI 2000 A1 SILVERCREST
Operation and Safety Notes
FR BE
Before reading, unfold the page containing the illustrations and familiarise yourself with all functions of the device.
| FR/BE | Instructions d'utilisation et consignes de sécurité | Page 1 |
| NL/BE | Bedienings- en verilgheidsinstructies | Pagina 37 |
| DE/AT/CH | Bedienungs- und Sicherheitshinweise | Seite 73 |
| GB | Operation and Safety Notes | Page 109 |
Sommaire
Introduction 2
Installation et raccordement .8
Preparation de la station support
Installation et raccordement
Accentuation des graves

m = 311 ;
Information for these operating
instructions 110
Copyright 110
Intended use. 110
Warning notices 111
Safety 112
Risks from electric shock. 112
Handling of batteries 112
Basic Safety Instructions 113
Operating components . 114
Setting up and connecting 116
Safety instructions. 116
Items supplied and transport
inspection 116
Unpacking 116
Disposal of the packaging .117
Set-up location requirements. 117
Electrical connection. 117
Appliance battery. 118
Remote Control Battery 118
Installation under a wall cupboard . 119
Disinstallation 120
Setting the appliance up. 120
Preparing the station for
iPod/iPhone 120
Providing mains power. 120
VHF wire antenna. 120
Handling and operation . 121
Switching On and Off 121
Basic settings 121
Activating the settings menu .122
Programming the alarm 126
Kitchen timer. 129
Programming the kitchen timer . . .130
Radio operation 131
Playback of external audio
appliances 134
Connection of iPod/iPhone 134
Additional functions 136
Cleaning 139
Safety instructions. 139
Cleaning the housing 139
Troubleshooting 139
Safety instructions. 139
Malfunction causes and remedies 140
Storage/Disposal. 141
Storage. 141
Disposal of the appliance. 141
Disposing of the batteries. 141
Appendix 141
Information regarding the
EG Declaration of Conformity . .141
Technical data 142
Warranty 143
Service 143
Importer 143
Introduction
Information for these operating instructions
These operating instructions are a component of the Under-Cabinet Radio SKRI 2000 A1 (henceforth designated as the appliance) and they provide you with important information about the intended use, safety, installation and connection as well as operation of the appliance.
These operating instructions must be kept available in the vicinity of the appliance at all times. They are to be read and used by everyone assigned to service and repair faults in the appliance.
Retain these operating instructions and pass them on, with the appliance, to any future owners.
Copyright
This documentation is copyright protected. Any copying or reproduction, including as extracts, as well as the reproduction of images, also in an altered state, is not permitted without the express written consent of the manufacturer.
Intended use
This appliance is intended only for use in the reception of FM radio stations, as a kitchen timer, to give alarms through signal tones, radio or iPod / iPhone and for the connection of external audio appliances (e.g. MP3 player) and iPod / iPhone in indoor areas. The appliance is intended as a free standing unit or for installation under a wall cupboard. For this, the built-in foot-pads resp. the supplied mounting plate must be used. Any other use or uses beyond those mentioned here are considered to be unintended use. This appliance is not intended for use in commercial or industrial environments.
No warranty claims of any kind will be accepted for damage caused by improper use, incompetent repairs, unauthorised modifications or for the use of unapproved replacement parts. The operator bears the risk alone.
Made for
iPod iPhone
"Made for iPod" and "Made for iPhone" means that an electronic accessory has been specifically designed for connection to an iPod or iPhone and the developer guarantees that the appliance complies with the performance standards of Apple. Apple is not responsible for the operation of this appliance or that it complies with safety and regulatory standards. Take note that using this accessory with an iPod or iPhone can affect the wireless performance. iPad, iPhone, iPod, iPod classic, iPod nano, iPod shuffle and iPod touch are trademarks of Apple Inc., registered in the U.S. and other countries. iPad is a trademark of Apple Inc.
Warning notices
In these extant operating instructions the following warning notices are used:

DANGER
A warning at this risk level indicates a threateningly dangerous situation.
In the event that the dangerous situation is not avoided it could lead to death or serious physical injury.
The directives in this warning are there to avoid the risks of death or serious physical injury.

WARNING
A warning at this risk level indicates a possible dangerous situation.
If the dangerous situation is not avoided it could lead to physical injuries.
The directives in this warning are there to avoid personal physical injuries.
IMPORTANT
A warning at this risk level indicates possible property damage.
If the situation is not avoided it could lead to property damage.
The directives in this warning are there to avoid property damage.
NOTICE
A notice indicates additional information that assists in the handling of the appliance.
Safety
In this section you receive important safety information regarding the handling of the appliance.
This appliance complies with the statutory safety regulations.
Incorrect usage can lead to injuries and property damage.
Risks from electric shock

DANGER
Potentially fatal risks from electric shock!
A potentially fatal risk can arise from contact with live wires or components!
Observe the following safety instructions to avoid the risks of electric shock:
- Do not use the appliance if the power adapter, the power cable or the plug are damaged.
- Do not, under any circumstances, open the power adapter. The risk of receiving an electric shock is elevated if the power carrying connections are touched or the electrical or mechanical construction is altered.
Handling of batteries

WARNING
Risks from improper use! The risk of explosions and injuries exists!
For the safe handling of batteries observe the following safety instructions:
Do not throw batteries into a fire.
Do not short circuit batteries.
Do not attempt to recharge batteries.
Regularly check the condition of the batteries. Leaking battery acid can cause permanent damage to the appliance. Special caution should be shown when handling damaged or leaking batteries. Risk of acid burns! Wear protective gloves.
- Store batteries in a place inaccessible to children. If swallowed seek IMMEDIATE medical attention.
If you do not intend to use the appliance for an extended period of time, remove the batteries.
Basic Safety Instructions
For safe handling of the appliance observe the following safety instructions:
Before using it, check the appliance for signs of visible external damage. Do not put into operation an appliance that is damaged or has been dropped.
Damaged cables or connections should be replaced by authorised qualified persons or by the Customer Service Department.
This appliance is not intended for use by individuals (including children) with restricted physical, physiological or intellectual abilities or deficiencies in experience and/or knowledge unless they are supervised by a person responsible for their safety or receive from this person instruction on how the appliance is to be used.
Children should be supervised to ensure that they do not play with the appliance.
Repairs should only be carried out by authorised specialist companies or by the Customer Service Department. Incompetent repairs can result in risks for the user. In addition, warranty claims become void.
Repairs to the appliance during the warranty period may only be carried out by a customer service firm authorised by the manufacturer, if they are not, additional warranty claims can no longer be considered for subsequent defects.
Defective components may only be replaced with original replacement parts. Only by using original replacement parts can it be guaranteed that the safety requirements are being complied with.
- Protect the appliance from moisture and penetration by liquids. Never submerge the appliance under water, do not place the appliance in the vicinity of water and do not place any object filled with liquids (i.e. flower vases) on the appliance.
Do not place any objects on the appliance.
Do not operate the appliance in the vicinity of open flames (i.e. candles).
Avoid direct sunlight.
Always pull on the plug when disconnecting from the mains power socket, never pull on the power cable itself.
In the event of a malfunction occurring or a thunderstorm approaching, remove the plug from the mains power socket.
Operating components
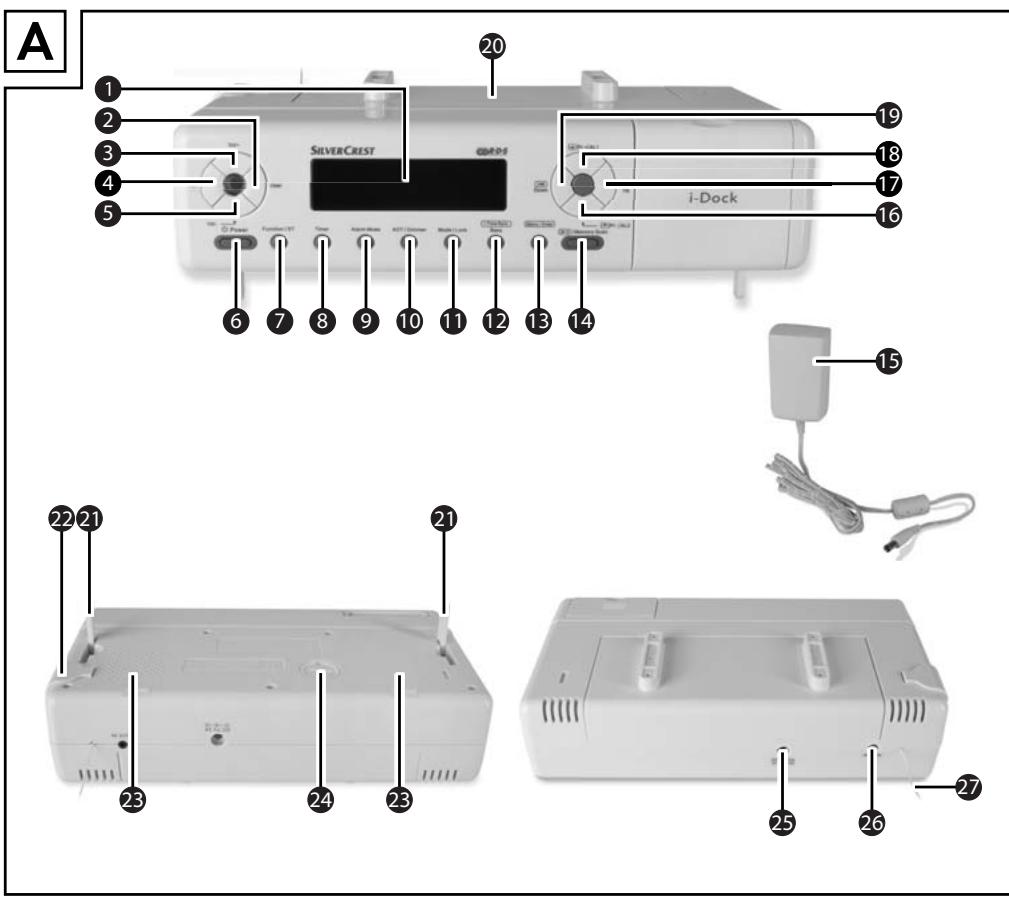
(for illustrations see front fold out side figure A)
1 Display
User: Select user
3 Vol+: Volume increase
4 Mem: Memory storage space selection
5 Vol-: Volume decrease
Power: Switching On and Off
7 Function / ST: Function selection / Stereo activation
8 Timer: Set and activate the timer
9 Alarm Mode: Select alarm type
10 AOT/Dimmer: Switch-off timer/Switch display dimmer on/off
11 Mode/Lock: Call-up settings menu / Button lock
12 i-Time Sync Bass: Synchronise time and date display with iPod / iPhone/ Bass boost
13 iMenu I Enter: Operation of the iPod / iPhone / Input
14 iMemory Scan: Pause/Playback with iPod / iPhone / Automatic radio station search / retrieve preset radio station
15 Connector power pack
16 /Pr-/AL2: Previous function with iPod/iPhone/Call-up previous memory storage space/Set Alarm 2
17 [▶]/Up: Fast forward with iPod/iPhone/Raise reception frequency
13 /Pr+/AL1: Next function with iPod/iPhone/Call-up next memory storage space/Set Alarm 1
19 Down: Fast rewind with iPod/iPhone/Lower reception frequency
20 Mounting plate
21 Foot-pads (hinged)
Securing bracket for iPod/iPhone
25 Speakers
24 Battery compartment
DC-Socket: Current connection socket (7V) for power adapter
26 AUX IN-Socket: Input connection socket for audio appliances with 3.5mm jackplug
27 Wire antenna for VHF reception
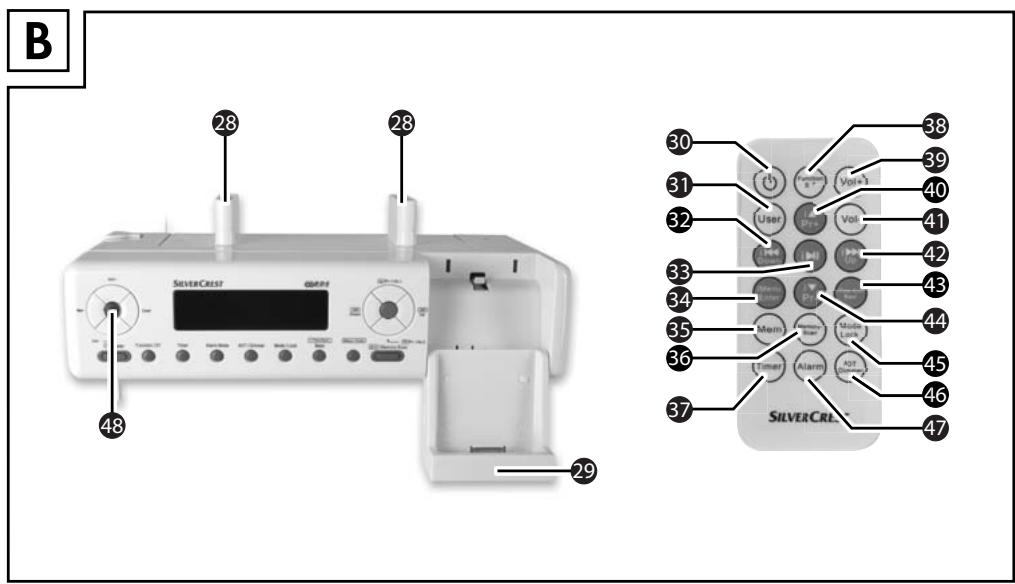
(for illustrations see front fold out side figure B)
28 Spacer (for under-cabinet installation)
29 Station for iPod/iPhone
30 : Switching On and Off
31 User: Select user
i Down: Fast rewind with iPod/iPhone /Lower reception frequency
33 i▶II: Pause/Playback with iPod/iPhone
34 iMenu / Enter: Operation with iPod/iPhone / Input
35 Mem: Memory storage space selection
36 Memory-Scan: automatic radio station search/call-up preset radio station
Timer: Set and activate the timer
38 Function/ST: Function selection / Stereo activation Mode: Setting menu
39 Vol+: Volume increase
40 i▲/Pr+: Next function with iPod/iPhone/Call-up next memory storage space
41 VOL-: Volume decrease
42 i▶/Up: Fast forward with iPod/iPhone/Raise reception frequency
iTime Sync/Bass: Synchronise time and date display with iPod / iPhone / Bass boost
44 i▼/Pr-: Select previous memory storage space / Previous function with iPod/iPhone
45 Mode/Lock: Call-up settings menu / Button lock
46 AOT/Dimmer: Switch-off timer/Switch display dimmer on/off
47 Alarm: Select alarm type
48 Sensor for remote control
Setting up and connecting
Safety instructions

WARNING
Damage may occur to property and injuries to people when taking the appliance into service!
Pay heed to the following safety information to avoid these risks.
- Packaging material should not be used as a play thing by children.
There is a risk of suffocation!
To avoid risks to persons and property, observe the requirements for the
set-up location and the electrical connections.
Items supplied and transport inspection
The appliance is delivered with the following components as standard:
- Under-Cabinet Radio SKRI 2000 A1
Power adapter JVSW0702000 - Mounting plate
4 Securing screws (short) - 2 × Spacers including 4 securing screws (long)
- Securing bracket for iPod/iPhone
- 1 x Battery 3 V Type CR2032
- 1 x Battery 3 V Type CR2025
Remote control - Jackplug cable 3.5 to 3.5 mm( 50 cm)
This operating manual
NOTICE
- Check the contents to ensure everything is present and for signs of visible damage.
If the items supplied are incomplete, or damaged due to defective packaging or transportation, contact the Service Hotline (see chapter Service p. 143).
Unpacking
Remove all appliance parts and the operating instructions from the carton.
Remove all packing material.
Disposal of the packaging
The packaging protects the appliance from transport damage. The packaging materials are selected from the point of view of their environmental friendliness and disposal technology and are therefore recyclable.

The recirculation of packaging into the material circuit saves on raw material and reduces the amount of waste generated. Dispos of packaging material that is no longer needed as per the regionally established regulations.
NOTICE
If possible preserve the original packaging during the warranty period so that, in the event of a warranty claim, you can repackage the appliance ideally for its return.
Set-up location requirements
For the safe and fault free operation of the appliance, the installation location must fulfill the following conditions:
When setting the appliance up, place it on a firm, flat and even surface. Use the hinged foot-pads.
- Set up or mount the appliance in such a way that the extant ventilation openings and the speaker are not covered.
- Do not operate the appliance in a hot, wet or very humid location or in the vicinity of flammable materials.
Do not install the appliance directly over a hotplate.
The mains power socket must at all times be easily accessible, so that the plug can be easily and quickly removed if necessary.
Electrical connection
The appliance is powered with a DC voltage of 7V via the supplied power adapter. Connect the appliance to the mains power supply only via the supplied power adapter.
Before connecting the appliance compare the connection data (Voltage and frequency) on the rating plate with that of your mains electric source. To avoid potential damage to the appliance this data must concur.
Protect the connection cable against hot surfaces and sharp edges.
Ensure that the connection cable is not tightly stretched or kinked.
- Do not allow the connection cable to hang over edges (Tripwire effect).
If you do not intend to use the appliance for an extended period, disconnect the plug from the mains power supply.
Appliance battery
With the insertion of a battery you can avoid the loss of programmed times and dates plus alarm times in the event of a possible power failure. The battery ensures that the internal clock and date continue to run even during a power failure. The display will then automatically show the correct time on the restoration of mains power.
NOTICE
The appliance can also be operated without a battery.
Inserting / replacing the battery
Open the cover of the battery compartment 24 on the underside of the appliance by turning the cover with a coin as far as it will go to the left and then lifting it off.
Insert the battery type CR2032 (supplied) into the battery compartment. The side with the marking ^+ points upwards.
Close the battery compartment by attaching the cover and then, using a coin, turn it all the way to the right.
Remote Control Battery
Activating the battery
The remote control battery is already inserted when delivered.
Activate the battery by removing the isolation strip.
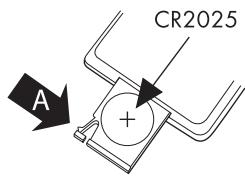
Changing the battery
Using a fingernail press the recess (A) to the right and, at the same time, pull the battery compartment out.
Insert a 3 V battery of type CR 2025 in the battery compartment. The side with the marking "+" must point upwards.
Slide the battery compartment completely back into the remote control.
Installation under a wall cupboard
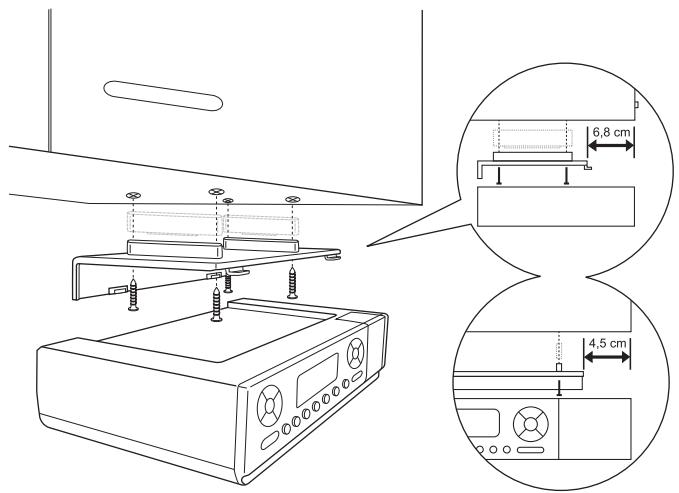
With the supplied mounting plate 20 you can install the appliance under, for example, a wall cupboard. For the installation of the appliance proceed as follows:
Slide the mounting plate 20 to the rear and remove the mounting plate 20.
Select a suitable installation location for the appliance (see also the section Set-up location requirements p. 117).
Hold the mounting plate 20 under the installation location. Thereby the front edge of the mounting plate 20 should be approx. 6.8~cm behind the front of the cupboard so that, after the installation, the appliance is flush with the cupboard. The side edges of the mounting plate 20 must have a spacing of about 4.5~cm to adjacent cabinets or walls.
NOTICE
If you wish to install the unit flush to the left on an adjacent cabinet or a wall, remove the safety clip 2 from the appliance beforehand.
Mark the 4 securing points with a pencil.
Using a spike or nail, make a small depression at the respective marking points.
If wished, insert the supplied spacer 23 with the retaining lug into the respective depression on the mounting plate 20.
Firmly screw the mounting plate 20 on with the supplied screws (see illustration).
Place the appliance aslant, with the front recesses in the top face of the appliance, in the mounting plate 20. Press the rear part of the appliance upwards against the mounting plate 20 until the appliance audibly locks into place.
Check to ensure that the appliance is securely seated.
Disinstallation
Pull the appliance forwards and remove the appliance downwards.
Unscrew the screws on the mounting plate 20 and remove the mounting plate 20.
Setting the appliance up
As an alternative you can stand the appliance on a level surface. In order to avoid the ventilation slots and speaker 23 on the bottom of the appliance being covered, the two foot-pads 21 on the appliance must be hinged outwards:
Reach into the recess on the side of the respective foot-pad and pull the hinged foot out as far as it will go.
Select a suitable installation location for the appliance (see also the section Set-up location requirements p. 117).
Preparing the station for iPod/iPhone
You can connect your iPod/iPhone to the appliance. For this you must fold the station 29 down and install the locking clip 22:
Fold the station 29 all the way down.
Remove the locking clip 22 from the side of the appliance.
On each side of the station 29 there is a recess. Slide the locking clip 27 from the front onto the station 29 so that the retaining lugs engage in the recesses.
Providing mains power
Connect the connector plug of the power adapter 15 into the DC socket 25 on the rear panel of the appliance.
Insert the power adapter 15 into a mains power socket.
VHF wire antenna
Unwind the wire antenna 27 completely for VHF reception.
Handling and operation
In this section you receive important information for the handling and operation of the appliance.
Switching On and Off
After connecting the appliance to the mains power supply, it automatically starts the setting system. In the display ① the text "PLEASE WAIT FOR SETTING THANKS" appears for about 3 to 5 minutes. Should a signal be received during this period, the system is updated automatically.
NOTICE
To cancel this process, press any button. The system then starts with the following default settings:
Date/Time 0101201200:00
Radio is switched off
Clock mode/Standby operation is active
Display dimmer is active
With connection to the mains power supply, the appliance switches to clock/ standby operation. The appliance can be switched on or off via the button 1 Power 6 or the 1 -button 30 on the remote control.
Using the button Function/ST 7 or the button Function/ST 38 on the remote control, you can switch back and forth between the modes radio, iPod and AUX.
NOTICE
The button (1) Power 6 or the (1) -button 30 on the remote control do not completely disconnect the appliance from the mains power supply. The appliance also consumes power when in standby-mode. To completely disconnect the appliance from the mains power supply, the power adapter 15 must be removed from the mains power socket.
Basic settings
After the appliance has been connected to the mains power supply it shows the time of day and the day of the week in the display ①. The appliance is in the operational mode clock/standby operation.
Activating the settings menu
To activate the settings menu, in the mode clock/standby operation press the button Mode / Lock 11 or the button Mode Lock 45 on the remote control. The time of day, shown in the display 1, begins to blink. Each further actuation of the button Mode / Lock 11 or 45 switches to the next setting potential. The menu item sequence is:
- Setting the time of day
- Setting the date
- Setting the memory function
- Set the Update Mode
- Switch display dimmer on/off
- Set display dimmer start time
- Setting the time of day format
NOTICE
The setting menu ends automatically if you do not actuate any buttons for approx. 15 seconds. The executed setting(s) is/are saved.
Setting the time
Prerequisite: The appliance is in the operational mode clock/standby operation.
Press the button Mode/Lock 1 or the Mode Lock button 45 on the remote control once. The time of day indicator begins to blink.
Using the buttons [1 1] / Up 17 and [1 1] / Down 19 or the 1 / Up 42 and 1 / Down 32 on the remote control, set the current time. With each press on the button the time of day changes by one minute. Holding the respective button down for more than 2 seconds starts the speed setting.
Press the button Mode/Lock 1, or the Mode Lock 45 button on the remote control, once again to save the current setting and move on to the next menu item.
NOTICE
The time of day will revert back to 00:00 if the appliance is disconnected from the mains power supply and no battery is inserted or if the battery is too weak.
Setting the date
Prerequisites: The appliance is in the operational mode clock/standby operation.
Press the button Mode/Lock 10, or the Mode Lock 45 button on the remote control, twice. The date indicator begins to blink.
Using the buttons /Up17 and /Down19 or the /Up42 and /Down buttons 32 on the remote control, set the current date. With each press of the button the date is changed by one day. The weekday indicator changes automatically. Holding the respective button down for more than 2 seconds starts the speed setting.
Press the button Mode/Lock 10, or the Mode Lock 45 button on the remote control, once again to save the current setting and move on to the next menu item.
NOTICE
The date will revert back to 010120 if the appliance is disconnected from the mains power supply and no battery is inserted or if the battery is too weak.
Setting the memory function
You can set up to 6 dates on which an automatic reminder will be triggered. The function SDA (Special Day Alert) is useful as a reminder, for example, of birthdays or other recurring events. The reminder occurs every year on the same date. On these dates an alarm tone is sounded for 10 minutes, every hour on the hour, from 08:00 to 23:00.
Prerequisite: The appliance is in the operational mode clock/standby operation.
Press the button Mode/Lock 10, or the Mode Lock 45 button on the remote control, three times. The current setting of the selected reminder dates is shown alternating with the indicator S3R. Next to the indicator S3R is the number of the memory slot for that date. Possible classifications are S3R to S3R6.
Using the button 1 2 /Memory Scan 14, or the Memory-Scan 36 button on the remote control, select storage slot of the date to be set.
Using the buttons /Up17 and /Down19 or the /Up42 and /Down32 buttons on the remote control, set the current date for this memory slot. With each press of the button the date is changed by one day. Holding the respective button down for more than 2 seconds starts the speed setting.
NOTICE
Press the button Timer 8, or the Timer 37 button on the remote control, to ignore the year. In the display 1 only the day and the month are indicated. The memory function will then be activated every year on this date.
Press the button Mode/Lock 1, or the Mode Lock 45 button on the remote control, once again to save the current setting and move on to the next menu item.
Set the Update Mode
Prerequisite: The appliance is in the operational mode clock/standby operation.
Press the button Mode/Lock 10, or the Mode Lock 45 button on the remote control, four times. In the display 1 appears UP IRTE and a blinking clock symbol 日
Press the button [口] 口 /Down 19, or the button [口] 口 /Down 32 on the remote control, to switch the automatic RDS function off. The blinking clock symbol extinguishes.
Press the button [1] [1]/Up[7] , or the button I / Up42 on the remote control, to activate the automatic RDS function. The blinking clock symbol appears.
Press the button Mode/Lock 1, or the Mode Lock 45 button on the remote control, once again to save the current setting and move on to the next menu item.
Switching time controlled display dimming on/off
Prerequisite: The appliance is in the operational mode clock/standby operation.
This appliance has two options for display dimming.
- Time controlled display dimming
- Setting the display dimming manually (see also chapter Switching the display dimmer on/off manually S. 138).
Press the button Mode/Lock 1, or the Mode Lock 45 button on the remote control, five times. The current setting of the display dimmer appears (J T ON or J T OFF).
Using the button [1 1] / Up 17 , or the 1 / Up 42 button on the remote control, select "ON", the display light extinguishes after 15 seconds.
Using the button 11 - 1 /Down 19,or the 11 - 1 /Down 32 button on the remote control,select "FF",the display light now glows continuously.
Press the button Mode/Lock 1, or the Mode Lock 45 button on the remote control, once again to save the current setting and move on to the next menu item.
| Mode | Display Indica-tor | Display lighting | Control with the button AOT/Dimmer 10 or 45 | |
| Time controlled Dimmer OFF | DT OFF | Is set by the AOT / Dimmer button | DIM OFF: Display lighting glows continuously DIM ON: Display lighting off; press any button and the display lighting switches on for 15 seconds. | |
| Time controlled Dimmer ON | DT ON | Off by default, from 23:00 to 05:59 | 23:00 pm - 05:59 am | Press any button and the display lighting switches on for 60 seconds. |
| 06:00 am - 22:59 pm | DIM OFF: Display lighting glows continuously DIM ON: Display lighting off; press any button and the display lighting switches on for 15 seconds. | |||
Setting the display dimmer start time
Prerequisite: The appliance is in the operational mode clock/standby operation.
Press the button Mode/Lock 10, or the Mode Lock 45 button on the remote control, six times. The current start time of the display dimmer (23:00) is shown alternating with the indicator 3T 5T 8R7.
Using the buttons 11 > 1 / Up 17 and 11 < 1 / Down 19 , or the / Up 42 and / Down 32 buttons on the remote control, set the desired start time. With each press on the button the start time changes by one minute. Holding the respective button down for more than 2 seconds starts the speed setting.
Press the button Mode/Lock 10, or the Mode Lock 45 button on the remote control, once again to save the current setting and move on to the next menu item.
Setting the time of day format
Prerequisite: The appliance is in the operational mode clock/standby operation.
Press the button Mode/Lock 10, or the Mode Lock 45 button on the remote control, seven times. The current setting for the time of day format is shown (24 HOUR = 24 hour format or 12 HOUR = 12 hour format).
Using the button 1 1 / Up 17 , or the button 1 / Up 42 on the remote control, change the time format to 12 HOUR if you want a clock display in 12-hour format.
Using the button / Down19 , or the / Down32 button on the remote control, change the time format to 44 HOUR, if you want a clock display in 24-hour format.
Press the button Mode/Lock 10, or the Mode Lock 45 button on the remote control, once again to save the current setting and to return to the basic settings.
Programming the alarm
This appliance has two alarms available. All settings for both alarms can be carried out independently of each other. When programming the alarm times you can select whether at the programmed time an alarm tone should sound, the radio should start playing or the iPod/iPhone should switch on.
NOTICE
If, during alarm programming, a further button is not pressed within approx. 15 seconds, the alarm will activate with the current settings.
Setting alarm times
Press the button Alarm Mode 9, or the button Alarm 47 on the remote control. The set alarm time of the respective alarm is shown blinking in the display 1 and the indicator 1 resp. 2 appears. The weekdays on which this alarm is activated are shown above the time indicator.
Using the buttons 17 /Up and 19 /Down 19, or the /Up 42 and /Down 32 buttons on the remote control, set the desired alarm time. With each press on the button the alarm time changes by one minute. Holding the respective button down for more than 2 seconds starts the speed setting.
Setting the weekdays
In alarm-mode, press the button Function/ST ⑦, or the button Function/ST ③8 on the remote control, to toggle between the weekday combinations Mon-Fri, Sat-Sun or Mon-Sun. The respective selected combination is indicated above the alarm time.
Press and hold the button Function/ST 7, or the Function/ST 38 button on the remote control, for at least 2 seconds, so as to switch between the weekday combinations and adjustment options for an individual weekday.
NOTICE
- With the adjustment options for an individual weekday, switch between the weekdays with the button Function/ST ⑦, or the button Function/ST ③ on the remote control.
Setting the alarm with an alarm tone
To select an individual "alarm tone" option for the respective alarm, in alarm-mode press the button / Pr + / AL1 13 or the button / Pr - / AL2 16 resp. the button Pr + 40 or the button Pr - 44 on the remote control, until in the display 1 the symbol appears.
Setting the alarm with radio
If it is intended that the radio switches on at the alarm time, carry out the following settings before activation of the alarm:
Switch the radio on by pressing the button (1) Power (6) , or the (1) button (30) on the remote control, and with the button Function / ST (7) , or the button Function / ST (38) on the remote control, select the operating mode radio.
Select the radio station with which you wish to be woken (see chapter Manual station selection p. 132 or Search for the next station p. 132).
With the buttons Vol+ 3 and Vol- 5, or the buttons Vol+ 39 and Vol- 41 on the remote control, set the desired sound volume level (see chapter Adjusting the volume p. 132).
Switch the radio off by pressing the button 心 Power 6, or the 心 button 30 on the remote control.
To select the "radio" option for the respective alarm, in alarm-mode press the button 4 /Pr+/AL1 18 or the button 4 /Pr-/AL2 16 resp. the button 4 Pr+ 40 or the button 4 Pr- 44 on the remote control, until in the display 1 the symbol 4 appears.
Setting the alarm with iPod/iPhone
If it is intended that the iPod/iPhone switches on at the alarm time, carry out the following settings before activation of the alarm:
Switch the appliance on by pressing the button (1) Power (6) , or the (1) button (39) on the remote control, and with the button Function/ST (7) , or the button Function/ST (38) on the remote control, select the operating mode (PO) .
Insert your iPod and/or iPhone into the station 29.
Select a title (or an album or playlist) on your iPod / iPhone.
With the buttons Vol+ 3 and Vol- 5, or the Vol+ button 39 and the Vol- button 41 on the remote control, set the desired sound volume level (see chapter Adjusting the volume p. 132).
Switch your iPod / iPhone in the pause mode, or switch the power off.
Switch the mode iPod off by pressing the button 巧 Power or the 巧 button on the remote control.
To select the "iPod" option for the respective alarm, press the button / Pr + / AL1 18, or the button / Pr - / AL2 16 resp. the Pr+ Taste 40 or the Pr- button 44 on the remote control, until in the display 1 the symbol appears.
Switching the alarm off
To switch an individual alarm off, in alarm-mode press the button / Pr + / AL1 13, or the button / Pr - / AL2 15 resp. the Pr+ button 40 or the - button 44 on the remote control, until in display 1 a symbol no longer appears.
When the alarm time has arrived
NOTICE
- When the alarm time is reached, the switch off timer (if enabled) is immediately terminated.
With the setting "Alarm with an alarm tone", a signal tone sounds. The volume of the signal tone will continually increase until the maximum sound volume level has been reached. The duration of the alarm signal is limited to 10 minutes. The radio is thereby switched to "mute".
With the setting "Alarm with Radio" the radio will be switched on. The previously selected station will be activated for a maximum of 60 minutes at the set volume.
With the setting "Alarm with iPod/iPhone" the iPod/iPhone will be switched on. Playback starts with the last selected title and is played at the set volume for a maximum of 60 minutes.
Press any button to end the currently sounding alarm.
NOTICE
The alarm becomes active again when the next alarm time has arrived (i.e. on the next day).
Kitchen timer
The appliance has a convenient kitchen timer with which, for example, cooking and baking times can be monitored. The programmable time range of the kitchen timer lies between 1 minute and 23 hours, 59 minutes.
Setting the kitchen timer
Press the button Timer 8, or the button Timer 37 on the remote control. The indicator shows 00:05. In the display the cooking pot symbol for the kitchen timer is faded in.
Using the buttons 17 /Up and Down or the Upbutton and the Down-button on the remote control, set the desired running time for the kitchen timer. With each press on the button the start time changes by one minute. Holding the button down for more than 2 seconds starts the speed setting.
NOTICE
If, during the setting, approx. 15 seconds passes without any changes taking place, the appliance reverts back to the previous operational mode.
Starting the kitchen timer
After setting the time, press the button Timer 8, or the button Timer 37 on the remote control, once again. The displayed time begins to run backwards. In the display a backwards-running clock (1) is blended in.
NOTICE
If, during the operation of the kitchen timer, another function is selected, the indicator of the remaining time is faded out. The cooking pot symbol and the backwards-running clock 1 continue to be indicated in the display 1. Press the button Timer 8 or the button Timer 37 on the remote control once again to display the remaining time for the kitchen timer for about 10 seconds.
30 seconds before the kitchen timer run time has expired the appliance begins to acoustically indicate, with individual signal tones, the arrival of the set time. The intervals between the individual tones will be ever shorter. When the set time has elapsed, the alarm signal of the kitchen timer sounds as a continuous tone for a maximum of 60 minutes.
Press the button Timer 8, or the button Timer 37 on the remote control, to switch the alarm signal of the kitchen timer off.
Interrupting the kitchen timer.
When the kitchen timer is running, press the button Timer ⑧, or the button Timer ③7 on the remote control. The kitchen timer is interrupted. The indicated remaining time begins to blink.
NOTICE
After approx. 15 seconds the appliance reverts back to the previous operational mode. Press the button Timer ⑧, or the button Timer ③7 on the remote control, once again to display the remaining time to elapse on the kitchen timer.
To restart the kitchen timer, press the button Timer 8, or the button Timer 37 on the remote control, once again. The kitchen timer restarts.
To switch the kitchen timer off before the expiry of the set period, press and hold the the button Timer 8, or the button Timer 37 on the remote control, until in the display 1 the cooking pot symbol and the backwards running clock are no longer indicated.
NOTICE
The kitchen timer is switched off immediately in the event of an alarm becoming active.
Programming the kitchen timer
So that it is no longer necessary to continually re-enter them, you can preprogramme the kitchen timer with the most frequently used time periods. Up to 6 time periods can be preprogrammed. By default, the six memory slots are preprogrammed with 5/10/15/20/25/30 minutes.
For the programming of the kitchen timer proceed as follows:
Press the button Timer 8, or the button Timer 37 on the remote control, to activate the kitchen timer.
Using the buttons [1 1] / Up 17 and [1 1] / Down 19 , or the 1 / Up- button 42 and the 1 / Down- button 32 on the remote control, set the desired running time for the kitchen timer. With each press on the button the start time changes by one minute. Holding the button down for more than 2 seconds starts the speed setting.
Press the button Function/ST 7, or the button Function/ST 38 on the remote control, to activate the kitchen timer. Next to the time display a blinking T is indicated, next to it appears a number I for the first timer.
Using the buttons /Pr+/AL1 18 and /Pr-/AL2 16, resp. the Pr+ button 40 or the Pr- button 42 on the remote control, select the memory slot for the interval to be saved, between T1 and T5.
Press the button Function/ST 7, or the button Function/ST 38 on the remote control, once again to programme the set time onto the selected memory slot. The blinking element is now indicated as a constant.
Repeat the process for the other memory slots.
Accessing the kitchen timer
To access a programmed time for the kitchen timer proceed as follows:
Press the button Timer 8, or the button Timer 37 on the remote control, to activate the kitchen timer.
Using the buttons /Pr+/AL1 18 and /Pr-/AL2 16, resp. the Pr+ button 40 or the Pr- button 44 on the remote control, select the memory slot between T and T for the required timer interval.
Press the button Timer 8, or the Timer button 37 on the remote control, once again to start the kitchen timer.
Radio operation
NOTICE
For good radio reception the wire antenna must be completely uncoiled. Adjust the antenna, whilst in radio operation, for the best reception.
The technical realities of the appliance allow for tuning reception frequencies outside of the permitted VHF (FM) range of 87.5 to 108 MHz. Deviating national regulations may apply in various countries to the allocated radio frequency ranges. Please note that information received outside of the assigned radio frequency ranges may not be exploited, passed on to third parties or otherwise misused.
Switching the radio on/off
Press the button Power 6, or the -Taste 30 on the remote control. The display 1 indicates the mode in which the appliance is currently in.
Press the button Function/ST 7, or the button Function/ST 38 on the remote control, several times to select the radio function. The display shows the reception frequency of the selected radio station.
Switch the radio off by pressing the button (1) Power (6) , or the (1) -button (30) on the remote control, once again. The appliance switches back to the operational mode clock/standby operation. The current time of day is shown.
Adjusting the volume.
Using the buttons Vol+ 3 and Vol- 5, or the Vol+ button 39 and Vol- button 41 on the remote control, set the desired sound volume level. The sound volume level will be indicated in the display 1. You can select a sound volume level between VCL. 0 and VCL. 32.
Manual station selection
Using single presses on the buttons [1 1] / Up 17 and [1 1] / Down 19 , resp. the 1 / Up -button 12 and the 1 / Down -button 32 on the remote control, select the desired radio station. The frequency of the station is shown in the display ① . During the tuning the speaker is switched off.
Search for the next station
The appliance can automatically search for the nearest station.
Press and hold the buttons [1] [1] /Up 17 and [1] [1] /Down 19, resp. the /Up-button 12 and the /Down-Taste 32 on the remote control, for at least two seconds. The appliance searches for the nearest station with sufficient reception quality.
Repeat this process until you have found the station you are looking for.
Selecting the user
Prerequisite: The appliance is in the radio operational mode.
Press the button User 2, or the User button 31 on the remote control, to select the desired user. The current user, R to J, is indicated in the display 1 for 10 seconds.
Press the buttons 1A / Pr + / AL1 18 and / Pr - / AL2 16 resp. the Pr+ button 40 or the Pr- button 42 on the remote control, to choose a preselected memory slot between 31 and 55.
NOTICE
Every user has 15 memory slots available. The first memory slot for user A is preset by the manufacturer.
Saving stations manually
Prerequisite: The appliance is in the radio operational mode.
The appliance provides 60 memory slots (4 users each with 15 memory locations) for transmitter frequencies. To save a station frequency proceed as follows:
Tune, as described previously, the desired station.
Press the button Mem 4, or the Mem button 35 on the remote control. The symbol MEM, the user R and the memory slot I appear in the display 1.
Press the button User 2, or the User button 31 on the remote control, until the desired user (R - T) is indicated.
Using the buttons 14 / Pr + / AL1 18 or 15 / Pr - / AL2 16, resp. the Pr+ button 40 or the Pr- button 44 on the remote control, select the desired memory slot for the set transmitter between 0 and 15.
Press the button Mem 4, or the Mem button 35 on the remote control. The reception frequency of the tuned station is saved on the selected memory slot.
Access saved stations
Prerequisite: The appliance is in the radio operational mode.
Press the button User 2, or the User button 3 on the remote control, until the desired user (R - J) is indicated.
Using the buttons /Pr+/AL1 18 or /Pr-/AL2 16 resp. the Pr+ button 40 or the Pr- button 44 on the remote control, select the memory slots for the saved radio transmitters between 0 and 5.
Automatic station search (AMS function)
Prerequisite: The appliance is in the radio operational mode.
To allocate the memory slots to the station frequencies with the strongest receivable signals, an automatic station search can be carried out.
NOTICE
- With the carrying out of the following described function all previously saved stations will be lost.
Press and hold the button 14 , or the Memory-Scan button 36 on the remote control, for at least three seconds. The appliance begins the station search and allocates the stations found to the memory slots R0 to J5.
On completion of the station search, by a single press on the button II / Memory~Scan~14 , or Memory Scan button 36 on the remote control, you can playback all the saved radio stations between R0 and 15 for 10 seconds.
NOTICE
If more than 60 stations are found, only the first 60 reception frequencies will be saved.
If less than 60 radio stations are found, the last memory slots remain unchanged.
Playback of external audio appliances
Connect an external audio appliance, for example, an MP3 player to the 3.5 mm jackplug socket AUX IN 26 on the rear panel of the appliance.
Press the button Power 6, or the button 30 on the remote control. The display 1 indicates the mode in which the appliance is currently in.
Press the button Function/ST 7, or the button Function/ST 38 on the remote control, several times to select the function RU.
Start playback of the external audio appliance and set the volume as required.
NOTICE
Follow the operating instructions for the external audio appliance.
Connection of iPod/iPhone
With the station 29 you can use the appliance as a speaker for your iPod/ iPhone. When you insert the iPod/iPhone in the station it will, in addition, be automatically charged.
iMenu
Prerequisite: The appliance is in the operational mode iPod.
Press the button iMenu I Enter 13 to activate menu management for the iPod/iPhone.
With this, the following functions can be executed:
| Button | Function |
| i▼/Pr- /AL2 16 | Next function |
| i▲/Pr+/AL1 18 | Previous function |
| i-Time Sync Bass 12 | Synchronise the date and time display of the appliance with the time on the iPod/iPhone |
| i▶II / Memory Scan 14 | Stop/continue playback |
| i↓←/Down 19 | Fast rewind |
| i→↑/Up 17 | Fast forward |
| iMenu I Enter 13 | brief press: back to menu long press: confirm selection |
Playback of music
Prepare the docking station 29 as described in the chapter Preparing the station for iPod/iPhone on p. 120.
Insert your iPod and/or iPhone into the station 29.
Press the button (1) Power 6, or the (1) -button 39 on the remote control. The display 1 indicates the mode in which the appliance is currently in.
Press the button Function/ST ⑦, or the button Function/ST ③8 on the remote control, several times to select the function IPOJ.
Select a title (or an album or playlist) on your iPod / iPhone.
Press the button [i▶II]/Memory Scan 14 or the -button 33 on the remote control to start or stop playback.
Charging the iPod/iPhone
If your iPod/iPhone is inserted into the station 29 it will charge automatically until the battery is full.
NOTICE
The iPod/iPhone will not charge via the back-up battery.
Setting the Time/i-Time Synchronisation
The iTime Sync function allows you to synchronize the time and date on the appliance with the time and date on your iPod or iPhone (iPod Touch, iPod Nano and iPod Classic); older iPod models such as iPod mini do not support this function).
Insert your iPod and/or iPhone into the station 29.
Press the button i-Time Sync Bass 12 or the button iTime Sync Bass 43 on the remote control. The time and date on the iPod or iPhone will be transferred to the appliance. After the synchronisation is completed, a signal tone sounds.
NOTICE
The time on the iPhone will be updated continuously over the cell phone towers. The time on the iPod corresponds only to the time on your computer after the last synchronisation. It is possible to have a time difference of 59 seconds between the appliance and the synchronised iPod/iPhone.
Additional functions
Stereo function
The appliance supports stereo function. The standard setting is Stereo on. To change the stereo function, proceed as follows:
Press and hold the button Function/ST 7, or the button Function/ST 38 on the remote control, until the current setting of the stereo function is indicated in the display 1 (S ON or S OFF).
Press and once again hold the button Function/ST ⑦, or the button Function/ST ③3 on the remote control, to change the setting.
NOTICE
- With the stereo reception of a radio transmitter and an activated stereo feature, there appears in the display ① for 3 seconds the indicator icon.
Button lock
You can lock the buttons of the appliance so that settings cannot be altered by unauthorised people.
Press and hold the button Mode/Lock 1, or the Mode Lock button 45 on the remote control, for at least two seconds to switch the button lock either on or off. When the button lock is switched on, in the display 1 the symbol appears.
To release the lock, press and hold the button Mode/ Lock 10, or the Mode Lock button 45 on the remote control, for at least two seconds.
Bass accentuation
With the bass accentuation you can switch on an enhanced playback of the low frequencies.
For about 2 seconds press the button i-Time Sync Bass 12, or the button iTime Sync Bass 43 on the remote control, to switch the bass accentuation on or off. With bass accentuation switched on, the symbol BASS appears in the display.
Alternating display
Prerequisite: The appliance is in the operational mode clock/standby operation.
Press the button [11 /Down19] or the Down button 2 on the remote control, the date and time are indicated alternately.
Press the button [11 / Down 19] , or the / Down button on the remote control, once more and only the time is indicated.
Prerequisite: The appliance is in the radio operational mode.
By pressing the button Mode/Lock 1, or the Mode Lock button 45 on the remote control, the reception frequency resp. the station name (for RDS reception) and the time are displayed alternately.
Press the button Mode/ Lock 10, or the Mode Lock button 45 on the remote control, once more to only indicate the time.
Press the button Mode/Lock 11 or the Mode Lock button 45 on the remote control, once more to indicate only the reception frequency resp. the station name (for RDS reception).
Automatic switch off (Sleep function)
With the sleep function the appliance switches itself off after a time lapse of between 5 and 90 minutes.
Press the button AOT/Dimmer 10, or the AOT Dimmer button 46 on the remote control, to call the function up. The currently remaining time until the radio switches itself off is shown.
Press the button AOT/Dimmer 10, or the AOT Dimmer button 46 on the remote control, repeatedly to set the desired time period. After about 15 seconds the appliance returns to an indication of the selected mode.
NOTICE
- The setable time period ranges from 90 to 5 minutes. The setting takes place in stages of 5 minutes. Afterwards, the indicator OFF appears. With the indicator OFF the sleep function is switched off.
- Should the appliance be in the mode clock/standby operation, by pressing the button AOT / Dimmer 10 or the AOT Dimmer button 45 on the remote control, you switch the appliance into the last selected mode (radio / iPod / AUX).
Switching the display dimmer on/off manually
Press and hold the button AOT/Dimmer 10, or the AOT Dimmer button 46 on the remote control, until in the display 1 the current setting of the display dimmer is indicated (JIM ON or JIM OFF).
Press and hold the button AOT/Dimmer 10, or the AOT Dimmer button 46 on the remote control, once again to change the current setting (see also the chapter Switching time controlled display dimming on/off p. 124). After about 15 seconds, the last indicated screen display reappears.
Cleaning
Safety instructions

DANGER
Potentially fatal risk from electric shock!
- Remove the plug from the mains power socket before you start cleaning the appliance.
IMPORTANT
Damage to the appliance!
To avoid irreparable damage, ensure that no moisture can get inside the appliance when you are cleaning it.
Cleaning the housing
Clean the surfaces of the appliance with a soft, dry cloth.
Troubleshooting
In this section you receive important information for the localisation and remedying of malfunctions. Observe these instructions to avoid risks and damage.
Safety instructions

WARNING
Pay heed to the following safety information to avoid risks and property damage:
- Repairs to electronic appliances may only be carried out by specialists who have been trained by the manufacturer. Considerable risk for the consumer and damage to the appliance can occur as a result of incompetent repairs.
Malfunction causes and remedies
The following table will help with the localising and remedying of minor malfunctions:
| Defect | Possible cause | Solution |
| The display is showing nothing. | The power adapter 15 has not been connected. | Insert the power adapter 15 into a mains power socket. |
| The mains power socket is not supplying any power. | Check the circuit fuse. | |
| No sound | The volume is set to minimum. | Increase the sound volume with the button Vol+ 3. |
| The appliance is in the operational mode clock/ standby operation. | With the button Power switch the appliance into the operating mode Radio/iPod/Aux. | |
| Playback of the external audio appliance has not started. | Start playback of the external audio appliance. | |
| Playback of the iPod/iPhone has not started. | Start playback of the iPod/iPhone. | |
| The iPod/iPhone is not properly inserted into the station 29 | Insert the iPod/iPhone correctly into the station 29. | |
| Noisy radio reception | The radio station is not properly tuned in. | Using the buttons Up 17 and Down 19, tune the radio station in to the ideal reception. |
| Reception is too weak. | Try to improve reception by moving the wire antenna 27. | |
| iPod/iPhone is not being charged | The iPod/iPhone is not properly inserted into the station 29. | Insert the iPod/iPhone correctly into the station 29. |
| The alarm with iPod/iPhone has not functioned | The selected playlist on your iPod/iPhone is empty. | Ensure that the playlist contains music. |
NOTICE
If you cannot solve the problem with the aforementioned methods, please contact the Customer Service Department.
Storage / Disposal
Storage
If you do not intend to use the appliance for an extended period of time, disconnect it from the mains power supply, remove the battery and store it at a clean, dry location that is not subjected to direct sunlight.
Disposal of the appliance

Do not dispose of the appliance in your normal domestic waste. This product is subject to the provisions of European Directive 2002/96/EC-WEEE (Waste Electrical and Electronic Equipment).
Dispose of the appliance through an approved disposal centre or at your community waste facility. Observe the currently applicable regulations. In case of doubt, please contact your waste disposal centre.
Disposing of the batteries
Batteries must not be disposed of in your household waste. Every consumer is statutorily obliged to dispose of batteries at a collection centre in his/her community/district or a at a dealer. This obligation is intended to ensure that batteries are disposed of in an environmentally friendly manner. Dispose of batteries only when they are fully discharged.
Appendix
Information regarding the EG Declaration of Conformity
This appliance complies with, in regard to conformance to the basic requirements and other relevant regulations, the European Directive for Electromagnetic Compatibility 2004/108/EC, the Low Voltage Directive 2006/95/EC as well as the Eco-Design Directive 2009/125/EC (Supplement 1275/2008 Appendix II, Nr.1).
The complete original Declaration of Conformity can be obtained from the importer.

Technical data
Mains plug
| Manufacturer | Fai Shing Industries Ltd. |
| Model | JVSW0702000 |
| Input voltage, current | 100-240 V~ 50/60 Hz, 350 mA |
| Output voltage, current | 7 V ---, 2 A |
| Protection class | II / ☐ |
Appliance
| Input voltage, current | 7 V ---, 2 A | |
| Battery for data retention | 1 x 3 V Type CR2032 (supplied) | |
| Battery for remote control | 1 x 3 V Type CR2025 (supplied) | |
| Power consumption | ||
| Operation | approx. 5 | W |
| Standby | approx. 1.8 | W |
| Speaker power output: | approx. 2 x 1 W (with 10 % harmonic distortion) | |
| Radio frequency range (VHF) | 87.5 - 108 MHz | |
| Operating temperature | +5 - +40 | °C |
| Humidity (no condensation) | 5 - 90 | % |
| Measurements (W x H x D) (without stand) | approx. 30 x 15.7 x 8.4 | cm |
| Weight | approx. 1070 | g |
Warranty
With this appliance you receive a 3 year warranty from the date of purchase. The appliance has been manufactured with care and meticulously examined before delivery.
Please retain your receipt as proof of purchase. In the case of a warranty claim, please make contact with our service department by telephone. Only in this way can a post-free dispatch for your goods be assured.
NOTICE
The warranty is valid only for material or manufacturing defects not, however, for transport damage, wear and tear or for damage to breakable parts, i.e. switches or batteries.
This appliance is intended solely for private, non-commercial use. If this product has been subjected to improper or inappropriate handling, abuse, or modifications not carried out by one of our authorised sales and service outlets, the warranty becomes void.
Your statutory rights are not restricted in any way by this warranty. The warranty period will not be extended as a result of warranty adjustments. This applies also to replacement and repaired parts.
Possible damage and/or faults present at the time of purchase must be reported immediately after unpacking or, at the very latest, within two days after the purchase date.
After expiry of the warranty period incidental repairs are subject to payment.
Service
GB Service Great Britain
Tel.: 0871 5000 720 (£ 0.10/Min.)
E-Mail: kompernass@lidl.co.uk
IAN 63920
Importer
KOMPERNASS GMBH
BURGSTRASSE 21
44867 BOCHUM, GERMANY
www.kompernass.com
KOMPERNASS GMBH
Burgstraße 21
D-44867 Bochum
www.kompernass.com
Version des informations · Stand van de informatie

- FR BE
- Sommaire
- Introduction 2
- Installation et raccordement .8
- Installation et raccordement
- Accentuation des graves
- Safety 112
- Operating components . 114
- Setting up and connecting 116
- Handling and operation . 121
- Cleaning 139
- Troubleshooting 139
- Storage/Disposal. 141
- Appendix 141
- Introduction
- Information for these operating instructions
- Copyright
- Intended use
- Warning notices
- DANGER
- A warning at this risk level indicates a threateningly dangerous situation.
- WARNING
- A warning at this risk level indicates a possible dangerous situation.
- IMPORTANT
- A warning at this risk level indicates possible property damage.
- NOTICE
- Safety
- Risks from electric shock
- Potentially fatal risks from electric shock!
- A potentially fatal risk can arise from contact with live wires or components!
- Handling of batteries
- Risks from improper use! The risk of explosions and injuries exists!
- Basic Safety Instructions
- Operating components
- (for illustrations see front fold out side figure A)
- (for illustrations see front fold out side figure B)
- Setting up and connecting
- Safety instructions
- Damage may occur to property and injuries to people when taking the appliance into service!
- Items supplied and transport inspection
- Unpacking
- Disposal of the packaging
- Set-up location requirements
- Electrical connection
- Appliance battery
- Inserting / replacing the battery
- Remote Control Battery
- Activating the battery
- Changing the battery
- Installation under a wall cupboard
- Disinstallation
- Setting the appliance up
- Preparing the station for iPod/iPhone
- Providing mains power
- VHF wire antenna
- Handling and operation
- Switching On and Off
- Basic settings
- Activating the settings menu
- Setting the time
- Setting the date
- Setting the memory function
- Set the Update Mode
- Switching time controlled display dimming on/off
- Setting the display dimmer start time
- Setting the time of day format
- Programming the alarm
- Setting alarm times
- Setting the weekdays
- Setting the alarm with an alarm tone
- Setting the alarm with radio
- Setting the alarm with iPod/iPhone
- Switching the alarm off
- When the alarm time has arrived
- Kitchen timer
- Setting the kitchen timer
- Starting the kitchen timer
- Interrupting the kitchen timer.
- Programming the kitchen timer
- Accessing the kitchen timer
- Radio operation
- Switching the radio on/off
- Adjusting the volume.
- Manual station selection
- Search for the next station
- Selecting the user
- Saving stations manually
- Access saved stations
- Automatic station search (AMS function)
- Playback of external audio appliances
- Connection of iPod/iPhone
- iMenu
- Playback of music
- Charging the iPod/iPhone
- Setting the Time/i-Time Synchronisation
- Additional functions
- Stereo function
- Button lock
- Bass accentuation
- Alternating display
- Automatic switch off (Sleep function)
- Switching the display dimmer on/off manually
- Cleaning
- Potentially fatal risk from electric shock!
- Damage to the appliance!
- Cleaning the housing
- Troubleshooting
- Malfunction causes and remedies
- Storage / Disposal
- Storage
- Disposal of the appliance
- Do not dispose of the appliance in your normal domestic waste. This product is subject to the provisions of European Directive 2002/96/EC-WEEE (Waste Electrical and Electronic Equipment).
- Disposing of the batteries
- Appendix
- Information regarding the EG Declaration of Conformity
- Technical data
- Mains plug
- Appliance
- Warranty
- Service
- Importer
Brand : SILVERCREST
Model : SKRI 2000 A1
Category : Radio